
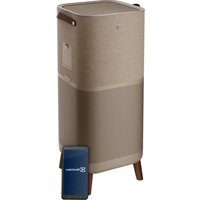
Pure Multi 700 - Air purifier ELECTROLUX - Free user manual and instructions
Find the device manual for free Pure Multi 700 ELECTROLUX in PDF.
| Brand | Electrolux |
| Model | Pure Multi 700 |
| Product Type | Air purifier with humidifier |
| Power Supply | 220-240 V, 50/60 Hz |
| Standby Consumption | < 2.0 W |
| Filter Type | Pre-filter mesh, Ultrafine particle filter, VOC odor filter, Rotating humidification filter |
| Number of Fan Speeds | 5 (including Silent mode) |
| Operating Modes | Smart and Manual |
| Additional Functions | Oscillation (narrow, wide, natural breeze), Ionizer, Wi-Fi, Child lock, Timer |
| Humidification | Yes, with removable water tank and rotating humidification filter |
| Air Quality Sensor | Laser sensor for PM1, PM2.5, PM10 |
| Air Quality Indicator | Color scale: green, yellow, orange, red, purple, dark red |
| Light Sensor | Yes (automatically adjusts screen and speed at night) |
| Connectivity | Wi-Fi 2.4 GHz via Electrolux app |
| Routine Maintenance | Clean pre-filter and sensor window every 4 weeks; clean humidification filter with citric acid |
| Filter Replacement | Particle and VOC filters approximately 1 year; humidification filter and antibacterial cartridge approximately 1 year |
| Safety | Child lock, automatic shutdown (not specified) |
| Available Spare Parts | Pre-filter, Ultrafine particle filter, VOC odor filter, Humidification filter, Antibacterial cartridge, Water tank |
| Warranty | 1 year maintenance and replacement of humidification filter |
| Country of Origin | Not specified |
Frequently Asked Questions - Pure Multi 700 ELECTROLUX
User questions about Pure Multi 700 ELECTROLUX
0 question about this device. Answer the ones you know or ask your own.
Ask a new question about this device
Download the instructions for your Air purifier in PDF format for free! Find your manual Pure Multi 700 - ELECTROLUX and take your electronic device back in hand. On this page are published all the documents necessary for the use of your device. Pure Multi 700 by ELECTROLUX.
USER MANUAL Pure Multi 700 ELECTROLUX
natural_image
Line drawing of a portable air purifier unit with ventilation grilles and control panel (no text or symbols)OPERATING MANUAL
Thank you for choosing the Electrolux air purifier. Always use original Electrolux consumables, accessories and spare parts to get the best results out of your unit. This appliance is designed with the environment in mind and hence all plastic parts are marked for recycling purposes.
GENERAL SAFETY INFORMATION
This USER MANUAL provides specific operating instructions for your model OR series. Use the unit only as instructed in this manual. These instructions are not meant to cover every possible condition and situation that may occur. Common sense and caution must be practiced when installing, operating, and maintaining any appliance.
WARNING! - CHILDREN & VULNERABLE PEOPLE SAFETY
Risk of suffocation, injury or permanent disability. Keep all packaging away from children.
This appliance can be used by children aged from 8 years and above under supervision.
This appliance can be used by persons with reduced physical, sensory or mental capabilities or lack of experience and knowledge if they have been given supervision or instruction concerning use of the appliance in a safe way and understand the hazards involved.
Cleaning and user maintenance shall not be made by children without supervision. Children shall not play with the unit. Children under 3 years of age should be kept away from the unit unless continuously supervised.
CAUTION! – AVOID INJURY OR DAMAGE TO THE UNIT OR PROPERTY
Do not direct airflow at fireplaces or other heat related sources as this could cause flare ups.
Do not climb on or place objects on the unit. Do not hang objects off the unit. Do not place containers with liquids on the unit.
Turn OFF the unit at the power source when it will not be used for an extended period.
Do not block or cover the air intake area, fan area and air outlet grill.
Ensure that any electrical/electronic equipment is at least 30cm away from the unit.
INFORMATION ABOUT RADIO
Power consumption of the product in network standby is less than 2.0W
Electrical Information
WARNING! Avoid fire hazard or electric shock.
This unit can be used in 50Hz or 60Hz power supply without any change. Do not use an extension cord or an adaptor plug.
Do not remove any prong from the power cord. Do not pinch, bend, or knot the power cord.
Do not cut or damage the power cord. If the supplied power cord is damaged, it should only be replaced by Electrolux, its service agent or similarly qualified persons. This unit contains no user serviceable parts. Always call an authorized Electrolux servicer for repairs.
If you are not sure the outlet is adequately grounded or protected by a time delay fuse or circuit breaker, have a qualified electrician install the proper outlet according to the National Electrical Code OR applicable local codes and ordinances.
Do not store or use gasoline or other flammable vapors and liquids in the vicinity of this or any other appliance. Read product labels for flammability and other warnings.
Do not let water or any other liquid or flammable detergent enter the unit to avoid electric shock and/or a fire hazard. Be sure to unplug he unit before cleaning.
Never unplug the unit by pulling on the power cord. Always grip the plug firmly and pull straight out from the receptacle.
Safety Precautions
Do not insert or place fingers or objects into the air discharge area or front facing grille of the unit.
Do not start or stop the unit by unplugging the power cord or turning OFF the power at the electrical box.
In the event of a malfunction (sparks, burning smell, etc.), immediately stop the operation, disconnect the power cord, and call an authorized Electrolux servicer.
Do not operate the unit with wet hands.
Do not pull on the power cord.
Do not touch the fan blade when removing the filter(s).
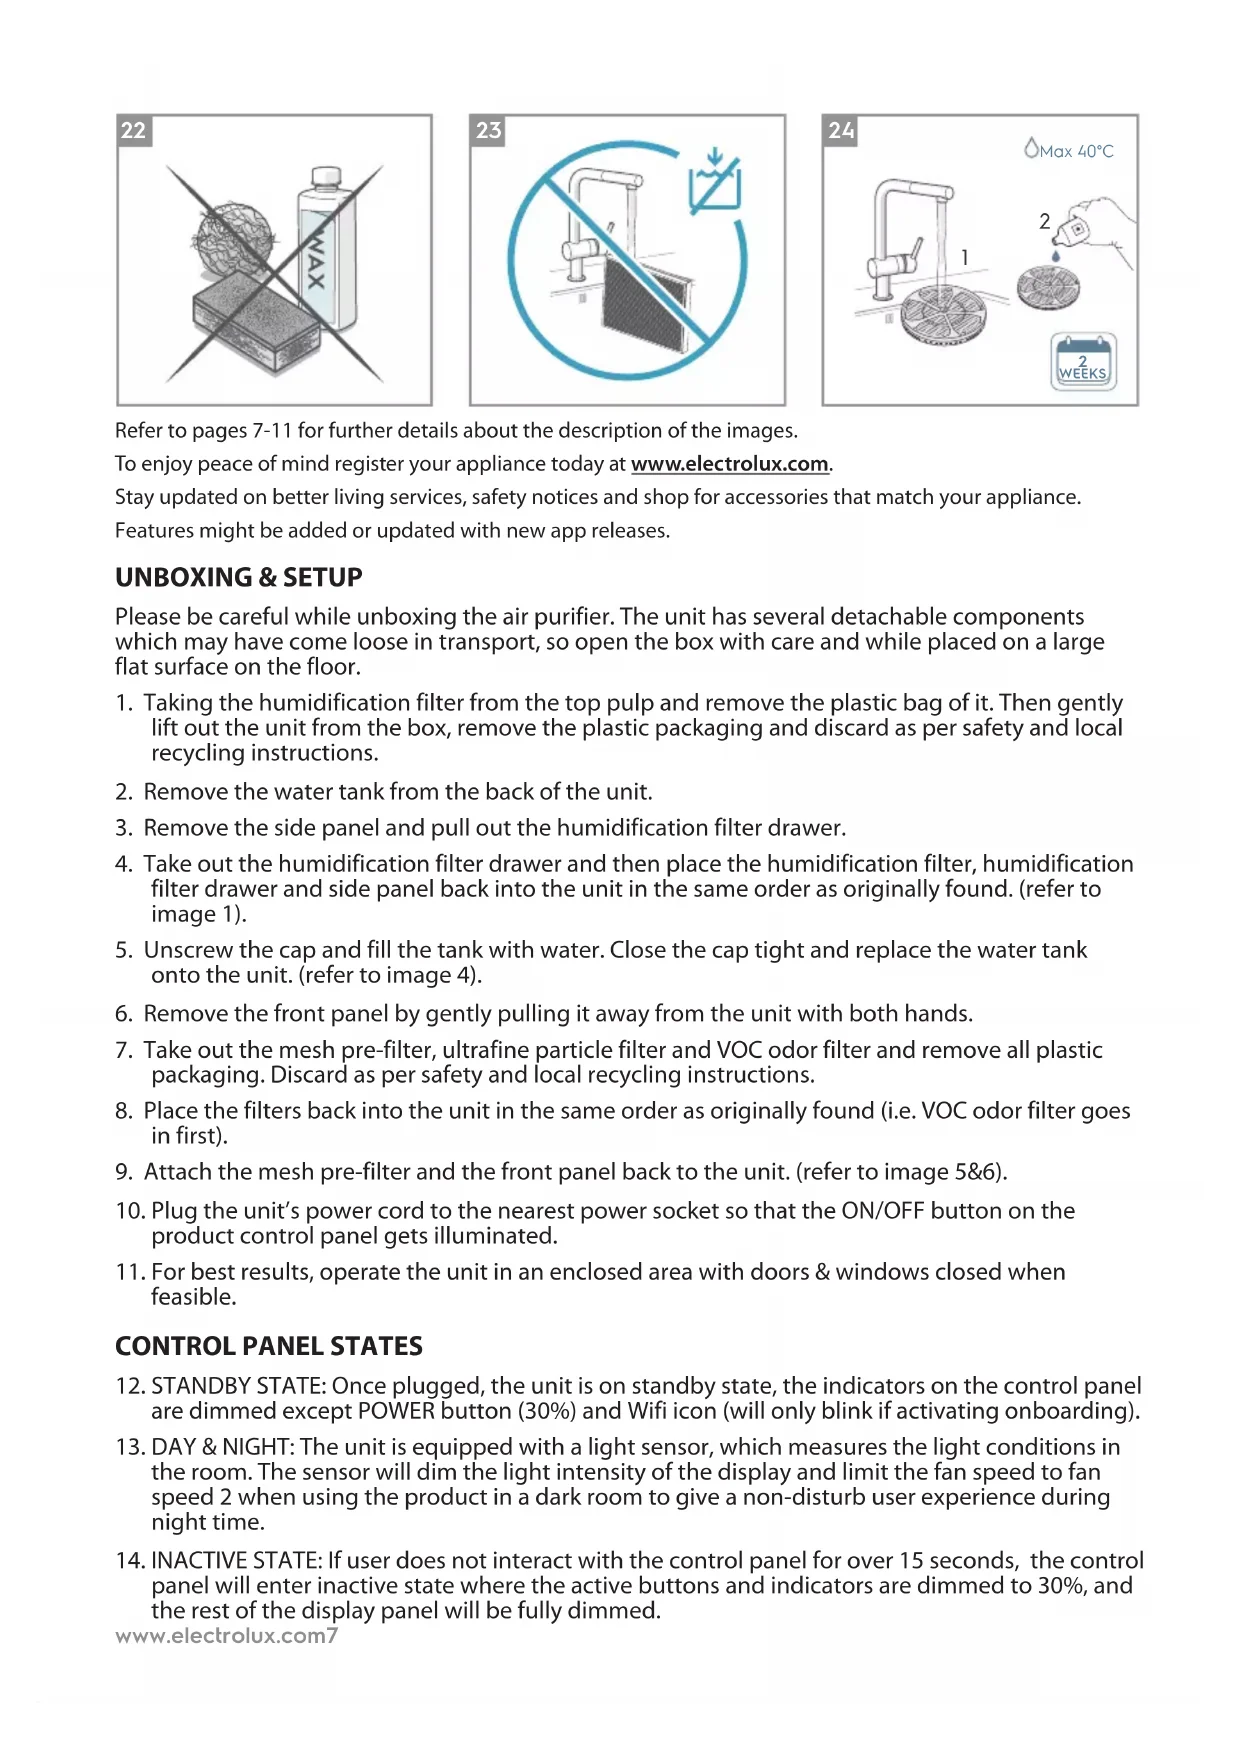
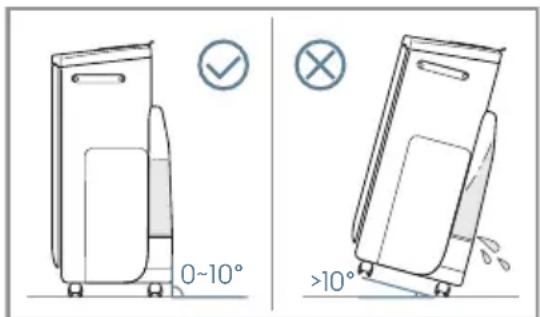
Do not incline the product more than 10^ , or move the product when there is water in the tank/filter drawer, since it may cause leakages.
Be aware that high humidity levels may encourage the growth of biological organisms in the environment.
Do not permit the area around the humidifier to become damp or wet. If dampness occurs, turn the output of the humidifier down. If the humidifier output volume cannot be turned down, use the humidifier intermittently. Do not allow absorbent materials, such as carpeting, curtains, drapes, or tablecloths, to become damp.
Unplug the appliance during filling and cleaning.
Never leave water in the reservoir when the appliance is not in use.
Empty and clean the humidifier before storage. Clean the humidifier before next use.
DISPOSAL
This symbol on the product or on its packaging indicates that the product may not be treated as household waste. To recycle your product, please take it to an official collection point or to an Electrolux service center that can remove and recycle the electric parts in a safe and professional way. Follow your country's rules for the separate collection of electrical products.
BEFORE STARTING
- Read this manual carefully.
- Check that all parts described are included.
- Pay special attention to the safety precautions!
DESCRIPTION OF YOUR AIR PURIFIER
- Front Panel
- Mesh pre-filter
- Ultrafine particle filter
- VOC odor filter
- Control panel display
- Louvres
- Hood
- Water tank
- Handle
- Sensor box
- Water tank cap
- Humidification filter
- Antibacterial Cartridge
- Humidification filter drawer
- Side panel
- Wheel
- ON/OFF button
- MODE button
- Fan speed
- Louvre swing
- Humidity button
- Air Quality light
- MODE display
- FAN SPEED indicator
- Swing indicator
- Target humidity level
- Warning alert icon
- Filter change icon
- Water tank icon
- Wifi icon
- lonizer icon
- Scheduler icon
- Child lock icon
- Light sensor
NOTE: Your specific model may not have all the components and features listed within this USER MANUAL. Please check the product packaging OR the product specification page on our website for exact details of your model. Electrolux reserves the right to change information contained herein without notice.
1
2

flowchart
graph LR
    A["1 YEAR"] --> B["2"]
    B --> C["3"]
    C --> D["4"]
    D --> E["5"]
    E --> F["6"]
    F --> G["7"]
    G --> H["8"]
1 year maintenance, exchanging humidification filter
3
4
6


natural_image
Line drawing of a toaster with a heat sink and scroll, showing a blue curved arrow indicating rotation (no text or symbols)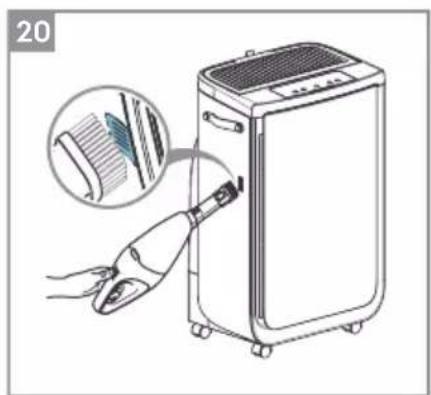
natural_image
Illustration of a hand inserting a device into a clean air conditioner unit, with an inset showing the internal structure (no text or symbols)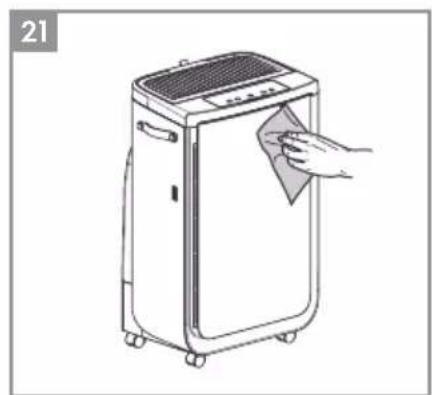
natural_image
Line drawing of a portable air conditioner unit with a hand cleaning it (no text or symbols)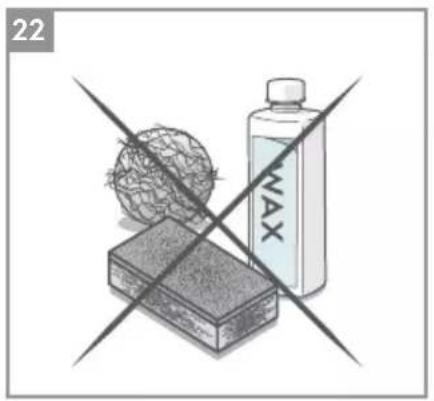
natural_image
Illustration of a transparent container with a wire mesh and a labeled 'MAX' bottle, crossed over a rectangular block (no text or symbols on the main objects)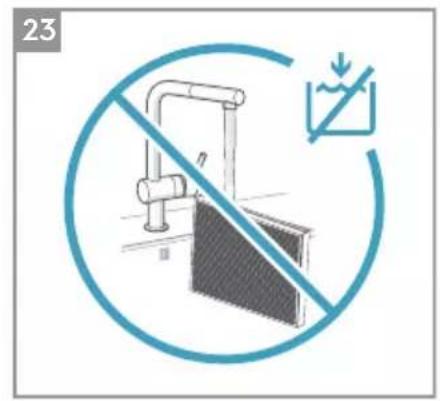

Refer to pages 7-11 for further details about the description of the images.
To enjoy peace of mind register your appliance today at www.electrolux.com.
Stay updated on better living services, safety notices and shop for accessories that match your appliance.
Features might be added or updated with new app releases.
UNBOXING & SETUP
Please be careful while unboxing the air purifier. The unit has several detachable components which may have come loose in transport, so open the box with care and while placed on a large flat surface on the floor.
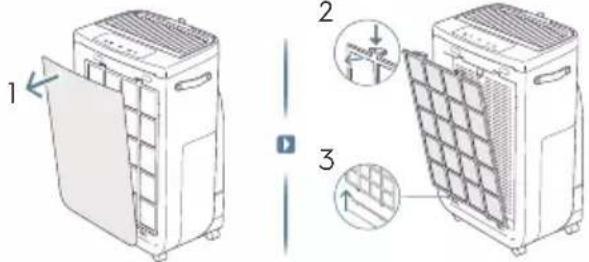
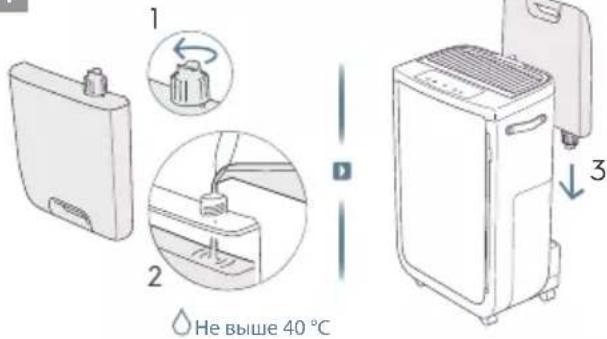
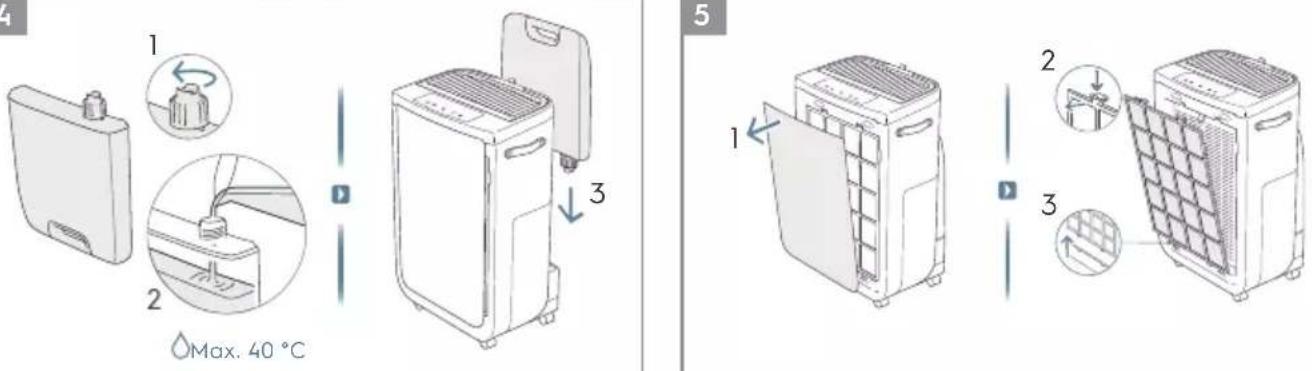
- Taking the humidification filter from the top pulp and remove the plastic bag of it. Then gently lift out the unit from the box, remove the plastic packaging and discard as per safety and local recycling instructions.
- Remove the water tank from the back of the unit.
- Remove the side panel and pull out the humidification filter drawer.
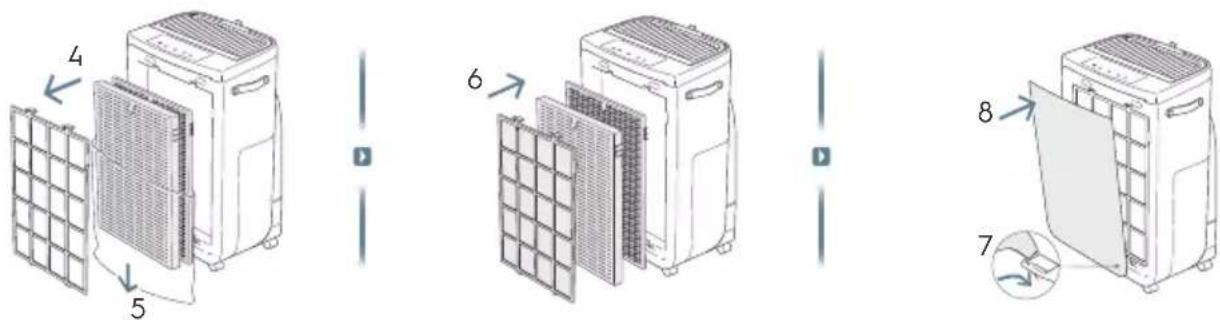
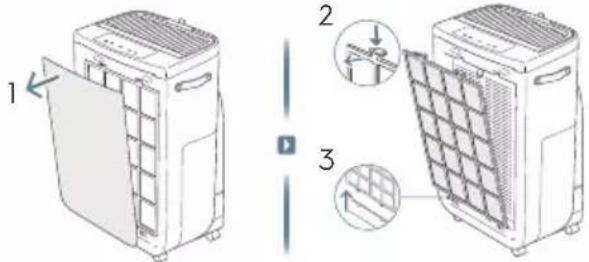
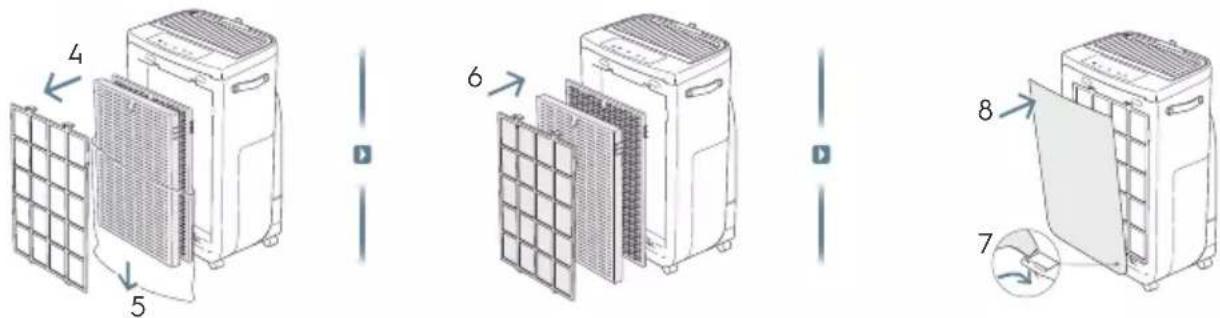
- Take out the humidification filter drawer and then place the humidification filter, humidification filter drawer and side panel back into the unit in the same order as originally found. (refer to image 1).
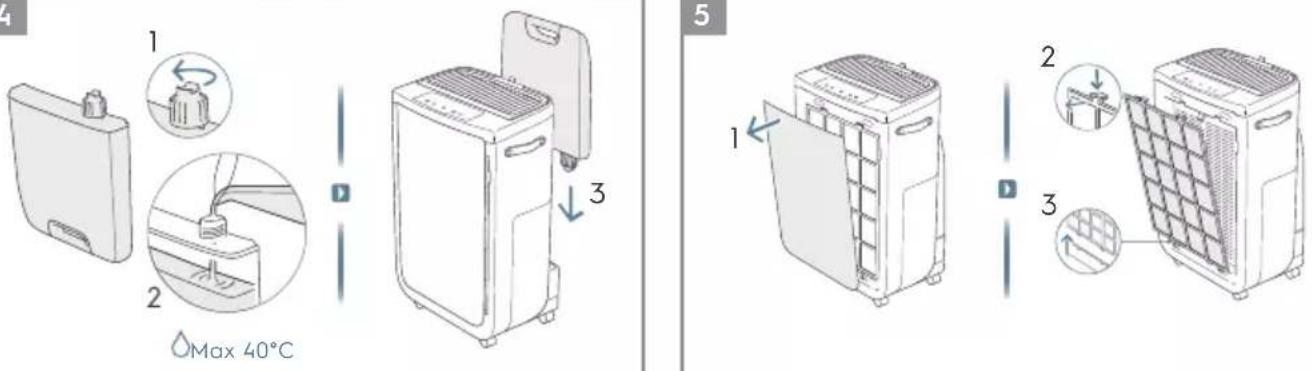
- Unscrew the cap and fill the tank with water. Close the cap tight and replace the water tank onto the unit. (refer to image 4).
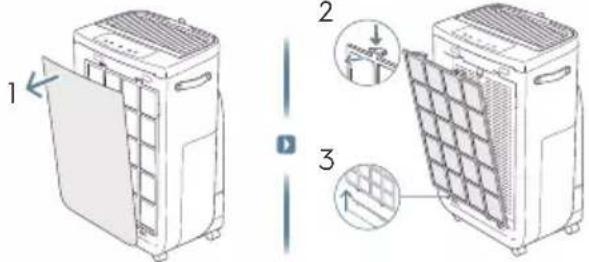
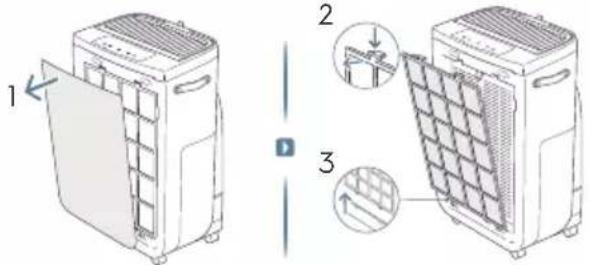
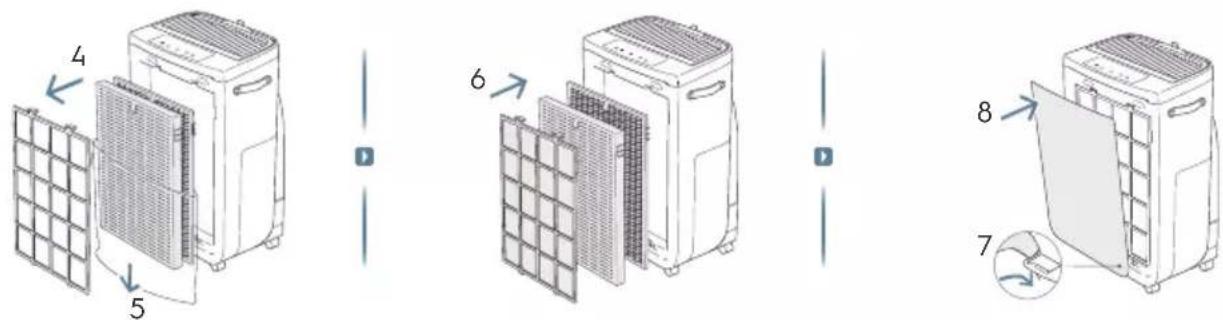
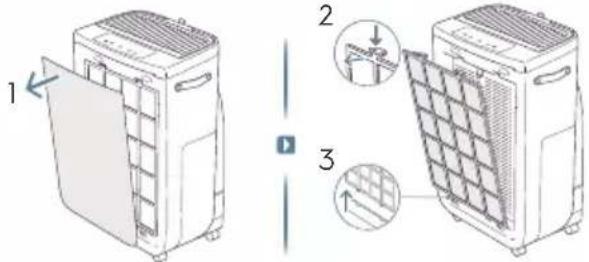
- Remove the front panel by gently pulling it away from the unit with both hands.
- Take out the mesh pre-filter, ultrafine particle filter and VOC odor filter and remove all plastic packaging. Discard as per safety and local recycling instructions.
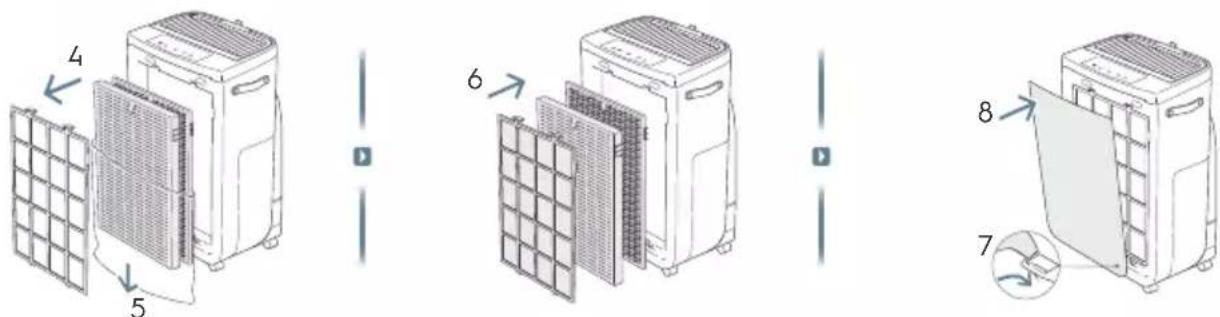
- Place the filters back into the unit in the same order as originally found (i.e. VOC odor filter goes in first).
- Attach the mesh pre-filter and the front panel back to the unit. (refer to image 5&6).
- Plug the unit's power cord to the nearest power socket so that the ON/OFF button on the product control panel gets illuminated.
- For best results, operate the unit in an enclosed area with doors & windows closed when feasible.
CONTROL PANEL STATES
- STANDBY STATE: Once plugged, the unit is on standby state, the indicators on the control panel are dimmed except POWER button (30%) and Wifi icon (will only blink if activating onboarding).
- DAY & NIGHT: The unit is equipped with a light sensor, which measures the light conditions in the room. The sensor will dim the light intensity of the display and limit the fan speed to fan speed 2 when using the product in a dark room to give a non-disturb user experience during night time.
- INACTIVE STATE: If user does not interact with the control panel for over 15 seconds, the control panel will enter inactive state where the active buttons and indicators are dimmed to 30%, and the rest of the display panel will be fully dimmed.
USING YOUR PRODUCT
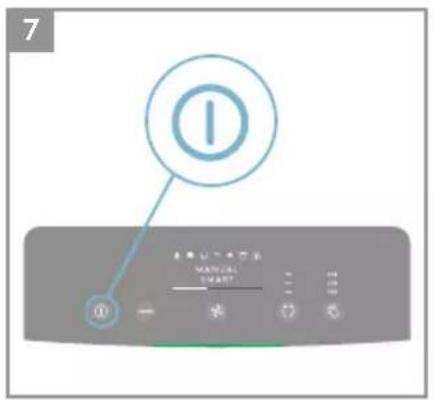
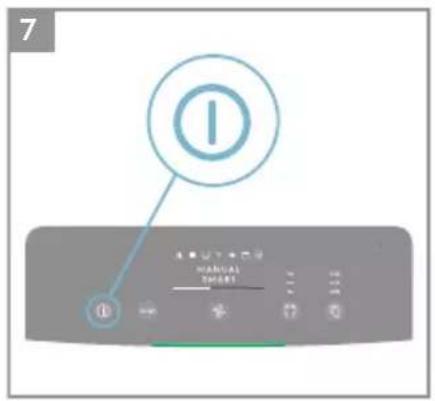
TURNING ON
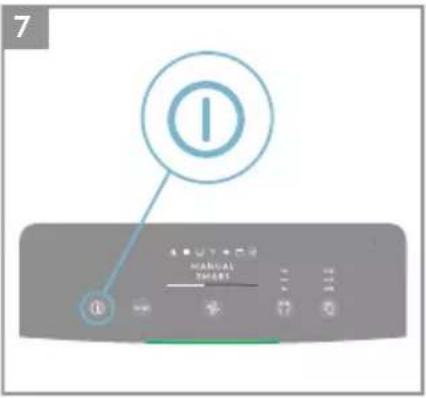
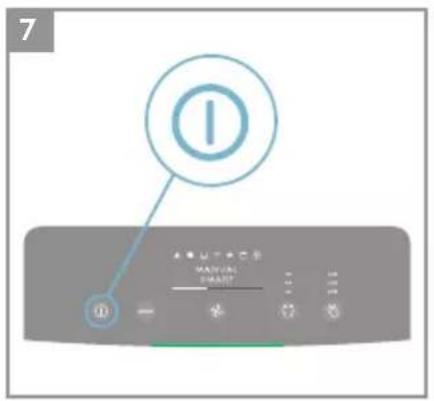
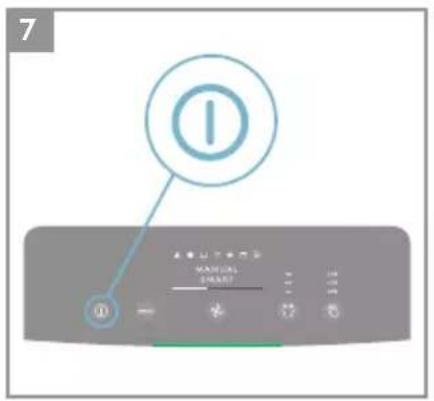
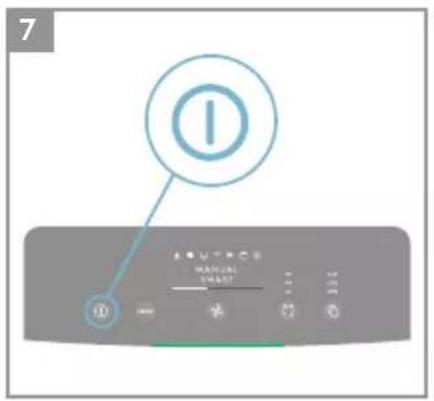
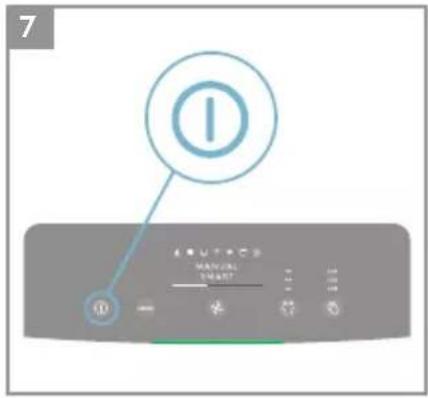
- Press the ON/OFF button ① to turn ON the air purifier, the unit will run in default setting (SMART mode, Humidity off and the louvres pointing forward) when used the unit the first time. Next time you start the unit it will resume the last settings you had before turning OFF the product.
NOTE: When turning ON the air purifier, it will take about 10 seconds for the sensors to calibrate and analyze the air quality. During this time, the air quality indicator will pulsate slowly in white.
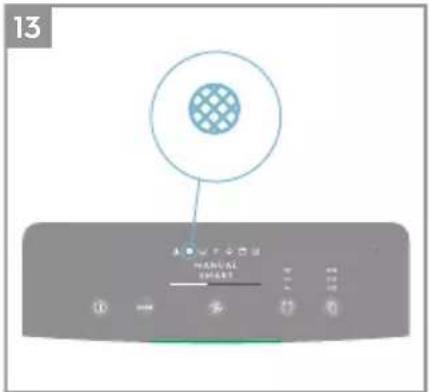
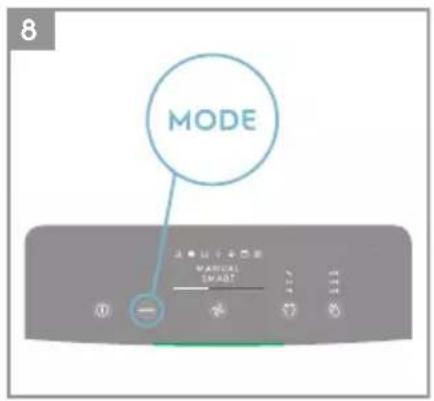
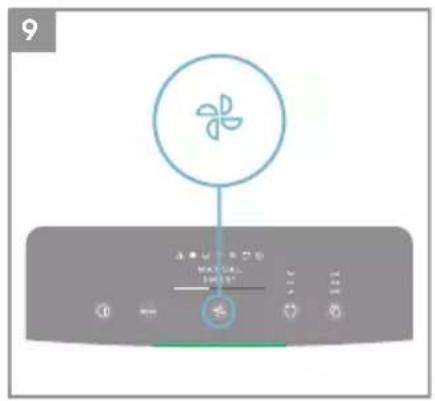
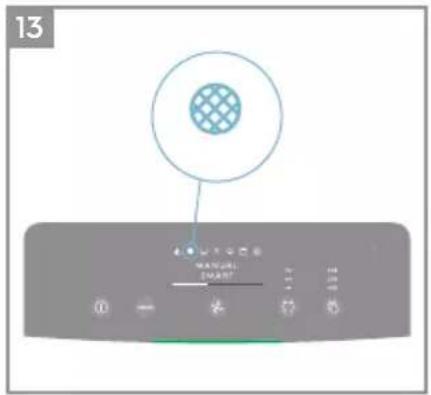
CHANGING MODES & FAN SPEEDS & SWING & HUMIDITY
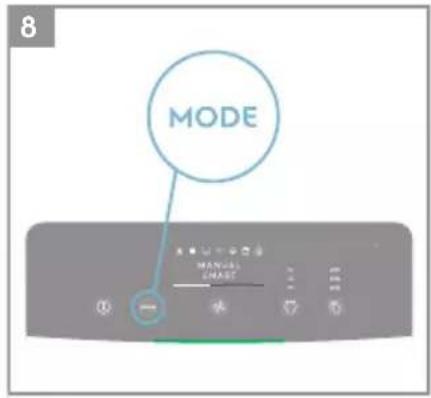
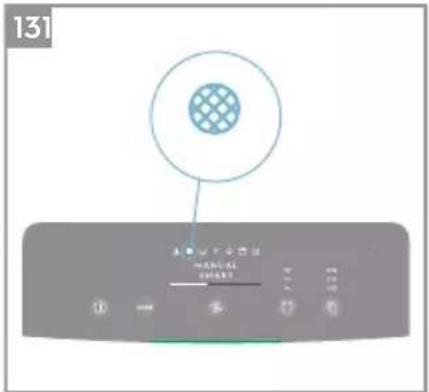
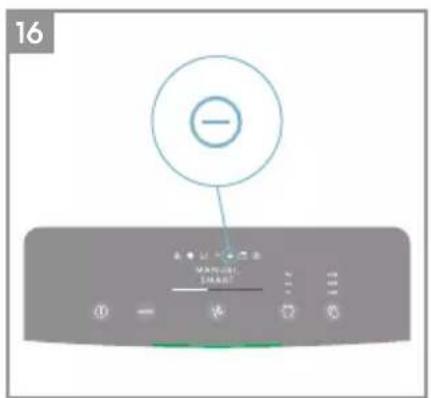
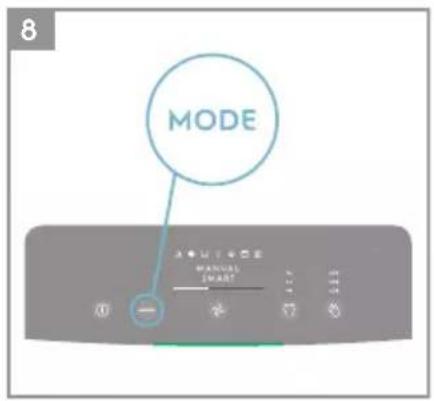
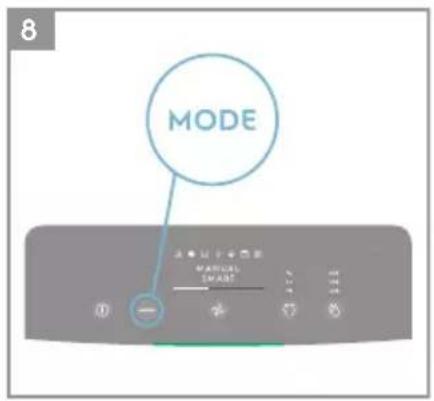
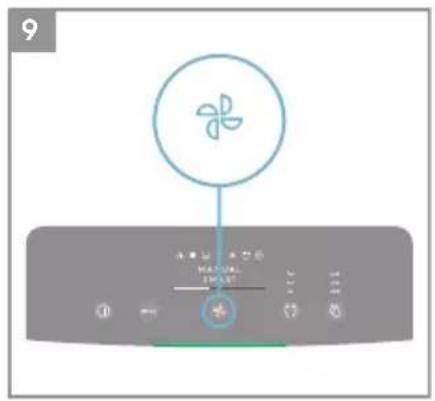
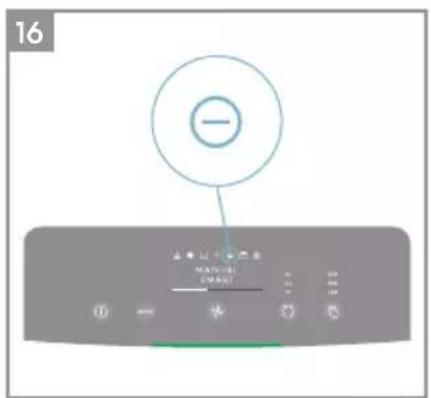
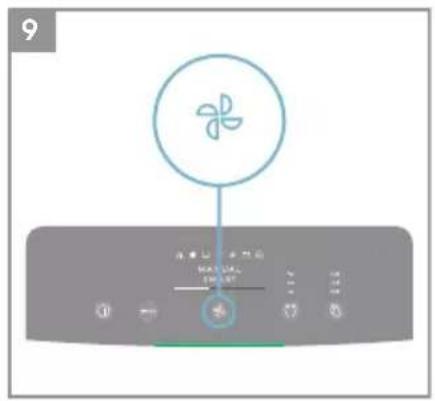
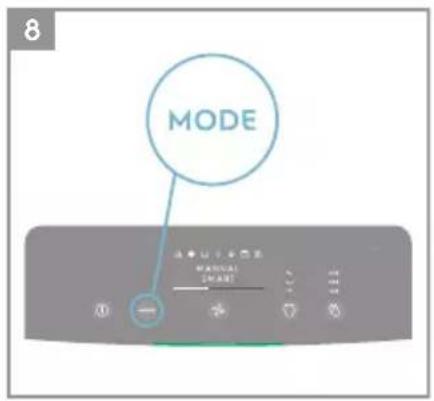
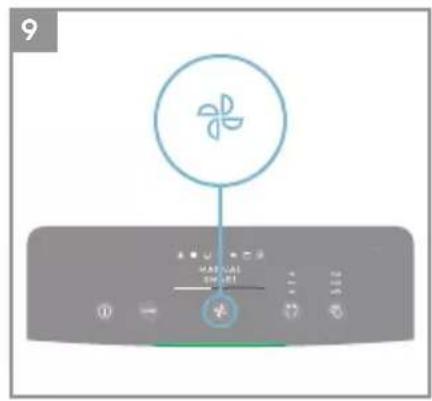
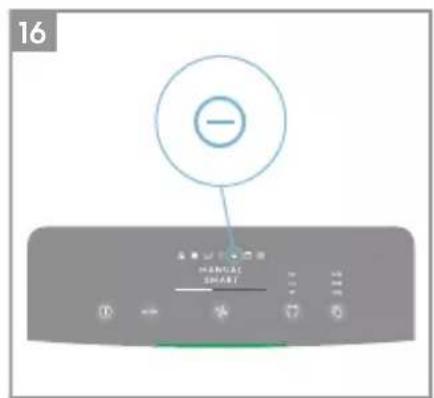
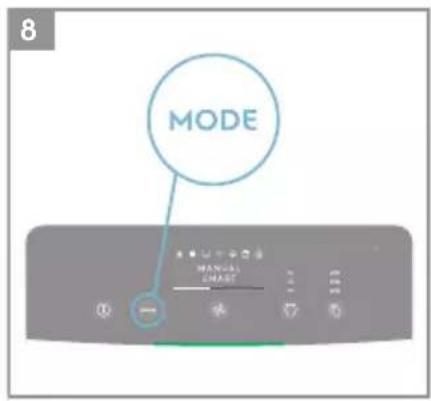
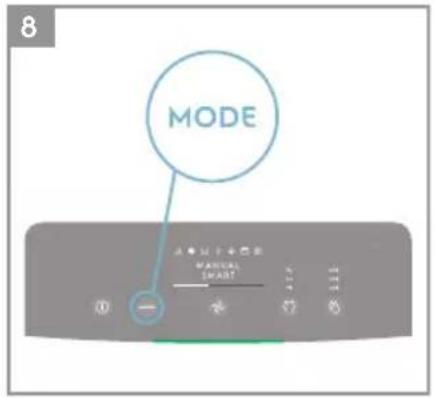
- Press the MODE button once to toggle between the two modes: SMART and MANUAL
SMART: This is the default mode the unit will start in. In the SMART mode the unit will utilize the sensor data as input to decide on the appropriate fan speed and humidification level for a comfortable air environment, depending on the temperature in the room. The fan speed or humidification level, can not be adjusted by the user under this mode. Please see the AIR QUALITY INDICATOR section for more details.
MANUAL: In the MANUAL mode the unit will utilize the sensor data as input only to show the air quality level via the air quality indicator but will not self-adjust the fan speed. This mode is best utilized for a quick burst of cleaning, especially when the user anticipates an increase in particulate matter in the room due to household chores (e.g. vacuuming).
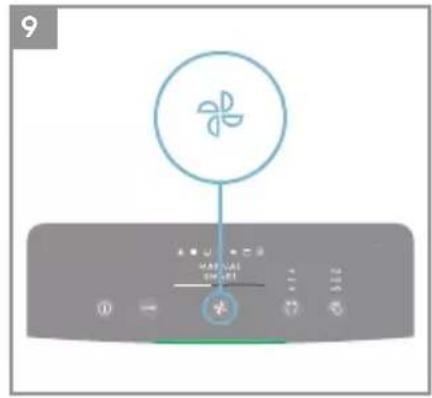
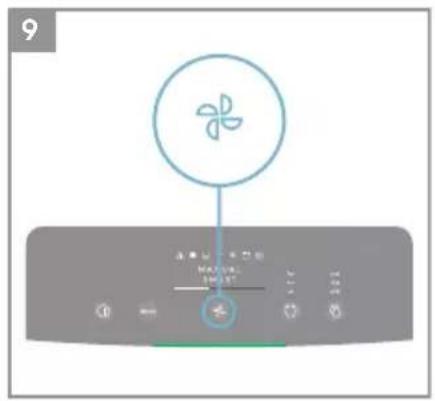
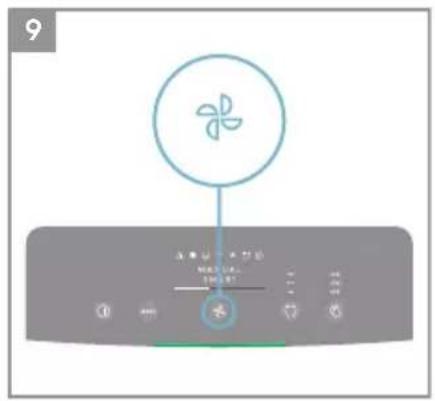
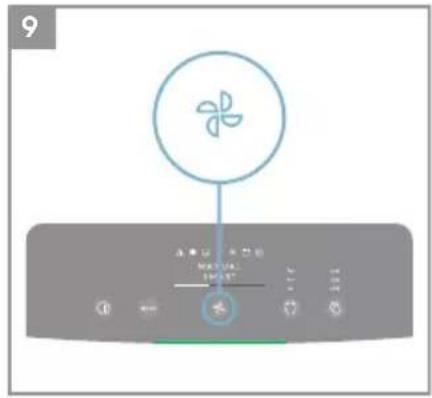
- FAN SPEED: While in MANUAL mode, Press the FAN button to adjust the fan speed – the air purifier has 5 levels fan speed, the fan speed indicator will show the fan speed.
NOTE: The unit will ramp up OR down to chosen speed setting gradually.
- QUIET Mode: This function can be used in SMART mode to limit the fan speed in daytime, to avoid disturbances if the PM values are increased. You can activate the QUIET mode via the Electrolux App. The display on the product will dim to show that the QUIET Mode has been activated. The air quality indicator will still function as normal in the QUIET Mode.
You can also activate the QUIET mode on the product display panel by pressing the MODE button for 3 seconds. To exit the QUIET Mode, just press either the MODE or FAN SPEED button.
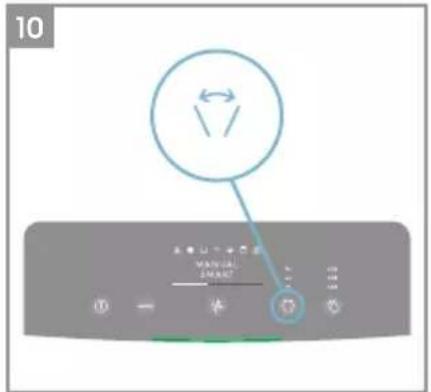
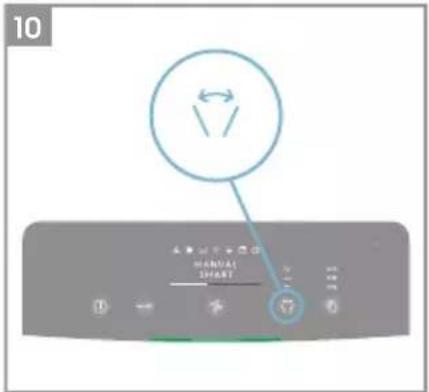
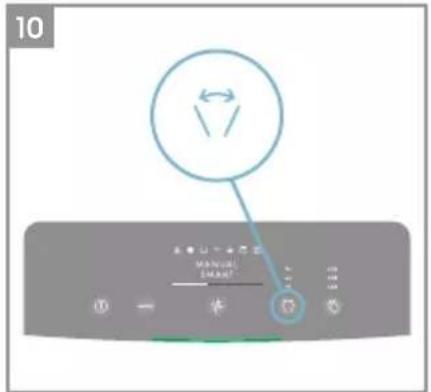
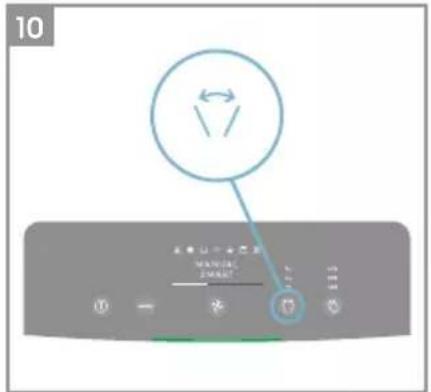
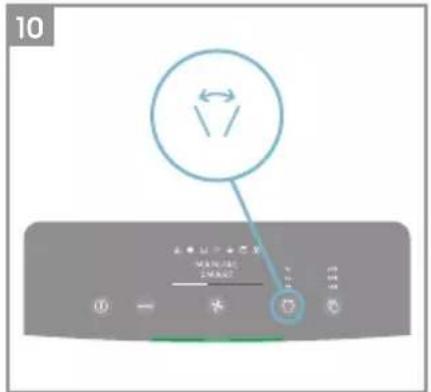
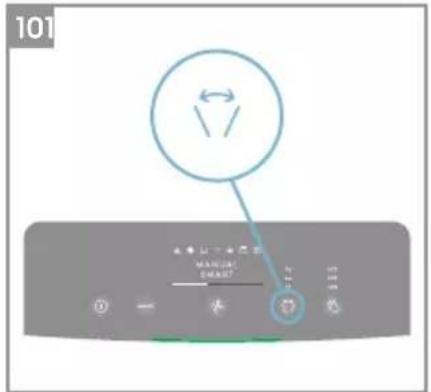
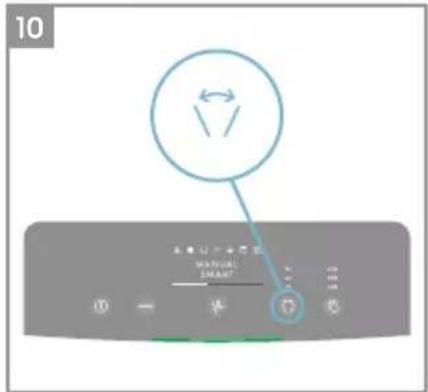
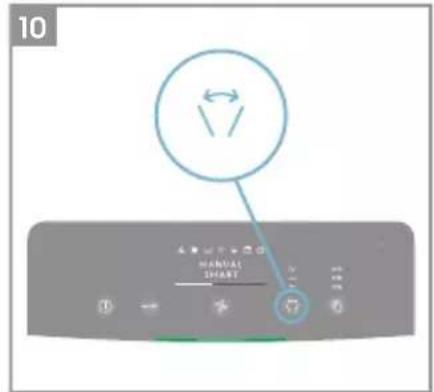
- SWING: Press SWING button can active Swing feature to get your desired air flow direction. There have below 3 options:
"↔" Narrow (Move the fins/louvres in the grill in a consistent way in a narrow angle range).
"←Wide (Move the fins/louvres in the grill in a consistent way in a wide angle range).
Natural Breeze (Move the fins/louvres in the grill in a random way back and forth with a wide angle range).
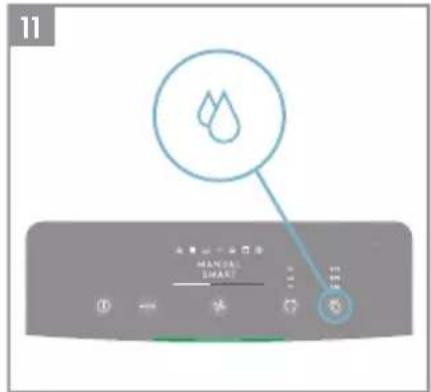
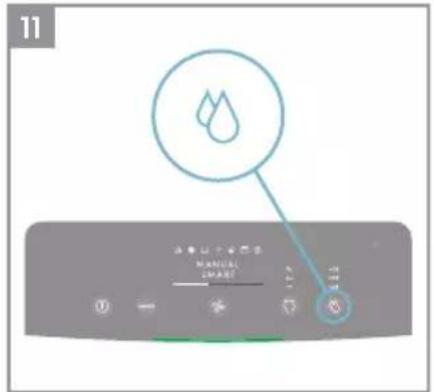
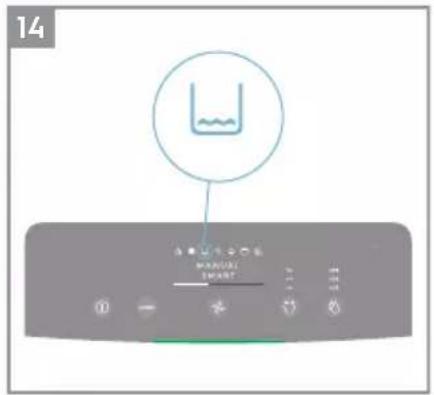
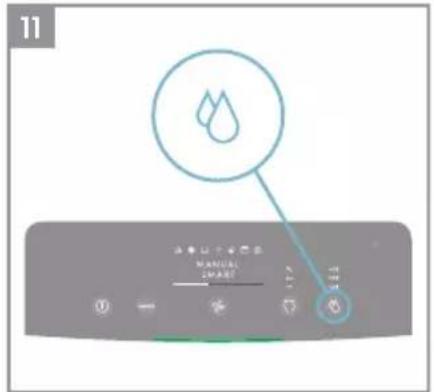
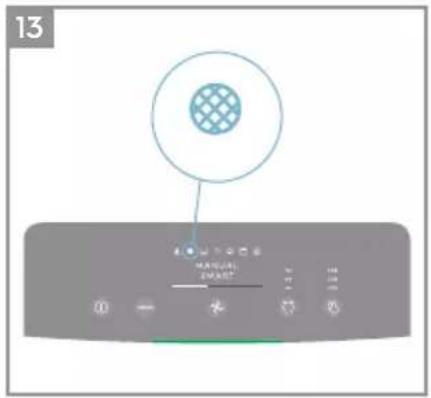
- HUMIDITY: Press HUMIDITY button to turn on the Humidification function and chose your target humidity level (40%, 50% and 60%). Once activated, the humidification filter will run until the relative humidity level of the room reaches the target humidity level you choose. The unit will then attempt to maintain this target of humidity in the air. In Humidity mode, please observe:
- If the room is large or windows or doors are open the target humidity level may not be reached.
- The air coming out from the air purifier will have a higher humidity than the target humidity setting, so that the room can get humidified.
FEATURE ICONS AND INDICATORS
NOTE: Not all indicators OR feature icons might be available on your model. Please consult packaging information or the product specifications on the website for details on available features.
-
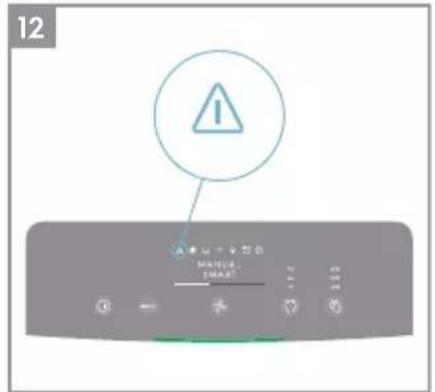
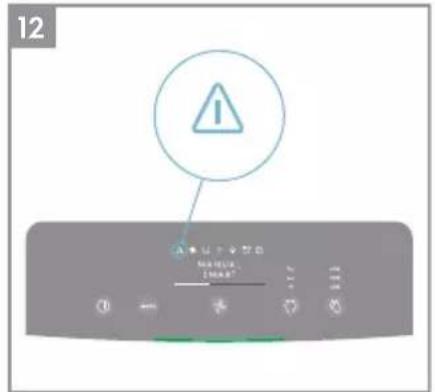
ALERT: The alert icon ⚠️ will light up to alert you of a possible electrical or electronic error with your unit. Please refer to the Electrolux App for details on the error type, component details and any mitigating actions. More details can also be found in the ERRORS & TROUBLESHOOTING section below.
-
FILTER CHANGE: The high efficiency filter(s) in the unit cannot be washed, they can only be replaced. The filter change icon will light up to remind you to change your filter(s). Your air purifier may equip with more than one filter, so please refer to the Electrolux App for details on which filter layer is to be replaced. Always ensure the plastic protective bag is removed before its use in the unit. After the used filter is replaced, the filter change icon will turn off automatically and no reset action is needed.
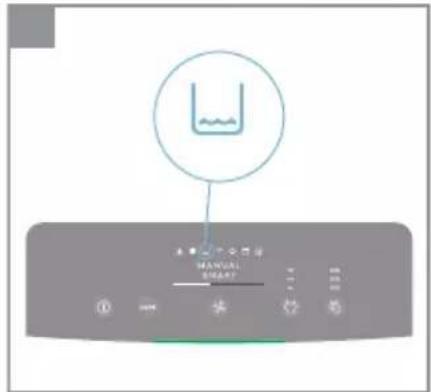
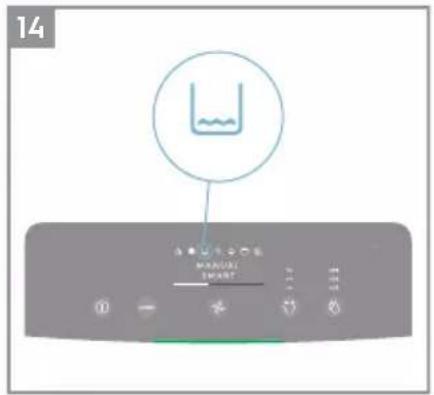
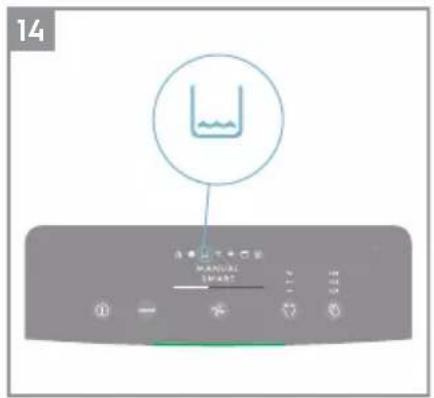
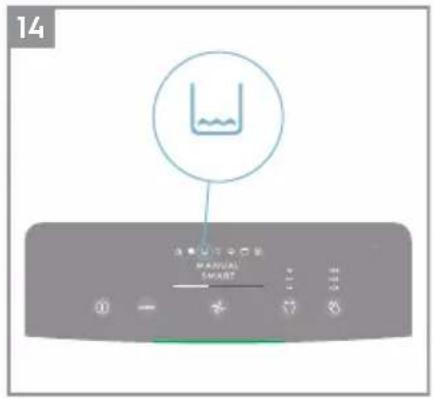
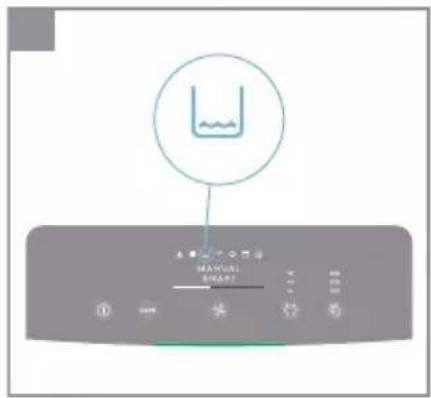
- WATER TANK: The water tank icon will light up to remind you refill the water tank for humidifying. After the water tank is refilled, the water tank icon will turn off automatically and no reset action is needed.
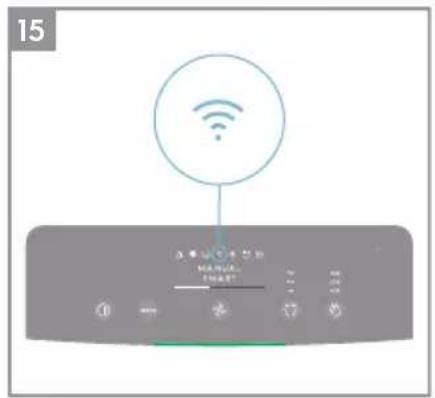
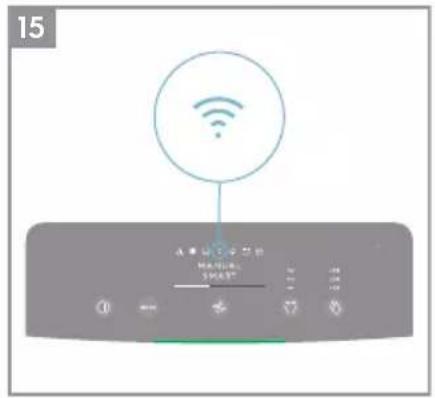
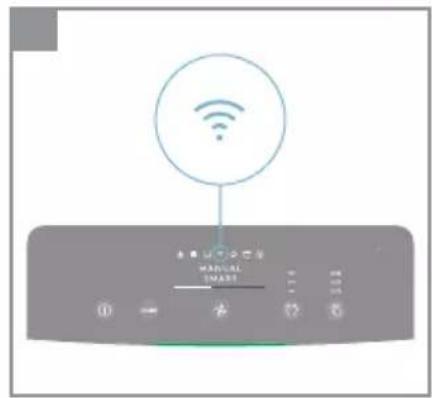
- WiFi: The unit is equipped with a WiFi module, which enables remote control and access to many more features including time-based tracking of your indoor air quality data. When the unit is connected to the home WiFi, this icon will light up. If the icon is blinking, it indicates a temporary loss of WiFi connectivity – please refer to the Electrolux App for more details.
NOTE: Download our Electrolux App and follow the step-step onboarding instructions to bring the air purifier online.
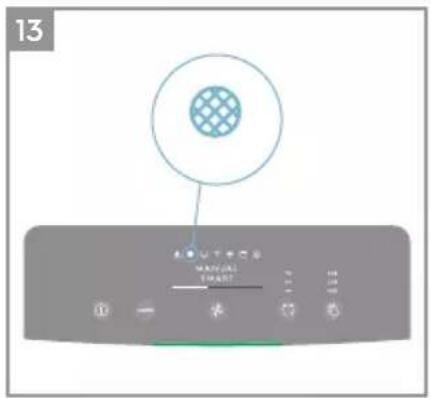
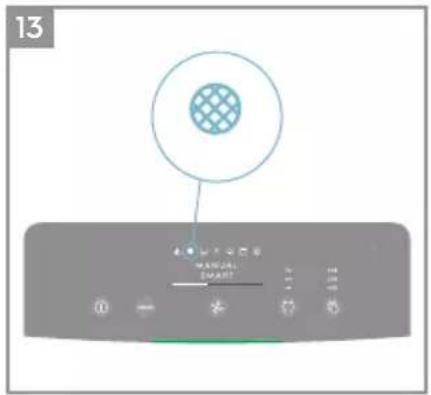
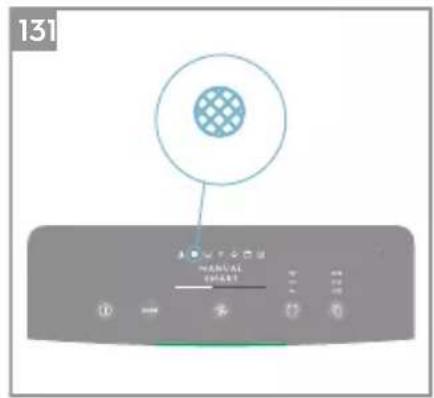
- IONIZER: The unit is equipped with an ionizer module, which will enabled generates negative ions to further improve air purification process. The ionizer is OFF by default, press and hold MODE & FAN button simultaneously for 3 seconds to activate the ionizer feature. When the ionizer feature is activated, the ionizer icon will light up. You can also activate the lonizer via the App. For more details on how an ionizer helps reduce airborne particles, please refer to the product information page on the website.
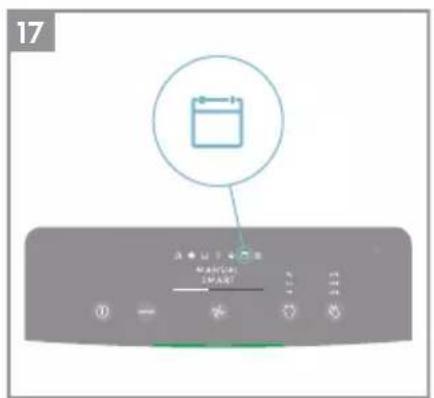
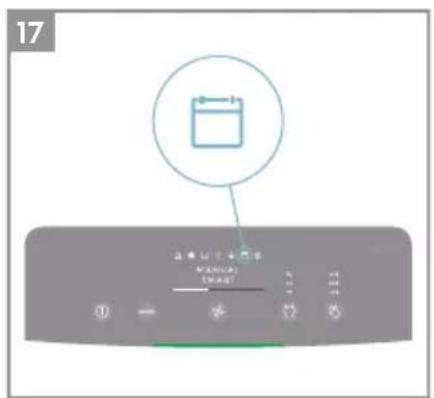
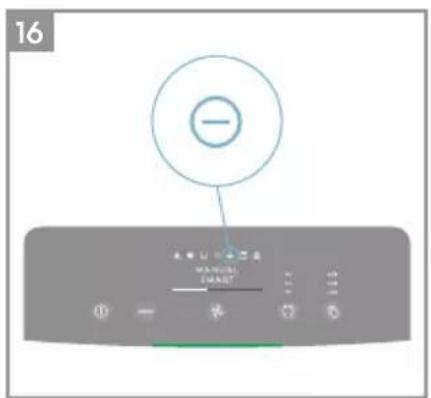
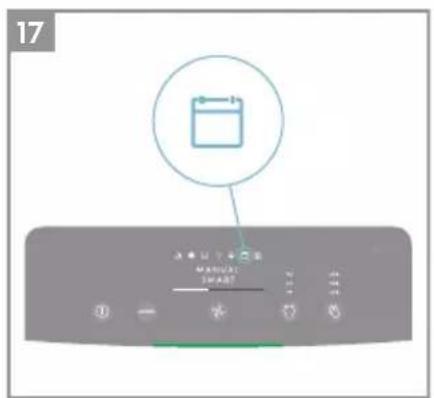
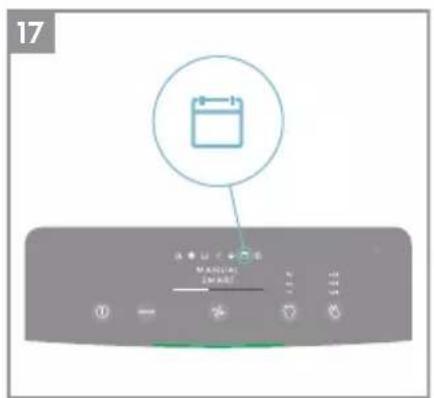
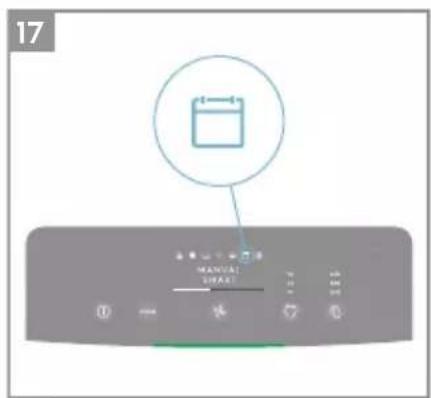
- SCHEDULER: show a scheduled event from the app is running.
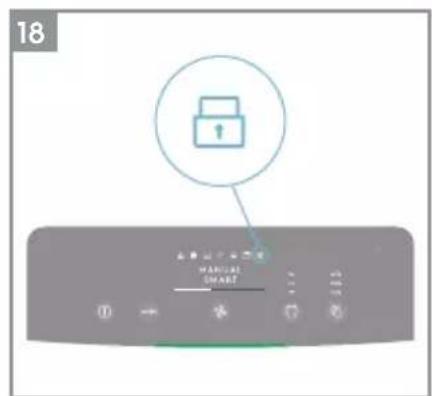
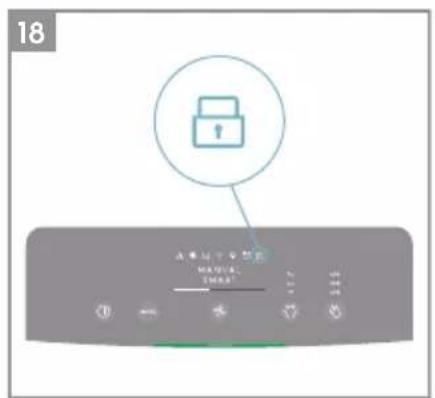
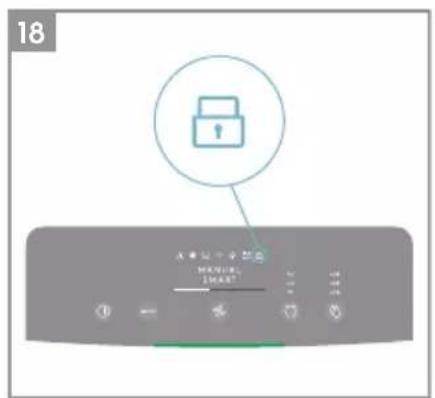
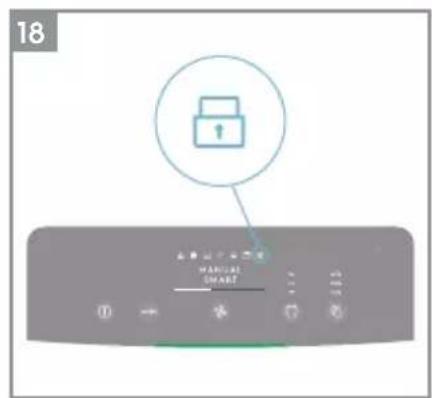
- CHILD LOCK: The unit is equipped with a safety lock feature to disable the product control panel to avoid unintended pressing. Press and hold MODE & POWER button simultaneously for 5 seconds to activate the child lock feature. The child lock icon 📁 will light up when the feature is activated. When the control panel is locked, you can only make changes via App.
- AIR QUALITY INDICATOR: The unit is equipped with an air quality sensor. The laser-based particulate matter (PM) sensor is a high precision particle sensor that can detect PM1, PM2.5 and PM10 levels. The air quality indicator will visually – with the aid of a color scale - show the real-time air quality as per table below. When in SMART mode, the air quality level will also determine the fan speed as per table below.
| LIGHT'S COLOR | PM 2.5 ( g/m^3 ) AIR QUALITY | |
| Green | 0-12 Very Good | |
| Yellow | 13-35 Good | |
| Orange | 36-55 Poor | |
| Red | 56-150 Very Poor | |
| Purple | 151-250 | Bad |
| Maroon | >250 | Very Bad |
NOTE: Please ensure regular cleaning of the sensor window to ensure it does not get clogged with dust and sensors keep performing accurately. Also ensure optimal humidity levels (between 35-80%) for accurate reading from the sensors.
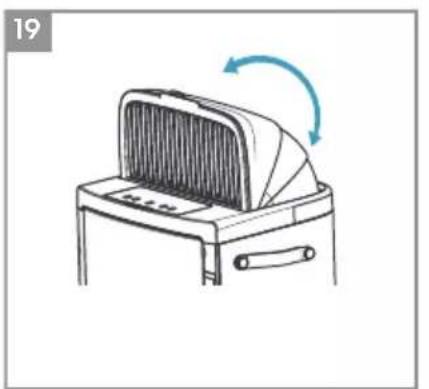
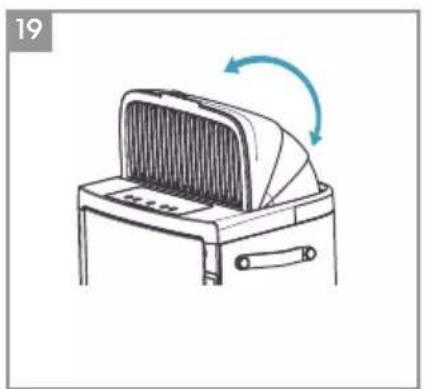
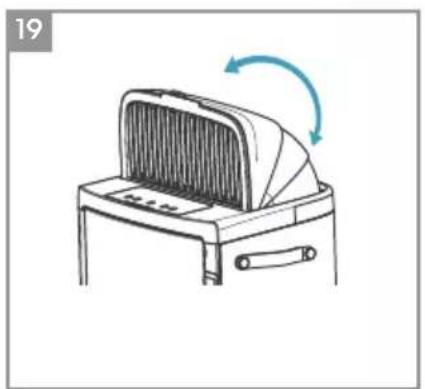
HOOD ADJUSTMENT
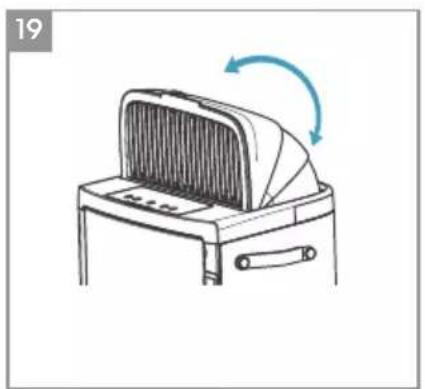
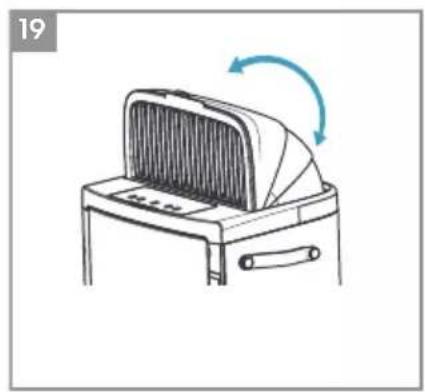
- HOOD: The unit is equipped with a hood to give a comfortable air environment. Adjust the air outlet direction by pulling up the hood manually. The hood can be adjusted in desired angle between 6^ - 90^ .
ONBOARDING
NOTE: Some steps in the onboarding flow may have changed, please follow step by step instructions in the latest version of the App as reference in case of discrepancy. Please ensure home WiFi is running on 2.4 GHz band, as the 5Ghz band will not be recognized by the air purifier.
- Please find the Electrolux App in the iOS App or Google Play store, download it, sign up and login to the App. Here you will be able to 'Add an appliance' in the App and follow the step by step instructions for onboarding the unit – steps below are indicative.
CLEANING & CARING
NOTE: Always unplug the air purifier before cleaning to prevent shock or fire hazards. Never use abrasive, harsh detergents OR wax for cleaning the unit. The high efficiency filters cannot be washed, they must always be replaced when at the end of life.
- Ensure the sensor window is kept unclogged for optimal performance of the unit. It is natural for dust to accumulate in this area, hence ensure regular (e.g. once per 4 weeks) vacuuming of the sensor window with a vacuum cleaner that has a narrow nozzle/brush.
- The plastic parts of the unit should be cleaned with an oil-free dry cloth. For stains on plastic parts, use a slightly damp soft microfiber cloth to gently rub against the stain.
- The fabric attached to the front panel should be wiped with an oil-free dry cloth or by using a vacuum cleaner with a soft brush. The area around the air inlet on the front of the unit may accumulate more dust than some other parts and hence may require more frequent cleaning to ensure optimal performance. The mesh filter should occasionally be wiped off or cleaned with a vacuum cleaner to avoid loss of performance.
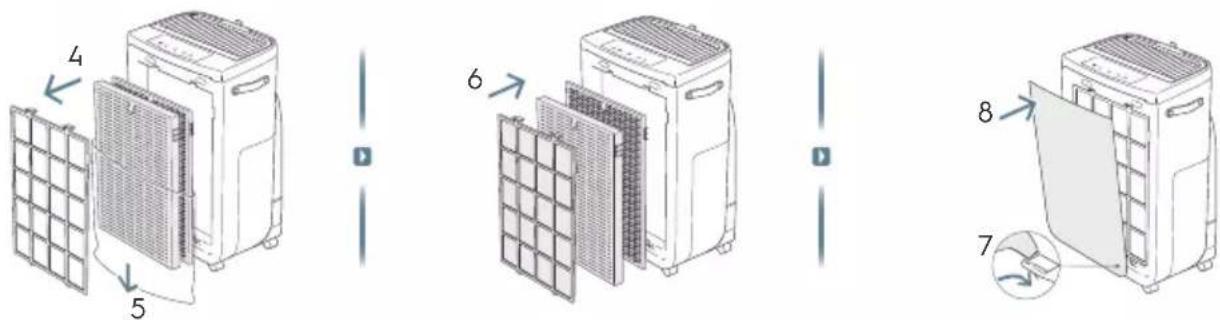
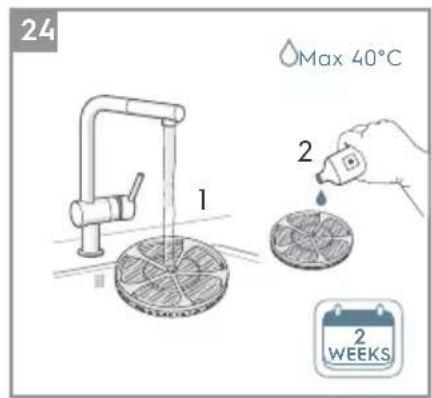
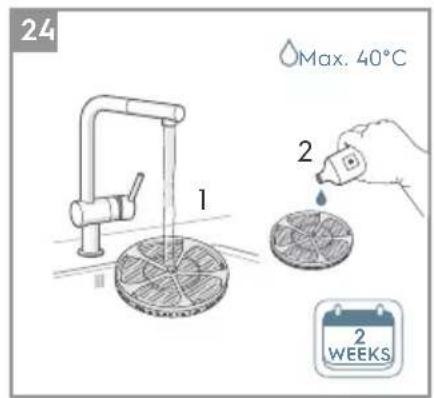
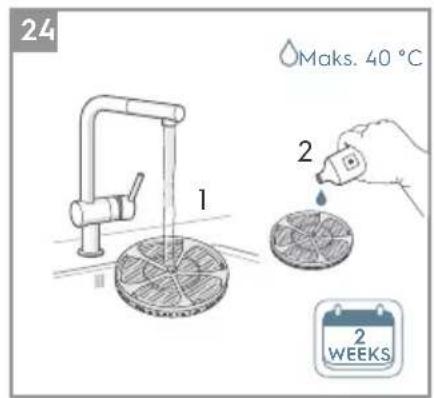
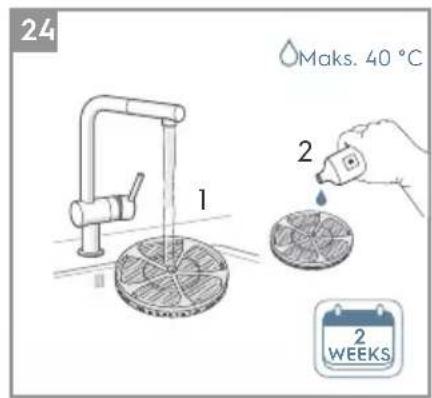
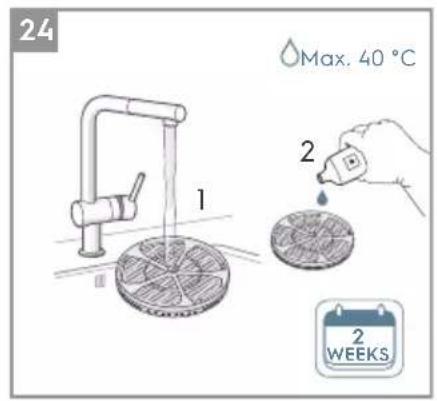
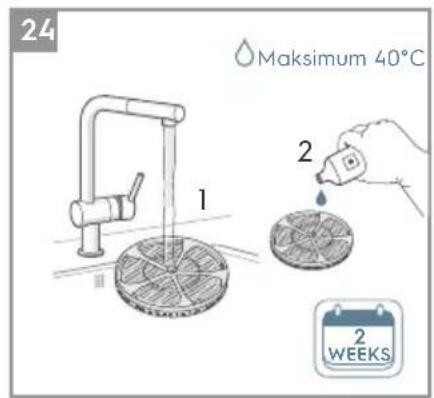
- Clean the humidification filter regularly to keep good humidification performance, take out the humidification filter wheel and rinse it with clean water and citrus acid or neutral detergent, to remove lime scale, and put back to the unit. (refer to image 24).
NOTE: Following the steps shown in image 1 to take out and put back the humidification filter wheel, no need to take the humidification filter off from the wheel during cleaning.
STORAGE
- When storing the air purifier, besides unplugging the unit, clean the mesh filter, and ensure that unit, including the fabric front panel, are covered to avoid accumulation of dust. For the Humidification model make sure to also empty the filter drawer, remove the humidification filter and let it dry, and empty the water tank before storing the product, to avoid mold buildup inside the product, which could lead to undesired smells.
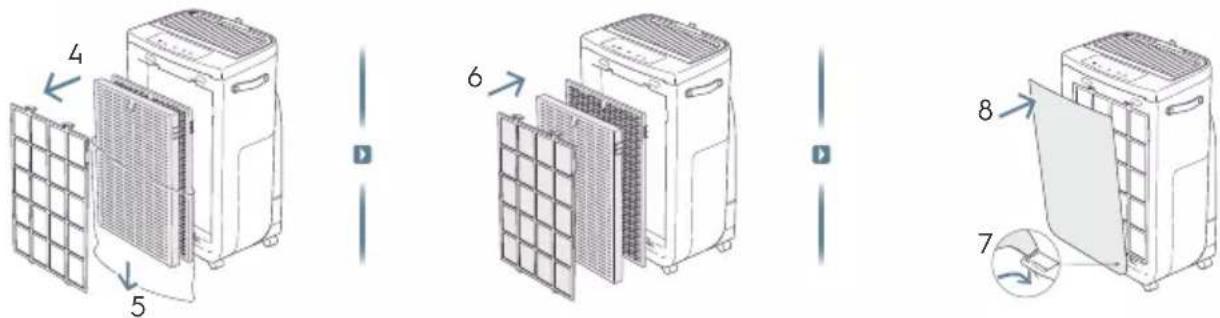
REPLACING FILTERS
REPLACE HEPA FILTERS
NOTE: The filters – except for the mesh pre-filter and humidification filter - cannot be washed and must always be replaced when at end of life. The air purifier have a variety of filters to choose from, tailored to your lifestyle needs. Head over to the Electrolux App or the product information page on our website for a guide on choosing the appropriate filter for your needs. Please visit your local electrolux website to order your replacement filter.
-
For the best experience and to secure an uninterrupted use of the air purifier, please monitor the filter's remaining lifetime in the Electrolux App and order a replacement filter in due time before the remaining filter lifetime reaches 0%. If you have notifications enabled, the Electrolux App will inform you when the filter life is close to end of life (e.g. at 5%).
-
When one or more of the filters is at end of life, the filter change icon will light up on the product control panel to indicate the need for replacement. Please head over to the Electrolux App to correctly identify which filter is at end of life and needs replacement. When filter is at end of life, the unit's fan speed may be reduced in SMART mode.
-
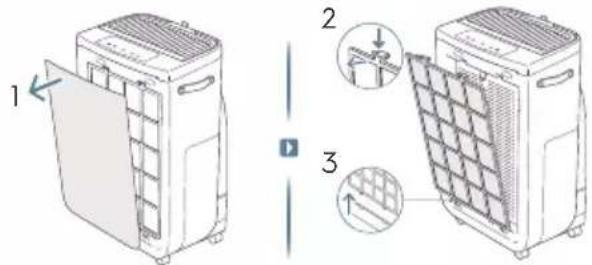
The used filter might be heavily coated with dust and particulate matter so before opening the front panel, please ensure a disposable bag or packaging is at hand to place the used filter in.
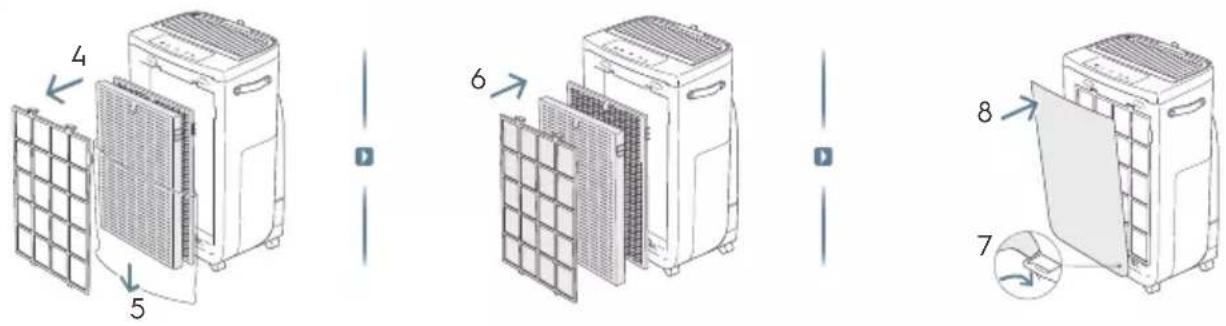
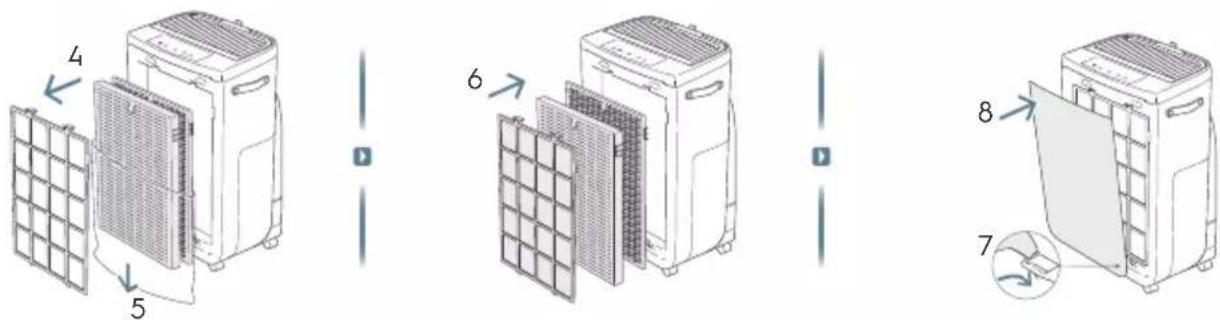
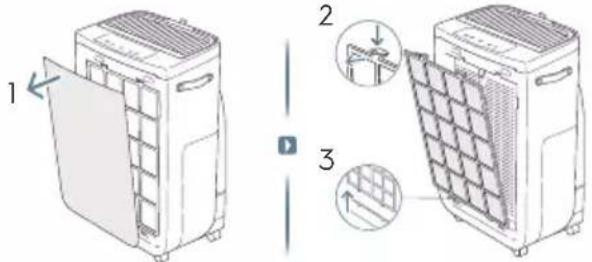
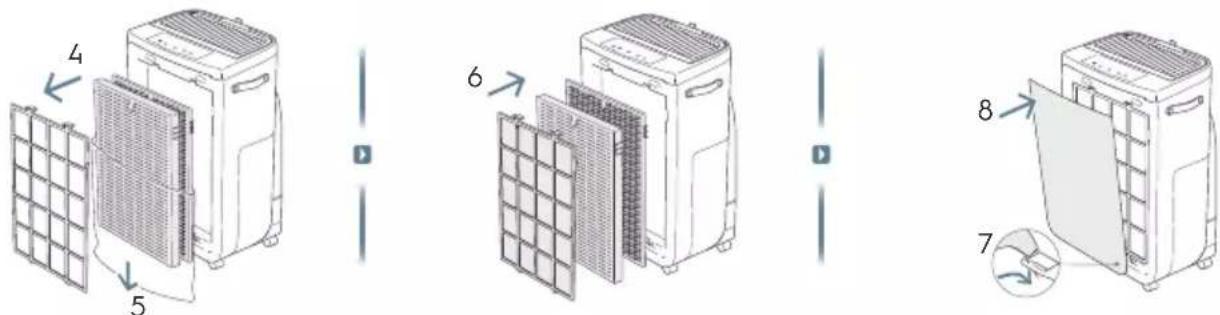
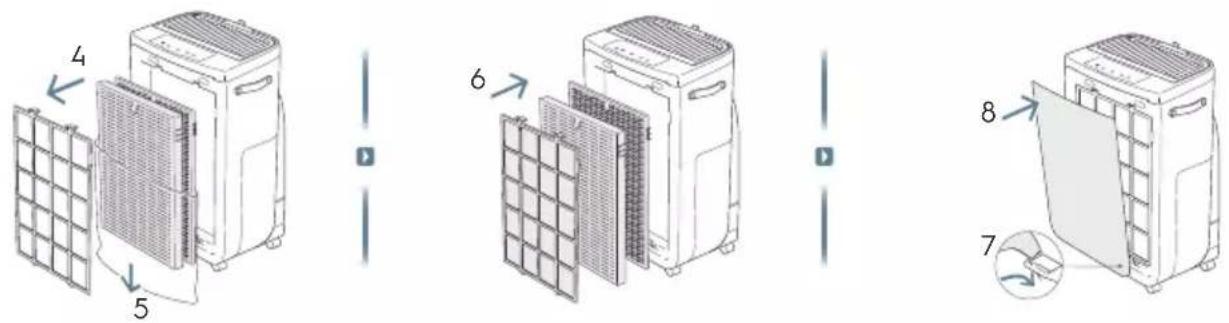
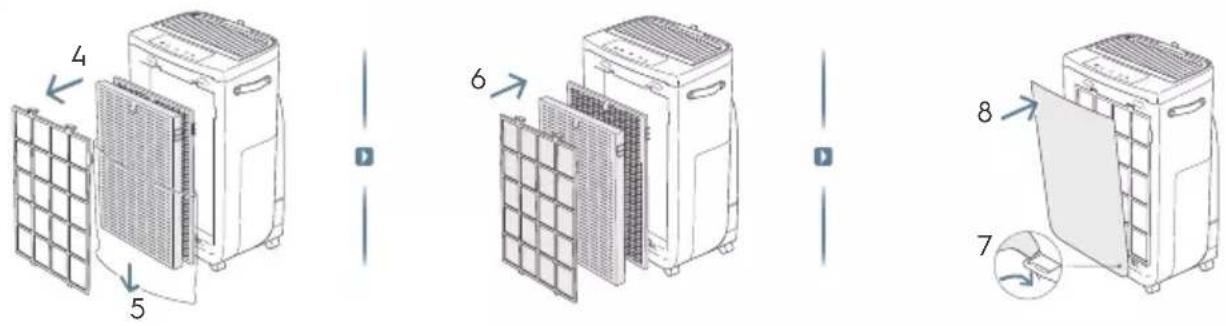
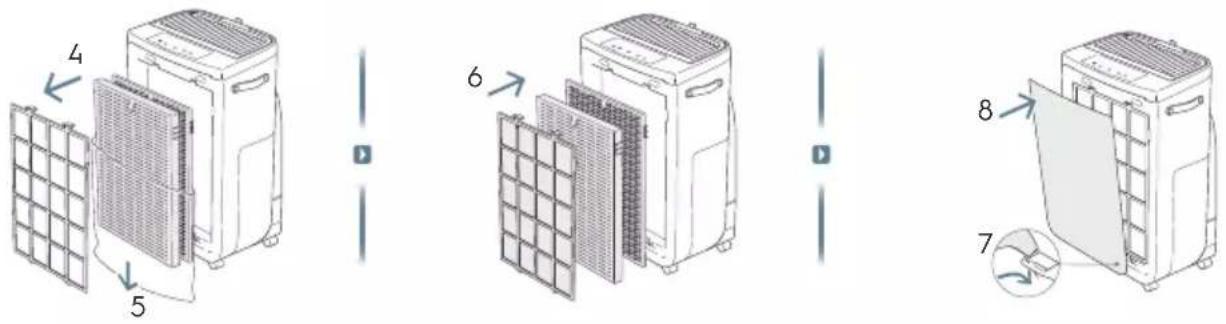
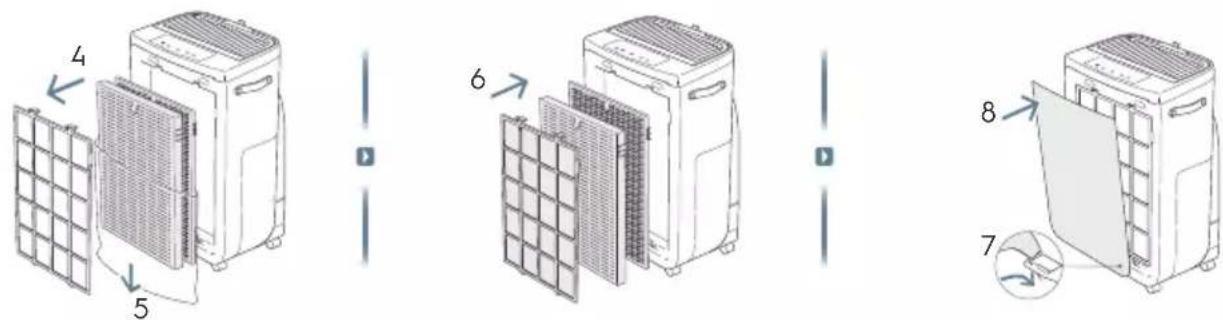
- Turn OFF the air purifier or unplug the unit before changing the filters, to ensure that the filter change icon will be turned OFF. Remove the front panel and the mesh pre-filter and put them aside. Next remove the filter which is at end of life and place it in the disposable bag at hand.
- Next, please remove the plastic packaging from the replacement filter and insert the filter in the appropriate place. Please ensure the VOC odor filter goes in first inside the unit, followed by the ultrafine particle filter. Reinsert the mesh pre-filter, close the front panel and turn ON the unit. The filter change icon on the product control panel will no longer be lit and the Electrolux App will indicate the same, with a new filter lifetime reading.
NOTE: In case the change is only reflected on the product control panel and not the Electrolux App, please restart the App and the unit, before further troubleshooting.
- Discard the used filter as well as any plastic packaging according to local recycling guidelines.
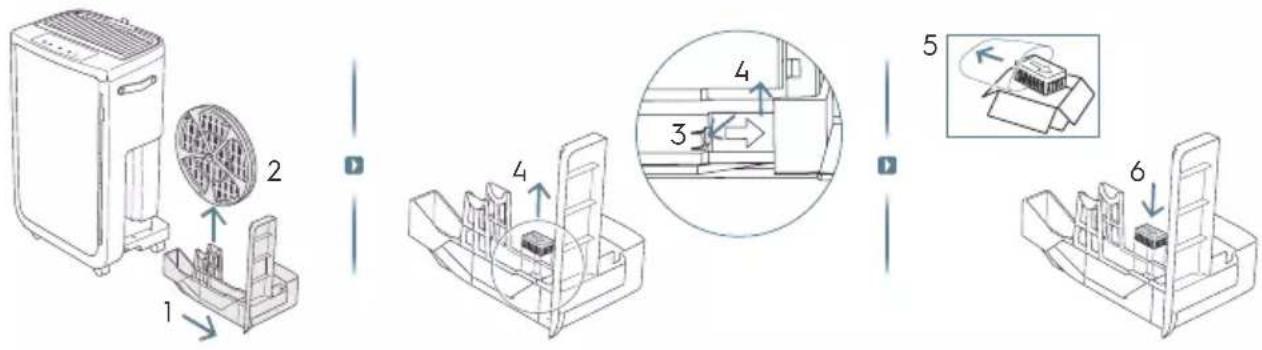
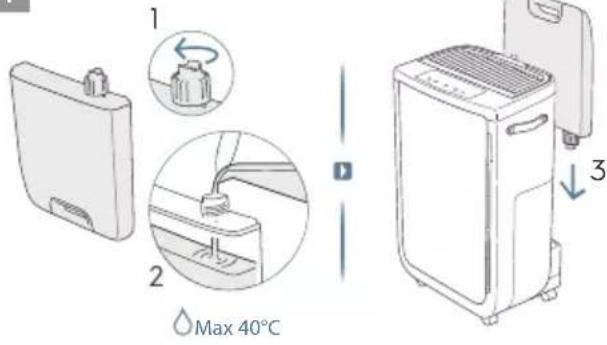
REPLACE HUMIDIFICATION FILTER AND ANTIBACTERIAL CARTRIDGE
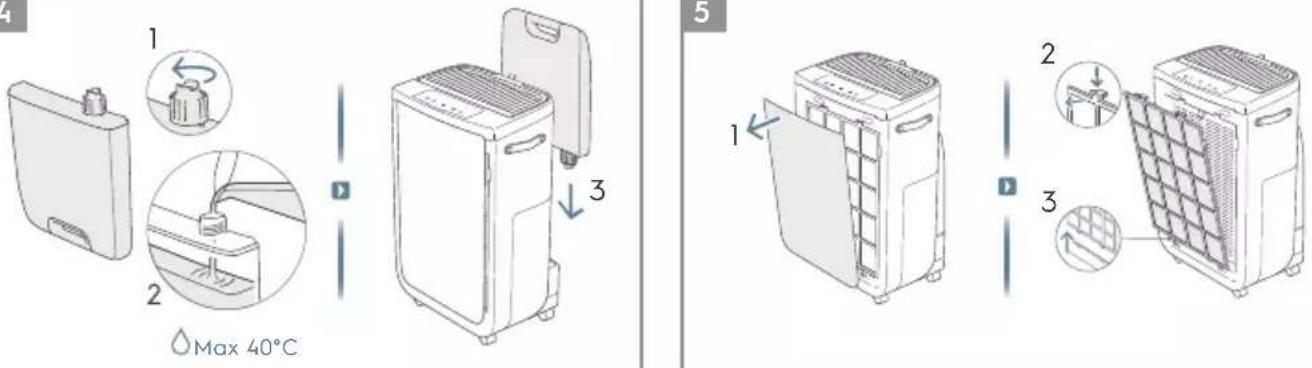
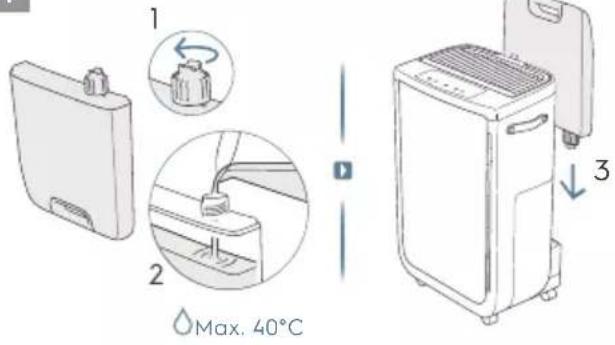
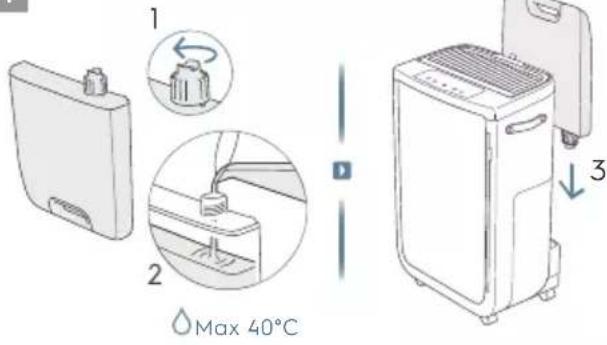
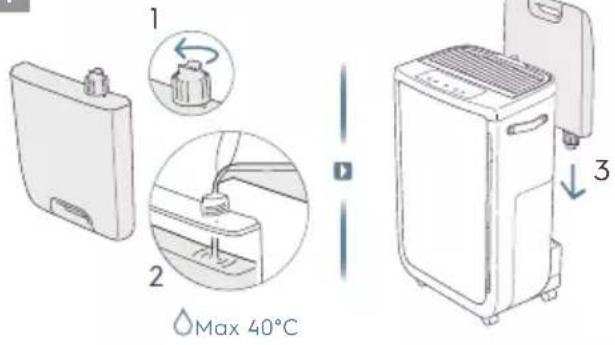
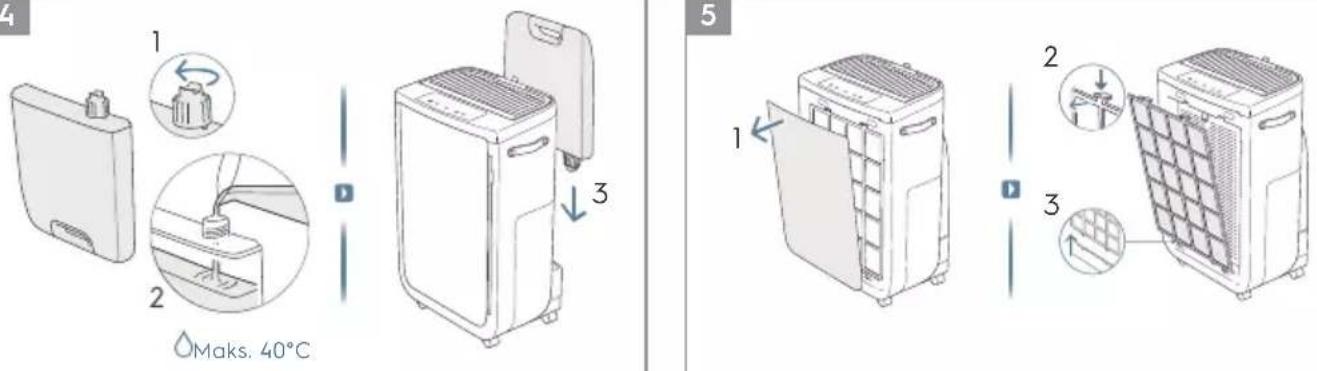
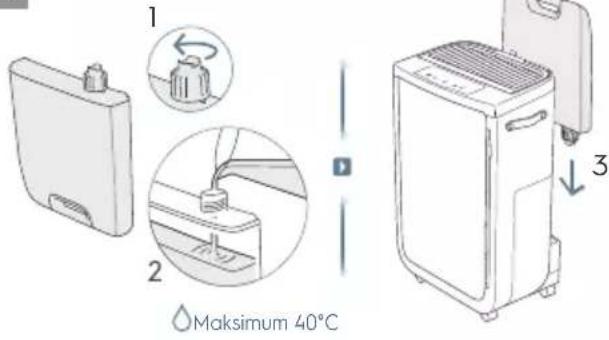
NOTE: The humidification filter and antibacterial cartridge need to be replaced around every 1 year, following below steps to replace them. (refer to image 2&3).
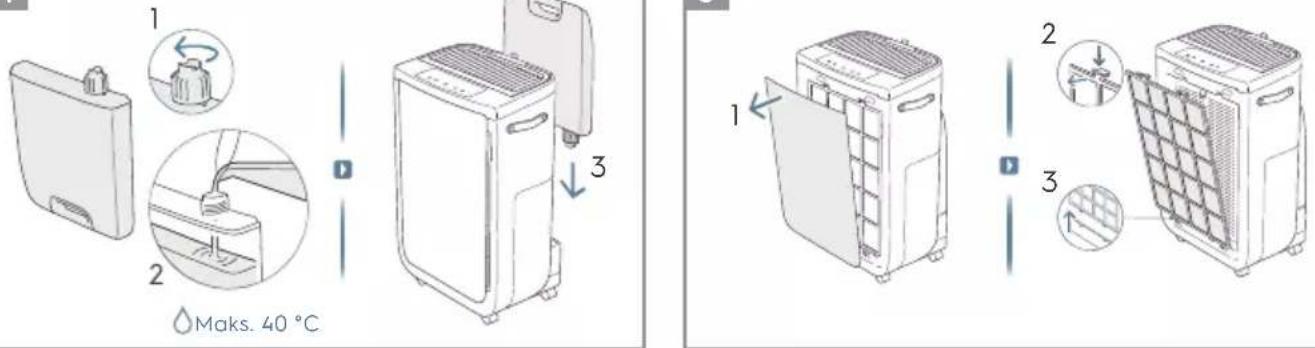
- Remove the water tank from the back of the unit first.
- Remove the side panel and pull out the filter drawer.
- Take out the humidification filter inside the filter drawer, loosen the shaft caps, separate the hooks in the humidification filter wheel frame and take out the humidification filter. Insert a new humidification filter into the wheel. Reassemble in the reverse order and lock the wheel caps. (refer to image 5&6).
- After removing the humidification filter, you will find the antibacterial box is inserted in the groove of the filter drawer base, pull it out and replaced with the new one.
- Then place the humidification filter wheel, filter drawer and side panel back on to the unit in the same order as delete. And make sure to fit the humidification filter wheel in the correct orientation. One of the wheel caps is larger than the other.
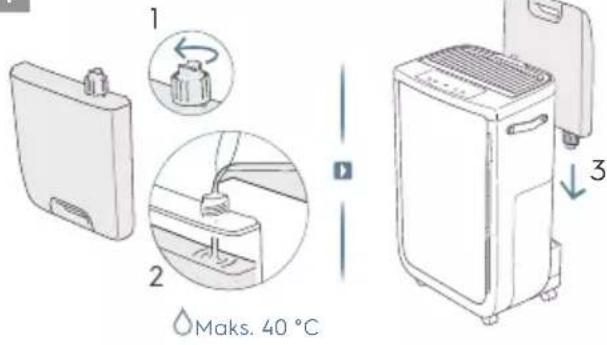
REFILL THE WATER TANK
NOTE: Please use tap water when filling the water tank. Hot water (over 40 °C), chemicals / detergents or adding fragrances may affect the product and humidification function. Please also observe that dirty water (including well water), can increase the risk of fungi / bacteria and mold growing.
- When the water tank is empty, the water tank indicator will light up on the control panel to remind you to refill the water tank. You will also get an alert in the App.
- Lift the water tank carefully to avoid water dripping on the floor. Turn the tank upside down, open the cap then fill the tank up with water. (refer to image 4).
- Next, close the cap and replace the water tank back on to the unit.
TROUBLESHOOTING
When fault indicators show that the system is not operating properly, perform the following check.
The table below is only a limited list. For the latest and complete section on troubleshooting, FAQ and error guide please refer to the corresponding section on our website or the Electrolux App.
| ISSUE# NOTES | TROUBLESHOOTING | ||
| 1 | The air purifier's alert icon is lit. | If you have just bought the unit OR inserted new filter(s), please ensure that the filter(s) are positioned in the correct way for the RFID tags to be read by the sensor.Generally, the unit comes with a variety of sophisticated sensors, electronics and other electrical components and if one of these is malfunctioning, you will see the alert icon on the product control panel light up. For more details on steps to resolve, please head over to the Electrolux App and check for details whenever you see this icon lit. | Please have at hand the unit's PNC and SERIAL number if you need to contact Electrolux service organisation for support. |
| 2 | The air purifier is running at max fan speed all the time for extended periods | If in MANUAL mode, please check the fan speed slider on the product control panel or within Electrolux App and adjust it to desired level.If in SMART mode, please check air quality indicator on the product control panel or within Electrolux App – if all PM values are constantly showing 999-1000 without any reduction then most likely the sensor is clogged. Please use a vacuum cleaner to clean the sensor via the sensor window – detailed instructions in CLEANING, CARING & STORAGE section above. | The PM sensor in the unit is highly accurate and sensitive and it is normal for the purifier to react to poor air quality by ramping up the fan speed – to get your indoor air quality back to safe levels. |
| 3 | The air purifier is running at lowest fan speed all the time for extended periods | If in MANUAL mode, please check the fan speed on the product control panel display or within Electrolux App and adjust it to desired level.If in SMART mode, please check air quality indicator on the product control panel or within Electrolux App – if all PM values are constantly reading very good without any increase then this is normal behavior for the unit - your air quality is very good! If the PM2.5 value is high and the unit is still operating at lowest fan speed, then please check filter change icon on the product control panel or within Electrolux App and if lit please replace used filter with a new one, this should resolve the specific fan speed issue.If neither of the above steps OR instructions in the Electrolux App help, please refer to item 9 in the table. | The unit is designed so that when a filter is at end of life, it will discourage usage till the filter is replaced, by limiting the fan speed so as not to reintroduce the captured particulate matter back into the air. |
| ISSUE# NOTESTROUBLESHOOTING | |||
| 4 | The air purifier produces a loud or abnormal noise | Please ensure that the plastic bags around the filters has been removed, ensure the air inlet (around the front panel) and air outlet grill (top of the unit) are unobstructed and that there is a clearance of at least 30 cm between the unit and the nearest surface.If neither of the above steps OR instructions in the Electrolux App help, please refer to item 12 in the table. | If there is an abnormal noise in your product, even after checking the steps in the trouble shoot guide, please contact an Electrolux authorized service center for further support. |
| 5 | The air purifier or fan does not operate | Ensure that the unit is receiving power. If needed, try pushing the power plug firmly into the wall socket to check if this resolves the issue. Check that the fuse of your home has not blown or that the circuit breaker has been tripped. Replace fuse or reset circuit breaker if needed.If neither of the above steps OR instructions in the Electrolux App help, please refer to item 12 in the table. | |
| 6 | The air purifier is running but the air quality does not improve | If in SMART mode, closely monitor the difference in air quality levels within the Electrolux App for next 20 minutes – if you do not see any improvement of the air quality values in the Electrolux App during this period then follow the step below.Change to MANUAL mode and adjust the fan speed to a higher level to see if this helps resolve the issue. If you still do not see any improvement.Close any open doors OR windows to the outside of the room and rerun the unit at the highest fan speed for 20 minutes. If this resolves the issue, we recommend that you operate the unit in this sealed environment as much as possible, till the air quality is also at a good level. | If the unit is placed in a room larger than the recommended size, it will take longer for the air quality to improve – please be patient and maintain the unit at the highest feasible speed. |
| 7 | The air purifier produces or emits a strange smell | The first time you run the unit, you may perceive a plastic, glue or paint smell – especially near the air outlet grill – this is unavoidable in some cases (like the ‘new car smell’) but should disappear quickly.If you perceive a burning smell, please disconnect the unit and contact Electrolux authorized service center for further support.The VOC filter is in the end of life. Please change to a new VOC filter. | Always ensure that the filters are covered in appropriate packaging while stored away between uses, and that all parts are dry to avoid smell or mould build up. |
| 8 | The filter icon is lit, even though I recently changed the filters | Turn OFF the unit with the ON OFF button, or unplug and re-plug the unit, to see if the icon disappears. | It is important to turn OFF the unit before changing the filter, in order to reset the product. |
| 9 | The air purifier or fan does not operate | The water refill light flashes. Make sure the water tank is properly installed and there is enough water in the water tank. Ensure that the side panel is closed. | |
| 10 | There are some white or yellow deposits on the humidification filter | The white deposits are called lime scale and they consist of minerals from the water. Scale on the rotary humidification filter affects the humidifying performance, however it does not harm your health. Follow the cleaning instructions in the user manual. | |
| 11 | It takes a long time to reach the target humidity level | Humidification technology evenly distributes invisible water vapour into your room. In dry conditions moisture from the humidifier will be absorbed by walls, furniture, and other items in your room. Ventilation of dry outside air will also increase the time it takes to reach the target humidity. To optimize humidification and purification performance, it's recommended to close doors and windows during use. Change the humidification filter every year. | |
| 12 | I am unable to connect the Air purifier to the App | If you are unable to onboard the unit and connect it to the Electrolux App after a couple of attempts, then please contact an Electrolux authorized service center for support. | The WiFi chip in the unit operates only at 2.4Ghz so please ensure your home WiFi is operating at this bandwidth. |
| 13 | I have another issue not listed here OR none of the above steps have helped resolve the issue | You can search for more troubleshooting and FAQ guides on our website OR the Electrolux App under the product information pages, or directly contact Electrolux authorized service center for support. Thank you! | Please have the unit's PNC and serial number available when contacting the Electrolux service. This information can be found on the rating label which is located on the main unit behind the front cover. |
NÁVOD NA OBSLUHU
4

5
6


natural_image
Line drawing of a toaster oven with a curved arrow indicating rotation (no text or symbols)
natural_image
Illustration of a hand using a tool to clean or adjust a portable air conditioner unit, with an inset showing the device's texture and color (no text or symbols present)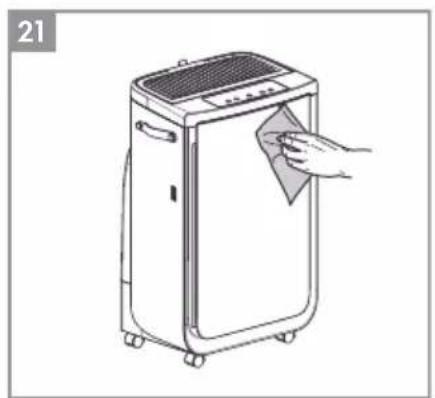
natural_image
Line drawing of a portable air purifier with a hand cleaning the lid (no text or symbols)
natural_image
Illustration of a crossed-out product box with a spherical object and a bottle labeled 'MAX' (no text or symbols on the main image)
2

flowchart
graph LR
    A["Step 1: Circular component with clockwise arrow"] --> B["Step 2: Circular component with clockwise arrow"]
    B --> C["Step 3: Circular component with clockwise arrow"]
    C --> D["Step 4: Circular component with clockwise arrow"]
    D --> E["Step 5: Circular component with clockwise arrow"]
    E --> F["Step 6: Circular component with clockwise arrow"]
    F --> G["Step 7: Circular component with clockwise arrow"]
    G --> H["Step 8: Circular component with clockwise arrow"]
4
6


natural_image
Line drawing of a toaster with a heat sink and scroll, showing a blue curved arrow indicating rotation (no text or symbols)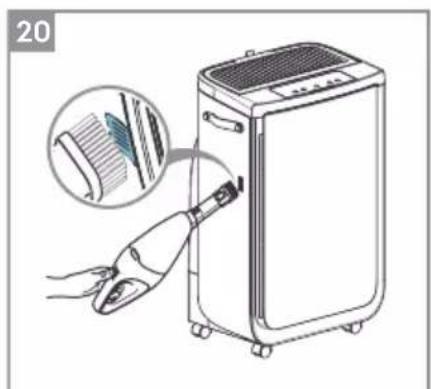
natural_image
Illustration of a hand using a handheld device to clean or install a portable air conditioner unit, with an inset showing the device's blade and handle (no text or symbols present)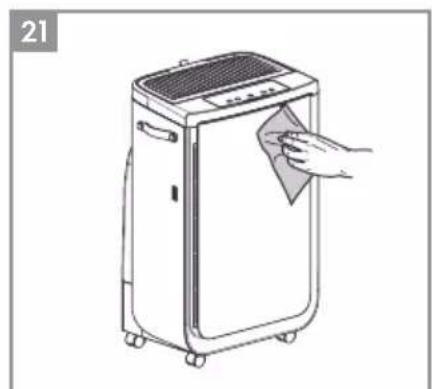
natural_image
Line drawing of a portable air conditioner unit with a hand cleaning it (no text or symbols)
natural_image
Illustration of a hand holding a sphere above a rectangular block, with a bottle labeled 'MAX' crossed out by two crossed lines (no text or symbols on the objects)

HEPA-FILTER WECHSELN
4
5
6


natural_image
Line drawing of a toaster oven with a curved arrow indicating rotation (no text or symbols)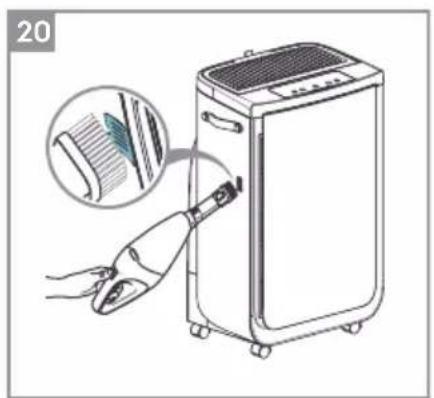
natural_image
Illustration of a hand using a tool to clean or adjust a washing machine, with an inset showing the blade being cut (no text or symbols present)
natural_image
Line drawing of a portable air purifier with a hand cleaning the lid (no text or symbols)
natural_image
Illustration of a crossed-out product box with a spherical object and a bottle labeled 'NAX' (no text or symbols on the main objects)
flowchart
graph LR
    A["Step 1: Circular component with rotation arrow"] --> B["Step 2: Circular component with rotation arrow"]
    B --> C["Step 3: Circular component with rotation arrow"]
    C --> D["Step 4: Circular component with rotation arrow"]
    D --> E["Step 5: Circular component with rotation arrow"]
    E --> F["Step 6: Circular component with rotation arrow"]
    F --> G["Step 7: Circular component with rotation arrow"]
    G --> H["Step 8: Circular component with rotation arrow"]
flowchart
graph LR
    A["1 fan with internal filter"] --> B["2 box with internal filter"]
    B --> C["3 box with internal filter"]
    C --> D["4 box with internal filter"]
    D --> E["5 zoomed-in box with internal filter"]
    E --> F["6 battery pack"]
4
5
6


![18 MATERIAL [SMART]](/content/2026/04/638704/images/f474e1e401f385a6b83a62a952d04cc767610638d36c4407965929819216edfa.jpg)
natural_image
Line drawing of a toaster oven with a curved arrow indicating rotation (no text or symbols)
natural_image
Illustration of a hand inserting a hair accessory into a portable air purifier unit, with an inset showing the fabric being inserted (no text or symbols present)
natural_image
Line drawing of a portable air conditioner unit with a hand cleaning it (no text or symbols)
natural_image
Illustration of a crossed-out product box with a spherical object and a bottle labeled 'NAX' (no text or symbols on the main image)

REMPLACEMENT DES FILTRES
REEMPLACER LES FILTRES HEPA
Imajte na umu da visoka razina vlažnosti može pogodovati rastu bioloških organizama u okolišu.
Nemojte dopustiti da područje oko uređaja bude vlažno ili mokro. Ako se pojavi vlaga, smanjite snagu ovlaživača. Ako nije moguće smanjiti snagu ovlaživača, koristite ga povremeno. Nemojte dopustiti da materijali koji apsorbiraju vlagu, poput tepiha, zavjesa, zastora ili stolnjaka, postanu vlažni.
2

flowchart
graph LR
    A["Step 1: Circular component with 5x rotation"] --> B["Step 2: Circular component with 2x rotation"]
    B --> C["Step 3: Circular component with 3x rotation"]
    C --> D["Step 4: Circular component with 4x rotation"]
    D --> E["Step 5: Circular component with 5x rotation"]
    E --> F["Step 6: Circular component with 5x rotation"]
    F --> G["Step 7: Circular component with 7x rotation"]
    G --> H["Step 8: Circular component with 8x rotation"]
1 godina održavanja, zamjena filtra za ovlaživanje
3
4
5
6


natural_image
Line drawing of a toaster oven with a curved arrow indicating rotation (no text or symbols)
natural_image
Illustration of a hand using a tool to clean air from a portable appliance, with an inset showing the device's edge detail (no text or symbols present)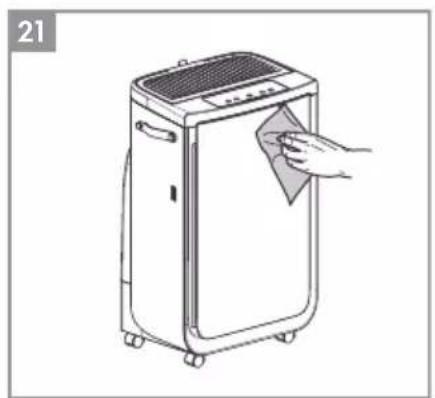
natural_image
Line drawing of a portable air purifier with a hand cleaning the lid (no text or symbols)

Za dodatne pojedinosti opisa slika pogledajte stranice 78-83.
HULLADÉKKÉNTI ELHELYEZÉS
4

5
6


![18 MATERIAL [SMART]](/content/2026/04/638704/images/e772af965f78bd5d42542117417cd6b68b14d05d50531a810cf002936680996e.jpg)

natural_image
Line drawing of a toaster oven with a curved arrow indicating rotation (no text or symbols)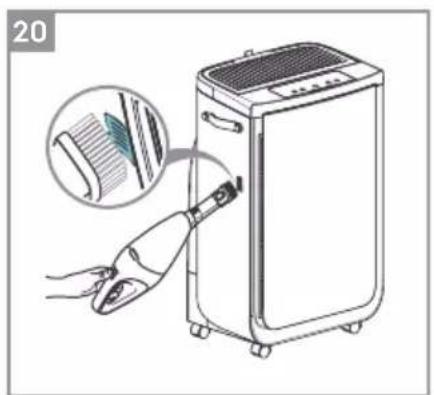
natural_image
Illustration of a hand inserting a hair accessory into a portable air purifier unit, with an inset showing the fabric being inserted (no text or symbols present)
natural_image
Line drawing of a portable air conditioner unit with a hand cleaning it (no text or symbols)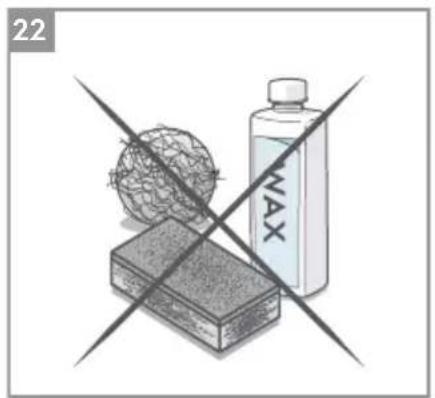


4
5
6


![18 MATERIAL [SMART]](/content/2026/04/638704/images/96e2927a6e4a3858846db36a632881b30e11662d3bdebb4cba3290712e480525.jpg)

natural_image
Line drawing of a toaster oven with a curved arrow indicating rotation (no text or symbols)
natural_image
Illustration of a hand inserting a hair accessory into a portable air purifier unit, with an inset showing the fabric being inserted (no text or symbols present)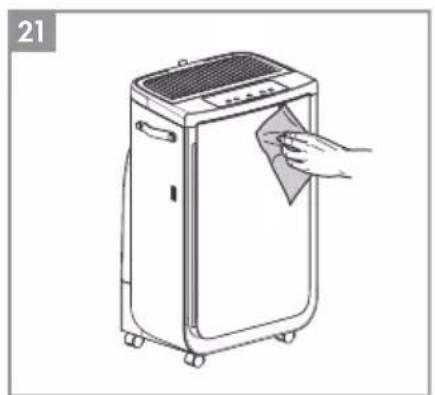
natural_image
Line drawing of a portable air conditioner unit with a hand cleaning it (no text or symbols)


INFORMACJE NA TEMAT RADIA
2

flowchart
graph LR
    A["1"] --> B["2"]
    B --> C["3"]
    C --> D["4"]
    D --> E["5"]
    E --> F["6"]
    F --> G["7"]
    style A fill:#f9f,stroke:#333
    style B fill:#f9f,stroke:#333
    style C fill:#f9f,stroke:#333
    style D fill:#f9f,stroke:#333
    style E fill:#f9f,stroke:#333
    style F fill:#f9f,stroke:#333
    style G fill:#f9f,stroke:#333
4
6

natural_image
Line drawing of a toaster oven with a curved arrow indicating rotation (no text or symbols)
natural_image
Illustration of a hand using a tool to clean or adjust a portable air conditioner unit, with an inset showing the device's texture (no text or symbols present)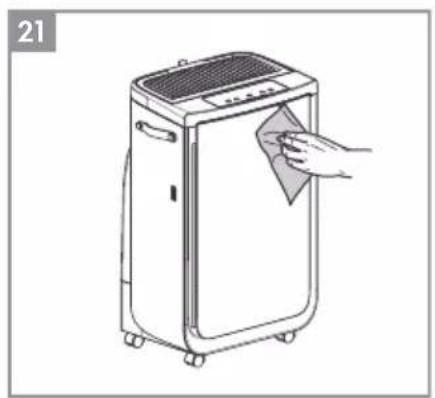
natural_image
Line drawing of a portable air purifier with a hand cleaning it (no text or symbols)


ZMIANA TRYBÓW, PRĘDKOŚCI WENTYLATORA, OBROTU ORAZ WILGOTNOŚCI
4
5

6


natural_image
Line drawing of a toaster oven with a curved arrow indicating rotation (no text or symbols)
natural_image
Illustration of a hand using a tool to clean or adjust a washing machine, with an inset showing the blade being cut (no text or symbols present)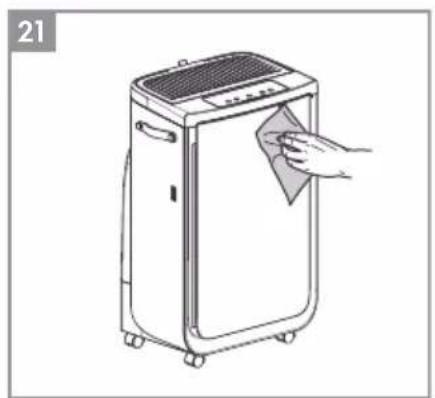
natural_image
Line drawing of a portable air purifier with a hand cleaning the lid (no text or symbols)


УТИЛИЗАЦИЯ
4
5
6


natural_image
Line drawing of a portable toaster with a curved arrow indicating rotation (no text or symbols)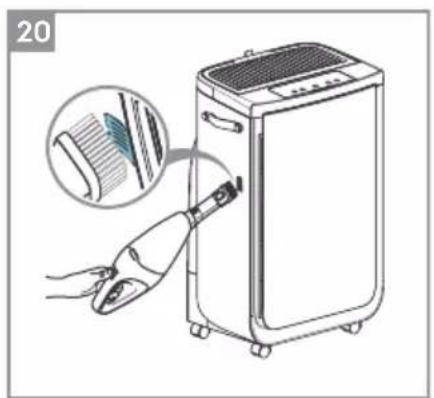
natural_image
Illustration of a hand using a tool to clean or adjust a portable air conditioner unit, with an inset showing the device's texture and color (no text or symbols present)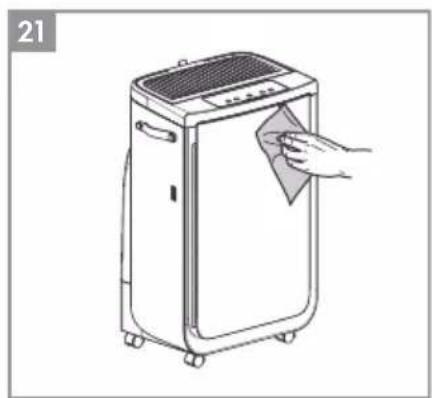
natural_image
Line drawing of a portable air conditioner unit with a hand cleaning the lid (no text or symbols)
natural_image
Illustration of a crossed-out product box with a spherical object and a bottle labeled 'NAX' (no text or symbols on the main objects)

2

flowchart
graph LR
    A["1 YEAR"] --> B["2"]
    B --> C["3"]
    C --> D["4"]
    D --> E["5"]
    E --> F["6"]
    F --> G["7"]
    G --> H["8"]
4
6


natural_image
Line drawing of a toaster oven with a blue arrow indicating rotation (no text or symbols)
natural_image
Illustration of a hand inserting a hair accessory into a device, with an inset showing the cable being inserted (no text or symbols present)
natural_image
Line drawing of a portable air conditioner unit with a hand cleaning it (no text or symbols)
natural_image
Illustration of a hand holding a sphere above a rectangular block, with a bottle labeled 'MAX' crossed out by two crossed lines (no text or symbols on the objects)

2

flowchart
graph LR
    A["1 YEAR"] --> B["2"]
    B --> C["3"]
    C --> D["4"]
    D --> E["5"]
    E --> F["6"]
    F --> G["7"]
    G --> H["8"]
4
6


natural_image
Line drawing of a toaster oven with a curved arrow indicating rotation (no text or symbols)
natural_image
Illustration of a hand using a tool to clean air from a portable appliance, with an inset showing the device's edge detail (no text or symbols present)
natural_image
Line drawing of a portable air purifier with a hand cleaning the lid (no text or symbols)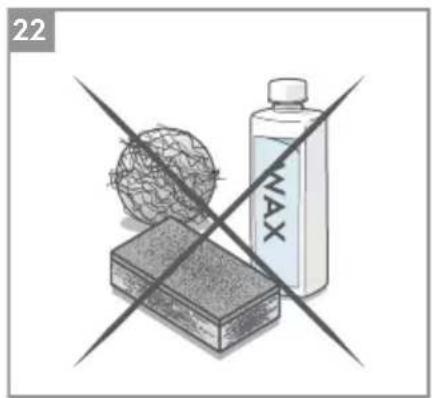
natural_image
Illustration of a battery labeled 'MAX' crossed over a grid sphere and a rectangular block, with no readable text or symbols.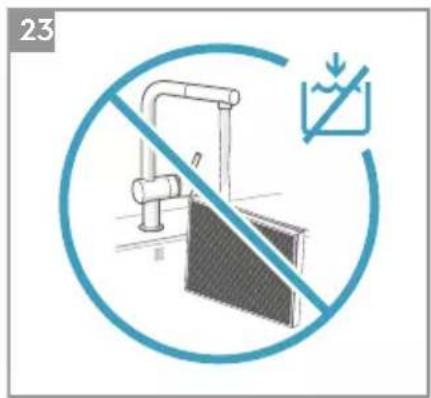
Za razlago slik in nadaljnje podrobnosti glejte strani 176-180.
2

flowchart
graph LR
    A["1 YEAR"] --> B["2"]
    B --> C["3"]
    C --> D["4"]
    D --> E["5"]
    E --> F["6"]
    F --> G["7"]
    G --> H["8"]
4
6


natural_image
Line drawing of a toaster oven with a blue arrow indicating rotation (no text or symbols)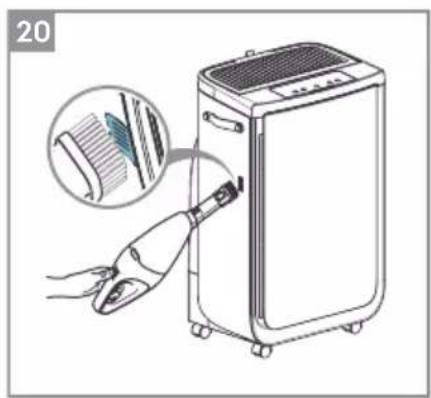
natural_image
Illustration of a hand inserting a hair accessory into a portable air purifier unit, with an inset showing the brush tip (no text or symbols present)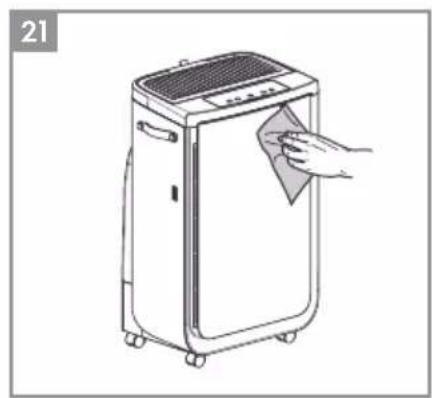
natural_image
Line drawing of a portable air conditioner unit with a hand cleaning it (no text or symbols)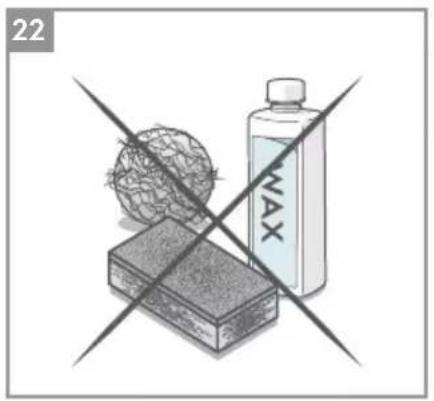
natural_image
Illustration of a hand holding a globe and a water bottle crossed over a rectangular block, with no visible text or symbols.
2

flowchart
graph LR
    A["Step 1: Circular component with rotation arrow"] --> B["Step 2: Circular component with rotation arrow"]
    B --> C["Step 3: Circular component with rotation arrow"]
    C --> D["Step 4: Circular component with rotation arrow"]
    D --> E["Step 5: Circular component with rotation arrow"]
    E --> F["Step 6: Circular component with rotation arrow"]
    F --> G["Step 7: Circular component with rotation arrow"]
    G --> H["Step 8: Circular component with rotation arrow"]
4
5

6


natural_image
Line drawing of a toaster oven with a curved arrow indicating rotation (no text or symbols)
natural_image
Illustration of a hand using a tool to clean or adjust a portable air conditioner unit, with an inset showing the device's texture and color (no text or symbols present)
natural_image
Line drawing of a portable air conditioner unit with a hand cleaning the lid (no text or symbols)
natural_image
Illustration of a crossed-out product box with a spherical object and a bottle labeled 'NAX' (no text or symbols on the main objects)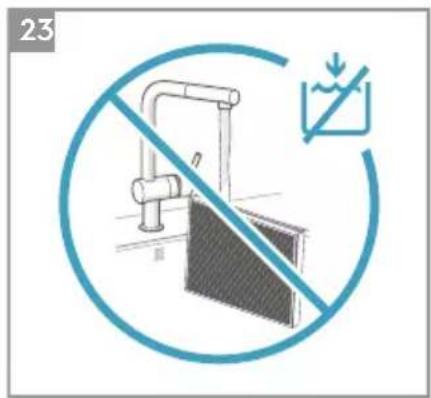


- OPERATING MANUAL
- GENERAL SAFETY INFORMATION
- WARNING! - CHILDREN & VULNERABLE PEOPLE SAFETY
- CAUTION! – AVOID INJURY OR DAMAGE TO THE UNIT OR PROPERTY
- INFORMATION ABOUT RADIO
- Electrical Information
- Safety Precautions
- DISPOSAL
- BEFORE STARTING
- DESCRIPTION OF YOUR AIR PURIFIER
- MANUAL
- UNBOXING & SETUP
- CONTROL PANEL STATES
- USING YOUR PRODUCT
- TURNING ON
- CHANGING MODES & FAN SPEEDS & SWING & HUMIDITY
- FEATURE ICONS AND INDICATORS
- HOOD ADJUSTMENT
- ONBOARDING
- CLEANING & CARING
- STORAGE
- REPLACING FILTERS
- REPLACE HEPA FILTERS
- REPLACE HUMIDIFICATION FILTER AND ANTIBACTERIAL CARTRIDGE
- REFILL THE WATER TANK
- TROUBLESHOOTING
- NÁVOD NA OBSLUHU
- HEPA-FILTER WECHSELN
- REMPLACEMENT DES FILTRES
- REEMPLACER LES FILTRES HEPA
- HULLADÉKKÉNTI ELHELYEZÉS
- INFORMACJE NA TEMAT RADIA
- ZMIANA TRYBÓW, PRĘDKOŚCI WENTYLATORA, OBROTU ORAZ WILGOTNOŚCI
- УТИЛИЗАЦИЯ
Brand : ELECTROLUX
Model : Pure Multi 700
Category : Air purifier