
F320 - Air purifier PURIFY - Free user manual and instructions
Find the device manual for free F320 PURIFY in PDF.

| Product Type | Air Purifier |
| Brand | PURIFY |
| Model | F320 |
| Power Supply | 220-240 V ~ 50/60 Hz |
| Filters | Washable pre-filter, antibacterial/HEPA filter, activated carbon/catalytic filter |
| Fan Speeds | Adjustable manually or automatically based on air quality |
| Operating Modes | Automatic, Manual, Timer (up to 12 h), Night (silent), Child Lock |
| Additional Functions | Ionizer (anions), UV sterilizing lamp, PM2.5 display, WiFi connectivity (Tuya Smart app) |
| Remote Control | Yes, infrared, range 4 m, angle 60° |
| Particle Sensor | Yes, PM2.5 |
| Pre-filter Maintenance | Clean every 2 weeks, replace every 2 years |
| HEPA/Carbon Filter Maintenance | Clean every 8 weeks, replace every 6 to 12 months |
| Sensor Cleaning | Every 8 weeks with a dry cotton swab |
| Safety | Panel open detection, fall/vibration detection, child lock |
| Usage | Indoor only |
| Included Accessories | Remote control with battery, pre-installed filters (remove plastic protection) |
| Connectivity | Wi-Fi 2.4 GHz, Tuya Smart app |
| Voice Compatibility | Alexa, Google Home (via app) |
Frequently Asked Questions - F320 PURIFY
User questions about F320 PURIFY
0 question about this device. Answer the ones you know or ask your own.
Ask a new question about this device
Download the instructions for your Air purifier in PDF format for free! Find your manual F320 - PURIFY and take your electronic device back in hand. On this page are published all the documents necessary for the use of your device. F320 by PURIFY.
USER MANUAL F320 PURIFY
natural_image
Diagram of a cylindrical device with a label pointing to its side panel (no text or symbols present)Filtro 2

natural_image
Diagram of a device casing with a grid pattern and an arrow pointing to it (no text or symbols)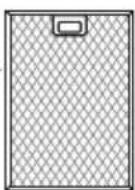
natural_image
Pure mechanical diagram showing a lever mechanism without any text or symbols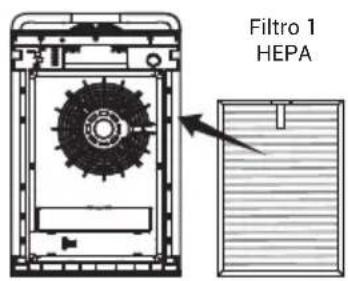

Filtro 2
CARBONE Prefiltro
natural_image
Technical line drawing of a mechanical device with a highlighted section and arrow (no text or symbols)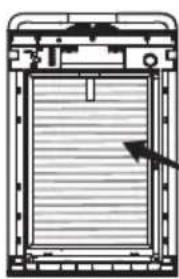
natural_image
Pure technical diagram of a mechanical component with no visible text, numbers, or symbols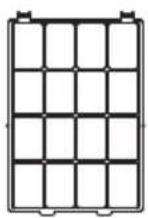

natural_image
Technical line drawing of a mechanical device with a lever and handle (no text or symbols)FUNZIONALITÀ UMIDIFICATORE (SERIE K)
flowchart
graph TD
    A["Device Opening"] --> B["Transfer to Sheet"]
    B --> C["Add Volume"]
    C --> D["Ordering to Cover"]
    D --> E["Ordering to Drain"]
    E --> F["Final Discharge"]
STATO FILTRO
natural_image
Diagram of a front view of a device with a fan and internal components, showing no text or symbols.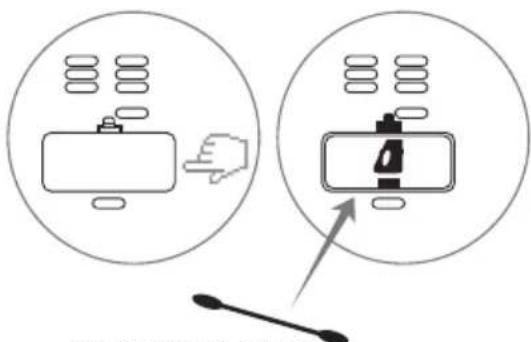
natural_image
Two identical black Android robot head icons on a light gray background (no text or symbols)
natural_image
Two clock icons: one with an alarm clock and the other with a clock face (no text or symbols)
chemical
Two molecular diagrams showing electron delocalization and charge distribution
natural_image
Two abstract icons: a simple sensor icon with vertical lines and a shield with a plus sign (no text or symbols)
natural_image
Two crescent moon symbols, one black and one gray, on a light gray background (no text or labels)
BLOCCO BIMBI
natural_image
Two black padlock icons side by side on a light gray background (no text or symbols)
natural_image
Two abstract black-and-white geometric shapes: a four-petal flower and a four-petal propeller, both on a light gray background (no text or symbols)TELECOMANDO
natural_image
Two identical remote control devices with circular and square buttons, no text or symbols visibleUTILIZZO VIA APP
INSTALLARE TUYA SU APPARATI APPLE/ANDROID
natural_image
Red square icon with white stylized 't' and wireless signal waves (no text or symbols)
RIMOZIONE DI UN DISPOSITIVO
- Do not place in direct sunlight, facing air conditioner vents, or heated places. It may cause the unit to warp, deteriorate, discolor, or malfunction.
- Do not place near TVs or radios. This may distort images or produce noise. Using the purifier remote may cause interference with your TV or radio. Please place at a distance of 1m or more away from these devices. In addition, if you are sharing outlets with these devices, plugging in the purifier may distort images or produce noise. If this happens, please plug the purifier into a different outlet.
- The product must be placed on the floor for pollen and other indoor dust. Since such particles easily fall near the floor, we recommend placing the product on a flat surface on the floor.
- For effective room circulation, place the product approximately 30cm or more away from walls or other objects. Please keep the backside at least 30cm away from the wall to enable it to work more effectively.
- Do not place items on the main unit or it may lead to malfunction. Be careful not to place magnets or any other metal items on here.
• Do not block the air inlet and outlet. For example, do not place anything on the outlet or front air inlet. - Do not use any cleaning agents or lubricants on this machine. Unplug before cleaning or carrying out any maintenance.
- Never use the device in a room with the door closed where people are sleeping.
SAFETY PRECAUTIONS
- Do not pick up or move the machine while it is running.
- When moving or storing, do not pull the power cord. This may cause a short circuit or do internal damage to the power cord. This may lead to a fire or electric shock.
- Do not damage power cord or outlet. Do not cut, excessively twist, pull, or bend the power cord. If the power cord is damaged, for your safety please call the manufacturer, service department, or a trained professional to replace it.
- Do not use power supplies, universal sockets, or connective devices that exceed the recommended power rating. Use only 220V\~5A AC power. Using a universal socket or connected power source that exceeds this rating may lead to overheating and cause a fire.
- Do not touch the power plug or product with wet hands, may cause electric shock.
• Prohibit the use of fingers or metal objects into the air outlet gap, may cause electric shock or injury. - To avoid electrical shock or fire, do not allow water, flammable cleaners, or other liquids enter the product.
• This product cannot replace normal ventilation equipment, vacuum cleaners, or kitchen fans. - Do not place this machine up-side-down, because there is a liquid humidification device in it.
- Keep out of the reach of children.
• (K490) The two arches at both sides of the operation panel are not handles and cannot be pulled. The handles are at both sides of the purifier body. -
Do not place in the following locations:
-
Unstable places: this may cause the product to topple or fall down. This may lead to injury, electrical leakage, or fire.
- Hot or humid places, such as the shower: this may result in electrical shock or fire due to electrical leakage.
- Places like the kitchen that emit fumes.
- Do not use this product near as gas appliances, heating devices or near stove.
EN
- Do not use this product in a humid or high-temperature environment (e.g. bathroom, toilet or kitchen)
- Do not use the air purifier in a room that is using an incense-type insect killer.
- Chemical residue may accumulate in the machine and then be released, causing harm to physical health.
- After using insect killer or mosquito coils, allow the room to be fully ventilated before using the air purifier.
ATTENTION
- Should any of the following conditions occur, turn off the machine immediately (electrical shock, sparks, or smoke may occur):
- Strange noises or vibrations during operation.
- Product is unusually hot, or has a burnt odor.
- Please clean the plug regularly. If there is dust or moisture on the plug it could damage it. This may result in a fire.
- Unplug the power cord, and wipe it with a dry cloth.
-
Unplug the power cord if the appliance is not used for a long period of time.
-
Before electrical maintenance, make sure to unplug the device. The product may suddenly turn on, leading to electrical shock or injury.
- Please plug the power cord securely into the power outlet. If the plug is not securely seated, this may cause overheating which may lead to electrical shock and even fire. Do not use a damaged plug or loose power outlet.
- Please unplug the cord using the plug insulator.
- Pulling the power cord to unplug it may cause damage to the power cord, electrical shock, short circuit, or fire.
- Do not use an extension cable.
- Should any of the following circumstances arise, please turn off the machine power immediately and contact the service department: a switch does not work, power cord or plug is unusually hot, you detect an abnormal sound or vibration, any other abnormalities or malfunctions.
- For internal use only.
- Risk of electric shock. Do not disassemble.
- Do not use the product near heat sources. Do not wet. Do not immerse in water. Use a damp cloth to clean.
- Observe the conditions of use indicated in this manual.
- When the product is turned on, please keep a minimum distance of 20cm from the product (exposure to radio frequencies).
WARNING
The device/remote contain magnets.
- Pacemakers and defibrillators may be affected by strong magnetic fields. If you or someone in your household has a pacemaker or defibrillator, avoid placing the remote control in a pocket or near to the device.
- Credit cards and electronic storage media may also be affected by magnets and should be kept away from the remote control and the top of the machine.
- Ensure that the machine is fully assembled in line with the instructions before use. Remove the plastic protection from all filters.
- Important! Keep all packaging (plastic bags, polyst-yrene foam) away from children.
- Important! Do not obstruct the air intake and outlet grills.
- Use only original spare parts and original consumables (filter).
- Once switch on a plastic odor could be released, it should decrease and then disappear after a few hours of operation.
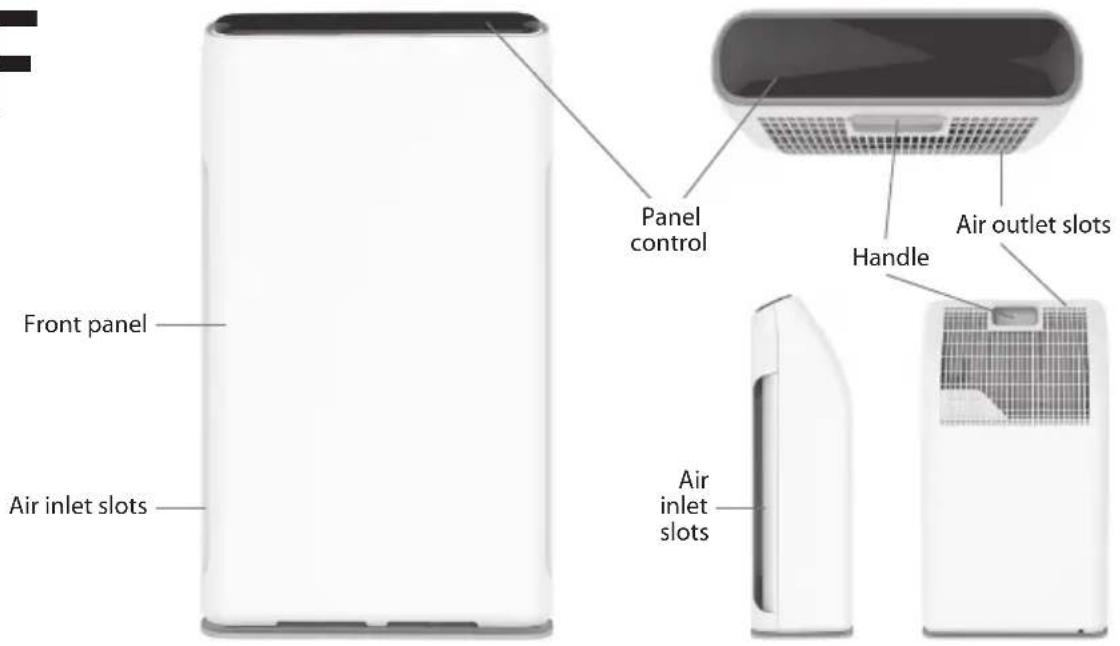
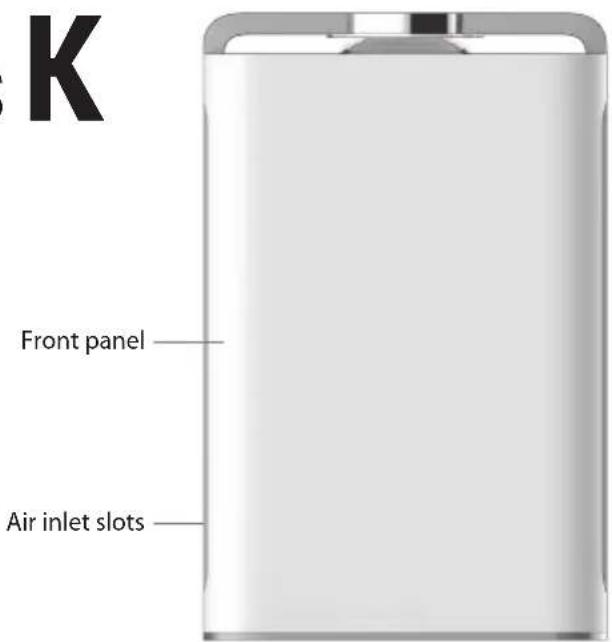
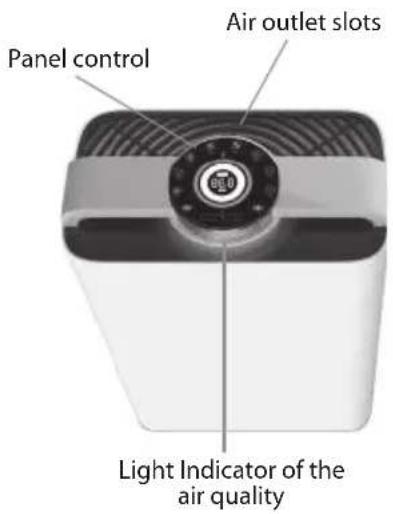
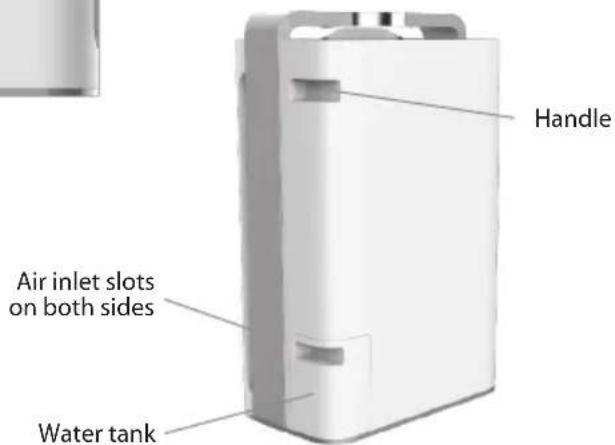
PRODUCT OVERVIEW
SERIES F
SERIES
K
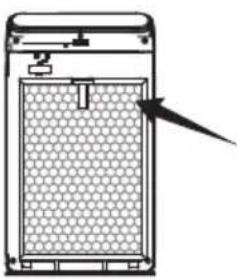
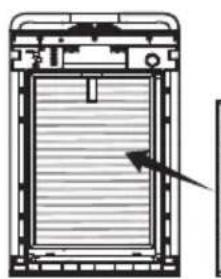
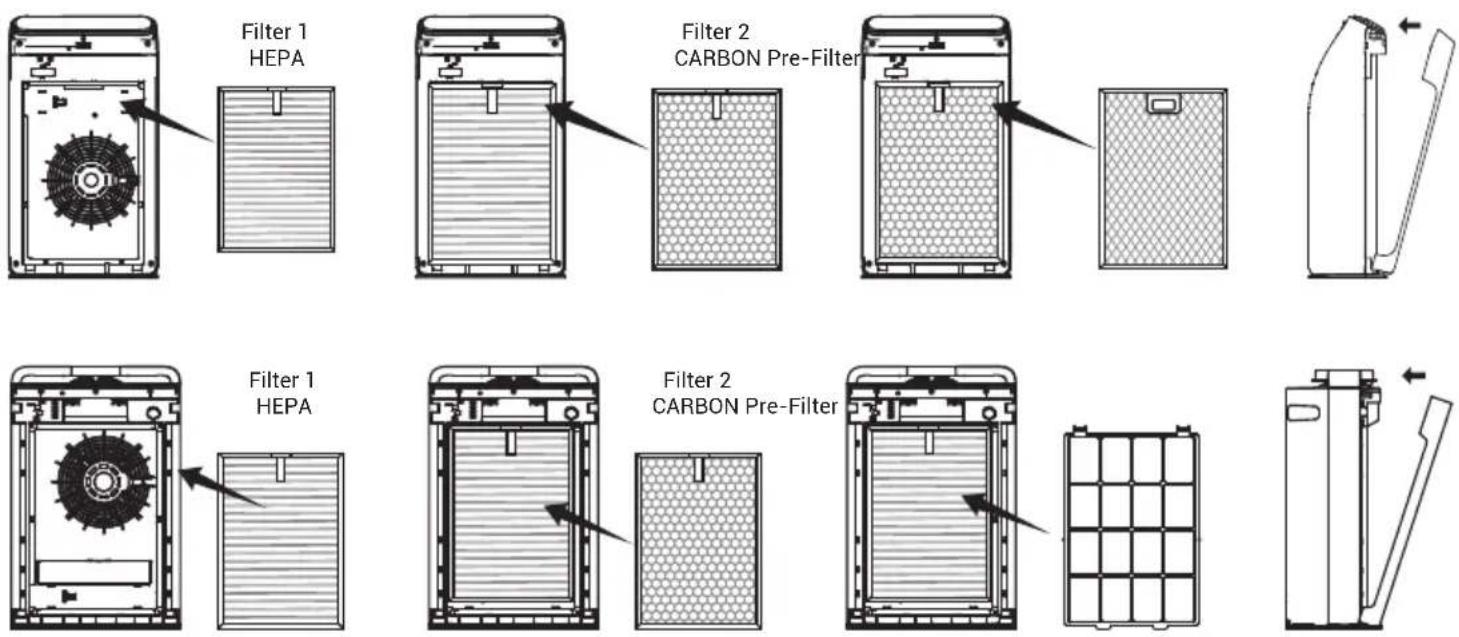
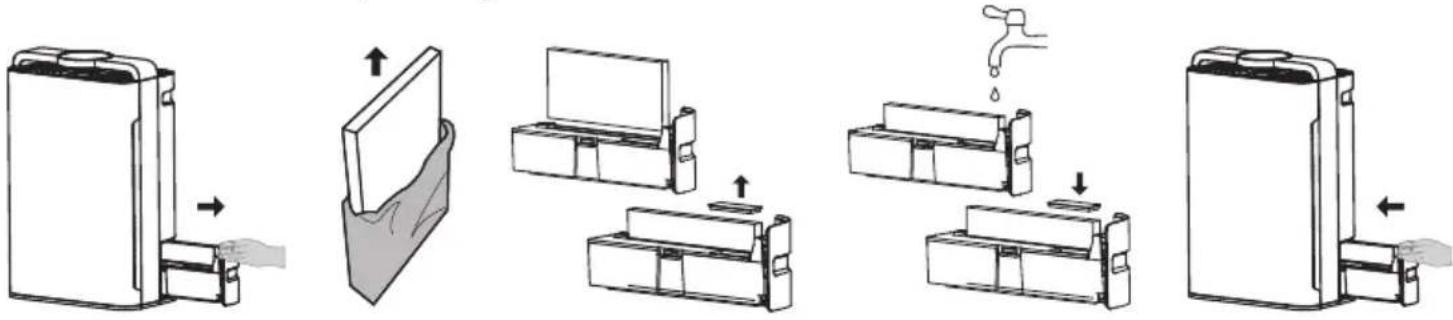
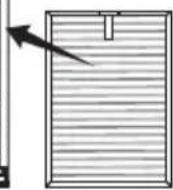
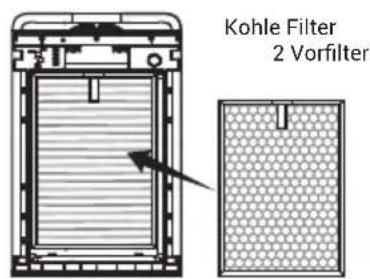
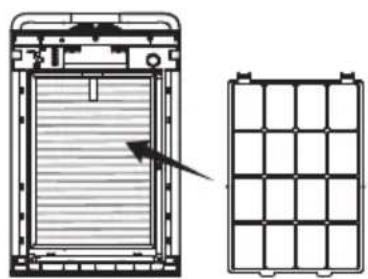
FILTER INSTALLATION
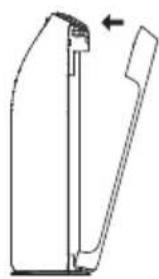
Open the device:
SERIES F
Press the middle of front panel to make the upper button out of its position.
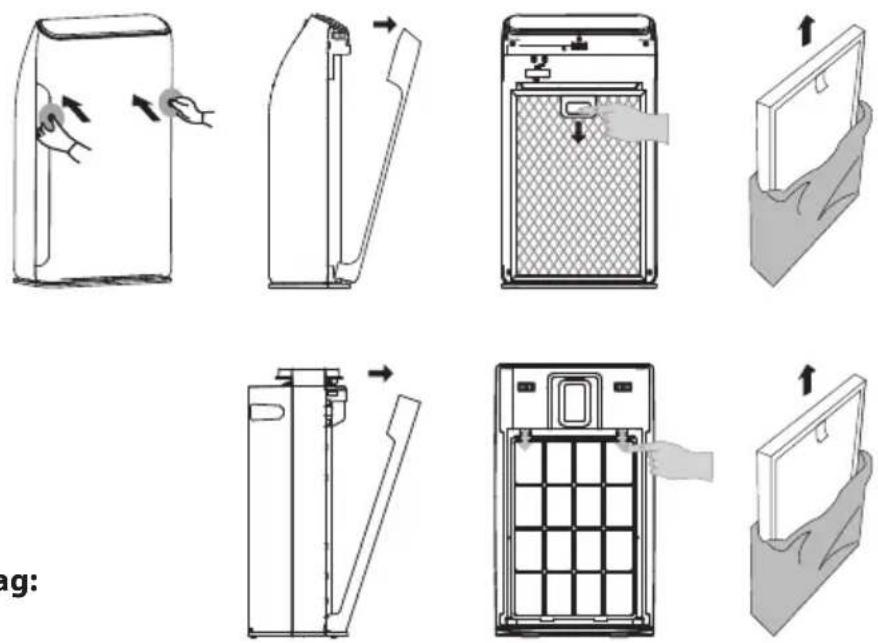
SERIES K
Pull out the front panel
Removing the filters from the plastic bag:
- Remove the front cover.
- Remove the filter.
• Take the filter out of the packaging. - Make sure to remove plastic bag off the filter before use.
Installing the filter and front cover
- There are differences between the inside and the outside of the dust filter 1 (antibacterial cotton filter and HEPA filter). Attention: The side with a handle should be placed outwards
- There are differences between the inside and the outside of the absorption filter 2 (Cellular -Activated Carbon Filter and cold catalyst filter). Attention: The side with a handle should be placed outwards
- There are differences between the inside and the outside of the front filter (pre-filter). Attention: The side with a handle should be placed outwards
• Install the front cover. Attention: The machine will not run if the front panel is uncovered.
HUMIDIFIER FUNCTIONALITY (SERIES K)
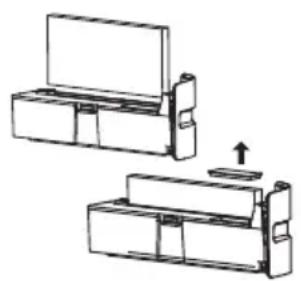
• Pull the water tank out from the side of the purifier.
- Remove the package of the humidifying filter.
- Put the humidifying filter into the water tank.
- Open the rubber lid of the inlet.
- Add about 1L cold water through the inlet, filling around 80% of the water tank.
• After adding water, close the lid.
- Push the tank back into the purifier.
• This machine has evaporative humidifying function.
- If water is added into the water tank, the machine will generate steam automatically.
The humidification effect is related to the wind speed, and it works better when the machine is operating at a higher gear. If the water level becomes low, the indicator light will flash while the machine continues working normally. If the water tank is taken out, the indicator light will stay on, and the machine will stop working.
flowchart
graph TD
    A["Device with left-hand switch"] --> B["Inserted part"]
    B --> C["Transfer to door panel"]
    C --> D["Transfer to door panel with water drop"]
    D --> E["Transfer to door panel with water drop"]
    E --> F["Transfer to door panel with water drop"]
    F --> G["Final device with right-hand switch"]
FILTER STATUS
SERIES F Please press the "Child Lock" button till the display show the filter accumulated time.
SERIES K When the machine is on, press "Reset" button and the total working time will be shown in hours on the screen. This equals a check of working time. Since the screen can only display three figures, the thousands digit will be displayed first, then hundreds, tens and single. This machine has a regular reminding function of filter replacement, which works every 320 hours and 1500 hours. After every 320 hours, the indicator light on the panel will flash to inform users to clean the filter No.1
Into APP product page there is the Total Filter Time.
REPLACING THE FILTERS
Release the front panel, referring to the Filter Installation section. Remove the front panel and remove the filters one by one.
Reinsert the new filters one by one in the correct sequence (and towards):
- Pre-filter: Clean the filter every 15 days and replace it every 2 years.
• Carbon / Catalytic Filter: Clean the filter every 60 days and replace it every 6/12 months.
• Antibacterial / HEPA filter: Clean the filter every 60 days and replace it every 6/12 months.
CLEANING AND MAINTENANCE
PRE-FILTER (every 2 weeks)
Clean the surface of the filter with a vacuum cleaner or wash with water. Allow to dry thoroughly.
CELLULAR ACTIVATED CARBON / COLD CATALYST FILTER (every 8 weeks)
Clean the dust from the front of the filter with a vacuum cleaner. Place the filter in a ventilated area, this will allow harmful gasses and germs to dissipate. Do not place under too much sun exposure. The filter is delicate. Do not press too hard on the filter while vacuuming. Do not use water to clean this filter.
ANTIBACTERIAL FILTER / HEPA (every 8 weeks)
Place the filter in a ventilated area, this will allow harmful gasses and germs to dissipate. Do not place under too much sun exposure. Do not use water to clean this filter.
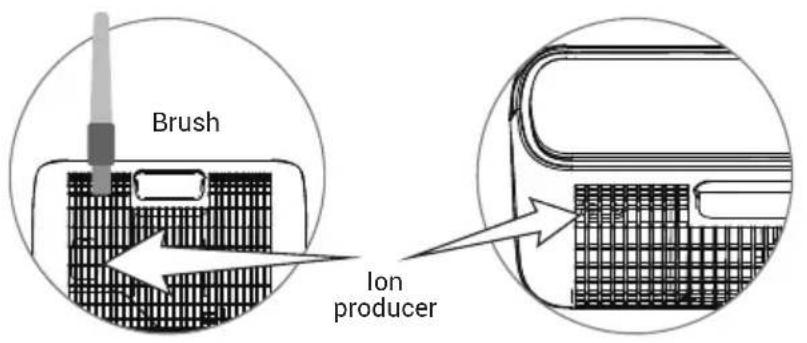
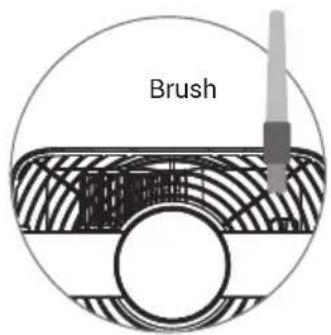
ANION PRODUCER
When you hear the machine produce a creaking sound, use a paintbrush as a cleaning tool. Insert the brush from the ventilation window above the anion emission head. Regularly clean the dust all around the emission head.
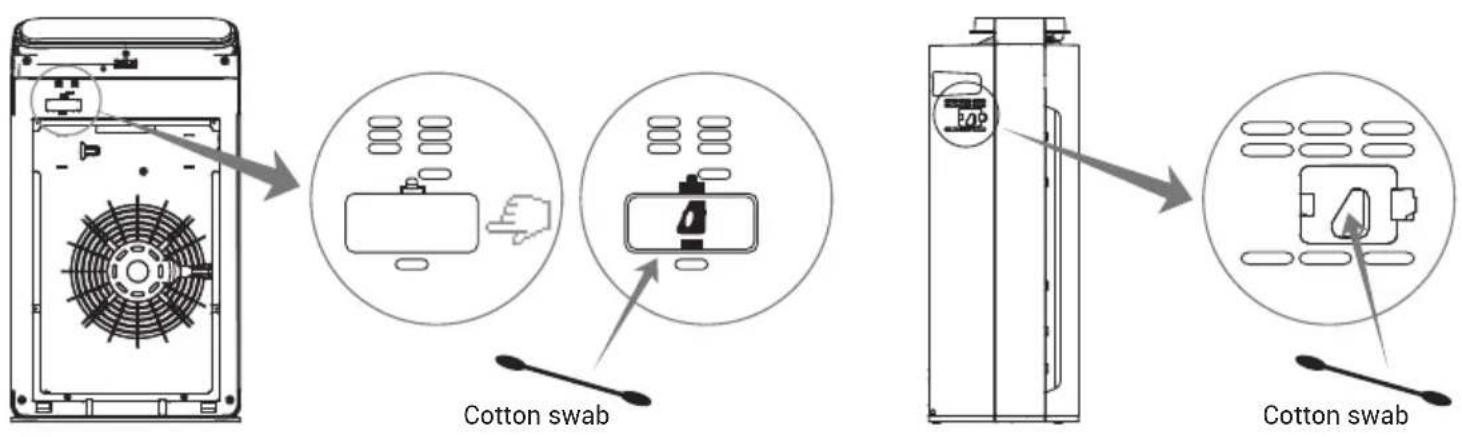
PARTICULATE SENSOR (every 8 weeks)
- Wipe the lens with a dry cotton swab periodically to remove any dirt. (Moisture or tobacco smoke residue may cause it to no longer work properly). First remove the particulate sensor cover, use a dry cotton swab to wipe the lens.
- Do not insert the cotton swab into any area other than the lens.
- Be sure to unplug the power cord.
- If you are unable to see clearly, please use a light.
FILTER CHANGE REMINDING RESET
The machine has filter change reminding function. It's set at 1500 hours. Please replace No.2 and No.3 filter when "change" icon light up. Also please press the "Child Lock" (SERIES F) or "Reset" (SERIES K) button for 5 seconds to reset this function.
TIPS
- Before cleaning and maintenance, unplug the power cord.
- Do not operate the machine in absence of a filter. It will not be able to remove the dust.
Dust taken into the machine may cause malfunction.
- When not using the machine for a long period of time, please unplug it. Power is also consumed while in standby mode.
- You may need to replace filters sooner depending on where and how you use the appliance (such as a household with a large smoking population or areas with higher air pollution).
- Replace the filter if filtration is not noticeable.
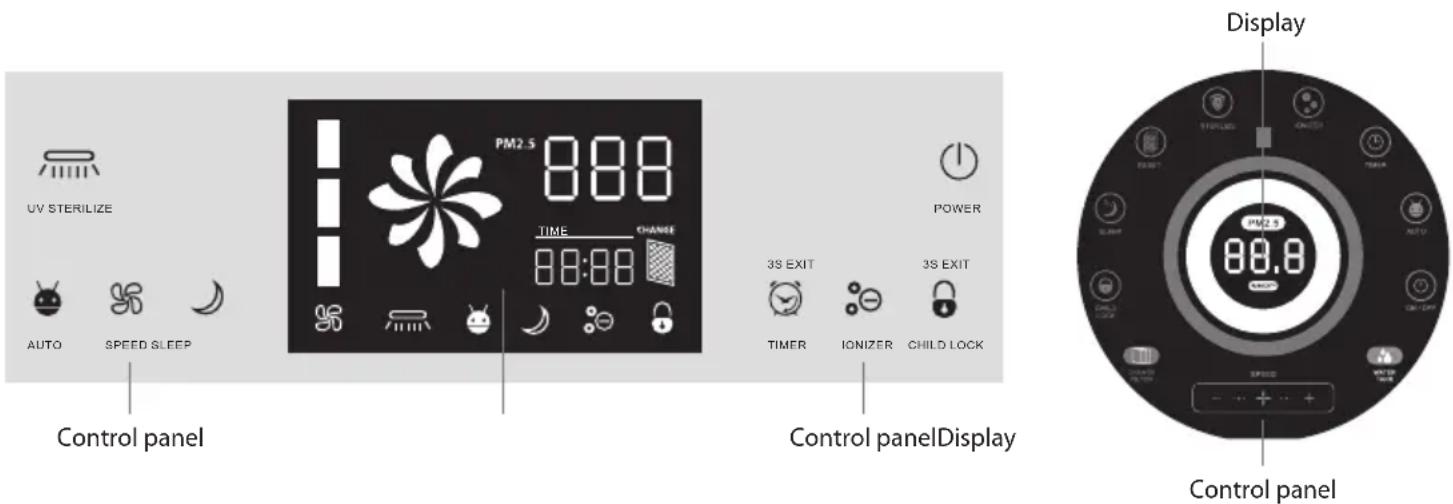
CONTROL OVERVIEW
POWER ON
Touch the "Power" button when the device is in standby mode. The device will boot. In SERIES F it will use the running mode active at shutdown (except the timer and sleep mode).

POWER OFF
If you press the power button on the operational panel while the machine is running, the device will enter into standby mode
Remark:
The machine includes a panel switch and anti fall switch. Machine won't turn on when remove panel and machine fall down.
EN
MODE AUTO
When the machine is on, after "Auto" button being touched, negative ion generator and germicidal lamp will start to work, and the gear will be changed according to sensor's data. (The icon will stay on when the machine operates in auto mode, otherwise it will be off.) Attention: If users change "Speed" under auto mode, the machine will quit this mode automatically. This mode is suitable for most situations.
MANUAL MODE
When the machine is plugged in, press "Power" button. Press "Speed" button to choose the gear, and then choose to turn on or off the negative ion generator and the UV germicidal lamp. This mode is suitable for the situations where compulsory purification is needed. The machine cannot change the gear automatically in this mode.
TIMER
When the machine is on, every touch of "Timer" button will add 1 hour (or 30 minutes) to the timing. When it accumulates to 12 hours, one more touch will turn it off. The icon will stay on when the machine operates in timing mode, otherwise it will be off. The machine will stopworking after the countdown is finished. If you need to cancel the countdown, please (SERIES K) press the button until the time displayed is accumulated to 12 hours, then one more touch will cancel this mode or (SERIES F) press for 3 seconds the button.
IONIZER
When the machine is on, pressing "lonizer" button will turn on negative ion mode, and pressing one more time will turn it off (The icon will stay on when the machine operates in negative ion mode, otherwise it will be off).
UV STERILIZE
When the machine is on, pressing "UV Sterilize" button will turn on UV sterilization mode, and pressing one more time will turn it off (The icon will stay on when the machine operates in sterilization mode, otherwise it will be off).
SLEEPING
When the machine is on, it will turn to sleeping mode 5 seconds after the "Sleep" button being pressed. In sleeping mode, all the lights turns off and the machine works at the first gear.
Press any button to wake it up and then press "Sleep" button to quit sleeping mode, or press "wind speed" button or smart button to quit after waking it up. In auto mode (SERIES K), it will turn to sleeping mode when the environment becomes dark, sensed by the photosensitive sensor.
SERIES F SERIES K

natural_image
Two identical black Android robot head icons on a light gray background (no text or symbols)
natural_image
Two clock icons: one with an alarm clock and the other with a clock (no text or symbols)
chemical
Two molecular diagrams showing electron delocalization and charge distribution
natural_image
Two abstract icons: a striped bar with vertical lines and a shield with a plus sign (no text or symbols)
natural_image
Two crescent moon symbols, one light and one dark, displayed side by side on a plain background (no text or labels)EN
CHILD-LOCK
(SERIES F) Touch the key "Child Lock". Upon release, the system will emit an acoustic signal and enter the selected mode by disabling the detection of the touch, the remote control and the App. Press the button again, for about 4 seconds, until the system emits an acoustic signal and deactivates the child mode.
(SERIES K) Touch the key "Child Lock" to activate the selected mode and press the button again, for about 5 seconds, until the icon is turned off (acoustic signal). This mode can also be inserted and removed from the APP / Remote control by tapping on the appropriate button.
SPEED
With the device on, touch the "Speed" button in the SERIES F or (+/-) in the SERIES K to increase/decrease the rotation speed of the motor. It is good to consider that the device will continue to operate at this speed always ignoring the sensor readings.

natural_image
Two black padlock icons side by side on a light gray background (no text or symbols)
natural_image
Two abstract geometric symbols: a four-blade spiral and a four-petal propeller, both on a light gray background (no text or labels)REMOTE CONTROL
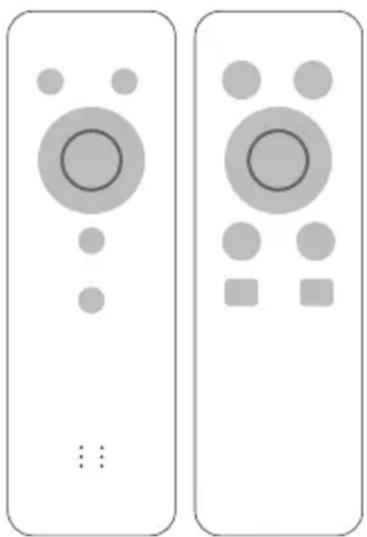
This product is provided with a remote control powered by button cells. (Please take out the cell if the remote control will not be used for long periods).
Attention: There is a one-to-one correspondence between the buttons on the remote control and the operation panel. The functions and operation methods are generally the same.
Attention: On first use, please take out the cell cover and remove the protective film of the cell, then replace the cell and its cover.
The remote control must be used pointing it at the IR receiver located on the front panel of the device no more than 4 meters away. The remote control has an opening angle of about 60^ .
Sunlight or a strongly lit room, or even the presence of obstacles between the remote control and the IR sensor of the device, can interfere with the correct operation of the remote control.
SERIES F SERIES K
natural_image
Two identical remote control devices with circular and square buttons, no text or symbols presentUSE VIA APP
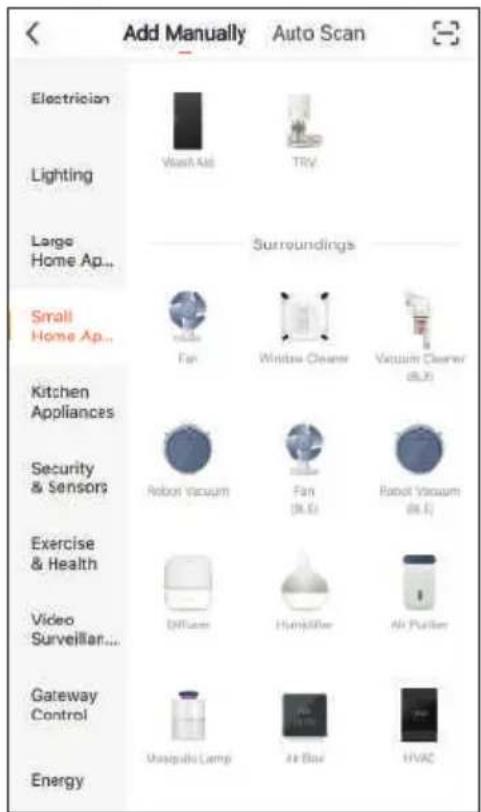
INSTALLING TUYA APP ON APPLE/ANDROID DEVICES
-
Download and install the Tuya application from the App Store or PlayStore on your iPhone/iPad/Android. Touch the App Store/PlayStore icon, then Search for Tuya Smart. The application is free
-
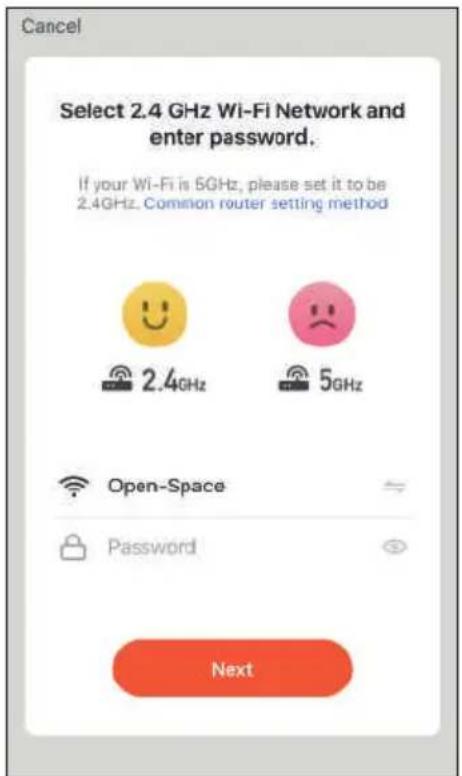
On your smartphone, tap the Settings icon, then Wi-Fi. Your smartphone will show you the network that you are currently connected to, which is the same that the Air Purifier will connect to. 5Ghz Wireless networks are not supported.
-
Launch the Tuya app. At the first start-up You need to create a new account (if this step has already been done, go immediately to the section where the controlled outlet is added). Tap on Register and accept the Privacy Policy, tapping on Agree.
-
The system will identify automatically the country/region you are in, or you may choose to select manually a country/region. Enter your email (mobile phone number) and tap Obtain Verification Code.
-
Enter the authentication code you received. Then enter the password and tap Completed to complete registration.
-
The Tuya app will display now the Home Page.
-
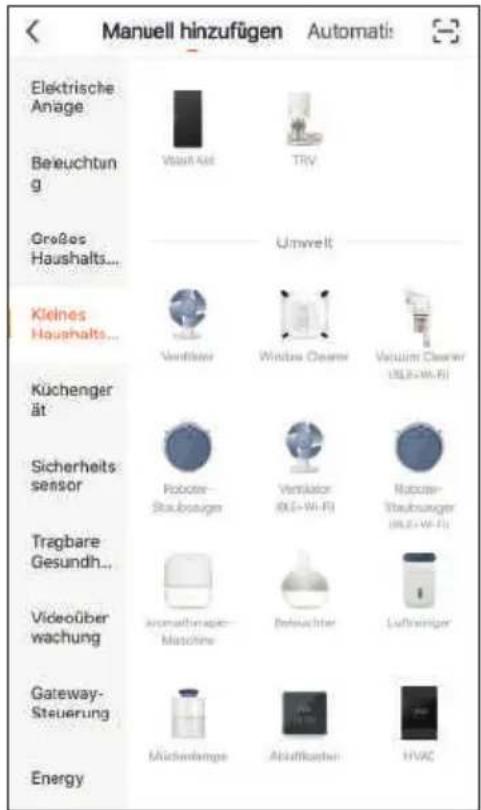
Now we will add manually a new device.
- Tap My Home then +
- Tap Small Home Device->Air Purifier.

natural_image
Red square icon with white stylized 't' and wireless signal waves (no text or symbols)

- Tuya app will show you the network that you are currently connected to, which is the same that the Air Purifier will connect to. Tap in order to select another wireless network.

pie
Cancel Adding device... Ensure that the device is powered on. | Category | Percentage (%) | |---|---| | Scan devices | 1 | | Register in Cloud | 2 | | Whether the device | 36 |
-
Enter, if not already present, the wireless network access password. Tap Next.
-
Now switch on the Air Purifier by touching the Power button. Please make sure the WiFi Led t is flashing rapidly (at a rate of twice a second) and then click the button to proceed to the next step. If this is not the case, follow these steps:
- SERIES F: Touch the lonizer icon for 5 seconds when the device is on, the WiFi Led will begin to flash - SERIES K: Turn off the device, touch the lonizer icon for 5 seconds, the WiFi LED will begin to flash. Switch on the device.
-
Select Confirm indicator rapidly blink then tap Next.
-
The app wil try to connect your device. Once finished the led bulb will turn solid white.
-
Tap in order to change the device's name and room. A simple name will make voice control easier with Alexa / Google Home.
Tap Done.
CONTROL DEVICES
-
Touch My Home 🔗 then All Devices. The app will display all the devices connected to the account
-
Touch a device (for control it).
The main screen will appear where you can find out the operating status of the device, the PM2.5 detected and the time of use of the filter (mesh work ...).
-
Touch Power in order to switch ON/OFF the Air Purifier.
-
Touch Wind Speed in order change the Fan speed.
-
Touch Function to access the advanced configuration screen where you can activate / deactivate, in order:
- The silent night mode (Sleep)
- The ionizer (Anion)
- Child lock (Lock)
- Auto Mode(Smart) mode
-
The UV lamp (UV disinfection)
-
Touch Timer to create on/off weekly schedules.

REMOVING THE DEVICE
You can remove the Air Purifier by your account following the next steps:
- APP
- My Home 🔗 tap on the device you want remove, tap the pencil then Remove Device and Confirm. The WiFi LED (F Series) starts to flash (blinking twice per second).
In the SERIES K models the APP, depending on the version, may display slightly different graphics.
PROBLEM AND SOLUTION
PROBLEM
Can not turn on or key has no response.
SOLUTION
• Is the Power cord plugged in?
Plug in the power cord.
• Is the purifier covered?
Close the front cover.
- Is the machine placed vertically on the ground?
Place themachine on a flat surface.
• Is the machine in child-lock mode?
When "Child-lock" appears on the display, hold the lock/reset button for 5 seconds to turn off the child-lock.
The air quality indicator of the device, despite the bad smell of the air, is green.
The air quality indicator is always red.
Is the purifier in a place that cannot easily absorb the dirty air (dust)?
Move it somewhere else
Is the particulate sensor dirty?
Clean the particulate sensor.
Sound during operation Is there too much dust on the anion producer?
Clean the anion producer.
The smell of the supply vent is unpleasant.
- Is the filter dirty?
Clean the filter.
- Has the filter been replaced in a long time?
Replace the filter.
Not into sleep mode automatically in the night.
Purifier in manual mode? Press "Auto" button on the control panel, make sure enter the Auto mode.
The purifier has been running for a long time but has had no significant improvement in air quality.
- Was the plastic bag on the filter removed?
Remove the plastic bag from the filter before using.
• Is the filter order incorrect?
Check the order and direction of the filters
The display shows F1 or F2. Please turn off the power immediately and contact the maintenance department.
Machine immediately goes to sleep mode.
Deactivate automatic mode.
For updates on this manual or further FAQs, consult the website www.purify-air.it/faq
natural_image
Diagram of a device with mesh pattern and an adjacent rectangular panel (no text or symbols)
natural_image
Technical line drawing of a mechanical component with an arrow indicating direction (no text or symbols)
natural_image
Technical line drawing of a mechanical device with a highlighted section and arrow (no text or symbols)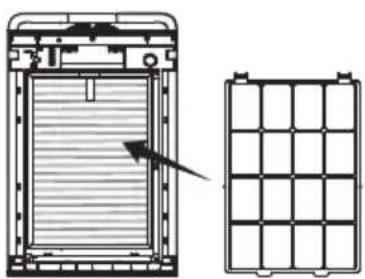
natural_image
Technical line drawing of a device with a side view showing internal structure and grid layout (no text or symbols)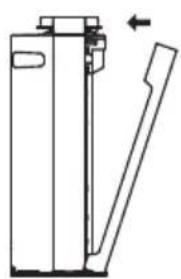
natural_image
Technical line drawing of a mechanical device with a lever and handle (no text or symbols)flowchart
graph TD
    A["Device Opening"] --> B["Transfer to Sheet"]
    B --> C["Add Volume"]
    C --> D["Ordering to Cover"]
    D --> E["Ordering to Drain"]
    E --> F["Final Discharge"]
ESTADO FILTRO
natural_image
Technical diagram of a front-mounted device showing internal fan structure and mounting points (no text or symbols)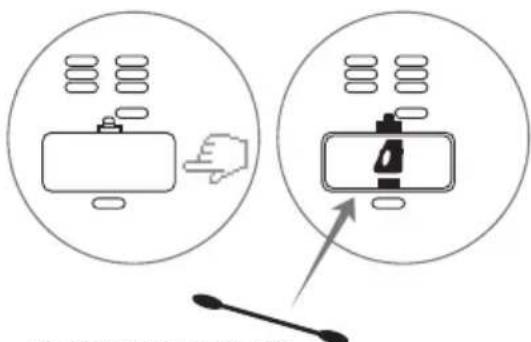
natural_image
Two identical black Android robot head icons on a light gray background (no text or symbols)
natural_image
Two clock icons: one with an alarm clock and the other with a clock (no text or symbols)
chemical
Two molecular diagrams showing electron delocalization and charge distribution
natural_image
Two abstract icons: a black dot with vertical lines and a shield with plus sign (no text or symbols)
natural_image
Two crescent moon symbols, one black and one gray, displayed side by side (no text or labels)ES
BLOQUEO PARA NIÑOS
natural_image
Two black padlock icons side by side on a light gray background (no text or symbols)
natural_image
Two abstract black-and-white geometric symbols: a four-petal flower and a four-petal propeller, both on light gray squares (no text or labels)MANDO A DISTANCIA
natural_image
Two identical remote control devices with circular and square buttons, no text or symbols visiblenatural_image
Red square icon with white stylized 't' and wireless signal waves (no text or symbols)

pie
Cancel Adding device... Ensure that the device is powered on. Scan devices. Register at Cloud Initialize the device.
DESMONTAJE DE UN DISPOSITIVO
flowchart
graph TD
    A["Handheld device"] --> B["Inserting part"]
    B --> C["Folded sheet with shaded area"]
    C --> D["Presser pressing down"]
    D --> E["Drain dropping to tap"]
    E --> F["Final container with inlet and outlet"]
ÉTAT DU FILTRE
REPLACEMENT DES FILTRES
natural_image
Two identical black Android robot head icons on white background (no text or symbols)
natural_image
Two simple clock icons: one with an alarm clock and the other with a clock (no text or symbols)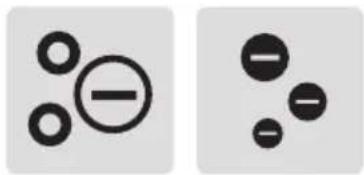
chemical
Two molecular diagrams showing electron delocalization and charge distribution
natural_image
Two icons: a droplet with vertical lines and a shield with a plus sign (no text or symbols)
natural_image
Two crescent moon symbols, one black and one gray, on a light gray background (no text or labels)VERROUILLAGE ENFANTS
natural_image
Two black padlock icons side by side on a light gray background (no text or symbols)
natural_image
Two abstract black-and-white geometric symbols: a four-petal flower and a four-petal propeller, both on a light gray background (no text or labels)TÉLÉCOMMANDE
natural_image
Two identical remote control devices with circular and square buttons, no text or symbols visibleUTILISER VIA APP
INSTALLATION DE L'APPLICATION TUYA SUR DES APPAREILS APPLE / ANDROID
natural_image
Red square icon with white stylized 't' and wireless signal waves (no text or symbols)
RETRAIT D'UN APPAREIL
natural_image
Diagram of a device with mesh pattern inside a container and adjacent to a closed lid (no text or symbols)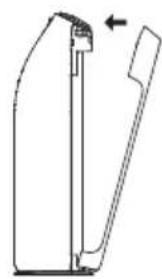
natural_image
Pure mechanical part diagram without any text, numbers, or symbols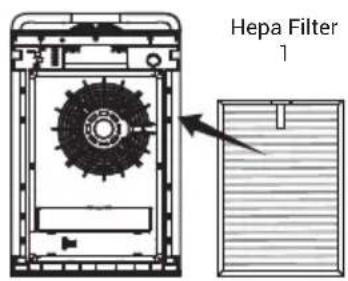
natural_image
Technical line drawing of a device with internal structure and grid layout (no text or symbols)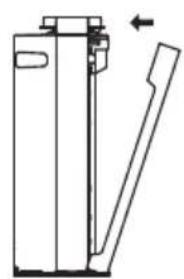
natural_image
Technical line drawing of a mechanical device with a lever and handle (no text or symbols)flowchart
graph TD
    A["Device Opening"] --> B["Transfer to Sheet"]
    B --> C["Add Volume"]
    C --> D["Ordering to Cover"]
    D --> E["Ordering to Drain"]
    E --> F["Final Discharge"]
FILTERZUSTAND
natural_image
Two identical black Android robot head icons on white background, no text or symbols present
natural_image
Two clock icons: one with an alarm clock and the other with a clock (no text or symbols)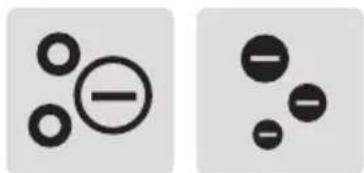
chemical
Two molecular orbital diagrams showing electron density distributions with negative charges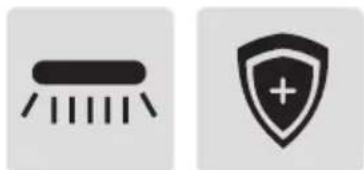
natural_image
Two icons: a droplet with vertical lines and a shield with a plus sign (no text or symbols)
natural_image
Two crescent moon symbols, one black and one gray, displayed side by side (no text or labels)DE
natural_image
Two identical padlock icons, one open and one closed, on a plain background (no text or symbols)
natural_image
Two abstract geometric symbols: a four-blade spiral and a four-petal flower-like shape, both on a light gray background (no text or labels)FERNBEDIENUNG
natural_image
Two identical remote control devices with circular and square buttons, no text or symbols presentVERWENDEN SIE ÜBER APP
INSTALLIEREN DER TUYA APP AUF APPLE / ANDROID-GERÄTEN
natural_image
Red square icon with white stylized 't' and wireless signal waves (no text or symbols)

pie
Cancel Adding device... Ensure that the device is powered on. | Category | Percentage (%) | |---|---| | Scan devices | 1 | | Register in Cloud | 2 | | Initialize the device | 36 |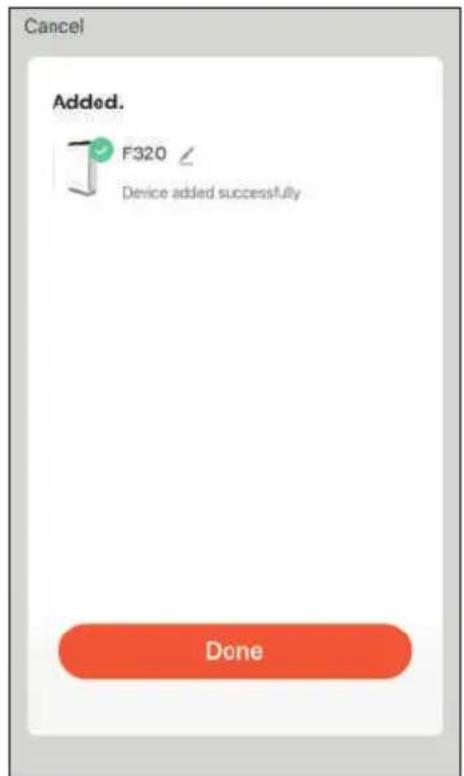
ENTFERNEN DES GERÄTS AUS DEM KONTO
natural_image
Technical line drawing of a mechanical component with an arrow indicating direction (no text or symbols)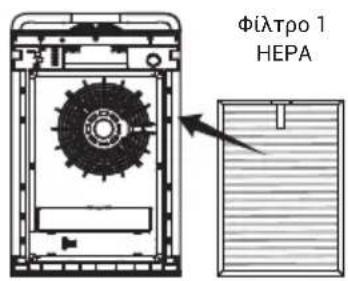
natural_image
Technical line drawing of a mechanical device with a lever and handle (no text or symbols)natural_image
Diagram of a device with a hand pressing a button, showing no text or symbols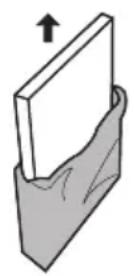
natural_image
Diagram showing two mechanical assembly steps with a monitor and base components, no text or symbols present.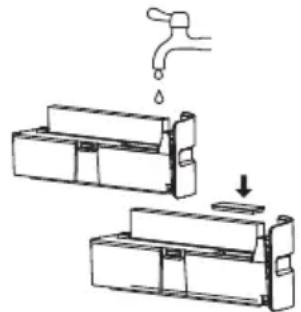
natural_image
Diagram showing a faucet pouring liquid into two storage compartments, with one dropping and the other holding a small container (no text or symbols present)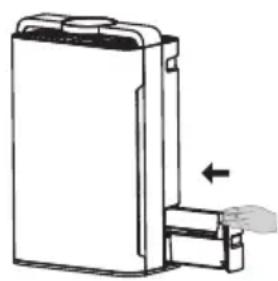
natural_image
Diagram of a mechanical device with a handle and arrow indicating movement (no text or symbols)ΚΑΤΑΣΤΑΣΗ ΦΙΛΤΡΟΥ
natural_image
Two identical black Android robot head icons on white background, no text or symbols present
natural_image
Two clock icons: one with an alarm clock and the other with a clock face (no text or symbols)
chemical
Two molecular diagrams showing electron delocalization and charge distribution
natural_image
Two icons: a black dot with vertical lines and a shield with a plus sign (no text or symbols)
natural_image
Two crescent moon symbols, one black and one gray, side by side (no text or labels)GR
natural_image
Two black padlock icons side by side on a light gray background (no text or symbols)
natural_image
Two abstract geometric symbols: a four-petal flower-like form and a four-petal propeller-like shape, both on a plain background (no text or labels)THΛΕΧΕΙΡΙΣΤΗΡΙΟ
natural_image
Two identical remote control devices with circular and square buttons, no text or symbols presentΧΡΗΣΗ ΙΛΑ ΑΡΡ
natural_image
Red square icon with white stylized 't' and wireless signal waves (no text or symbols)

pie
Cancel Adding device... Ensure that the device is powered on. | Category | Percentage (%) | |---|---| | Scan devices | 1 | | Register in Cloud | 2 | | Whether the device | 36 |