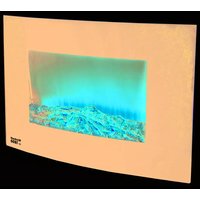
EF 1800 - Fireplace EINHELL - Free user manual and instructions
Find the device manual for free EF 1800 EINHELL in PDF.


| Product Type | Electric Fireplace |
| Brand | Einhell |
| Model | EF 1800 |
| Dimensions (W x H x D) | 88 x 56 x 15 cm |
| Power Supply | 220-240 V ~ 50 Hz |
| Maximum Heating Power | 1800 W |
| Protection Class | I |
| Ingress Protection Rating | IP X0 |
| Main Functions | Flame effect, heating 900/1800 W, thermostat (15-35 °C), daily/weekly timer programming, remote control |
| Installation Type | Wall-mounted only |
| Minimum Safety Distances | Sides 20 cm, ceiling 100 cm, floor 60 cm, front 100 cm |
| Safety | Overheat protection, open window function, automatic shutdown |
| Maintenance and Cleaning | Clean with a damp cloth, no solvents; glass with glass cleaner |
| Spare Parts and Repairability | Repairs must be carried out by a qualified professional |
| Remote Control Battery | CR2025 |
Frequently Asked Questions - EF 1800 EINHELL
User questions about EF 1800 EINHELL
0 question about this device. Answer the ones you know or ask your own.
Ask a new question about this device
Download the instructions for your Fireplace in PDF format for free! Find your manual EF 1800 - EINHELL and take your electronic device back in hand. On this page are published all the documents necessary for the use of your device. EF 1800 by EINHELL.
USER MANUAL EF 1800 EINHELL
GB Original operating instructions Electric fi replace
This product is only suitable for well insulated spaces or occasional use.
natural_image
Line drawing of a battery pack with a circular component and a clip, no text or symbols present

-4-
D

Danger! - Read the operating instructions to reduce the risk of injury
GB
Danger!
When using the equipment, a few safety precautions must be observed to avoid injuries and damage. Please read the complete operating instructions and safety regulations with due care. Keep this manual in a safe place, so that the information is available at all times. If you give the equipment to any other person, hand over these operating instructions and safety regulations as well. We cannot accept any liability for damage or accidents which arise due to a failure to follow these instructions and the safety instructions.
1. Safety regulations
Danger!
Read all safety regulations and instructions.
Any errors made in following the safety regulations and instructions may result in an electric shock, fi re and/or serious injury.
Keep all safety regulations and instructions in a safe place for future use.
- Check that the equipment has been delivered in perfect condition. If it has suffered any damage, do not connect the equipment to the power supply.
- Position the power cable so that there is no danger of tripping over it.
- Do not pass the power cable over hot parts of the equipment during operation.
- Never use the power cable to pull the power plug out of the socket-outlet! Never use the power cable to carry the equipment or try to move the equipment by pulling the power cable.
- Never wind the power cable around the fan heater.
- Never jam the power cable between objects or pull the cable over sharp edges or position the cable over hot plates or open flames.
- Use the equipment in enclosed, dry areas only.
- Do not use this heater in the immediate vicinity of a bath, shower or swimming pool.
- Do not use the heater in a bathroom.
- Never immerse the equipment in water – danger of fatal accident!
• Never use the equipment with wet hands. - Never open the appliance or touch live parts – danger of fatal accident!
-
Position the equipment in such a way that the power plug is accessible at all times.
-
If the equipment is not used for a lengthy period of time, disconnect it from the power supply!
- Do not position the equipment directly below a socket.
- If the equipment is used for a lengthy time, the housing can become very hot. Position the equipment in such a way as to prevent accidental touching.
- Do not use the equipment in rooms in which inflammable materials (for example solvents, etc.) or gases are used or stored.
- Keep highly inflammable substances and gases away from the equipment.
- Do not use in areas where there is a fire risk (for example wooden sheds).
- Only use the heater with its power lead fully extended.
- Do not insert any foreign objects in the equipment's openings – danger of electric shock and damage to the equipment.
- Keep children and people on medication or under the influence of alcohol away from the equipment.
- Warning: Do not cover the heater. If you fail to observe this point, the heater may suffer from overheating. Risk of fire! Pay attention to the symbol on the equipment (Fig. 10).
- Maintenance and repair work may only be carried out by authorized trained personnel.
- Check the power cable at regular intervals for signs of defects or damage. A damaged power cable may be replaced only by an electrician or ISC GmbH in compliance with the relevant regulations.
- For electrical safety purposes we recommend that you install a residual current device circuit-breaker (RCD).
- Connect the equipment to an earthed socket outlet only.
- It must be impossible for the control elements to be touched by a person in a shower, in a vessel filled with liquid or in a bathtub.
- Children younger than 3 years must be kept away unless they are continuously supervised.
- Children of 3 years and younger than 8 years are allowed to use the equipment only if they are supervised or have received instruction in how to use the equipment safely and understand the dangers which result from such use, provided that the equipment is positioned or installed in its normal place of use. Children of 3 years and younger than 8 years are not allowed to insert the plug into
GB
the socket, regulate the equipment, clean the equipment and/or perform the maintenance which a user is expected to perform.
- This equipment can be used by children of 8 years and older and by people with limited physical, sensory or mental capacities or those with no experience and knowledge if they are supervised or have received instruction in how to use the equipment safely and understand the dangers which result from such use. Children are not allowed to play with the equipment. Unless supervised, children are not allowed to clean the equipment or carry out user-level maintenance work.
- Caution – Some parts of the product can become very hot and cause burns. Special care is required when children and persons in need of protection are present.
2. Layout and items supplied
2.1 Layout (Fig. 1)
1 Glass front panel
2 Hearth - decorative element
3 Air outlet and heating element
4 Operating elements
5 Main switch
6 Remote control (incl. battery CR 2025)
2.2 Items supplied (Fig. 2)
Please check that the article is complete as specified in the scope of delivery. If parts are missing, please contact our service center or the sales outlet where you made your purchase at the latest within 5 working days after purchasing the product and upon presentation of a valid bill of purchase. Also, refer to the warranty table in the service information at the end of the operating instructions.
- Open the packaging and take out the equipment with care.
- Remove the packaging material and any packaging and/or transportation braces (if available).
- Check to see if all items are supplied.
- Inspect the equipment and accessories for transport damage.
- If possible, please keep the packaging until the end of the guarantee period.
Danger!
The equipment and packaging material are not toys. Do not let children play with plastic bags, foils or small parts. There is a danger of swallowing or suffocating!
10 Heater
11 Wall bracket for the top
12 Fixing bracket
13 Dowel ∅ 6 mm (6x)
14 Screw 4x30 mm (6x)
15 Screw 4x8 mm (2x)
• Original operating instructions
3. Proper use
The equipment is designed exclusively for use as an additional heater in dry, closed rooms. The equipment is allowed to be mounted only on a wall. Never mount the equipment on a wall which is not capable of bearing the load or which is combustible, on angled surfaces, or on the ceiling.
The equipment is to be used only for its prescribed purpose. Any other use is deemed to be a case of misuse. The user / operator and not the manufacturer will be liable for any damage or injuries of any kind caused as a result of this.
Please note that our equipment has not been designed for use in commercial, trade or industrial applications. Our warranty will be voided if the machine is used in commercial, trade or industrial businesses or for equivalent purposes.
4. Technical data
Rated voltage: 220-240 V \~ 50 Hz
Max. heat rating 1800 W
Protection class: ....
Protection type: IP X0
Equipment dimensions: 88 x 56 x 15 cm
GB
5. Before starting the equipment
Before you connect the equipment to the mains supply make sure that the data on the rating plate are identical to the mains data.
5.1 Wall-mounting
Caution!
In order to avoid breaking the glass, remove the glass front panel from the equipment and only fit it back in place again at the end.
The minimum clearances must be observed. The equipment is allowed to be used only when it is completely assembled and in a vertical position.
(Fig. 3) Ensure that a minimum clearance of 20 cm to the sides, 100 cm to the ceiling, 60 cm to the floor and 100 cm to the front of the housing are maintained. Observe point 1 - Safety information.
Caution! Make sure that there are no electric cables or other installations (for example water pipes) near the drill holes. Ensure that the equipment is secured firmly and horizontally to the wall. Use only suitable fastening material on a wall capable of bearing the load. The supplied dowels and screws are suitable for the following: Concrete, natural stone with a dense structure, solid brick, solid limestone bricks, solid lightweight concrete bricks and aerated concrete.
- Fig. 4: Mark the positions of the four drill holes for the top wall bracket (11) horizontally on a wall capable of bearing the load. The drill holes are arranged 150 mm apart.
- Then drill four holes ( 6 mm) in the wall and insert the dowels (Fig. 2/Item 13). Place the holes in the top wall bracket (Fig. 4/Item 11) over the drill holes and secure the wall bracket using 4 screws 4x30 mm (Item 14). Ensure that the hooks on the wall bracket point upwards (Fig. 4).
- Fig. 5: Fit the fi xing bracket (12) using two 4x8 mm screws (Fig. 2/Item 15) to the middle on the underside of the heater housing.
- Fig. 6: Hang the housing on the wall bracket. Ensure that the hooks on the wall bracket latch into the holes in the housing (A).
-
Fig. 5: Transfer the holes (B) in the fixing bracket (12) to the wall and remove the heater housing again.
-
Drill two holes ( 6 mm) in the wall, insert the dowels (Fig. 2/Item 13) and hang the housing on the top wall bracket again (Fig. 6). Ensure that the hooks latch into the holes in the housing (A).
- Fig. 5: Secure the fi xing bracket using two 4x30 mm screws (Fig. 2/Item 14) to the wall.
- Fig. 7: Arrange another person to help you and hang the glass front panel (1) in the slots (C) provided on the housing by the hooks provided on the side of the glass front panel.
5.2 Remote control
Note: All modes and functions can be set using the buttons on the appliance as well as with the remote control. The remote control requires a CR 2025 button cell (included in the remote control). Pull the contact protection (small plastic plates) out of the housing before use.
Important! It may take a few seconds for the equipment to react when you press the buttons on the remote control. Do not press the buttons on the remote control repeatedly within 2 seconds.
- Never use a battery type other than the specified one.
- If the remote control is not used for a lengthy period of time, remove the battery to prevent it leaking.
- Point the remote control towards the heater. The range is max. 5 meters.
- Direct sunlight and objects can considerably reduce the range of the remote control.
- Handle the remote control with care. Do not drop it and keep it away from heat and moisture.
Inserting the battery (Fig. 8):
- Open the battery compartment cover by pressing the lock (F) towards the middle and pulling the battery compartment out at the same time.
- Make sure you fit the battery with the + and - terminals correctly positioned as shown on the housing.
- Press the battery compartment cover into the remote control.
As the end user you are legally required to return spent batteries. You can hand them in at public collection points provided by your council or sales outlets where batteries of this type are sold. Observe the instructions in section 11 as well.
GB
6. Operation
Note: Every press of a button is confirmed by a short audio signal.
Read the safety regulations in section 1.
When the equipment is used for the first time or after a long period of rest, it may emit an odor for a short time. This is not a fault.
6.1 Switching the mains voltage on/off (Fig. 1)
The main switch (5) disconnects the equipment completely from the mains power supply. The first step when you want to use the equipment is to turn on ("I") the main switch; the last step when you no longer need the equipment is to turn off ("0") the main switch.
6.2 Switching the equipment on and off (Fig. 9)
Press the "Power" button (D). The equipment comes on and the flame effect and display will be activated. To switch off, press the "Power" button (D) again. The flame effect and display will go out.
6.3 Switching the dimmer function on and off (Fig. 9)
Press the "Flame" button (E). The brightness of the flame effect, for which there are 5 settings, can be adjusted by pressing the button several times.
6.4 Temperature indicator in °C/°F (Fig. 9)
Note: Only selectable on the equipment. The temperature can be displayed in either °C or °F. To switch from one to the other, press the "DOWN" button for 5 seconds.
6.5 Setting the desired temperature (Fig. 9)
Note: The desired temperature to be set corresponds to the equipment temperature measured on the integrated temperature sensor and shown on the display. This may vary slightly from the actual room temperature. If the temperature exceeds the set desired temperature, the heating function switches off. If the temperature falls below the set desired temperature, the heating function switches on again.
6.5.1 Adjusting the setting on the equipment (Fig. 9)
Press the "UP" button to start the temperature setting function (15°C – 35°C or 59°F – 95°F). Then press the "UP" or "DOWN" buttons to adjust the temperature setting. The temperature will be increased or decreased by 1°C each time.
6.5.2 Adjusting the setting using the remote control (Fig. 9)
Press the "F" button to start the temperature setting function (15°C – 35°C or 59°F – 95°F). The temperature will be increased by 1°C with each press of the button and starts again at 15°C when 35°C has been reached.
6.6 Switching the heating function on and off (Fig. 9)
With the heater switched on, press the "Heater" button (H) until the "Heat 1" LED for 900 W heat output appears. If you press the "Heater" button (H) again, the "Heat 2" LED for 1800 W heat output appears. Pressing the "Heater" button (H) again switches the heat output off.
6.7 Programming the automatic timer for switching on and off (Fig. 9)
Note:
- Switch on the appliance as previously described.
- One switch ON time and one switch OFF time can be set for each day. Think in advance about when you want the equipment to switch on and off and make a note of those times.
- Programming the switch ON time: A small LED next to the "10 minutes display" (e.g. 10:5.1) appears.
- Programming the switch OFF time: A small LED next to the "Minutes display" (e.g. 10:51.) appears.
- The display flashes for 5 seconds for all settings. Settings can be made during this time. If no button is pressed for 5 seconds the current setting will be saved automatically.
6.7.1 Programming days on the equipment or using the remote control (Fig. 9)
Switch ON time
- Press the "TIMER" or "7" button once. The "Mon" LED and the hours display will flash
- Press the "UP" (K) or "DOWN" (L) buttons and set the switch ON time for Monday in hours.
- Press the "TIMER" or "24H" button and use the "UP" (K) and "DOWN" (L) buttons to set
GB
the switch ON time for Monday in minutes.
Switch OFF time
- Press the "TIMER" or "7" button again within 5 seconds. The "Mon" LED and the hours display will flash.
- Press "UP" (K) or "DOWN" (L) to set the switch OFF time for Monday in hours.
- Press the "TIMER" or "24H" button and use "UP" (K) and "DOWN" (L) to set the switch OFF time for Monday in minutes.
Press the "TIMER" or "7" button again to program Tuesday. Repeat these programming steps for all the other days of the week.
To skip a day of the week (e.g. Tuesday) when you are programming, press the "TIMER" or "7" button as often as necessary until the next day you want to program (e.g. Wednesday) appears.
6.7.2 Programming weeks using the remote control (Fig. 9)
Note: In addition to programming days as described above, you can also program the switch ON and OFF times on a weekly basis as well using the remote control.
Programming the hour switch ON time (Fig. 9)
- Press the "7" button. The "Mon" LED and the hours display will flash.
- Press the "UP" (K) or "DOWN" (L) buttons to set the switch ON time for Monday in hours.
- Press the "7" button again. Program Tuesday.
- Repeat these programming steps for the other days of the week.
- Once all the days of the week have been programmed, the current setting will be saved automatically after 5 seconds (do not press any of the buttons).
Programming the minutes switch ON time (Fig. 9)
- Press the "7" button and then "24H". The "Mon" LED and the minutes display will flash.
- Press the "UP" (K) or "DOWN" (L) buttons to set the switch ON time for Monday in minutes.
- Press the "7" button again and then "24H". Program Tuesday.
- Repeat these programming steps for the other days of the week.
- Once all the days of the week have been programmed, the current setting will be saved automatically after 5 seconds (do not press
any of the buttons).
Programming the hour switch OFF time (Fig. 9)
- Press the "7" button and then press the "24H" button twice. The "Mon" LED and the hours display will flash.
- Press the "UP" (K) or "DOWN" (L) buttons to set the switch OFF time for Monday in hours.
- Press the "7" button again and then press "24H" twice. Program Tuesday.
- Repeat these programming steps for the other days of the week.
- Once all the days of the week have been programmed, the current setting will be saved automatically after 5 seconds (do not press any of the buttons).
Programming the minutes switch OFF time (Fig. 9)
- Press the "7" button and then press the "24H" button three times. The "Mon" LED and the minutes display will flash.
- Press the "UP" (K) or "DOWN" (L) buttons to set the switch OFF time for Monday in minutes.
- Press the "7" button again and then press "24H" three times. Program Tuesday.
- Repeat these programming steps for the other days of the week.
- Once all the days of the week have been programmed, the current setting will be saved automatically after 5 seconds (do not press any of the buttons).
6.8 Setting the current time (Fig. 9)
Note: This can only be set on the equipment. If no button is pressed for 5 seconds the current setting will be saved automatically.
- Switch off the heater with the "POWER" button (D).
- Press the "TIMER" button for 3 seconds. The hours display will flash for 5 seconds.
- Use the "UP" and "DOWN" buttons to set the current hour.
- Press the "TIMER" button; the minutes display will flash for 5 seconds.
- Use the "UP" and "DOWN" buttons to set the current minutes.
- Press the “TIMER” as often as necessary until the LED for the current day of the week appears. The hours and minutes displays flash alternately during this time.
GB
6.9 Activating the automatic timer (Fig. 9)
Switch off the equipment with the "POWER" button (D). The equipment will switch on at the next switching point with the last heating function, desired temperature and flame effect to have been set.
6.10 "Windows open" function
If the temperature drops by 5^ C within 10 minutes while the heating function is switched on, a signal will sound for several seconds and the heating function will switch off.
6.11 Overheating protection
In case of excessive heating, the heat output or the equipment will shut down automatically. In this case switch off the equipment completely and unplug it from the mains power. Allow the appliance to cool for about 15 minutes. After eliminating the cause (e.g. a covered air grille), the equipment can be switched on again as described above. If the overheating guard triggers repeatedly or the equipment cannot be switched on, please contact your customer services workshop.
7. Replacing the power cable
Danger!
If the power cable for this equipment is damaged, it must be replaced by the manufacturer or its after-sales service or similarly trained personnel to avoid danger.
8. Cleaning, maintenance and ordering of spare parts
Danger!
Always pull out the mains power plug before starting any cleaning work.
The equipment must have cooled down.
8.1 Cleaning
- Keep all safety devices, air vents and the motor housing free of dirt and dust as far as possible.
- Remove dust with a vacuum cleaner.
- Clean the equipment regularly with a damp cloth. Do not use cleaning agents or solvents; these may be aggressive to the plastic parts in the equipment. Ensure that no water can
get into the interior of the equipment. The ingress of water into an electric power tool increases the risk of an electric shock.
- The glass front can be cleaned with a conventional glass cleaning agent.
8.2 Maintenance
There are no parts inside the equipment which require additional maintenance.
Heating elements or the LEDs used for the flame effect may only be replaced by a qualified electrician or by the customer service authorized by Einhell in compliance with the relevant regulations.
8.3 Ordering replacement parts:
Please quote the following data when ordering replacement parts:
• Type of machine
• Article number of the machine
• Identification number of the machine
- Replacement part number of the part required For our latest prices and information please go to www.isc-gmbh.info
9. Disposal and recycling
The equipment is supplied in packaging to prevent it from being damaged in transit. The raw materials in this packaging can be reused or recycled. The equipment and its accessories are made of various types of material, such as metal and plastic. Never place defective equipment in your household refuse. The equipment should be taken to a suitable collection center for proper disposal. If you do not know the whereabouts of such a collection point, you should ask in your local council offices.
10. Storage
Store the equipment and accessories in a dark and dry place at above freezing temperature. The ideal storage temperature is between 5 and 30 °C. Store the electric tool in its original packaging.
GB
11. Disposing of batteries
Batteries contain materials that are harmful to the environment. Never place batteries in your household refuse, in fi re or in water. Batteries should be collected, recycled or disposed of by environment-friendly means. Send your old batteries to iSC GmbH, Eschenstrasse 6 in D-94405 Landau. You can then be sure that the equipment will be correctly disposed of by the manufacturer.
GB
12. Troubleshooting
If the equipment is operated properly you should experience no problems with malfunctions or faults. In the event of any malfunctions or faults, please check the following before you contact your customer services.
| Problem Possible cause Remedy | ||
| The equipment does not heat | The power plug is not connected | Connect the power plug |
| The main switch is not turned on | Turn on the main switch | |
| Equipment in standby | Press the “Power” button | |
| Heat output switched off | Adjust the heat output | |
| The thermostat is set too low | Increase the temperature | |
| “Timer” has switched off the equipment | Change the selected time | |
| Remote control does not work | Battery discharged | Replace the battery |
| Remote control beyond range | Reduce the distance to the heater | |
| Direct sunlight on the heater | Reduce the sunlight (provide shading) | |
13. Information requirements for electric local space heaters
| Model identifier(s): EF 1800 | ||||||
| Item Symbol Value Unit Item Unit | ||||||
| Heat output | Type of heat input, for electric storage local space heaters only (select one) | |||||
| Nominal heat output | P_nom | 1,8 kW | manual | heat charge control, with integrated thermostat - | ||
| Minimum heat output (indicative) | P_min | 0,9 kW | manual heat charge control with room and/or outdoor temperature feedback | - | ||
| Maximum continuous heat output | P_max.c | 1,8 kW | electronic heat charge control with room and/or outdoor temperature feedback | - | ||
| Auxiliary electricity consumption | fan assisted heat output - | |||||
| At nominal heat output | eI_max | 1,681 kW | Type of heat output/room temperature control (select one) | |||
| At minimum heat output | eI_min | 0,870 kW | single stage heat output and no room tempera-ture control | no | ||
| In standby mode | eI_s8 | 0,000 kW | Two or more manual stages, no room tempera-ture control | no | ||
| with mechanic thermostat room temperature control | no | |||||
| with electronic room temperature control no | ||||||
| electronic room temperature control plus day timer | no | |||||
| electronic room temperature control plus week timer | yes | |||||
| Other control options (multiple selections possible) | ||||||
| room temperature control, with presence detection | no | |||||
| room temperature control, with open window detection | yes | |||||
| with distance control option yes | ||||||
| with adaptive start control | no | |||||
| with working time limitation | no | |||||
| with black bulb sensor | no | |||||
| Contact details | ISC GmbH, Eschenstr. 6, D-94405 Landau/Isar | |||||
GB

For EU countries only
Never place any electric power tools in your household refuse.
To comply with European Directive 2012/19/EC concerning old electric and electronic equipment and its implementation in national laws, old electric power tools have to be separated from other waste and disposed of in an environment-friendly fashion, e.g. by taking to a recycling depot.
Recycling alternative to the return request:
As an alternative to returning the equipment to the manufacturer, the owner of the electrical equipment must make sure that the equipment is properly disposed of if he no longer wants to keep the equipment. The old equipment can be returned to a suitable collection point that will dispose of the equipment in accordance with the national recycling and waste disposal regulations. This does not apply to any accessories or aids without electrical components supplied with the old equipment.
The reprinting or reproduction by any other means, in whole or in part, of documentation and papers accompanying products is permitted only with the express consent of the iSC GmbH.
Subject to technical changes
GB
Service information
We have competent service partners in all countries named on the guarantee certificate whose contact details can also be found on the guarantee certificate. These partners will help you with all service requests such as repairs, spare and wearing part orders or the purchase of consumables.
Please note that the following parts of this product are subject to normal or natural wear and that the following parts are therefore also required for use as consumables.
| Category Example | |
| Wear parts* Batteries | |
| Consumables* | |
| Missing parts |
* Not necessarily included in the scope of delivery!
In the effect of defects or faults, please register the problem on the internet at www.isc-gmbh.info. Please ensure that you provide a precise description of the problem and answer the following questions in all cases:
• Did the equipment work at all or was it defective from the beginning?
• Did you notice anything (symptom or defect) prior to the failure?
• What malfunction does the equipment have in your opinion (main symptom)?
Describe this malfunction.
GB
Warranty certifi cate
Dear Customer,
All of our products undergo strict quality checks to ensure that they reach you in perfect condition. In the unlikely event that your device develops a fault, please contact our service department at the address shown on this guarantee card. You can also contact us by telephone using the service number shown. Please note the following terms under which guarantee claims can be made:
- These guarantee terms apply to consumers only, i.e. natural persons intending to use this product neither for their commercial activities nor for any other self-employed activities. These warranty terms regulate additional warranty services, which the manufacturer mentioned below promises to buyers of its new products in addition to their statutory rights of guarantee. Your statutory guarantee claims are not affected by this guarantee. Our guarantee is free of charge to you.
- The warranty services cover only defects due to material or manufacturing faults on a product which you have bought from the manufacturer mentioned below and are limited to either the rectification of said defects on the product or the replacement of the product, whichever we prefer. Please note that our devices are not designed for use in commercial, trade or professional applications. A guarantee contract will not be created if the device has been used by commercial, trade or industrial business or has been exposed to similar stresses during the guarantee period.
-
The following are not covered by our guarantee:
-
Damage to the device caused by a failure to follow the assembly instructions or due to incorrect installation, a failure to follow the operating instructions (for example connecting it to an incorrect mains voltage or current type) or a failure to follow the maintenance and safety instructions or by exposing the device to abnormal environmental conditions or by lack of care and maintenance.
- Damage to the device caused by abuse or incorrect use (for example overloading the device or the use or unapproved tools or accessories), ingress of foreign bodies into the device (such as sand, stones or dust, transport damage), the use of force or damage caused by external forces (for example by dropping it).
-
Damage to the device or parts of the device caused by normal or natural wear or tear or by normal use of the device.
-
The guarantee is valid for a period of 24 months starting from the purchase date of the device. Guarantee claims should be submitted before the end of the guarantee period within two weeks of the defect being noticed. No guarantee claims will be accepted after the end of the guarantee period. The original guarantee period remains applicable to the device even if repairs are carried out or parts are replaced. In such cases, the work performed or parts fitted will not result in an extension of the guarantee period, and no new guarantee will become active for the work performed or parts fitted. This also applies if an on-site service is used.
-
To make a claim under the guarantee, please register the defective device at: www.isc-gmbh.info. Please keep your bill of purchase or other proof of purchase for the new device. Devices that are returned without proof of purchase or without a rating plate shall not be covered by the guarantee, because appropriate identification will not be possible. If the defect is covered by our guarantee, then the item in question will either be repaired immediately and returned to you or we will send you a new replacement.
Of course, we are also happy offer a chargeable repair service for any defects which are not covered by the scope of this guarantee or for units which are no longer covered. To take advantage of this service, please send the device to our service address.
Also refer to the restrictions of this warranty concerning wear parts, consumables and missing parts as set out in the service information in these operating instructions.
F

Subject to change without notice

Liu/Product-ManagementWeichselgartner/General-Manager
Archive-File/Record: NAPR015607
Documents registrar: Josef Landauer
Wiesenweg 22, D-94405 Landau/Isar


EH 11/2018 (01)
- GB Original operating instructions Electric fi replace
- GB
- Danger!
- Safety regulations
- Layout and items supplied
- Layout (Fig. 1)
- Items supplied (Fig. 2)
- Proper use
- Technical data
- Before starting the equipment
- Wall-mounting
- Caution!
- Remote control
- Inserting the battery (Fig. 8):
- Operation
- Switching the mains voltage on/off (Fig. 1)
- Switching the equipment on and off (Fig. 9)
- Switching the dimmer function on and off (Fig. 9)
- Temperature indicator in °C/°F (Fig. 9)
- Setting the desired temperature (Fig. 9)
- Adjusting the setting on the equipment (Fig. 9)
- Adjusting the setting using the remote control (Fig. 9)
- Switching the heating function on and off (Fig. 9)
- Programming the automatic timer for switching on and off (Fig. 9)
- Note:
- Programming days on the equipment or using the remote control (Fig. 9)
- Switch ON time
- Switch OFF time
- Programming weeks using the remote control (Fig. 9)
- Programming the hour switch ON time (Fig. 9)
- Programming the minutes switch ON time (Fig. 9)
- Programming the hour switch OFF time (Fig. 9)
- Programming the minutes switch OFF time (Fig. 9)
- Setting the current time (Fig. 9)
- Activating the automatic timer (Fig. 9)
- "Windows open" function
- Overheating protection
- Replacing the power cable
- Cleaning, maintenance and ordering of spare parts
- Cleaning
- Maintenance
- Ordering replacement parts:
- Disposal and recycling
- Storage
- Disposing of batteries
- Troubleshooting
- Information requirements for electric local space heaters
- Service information
- Warranty certifi cate
Brand : EINHELL
Model : EF 1800
Category : Fireplace