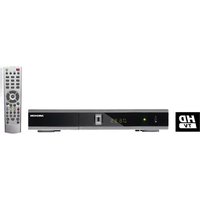
LIFE P24003 (MD 24115) - Digital decoder MEDION - Free user manual and instructions
Find the device manual for free LIFE P24003 (MD 24115) MEDION in PDF.


| Product type | Digital satellite receiver |
| Brand | MEDION |
| Model | LIFE P24003 (MD 24115) |
| Dimensions (L x H x D) | Approx. 260 x 185 x 40 mm |
| Weight | Approx. 2.5 kg |
| Power supply | 110-240 V ~ 50/60 Hz |
| Power consumption | 8 W (standby < 1 W) |
| Tuner | SAT IF input, range 950-2150 MHz, impedance 75 ohms |
| Video resolutions | 576p, 720p, 1080i |
| Screen formats | 4:3, 16:9, Letterbox, full screen |
| Video connections | HDMI, Y Pb Pr (YUV), SCART (RGB), S-Video, RCA CVBS |
| Audio connections | SPDIF digital, Stereo RCA (L/R) |
| USB port | 1 x USB 2.0 (front), FAT32 compatible |
| Common Interface | 1 slot for CI module + Smartcard |
| Main functions | HD satellite reception, teletext, EPG, favorite lists, parental control, games (Sudoku, Tetris, Snake, Box) |
| DiSEqC | DiSEqC 1.0, DiSEqC 1.2 (motor), Tone Burst 22 kHz |
| LNB power supply | 13 V / 18 V, OFF, 500 mA max. |
| Operating temperature | 0 °C to +40 °C |
| Cleaning | Soft dry cloth, unplug before cleaning |
| Safety | Do not open, do not repair yourself, use in dry indoor area |
| Remote control batteries | 2 x 1.5 V batteries, type AAA/LR03 |
| Package contents | Receiver, remote control, 2 batteries, SCART cable, user manual |
Frequently Asked Questions - LIFE P24003 (MD 24115) MEDION
User questions about LIFE P24003 (MD 24115) MEDION
0 question about this device. Answer the ones you know or ask your own.
Ask a new question about this device
Download the instructions for your Digital decoder in PDF format for free! Find your manual LIFE P24003 (MD 24115) - MEDION and take your electronic device back in hand. On this page are published all the documents necessary for the use of your device. LIFE P24003 (MD 24115) by MEDION.
USER MANUAL LIFE P24003 (MD 24115) MEDION
Menü Common Interface
Safety instructions .... 3
Keep electrical equipment out of reach of children.... 3
Safe set-up 3
Safe connection .... 3
Safe use....4
Never carry out repairs yourself.... 4
Handling batteries.... 4
Handling storage media 5
Proper use 5
HDTV 5
The satellite unit 6
Connect and roughly align the antenna 6
General....7
Preset channel list 8
Check package contents 9
Overview of the device 9
Front view 9
Rear view 10
Remote control 11
Connecting the device.... 13
Notes on making connections.... 13
Connecting the TV 16
Connecting a USB device 22
Operating the appliance 23
Insert batteries into the remote control 23
Mains connection....23
Switching on for the first time 24
Switching on/off 24
Operating the device 25
Navigating in the menus 25
Setting the volume.... 25
Automatic shutdown.... 25
Selecting TV and radio reception.... 26
Programme selection 26
Choosing a satellite 26
Audio settings 27
Subtitles 27
Video format 27
Teletext....27
Favourite....28
EPG 28
Playback from a USB device 29
Playback of pictures 29
Playback of MP3 files, 29
Common Interface and Smart Card 30
CI module....30
Smart card 30
Common Interface menu 31
The menu....32
Navigating in the main menu 32
Installation menu 32
Setup menu 33
Channel menu 34
Advanced menu....35
Games menu.... 36
Cleaning.... 37
Disposal.... 38
Technical data 39
Restricted Warranty.... 40
I. General Conditions of Warranty 40
II. Special warranty conditions for repair on site or replacement on site 42
Safety instructions

About these instructions
Read these instructions carefully before using the appliance. Note the warnings on the device and in the operating instructions.
Always keep the operating instructions close to hand. If you sell the appliance or give it away, please ensure that you also pass on these instructions.
Keep electrical equipment out of reach of children
Never allow children to use electrical appliances unattended. Keep plastic packaging out of the reach of children. There is a risk of suffocation.
This product is not intended for use by people (including children) with reduced physical, sensory or mental abilities or for those without experience and/or knowledge, unless they are supervised by a person responsible for their safety or they have been instructed on its use. Children should be supervised to ensure they do not play with this unit.
Safe set-up
- Only use the appliance in dry rooms.
- If you move the receiver from a cold to a warm environment, condensation may build up on the inside of the receiver. If this occurs, wait around two to three hours before using the receiver.
- Place the appliance on a sturdy, level surface.
- Set the appliance up at least 10 cm from the wall. Do not cover the air vents.
- Avoid using close to:
- sources of heat, such as radiators, appliances with strong magnetic fields, such as speakers.
- Do not place any open flames, e.g. burning candles, on the appliance.
- Do not place the appliance on delicate surfaces.
- Avoid exposing the receiver to water drops or sprayed water. Do not place objects that are filled with water, e.g. vases, on, above or next to the receiver. Otherwise, there is a risk of electric shock.
- Do not place any heavy objects on the receiver.
Safe connection
- Only connect the appliance to a freely accessible, properly installed 230 V \~ 50 Hz power socket.
- The plug must be freely accessible so that you can disconnect the device from the mains quickly and easily in the event of emergency.
- Lay the cable so that nobody can step on it or trip over it. Do not use an extension cable.
- Do not kink or crush the mains cable.
• Always remove the mains plug from the socket.
Safe use
- Pull the plug out of the mains socket and remove the aerial cable from the appliance if you are not planning to use the appliance for an extended period or if a storm is approaching.
- The mains cable should not be wrapped around the appliance or be in contact with any hot surfaces during use.
- Do not permit moisture to penetrate the casing. Never touch the appliance, mains cable or plug with wet hands. There is a risk of electric shock.
- If foreign bodies or liquids get into the appliance pull the mains plug from the socket immediately. Arrange for a qualified specialist to check the appliance before using it again. Otherwise, there is a risk of electric shock.
- Never use the appliance if it has been damaged or if the mains cable or plug shows signs of damage. Pull the mains plug out of the socket immediately if the appliance is damaged. Never open the appliance. In the event of a fault, contact our Service Centre or another suitable professional repair workshop.
- The universal remote control has a class 1M infrared diode. Never use optical devices to look at the LED.
Never carry out repairs yourself
If the plug, cable or appliance is damaged, pull the plug immediately from the mains socket.

DANGER!
Never try to open and/or repair the appliance yourself. There is a risk of electric shock.
In the event of a fault, please contact the Medion Service Centre or an approved repair specialist.
In order to prevent exposure to danger, damaged mains cables should be replaced by the manufacturer or the manufacturer's customer service department or a similarly qualified person.
Handling batteries
Batteries may contain combustible materials. If not properly handled, batteries may leak, heat up intensely, ignite or even explode, which could result in damage to your camera and your health.
- Please note the following safety advice:
- Keep batteries away from children.
- If batteries are swallowed, consult your doctor immediately.
- Never charge batteries (unless it is expressly specified).
- Never discharge the batteries by means of high power output.
- Never short-circuit the batteries.
- Never expose the batteries to excessive heat such as sunlight, fire or similar.
- Do not dismantle or deform the batteries.
-
You could injure your hands or fingers or battery fluid could come into contact with your eyes or skin. If this should happen, then rinse the affected areas immediately with a large amount of clean water and contact your doctor immediately.
-
Avoid heavy impacts and vibrations.
- Always observe the correct polarity. Make sure that the plus (+) and minus (-) poles are correctly inserted to avoid short circuits.
- Clean the contacts in the battery compartment and on the new batteries before insertion.
- Do not mix up new and old batteries or different types of battery. This could cause your appliance to malfunction. In addition, the weaker batteries would discharge too much.
- Remove spent batteries from the appliance immediately.
- Remove the batteries from the device if you do not intend to use it for an extended period.
- Replace all the old batteries in an appliance with new batteries of the same type.
- Cover the contacts of the batteries with sticky tape if you want to store or dispose of them.
Handling storage media
Make a backup of your data on an external storage device after every update. We do not accept any liability for compensation claims arising from loss of data or damages incurred as a result of such losses.
Proper use
The MD 24115 digital satellite receiver is used to privately receive digital satellite TV and radio channels.
It is not intended for use in establishments that are part of public telecommunications networks in the industrial sector.
HDTV
The receiver can pick up free-to-air channels in HD quality.
Encrypted channels can also be picked up via the common interface slot, inasmuch as authorisation has been acquired from the corresponding station. The prerequisite for HD quality reception of both encrypted and free-to-air channels is that these channels are broadcast in HD quality.
The satellite unit
Connect the receiver to your satellite antenna using a coaxial cable. To do so you require a satellite antenna with a universal LNB for digital reception.
Connect and roughly align the antenna
If you have not yet mounted and aligned your satellite unit, you must first find a suitable location for installing the antenna.
Bear in mind, the antenna must be facing in a south-easterly direction. In other words, if you stand behind your antenna you must have an unobstructed view to the south-east. The 90° angle between south and east is home to nearly all of the standard satellite positions, e.g. ASTRA1 19.2°E, Eutelsat Hotbird 13°E, Türksat 42°E.
Please note that the antenna should never be mounted behind a balcony parapet, wall or other barriers (e.g. trees).
After making all the connections, you can begin to set up the antenna. Please recheck that the receiver is connected to the antenna via the LNB and that the receiver is connected to the television. Once these connections have been correctly made, you can switch on the device.
Step one:
Switch your television on. Select the AV channel.
Step two:
Now switch your receiver on. Please note that the receiver is pre-programmed for the most standard satellites and their stations and that you merely have to enter the programme slots via the number pad on the receiver's remote control. Example: If you want to receive ASTRA 19.2°E, you simply have to set your receiver to programme position 1 to align your antenna. The same applies for other satellites, such as Hotbird. If you want to align your antenna for Hotbird, you must call up the pre-programmed channel selection for Hotbird on your receiver.
Step three:
Now align your antenna toward the selected satellite. There are several possibilities for doing this. The simplest and cheapest solution is as follows:
Stand behind your antenna and move it into a vertical position (see diagram B). Ensure that the receiver component of the antenna is pointing south (see diagram A).
| Diagram A. ha (horizontal angle) | Diagram B. va (vertical angle) | |
 |  | |
While watching the TV screen, turn the antenna slowly towards the east (left) until the receiver component is facing directly east, in other words 90°.

With digital satellite reception the receiver picks up the signal with a slight time delay. Therefore, turn your antenna very slowly and wait a few seconds in each position until the receiver displays the signal strength in the on-screen menu.
Now steepen the angle by 1° . To do this, pull the top of the antenna. Now move the antenna slowly back to its starting point facing south. Now move the antenna back down by 1° and turn it left again (towards the east). Repeat these steps until the horizontal angle and the elevation angle cross, for example at 19.2° E for ASTRA1, and you can receive the preset programme on your television.
Check again whether you are receiving the preset programme selection on your receiver and use CH button on the remote control to scroll through the channels.
Once you are receiving the desired satellite, you can optimise the antenna alignment until you have a perfect picture on all channels. You can achieve this by adjusting the horizontal and elevation angles (see diagrams A and B).
Finally, tighten all the screws so that the position of the antenna remains firmly fixed.
General
You can use your receiver to watch unencrypted ("free to air") satellite programmes via a satellite antenna. You can receive encrypted satellite channels using the CI module and smart card (not supplied).
The satellite antenna must be pointed at the appropriate satellite.
To receive most German-language channels and many other European channels, you need only a single antenna that is directed at the ASTRA satellite 19.2° east.
Preset channel list
The principal satellites and channels have been pre-programmed. In other words, you do not need programme the receiver after start-up or carry out a station search. You can, however, search for new stations at any time by carrying out a station search for a specific satellite or all satellites.
Check package contents
Please check your purchase to ensure all items are included and contact us within 14 days of purchase if the delivery is incomplete:
The following items are supplied with the product:
- SAT receiver
- Remote control
- 2 batteries
- SCART cable
• These operating instructions and guarantee documents
Overview of the device
Front view
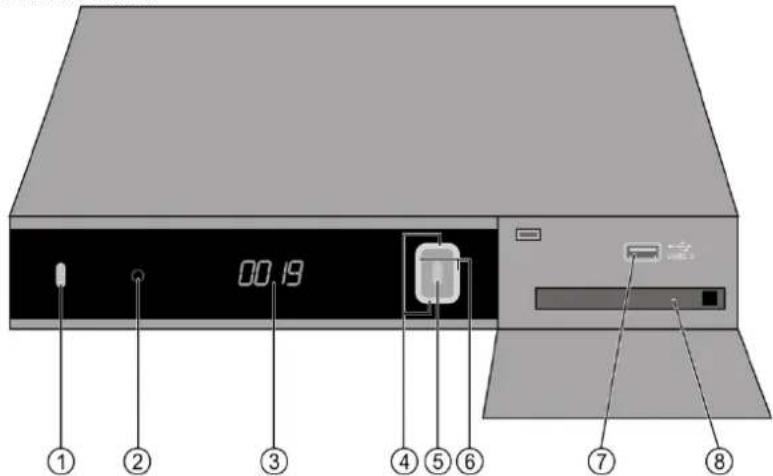
1) Standby button
2) Standby/operating light
3) Display
4) Channel selector buttons
5) OK button
6) Volume buttons
7) USB connection
8) CI module slot
Rear view

1) SAT-F connection input
2) SPDIF output
3) Audio cinch output
4) CVBS output
5) Mains switch
6) Power cable
7) SAT-F connection output
8) S-video output
9) Component (YUV) output
10) SCART output
11) HDMI output
Remote control

Connecting the device
Notes on making connections
In order for the appliance to work correctly it is essential that the antenna is installed properly and aligned to the best possible position for digital satellite reception.
▶ Always ensure that:
- the cable is not caught in anything, that it is not touching any sharp or hot objects, and
- that you have unplugged all the appliances for which you are making connections.
This prevents damage occurring due to short circuits or the risk of an electric shock if you make incorrect connections.

DANGER!
Never make connections during a thunder storm! Power surges in the metal parts of the appliance may occur via the external antenna or power lines during a thunderstorm. There is a risk of electric shock.
Connect satellite antenna
Connect the receiver to your satellite antenna using a coaxial cable. To do this you require a satellite antenna with a universal LNB for digital reception.
Assembling the antenna cable
Before connecting the receiver you may need to assemble the antenna cable.

The wire mesh and the inner conductor of the antenna cable conduct electricity during use. Never touch the antenna cable during operation. There is a risk of electric shock.
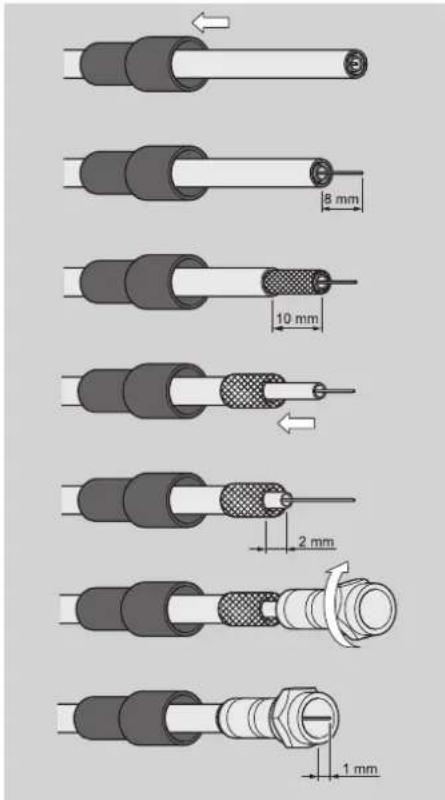
To attach the F plug onto the coaxial cable you will need a wire stripper and wire cutters.
▶ Strip 8 mm off each end of the coaxial cable down to the inner conductor.
▶ Carefully remove 10 mm of the outer insulation to expose the wire mesh.
▶ Fold the wire mesh back and over the outer insulation so that it cannot touch the inner conductor.
Remove the inner insulation up until 2 mm from the wire mesh.
▶ Screw the F plug onto the folded-back wire mesh until the plug abuts against the inner insulation.
The wire mesh should not protrude beyond the end of the plug.
- Trim the inner conductor with a wire cutter so that no more than 1 mm extends from the plug.
Connecting the antenna cable
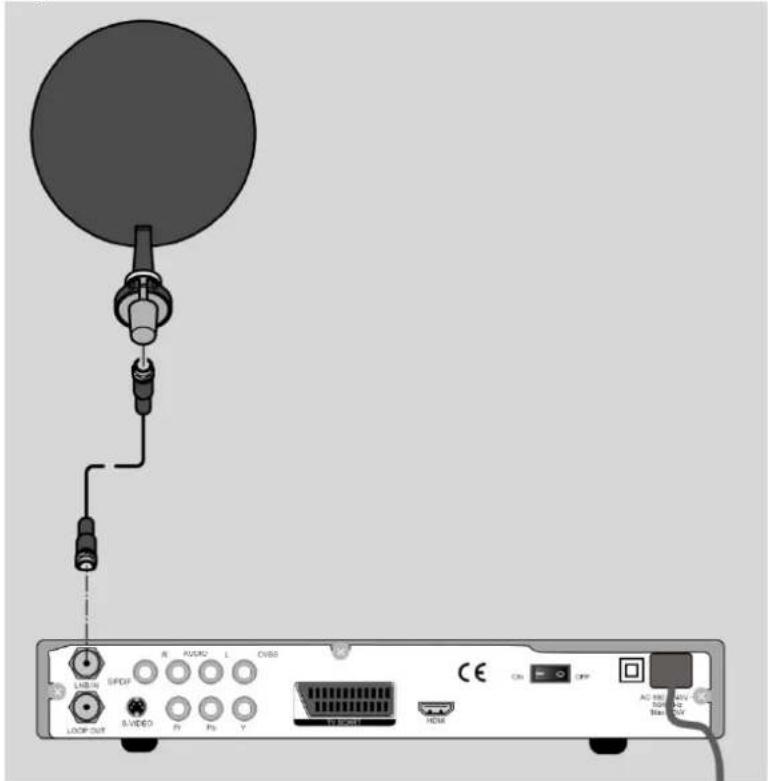
- Connect the antenna cable to the LNB IN input socket.

Follow the assembly instructions for the satellite antenna and the antenna cable.
Connecting more than one antenna
If you use a switching box, you can connect several antennas or an LNB with multiple outputs to the receiver. This is can be necessary for multiple subscriber systems or the interconnection of satellites using satellite antennas with different alignments.
Connect the multi-switch as described in the multi-switch documentation.
- Connect the multi-switch to the LNB IN input socket.
Connecting the TV
The appliance has several types of video output with various signal qualities and allocations.

You may need to refer to your TV documentation to make the correct connections and to select the right source.
Connecting with a HDMI cable
The HDMI output provides the best-quality pictures and sound. You will need a HDMI connection to be able to play high-resolution digital television.
HDMI (High Definition Multimedia Interface) in consumer electronics is the only interface that transmits audio and video data simultaneously. It can process all current picture and sound formats, including HDTV (High Definition Television).
You can connect your SAT receiver to a television set with either an HDMI input or a DVI input (HDMI is downwards compatible to DVI – Digital Visual Interface). To connect to a HDMI input you simply need a HDMI cable.
If your television set has a DVI socket, you will also need an adapter (HDMI – DVI): these are available in specialist stores.
Please note that a DVI connection will only carry pictures and no sound. Sound must be carried over a separate cable (e.g cinch).
Connection scheme for the HDMI connection:

Connect HDMI cable to the HDMI connection on the receiver and the corresponding HDMI connection on the television.

Once you have connected the television set with the HDMI or DVI input then start

by switching on this appliance only. Wait approximately 30 seconds and only then switch on the SAT receiver.
The SAT receiver is pre-configured for a resolution of 1080i, 50 Hz. If your television has a different protocol or picture format, you can set this in the menu: MENU > System settings > AV settings > Resolution.

Please note: The HDMI output has been certified according to the valid HDMI standard. It is possible, however, in certain cases that the connection is not compatible with the DVI or HDMI connection on another device, which will make error-free transmission impossible. This is not a fault in the SAT receiver.
Connecting with a component cable
The second-best picture quality is offered by the component connections Y Pb Pr (also called YUV). This connection type also requires an additional sound connection.
Connection scheme for the component connection:

Connect the component cables (red/green/blue) (not supplied) to the Y Pb Pr outputs on the device and the corresponding inputs on the TV set.
▶ Also connect the audio cable (red/white) to the R-AUDIO and L-AUDIO connections on the device and the corresponding audio inputs on the TV set.
Connecting with a S-Video cable

Connect the S-VIDEO connection on the device to the TV's video input.
▶ Also connect the Audio L R connections on the device and the corresponding audio inputs on the TV set.
Connecting with a SCART cable
On the TV SCART connection there are good quality video and audio signals. The colour signals (RGB), in particular, are provided separately from each other here.
Connection scheme for the SCART connection:

Connect a SCART cable (not supplied) to the TV SCART connection on the receiver and the corresponding SCART connection on the television.
Connecting with cinch cable
You can also connect the satellite receiver solely via cinch cable (not supplied). The CVBS cinch connection provides only video signals with integrated colour signal (FBAS). Use this connection for devices with a single video input.
Connection scheme for the cinch connection:

- Connect the CVBS connection on the appliance to the TV's video input.
▶ Also connect the audio cable (red/white) to the R-AUDIO and L-AUDIO connections on the device and the audio inputs on the TV set.
Sound system – analogue
If you would like to hear the TV sound via a sound system, you can use the L/R cinch outputs.

Connect the R-AUDIO and L-AUDIO connections to the corresponding inputs (or AUX inputs) on the sound system.
Sound system – digital
Although your receiver receives the signals digitally it has to convert them first to analogue signals for traditional hi-fi systems. This may reduce the quality slightly. You can avoid this loss of quality if you use the receiver's S/PDIF output, e.g. for an amplifier or a Dolby Surround decoder.

Connect the S/PDIF output to the digital input on your amplifier or Dolby Surround system using a suitable cable.
Connecting a USB device
You can connect a USB device to show images or listen to audio files or to record programmes.
▶ Open up the panel on the front of the device.
Insert the plug of a USB cable or a USB device into the USB connection.
▶ If necessary, connect the other plug to the external USB device.
Operating the appliance
Insert batteries into the remote control
▶ Open the battery compartment.
▶ Insert two batteries (1.5V Micro, AAA/LR03) into the battery compartment. Pay attention to the polarity +/- (the negative terminal faces the spring).
▶ Close the battery compartment.

Mains connection
▶ After making the connections, plug the mains plug into a properly installed socket (230V \~ 50Hz).

DANGER!
Only use sockets that are in perfect condition. Unstable plugs or sockets can cause fires. Reception may be impaired if the plugs or sockets are defective. Do not use defective sockets under any circumstances. Have defective plugs or sockets repaired by a specialist before using the appliance.
DANGER!
Pull the plug out of the socket immediately if the plug or power cable is damaged. Arrange for customer services to exchange the mains cable for a new one with a sealed plug.
Do not connect the appliance to the mains power until the damage has been repaired. Otherwise there is a risk of an electric shock.
DANGER!
Never cover the ventilation openings on the base and upper side of the appliance.
The appliance produces heat even when in standby mode. Covering the ventilation openings may cause fires.
Do not leave electrical appliances unattended while they are switched on.
Unplug the appliance if you plan to leave it unattended for an extended period (e.g. holiday).
Unplug the appliance and remove the aerial cable if a thunderstorm is expected.
This prevents a local lightning strike from damaging your appliances.
Switching on for the first time

The channel listings for the several satellites have been pre-programmed. Therefore, it is not necessary to carry out a station search when you first switch on the device. On page 32 there is a description of how to add other channels.
When you switch on for the first time, the installation assistant appears.
▶ Use the arrow keys ▲▼ to choose the language for the on-screen menus. The language changes immediately.
▶ Confirm your selection by pressing the OK button.
The welcome screen tells you about the functions of the installation assistant: press OK to continue.
▶ Select the desired satellites by using the ▲▼ and confirm your selection by pressing the OK button.
▶ You can now start a station search or call up the preset channel list. Use the arrow keys ▲▼ to choose the required option.
If you start a station search, you should now select whether all channels should be sought or only free-to-air channels.
▶ Press the OK button to move to the next menu item.
Switching on/off
▶ Switch your TV on and select the AV or HDMI mode.
▶ Switch on the receivers by using the power switch at the rear of the device (position 1). The channel number appears on the display.

Just like a computer, when you start the digital receiver it first has to load an operating program. The appliance may take a few seconds to respond. Whilst this takes place, the manufacturer's logo is displayed on the screen.
To switch the receiver to standby mode, press the standby button ⏻; the red standby LED lights up.
To reactivate the device from standby mode, press the standby button ⏻ again; the green operating LED lights up.
▶ Set the power switch to the 0 position to switch the device off.
Operating the device
Navigating in the menus
On-screen menus can be called up using various keys. The keys and their meaning are displayed at the bottom of the screen.
▶ Within a menu, you can select a menu option using the arrow keys ▲▼. Press the OK button to confirm your selection.
▶ You can select the setting for a menu option using the arrow keys ◀ ▶.
▶ Press the EXIT button to leave the menu and save the settings.
Setting the volume
Volume changes also affect any video recording that is currently taking place. To avoid this, change the volume directly on the TV while making a video recording.
▶ To increase the volume, press the V+ button.
▶ To reduce the volume, press the V-button.
The volume level is shown by a bar at the bottom of the TV screen.
To mute the sound, press the button. The symbol is shown on the screen.
To hear the sound again, press the 🎨 button again or press the V+ or V- buttons. The volume level bar reappears on the TV screen.
Automatic shutdown
This satellite receiver fulfils the requirements of the ECO standard and has an automatic shutdown function. If the device is not operated within a certain preset period, it switches automatically to standby mode.
You can adjust this function be setting the required time period to anything between one and six hours or you can deactivate the function completely.
To set the time, proceed as follows:
▶ Press the MENU button to call up the menu.
▶ Use the arrow keys ◀ ▼ to choose the required option.
▶ Select the option Time Setting by using the arrow keys ▲▼ and confirm your selection by pressing the OK button.
▶ Now select the menu option Auto Power Down and use the arrow keys ◀ ▶ to set the desired time.
▶ Use the EXIT button to exit the menu and save your settings.
Selecting TV and radio reception
▶ To switch to receiving digital radio channels press the TV/R button.
- Press the TV/R button again to switch back to the television programme.
Programme selection
▶ To change to the next channel, press the P+ button.
To change to the previous channel, press the P—button.
In order to directly select a channel, enter the corresponding memory space using the number buttons. Enter multi-digit programme numbers rapidly in sequence.
▶ To switch back to the previously viewed channel, press the RCL button.
Selecting channels from the channel list
If you want to select a channel via the channel list, you do so as follows:
During reception press the OK button. The channel list is displayed.
The select a station, use the arrow keys to move to the desired channel.
- You can skip forward or backward by a whole page by pressing the P+ and P-buttons.
▶ To change to the highlighted channel press the OK button.
The channel list is automatically hidden, but you can also easily hide it at any time by pressing the EXIT.
Showing channel information
When you switch to another channel, the following information will be displayed:
1) Channel number with TV or radio symbol
2) Signal strength and quality
3) Date and time
4) EPG information and satellite data
5) HD symbol (this programme is being sent in HD quality)
6) Encryption symbol (this channel is subscription only)
7) Teletext symbol (the channel has a teletext service)
8) Subtitle symbol (the channel has a subtitle service)
9) Screen format and resolution
You can call up channel information at any time using the INFO button.
Choosing a satellite
▶ Press the SAT button. You will now see a two-part list. On the left-hand side is the normal channel list and on the right-hand side is a list of all the installed satellites.
▶ Select the desired satellites by using the ▲▼ buttons and confirm your selection by pressing the OK button to restrict your programme list to this satellite.
Audio settings
Some stations transmit programmes with multi-channel sound. This involves sending different language versions of a programme via separate audio channels
▶ Press the AUDIO button once to choose between the two audio channels.
▶ Use the ▲▼ buttons to select the required audio channel and confirm your selection with OK.
▶ Press the AUDIO button twice to select stereo sound (both output channels).
▶ You can choose between Stereo; Right and Left. Select the output channel by using the ▲▼ buttons and confirm your selection by pressing the OK button.
▶ Press EXIT to leave the menu.
Subtitles
▶ Press the yellow SUB button to open the Subtitles menu.
- Select, as required, the subtitles and subtitle language – if the channel is transmitting these for the current programme.
▶ Press EXIT to leave the menu.
Video format
▶ Press V.F. button to open the Video Settings menu.
▶ Use the arrow keys ◀ to move between the various settings menus Video Format; Aspect Ratio und Conversion Mode.
▶ Use the arrow keys ▲▼ to choose the required settings.
▶ Confirm your selection by pressing the OK button.
Teletext
Teletext services vary with channel suppliers.
▶ Select the channel for which you want to open the teletext.
Starting/closing teletext
To start the teletext function, press the TEXT button. Select the required language and confirm the selection with the OK button. The index page (page 100) is shown initially. This provides you with an overview of the contents.
▶ To close the teletext, press the EXIT button.
Select teletext page
▶ Select a page by entering the 3-digit page number with the number keys.
▶ You can also use the ▲ and ▼ buttons to scroll through the pages.
The number of the current page and the page that is being loaded is shown above the text.
Favourite
You can set up to eight favourites lists. A favourites list is used to store the channels that you watch most often.
Editing favourite lists
▶ Press the MENU button.
▶ Use the arrow keys ◀ to choose the Channel option and from here select the suboption Favourite.
▶ Press the FAV button to select a favourites list.
Now use the ▲▼ buttons to choose the channel that you would like to add to the favourites list.
▶ Confirm your selection with OK.
▶ Repeat these steps for all your favourites channels and favourites lists.
▶ You can also add radio stations to a favourites list. To do this press TV/R to switch between the TV and radio list.
▶ Save your settings with the green SAT button.
- Exit the menu by pressing the EXIT button.
Calling up favourites
During TV operation, you can call up favourites lists by pressing the FAV button (press repeatedly to toggle between lists).

Once you have opened a favourites list, you can use the programme selection keys to choose a channel from this list.
The display then shows the channel number from the favourites list.
EPG
The EPG (Electronic Programme Guide) is an electronic guide to the TV programmes. You can see the programme preview for the next few days and call up information on specific programmes. You can also add programmes to the timer.

Not all stations broadcast EPG data. The programme information content varies from station to station.
Calling up programme information
▶ Press the EPG button to call up the EPG menu.
- Now select the desired channel from the list on the left-hand side and use the arrow key ▶ to switch to the programme overview.
▶ Select the required programme from the programme overview on the right and press the INFO button or OK to call up information on this programme.
▶ Use the EXIT or OK to exit the programme information.
▶ Use the red RCL button to switch to the overview of the previous day.
▶ Use the green SAT button to switch to the overview of the next day.
- Use the yellow SUB button to return to today's overview.
▶ Use the blue TEXT button to add the desired programme to the time list.
Adding programmes to the timer from the EPG
▶ Select a programme as described above and add its information by pressing the blue TEXT button.
▶ Check the timer programming information and confirm this with the green SAT button.
To find out how to programme a timer recording without the EPG, turn to page 35.
Playback from a USB device
- Connect a USB device to the USB socket behind the front panel.

The drive must use the FAT32 file system. Other file systems (NTFS or FAT16) will not be recognised.
Please bear in mind that not all commercially available drives are compatible with this receiver. This is not a fault with the product.
Playback of pictures
- Press MENU button to switch to the menu option Channel.
▶ Select the sub-option File Explorer.
On the right-hand side of the Explorer you will see the attached USB device. On the left-hand side, the storage capacity of the attached device is shown.
▶ Use the OK button to open the folder menu for the USB device.
Now use the arrow keys ▲▼ to select the desired folder containing the images and confirm your selection by pressing the OK button.
Now use the arrow keys ▲▼ to select the desired image and open your selection by pressing the OK button.
▶ Use the arrow keys ▲▼ to browse through individual images.
▶ Use the EXIT button to exit this menu option.
Playback of MP3 files,
- Press MENU button to switch to the menu option Channel.
▶ Select the sub-option MP3 Player.
▶ You will now be asked if you want to open the music list; confirm the question with the OK button.
▶ Use the arrow keys ▲▼ to choose the desired music tracks.
▶ Start the playback by pressing the play button ▶.
▶ Use the skip buttons ◀ and ▶ to skip back and forth between the individual music files.
▶ Press the ■ button to stop playback of a music file.
▶ Use the EXIT button to exit the MP3 player.
Common Interface and Smart Card
On the front of the device behind the panel you will find the slot intended for Common Interface modules. The CI modules are equipped with Smart Cards for decoding encrypted channels.
CI module
Before inserting the Common Interface (CI) module, shut down the receiver completely using the power switch at the rear of the device.
▶ Open the panel and slide the CI module into the slot as far as it will go. The press stud on the right of the slot appears.

In order to avoid damage, only modules that bear the PC Card logo may be inserted. Other modules can cause irreparable damage to the receiver. Do not use force to insert a module. Instead, remove the module from slot and insert it again. Ensure that the correct side is facing upwards.
Smart card
- Insert the smart card in the CI module
Smart cards often have confusing labelling as they have been designed for other decoders. Most Common Interface modules expect the cards to be inserted with the shiny, gold contacts facing upwards.
▶ Afterwards, switch the receiver on again. The module will be initialised. Depending on the programme provider, a message on your screen. Please follow these instructions.

If you possess a CI module which only accepts the chip from your smart card, then you must first insert the chip and the CI module into the Common Interface slot.
Now close the panel of the Common Interface slot (if no external USB device is connected). This will help you to protect the interior of your device from contamination.
As long as you want to watch the encrypted channels, the CI module and its smart card must remain correctly inserted into the Common Interface slot.
The CI module (with or without smart card) can be left in the Common Interface slot when the device is switched to standby mode or turned off at the power switch.
To remove the CI module from the Common Interface slot, open the panel and push in the press stud on the right-hand side of the slot. You can now remove the CI module with its inserted smart card.
Common Interface menu
If an encryption module has been correctly detected, its name appears in the list in the Common Interface menu option in the Advanced menu. If you go to the entry for this module in this list and press the OK button, a menu is displayed that is produced from the relevant encryption module. If you have any questions, please refer to the module's manufacturer.

Some modules do not register themselves completely and provide a menu system until a valid card has been inserted.
For navigating in manufacturer-specific menus use the ▲▼ and OK buttons. If a menu does not respond to the OK entry, you can force the dialogue to cancel by pressing the EXIT button. The receiver then ends the connection to the module's menu system.
The menu
▶ Open the menu by pressing the MENU button. You can close it with the same button or with the EXIT button.
▶ To save a new setting, press the green SAT or leave the menu by pressing EXIT.
Navigating in the main menu
▶ Use the arrow keys ◀ ▶ to choose an option in the main menu.
▶ Use the arrow keys ▲▼ to navigate to the various sub-items in a menu.
▶ To open a menu item, press the OK button.
Installation menu
In this menu you can make all the settings for your satellite antenna.
Satellite Setting
Here you can select the satellites to be scanned and make settings to adjust your receiver to your satellite antenna.
▶ Use the arrow keys ▲▼ to move through the menu.
▶ Use the arrow keys ◀ to choose the required settings.
▶ If a selection list is available, you can call it up using the OK button.
▶ Save your settings by pressing the green SAT button or by pressing EXIT and leaving the menu.
Auto scan
Choose the settings for a station search here.
▶ Use the arrow keys ▲ ▼ ▶ to move through the menu.
▶ Use the OK button to mark or unmark a setting.
▶ Press the green SAT button to start the station search.
▶ Use the EXIT button to exit the menu without starting a station search.
Manual scan
In this menu you can manually enter certain frequency information for a channel and make a targeted search for this channel only.
▶ Use the arrow keys ▲▼ to move through the menu.
▶ Use the arrow keys ◀ ▶ to choose the required settings.
▶ If a selection list is available, you can call it up using the OK button.
▶ Press the green SAT button to start the station search.
▶ Use the EXIT button to exit the menu without starting a station search.
Satellite Edit
In this menu you can edit the pre-programmed satellite and transponder lists.
▶ Use the arrow keys ▲ ▼ ▶ to move through the menu.
▶ Use the red RCL button to remove satellites or transponders from the list.
▶ Use the yellow SUB button to add new satellites or transponders.
▶ Use the blue TEXT button to edit or rename existing satellites or transponders.
▶ Use the green SAT button to save the settings.
▶ Use the EXIT button to exit the menu.
Setup menu
In this menu you can adjust the receiver to suit your requirements.
Language
In this menu you can stipulate in which country you are using your receiver and in which language the menu and the various functions operate.
▶ Use the arrow keys ▲▼ to move through the menu.
▶ Use the arrow keys ◀ ▶ to choose the required settings.
▶ If a selection list is available, you can call it up using the OK button.
▶ Use the green SAT button to save the settings.
▶ Use the EXIT button to exit the menu and save all your settings.
TV Output
Use this menu to make the settings for your television picture format.
▶ Use the arrow keys ▲▼ to move through the menu.
▶ Use the arrow keys ◀ to choose the required settings.
▶ If a selection list is available, you can call it up using the OK button.
▶ Use the green SAT button to save the settings.
▶ Use the EXIT button to exit the menu and save all your settings.
Time settings
In this menu, you can set the system clock and the Auto Power Down function.
▶ Use the arrow keys ▲▼ to move through the menu.
▶ Use the arrow keys ◀ ▶ to choose the required settings.
▶ If a selection list is available, you can call it up using the OK button.
▶ Use the green SAT button to save the settings.
▶ Use the EXIT button to exit the menu and save all your settings.
The system time can be set manually or automatically. For automatic time setting, select the option On in the submenu Use GMT.
Parental Control
The child protection menu allows you to set up your receiver so that your child can only watch certain channels or only has limited access to the menu functions.
The factory-set password is: 0000.
▶ Use the arrow keys ▲▼ to move through the menu.
▶ Use the arrow keys ◀ to choose the required settings.
▶ If a selection list is available, you can call it up using the OK button.
▶ Use the green SAT button to save the settings.
▶ Use the EXIT button to exit the menu and save all your settings.
OSD Display
In this menu you can edit the settings for the on-screen display (OSD).
▶ Use the arrow keys ▲▼ to move through the menu.
▶ Use the arrow keys ◀ to choose the required settings.
▶ If a selection list is available, you can call it up using the OK button.
▶ Use the green SAT button to save the settings.
▶ Use the EXIT button to exit the menu and save all your settings.
Channel menu
In the channel menu you can edit the channel list, set up favourites lists and programme timer recordings.
Sort and edit
The station search draws up a list of channels according to certain preset criteria. This channel list does not always correspond to the user's requirements. In this menu you can sort and edit the channel list.
▶ Select the satellite to be edited from the list on the left-hand side using the arrow keys ▲▼ and then use the arrow key ▶ to switch to the channel list.
Use the red RCL button to choose which channels should be deleted at the end of editing. You can cancel the selection by pressing the button again. If you are still in the satellite list, you can use this button to mark all a satellite's channels for deletion.
- You can use the yellow SUB button to sort a satellite's channel according to certain criteria. Use this button to mark a channel in the channel list and then move it to another position.
▶ Use the blue TEXT button to rename a satellite.
▶ Use the green SAT button to save the settings. For instance, if you are using the delete function, this means that all marked channels will be deleted from the list and can only be re-added to the list by carrying out a new station search.
Favourites
To find out how to set up favourites lists, see page 28.
File Explorer
To find out how to use the File Explorer, see page 29.
Timer
In this menu you can programme a timer recording without using the electronic programme guide (EPG). You can store up to 8 timer recordings.
▶ Select a empty slot and press the OK button.
▶ Use the arrow keys ▲▼ to move through the menu.
▶ Use the arrow keys ◀ to choose the required settings.
▶ If a selection list is available, you can call it up using the OK button.
▶ Use the green SAT button to save the settings.
▶ Use the EXIT button to exit the menu without saving the settings.
MP3 player
The functions of the MP3 player are described on page 29.
Advanced menu
In this menu option you can make adjustments to the receiver's advanced functions.
Common Interface
You will find information about the CI module and its functions on page 30.
System info
This menu option calls up an information table which provides you with an overview of the receiver's hardware and software.
USB upgrade
In this menu you can carry out a software upgrade via USB.

If you decide to carry out a software upgrade, you require at least a basic understanding of the technical terms used in consumer electronics. If you do not have this level of understanding, then arrange for a specialist to carry out the work.
OTA
In this menu you can carry out a software upgrade via OTA.

If you decide to carry out a software upgrade, you require at least a basic understanding of the technical terms used in consumer electronics. If you do not have this level of understanding, then arrange for a specialist to carry out the work.
Factory Reset
If it becomes necessary to return the device to its factory settings, then select this menu option.
▶ Enter the password you have set for the device (factory default: 0000) and the device will be restored to the delivery state.
▶ Use the EXIT button to cancel this process without making any changes.
Games menu
In addition to TV and radio stations, your appliance also offers a range of four fun games.
Sudoku
The aim of Sudoku is to fill all of the 81 number fields with the correct numbers (1 to 9). Each number (1 to 9) may only appear once in each 3x3 block. In addition, each number may only appear once in each row or column. Use the arrow keys ▲▼◀▶ to move the cursor to an empty field and then enter a number using the number keys.
Tetris
The aim of Tetris is to sort the falling blocks using the arrow keys in such a way that the field is filled up with as few gaps as possible. Every time a line is filled completely, it disappears and the rows above drop down. You receive points for each block that you insert and for each eliminated row. The game ends when you have no more space to insert blocks.
Snake
To play Snake you use the arrow keys ▲▼◀▶ to control a snake that has to eat the squares that appear on the board. The snake should not bite itself or hit a wall. Each time it eats a square the snake grows and becomes increasingly difficult to navigate.
Box
The aim of Box is cover the holes in each level with the available boxes. You control your game avatar with the arrow keys ▲▼◀▶ and use it to push the boxes in front of you. Once a box runs up against the edge of the playing field, however, and can no longer be moved, the level is over.
Cleaning
Before cleaning, pull the receiver's plug out of the mains socket. Use a dry, soft cloth to clean the unit.
Do not permit moisture to penetrate the casing. There is a risk of electric shock.
Avoid the use of chemical solutions or cleaning products because these may damage the appliance surface and/or markings.
Disposal

Packaging
Your appliance has been packaged to protect it against transportation damage. The packaging constituents are raw materials and can be reused or recycled.

Appliance
At the end of its service life, the appliance should not be disposed of with the household rubbish. Please enquire about the options for environmentally friendly disposal.

Batteries
Do not dispose of used batteries in household rubbish. Batteries should be taken to a collection point for used batteries.
Technical data
Other
Power supply: 110–240 V \~ 50/60 Hz
Batteries for remote control: 2 x 1.5 V AAA R03/LR03
Power consumption: 8 W
Power consumption in standby mode: < 1 W
Dimensions (W x H x D): approx. 260 x 185 x 45 mm
Weight:
Operating temperature: 0°C to +40°C
approx.
Tuner
SAT-ZF input: F socket
Input range: 950 to 2150 MHz
Impedance:
75
Ohm
Antenna
LNB power supply: 13 V/18 V, off; max. 500 mA
Switching signals: DiSEqC 1.0/DiSEqC 1.2 motor control,
Tone burst 22 kHz
Video
Connections:
HDMI
Y Pb Pr (YUV)
VCR SCART (CVBS),
Video cinch
Screen formats:
4:3/16:9/letterbox/full screen
Video formats:
RGB, CVBS, YUV
Resolutions:
576p/720p/1080i
Audio
Connections (outputs)
SPDIF (digital)
Cinch left/right (analogue stereo)
Subject to technical modifications.

Restricted Warranty
I. General Conditions of Warranty
1. General
This warranty covers defects relating to workmanship and manufacture in MEDION products. The period during which this warranty is valid and during which claims against the warranty can be made to MEDION must be in accordance with the following terms in order to be considered eligible:
- Is effective from the date of purchase or receipt of the MEDION product from an authorised seller of MEDION products; and
- expires at the end of the warranty period specified on the warranty card provided with the product.
For the warranty to be valid, you must:
- provide suitable evidence of purchase, a copy of the original purchase receipt from an authorised seller of MEDION products is preferred; or
- register your product within 28 days of purchase either online at www.MEDION.co.uk or by completing and returning the pre-paid registration card included with the product.
Please keep the original purchase receipt and the warranty card in a safe place. MEDION and its authorised sellers reserve the right to refuse a repair under warranty or a warranty confirmation if a proof of purchase [or registration of purchase] cannot be established, or has not been, submitted.
When it is necessary to return your product for repair please ensure that your product is suitably packed for transportation.
Provided that your product is still within warranty (please check the duration of the warranty period as described above) and is eligible for repair or replacement under the terms of the warranty, to return your product, please telephone MEDION on the service hotline number. You will be sent a pre-paid transportation box suitable for returning your product to MEDION. PLEASE MAKE SURE THAT YOU HAVE A BACKUP COPY OF ALL DATA ON THE PRODUCT BEFORE RETURNING THE PRODUCT TO MEDION. MEDION shall bear the costs of postage and packaging for returning the product and the transportation risk. However, if following examination of the defective product in question, MEDION, in its reasonable opinion, considers that the defect has been caused by:
- your operating and/or using the product other than as instructed in the accompanying documentation;
- damage caused in transit as a result of your negligence in packaging of the product; and/or
• otherwise than in accordance with the terms of this warranty;
This warranty shall be void and you may be required by MEDION to reimburse MEDION for the reasonable costs of postage and packaging before MEDION will return the product to you. If so and you would still like MEDION to repair or replace the product, MEDION may do so but you will be charged MEDION's standard rates for repair and replacement for this service.
Before returning the product, please contact MEDION via the service hotline or via the internet (www.MEDION.co.uk). You will receive a reference number (RMA No.) on the warranty card. Please mark the outside of your package to ensure that this reference number is clearly visible. Please submit a letter containing as much detailed information as possible and, a full description of the defect or fault.
This should include:
• a description of the fault;
- when it occurred, how long it has been evident and how frequently it occurs;
- any errors message(s) displayed when using the product;
- a description of the circumstance(s) and conditions in which the fault occurs; and
- whether it is an intermittent or persistent fault;
This will greatly assist MEDION in identifying the defect, when submitted together with the defective product.
Unless otherwise instructed by a MEDION representative in all cases, the product must be returned complete with all parts which were included with the original product. Incomplete contents of the returned package may lead to a delay in the repair or replacement. MEDION does not accept any liability for any additionally submitted material(s) which were not supplied with the original MEDION product.
This warranty does not affect your statutory rights in any way and is subject to the applicable legal statutes of the country where the product was sold to you by an authorised MEDION seller.
2. Scope
Subject to any exclusions set out within this warranty, where there is a defect in your MEDION product covered by this warranty, MEDION will repair or replace the MEDION product. The decision whether to repair or replace the product will be made solely at the discretion of MEDION. MEDION may, in its own discretion, replace the product returned for repair under warranty with a replacement product that is either identical or, in the event that such product(s) are no longer available, a product of equal or superior specification and quality.
No warranty is given for batteries or rechargeable batteries or for consumable materials subject to wear and tear, i.e. for parts which have to be replaced periodically during the normal use of the product, such as video-projector lamp.
Non critical failures that fall within industry specified tolerances e.g. noise, LCD pixels are not covered by this warranty. Please consult the appropriate section in your user or instruction manual for this product for exact specifications and tolerances.
To the extent which is permitted under law, MEDION will accept no liability for burnt-in images on plasma or LCD products as a result of normal wear and tear during the operation of the product. Please refer to your user or instruction manual for this product for detailed operating instructions for your plasma or LCD product.
The warranty does not cover errors relating to the playback of data media in an incompatible format or created with unsuitable software.
If it is found during repair or assessment that the defect concerned is not covered under warranty, MEDION reserves the right to invoice you for all reasonable costs incurred by MEDION. These costs will be in relation to the return of the product, including reasonable administration costs, plus reasonable costs for materials used and labour provided when repairing or replacing the product. This is subject to MEDION providing
you with an estimate for carrying out such work prior to costs being incurred and that you have accepted the estimate.
You are entitled to seek independent advice or consultation relating to your product or any of MEDION's findings. MEDION will not be liable for any costs incurred to you when doing so.
3. Exclusion from warranty
To the extent permitted by law, this warranty shall be void in the event that defects or loss caused by:
a. failure and damage resulting from the operation of the product in an environment other than that recommended in the accompanying user or instruction manual (e.g. in direct sunlight or in a damp room);
b. accidental damage;
c. use other than in accordance with the accompanying user or instruction manual;
d. modifications, conversions, expansions, maintenance and/or repairs made to the MEDION product by unauthorised repairers or use of unauthorised third party parts;
e. negligence;
f. virus attack or software errors; or
g. improper transportation or packaging during return of the product.
This warranty will also be considered void if labels or serial numbers of the product or of a component of the product are modified or made illegible.
To the extent permitted by law, MEDION shall; only be responsible for losses which are a reasonably foreseeable consequence of the relevant defect in the product; MEDION will not be responsible for any costs incurred in relation to software configuration; economic loss; loss of opportunity; loss of income; or loss of data or software arising out of its repair or replacement of a MEDION product under this warranty
4. Service Hotline
Before returning the product to MEDION you must contact us using the service hotline or via the internet (www.MEDION.co.uk). You will receive further instructions for making your claim under warranty when you call.
The service hotline is available on 362 days in the year, including Sundays and bank holidays but excluding Christmas day, New Years Day and Easter day. The service hotline is subject to [national rate] telephone call charges. These charges are subject to change. The price of your call will be stated at the beginning of the call.
II. Special warranty conditions for repair on site or replacement on site
If a claim for repair or replacement on site is included within the terms of the warranty card provided with the product, the special warranty conditions for repair or replacement of your MEDION product on site apply.
The following provisions must be made by you for carrying out repairs or replacements on site:
- MEDION or its authorised personnel must have unrestricted, safe and immediate access to the products.
- Telecommunication facilities required by MEDION or its authorised personnel for proper execution of your order, for testing and diagnostic purposes and for remedying faults are provided by you at your own expense.
- You are responsible yourself for restoring the application software after the repair services have been carried out by MEDION or its authorised personnel.
- You must take all other necessary steps to enable MEDION or its authorised personnel to carry out your order properly.
- You are responsible yourself for connecting and configuring any existing external peripheral products after MEDION or its authorised personnel have carried out their repairs.
The free cancellation period for repairs or replacements on site is 24 hours, thereafter our reasonable costs resulting from late or missing cancellation shall be invoiced at your expense.
Sommaire
Réglages audio....28
Sous-titres 28
Format vidéo....28
Télétexte 28
Listes de favoris 29
EPG 29
Resoluties: 576p / 720p / 1080i
Audio
- MENÜ COMMON INTERFACE
- SAFETY INSTRUCTIONS
- ABOUT THESE INSTRUCTIONS
- KEEP ELECTRICAL EQUIPMENT OUT OF REACH OF CHILDREN
- SAFE SET-UP
- SAFE CONNECTION
- SAFE USE
- NEVER CARRY OUT REPAIRS YOURSELF
- DANGER
- HANDLING BATTERIES
- HANDLING STORAGE MEDIA
- PROPER USE
- HDTV
- THE SATELLITE UNIT
- CONNECT AND ROUGHLY ALIGN THE ANTENNA
- STEP ONE
- STEP TWO
- STEP THREE
- GENERAL
- PRESET CHANNEL LIST
- CHECK PACKAGE CONTENTS
- OVERVIEW OF THE DEVICE
- CONNECTING THE DEVICE
- NOTES ON MAKING CONNECTIONS
- CONNECT SATELLITE ANTENNA
- ASSEMBLING THE ANTENNA CABLE
- CONNECTING MORE THAN ONE ANTENNA
- CONNECTING THE TV
- CONNECTING WITH A HDMI CABLE
- CONNECTING WITH A COMPONENT CABLE
- CONNECTION SCHEME FOR THE COMPONENT CONNECTION
- CONNECTING WITH A SCART CABLE
- CONNECTION SCHEME FOR THE SCART CONNECTION
- CONNECTING WITH CINCH CABLE
- CONNECTION SCHEME FOR THE CINCH CONNECTION
- SOUND SYSTEM – ANALOGUE
- SOUND SYSTEM – DIGITAL
- CONNECTING A USB DEVICE
- OPERATING THE APPLIANCE
- INSERT BATTERIES INTO THE REMOTE CONTROL
- MAINS CONNECTION
- SWITCHING ON FOR THE FIRST TIME
- SWITCHING ON/OFF
- OPERATING THE DEVICE
- NAVIGATING IN THE MENUS
- SETTING THE VOLUME
- AUTOMATIC SHUTDOWN
- SELECTING TV AND RADIO RECEPTION
- PROGRAMME SELECTION
- SELECTING CHANNELS FROM THE CHANNEL LIST
- SHOWING CHANNEL INFORMATION
- CHOOSING A SATELLITE
- AUDIO SETTINGS
- SUBTITLES
- VIDEO FORMAT
- TELETEXT
- STARTING/CLOSING TELETEXT
- SELECT TELETEXT PAGE
- FAVOURITE
- EDITING FAVOURITE LISTS
- CALLING UP FAVOURITES
- EPG
- CALLING UP PROGRAMME INFORMATION
- ADDING PROGRAMMES TO THE TIMER FROM THE EPG
- PLAYBACK FROM A USB DEVICE
- PLAYBACK OF PICTURES
- PLAYBACK OF MP3 FILES
- COMMON INTERFACE AND SMART CARD
- CI MODULE
- SMART CARD
- COMMON INTERFACE MENU
- THE MENU
- NAVIGATING IN THE MAIN MENU
- INSTALLATION MENU
- SATELLITE SETTING
- AUTO SCAN
- MANUAL SCAN
- SATELLITE EDIT
- SETUP MENU
- LANGUAGE
- TV OUTPUT
- TIME SETTINGS
- PARENTAL CONTROL
- OSD DISPLAY
- CHANNEL MENU
- SORT AND EDIT
- FAVOURITES
- FILE EXPLORER
- TIMER
- MP3 PLAYER
- ADVANCED MENU
- COMMON INTERFACE
- SYSTEM INFO
- USB UPGRADE
- OTA
- FACTORY RESET
- GAMES MENU
- SUDOKU
- TETRIS
- SNAKE
- BOX
- CLEANING
- DISPOSAL
- PACKAGING
- APPLIANCE
- BATTERIES
- TECHNICAL DATA
- OTHER
- TUNER
- ANTENNA
- VIDEO
- AUDIO
- RESTRICTED WARRANTY
- GENERAL CONDITIONS OF WARRANTY
- SCOPE
- EXCLUSION FROM WARRANTY
- SERVICE HOTLINE
- SPECIAL WARRANTY CONDITIONS FOR REPAIR ON SITE OR REPLACEMENT ON SITE
- SOMMAIRE
Brand : MEDION
Model : LIFE P24003 (MD 24115)
Category : Digital decoder