Maxx Heat BTHG002 - Electric heating Batavia - Free user manual and instructions
Find the device manual for free Maxx Heat BTHG002 Batavia in PDF.

User questions about Maxx Heat BTHG002 Batavia
0 question about this device. Answer the ones you know or ask your own.
Ask a new question about this device
Download the instructions for your Electric heating in PDF format for free! Find your manual Maxx Heat BTHG002 - Batavia and take your electronic device back in hand. On this page are published all the documents necessary for the use of your device. Maxx Heat BTHG002 by Batavia.
USER MANUAL Maxx Heat BTHG002 Batavia
Operating instructions
Gebruiksaanwijzing
Mode d'emploi
natural_image
Illustration of a BATAVA fuel injector with orange and gray components against a black textured background (no text or symbols on the device itself)Modelnr. BT-HG002
Art.Nr. 7062420
MAXXHEAT
2000 W
text_image
BATXIA ADVANCED BATS TECHNOLOGY 2 YEAR WARRANTY ANS DE GARANTIE JAHRE GARANTIE JAAR GARANTIE
text_image
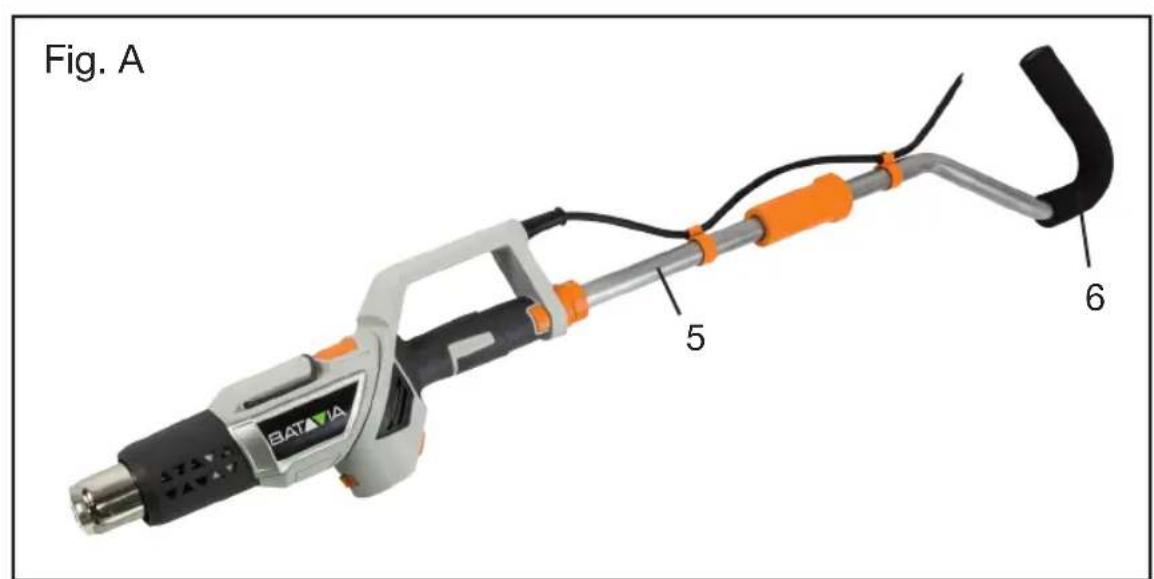
Fig. A BATAVA 5 6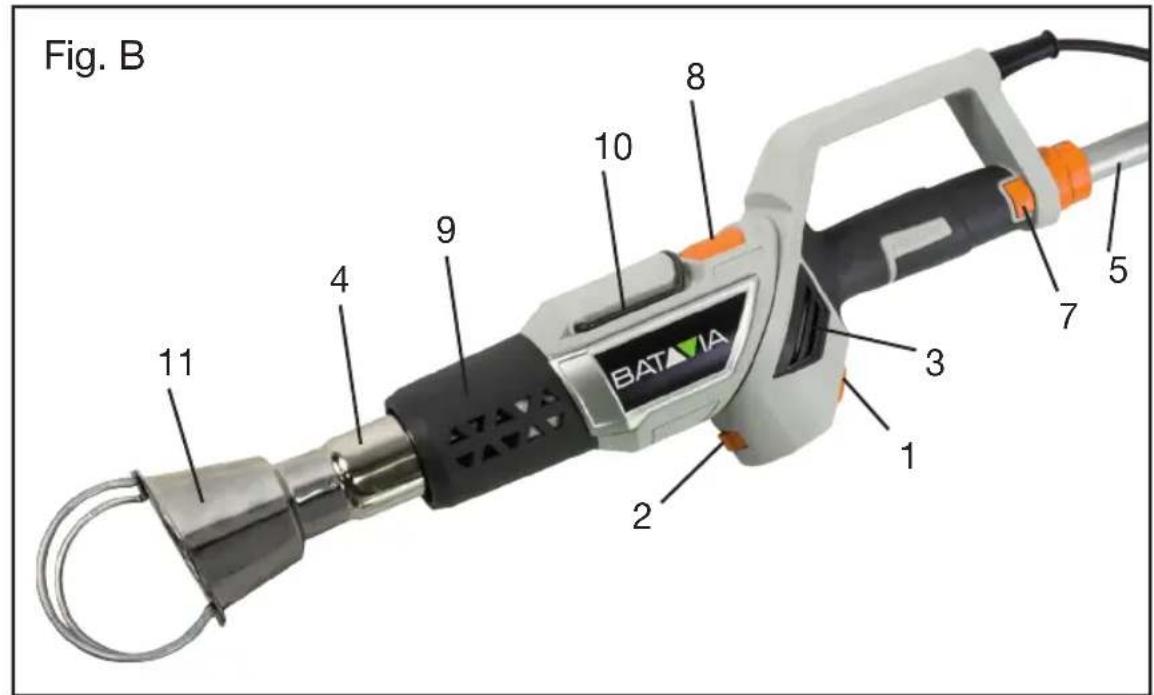
text_image
Fig. B BATAVA 1 2 3 4 5 7 8 9 10 11
text_image
Fig. C 14 13 11 12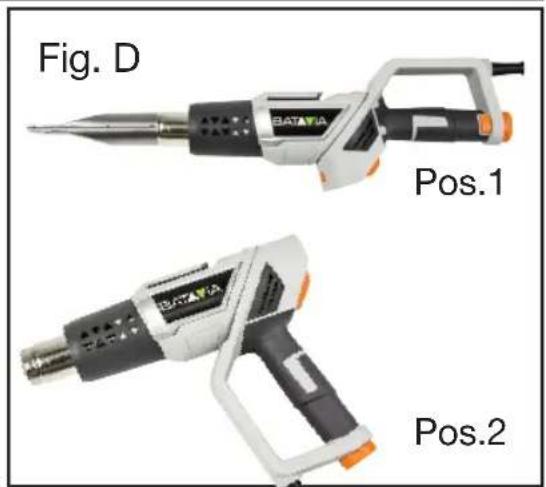
natural_image
Two BATAVA electric soldering tools labeled Fig. D and Pos.1, Pos.2 (no additional text or symbols visible)ÜBERSICHT
- On / off switch
- Temperature switch
- Ventilation openings
- Hot Air nozzle
- Extension handle
- Handle
- Lock button for extension handle
- Lock button for revolving handle
- Cap
- Stand
- Nozzle for weed control
- Flat nozzle for paint removal
- Flat nozzle for paint removal
- BBQ / fireplace nozzle
OVERZICHT
Drehbarer Hanfgriff:
natural_image
Mechanical pipe assembly diagram showing a curved pipe with directional arrows indicating flow or movement (no text labels)Instruction manuals provide valuable hints for using your new device. They enable you to use all functions, and they help you avoid misunderstandings and prevent damage. Please take the time to read this manual carefully and keep it for future reference. Intended for household and similar purposes.
EXPLANATION OF THE SYMBOLS

Denotes risk of personal injury, loss of life or damage to the tool in case of non-observance of the instructions in this manual.

Indicates electrical shock hazard.

Do not expose to rain.

Remove plug from the mains immediately if the cable is damaged or cut.

Caution, hot surface.
GENERAL SAFETY INSTRUCTIONS FOR POWER TOOLS

WARNING! Read all instructions
WARNING: Always switch off the appliance when non-working.
WARNING: Always remove the plug from the socket when not using the device, when replacing the nozzles or during maintenance of the device
Failure to follow all instructions listed below may result in electric shock, fire and/or serious injury.
The term “power tool” in all of the warnings listed below refers to your mains operated (corded) power tool or battery operated (cordless) power tool.
Save these instructions for future reference!
1. Work area
a. Keep work area clean and well lit. Cluttered and dark areas invite accidents.
b. Do not operate power tools in explosive atmospheres, such as in the presence of flammable liquids, gasses or dust.
Power tools create sparks which may ignite the dust of fumes.
c. Keep children and bystanders away while operating a power tool.
Distractions can cause you to lose control.
2. Electrical safety
a. Power tool plugs must match the outlet. Never modify the plug in any way. Do not use any adapter plugs which earthed (grounded) power tools. Unmodified plugs and matching outlets will reduce risk of electric shock.
b. Avoid body contact with earthed or grounded surfaces such as pipes, radiators, ranges and refrigerators. There is an increased risk of electric shock if your body is earthed or grounded.
c. Do not expose power tools to rain or wet conditions. Water entering a power tool will increase the risk of electric shock.
d. Do not abuse the cord. Never use the cord for carrying, pulling or unplugging the power tool. Keep cord away from heat, oil, sharp edges or moving parts. Damaged or entangled cords increase the risk of electric shock.
e. When operating a power tool outdoors, use an extension cord suitable for outdoor use. Use of a cord suitable for outdoor use reduces the risk of electric shock.
f. Always use tool in conjunction with a residual circuit breaker device. The use of a residual circuit breaker device reduces the risk of electric shock.
3. Personal safety
a. Stay alert, watch what you are doing and use common sense when operating a power tool. Do not use a power tool while you are tired or under the influence of drugs, alcohol or medication.
A moment of inattention while operating power tools may result in serious personal injury.
b. Use safety equipment. Always wear eye protection.
Safety equipment such as dust mask, non-skid safety shoes, hard hat, or hearing protection used for appropriate conditions will reduce personal injuries.
c. Avoid accidental starting. Ensure the switch is in the off position before plugging in.
Carrying power tools with your finger on the switch or plugging in power tools that have the switch on invites accidents.
d. Remove any adjusting key or wrench before turning the power tool on.
A wrench or a key left attached to a rotating part of the power tool may result in personal injury.
e. Do not overreach. Keep proper footing and balance at all times.
This enables better control of the power tool in unexpected situations.
f. Dress properly. Do not wear loose clothing or jewellery. Keep your hair, clothing and gloves away from moving parts.
Loose clothes, jewellery or long hair can be caught in moving parts.
g. If devices are provided for the connection of dust extraction and collection facilities, ensure these are connected and properly used.
The use of these pieces of equipment reduce hazards caused by dust.
- Power tool use and care
a. Do not force the power tool. Use the correct power tool for your application.
The correct power tool will do the job better and safer at the rate for which it was designed.
b. Do not use the power tool if the switch does not turn it on and off.
Any power tool that cannot be controlled with the switch is dangerous and must be repaired.
c. Disconnect the plug from the power source before making any adjustments, changing accessories, or storing power tools.
Such preventive safety measures reduce the risk of starting the power tool accidentally.
d. Store idle power tools out of the reach of children and do not allow persons unfamiliar with the power tool or these instructions to operate the power tool.
Power tools are dangerous in the hands of untrained users.
e. Maintain power tools. Check for misalignment or binding of moving parts, breakage of parts and any other condition that may affect the power tools operation. If damaged, have the power tool repaired before use.
Many accidents are caused by poorly maintained power tools.
f. Keep cutting tools sharp and clean.
Properly maintained cutting tools with sharp cutting edges are less likely to bind and are easier to control.
g. Use the power tool, accessories and tool bits etc., in accordance with these instructions and in the manner intended for the particular type of power tool, taking into account the working conditions and the work to be performed.
Use of the power tool for operations different from intended could result in a hazardous situation.
- Service
a. Please use a qualified expert who uses original replacement parts to repair your power tool.
This will ensure proper functioning of the power tool.
ADDITIONAL SAFETY INSTRUCTIONS

When using electric tools, basic safety precautions should always be followed to reduce the risk of fire, electric shock and personal injury.
Read all these instructions before attempting to operate this product and save these instructions.
Before using the appliance
Check the following:
- Make sure the voltage of the hot air gun corresponds with the power voltage;
- Are the mains lead and the mains plug in a good state: strong, without ravels or damages.
– Caution is advised when using long extension cables
- Do not use the appliance under moist circumstances;
- The metal mouthpiece gets hot. Watch out and do not touch the metal mouthpiece;
- Prevent damage of the heating element. Do not lock or block the mouth piece;
- Do not leave the appliance when switched on;
- When in operation do not point the device at people or animals
- Never look into the hot air nozzle
- Do not use this device in rain or damp surroundings, or near explosive or flammable products.
- Do not use the device on or near very dry spots to avoid fire
- Always remove the plug from the socket when not using the device, when replacing the nozzles or during maintenance of the device
- Do not point the device at the same place for longer periods of time
- Do not hold the device too close to the surface about to be worked on as the device can overheat
- Pay attention to the direct / indirect workspace as the heat can ignite flammable materials, which are close by but not necessarily in view
- Do not allow the hot parts of the device to touch the cord or other flammable materials
- The device should always be clean, dry and free of grease and oil
- Do not use the appliance for purposes other than for which it is intended.

This appliance operates at a temperature of 600 degrees without visible signs of this temperature (no flames), still there is a chance of fire risk. Watch out for the hot air stream from the mouth piece. This air stream can cause burns.
When operating the appliance
- If you are going to use the hot air gun, vapours and gas can be released during a short time. This can be harmful for your health. Asthmatics can suffer hindrance of it;
- Before connecting the plug to the mains voltage you have to check if the switch is in position "0";
- Keep the mains lead always away from the mouthpiece of the hot air gun;
- Keep children and animals away from the appliance if you are using it.
- Keep all parts of the body away from the metal heating head. Do not touch it before it is cooled down.
- Carry the appliance by the handle when the metal heating head is cooled down.
- Hold the appliance by insulated gripping surfaces only, because the metal heating head may contact hidden wiring or its own cord.
Immediately switch off the appliance when:
- Plug and/or cable are defective or damaged;
- The switch is defective;
- You smell or see smoke caused by scorched insulation from the hot air gun.
Electrical safety
When using electric machines always observe the safety regulations applicable in your country to reduce the risk of fire, electric shock and personal injury. Read the following safety
instructions and also the enclosed safety instructions.

Always check that the power supply corresponds to the voltage on the rating plate.

Class II machine – Double insulation – You don't need any earthed plug
Replacing cables or plugs
If the power cord is damaged, it must be replaced by the manufacturer or its service agent or a similarly qualified person, in order to avoid a hazard.
Immediately throw away old cables or plugs when they have been replaced by new ones. It is dangerous to insert the plug of a loose cable in the wall outlet.
Using extension cables
Only use an approved extension cable suitable for the power input of the machine. The minimum conductor size is 1.5 mm ^2 . When using a cable reel always unwind the reel completely
Inadequate extension cords can be dangerous. If an extension cord is used, it shall be suitable for outdoor use, and the connection has to be kept dry and off the ground. It is recommended that this is accomplished by means of a cord reel which keeps the socket at least 60 mm above the ground.
CONTENTS
1 Weed Killer
1 Nozzle for weed control
2 Nozzles for paint removal
1 Nozzle for BBQ
1 Extension handle (2 parts)
1 Instruction manual
PRODUCT
Fig. A
- On / off switch
- Temperature switch
- Ventilation openings
- Hot Air nozzle
- Extension handle
- Handle
- Lock button for extension handle
-
Lock button for revolving handle
-
Cap
- Stand
- Nozzle for weed control
- Flat nozzle for paint removal
- Glass protection nozzle for paint removal
- BBQ / fireplace nozzle
OPERATION

Always use with caution! Do NOT cover the ventilation openings during use as it causes a risk of burns! Do not touch the hot nozzle!
Temperature settings:
With the temperature switch you can select from three temperature settings. Depending on the application, you can use the following settings:
Setting I 50 °C (venting / cooling)
Setting II 400 °C
Setting II 600 °C
The volume of air in each setting 500L /Minute
To turn on the power:
- Press the on / off switch (1)
To turn off the appliance:
- Press the on / off switch (1) again. The unit is now switched off.
To install the nozzle:
The nozzles can easily be pushed over the hot air nozzle. Never touch the nozzles during or immediately after use of the device. The nozzles are very hot.
Rotating handle:
The device has two handle positions (see Fig. D) Position 1 is suitable for killing weeds and igniting the BBQ. In position 2, the device can be used as a hot air gun.
To change the handle position:
- Press the release button (8)
- Turn the handle to the desired position
- Make sure that the release button has been locked again.
OPTION 1: WEED KILLER
Assembly of the telescopic extension handle:

natural_image
Mechanical pipe assembly diagram showing a curved pipe with directional arrows and labeled component A (no text or symbols beyond labels)Attach the extension handle to the device. Make sure that the extension handle firmly clicks into position. The telescopic extension handle can be adjusted easily to the required length. Turn knob A, reposition the handle to the desired length and then turn knob A securely. If using the device as a weed killer you must use the extension handle. Hold the weed killer firmly by holding the end of the extension handle.
Use:
- Ensure the extension handle is firmly fixed onto the device and that the device is turned off.
- Turn the device to position 1 (see Fig. D)
• Install the nozzle (11) to destroy weeds. - Insert the plug into the socket
- Check to ensure the nozzle is not blocked before turning the device on.
- Set the temperature to setting II or III.
- Allow the device about 45 seconds to warm up.
- To eliminate weeds, hold the nozzle over the weeds for about 5 seconds. During these 5 seconds the cell structure of the weed is destroyed. As a result, the weed dies within a few days.
- It is not necessary to completely burn the weeds, 5 seconds is more than sufficient.
- For an efficient treatment the nozzle should be held around 0 to 5 cm above the weeds
- The effects are not visible immediately but will take a while before they can be seen. It is more of a long-term effect.
OPTION 2: PAINT REMOVAL
The paint removal is always done without the use of the extension handle. Remove the extension handle by pressing and releasing button (7) and pulling the extension handle from the device.
The paint removal can be used for various purposes, such as:
- Removing old paint and gloss
- Removing self-adhesive labels
- Bonding of PVC labels
- Removing vinyl wallpaper
- Fast drying of damp equipment
- Shrink packaging
• Defrosting of water pipes - Loosening of nuts and bolts
The following standard nozzles are included:
- Glass protection nozzle (13): For the removal of paint and gloss from window frames, protecting the window and panes.
- Flat nozzle (12): For a better hot air distribution.
The device can also be used without a nozzle attachment.
Use:
- Remove the extension handle
- Turn the device to position 2 (Fig. D)
- Attach the desired nozzle onto the device.
- Insert the plug into the socket
- Check to ensure the nozzle is not blocked before turning the device on.
- Set the temperature to setting II or III.
OPTION 3: BBQ / FIREPLACE LIGHTER
The BBQ and fireplace lighter is always to be used without the extension handle. Remove the extension handle by pressing and releasing button (7) and pulling the extension handle from the device.
Use:
- Remove the protective cap (9) from the device.
- Attach the BBQ nozzle onto the device
- Select temperature setting III.
- Place the nozzle under the coal or the wood.
- Ensure that the firelighter is properly positioned
-
Insert the plug into the socket
-
Check to ensure the nozzle is not blocked before turning the device on.
- Remove the device from the coals or the wood as soon as it starts to glow
- Now blow hot air into the coals or wood from a distance of around 5 – 10 cm, until the coals or wood is burning properly.
- Doing this will help to avoid damaging the nozzle attachment. Exposing the nozzle to high temperatures for a prolonged period of time could cause the material to melt. Please follow these instructions to achieve long-term enjoyment with the product.
Watch Out! To avoid overheating of the BBQ or Fireplace do not use the device for longer than necessary.
COOLING:
Before turning off the device, it must be cooled first. Select temperature setting I for at least one minute. The device can be switched off thereafter.
Place the appliance on its stand (10) after use and allow it to cool down before storage
STORAGE:
Make sure that the device has completely cooled down before storing.
CLEANING
Keep the ventilation slots of the machine clean to prevent overheating of the engine. Regularly clean the machine housing with a soft cloth, preferably after each use. Keep the ventilation slots free from dust and dirt. If the dirt does not come off use a soft cloth moistened with soapy water. Never use solvents such as petrol, alcohol, ammonia water, etc. These solvents may damage the plastic parts.
TECHNICAL DATA
Voltage: 230 - 240 V\~ 50 Hz
Power: 2000 W
Air flow: . . . . . . . . . . . . 500 litres/minute
Setting I: .....50 °C
Setting II: 400 °C
Setting III: 600 °C
DISPOSAL

Do not dispose of electric power tools with domestic refuse.
The electric power tool is shipped in packaging to reduce transport damage.
This packaging is a raw material and as such can either be reused or can be fed back into the raw material cycle. The electric power tool and its accessories are made from various materials such as metals and plastics. Take defective components to a special refuse collection point. Ask about these at your specialist shop or local council.
EC-DECLARATION OF CONFORMITY
We, the Batavia GmbH, Weth. Buitenhuisstraat 2a, NL-7951 SM Staphorst, declare by our own responsibility that the product Maxx-Heat, Model BT-HG002, Item-No 7062420, is according to the basic requirements, which are defined in the European Directives Electromagnetic Compatibility 2004/108/EC (EMC), 2006/42/EC (Machinery), 2011/65/EC and their amendments. For the evaluation of conformity, the following harmonized standards were consulted:
EN 60335-1
EN 60335-2-45
EN 62233
EN 55014-1
EN 55014-2
EN 61000-3-2
EN 61000-3-3
Staphorst, 15 February 2015

text_image
Handwritten signature or scribble on a white background, possibly a signature or artistic markMeino Seinen, QA Representative Batavia GmbH, Weth. Buitenhuisstraat 2a, 7951 SM Staphorst, Netherlands
Français
CHER CLIENT
Attention, surface chaude.
CONSIGNES GÉNÉRALES DE SÉCURITÉ POUR APPAREILS ÉLECTRIQUES

natural_image
Mechanical component diagram showing a lever with curved handle and labeled point A (no text or symbols beyond labels)CE-DÉCLARATION DE CONFORMITÉ
text_image
Handwritten signature or scribble on a white background, possibly a signature or autograph.Draaibare handgreep:
natural_image
Mechanical diagram showing a lever with curved handle and labeled component A (no text or symbols beyond labels)text_image
Handwritten signature or scribble on a white background, possibly a signature or artistic mark.This product has got a 2 year warranty
Dear Client, if for any reason this product is not working, please ensure you contact our Client Service Centre. Ensure you have your original receipt of purchase. This warranty covers all defects in workmanship or materials in this Batavia product for a two year period from the date of purchase. The warranty does not cover any malfunction, or defect resulting from misuse, neglect, alteration, or repair.
Other European countries | Customer Services
Monday till Friday from 8 am until 4 pm

00800 66477400
Overige landen Europa | Klantenservice
This appliance can be used by children aged from 8 years and above and persons with reduced physical, sensory or mental capabilities or lack of experience and knowledge if they have been given supervision or instruction concerning use of the appliance in a safe way and understand the hazards involved. Children shall not play with the appliance. Cleaning and user maintenance shall not be made by children without supervision.