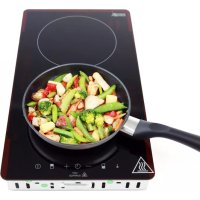
BCT115J1BIS - Cooker Avanti - Free user manual and instructions
Find the device manual for free BCT115J1BIS Avanti in PDF.


| Product Type | Induction Cooktop (hob) |
| Power Supply | 115 V AC, 60 Hz, 15 A (dedicated circuit recommended) |
| Burner Power | Front burner: 1200 W; Rear burner: 1800 W |
| Number of Burners | 2 |
| Controls | Touch panel with digital display, lock, timer |
| Temperature Ranges | 0 to 9 (0 = no heat, 9 = high heat) |
| Automatic Timer | Adjustable from 0 to 99 minutes, auto shut-off |
| Panel Lock | Auto-lock after 1 min of inactivity; activate/deactivate by long press of 3 seconds |
| Hot Surface Indicator | Flashing "H" display after burner turns off |
| Safety | Child lock, auto shut-off with timer, mandatory grounding |
| Installation | By a qualified technician; 3-prong grounded outlet; minimum clearance of 30 inches above the surface |
| Maintenance and Cleaning | Clean with mild detergent and a damp cloth; do not use steel wool or abrasive cleaners |
| Recommended Cookware | Flat bottoms, size appropriate for burner, tight-fitting lids |
| Intended Use | Domestic, indoor only |
| Warranty | 1 year parts and labor (90 days for commercial use) |
| Repairability | Entrust to a qualified technician; contact Avanti customer service |
Frequently Asked Questions - BCT115J1BIS Avanti
User questions about BCT115J1BIS Avanti
0 question about this device. Answer the ones you know or ask your own.
Ask a new question about this device
Download the instructions for your Cooker in PDF format for free! Find your manual BCT115J1BIS - Avanti and take your electronic device back in hand. On this page are published all the documents necessary for the use of your device. BCT115J1BIS by Avanti.
USER MANUAL BCT115J1BIS Avanti
Avanti has a policy of continuous improvement on its products and reserves the right to change materials and specifications without notice.
Avanti Products LLC
P.O. Box 520604
Miami, FL 33152
www.avantiproducts.com
TABLE OF CONTENTS
| Help Us Help You ... | 3 |
| Appliance Safety | 4 |
| Important Safeguides | 5 |
| Parts and Features | 6 |
| Important Safety Instructions | 7 - 8 |
| Installation Instructions | 9 |
| Before Using Your Electric Cooktop | 9 |
| Important Precautions and Recommendations | 10 |
| Installation of Your Electric Cooktop | 11 |
| Electrical Connection | 12 |
| Operating Your Electric Cooktop | 13 |
| Control Panel | 14 |
| Cookware Tips | 14 |
| Care and Maintenance | 15 |
| Troubleshooting Guide | 15 |
| Service for Your Appliance | 16 |
| Wiring Diagram | 16 |
| Your Avanti Products Warranty | 17 |
| Instrucciones en Español | 18 - 31 |
| Instructions en Français | 32 - 46 |
| Registration Information and Registration Card | Last Page |
HELP US HELP YOU...
| Read this guide carefully. | Write down the model and serial numbers. |
| It is intended to help you operate and maintain your new appliance properly. | You'll find them on a plate located on the rear outside wall of the appliance. |
| Keep it handy to answer your questions.If you don't understand something or you need more help, please call: | Please write these numbers here: |
| Avanti Customer Service800-220-5570 | Date of Purchase |
| Keep proof of original purchase date (such as your sales slip) with this guide to establish the warranty period. | Model Number |
| Serial Number | |
| CAUTION:THIS APPLIANCE IS NOT DESIGNED FOR THE STORAGE OF MEDICINE OR OTHER MEDICAL PRODUCTS. | Use these numbers in any correspondence or service calls concerning your appliance.If you received a damaged appliance, immediately contact the dealer (or builder) that sold you the appliance.Save time and money. Before you call for service, check the Troubleshooting Guide. It lists causes of minor operating problems that you can correct yourself. |
IF YOU NEED SERVICE
We're proud of our service and want you to be pleased. If for some reason you are not happy with the service you receive, here are some steps to follow for further assistance.
FIRST, contact the people who serviced your appliance. Explain why you are not pleased. In most cases, this will solve the problem.
NEXT, if you are still not pleased, write all the details, including your telephone number, and send it to:
Customer Service
Avanti Products
10880 NW 30 Street
Miami, FL 33172 USA
APPLIANCE SAFETY
Your safety and the safety of others are very important.
We have provided many important safety messages in this manual and on your appliance. Always read and obey all safety messages.

This is the Safety Alert Symbol.
This symbol alerts you to potential hazards that can kill or injure you and others. All safety messages will follow the Safety Alert Symbol and either the words "DANGER", "WARNING" or "CAUTION". These words mean:
| Danger means that failure to heed this safety statement may result in severe personal injury or death | |
| Warning means that failure to heed this safety statement may result in extensive product damage, serious personal injury, or death. | |
| CAUTION | Caution means that failure to heed this safety statement may result in minor or moderate personal injury or property or equipment damage. |
All safety messages will alert you to what the potential hazard is, tell you how to reduce the chance of injury, and let you know what can happen if the instructions are not followed.

natural_image
Warning symbol: black triangle with exclamation mark (no text or numbers)PROP. 65 WARNING FOR CALIFORNIA RESIDENTS
WARNING:
Cancer And Reproductive Harm
www.p65warnings.ca.gov
IMPORTANT SAFEGUIDES

Before the appliance is used, it must be properly positioned and installed as described in this manual, so read the manual carefully. To reduce the risk of fire, electrical shock or injury when using the appliance, follow basic precaution, including the following:

DANGER

• It is recommended that a separate circuit, serving only your appliance be provided.
- Never clean appliance parts with flammable fluids. These fumes can create a fire hazard or explosion. And do not store or use gasoline or other flammable vapors and liquids in the vicinity of this or any other appliance. The fumes can create a fire hazard or explosion.
- Before proceeding with cleaning and maintenance operations, make sure the power line of the unit is disconnected.
- Disconnect power to the appliance before cleaning or servicing. Failure to do so can result in electrical shock or death.
- Do not attempt to repair or replace any part of your appliance unless it is specifically recommended in this manual. All other servicing should be referred to a qualified technician.

WARNING

- This appliance shall not be used for space heating. The surface unit should not be operated without cookware. This information is based on safety considerations.
- Keep appliance area clear and free from combustible materials, gasoline, and other flammable vapors.
• Do not obstruct the flow of ventilation air. - Disconnect the electrical supply to the appliance before servicing.
- When removing appliance for cleaning and/or service:
• Disconnect AC power supply. - It is important for the appliance to be leveled in order to work properly. You may need to make several adjustments to level it.
• Never allow children to operate, play with or sit on the appliance. - Electrical Grounding Instructions - The appliance must be installed and grounded by a qualified technician in accordance with the National Electrical Code ANSI/NFPA No. 70 (Latest Edition) and local electrical code requirements.
- Replacement Parts – Only authorized replacement parts may be used in performing service on the appliance. Replacement parts are available from factory authorized parts distributors. Contact the nearest Avanti service center in your area.
PARTS & FEATURES
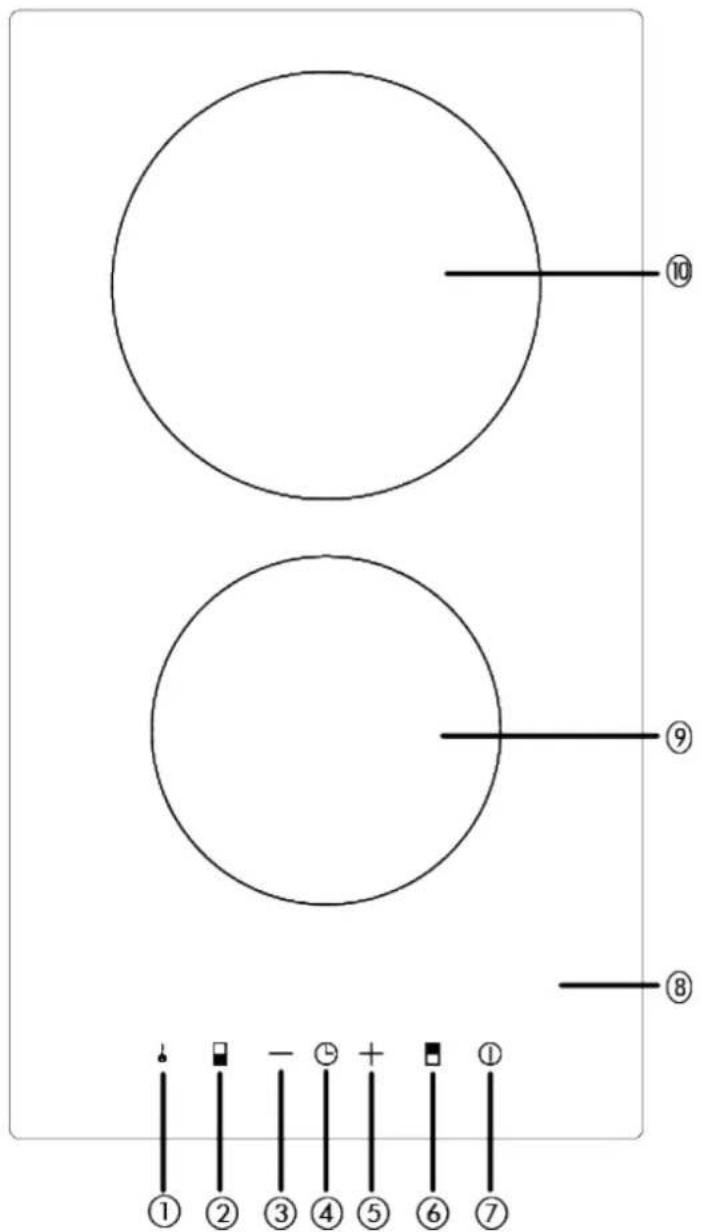
- Control Panel Lock Button
- Front Burner Selector Button
- Reduce / Decrease (-) Button
- Timer Selector Button
- Add / Increase (+) Button
- Rear Burner Selector Button
- Power ON / OFF Button
- Cooktop Surface
9 Front Burner (1200 Watts)
10 Rear Burner (1800 Watts)
IMPORTANT SAFETY INSTRUCTIONS
| WARNING | To reduce the risk of fire, electrical shock, or injury when using the appliance, follow these basic precautions: |
| Read all instructions before using the appliance.Proper Installation - Be sure the appliance is properly installed and grounded by a qualified technician.Installation, repair and maintenance work should be performed by a qualified service technician. Work by unqualified persons could be dangerous and may void the warranty.Install the appliance so that the power cord does not come into contact with any portion of the unit which may become hot during use.In the event of any damage to the appliance, it must be turned off immediately and disconnected from the main power supply. Do not use the appliance until it has been repaired.Never use your appliance for warming or heating the room.Do Not Leave Children Alone - Children should not be left alone or unattended in area where the appliance is in use. They should never be allowed to sit or stand on any part of the appliance.Do not store items of interest to children in cabinets above the appliance. Children climbing on the appliance to reach these items could be injured.The appliance is hot during use and remains so for some time after being switched off. Keep children away from the appliance.Ensure that all packing material is disposed of safely and kept out of the reach of children. Danger of suffocation!Wear Proper Apparel - Loose fitting or hanging garments should never be worn while using the appliance.User Servicing - Do not repair or replace any part of the appliance unless specifically recommended in the manual. All other servicing should be referred to a qualified technician.Storage in or on Appliance - Flammable materials should not be stored near the surface units.Do Not Use Water on Grease Fires - Smother fire or flame or use dry chemical or foam-type extinguisher.Use Only Dry Potholders - Moist of damp potholders on hot surfaces may result in burns from steam. Do not let potholder touch hot heating elements. Do not use a towel or other bulky cloth.Use Proper Pan Size - This appliance is equipped with one or more surface units of different size. Select utensils having flat bottoms large enough to cover the surface unit heating element. The use of undersized utensils will expose a portion of the heating element to direct contact and may result in ignition of clothing. Proper relationship of utensil to burner will also improve efficiency.Never Leave Surface Units Unattended at High Heat Settings – Boil over causes smoking and greasy spillovers that may ignite.Glazed Cooking Utensils - Only certain types of glass, glass/ceramic, ceramic, earthenware, or other glazed utensils are suitable for appliance top service without breaking due to sudden change in temperatureUtensil Handles Should Be turned Inward and Not Extend Over Adjacent Surface Units – To minimize burns, ignition of flammable materials, and spillage due to unintentional contact with the utensil, the handle of a utensil should be positioned so that it is turned inward, and does not extend over adjacent surface units. | |
- Do Not Cook on Broken Cook-top – If cook-top should break, cleaning solutions and spillovers may penetrate the broken cook-top and create a risk of electric shock. Contact a qualified technician immediately.
- Clean Cook-top With Caution – If a wet sponge or cloth is used to wipe spills on a hot cooking area, be careful to avoid steam burn. Some cleaners can produce noxious fumes if applied to a hot surface.
- Use Care When Opening Door – Let hot air or steam escape before removing or replacing food.
- Do Not Heat Unopened Food Containers – Build-up of pressure may cause container to burst and result in injury.
- Keep Oven Vent Ducts Unobstructed.
- Placement of Oven Racks – Always place oven racks in desired location while oven is cool. If rack must be moved while oven is hot, do not let potholder contact hot heating element in oven.
- Do Not Touch Surface Units, Heating Elements, Interior Surfaces of Oven or Areas Near Units - Surface units and heating elements may be hot even though they are dark in color. Area near surface and interior surfaces of an oven become hot enough to cause burns. During and after use, do not touch, or let clothing or other flammable materials contact surface units, areas near units or interior surfaces of oven until they have had sufficient time to cool. Other surfaces of the appliance may become hot enough to cause burns – among these surfaces are oven vent openings and surfaces near these openings, oven doors, and window of oven doors.
This Unit Is For Indoor Use Only -SAVE THESE INSTRUCTIONS-
INSTALLATION INSTRUCTIONS

WARNING
HAVE THIS APPLIANCE INSTALLED BY A QUALIFIED INSTALLER.
Improper installation, adjustment, alteration or maintenance can cause injury or property damage.
Consult a qualified installer or service agency.
IMPORTANT – SAVE FOR THE LOCAL ELECTRICAL INSPECTOR'S USE.
ÿ BEFORE USING YOUR ELECTRIC COOKTOP
- Remove the exterior and interior packing. - Check to be sure you have all of the following parts:
• 1 Instruction Manual
• 1 Installation Bracket Assembly Kit (4 Brackets in total).
(Packed in the Styrofoam packing – DO NOT DISCARD)
- Clean the cooktop surface with lukewarm water using a soft cloth or sponge.
- Have your appliance installed and properly grounded by a qualified installer in accordance with the installation instructions.
- Do not attempt to repair or replace any part of your appliance unless it is specifically recommended in this manual.
- Do not remove permanently affixed labels, warnings, or plates from the product. This may void the warranty.
- The installer should leave these instructions with the consumer who should retain for local inspector's use and for future reference.
- Please observe all local and national codes and ordinances.
IMPORTANT:
This cooktop is designed and manufactured solely for the cooking of domestic (household) food and is not suitable for any non-domestic application and therefore should not be used in a commercial environment.
The appliance warranty will be void if the cooktop is used within a non-domestic environment i.e. a semi commercial, commercial or communal environment.
ÿ IMPORTANT PRECAUTIONS AND RECOMMENDATIONS
After having unpacked the appliance, check to ensure that it is not damaged and all accessories or items included were received. In case of doubt, do not use it and consult your supplier or a professionally qualified technician.
Packing elements (i.e. plastic bags, polystyrene foam, packing straps, etc.) should not be left around within easy reach of children, as these may cause serious injuries.
The appliance has been thoroughly tested for safe and efficient operation. However, as with any appliance, there are specific installation and safety precautions that must be followed to ensure safe and satisfactory operation.
- Do not attempt to modify the technical characteristics of the appliance as this may become dangerous to use.
- Do not carry out cleaning or maintenance operations on the appliance without having previously disconnected it from the electric power supply.
• After use, ensure that the controls are in the OFF position.
• Never touch the appliance with wet hands or feet.
• Do not operate the appliance barefooted.
• Do not allow children or other incapable people to use the appliance without supervision. - During and after use of the appliance, certain parts will become very hot. Do not touch hot parts.
- Keep children away from the appliance when it is in use.
• Fire Risk! Do not store flammable materials in the oven or in the bottom drawer. - Fire Risk! Do not attempt to dry clothing or any other type of textile in the oven or in the bottom drawer.
• Make sure that electrical cables connecting other appliances in the proximity of the appliance cannot come into contact with the hob or become entrapped in the oven door. - The manufacturer declines all liability for injury to persons or damage to property caused by incorrect or improper use of the appliance.
- To avoid any possible hazard, the appliance must be installed by qualified personnel only. Any repairs by unqualified persons may result in electric shock or short circuit. In order to avoid possible injuries to your body or to the appliance, do not attempt ant repairs by yourself. Such work should be carried out by qualified service personnel only.
- Burn Hazard! The appliance may become very hot during operation. Make sure children are kept out of reach and warn them accordingly. To avoid burns use clothes and gloves when handling hot parts or utensils.
- Stand away from the appliance when operating. Hot air or steam which escapes can cause burns to hands, face, and/or eyes.
- Never clean the oven with any high-pressure steam cleaning devices, as it may provoke a short circuit.
- This appliance is intended for household use. Never use the appliance for any other purpose.
- If you should decide not to use the appliance any longer (or decide to substitute an older model), before disposing of it, it is recommended that it be made inoperative in an appropriate manner in accordance to health and environmental protection regulations, ensuring in particular that all potentially hazardous parts be made harmless, especially in relation to children who could play with old appliances. Remove the door before disposal to prevent entrapment.

INSTALLATION OF ELECTRIC COOKTOP
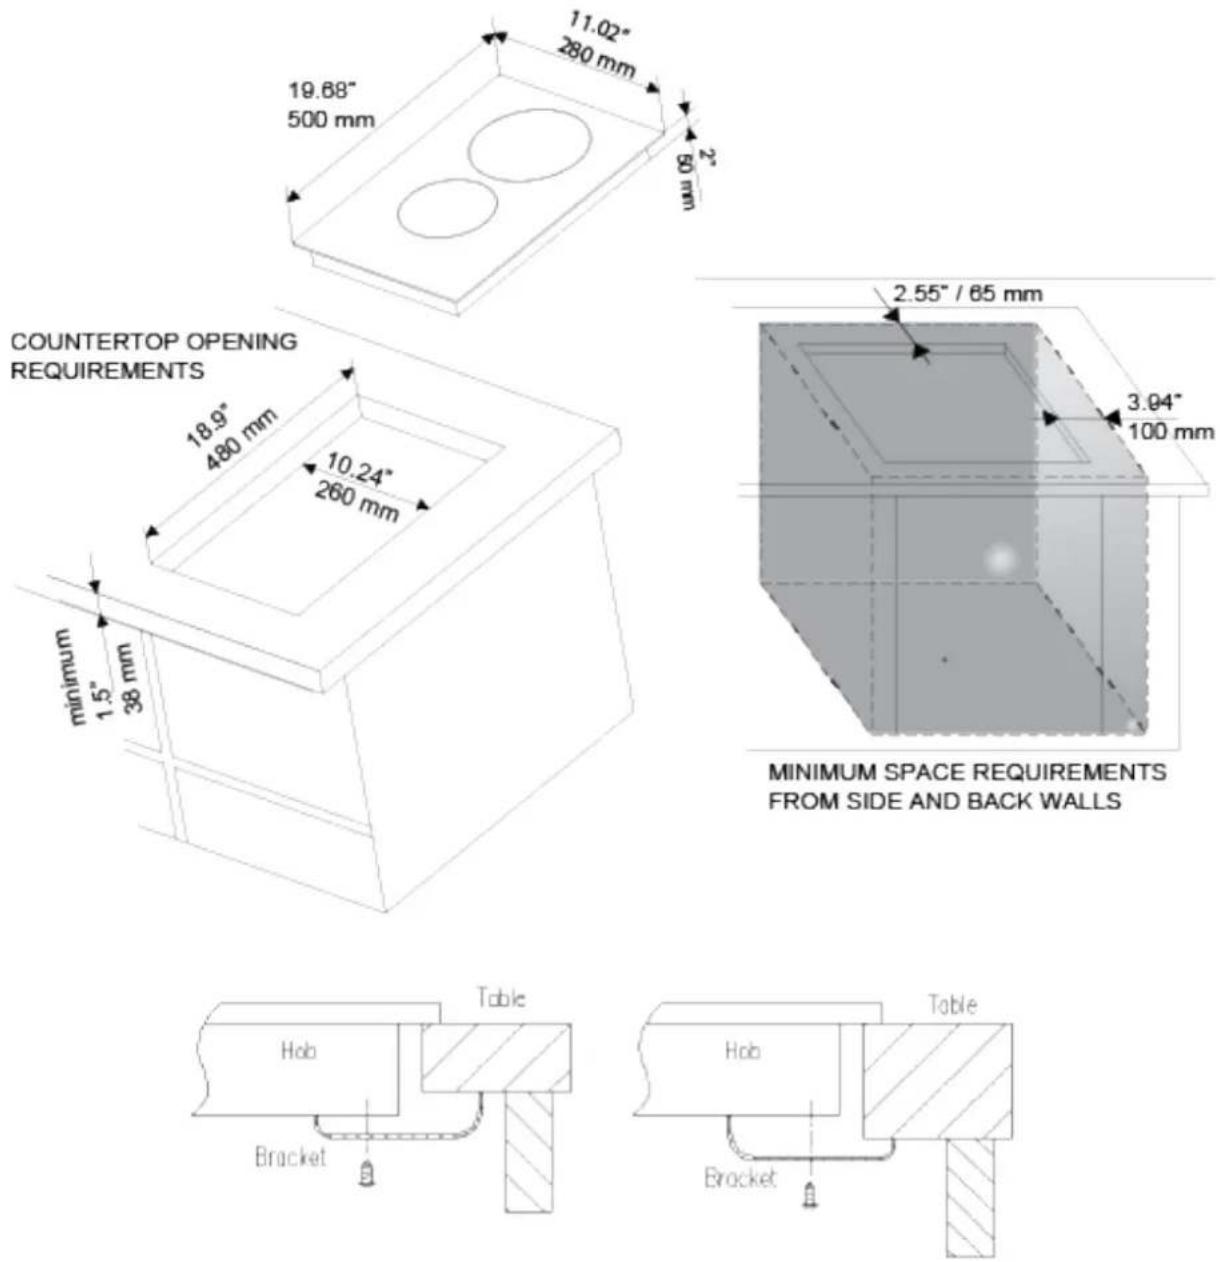
- The electric cooktop must be installed by a qualified technician. Make sure you have everything necessary for correct installation. It is the installer's responsibility to comply with installation clearances specified in the manual.
- Cabinet opening dimensions that are shown below must be used. Given dimensions are minimum clearances. The minimum spacings must be maintained between the appliance cooking surface and the horizontal surface above the cooking top.
- 30 inches is the minimum clearance between the top of the cooking surface and the bottom of an unprotected wood or metal cabinet
- To eliminate the risk of burns or fire by reaching over heated surface units, cabinet storage space located above the surface units should be avoided. If cabinet storage is to be provided, the risk can be reduced by installing a vent hood that projects horizontally a minimum of 5 inches beyond the bottom of the cabinets.
- Avoid locating the unit in moist areas. As this may result in the risk of electrical shock.
ELECTRICAL CONNECTION

WARNING
Improper grounding can result in the risk of electrical shock. If the power cord is damaged, have it replaced by an authorized Avanti Products service center.
The appliance must be properly installed and grounded by a qualified technician in accordance, with the National Electrical Code ANSI / NFPA No. 70 (Latest Edition) and local electrical code requirements. Installation should be made by a licensed electrician.
The appliance may be connected by means of permanent "Hard Wiring" or "Power Supply Cord Kit".
The cooktop must be connected to the proper electrical voltage and frequency as specified on the rating label. Note: Unit must be connected to an independent 20 Amp circuit.
The cooktop can be connected directly to the fused disconnect (or circuit breaker box) through flexible, armored or non-metallic sheathed, copper cable (with grounding wire). Allow two to three feet of slack in the line so that it can be moved if servicing is ever necessary.
FOR PERSONAL SAFETY, THE COOKTOP MUST BE PROPERLY GROUNDED.
Remove house fuse or open circuit breaker before beginning installation.
Do not attempt to repair or replace any part of the appliance unless it is specifically recommended in this manual. All other servicing should be referred to a qualified technician.
To minimize the possibility of electric shock, disconnect this appliance from the A/C power supply before attempting any maintenance.
NOTE: Turning the appliance off does not disconnect the appliance from the power supply. We recommend having a qualified technician service your appliance.
| INSTALLATION MUST BE DONE BY A LICESNSED PROFESSIONAL | ||
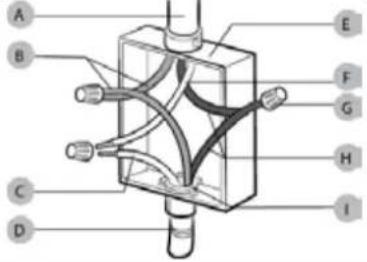 | A – 3-wire cable from the main power supplyB – L1 WiresC – Ground (G) or bare ground wire (from cooktop)D – 3-Wire cable from the cooktopE – Junction Box | F – Neutral wire(from power supply)G – UL listed wire connectorH – L2 wiresI – UL listed or CSA approved conduit connector |
| 1. Disconnect Main Power Supply2. Remove junction box cover, if present.3. Connect the flexible cable conduit from the cooktop to the junction box using a UL listed or CSA approved conduit connector.4. Tighten screws on conduit connector, if present.5. Connect the two L2 wires together using the UL listed wire connectors6. Connect the two L1 wires together using the UL listed wire connectors7. Connect the Ground (G) or bare ground wire from the cooktop cable to the Ground (G) or bare ground wire (in the junction box) using UL listed wire connectors.8. Install junction box cover9. Reconnect power. | ||
OPERATING YOUR APPLIANCE
ÿ CONTROL PANEL
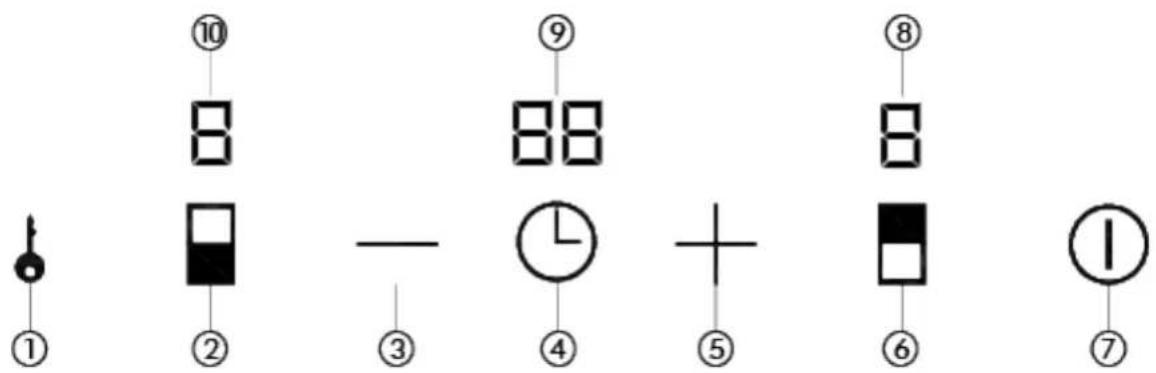
| 1 | Control Panel Lock Button | 6 | Rear Burner Selector Button |
| 2 | Front Burner Selector Button | 7 | Power ON / OFF Button |
| 3 | Reduce / Decrease (-) Button | 8 | Rear Burner Control Display |
| 4 | Timer Selector Button | 9 | Timer Control Display |
| 5 | Add / Increase (+) Button | 10 | Front Burner Control Display |
Push this button to turn the cooktop power on or off,
BURNER SELECTOR BUTTONS (FRONT BURNER / REAR BURNER)
Press the appropriate button for the desired burner.
Once pressed the burner display will show the default setting (5 = Medium), adjust to the desired cook temperature using the (-) or (+). The temperature setting ranges from 0 - 9. The setting will blink or flash in the display indicating it is in setting mode. Once you have selected the desired temperature simply press the button for the selected burner or leave the control panel alone for approximately for 3 seconds, the setting will stop blinking in the display window.
Example of comparable temperature ranges:
| 0 | 1 – 2 | 3 – 4 | 5 – 6 | 7 – 8 | 9 |
| No Heat | Low Heat | MediumLow Heat | MediumHeat | MediumHigh Heat | High Heat |
AUTOMATIC SHUT OFF TIMER
Press to set a pre-set cook time, press the Timer button and then set the desired cook time using the (-) or (+) buttons. The default time is 10 minutes.
Press the button for the desired burner (front or rear), then select the desired cook temperature setting using the (-) or (+) buttons.
Press the timer button (10 will appear in the display window as 10 minutes is the default), set the desired cook time by pressing the (-) or (+) buttons (time ranges between 0 - 99 minutes).
The (•) next to the temperature setting in each window will turn on to indicate the timer has been set for that burner.
Once set, the unit will automatically shut off after the cook time has expired.
HOT SURFACE INDICATOR
After the burner is used and turned off, the display will flash (H) to warn that the surface is still hot.
Once the burner and surface has cooled down the (H) indicator will turn off automatically.
Each burner will show the (H) warning respectively.
CONTROL PANEL LOCK:
When the control panel lock is activated, the display will flash LO. This is a safety system that will automatically lock the controls after no activity on the control panel for approximately 1 minute. To deactivate the control panel lock, simply press and hold the button for approximately 3 seconds, the indicator light will turn off and the controls will work as normal.
To activate the lock, simply press and hold the button for approximately 3 seconds and the control panel will be lock and will not allow any changes.
ÿ COOKWARE TIPS
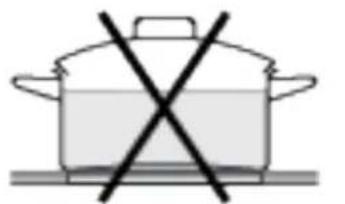
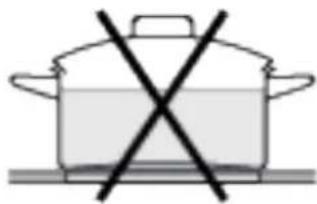
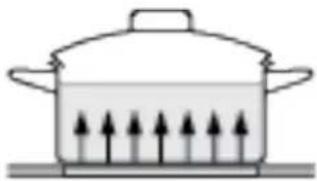
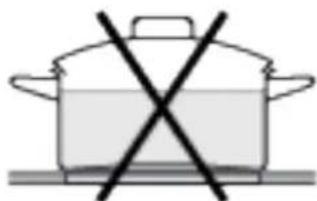
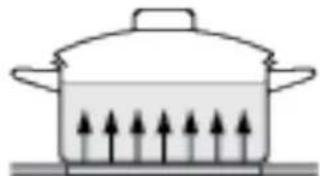
The physical characteristics of pots and pans influence the performance of any cooking systems. Therefore, emphasis must be placed on the importance of using proper cookware.

natural_image
Simple line drawing of a container with crossed-out arrows indicating pressure or flow (no text or symbols)Small Diameter
natural_image
Simple line drawing of a cooking pot with a crossed X symbol (no text or labels)Convex Bottom
natural_image
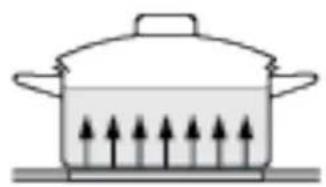
Simple line drawing of a cooking pot with upward arrows inside, placed on a surface (no text or symbols)Ideal Size/Shape
- Use cooking vessels with flat bottoms and tight-fitting lids to conserve energy and shorten cooking times.
- Only certain types of glass, glass/ceramic, ceramic, earthenware or other glazed utensils are suitable for cooktop. Manufacturers suggest using low to medium heat selections when using glass cookware.
- Pan size should match the element size. A slightly larger pan covers the entire element and prevents spillovers from contacting the heat surface and burning in. Using a smaller pan than the element is a waste of energy.
- To avoid spattering and to maximize efficiency, pan bottoms should be clean and dry before coming in contact with the elements.
- Wipe spills off the elements with a damp cloth as soon as they cool to cut down on clean up time. Be sure the control is OFF
If a surface unit stays red for a long time, the bottom of the pan is not flat enough or is too small for the surface unit. Prolonged usage of incorrect utensils could result in damage to the surface unit, cooktop, wiring and surrounding areas. To prevent damage use correct utensil, start cooking on position HI and turn control down to continue cooking.
Never leave an empty utensil, or one which has boiled dry, on a hot surface unit. The utensil could overheat and damage the utensils or surface unit.
Always be sure that all control knobs are turned to OFF and the indicator lights are OFF when you are not cooking.

WARNING
Make sure that the handles of cookware do not stick out over the edge of the appliance, to avoid them being knocked over by accident. This also makes it more difficult for children to reach the cooking pots/pans.
CARE AND MAINTENANCE
ÿ GENERAL INFORMATION
- CAUTION: Before any operation of cleaning and maintenance disconnect the appliance from the electrical supply.
• It is advisable to clean when the appliance is cold and especially for cleaning the glass cooktop. - Avoid leaving alkaline or acidic substances (lemon juice, vinegar, etc.) on the surfaces.
- Avoid using cleaning products with a chlorine or acidic base.
• The cooktop should always be cleaned after every use.
ÿ CLEANING YOUR APPLIANCE
- Disconnect the A/C from the main power box or designated circuit breaker, turn off the cooktop, make sure all surface units are off and cool before removing proceeding.
• The cooktop surface should be cleaned with mild detergent and warm water. - Wring excess water out of the sponge or cloth when cleaning area of the controls, or any electrical parts.
• Wipe dry with a clean soft cloth. - Do not use steel wool or steel brush on the cooktop.
PROBLEMS WITH YOUR APPLIANCE?
You can solve many common appliance problems easily, saving you the cost of a possible service call. Try the suggestions below to see if you can solve the problem before calling the servicer.
TROUBLESHOOTING GUIDE
| PROBLEM | POSSIBLE CAUSE |
| Surface units will not maintain a rolling boil or frying rate is not fast enough | You must use pans that are absolutely flat.Pan bottoms should closely match the diameter of the surface unit selected. |
| Foods cook slowly | Improper cookware being used. |
| Surface units do not operate | You have blown a household fuse or tripped a circuit breaker.You have not set the temperature control correctly. |
| Controls will not respond to touch. | The control panel lock is activated.Deactivate the control panel lock as previously described in this manual |
SERVICE FOR YOUR APPLIANCE
We are proud of our customer service organization and the network of professional service technicians that provide service on your Avanti appliances. With the purchase of your Avanti appliance, you can have the confidence that if you ever need additional information or assistance, the Avanti Products Customer Service team will be here for you. Just call us toll-free.
AVANTI PRODUCTS CUSTOMER SERVICES
| Product Information800-323-5029 | Whatever your questions are about our products, help is available. |
| Part Orders800-220- 5570 | You may order parts and accessories that will be delivered directly to your home by personal check, money order, Master Card, or Visa. |
| In-Home Repair Service800-220-5570 | An Avanti Products authorized service center will provide expert repair service, scheduled at a time that is convenient for you. Our trained servicers know your appliance inside and out. |
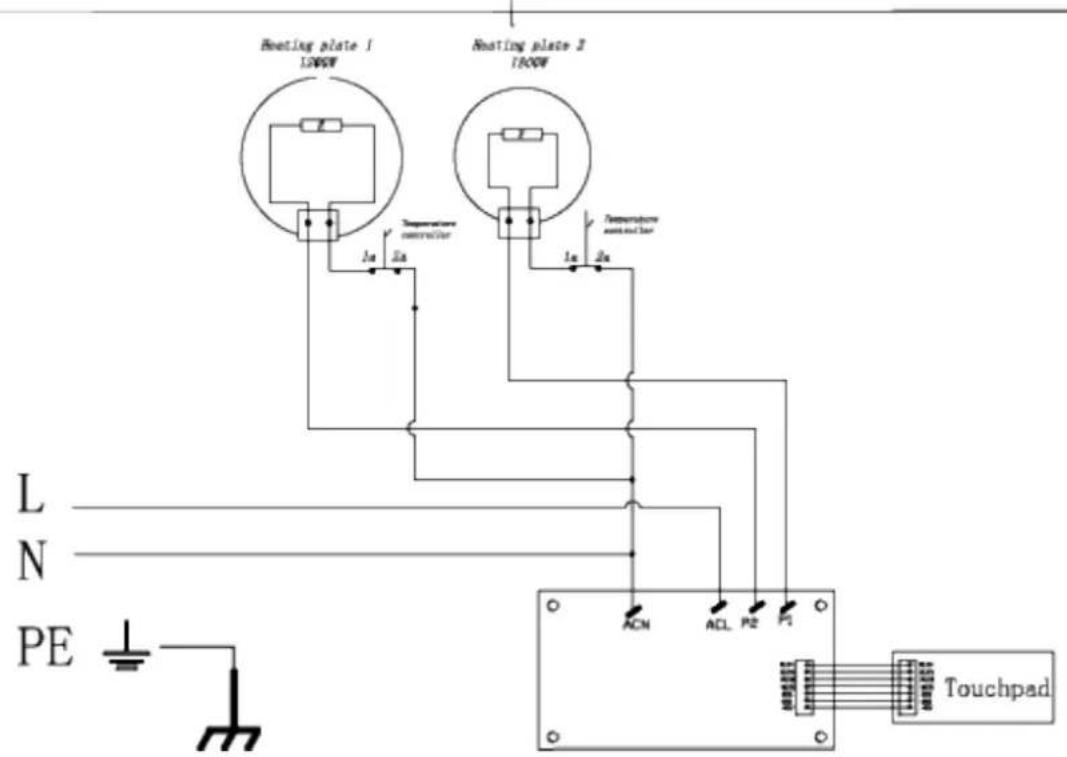
WIRING DIAGRAM
| YOUR AVANTI PRODUCTSWARRANTY | Staple your sales receipt here. Proof of original purchase date is needed to obtain service under warranty. |
| WHAT IS COVERED – LIMITED ONE-YEAR WARRANTYAvanti Products warrants that the product is free from defects in materials and/or workmanship for a period of twelve (12) months from the date of purchase by the original owner. The foregoing timeline begins to run upon the date of purchase, and shall not be stalled, tolled, extended, or suspended for any reason whatsoever unless described in detail in the warranty document. For one year from the date of purchase by the original owner, Avanti products will, at its option, repair or replace any part of the product which proves to be defective in material or workmanship under normal use. Avanti Products will provide you with a reasonably similar product that is either new or factory refurbished. During this period Avanti Products will provide all parts and labor necessary to correct such defects free of charge, so long as the product has been installed and operated in accordance with the written instructions in this manual. In rental or commercial use, the warranty period is 90 days. All Avanti appliances of 4.4 cubic feet capacity or less must be brought/sent to the appliance service center for repair. | |
| FULL 30 – DAY WARRANTYFrom the date of purchase on glass parts and finish of porcelain enamel, painted, or bright metal finished parts. | |
| WARRANTY EXCLUSIONS / WHAT IS NOT COVERED:The warranty coverage described herein excludes all defects or damage that are not the direct fault of Avanti Products, including without limitation, one or more of the following: | |
| A failure to comply with any applicable state, local, city, or county electrical, plumbing and/or building codes, regulations, or laws, including failure to install the product in strict conformity with local fire and building codes and regulations.Any external, elemental and/or environmental forces and factors, including without limitation, rain, wind, sand, floods, fires, mud slides, freezing temperatures, excessive moisture or extended exposure to humidity, lightning, power surges, structural failures surrounding the appliance, and acts of God. | |
| Content losses of food or other content due to spoilage.Incidental or consequential damagesParts and labor costs for the following will not be considered as warranty:Light bulbs and/or plastic housing.Failure of the product if it is used for other than it intended purpose.Shipping and handling costs associated with the replacement of the unit. | Repairs performed by unauthorized servicers.Service calls that are related to external problems, such as abuse, misuse, inadequate electrical power, accidents, fire, floods, or any other acts of God.Surcharges including but not limited to, any after hour, weekend, or holiday service calls, tolls, ferry trip charges, or mileage expense for service calls to remote areas.The warranty does not apply outside the Continental USA. |
| In no event shall Avanti Products have any liability or responsibility whatsoever for damage to surrounding property, including cabinetry, floors, ceilings, and other structures and/or objects around the product. Also excluded from this warranty are scratches, nicks, minor dents, and other cosmetic damages on external surfaces and exposed parts; Products on which the serial numbers have been altered, defaced or removed; service visits for customer education, or visits where there is nothing wrong with the product; correction of installation problems (you are solely responsible for any structure and setting for the product, including all electrical, plumbing and/or other connecting facilities, for proper foundation/flooring, and for any alterations including without limitation cabinetry, walls, floors, shelving etc., as well as the resetting of breakers orfuses. | |
| OUT OF WARRANTY PRODUCTAvanti Products is under no obligation, at law or otherwise, to provide you with any concessions, including repairs, pro-rates, or product replacement, once this warranty has expired. | |
| WARRANTY – HANGES / TOASTEHOVENS | |
AVISO DE SEGURIDAD
natural_image
Simple line drawing of a container with arrows indicating pressure or flow, crossed out by two crossed-out lines (no text or symbols)Small Diameter
natural_image
Simple line drawing of a cooking pot with a crossed X symbol (no text or labels)Convex Bottom
natural_image
Simple line drawing of a cooking pot with upward arrows indicating heating or cooling process (no text or symbols)Ideal Size/Shape
natural_image
Symbolic illustration of a cooking pot with crossed arrows indicating pressure or discharge (no text or labels)Small Diameter
natural_image
Simple line drawing of a cooking pot with a crossed X symbol (no text or labels)Convex Bottom
natural_image
Simple line drawing of a cooking pot with upward arrows indicating heating or storage (no text or symbols)Ideal Size/Shape
PROBLÈMES AVEC VOTRE APPAREIL?
Thank you for purchasing this fine Avanti product. Please fill out this form and return it to the following address within 100 days from the date of purchase and receive these important benefits:
Avanti Products LLC P.O.Box 520604 – Miami, Florida 33152
ÿ Protect your product:
We will keep the model number and date of purchase of your new Avanti product on file to help you refer to this information in the event of an insurance claim such as fire or theft.
ÿ Promote better products:
We value your input. Your responses will help us develop products designed to best meet your future needs.
-(detach here)-
Avanti Registration Card
| Name | Model # Serial # | |||
| Address | Date Purchased | Store / Dealer Name | ||
| City | State | Zip | E-mail Address | |
| Area Code | Phone Number | Occupation | ||
| Did You Purchase An Additional Warranty | As your Primary Residence, Do You: | |||
| £ Extended | £ Own | £ Rent | ||
| £ None | Your Age: | |||
| Reason for Choosing This Avanti Product: Please indicate the most important factors That influenced your decision to purchase this product: | £ under 18 | £ 18-25 £ 26-30 | ||
| £ 31-35 | £ 36-50 £ over 50 | |||
| Marital Status: | ||||
| £ Married | £ Single | |||
| £ Price | Is This Product Used In The: | |||
| £ Product Features | £ Home | £ Business | ||
| £ Avanti Reputation | ||||
| £ Product Quality | How Did You Learn About This Product: | |||
| £ Salesperson Recommendation | £ Advertising | |||
| £ Other: | £ In-Store Demo | |||
| £ Friend / Relative Recommendation | £ Personal Demo | |||
| £ Warranty | ||||
| £ Other: | ||||
Comments:
BCT115J1B-IS 06222018
PRINTED IN CHINA

- IF YOU NEED SERVICE
- APPLIANCE SAFETY
- IMPORTANT SAFEGUIDES
- DANGER
- WARNING
- This Unit Is For Indoor Use Only -SAVE THESE INSTRUCTIONS-
- INSTALLATION INSTRUCTIONS
- HAVE THIS APPLIANCE INSTALLED BY A QUALIFIED INSTALLER.
- ÿ BEFORE USING YOUR ELECTRIC COOKTOP
- (Packed in the Styrofoam packing – DO NOT DISCARD)
- IMPORTANT:
- ÿ IMPORTANT PRECAUTIONS AND RECOMMENDATIONS
- INSTALLATION OF ELECTRIC COOKTOP
- ELECTRICAL CONNECTION
- FOR PERSONAL SAFETY, THE COOKTOP MUST BE PROPERLY GROUNDED.
- OPERATING YOUR APPLIANCE
- ÿ CONTROL PANEL
- BURNER SELECTOR BUTTONS (FRONT BURNER / REAR BURNER)
- AUTOMATIC SHUT OFF TIMER
- HOT SURFACE INDICATOR
- CONTROL PANEL LOCK:
- ÿ COOKWARE TIPS
- CARE AND MAINTENANCE
- ÿ GENERAL INFORMATION
- ÿ CLEANING YOUR APPLIANCE
- PROBLEMS WITH YOUR APPLIANCE?
- SERVICE FOR YOUR APPLIANCE
- AVISO DE SEGURIDAD
- PROBLÈMES AVEC VOTRE APPAREIL?
- Avanti Products LLC P.O.Box 520604 – Miami, Florida 33152
- ÿ Protect your product:
- ÿ Promote better products:
Brand : Avanti
Model : BCT115J1BIS
Category : Cooker