
WTC0812A - Air-conditioner BRANDT - Free user manual and instructions
Find the device manual for free WTC0812A BRANDT in PDF.


User questions about WTC0812A BRANDT
0 question about this device. Answer the ones you know or ask your own.
Ask a new question about this device
Download the instructions for your Air-conditioner in PDF format for free! Find your manual WTC0812A - BRANDT and take your electronic device back in hand. On this page are published all the documents necessary for the use of your device. WTC0812A by BRANDT.
USER MANUAL WTC0812A BRANDT
INSTALLATION, OPERATING AND
MAINTENANCE INSTRUCTIONS
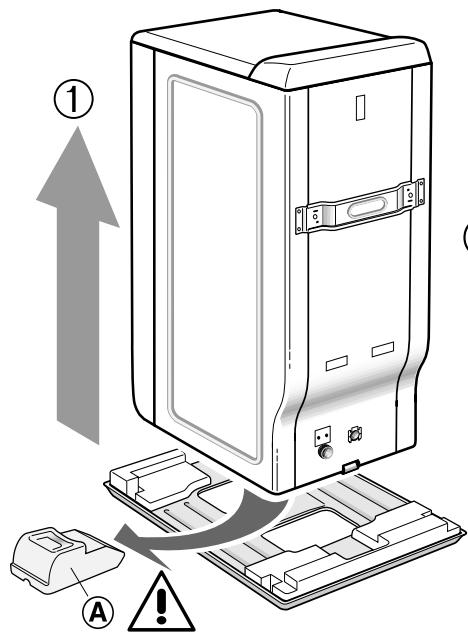
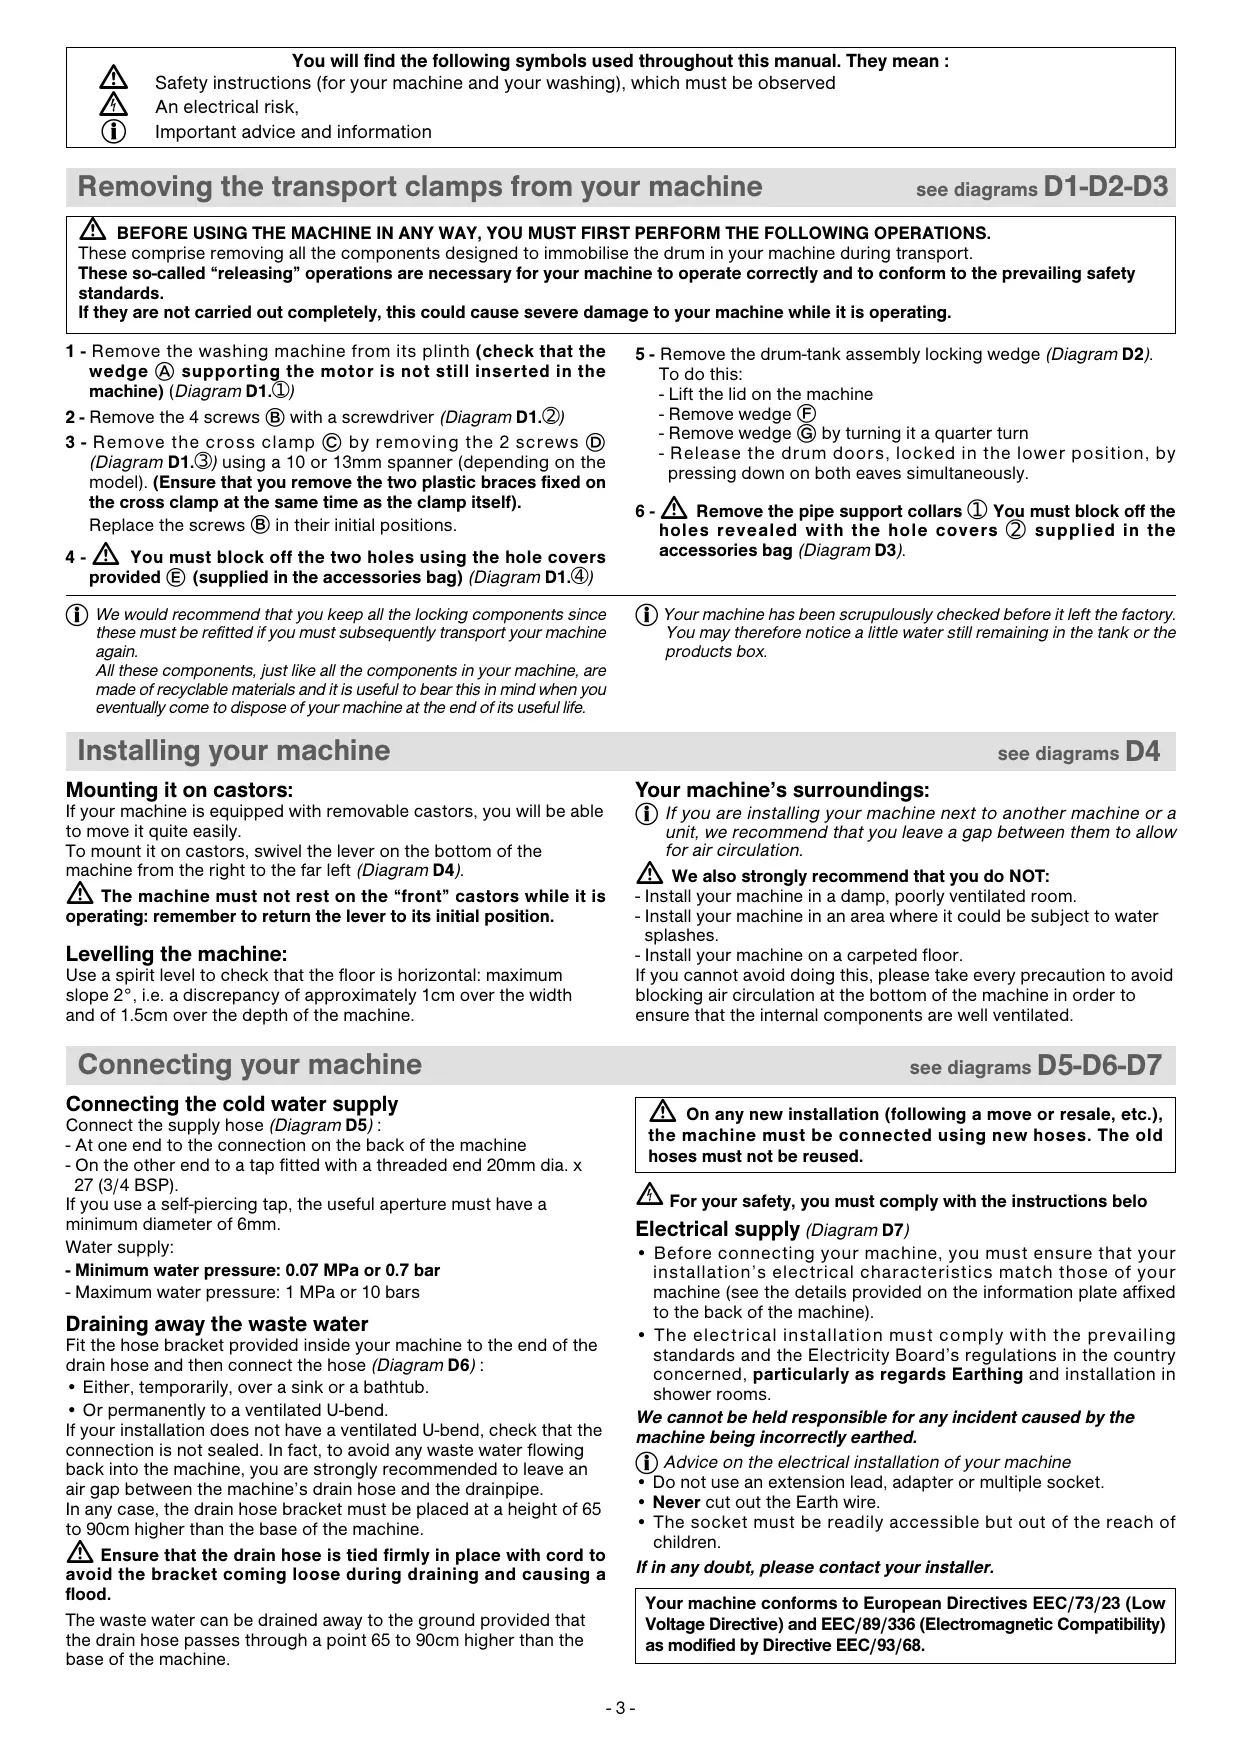
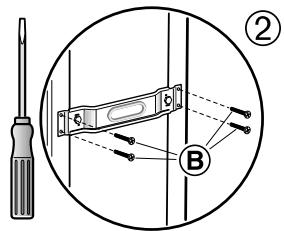
D1
D2
D3
D4
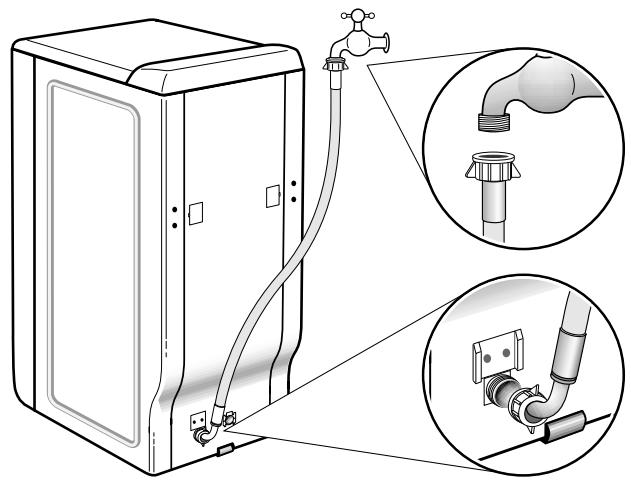
D5
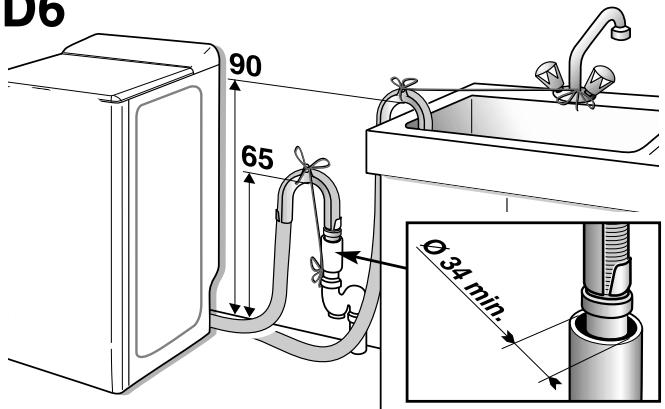
D6
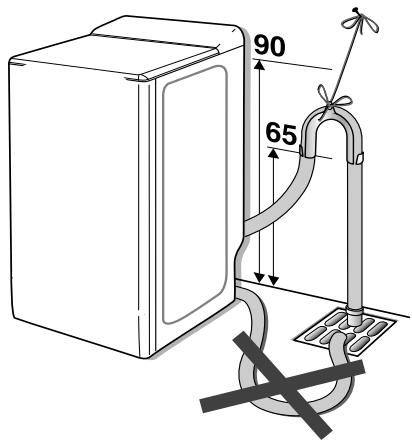
D7
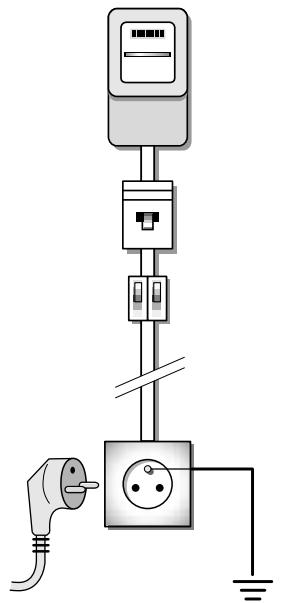
Removing the transport clamps from your machine
see diagrams D1-D2-D3
BEFORE USING THE MACHINE IN ANY WAY, YOU MUST FIRST PERFORM THE FOLLOWING OPERATIONS.
These comprise removing all the components designed to immobilise the drum in your machine during transport.
These so-called "releasing" operations are necessary for your machine to operate correctly and to conform to the prevailing safety standards.
If they are not carried out completely, this could cause severe damage to your machine while it is operating.
1 - Remove the washing machine from its plinth (check that the wedge supporting the motor is not still inserted in the machine) (Diagram D1.①)
2 - Remove the 4 screws (B) with a screwdriver (Diagram D1.②)
3 - Remove the cross clamp © by removing the 2 screws (Diagram D1.③) using a 10 or 13mm spanner (depending on the model). (Ensure that you remove the two plastic braces fixed on the cross clamp at the same time as the clamp itself).
Replace the screws in their initial positions.
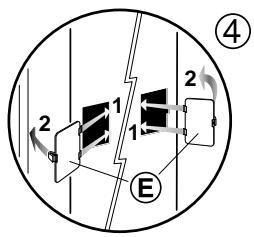
4 - A You must block off the two holes using the hole covers provided (supplied in the accessories bag) (Diagram D1.4)
We would recommend that you keep all the locking components since these must be refitted if you must subsequently transport your machine again.
All these components, just like all the components in your machine, are made of recyclable materials and it is useful to bear this in mind when you eventually come to dispose of your machine at the end of its useful life.
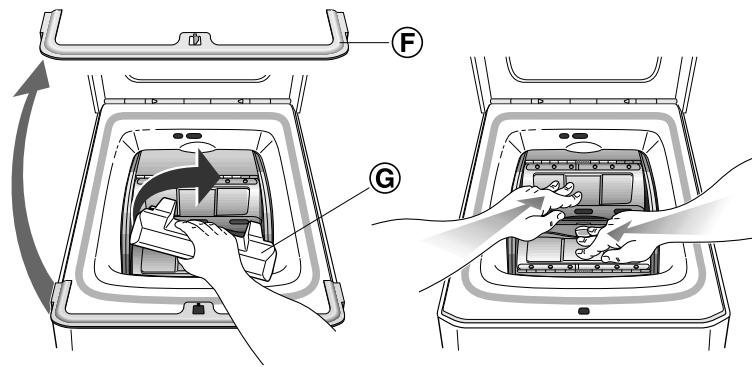
5 - Remove the drum-tank assembly locking wedge (Diagram D2). To do this:
- Lift the lid on the machine
- Remove wedge (F)
- Remove wedge ⑥ by turning it a quarter turn
- Release the drum doors, locked in the lower position, by pressing down on both eaves simultaneously.
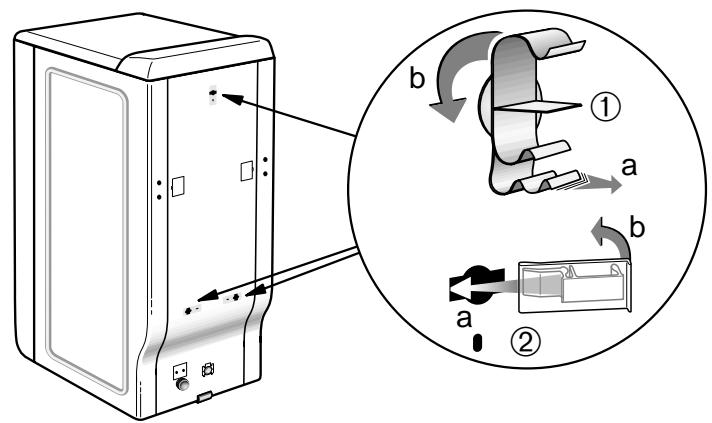
6 - Remove the pipe support collars ① You must block off the holes revealed with the hole covers ② supplied in the accessories bag (Diagram D3).
Your machine has been scrupulously checked before it left the factory. You may therefore notice a little water still remaining in the tank or the products box.
Installing your machine
see diagrams D4
Mounting it on castors:
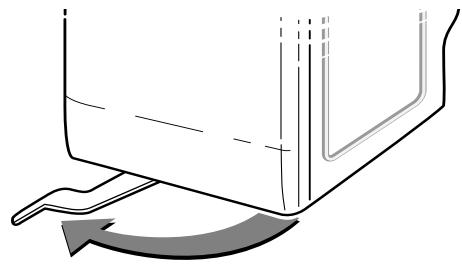
If your machine is equipped with removable castors, you will be able to move it quite easily.
To mount it on castors, swivel the lever on the bottom of the machine from the right to the far left (Diagram D4).
The machine must not rest on the "front" castors while it is operating: remember to return the lever to its initial position.
Levelling the machine:
Use a spirit level to check that the floor is horizontal: maximum slope 2^ , i.e. a discrepancy of approximately 1cm over the width and of 1.5cm over the depth of the machine.
Your machine's surroundings:
If you are installing your machine next to another machine or a unit, we recommend that you leave a gap between them to allow for air circulation.
We also strongly recommend that you do NOT:
- Install your machine in a damp, poorly ventilated room.
- Install your machine in an area where it could be subject to water splashes.
- Install your machine on a carpeted floor.
If you cannot avoid doing this, please take every precaution to avoid blocking air circulation at the bottom of the machine in order to ensure that the internal components are well ventilated.
Connecting your machine
see diagrams D5-D6-D7
Connecting the cold water supply
Connect the supply hose (Diagram D5):
- At one end to the connection on the back of the machine
- On the other end to a tap fitted with a threaded end 20mm dia. x 27 (3/4 BSP).
If you use a self-piercing tap, the useful aperture must have a minimum diameter of 6mm.
Water supply:
- Minimum water pressure: 0.07 MPa or 0.7 bar
- Maximum water pressure: 1 MPa or 10 bars
Draining away the waste water
Fit the hose bracket provided inside your machine to the end of the drain hose and then connect the hose (Diagram D6):
- Either, temporarily, over a sink or a bathtub.
- Or permanently to a ventilated U-bend.
If your installation does not have a ventilated U-bend, check that the connection is not sealed. In fact, to avoid any waste water flowing back into the machine, you are strongly recommended to leave an air gap between the machine's drain hose and the drainpipe.
In any case, the drain hose bracket must be placed at a height of 65 to 90cm higher than the base of the machine.
Ensure that the drain hose is tied firmly in place with cord to avoid the bracket coming loose during draining and causing a flood.
The waste water can be drained away to the ground provided that the drain hose passes through a point 65 to 90cm higher than the base of the machine.
On any new installation (following a move or resale, etc.), the machine must be connected using new hoses. The old hoses must not be reused.
For your safety, you must comply with the instructions belo
Electrical supply (Diagram D7)
- Before connecting your machine, you must ensure that your installation's electrical characteristics match those of your machine (see the details provided on the information plate affixed to the back of the machine).
- The electrical installation must comply with the prevailing standards and the Electricity Board's regulations in the country concerned, particularly as regards Earthing and installation in shower rooms.
We cannot be held responsible for any incident caused by the machine being incorrectly earthed.
i Advice on the electrical installation of your machine
- Do not use an extension lead, adapter or multiple socket.
- Never cut out the Earth wire.
- The socket must be readily accessible but out of the reach of children.
If in any doubt, please contact your installer.
Your machine conforms to European Directives EEC/73/23 (Low Voltage Directive) and EEC/89/336 (Electromagnetic Compatibility) as modified by Directive EEC/93/68.
Perform these actions in the following order:
Open the machine
- Check that the "Start/Stop" () button is released.
- Depending on the model, lift the opening handle or press the push button on the front of the machine.
The lid will open.
- Open the drum by pressing the button on the front door.
Insert your washing
For optimum washing performance, place your washing, preferably sorted and folded, in the drum, distributing it evenly without heaping it up. Mix large and small items to obtain an optimum, well-balanced spin.
Close the drum
Ensure that the drum is correctly closed.
Check that the three hooks and the border of the button are fully visible.
Loading the washing products
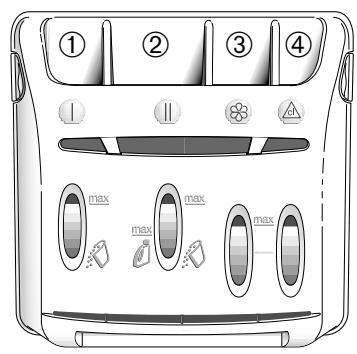
① Pre-wash container (powder)
② Wash container (powder or liquid)
③ Softener
④ Bleach
POWDERED DETERGENT
LIQUID DETERGENT
The "WASH" container may contain powder or liquid but liquid detergent should not be used for programmes WITH Pre-wash and/or WITH "Delayed Start" (depending on the model).
Concentrated softener should be diluted with warm water.
Concentrated bleach must be diluted.
To fill the product containers correctly, place the lid fully open.
Do not exceed the MAX level.
Dispensing the detergent
The amount of detergent to be used depends on the hardness of the water, the extent to which your washing is soiled and the amount of washing to be washed.
Please refer to the dosing instructions on your pack of detergent. Warning: in most cases, the detergent manufacturer's recommendations apply to the drum filled to the maximum. Adjust the dosage correctly to the weight of the washing you have placed in the machine.
These recommendations will help you to avoid using too much detergent, which causes foam to be produced. Too much foam can reduce your machine's performance and increase the length of the washing cycle and the consumption of water.
Detergents for woollens and delicate fabrics
You are recommended to use an appropriate detergent for washing these fabrics (avoid placing such detergents directly on the drum because they have an aggressive action on the metal).
Before your first wash
Before making your first wash, we recommend that you carry out a "COTTON 90 wash without pre-wash" and with no washing in the drum, using a 1/2 measure of your usual detergent in order to eliminate any residues from manufacturing that may remain in your machine.
Automatic safety devices
Lid opening safety device:
As soon as the washing cycle starts, the lid on your machine will lock.
As soon as the cycle is finished, or when the machine has stopped with the drum full of water, the lid unlocks.
If you wish to open the lid during the cycle, release the "Start/Stop" button(①) and wait at least 2 or 3 minutes for the lid safety device to disengage.
Selecting a washing programme
1 Selecting the type of washing
Choose the most suitable programme for your type of washing. COTTON
If your washing consists of WHITES, COTTONS or LINEN
SYNTHETICS or COLOUREDS
If your washing consists of COLOUREDS, HARD-WARING SYNTHETICS or MIXED FIBRES
DELICATES and WOOLLENS
If your washing consists of NET CURTAINS, DELICATE FABRICS, FRAGILE HOUSEHOLD TEXTILES or "MACHINE-WASHABLE WOOLS"
For more details, please refer to the programmes table on the following page.
2 Selecting the temperature.
Choose the most suitable temperature for your type of washing. To do this, follow the instructions on the labels attached to most textiles.
Please refer to the meanings of the symbols at the end of this manual.
COTTON : from "cold" to 90^
SYNTHETICS and COLOUREDS : from “cold” to 60^
DELICATES and WOOLLENS : from "cold" to 40^
Water safety device:
While the machine is operating the constant water level control system prevents your machine from overflowing.
Spin safety device:
Your washing machine if fitted with a safety device that can restrict spinning when it detects that the washing is poorly distributed. In this case, your washing may be insufficiently spun. Redistribute your washing evenly in the drum and programme a new spin.
3 Selecting the end of the programme
a - Spinning
Select a spinning speed appropriate to the type of washing.
COTTON. SYNTHETICS
and COLOUREDS : from 400 rpm to maximum speed
DELICATES and WOOLLENS : from 400 rpm to 600 rpm
The spin speed is automatically restricted to 550 rpm in the "Delicates and Woollens" programme.
b-Drip-drying
Select this option if you wish simply to drip-dry your washing. To select this option, turn knob 3 to the "0" position.
If you programme "drip-dry", the cycle ends is a gentle spin at 100 r.p.m.
4 Extra rinse
An additional programme for "sensitive and allergic skins"
It adds an extra rinse to the "Cotton" and "Synthetics and Coloureds" cycles.
Selecting this button has no effect during the "Delicates and Woollens" cycle.
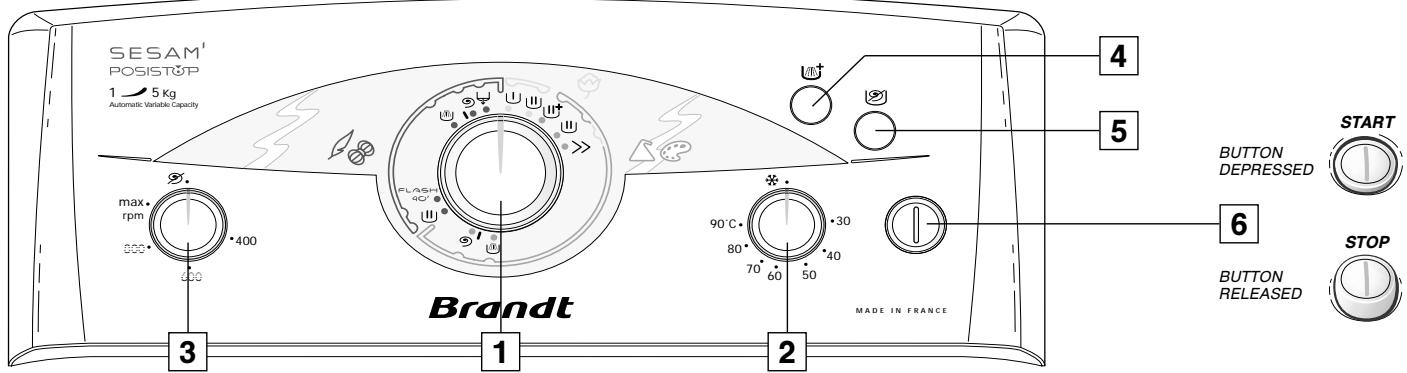
5 Full drum stop

This function should be used for textiles that you do not wish to spin or if you expect to be away for a prolonged period after the washing cycle has finished.
When this button is selected, the cycle is interrupted before the final spin, allowing your washing to float in water to avoid creasing.
Then:
- If you subsequently wish to spin and drain.
Simply release this button
The programme will finish automatically.
- Or if you wish just to drain.
Turn knob 1 to the " 12 " position and release the button.
6 Start/Stop

Check that the electrical power cable is connected and that the water tap is open. Also ensure that the drum doors and the machine's lid are correctly closed.
Press button 6 in when you have finished programming the machine. The washing cycle starts.
Once the cycle has finished, switch off the machine by releasing button 6.
You can then open the lid and remove your washing.
Also release any other buttons you have selected.
As a safety precaution, we recommend that you disconnect the power cable and turn off the water tap.
POSISTOP "Direct access to the washing"
Your machine is fitted with a system that positions the drum doors in the upper position at the end of the cycle.
If this has not happened, this is because the washing was poorly distributed in the drum.
In this case, turn the drum by hand to bring the doors into the upper position.
Programmes examples
| Type of washing | Programmes | °C | 9 | U | U | °C | °C | |
| 90°C wash with pre-wash | 90 | 400↓max | ■ | ■ | 3 | 02:45 | ||
| 90°C wash | 90 | ■ | 3 | 02:30 | ||||
| ECO 40° or 60°C wash | 40 / 60 | ■ | 3 | 02:30 | ||||
| Intensive 40° to 60°C wash | 40 → 60 | ■ | 3 | 02:10 | ||||
| 40° to 60°C wash | 40 → 60 | ■ | 3 | 02:00 | ||||
| Cold to 30°C wash | » | → 30 | ■ | 3 | 01:50 | |||
| Rinse & spin, cotton, synthetics and coloureds | — — | ■ | 1 | 00:25 | ||||
| Spin, cotton, synthetics and coloureds | 9 | — — | — | 00:15 | ||||
| Delicate fabrics cold to 40°C wash | → 40 | 400↓600 | ■ | 3 | 00:50 | |||
| Rapid wash, all textiles, at 30°C | FLASH 40' | 30 | ■ | 3 | 00:40 | |||
| Rinse & spin, delicates & woolens | — — | 1 | 00:15 | |||||
| Spin, delicates & woolens | 9 | — — | — | 00:10 | ||||
| Drain | — — | — | 00:05 | |||||
Maximum loads
"Cotton" and "Coloureds": 5 kg.
"Synthetics" and "FLASH 40": 2.5 kg.
"Delicates and woollens": 1 kg.
STANDARD COMPARISON TESTING PROGRAMME
| Programme | Δ- U+ | Duration | 2:10 |
| Temperature | 60°C | Energy | 1.15 kWh |
| Load | 5 kg | Water | .55 l |
To comply with the statement on the label, the tests are conducted in accordance with European Directive 92/75/EEC at nominal capacity, ensuring complete use of the CEI detergent from the start of the washing phase.
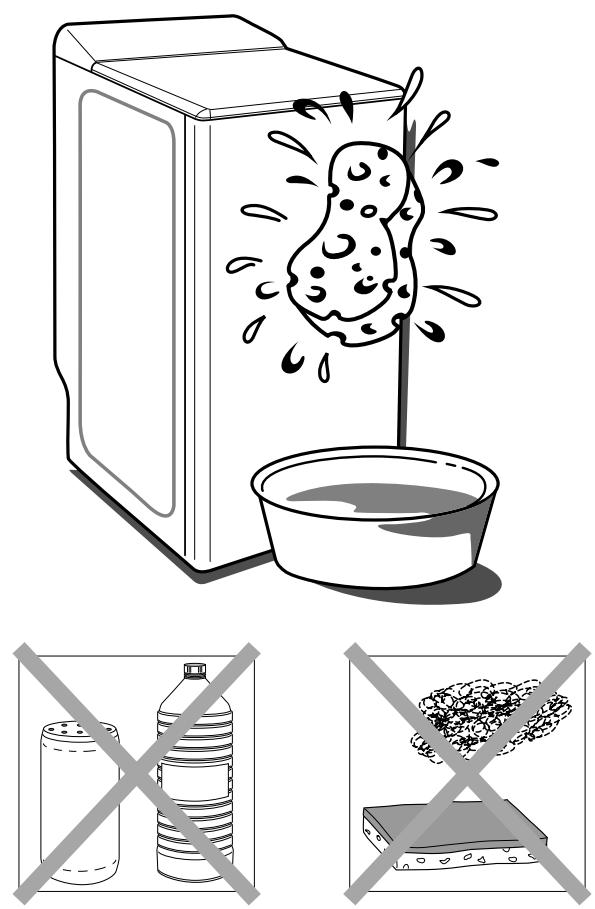
Cleaning the machine (Diagram D8).
To clean the casing:
Use only soap and water.
To clean all the plastic components (control panel, plinth, etc.):
Use only a cloth dampened with water.
In all cases, do not use:
- Abrasive powders
Metal or plastic sponges - Alcohol-based products (alcohol, thinners, etc.)
Care of the internal components
To ensure better hygiene, we recommend that you:
- Leave the lid open for a short time after washing.
- Clean the plastic and rubber access components to the tank approximately once a month using a slightly chlorinated product.
Run a rinsing cycle to remove any residue of this product.
- Run a washing cycle at 90^ at least once a month.
Periodic checks
We recommend that you check the condition of the water supply and drain hoses. If you notice the slightest cracking, do not hesitate to replace them with identical hoses available from the manufacturer or his After-Sales service.
Replacing a water supply hose
When replacing the hose, ensure that the hose is tightly fastened and that there is a seal at both ends.
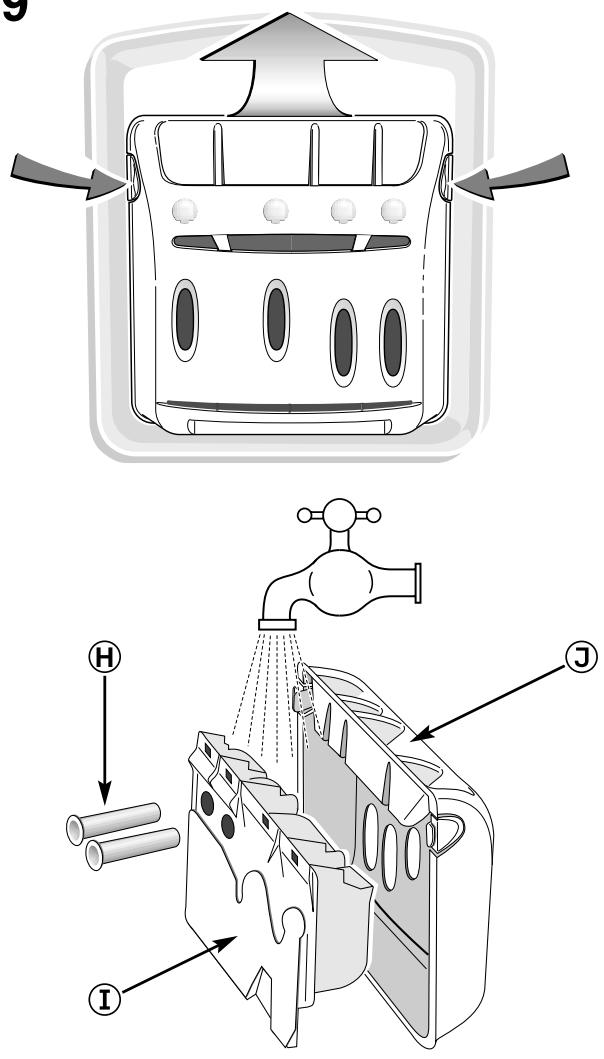
Cleaning the products' box (Diagram D9).
- Press the bosses on each side of the box simultaneously to extract it from its housing.
- Remove the siphons from the rear of the box ① and separate the box from its front cover ③
- Rinse everything under the tap (taking care to empty any excess water remaining inside the box).
- Refit all the box' components, ensuring that the box section itself is properly clipped into the cover and then re-insert the complete assembly into its location under the machine's lid.
Cleaning the pump filter
This filter catches any small objects inadvertently left in the clothes to avoid their disrupting the pump's operation.
To clean the filter, proceed as follows:
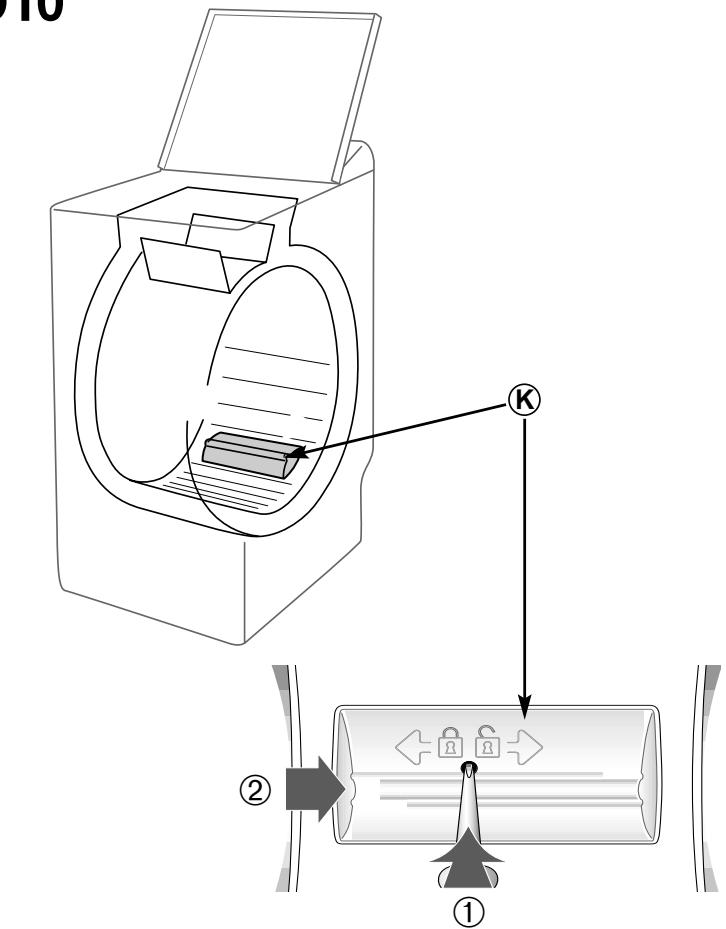
- Open the drum doors. At the back of the drum, you will see a plastic component (K Diagram D10)
- Unscrew this component.
To do this:
- Insert a rod (a pencil or a screwdriver, for instance) into the hole in component
-
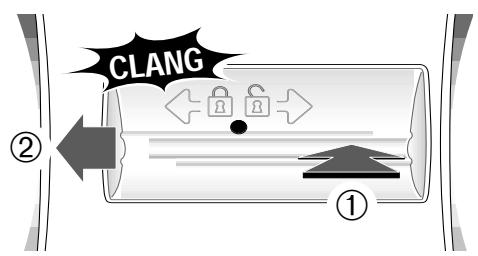
While pressing down vertically with the rod, push component K towards the right until it releases from its housing
-
Remove component K
-
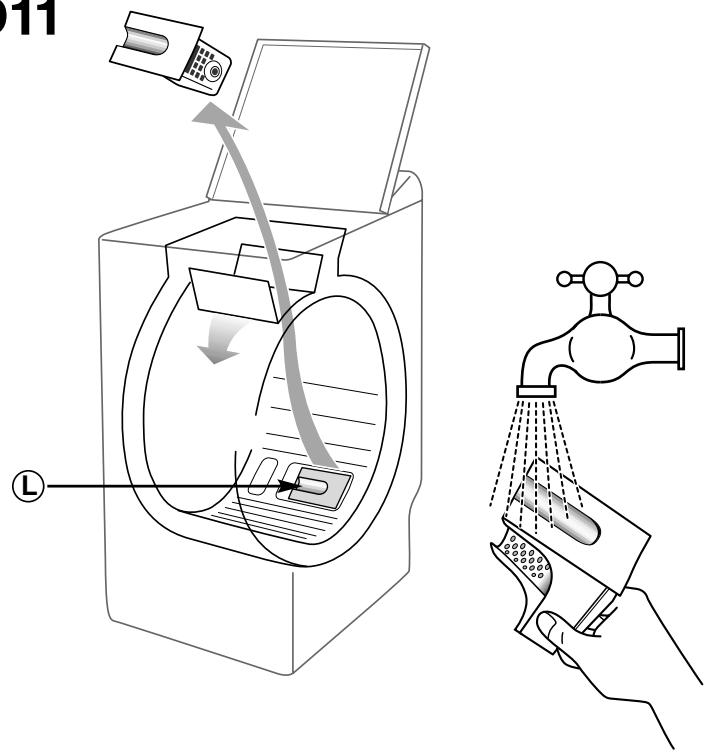
Turn the drum slightly towards the front of the machine with the doors open (Diagram D11).
Through the openings freed by removing component you can now access the pump filter L. - Remove it from its housing (Diagram D11).
- Remove the various objects that may be inside it.
- Rinse it under the tap (Diagram D11).
- Re-insert it by pushing it fully into its housing, after checking that the housing is clean.
- Re-insert component , carefully positioning it in the openings at the back of the drum and pushing it to the left until it is perfectly engaged. (Diagram D12).
Frost risk
When there is a risk of frost, disconnect the water supply hose and empty any water remaining in the drain hose by placing this as low as possible in a basin.

Replacing the power cable
For your safety's sake, this operation must be performed by the manufacturer's After-Sales service or a qualified professional electrician.
Incidents that may occur
Some incidents may occur when using your machine: these are the points to be checked:
The cycle does not start - check:
- The programme has been completely selected:
- The machine is correctly being supplied with water and power
- The machine's lid is properly closed
Foam overflows - check:
- You have not used too much detergent
-
You have used a detergent suitable for washing machines:
-
Drain and programme several rinses. Then restart the washing programme.
Heavy vibration during spin - check:
- All the transport material has been removed correctly from the machine
- The floor is horizontal
- The machine is not resting on its two "front" castors (depending on the model).
A puddle of water forms around the machine
First of all remove the plug and the fuse and shut off the water supply tap.
While the machine is operating, the continuous water level control prevents the water from overflowing. If, nevertheless, water escapes from the machine, check:
- The drain hose bracket is correctly positioned on the drain pipe.
- The water supply connections on the machine and the tap are watertight
The washing is not spun or not spun enough - check:
- You have not programmed a function cancelling the spin cycle, e.g. "Drip-dry".
The spin safety system has detected poor distribution of the washing in the drum:
- In this case, untangle the washing and programme a new spin.
The machine does not drain - check:
- You have programmed a "Stop with drum full of water".
-
The drain pump filter is blocked:
-
Clean it (for the procedure, see below)
- The drain hose is not kinked or crushed.
The lid will not open - check:
The programme has finished completely
The lid remains locked all the time the programme is running.
The drum doors open to slowly
(for machines fitted with gently opening doors)
- Your machine has not operated for a long time
It is located in too cold an area - Detergent residue (powder) is blocking the hinges
- In all cases, everything returns to normal once the doors have opened
D8
D10
D9
D11
D12
Fabric cleaning code
| 95 | Wash : never exceed the recommended temperatures | ||
| cl | Cold diluted bleach can be used | ||
| Iron : ● cold ●● medium ●●● hot | |||
| F | F Dry-cleaning : mineral spirit hexachlorethane all solvents | ||
| Do not use ! | |||
After Sales Service :
Possible maintenance on your washing machine should be undertaken by :
-
either your dealer,
-
or another qualified mechanic who is an authorized agent for the brand appliances.
When making an appointment, state the complete reference of your equipment (model, type and serial number). This information appears on the manufacturer's nameplate attached to the rear of the equipment.