
HVRPWR CH95519 - Vacuum Cleaner HOOVER - Free user manual and instructions
Find the device manual for free HVRPWR CH95519 HOOVER in PDF.
Download the instructions for your Vacuum Cleaner in PDF format for free! Find your manual HVRPWR CH95519 - HOOVER and take your electronic device back in hand. On this page are published all the documents necessary for the use of your device. HVRPWR CH95519 by HOOVER.
USER MANUAL HVRPWR CH95519 HOOVER
USER MANUAL For use with model CH95519. IMPORTANT:
READ CAREFULLY BEFORE
ASSEMBLY AND USE. THIS PRODUCT IS
INTENDED FOR COMMERCIAL USE ONLY. Appearance of the product may differ slightly from the images depicted.2 Welcome. Thank you for choosing a Hoover
IF YOU NEED ASSISTANCE
Please call 1-888-768-2014 (Mon-Fri 8am-5pm EST) to speak with a customer service representative; or visit our website at HooverCommercial.com.3 Table of Contents Safety Instructions 4-5 Product Features 6-7 Getting Started 8 HVRPWR
Fully assemble before operating.
Do not use the unit, store or charge battery outdoors or on wet surfaces. Do not allow charger to get wet.
The charger is for indoor use only. Be sure to always keep the battery and charger in a dry place.
Do not allow to be used as a toy. Not intended for use by children age 12 and under. Close supervision is necessary when used near children. To avoid injury or damage, keep children away from product, and do not allow children to place ngers or other objects into any openings.
Use only as described in this manual. Use only Hoover Commercial’s recommended attachments and products.
Do not use charger with damaged cord or plug. If appliance or charger is not working as it should, has been dropped, damaged, left outdoors, or dropped into water, call customer service at 1.888.768.2014 prior to continuing use.
Do not pull or carry charger by cord, use cord as a handle, close a door on cord, or pull cord around sharp edges or corners. Do not place product on cord. Do not run appliance over cord. Keep cord away from heated surfaces.
Do not unplug charger by pulling on cord. To unplug charger, grasp the plug, not the cord.
Do not handle charger — including charger plug and charger terminals, or appliance — with wet hands.
Do not incinerate the charger, battery, or appliance even if it is severely damaged. The batteries can explode in a re.
Do not put any object into ventilation openings. Do not use with any opening blocked; keep free of dust, lint, hair, and anything that may reduce air ow.
Dress properly. Do not wear loose clothing or jewelry. Contain long hair. Keep hair, loose clothing, ngers, and all parts of body away from openings and moving parts. Loose clothing, jewelry, or long hair can be caught in internal moving parts.
Use extra care when cleaning on stairs. To avoid personal injury or damage, and to prevent the cleaner from falling, always place cleaner at bottom of stairs or on oor. Do not place cleaner on stairs or furniture, as it may result in injury or damage.
This product includes rechargeable lithium-ion batteries. Do not expose batteries to high temperatures, as they may catch re and/ or explode.
Do not expose battery to crushing, incineration or similar actions.
Do not dispose of battery in a re or trash compactor. See battery disposal section for directions.
Do not attempt to disassemble battery.
Unplug the charger from the outlet before any routine cleaning or maintenance.
Leaks from battery cells can occur under extreme conditions. If any liquid gets on the skin wash quickly with soap and water. If any liquid gets into the eyes, do not rub eyes, immediately ush them with clean water continuously for a minimum of 15 minutes. Seek medical attention immediately.
Recharge only with the charger (Hoover Commercial Part #CH07150) supplied by Hoover Commercial to recharge. A charger that is suitable for one type of battery pack may create a risk of injury and re when used with another battery pack.
Use only the battery (Hoover Commercial Part #CH27260 , CH17360) supplied by Hoover Commercial. Use of any other battery packs may create a risk of injury and re.
Do not touch or insert objects into battery pack or charger terminals. Corrosive or conductive uids, such as salt water, chlorine, certain industrial chemicals, and bleach or bleach containing products, etc., can cause a short circuit in the battery pack. If your battery pack is exposed to a corrosive or conductive uid, do not attempt to use or charge the battery pack and immediately perform the following steps: Wear appropriate personal protective equipment, including eye protection and rubber gloves. Place your exposed battery pack in a large bucket, such as a 5 gallon or similar bucket, and ll the bucket with regular tap water. Do not place more than two packs in the bucket. Locate the bucket outdoors in an area inaccessible to children and pets and away from all buildings, garages/sheds, structures, vehicles, and combustible/ammable materials. Leave the battery pack(s) in the bucket lled with tap water and call Customer Service at 1-888-768-2014 for additional instructions on the proper disposal of the exposed battery pack(s).5 SAFETY INSTRUCTIONS
Do not attempt to short circuit the battery or charger terminals.
Do not use to pick up ammable or combustible liquids, such as gasoline, or ne wood sandings, or use in areas where they may be present.
NEVER vacuum materials that are burning or smoking, such as hot coals, cigarette butts, matches, or hot ashes etc.
Do not use without Filter Dust Bag in place.
Prevent unintentional starting. Ensure the switch is in the off-position before connecting to battery pack, picking up or carrying the appliance. Carrying the appliance with your nger on the switch or energizing appliance that has the switch on invites accidents.
Always remove the battery pack from the appliance before making any adjustments, changing accessories, storing product, cleaning or when not in use. Removing battery pack will prevent accidental starting that could cause serious personal injury.
When battery pack is in use, keep it away from other metal objects, like paper clips, coins, keys, nails, screws, or other small metal objects, that can make a connection from one terminal to another. Shorting the battery terminals together may cause burns or a re.
Under abusive conditions, liquid may be ejected from the battery; avoid contact. If contact accidentally occurs, ush with water. If liquid contacts eyes, additionally seek medical help. Liquid ejected from the battery may cause irritation or burns.
Do not use a battery pack or appliance that is damaged or modied. Damaged or modied batteries may exhibit unpredictable behavior resulting in re, explosion or risk of injury.
Do not expose battery pack or appliance to re or excessive temperature. Exposure to re or temperature above 265°F (130°C) may cause explosion.
Follow all charging instructions and do not charge the battery pack or appliance outside of the temperature range specied in the instructions. Charging improperly or at temperatures outside of the specied range may damage the battery and increase the risk of re.
Have servicing performed by a qualied repair person using only identical replacement parts. This will ensure that the safety of the product is maintained.
Do not modify or attempt to repair the appliance or the battery pack except as indicated in the instructions for use and care.
Brushroll may suddenly restart – turn power switch off and remove battery before cleaning or servicing. CAUTION: TO REDUCE THE RISK OF DAMAGE:
Avoid picking up hard, sharp objects with this product, as they may cause damage.
Do not expose machine to freezing temperatures.
WARNING: TO REDUCE THE RISK OF ELECTRIC SHOCK, THE CHARGER HAS
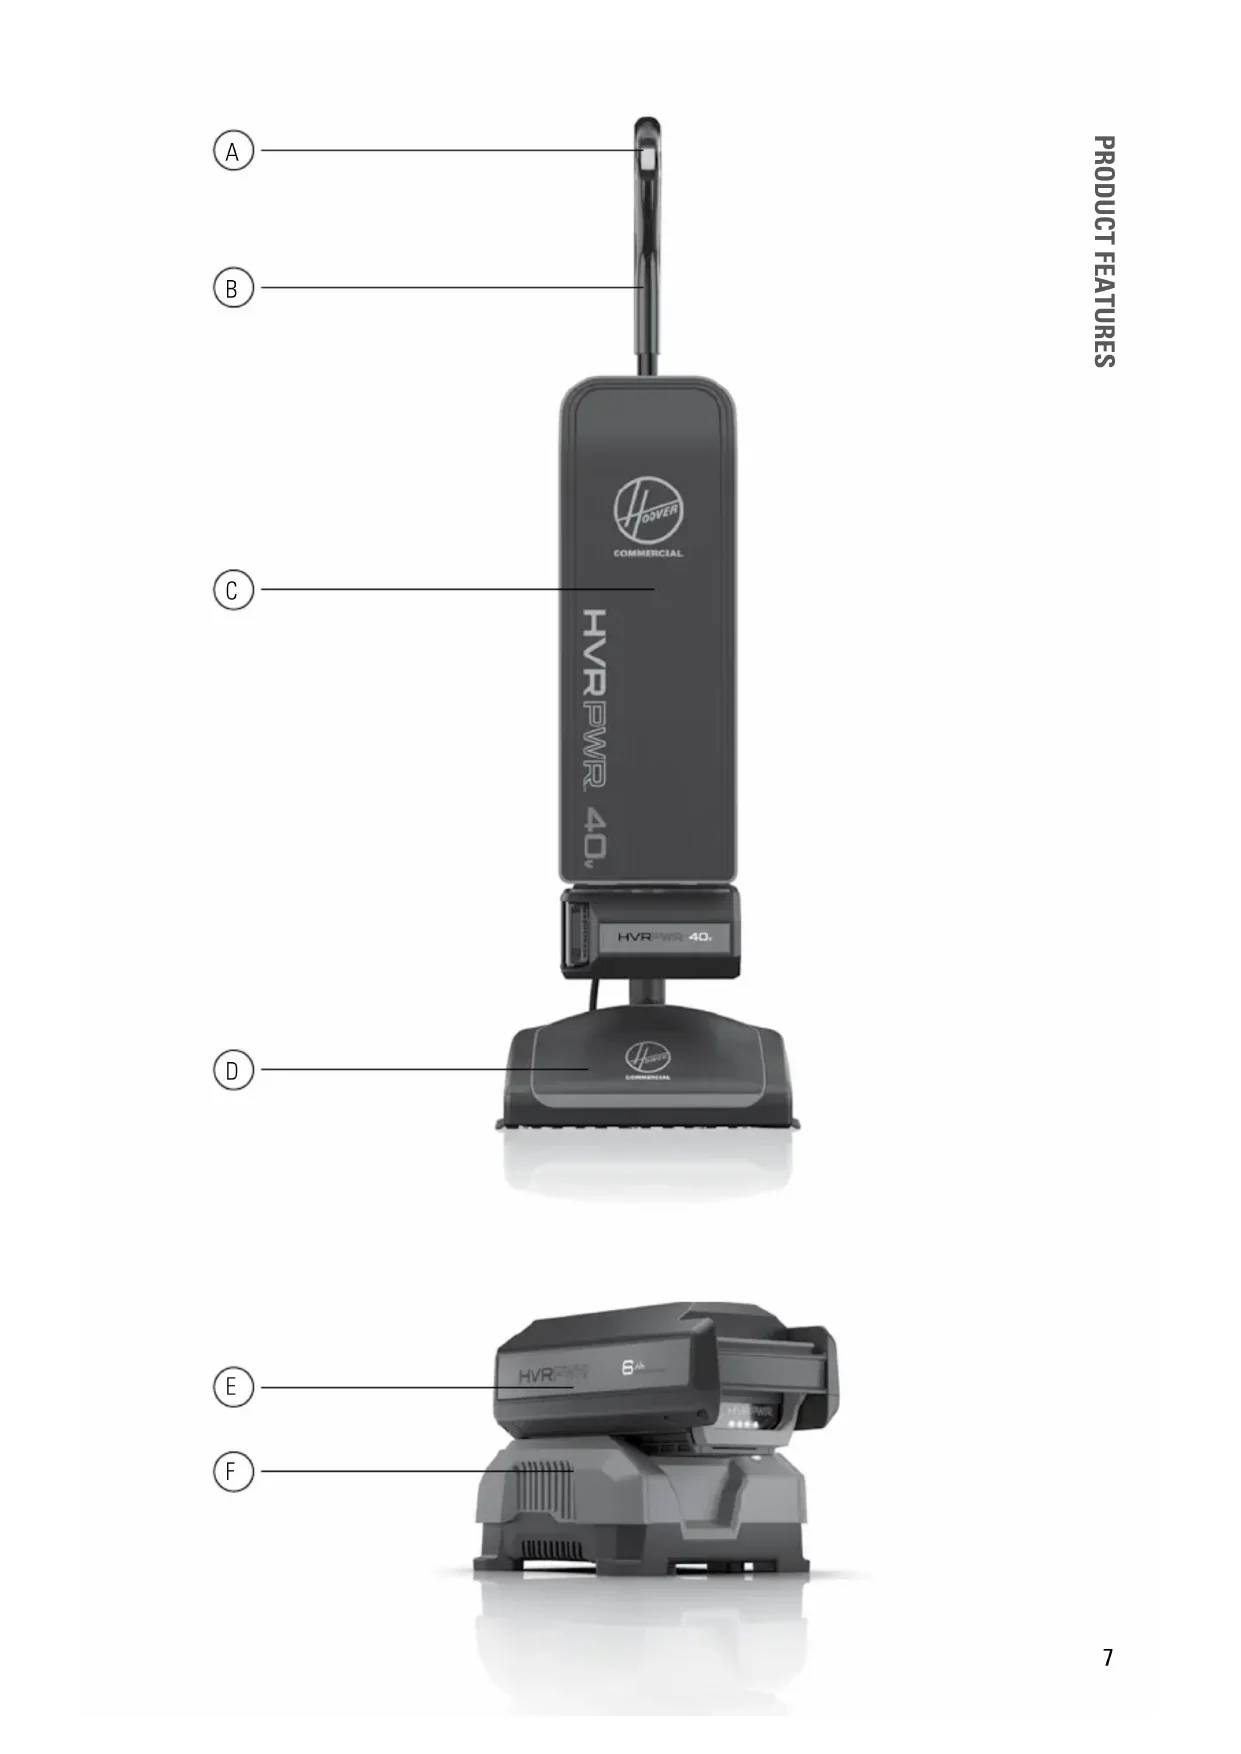
A POLARIZED PLUG (ONE BLADE IS WIDER THAN THE OTHER). THIS PLUG WILL FIT IN A POLARIZED OUTLET ONLY ONE WAY. IF THE PLUG DOES NOT FIT FULLY IN THE OUTLET, REVERSE THE PLUG. IF IT STILL DOES NOT FIT, CONTACT A QUALIFIED ELECTRICIAN TO INSTALL THE PROPER OUTLET. DO NOT CHANGE THE PLUG IN ANY WAY. BATTERY DISPOSAL WARNING: RISK OF EXPLOSION OR EXPOSURE TO TOXIC MATERIAL. CAUTION: The battery used in this device may present a risk of re or chemical burn if mistreated. Do not disassemble, heat above manufacturer’s maximum temperature limit (40°C/104°F), or incinerate. Replace battery with Hoover Commercial Battery Part #CH27260 , CH17360 only. Use of another battery may present a risk of re or explosion. Dispose of used battery promptly. Keep away from children. Do not disassemble and do not dispose of in re. Do not attempt to disassemble the battery or remove any component projecting from the battery terminals. The battery and charger have no user serviceable parts. Fire or injury may result. Prior to disposal, protect exposed terminals with heavy insulating tape to prevent shorting. LITHIUM-ION BATTERIES: The battery must be collected, recycled or disposed of in an environmentally sound manner. The EPA certied RBRC Battery Recycling Seal on the lithium-ion (Li-ion) battery indicated Techtronic Industries, a corporate afliate of Hoover Commercial, is voluntarily participating in an industry program to collect and recycle these batteries at the end of their useful life, when taken out of service in the United States or Canada. The RBRC program provides a convenient alternative to placing used Li-ion batteries into the trash or the municipal waste stream, which may be illegal in your area. Please visit www.rbrc.org/call2recycle/ for information on Li-ion battery recycling and disposal bans/restrictions in your area. Hoover Commercial involvement in this program is part of our commitment to preserving our environment and conserving our natural resources.6 Product Features Carton Contents
40v Battery & Charger (Sold Separately)
To charge the battery, slide battery into charger. Push backward until battery clicks into place and LED Status Indicator is lit.
When charging, the fully lit LEDs on the battery will indicate charge level.
Charger LED Status Indicator will turn green when battery is fully charged.
To remove battery, press the release button and slide battery forward while holding down on charger base. NOTE: Batteries are shipped in a low charge condition to prevent possible problems. You should charge them before rst use. CHARGING AMBIENT TEMPERATURE RANGE: 5 °C – 40 °C (41 °F – 104 °F)9 How To Insert The Battery
Insert battery into housing by grasping the integrated handle and pushing rmly in until battery locks into place.
To remove battery, grasp the integrated handle while pressing the release button. Slide out from housing by pulling while holding down release button.
Make sure Upper Tube Connector (A) is installed on Upper Tube (B).
Insert Upper Tube into the top of Debris Transfer Tube (C) until it locks in place.
Twist Upper Tube Connector (A) clockwise until it clicks to secure Upper Tube (B). (A) (A) (B) (B) (C) CAUTION: NOT TO BE USED FOR GROOMING A PET. FULLY ASSEMBLE PRODUCT TO USE.11 GETTING STARTED
Make sure the ltration bag (A) is attached properly to the ltration bag dock (B). Attachment instructions are located on the ltration bag and in the maintenance section of this manual. Your vacuum comes with a bag preinstalled for your convenience. Do not operate without a bag.
Step on (A) power head and pull handle back to lower into operating position. Return handle to full upright position to engage lock. This product features Auto Stop and will not operate in the upright position by disengaging power to the motor.
Push ngertip controls forward to select “I” or Hush mode. Push the ngertip controls all the way forward to select “II” or Boost mode for high trafc or heavily soiled areas. Push the controls backward to “O” or the off position when the product is not in use. Getting Started Please read “Important Safety Instructions” before use. (A) (B) (A)12
Unzip the Filtration Bag Case completely.
Pull the cardboard collar on the ltration bag downward to release the bag dock from the dock port.
Gently pull the cardboard collar on the ltration bag up to engage the self sealing lock and remove from the bag dock. Discard.
Slide a new ltration bag collar rmly into the bag dock ensuring all hooks on dock door are inserted on the cardboard collar. Maintenance - How To Replace The Filter Bag
Rotate bag dock up and press rmly on the ltration bag at indicated points until it snaps into place.
Zip up the ltration bag case completely. Maintenance - How To Replace The Filter Bag
Remove the two black screws.
Lift wiper blade from the bottom plate.
Lift up metal guards to access the brushroll channel.
Clear brushroll of debris and obstructions by using scissors to cut across the channel.
Put metal guards back into place and secure wiper back into place with the two black screws.15
Remove the brushroll belt and brushroll from the holding channels inside of the power head nozzle.
Lay the unit at to access the power head nozzle. Remove the 7 screws to take off the baseplate from the power head.
Rotate both plastic black endcaps at the ends of the brushroll to show a single notch “NORMAL” position. Insert back into the holding channels of the power head nozzle. Maintenance - Removing the brushroll and belt NORMAL
TO REDUCE THE RISK OF PERSONAL INJURY, UNPLUG BEFORE CLEANING OR SERVICING. DO NOT USE VACUUM WITHOUT INNER FILTRATION BAG IN PLACE.
When rotating the black endcaps on the brushroll, make sure both endcap settings are the same and faceup when you insert the brushroll.
REMOVING THE BRUSHROLL AND BELT16
Maintenance - Removing the brushroll and belt
IF YOU NEED ASSISTANCE
Please call 1-888-768-2014 (Mon-Fri 8am-5pm EST) to speak with a customer service representative; or visit our website at HooverCommercial.com.
Manually spin the brushroll to see that it turns freely.
Reassemble the brushroll belt. Reference the Maintenance Section on Checking and Replacing the Brushroll Belt for details.
Replace the 7 screws to secure the baseplate to the power head nozzle.17 CLEARING CLOGS
An overloaded ltration bag may cause dirt and debris to back up into the air ow system. Open the bag dock and check for visible clogs at the bag port. Change ltration bag if contents have reached the MAXIMUM FILL LINE.
Also, check for blockages in the power head nozzle. Maintenance - Clearing Clogs
If blockage is not in the power head nozzle, remove the lower tube. Detach rubber straps at bottom of bag and remove screws to tilt battery dock forward.
Twist lower tube connector counterclockwise and slide up. Pull the lower tube out of the fan housing. Once removed, check for blockage.
If the lower tube is not blocked, look into the fan housing for blockage. Be sure to reassemble lower tube and tighten the lower tube connector before continuing use. Lubrication The motor and brushroll are equipped with bearings which contain sufcient lubrication for their lifetime. The addition of lubricant could cause damage. Do not add lubricant to motor or brushroll. The Belt This vacuum is equipped with the Endurolife
Belt, which is designed for long life and doesn’t need changing. Motor Protections If the vacuum becomes overloaded (which could occur when a large obstruction is sucked up or when vacuuming extremely thick carpet), the electronics are designed to shut down the vacuum. If this happens, the vacuum will automatically shut off. To reset the vacuum, turn the unit to “O” or off, then turn on to continue use. If it shuts down again there may be a large obstruction in the vacuum. See Clearing Clogs for the steps on clearing a clog from the air path.
IF YOU NEED ASSISTANCE
Please call 1-888-768-2014 (Mon-Fri 8am-5pm EST) to speak with a customer service representative; or visit our website at HooverCommercial.com.
WARNING TO REDUCE THE RISK OF ELECTRIC SHOCK AND INJURY FROM MOVING PARTS — REMOVE BATTERY BEFORE CLEANING OR SERVICING.19 TROUBLESHOOTING Troubleshooting Any other servicing should be done by an authorized service representative. Problem Possible Cause Possible Solution Vacuum won’t run 1. Auto Stop feature has been triggered.
1. Unit may have been put in upright position while on.
Recline the unit turn the power to “0” or Off and then turn back on.
2. Your battery may not be
2. Make sure the battery is fully seated in battery
3. Your battery may not be
3. Check the Charge Level Indicator and charge the
battery if it’s low.
4. Your battery may be too hot. 4. Remove battery and let cool for 30 minutes, replace
battery and retry or replace with second charged battery.
5. There may be internal
Vacuum won’t pick up OR Low suction
1. Filter Bag full and/
or lower tube clogged.
Check Brushroll - Pg. 14 CHARGER RED LED GREEN LED ORANGE LED ACTION Power OnWithout battery packON OFFReady to charge battery pack. Testing Hot battery packOFFOFF OFF
OFF When battery pack reaches cooled temperature, charger begins charge mode.Cold battery packWhen battery pack reaches warmed temperature, charger begins charge mode.Deeply dischargedCharger conditions battery until normal voltage is reached, then begins charge mode. ErrorError Flashing Flashing Battery pack or charger is damaged or faulty.
Error, try to repeat the conditions a second time by removing and reinstalling the battery pack. If the LED status repeats a second time, try charging a different battery.
If a different battery charges normally, dispose of the pack (see BATTERY DISPOSAL section).
If a different battery also indicates “Error,” the charger may be damaged or faulty. Charging Fast charging OFFFlashing Battery is being charged. Ready Battery full OFF OFF OFFONCharging is complete. STORAGE: Always remove the battery pack before storing the charger or any time the charger is unplugged.
2. Filter Bag not installed
2. Review Filter Bag removal &
replacement - Pg. 12
3. Tubes not installed correctly. 3. Review Tube installation.
Vacuum is difcult to push or won’t move forward
1. Belt broken or stretched. 1. Replace brushroll belt - Pg. 15
2. Brushroll is clogged. 2. Clear/ remove debris from
WHAT THIS WARRANTY COVERS
When used and maintained in normal Commercial use and in accordance with the Owner’s Guide your Hoover
Commercial upright is warranted against original defects in material and workmanship for 1 year limited warranty from date of purchase (the “Warranty Period”). During the Warranty Period, Hoover Commercial will provide labor and parts, at no cost to you, to correct any such defect in your CH95519 that was purchased in the United States, at a U.S. Military Exchange, or in Canada. Hoover Commercial also reserves the right to provide you with a replacement product(s) or refund, in Hoover Commercial’s discretion, in order to satisfy the terms of this warranty.
HOW TO MAKE A WARRANTY CLAIM
If this product is not as warranted, take or send the product to a Hoover
Commercial Authorized Warranty Service Dealer along with proof of purchase. For an automated referral to authorized service outlets, phone: 1-888-768-2014 . For additional assistance or information concerning this Warranty or the availability of warranty service outlets, phone 1-888-768-2014 , Mon-Fri 8am-5pm EST.
WHAT THIS WARRANTY DOES NOT COVER
Certain parts for your Hoover
Commercial product require replacement in the ordinary course of use due to normal wear. These items include belts, agitator roll sleeves, agitator bearings, brushes, bags, lters and bulbs. These parts are not covered by this Warranty. This Warranty also does not cover: improper maintenance of the product, damage due to misuse, acts of God, nature, vandalism or other acts beyond the control of Hoover
Commercial , owner’s acts or omissions, use outside the country in which the product was initially purchased, resale of the product by the original owner, defects or damages caused by repair or alteration by anyone other than an Authorized Hoover
Commercial Warranty Service Dealer. Hoover
Commercial reserves the right to inspect any alleged defective product and make nal decisions on any warranty claim. This warranty does not cover pick up, delivery, transportation or house calls. However, if you mail your product to a Hoover
Commercial Authorized Warranty Service Dealer for warranty service, cost of shipping will be paid one way.
OTHER IMPORTANT TERMS
This Warranty is not transferable and may not be assigned. This Warranty shall be governed and construed under the laws of the state of North Carolina. The Warranty Period will not be extended by any replacement or repair performed under this Warranty. THIS WARRANTY IS THE EXCLUSIVE WARRANTY
BE LIABLE FOR ANY SPECIAL, INDIRECT, INCIDENTAL OR CONSEQUENTIAL DAMAGES OF ANY KIND OR NATURE TO OWNER OR ANY PARTY CLAIMING THROUGH OWNER, WHETHER BASED IN CONTRACT, NEGLIGENCE, TORT OR STRICT PRODUCTS LIABILITY OR ARISING FROM ANY CAUSE WHATSOEVER. Some states do not allow the exclusion of consequential damages, so the above exclusion may not apply to you. This warranty gives you specic rights; you may also have others that vary from state to state.21
2. Review Filter Bag removal &
replacement - Pg. 52