
WFH1687K - Washing machine BRANDT - Free user manual and instructions
Find the device manual for free WFH1687K BRANDT in PDF.
| Brand | BRANDT |
| Model | WFH1687K |
| Product Type | Front-loading washing machine |
| Wash capacity (cotton) | 7 kg |
| Wash capacity (synthetics) | 3 kg |
| Wash capacity (delicates) | 2 kg |
| Wash capacity (wool) | 1.5 kg |
| Maximum spin speed | 1400 rpm (estimated) |
| Power supply | 230 V / 50 Hz, 10-16 A, earthed socket |
| Water pressure | 0.1 - 1 MPa (1 - 10 bar) |
| Wash programs | Cotton, Synthetics, Delicates, Wool, Hand wash, Flash 30', OptiA45, Stretch, Rinse only, Spin/Drain |
| Special functions | Prewash, Intensive, Extra Rinse, Anti-crease, Hold rinse, Delay end, Child lock, Buzzer |
| Display | Digital display with text messages and indicators |
| Dimensions (H x W x D) | 85 x 60 x 60 cm (estimated) |
| Net weight | Approximately 70 kg (estimated) |
| Noise level (wash/spin) | Not specified in the manual |
| Energy class | Not specified in the manual |
| Maintenance | Regular cleaning of the detergent drawer, pump filter, water inlet filters |
| Safety | Door lock, overflow protection, anti-foam, unbalanced load, child lock |
Frequently Asked Questions - WFH1687K BRANDT
User questions about WFH1687K BRANDT
0 question about this device. Answer the ones you know or ask your own.
Ask a new question about this device
Download the instructions for your Washing machine in PDF format for free! Find your manual WFH1687K - BRANDT and take your electronic device back in hand. On this page are published all the documents necessary for the use of your device. WFH1687K by BRANDT.
USER MANUAL WFH1687K BRANDT
·Safety instructions 3
The environment and tips on saving energy 3
Description of the machine 4
· Environmental protection 5
1 - How to install your machine for the first time
- Removing the transport clamps from your machine 6
Preparing to install your machine 7
Installation under a worktop 7 - Connecting the water supply 8
- Connecting to the drain 9
- Connecting to the electricity supply 9
2 - How to operate your machine
· Textile maintenance code 10
Preparing your washing (sorting, colour test, loads and checks) 11
- Treating stubborn stains 12
- Loading your washing. 13
- Loading the washing products 13
- Programming / cancelling a program 14 to 17
- Function details 18 to 19
- Changing a washing programme 20
Automatic safety systems 21
3 - General maintenance
- Cleaning the machine and the internal components 22
· Risk of frost. 22 - Cleaning the products' box 22
- Cleaning the filters 23
- Cleaning and upkeep of your appliance 23
4 - Incidents that may arise
The cycle does not start 25
·Heavy vibrations during spin 25
The washing is not spun or is not spun enough 25
· A pool of water forms around the machine 25
The machine does not drain 25
The door does not open 25
The machine refuses to accept a programme 25
5 - Particular messages provided by the indicator lights or on the display
Problems that you can rectify yourself 26
- Problems requiring a service engineer 26
Safety instructions
This machine is designed solely for domestic use, for washing, rinsing and spinning machine-washable textiles.
You must comply with the following instructions. We will refuse any liability and rescind the guarantee if these recommendations are not observed, which can cause damage to equipment or physical injury.
- To avoid damaging your machine and your washing, your machine must only be used for the purpose for which it has been designed. Only use washing and maintenance products certified as being for use in domestic washing machines.
- If you treat your washing with stain removers, solvents and, in general, any inflammable or potentially explosive product, do not put them into the machine immediately (see the section on "TREATING STUBBORN STAINS"). Furthermore, you are strongly recommended not to use solvents or products in an aerosol can near to your machine or, any electrical appliance in general, in a poorly ventilated room (risk of fire and explosion).
- If an incident should occur, which you cannot resolve using the remedies we recommend (see the section on "INCIDENTS THAT MAY ARISE"), call a
professional service engineer.
- When making a new installation, the machine must be connected to the water supply with a new hose. The old hose must not be re-used. Check the water and drain hoses regularly: this will help you avoid water damage.
- Do not allow children to play with the machine and keep pets away from it.
- Worn-out machines must immediately be rendered unusable. Unplug the power cable and cut it off next to the machine. Shut off the water supply and remove the hose. Break the lock on the machine's door.
The environment and tips on saving energy
- Programme a pre-wash only when it is absolutely necessary: e.g. for sportswear or very dirty working clothes, etc.
- If your washing is only slightly or moderately dirty, a low temperature programme is quite enough to provide you with a perfect result.
- For only slightly dirty washing, select a short washing cycle ("Rapid", "Express" or "FLASH", depending on the model).
- Use an amount of detergent to suit the hardness of the water, the quantity of washing and how dirty it is. Always follow
the instructions on the detergent pack.
- Both the packaging and the component parts of your machine use recyclable materials. Please bear this in mind when disposing of them. Please contact your dealer or the technical Services Department in your town regarding how to dispose of them appropriately, in an environmentally friendly manner.
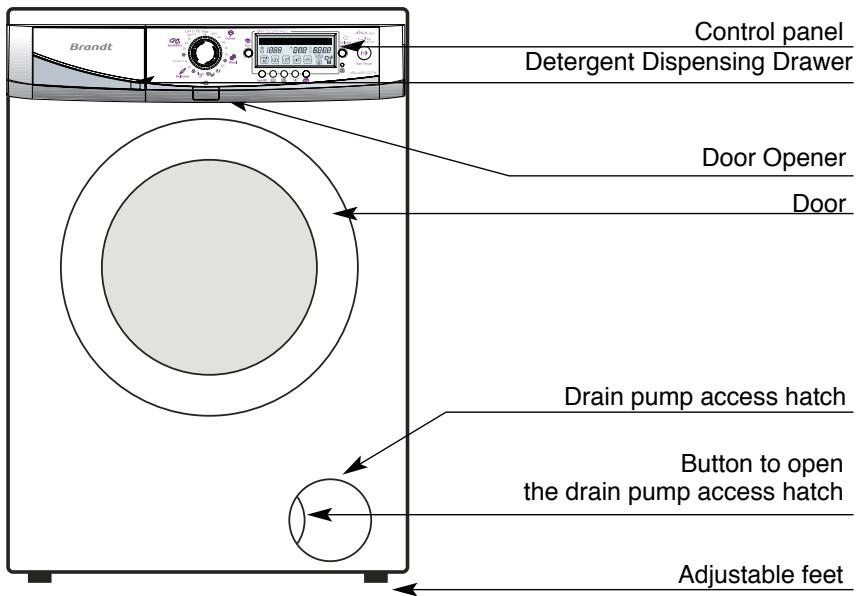
Description of the machine

Environmental Protection
This appliance's packaging material is recyclable. Help recycle it and protect the environment by dropping it off in the municipal receptacles provided for this purpose. Your appliance also contains a great amount of recyclable material. It is marked with this label to indicate the used appliances that should not be mixed with other waste. This way,
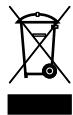
the appliance recycling organised by your manufacturer will be done under the best possible conditions, in compliance with European Directive 2002/96/EC on Waste Electrical and Electronic Equipment. Contact your town hall or your retailer for the used appliance collection points closest to your home.
We thank you doing your part to protect the environment.
Removing the transport clamps from your machine
YOU MUST PERFORM THE OPERATIONS DESCRIBED BELOW BEFORE USING THE MACHINE
These operations consist of removing all the elements designed to immobilize your machine's internal components while it is being transported. These so-called "releasing" operations are required for your machine to operate properly and to comply with the prevailing safety standards. If you do not perform these operations completely, this can cause severe damage to your machine while it is operating.
- Remove the transport clamps before you start your machine. These are the screws marked "C" (Figure1).
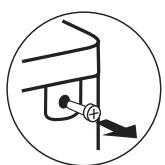
- Use a spanner to unscrew the "C" screws anti-clockwise (Fig. 2) until you can remove them by hand.
- Finish removing the "C" screws and their rubber seals by pulling them towards you (Fig. 3)
To facilitate this operation, pour a drop of washing-up liquid on the screws and release them a little at a time, working from top to bottom.
- You must block up the holes left by the "C" screws with the covers provided (in the accessories bag).
Your machine was scrupulously checked before it left the factory: you may therefore notice the presence of a small amount of water in the drum or in the products' box.
We advise you to keep all the clamping components because these must be re- inserted if you subsequently have to transport your machine.

Preparing to install your machine
Your machine's surroundings:
If you are installing your machine next to another appliance or a unit, we recommend that you always leave a gap between them to help the air to circulate. On the other hand, we would strongly advise you NOT:
- To install your machine in a damp, poorly ventilated room.
- To install your machine in a location where it could be splashed with water.
- To install your machine on a carpeted floor.
If you cannot avoid this, take every precaution against obstructing the air flow to the base of the machine to ensure good ventilation for the machine's internal components.
Levelling:
Use a spirit level to check that the floor is horizontal: maximum slope: 2^ , i.e. a discrepancy of approximately 1cm over the width and 1.5cm over the depth of the machine.
Adjusting the feet:
To ensure that your machine operates
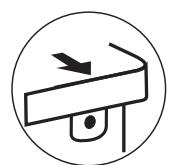
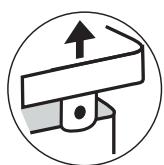
Installation under a worktop
If you wish to install your washing machine under a worktop, you must remove the top of the machine (Fig. 5)
Ensure that your machine is not connected to the electricity supply. Unscrew and remove the two screws
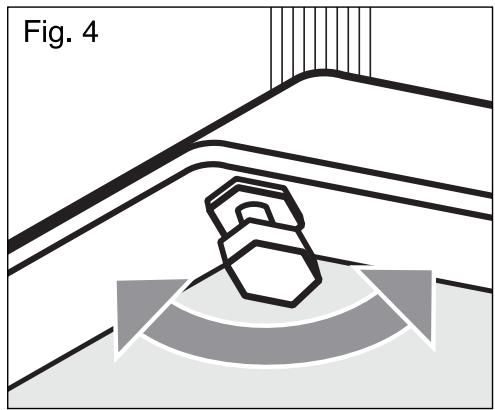
safely and quietly, its feet must be fitted. Your machine is supplied with four adjustable feet. If your machine is unstable, - Unscrew the white plastic lock nut, - Screw or unscrew the adjustable feet until your machine is perfectly balanced, - Once the feet have been set, tighten the bolt to retain your setting.
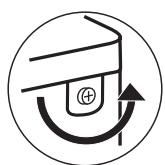
Fig. 5
Connecting your machine
Connecting to the cold water supply
Connect the water hose (Fig. 6)
- By screwing the elbowed end to the connection on the back of the machine
- By screwing the other end to a tap fitted with a threaded end piece diameter 20x27 (3/4 BSP).
If you use a self-piecing tap, the useful opening must be at least 6mm in diameter. To avoid any water leaks, remember to fit the rubber seals in each end and tighten your connections correctly. The seals are
provided in the accessories bag.
Water supply:
- Minimum water pressure: 0.1 MPa or 1 bar
- Maximum water pressure: 1 MPa or 10 bars
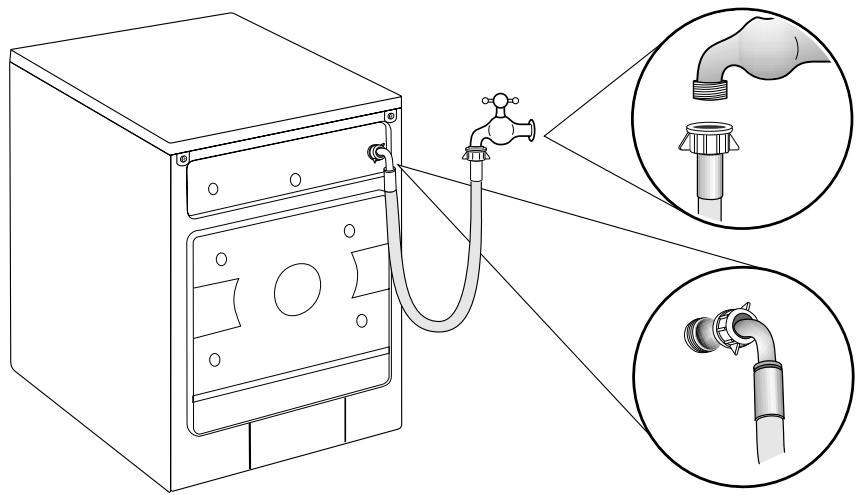
Fig 6
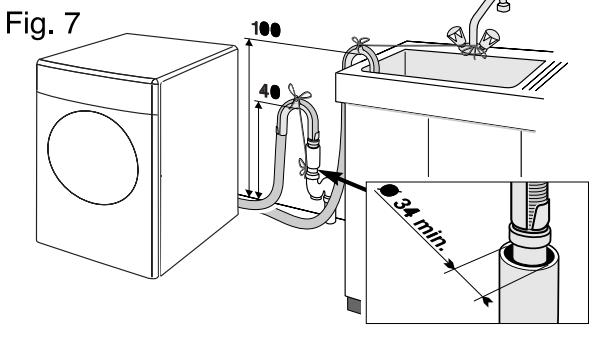
Connecting to the drain
Connect the drain hose (Fig. 7)
- Either, temporarily, to a sink or a bath tub
- Or, permanently, to a ventilated U bend. If your installation does not have a ventilated U bend, ensure that the connection is not airtight. In fact, to avoid any flowback of the waste water into the machine, you are strongly recommended to leave an air gap between the drain hose and the waste pipe
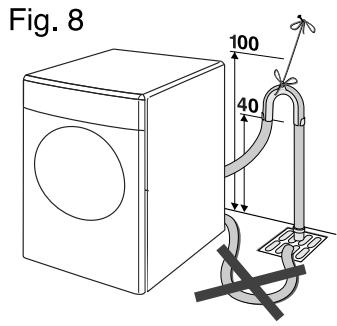
The hose must not be twisted or kinked and must be held by the hose hook to avoid it falling to the ground (Fig. 8)
The hose hook must be placed 40 to 100cm above the base of the machine. Ensure that it is tied firmly in place to avoid it coming loose during draining and causing a flood.
Electricity supply
For your safety, you must comply with the instructions below.
The electrical installation must comply with Standard NF C 15-100, particularly as regards the Earthing requirements. Line 3 × 2.5 ~mm^2 single-phase 230 ~V connected to:
- A single-phase 20A 230V-50Hz meter
- A differential circuit breaker and a separate fuse (10 or 16A, depending on the model)
- A 2-pin + Earth 10/16A socket
We cannot be held responsible for any accident caused by improper electrical installation. Advice on the electrical installation of your machine:
- Do not use an extension lead, an adapter or a multiple-outlet socket.
- Never remove the Earth.
- The socket must be easily accessible but out of the reach of children.
If in any doubt at all, please contact your installer.
Your machine complies with European Directives EEC/73/23 (Low Voltage Directive) and EEC/89/336 (Electromagnetic Compatibility) as modified by Directive EEC/93/68.
Textile maintenance codes
To assist you in caring for your textiles, they are provided with a label summarising the information required. This information is expressed as a code using the symbols below :
| WASHING | BLEACHING | ||||
| 95 | Max. temperature: 95°C | diluted cold bleach | Use no bleach | ||
| - Normal mechanical action | |||||
| - Normal rinsing | |||||
| - Normal spin dry | |||||
| - Reduced mechanical action | |||||
| - Rinsing at decreasing temperature | |||||
| - Reduced spin-drying | |||||
| IRONING | |||||
| 60 | Max. temperature: 95°C | 200°C hot setting | 150°C medium setting | 110°C low setting | Do not iron(use no steam) |
| - Normal mechanical action | |||||
| - Normal rinsing | |||||
| - Normal spin dry | |||||
| - Reduced mechanical action | |||||
| - Rinsing at decreasing temperature | |||||
| - Reduced spin-drying | |||||
| DRY-CLEANING | |||||
| 40 | Max. temperature: 40°C | AAll the usual solvents | PPerchloroth-yleneMineral oil | FMineral oil and F113 fluorinated solvents | Do not dry-clean nor use solvent stain removers |
| - Normal mechanical action | |||||
| - Normal rinsing | |||||
| - Normal spin dry | |||||
| - Reduced mechanical action | |||||
| - Rinsing at decreasing temperature | |||||
| - Reduced spin-drying | |||||
| Normal processing | |||||
| 40 | Max. temperature: 30°C | - Reduced mechanical action- Reduced drying temperature- No addition of water(Free-service cleaning impossible) | |||
| - Highly reduced mechanical action | |||||
| - Normal rinsing | |||||
| - Reduced spin | |||||
| DomESTIC TUMBLE-DRYING | |||||
| 30 | Hand wash only | Hot dry | Cool dry | Do not tumble-dry | |
| Max. temperature: 40°C(Certain machines are now equipped with a programme enabling this type of textile to be machine-washed) | |||||
| Do not wash | |||||
Preparing your washing
Sorting your washing
Please refer to the table on the preceding page for sorting your washing and selecting a suitable programme for the labels. Whenever you are washing a mixed load, use the programme for the most delicate fabric. When washing new textiles, as a precaution, first check that the textile does not run: see "Colour test" below.
Colour test
When being washed for the first time, coloured textiles frequently run unless guaranteed to be colourfast. Before starting the machine, perform the following test :
-
Select an invisible part of the textile
-
Dampen it with warm water
- Then press it against a white cloth
- If the textile does not run, you can machine-wash it normally
- If the textile runs, machine-wash it separately of by hand.
Do not exceed the following maximum loads :
COTTON / COLOURS / MIXED FIBRES : 7kg
SYNTHETICS: 3kg
DELICATE FABRICS / SILK: 2kg
WOOLLENS: 1,5 kg
HANDWASH 1 kg
Average weight of various "thin" items of washing
Single sheet. 400 to 500 g
Double sheet 800 g
Pillow case. 200 g
Light nightdress 150 g
Children's cotton trousers. 120 g
Adult's cotton trousers. 500 g
Men's cotton/polyester shirt. 200 g
Large size cotton T-shirt 150 g
Dishcloth 100g
Tablecloth 250g
Delicate lingerie 50g
Children's synthetic woollens 50 g
Sock. 20 g
Adult's cotton pyjamas 250 g
Average weight of various "thick" items of washing
Adult jeans. 800 g to 1kg
Large terry towel. 700 g
Small terry towel 300 g
Adult jogging pants. 350 g
Children's terry pyjamas 100 g
Bathrobe 1200g
Sweatshirt 250g
Duvet cover 1500 g
Checking your washing
Non-observance of the following instructions may result in severe and even irreversible damage (damage to the drum, torn washing, etc.) and cancel the guarantee.
- Empty the pockets
- Close any zips and press-studs
-
Remove any curtain hooks or place your curtains in a washing net.
-
Remove any poorly attached buttons, pins and hooks
- Place small items of laundry (ribbons, pouches, etc.) in a washing net
- Turn multi-layer textiles inside out (sleeping bags, anoraks)
- Turn knitwear, textiles with sewn-on decorations and trousers inside out
Treating stubborn stains
Stains caused by sweat, blood, fruit, wine or chocolate generally disappear when using biological detergents but some stains require specific treatment before being placed in the machine. Perform a test first of all on a scarcely visible part of the textile and rinse thoroughly. If you use a stain remover, always start at the outside of the stain to avoid any rings.
GRASS: dab the stain with white vinegar or 90^ proof alcohol* (if this is suitable for the textile) and then rinse and wash
BALLPOINT / FELT TIP PEN: remove as much of the ink as possible by dabbing the stain with absorbent paper. Place a clean white cloth under the stain and dab the stain with another cloth soaked in white vinegar for synthetic and artificial fibres or 90^ proof alcohol* for other fibres (if this is suitable for the textile)
RUST: for slight stains, cover with salt, squeeze lemon juice over the salt and leave overnight: then rinse thoroughly and wash. For heavier stains, use an anti-rust product, carefully following the manufacturer's instructions.
CHEWING GUM: chill it using an ice cube. As soon as it is hard enough, scrape it off with your fingernail. Remove any remaining ring with a degreasing product OIL - TAR: use liquid stain remover or, failing this, spread a little fresh butter on the stain, leave it for a while and then dab with turpentine*.
PAINT: do not leave paint stains to dry. Treat them immediately with the solvent indicated on the paint tin (water, turpentine, white spirit). Soap and then rinse.
CANDLEWAX: remove as much of the stain as possible by scratching it. Then place absorbent paper on both sides of the textile and iron the stain to melt the rest of the wax.
MAKE-UP: place the stained surface of the fabric on absorbent paper, then dampen the reverse of the fabric with 90^ proof alcohol (if this is suitable for the textile) and provided that the stain is not greasy. Otherwise, opt for a de-greasing product (trichlorethylene type).
COFFEE - TEA: On white cotton: dab the stain with oxygenated water before washing normally - On coloured cotton: dab the stain with a watervinegar solution (2 soup spoons of white vinegar to 1/4 litre of water) before washing normally - On woolen: dab the stain with a mixture of equal parts of alcohol and white vinegar before washing the item
CHOCOLATE - FRUIT - FRUIT JUICE - WINE: dab the stain with a water vinegar solution (2 soup spoons of white vinegar to 1/4 litre of water). Rinse well and wash normally.
GREASE: sprinkle the textile immediately with talc. Leave to dry and brush gently to remove the talc. Then dab with a degreasing product of the mineral oil* type. Rinse and wash normally.
BLOOD: soak the stained item as quickly as possible in cold salty water, then proceed to wash normally.
KETCHUP - TOMATO SAUCE: prepare a solution of one part glycerene to one part warm water. Soak the item for an hour; then proceed to wash normally.
USING STAIN-REMOVING PRODUCTS:
To avoid any risk of fire or explosion:
(*) If you are using the products recommended in the remedies above, take care to rinse your washing thoroughly before placing it in the machine.
- If you are using commercial stain removers, follow the manufacturer's instructions very carefully.
We would remind you that, generally, stains treated immediately can be easily removed. On the other hand, old stains that have been ironed or tumble-dried cannot be removed.
Loading your washing
Proceed as follows:
Open the machine
- To access the drum, pres the "Door" button located just above the door.
Insert your washing
For optimum washing performance, sort and fold your washing and then place it the drum, distributing it evenly, without piling it up. Mix large and small items together for
optimum spinning.
Close the machine
- Check that no item is caught in the door when you close it.
- Close the door by pressing it gently.
- Ensure that the door is locked. If it is not, a safety system will prevent you from starting your machine.
For your safety, the door is locked throughout the washing cycle.
Loading the washing products
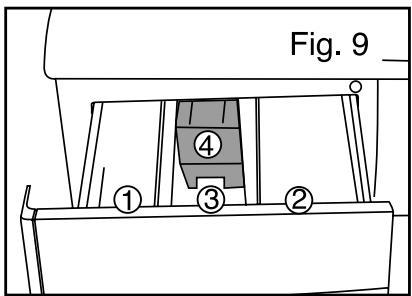
You can place liquid or powder in the "WASH" compartment but should never use liquid detergent for programmes WITH a Pre-wash and/or WITH "Delayed Start" (depending on the model).
① Wash compartment (powder or liquid)
② Pre-wash compartment (powder)
③ Softener
④ Siphon
Concentrated softener must be diluted with warm water.
To fill the compartments properly, open the detergent dispensing drawer to its maximum extent.
Never fill beyond the MAX level.
Dispensing the detergent
The amount of detergent to use depends on the water hardness, how dirty the washing is and how much washing there is. Please refer to the dosage instructions on the detergent pack.
Warning: The detergent manufacturers' recommendations are generally based on filing the drum to the maximum. Adapt the dosage appropriately for the weight of washing you are inserting in the machine. These recommendations will avoid too high a dose of detergent, which can cause foam. Too much foam can reduce your machine's
performance and increase the washing time and the water consumption.
Detergents for woollens and delicate textiles. Detergents for woollens and delicate textiles. You are recommended to sue an appropriate detergent to wash these types of textiles (avoid putting such detergents directly into the drum because some of these products can attack the metal.
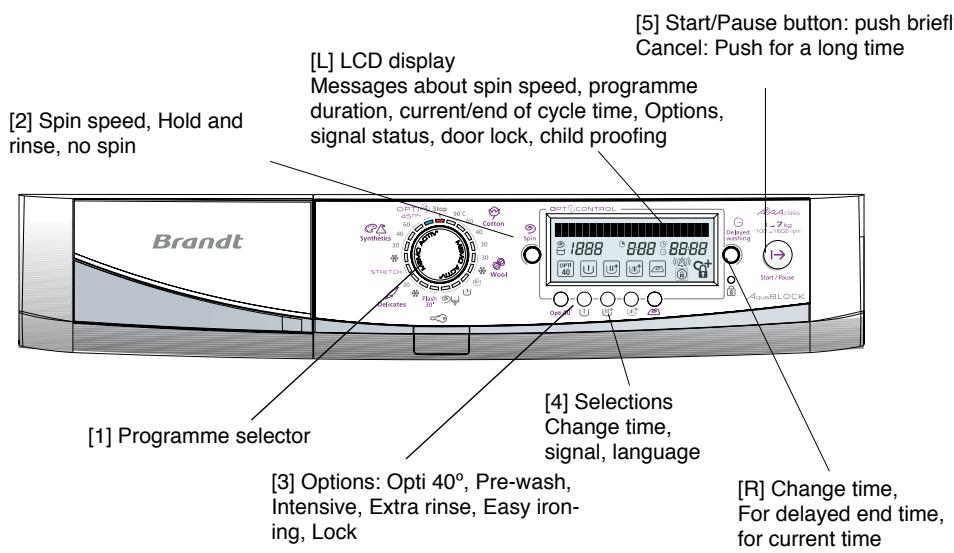
(i) To start machine, push on programme selector [1]. Screen shows "Hello"
1 All buttons are touch-sensitive. That means the buttons do not remain pushed in. We recommend you just push them briefly. Any push on the "Start/Pause" button should be brief unless you are cancelling a programme. In that case you should hold the button down. () Details of this function are shown in the following pages.
When starting your machine, if the screen is displaying a cycle status message - such as Pre-wash, Wash, Rinse, Spin, Drain - push the "Start/Pause" button [5] in until the messages disappear, before doing any other operation.
Setting the current time.
You can set the current time by simultaneously pushing on the Easy Ironing and Lock buttons for at least 3 seconds, until screen L shows "Set the time". Then turn knob R to set time. The screen shows "Time Setting" and the time display flashes. You can turn knob R both ways and adjust the speed fairly closely. To set the current time, push "Start/Pause". Screen L displays "Time set", Push "Start/Pause" again: screen displays "Summer time" or "Winter time", turn knob R to make your choice, then push "Start/Pause" again to set.
① To change to and from daylight saving time, proceed as above, checking the time displayed and only needing to change the "Winter time" or "Summer time" setting.
Programming
When the power supply is on, your washing-machine has a Memo Activ system that automatically offers you the programme that you use the most.
| Programming a washing cycle without options | Signals and messages |
| When you push selector [1], machine automatically selects the programme you use most often (*) | The blue indicator corresponding to the programme selected lights up. Screen L indicates programme name, maximum spin speed, washing time, finish time and available options. |
| Use selector 1 if you want to choose a different programme. | The blue indicator corresponding to the new programme selected lights up. Screen L indicates programme name, maximum spin speed, washing time, finish time and available options. |
| Use "Spin" button 2 to - change the proposed spinning speed, - drain, for a cycle ending without a spin stage. - Hold and rinse. Your machine will stop full of water before final spin. | Display shows "spin speed" when you turn knob 2 to increase or decrease spin speed and the new speed flashes on the screen. If you choose a drain option, the display will show "000" speed. If you choose a "Hold ano rinse" option, no speed figure will appear and the display will show the pictogram ☐. |
| Choose instant start by briefly pressing "Start/Pause" 5. | Screen L will show "Start". |
| The LCD screen L shows the cycle stage and remaining time so that you continuously see the progress of the selected programme. | The programme stage messages are "Pre-wash", "Wash", "Rinse", "Spin", and "Empty". |
| When the screen L shows "Completed program", the machine has completed the cycle (**) | Display shows "Completed program" and the current time. |
| Programming a washing cycle with options: | Signals and messages |
| When you push selector 1, machine automatically selects the programme you use most often (*) | The blue indicator corresponding to the programme selected lights up. Screen L indicates programme name, maximum spin speed, washing time, finish time and available options. |
| Use selector 1 if you want to choose a different programme. | The blue indicator corresponding to the new programme selected lights up. Screen L indicates programme name, maximum spin speed, washing time, finish time and available options. |
| Use "Spin" knob 2 to - change the proposed spinning speed, - drain, for a cycle ending without spinning, - Hold ano rinse. Your machine will stop full of water before final spin. | Display shows "spin speed" when you turn knob 2 to increase or decrease spin speed, and the new speed flashes on the screen. If you choose a drain option, the display will show "000" speed. If you choose a "Hold ano rinse" option, no speed figure will appear and the display will show the pictogram ☐. |
| Use the buttons to select from options "Opti 40" , "Pre-wash", "Extra rinse" or "Easy ironing". | Screen L shows available options. The frame of the option button lights up when selected. If you select incompatible options (such as "Easy ironing" with "Intesive" at the same time), the last option selected will remain. |
| Choose instant start by briefly pressing "Start/Pause" 5. | Screen L will show "Start". |
| Or choose "delayed end" time as follows: - use knob R to set 'Delayed end' time in multiples of 15 minutes to a maximum of 24 hours. - press "Start/Pause" briefly. After 5 seconds without touching the "Start/Pause" button, the "Delayed time" is automatically set. - washing will automatically begin at the time programmed in. | When you are setting a "delayed end" time, screen L will show "End of cycle time at 19:00". Once you have set the "delayed end" time, the screen will show "Start at 17:45". The screen shows just the starting time after 30 seconds. |
| The LCD screen L shows the cycle stage and remaining time so that you continuously see the progress of the selected programme. | The programme stage messages are "Pre-wash", "Wash", "Rinse", "Spin", and "Empty". |
| When the screen L shows "Completed program", the machine has completed the cycle (**) | Display shows "Completed program" and the current time. |
() Check that the electric cable is connected and the water tap is open before starting the machine. Also make sure that the machine door is correctly closed.
(*) When the washing cycle is finished and the screen shows "Completed program", you can programme your machine again. If you press the "Start/Pause" button 5, the machine will automatically start the previous completed cycle again, including options.
Programming
| Locking control buttons during washing cycles (Child protection) | Messages |
| If you want to lock your washing machine control buttons during washing - to avoid, for example, a child modifying the programme during the cycle - do the following: If no lock option has been selected, push on the 8 lock button for at least 3 seconds. Control panel is automatically locked all washing cycle long | After pushing the lock button for 3 seconds, the screen L displays “Child protection...Lock: cycle”. Then the pictogram of a padlock appears at bottom right of the screen. If Control panel are manipulated during washing, the screen L shows “Control panel locked”. |
| Controls completely locked (child protection) | |
| If you want completely to lock your washing machine control buttons both during washing and when stopped - to avoid a child accidentally starting a cycle - do the following: If no lock option has been selected, push the 8 lock button for at least 3 seconds to lock controls during the cycle, then do the same thing again to lock controls completely. If Control panel has already been locked during the cycle, you just have to press the 8 lock button once again to lock completely Control panel. Control panel is then immediately locked. | When the lock button is first pushed, the screen L displays “Child protection: lock cycle”. When the button is pushed again, the screen shows “Child protection...Lock: Full”. Then the pictogram of a padlock with a “+” sign appears at bottom right of the screen. If Control panel are manipulated, the screen L shows “Control panel locked”. |
| Unlocking Control panel (Removing child safety mode) | |
| To unlock Control panel, press the 8 lock button once for 3 seconds minimum if Control panel is locked completely, or press the 8 lock button for 3 seconds twice if Control panel is locked only during the cycle. Control panel is then immediately unlocked. | Screen L shows “Child protection...Unlock”, then the open-lock pictogram appears bottom right of the screen. |
| Adding or taking out an item during the cycle (not possible during spin stage): | |
| • Briefly push “Start/Pause” 5 to interrupt the cycle. • Insert or remove laundry items*. • Briefly push “Start/Pause” 5 to restart the cycle. pour relancer le cycle. (*) the time before the door can be opened can be between 1 and 2 minutes. If you chose “Delayed end”, you can immediately access the drum at any moment during the preceding phase. | When the programme is interrupted, screen shows “Paused programme” and “Push Start button”. Display will again show the programme stage in progress when the programme is restarted. |
| To cancel washing or pause mode during programming: | |
| • Push “Start/Pause” [5] for at least 3 seconds. You can do this at any time during the period preceding the cycle or even during a pause. If you programmed in one “delayed end” hour and you cancelled it during the waiting period before the cycle started, your whole programming will be cancelled. If you want to cancel only the “delayed end” hour, turn knob [R] to the left to the point you were coming to, at the time when the selected cycle stops. If there is water still in the drum, the machine will begin to discharge it. After the programme is cancelled, the machine will have no water in it and will be ready to be used again. | During cancellation, screen shows “Programme cancelling”. |
For more details on the various functions, refer to "FUNCTION DETAILS"
Important: if you stopped your machine during the wash cycle by selecting the "Stop" position - or if you had a cut in power supply - the wash cycle will systematically return to the point at which it was interrupted when the machine is switched on again.
Programming
To choose the best programme for your type of clothing, follow the instructions shown on the labels on most textiles.
| Programs table | Temperature (°C) | Maximum load (Kg) | Pre Wash | Intensive | Extra Rinse | Easy ironing | Draining | Hold and rinse |
| Type of textile | ||||||||
| COTTON | 30 – 90° | 7,0 | • | • >40° | • | • | • | • |
| SYNTHETICS | Cold – 60° | 3,0 | • | • >40° | • | • | • | • |
| DELICATE | Cold – 30° | 2,0 | • | • | • | • | ||
| WOOLLENS | Cold – 30° | 1,5 | • | • | • | |||
| Special programs | ||||||||
| HAND WASHABLE TEXTILES | 30° | 1,0 | • | |||||
| FLASH 30' | 30° | 3,0 | • | |||||
| OPTIA45 | 40° | 3,5 | • | |||||
| STRETCH | 30° | 2,5 | • | • | • | • | ||
| Specific programs | ||||||||
| RINSING only | According to textile | • | ||||||
| SPINNING only, DRAIN | • | |||||||
These options can be performed with the maximum load for the textile concerned.
- : These functions can be used alone or combined – illogical combinations are impossible.
Function details
Programmes
Cotton
For a load of white COTTON or fast colours.
If you are washing coloureds, do not go above 60^ temperature.
During the first few minutes of this programme, using AQUALOGIC, your washing machine automatically adjusts water and energy consumption levels to make a perfect wash
Synthetics
For COLOURED DELICATES, COLOUR FAST SYNTHETICS and MIXED FIBRES
Delicates "
For NET CURTAINS, DELICATE TEXTILES and FRAGILE CLOTHING.
Woollens
For "MACHINE WASHABLE" WOOLLENS.
Hand washable textiles
For SILK and PARTICULARLY DELICATE TEXTILES.
Flash 30
This programme allows you to clean 3kg of lightly soiled WHITE COTTON, COLOURS and COLOUR FAST SYNTHETICS. Programme duration 30 minutes maximum.
This programme automatically sets the washing temperature to 30^ .
Detergent levels must be halved for this programme.
OptiA45minutes:
This programme allows you to wash a normal 3.5kg load of mixed cotton and synthetics in only 45 minutes.
Stretch:
This programme allows you to wash carefully your Elasthane-based textiles such as Lycra so that they can keep their elasticity longer.
Rinse only "
Separate rinsing followed by choice of
- spin and drain
drain only ("drain" option) - stop full of water.
Spin only " ⑨
This allows a separate spin with drain.
For "rinse only" followed by "spin" or "spin only" make sure you choose a suitable spin speed for the type of wash in the machine.
Options
Pre-wash
For dirty clothing with mud, blood, etc.
A specifically cold pre-wash stage precedes the washing phase.
This cold wash removes the dirt particles in the clothes before any hot water cycle.
Detergent must be put in the " container in the dispenser drawer.
Intensive
This function improves washing performance and helps remove difficult stains by automatically raising washing temperature and increasing agitation time.
The "Intensive" option is available only for programmes where the wash temperature is 40^ or above.
Extra rinse
"Special for sensitive and allergic skin": adds another rinse stage to the wash cycle.
Function details
Easy-ironing
Makes it easier to iron your laundry.
This option also enables you to wash and spin your clothing more delicately while retaining identical wash performance.
Hold and rinse
This function is for textiles that you do not want to spin, or if you expect to be away for a long time after washing finishes.
This function stops the cycle before the final spin so your laundry stays soaked in water to avoid creasing.
When the machine is stopped full of water, the "Holding at Rinse" icon flashes and the "Programme stopped" message is displayed until the cycle ends.
- If you want to drain and spin.
Turn Selector [1] to "Spin" and use knob [2] to choose a speed suitable to your laundry load, then push "Start/Pause" [5]. The screen displays "Spin" and the spin speed, and the programme finishes automatically.
- if you want only to drain. Turn Selector [1] to "Spin" and use knob [2] to choose "000", then push "Start/Pause" [5]. The screen displays "Drain" and the spin speed, and the programme finishes automatically.
Opti40°
This programme efficiently washes a full cotton load at 40^ whilst economising on electricity.
End time

As soon as the programme starts, the display shows the chosen end of cycle time"
The time shown by the machine at the start of the programme can vary during the cycle:
- if you change the washing temperature (even during spin), or if you add or cancel any options, the time will be re-calculated and updated on the display.
- Some operating problems (unbalanced load or excess of foam) can alter the cycle length and thus the displayed end time.
- If the power supply is cut during the washing phase, when the power is restored, the time displayed can be earlier than the real end time. This time will be updated at the start of the rinsing phase.
Load out of balance": when you wash very small amounts of laundry it can ball up in the drum. This prevents your machine working at its best.
Activating sound alarm
Your washing machine has a sound alarm that you can activate or de-activate by pushing on "Easy Ironing" and "Extra rinse" simultaneously for 3 seconds. Screen L shows "Buzzer:YES" and the machine makes a beep when the alarm is activated. Screen L shows "Buzzer:NO" and the machine makes two beeps when the alarm is de-activated.
Screen L shows "Buzzer:NO" and the machine makes one beep when the alarm is de-activated.
Language selection
You can change the display language by pushing the Opti40° and Pre-wash button simultaneously for two seconds.
In default the display shows "Language: English".
Turn the time adjustment button [R] to change the language.
Confirm the new language by pushing Start/Pause button [5].
Delayed end
You can delay the programme finishing time by between one and twenty-four hours to take advantage of electricity night tariffs, or to have the programme finish at a time that you desire.
To do that, use knob [R] to select the finishing time you want. As you are adjusting to get that time, the screen shows "End of cycle time at..." shows the programme end time along with the current time which flashes. After the programme end time is selected, the screen [L] will show the cycle beginning time "Start at 19:45". Screen [L] will go blank 30 seconds after cycle validation.
tion. Your washing machine will automatically start at the time programmed in.
When the machine is in time delay mode, the screen [L] shows the beginning time along with the time delay pictogram.
(1) Before you select the time delay programme, screen [L] shows the time and the clock icon until the cycle starts.
Changing a washing programme
During programming:
All changes are possible before you press the "Start/ Pause" [5] "I→" button.
After the cycle starts:
- You cannot change the type of textile (for example changing from "COTTON" to "SYNTHETIC", from "SYNTHETIC" to "DELICATE" etc).
To change the type of textile during a cycle, you must cancel the current programme and programme a new cycle. - You can change the temperature at the start of the washing phase, after putting the machine in the "Pause" mode.
- You can change the spin speed during the entire cycle preceding spin.
- You can select a "draining" and a "Hold and Rinse" up to the end of the rinse (until the "rinse" cycle progress indicator lamp goes out).
- When you select the "Delayed wash" you can only activate the "Pre-wash" and "Easy ironing" options during the period preceding the effective start of the cycle.
-
You can activate the "Extra Rinse" option until rinsing starts (until the "rinsing" cycle progress indicator lamp lights up).
-
You can deactivate all the options during the entire cycle as long as their action has not yet started.
At the end of the cycle:
When the message "Completed program" appears in [L] display :
- You can programme a new cycle without having to go via the "Stop" position.
You can press on any one of the 2, 3, 4 buttons, or turn the program selector to position 1.
The machine is then ready for new programming.
- If at the end of the cycle you press the "Start/ Pause" [5] button directly, the machine will re-launch the last programme cycle, including the options.
Automatic safety systems
Door opening safety:
Your machine's door will be locked when the wash cycle has started.
When the cycle is completed or when the machine has stopped with the tank full of water, the door unlocks immediately. If you have programmed a "Delayed end", the door is not locked throughout all the waiting period preceding the start of the cycle.
If you want to open the door during the cycle, press briefly on 5 " 1 " button and wait 1 or 2 minutes for the door safety to unlock.
Depending on the time in the cycle when you want to open the door, this time can be longer since there will be a cooling period added to it.
During this cycle the door safety will not unlock unless the interior temperature is below 60^ , and this is to prevent you from being seriously scolded.
Water safety:
The continuous water level control will prevent any overflow during operation.
Spinning safety:
Your washing machine is equipped with a safety system which can limit spinning when the load is incorrectly distributed (this incorrect distribution is called "Out of
balance"). In this case, your wash may be insufficiently spun. So spread your wash uniformly around the drum and programme a new spin.
Anti-foam safety system:
Your washing machine knows how to detect when too much foam is produced, during spin cycle, LCD display shows following messages "Excess of detergent" or "Request of a rinse more.
At that time the spin stops and the machine is drained.
Then the cycle re-starts, using a more appropriate spin rate and adding, where necessary a supplementary rinse.
The End time is changed.
Reduce your doses of detergent during the following washes.
Tap closed
When you can read on LCD display following messages "Open tap" or "Press Start", this shows that there is a blockage in the water supply of your machine,
-
check if the water supply tap is indeed open,
-
check if the water supply tube is not bent or kinked.
Programme for comparative and standardised tests.
Programme COTTON
Temperature 60°C
Load 7 kg
Duration 2h15
Energy consumption 1,19 kWh
Water 491
For the display written on the energy label, the tests are made in accordance with European Directive 92/75/CEE at nominal capacity ensuring the total use of the CEI detergent from the start of the wash phase.
General maintenance
Cleaning the machine
To clean the casing, the control panel and all the plastic components in general, use a sponge or a cloth dampened only with water and liquid soap.
Never use:
- Abrasive powders
- Plastic or metal sponges
- Alcohol-based products (alcohol, thinner, etc.)
Maintaining the internal components
To ensure optimum hygiene, we recommend that you:
- Leave the door open for a short time after the wash, (ensure that your children and pets cannot get into the machine)
Clean the plastic and rubber components providing access to the inside approximately once a month with a slightly chlorinated cleaning product.
To eliminate any residual traces of this product, programme a rinse.
- Run a 90^ C washing cycle at least once a month.
Risk of frost
If there is a risk of frost, disconnect the water hose and empty any water in the drain hose by placing it as low as possible in a basin.
Periodic checks
We recommend that you check the condition of the water and drain hoses. If you notice the slightest cracking, do not hesitate to replace them with identical hoses available from the manufacturer or his After-Sales Service.
Replacing the water hose
When replacing this, ensure that the connections are tight and that there is a rubber seal at both ends.
Replacing the power cable
For your own safety, this operation must be performed by the manufacturer's After-Sales Service or by a qualified electrician.
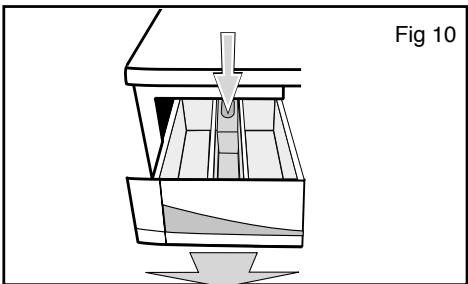
Cleaning the detergent dispensing drawer
To clean the products' box, pull it towards you and then remove it from its housing by pressing on the point indicated on the siphon (the coloured component). Rinse the box in water
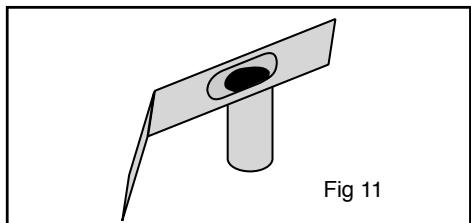
Cleaning the siphon
Wash the siphon (the coloured component in the products' box) every 30 to 40 doses of detergent. Remove the siphon by holding it by the edges. To avoid the siphon becoming blocked, rinse any residual softener away carefully and ensure that it is refitted perfectly in place before using the machine.
Cleaning the filters
Cleaning the pump filter
This filter collects any small items that you may have inadvertently left in the clothes and prevents them from disrupting the pump's operation.
To clean it, proceed as follows:
When the drum is full (for example, if there is a power cut), there can be up to 15 litres of water that must be drained away: provide a large enough receptacle.
Take precautions, the water to be drained may still be scalding hot.
- Remove your machine's power cable from the socket.
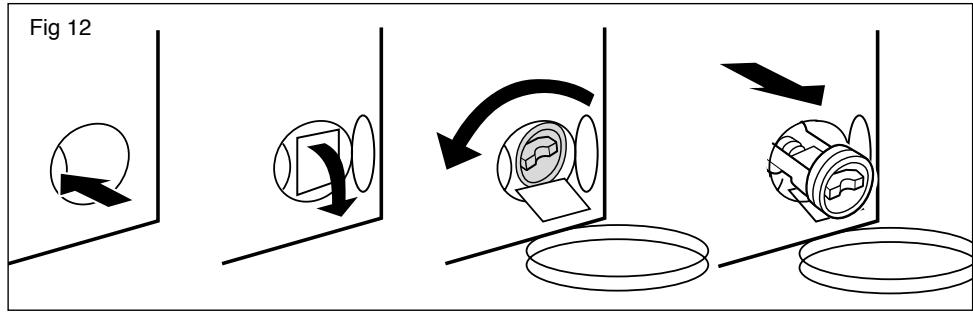
- Open the access hatch by pressing on the button (Fig. 12).
- Tilt the chute in front of the filter towards your receptacle,
- To control the flow of water coming out, slightly unscrew the filter by turning it
anti-clockwise,
- If your receptacle becomes full before you have drained the machine completely, screw in the filter, empty your receptacle and then start again until there is no more water,
- Then open the filter by turning it anticlockwise and empty the small amount of water from the filter's lid (30ml maximum).
- Remove any residue left in the filter's housing,
- Clean the filter,
- Replace the filter in its housing and lock it in place by turning it clockwise.
- Refit the chute
- Close the filter access hatch.
Ensure that the filter is correctly repositioned to avoid any water leaks.
Cleaning the filters on the water supply
The filters at the point where the water hose is connected to your machine and to the tap prevent dirt and small objects entering your machine. We recommend that you clean them from time to time. Proceed as follows to clean them:
- First of all, close the water tap,
- Unscrew the part of the hose that is
connected to the back of your machine,
- Remove the filter from the back of your machine using a pair of pliers and wash it under the tap,
- Refit the filter and the hose,
- Unscrew the hose connected to the water tap,
- Remove the filter with your hands and clean it under the tap
- Refit the filter and the hose,
Cleaning and upkeep of your appliance
To keep your appliance in good working order, we recommend that you use Clearit household products.

Professional expertise for the general public
Clearit offers you professional products and adapted solutions for the daily upkeep of your household and kitchen appliances.
You may find them in conventional retail outlets, along with a complete line of by-products and consumables.
Incidents that may arise
Some incidents may occur while you are using your machine; these are the points to check.
| Incidents | Possible causes / remedies |
| The cycle does not start | ·You have forgotten to press the "Start/Pause" button. ·There is no electricity to the machine: -Check that the plug is correctly connected. -Check the circuit breaker and the fuses. ·The water tap is closed. ·The machine's door is not closed properly. |
| Heavy vibrations during spinning | ·The transport clamps have not been correctly removed from your machine:-See the section on "REMOVING THE TRANSPORT CLAMPS FROM YOUR MACHINE" ·The floor is not horizontal. ·The feet are wrongly adjusted or their nuts have come loose. |
| The washing has not been spun or has not been spun enough | ·You have selected a programme without a spin, for example: "No spin". ·The spin safety system has detected that the washing is poorly distributed in the drum:- Redistribute the items better and programme a new spin. |
| A pool of water forms around the machine | First of all remove the plug from the socket or remove the relevant fuse and close the water tap. While your machine is operating, constant control of the water level avoids any water overflowing. If, despite this, water is leaking from the machine, it may be that: ·The drain hose hook is poorly positioned in the drain pipe. ·The connections for the water hose on the machine and at the tap are not tight:- Check that the seals are in place and that the connections are tight. |
| The machine does not drain | ·You have programmed a "Hold and Rlnse". ·The pump filter is blocked:- Clean it (see the section on "CLEANING THE FILTERS" for how to do this). ·The drain hose is kinked or squashed |
| The door does not open | ·The programme has not finished yet. The door remains locked throughout the whole of the programme. |
| The machine refuses to accept the programme | ·The "Child safety" system is active, (see the section on "PROGRAMMING") ·You have interrupted a cycle while it is running. Cancel it (see the section on "PROGRAMMING") |
In general, whenever you notice an anomaly, it is advisable to stop the machine, unplug the power cable and close the water tap.
Problems that you can rectify yourself.
In this section, we explain how you can rectify these problems very easily yourself. Your machine automatically detects certain operating faults and informs you of these by means of the indicator lights which light up red or by special messages which appear on the display.
| Messages | Causes / Remedies |
| Closed tap indicator light on | Water supply tap closed. Check that the water supply tap is open, then press the "Start/Pause" button again to re-launch the cycle. This incident can also be caused by incorrect connection of the drain hose (see section "CONNECTING YOUR MACHINE: Draining of used water"). |
| Foam detection light on | Too much detergent. The machine automatically starts an extra rinse. Check the amount of detergent you use on your next wash. |
Incidents shown on the display, which require the services of a service technician
First of all check that the message displayed is not an incident that you can solve yourself (see above).
Your machine also detects certain operating faults which can only be solved by the visit of a service technician and informs you of this by other messages, some examples of which we show below
After-Sales Service
Any work on your machine must be performed by your dealer or some other service engineer approved by the manufacturer.
When you call, mention your machine's full reference (model, type and serial number).
This information is given on the identification plate.

Page
SYNTHETIKFASERN: 3kg
EMPFINDLICHE STOFFE / SEIDE: 2kg
WOLLE: 1,5 kg
HANDWÄSCHE 1 kg