
AJYP101 - Motion detector Aqua Joe - Free user manual and instructions
Find the device manual for free AJYP101 Aqua Joe in PDF.

| Brand | Aqua Joe |
| Model | AJYP101 |
| Product Type | Motion-activated Pest Repellent Sprinkler |
| Power Source | Solar + 4 AAA Ni-MH batteries |
| Field of View | 120° |
| Maximum Detection Range | 12 m |
| Maximum Spray Range | 13 m |
| Maximum Coverage | 530 m² |
| Maximum Water Pressure | 7 bar (100 psi) |
| Maximum Flow Rate | 200 l/min |
| Maximum Rotation | 360° |
| Height | 58 cm |
| Net Weight | 0.6 kg |
| Base | Stake |
| Detection Modes (by animal size) | Large (3-5 m), Medium (8-10 m), All (10-12 m) |
| Activation Modes | Off, Always On, Day, Night |
| Automatic Watering Timers | 10, 20, 30 minutes |
| Rotation Angle Adjustment | 0° to 300° with friction collars |
| Spray Range Adjustment | By control knob and deflector screen |
| Spray Patterns | Concentrated to mist (adjustable via diffuser screw) |
| Winter Storage | Drain all water before freezing |
| Warranty | 2 years (residential use) |
Frequently Asked Questions - AJYP101 Aqua Joe
User questions about AJYP101 Aqua Joe
0 question about this device. Answer the ones you know or ask your own.
Ask a new question about this device
Download the instructions for your Motion detector in PDF format for free! Find your manual AJYP101 - Aqua Joe and take your electronic device back in hand. On this page are published all the documents necessary for the use of your device. AJYP101 by Aqua Joe.
USER MANUAL AJYP101 Aqua Joe
WATERING MODE + ANIMAL-REPELLING MODE
Model AJYP101
natural_image
Technical line drawing of two identical precision irrigation sprinkler devices (no text or symbols)If you have any questions or comments, please call the
Snow Joe ^® + Sun Joe ^® customer service department at:
1-866-SNOWJOE (1-866-766-9563)
Know Your Pest Deterrent Sprinkler
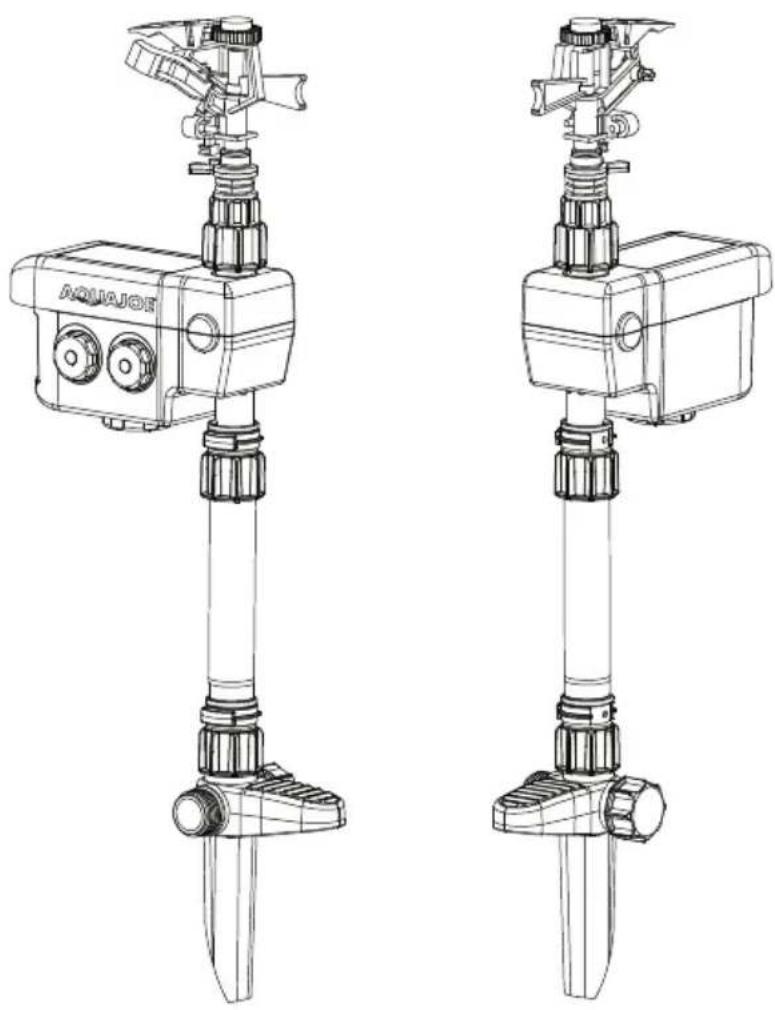
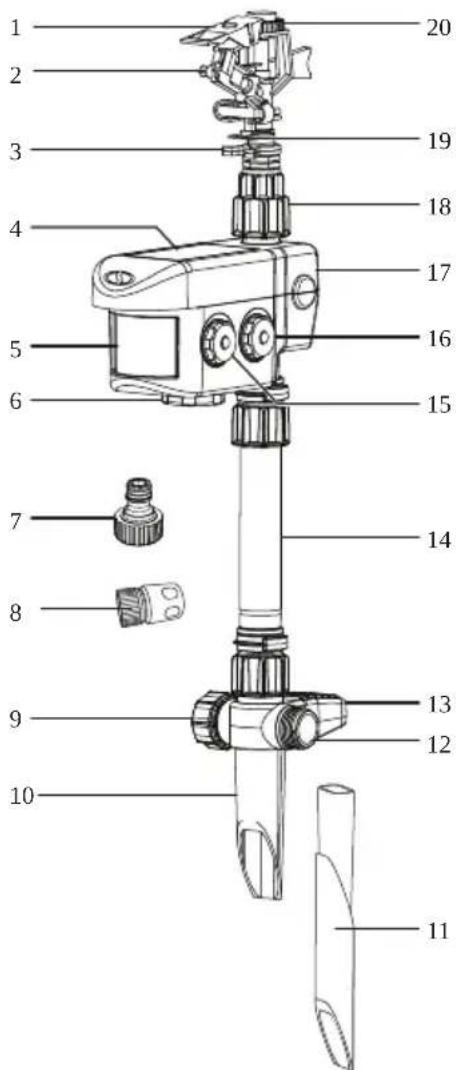
Read the owner's manual and safety rules carefully before using your Pest Deterrent Sprinkler. Compare the illustration below to the actual unit in order to familiarize yourself with the location of the various controls and adjustments. Save this manual for future reference.
- Deflector shield
- Di user screw
- Friction collars
- Solar cell
- Motion sensor lens
- Battery compartment
- Hose quick-connector
- Hose end connector
- Flow-through cap
-
Flow-through cap
-
Step spike
-
Extended spike
-
Hose-end connector
-
Foot pedal
-
Post
-
Detection + sprinkler mode dial
-
Activation mode dial
-
Sensor housing
-
Sprinkler connector
-
Trip lever
-
Distance control knob
Technical Data
Power Source .... Solar + Battery
Detection Field of View 120°
Max Motion Detection Range .... 40 ft (12 m)
Batteries ...... AAA Ni-MH (x4)
Spray Patterns .... Jet-Mist
Animal Detection Modes
10 – 16 ft (3 – 5 m) Large-sized Animals
26 - 33 ft (8 - 10 m) Medium-sized Animals
33 - 39 ft (10 - 12 m) All Animals
Max Coverage* 5700 sq ft (530 m ^2 )
Max Spray Distance* ....42 ft (13 m)
Max Pressure 100 PSI (7 bar)
Max Flow* 52 GPM
Max Rotation 360°
Height 23 in. (58 cm)
Base Step Spike
Net Weight 1.3 lbs (0.6 kg)
Unpacking
Carton Contents
- Sprinkler head
- Sprinkler connector
- Sensor housing
- Post
- Step spike
- Hose quick-connector
- Optional predator sticker
- Manual and registration card
- Hose-end connector
-
Extended spike
-
Carefully remove the pest deterrent sprinkler and check to see that all of the above items are supplied.
- Inspect the product carefully to make sure no breakage or damage occurred during shipping. If you find damaged or missing parts, DO NOT return the unit to the store. Please call the Snow Joe® + Sun Joe® customer service center at 1-866-SNOWJOE (1-866-766-9563).
NOTE: Do not discard the shipping carton and packaging materials until you are ready to use your new pest deterrent sprinkler. The packaging is made of recyclable materials. Properly dispose of these materials in accordance with local regulations.
IMPORTANT! The equipment and packaging materials are not toys. Do not let children play with plastic bags, foils, or small parts. These items can be swallowed and pose a suffocation risk!
Assembly
No Tools Required
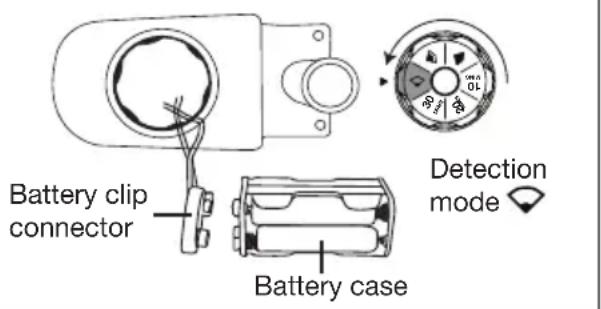
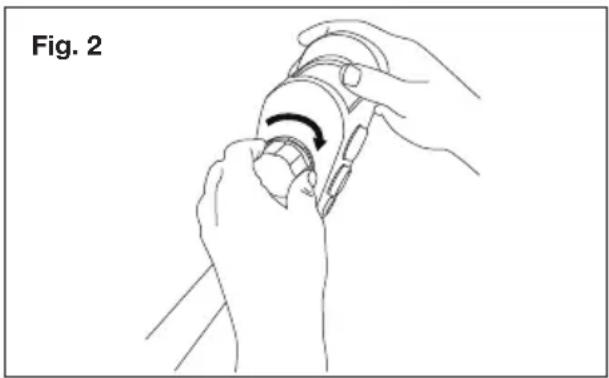
- Set the detection mode to Open the battery cover (located under the sensor housing), then snap the battery case onto the battery clip connector (Fig. 1) and close the battery cap clockwise until the click sounds (Fig. 2).
⚠ WARNING! Under abusive conditions, liquid may be ejected from the battery; avoid contact. If contact accidentally occurs, flush with water. If liquid contacts eyes, additionally seek medical help. Liquid ejected from the battery may cause irritation or burns. may cause irritation or burns.
⚠ WARNING! Do not use a battery pack or appliance that is damaged or modified. Damaged or modified batteries may exhibit unpredictable behavior resulting in fire, explosion or risk of injury.
⚠ WARNING! Do not expose a battery pack or appliance to fire or excessive temperature. Exposure to fire or temperature above 265°F may cause explosion.
Fig. 1
natural_image
Line drawing of hands using a tool to adjust or install a mechanical component, labeled 'Fig. 2' (no text or symbols on the diagram itself)- Run a dry test by turning the detection mode to 📋 and wave your hand in front of the sensor lens. You should clearly hear the internal water valve click open, then click closed 3 seconds later.
If this does not work, try a new battery. The sprinkler resets 8 seconds after the valve closes if the sensor does not detect any further motion.
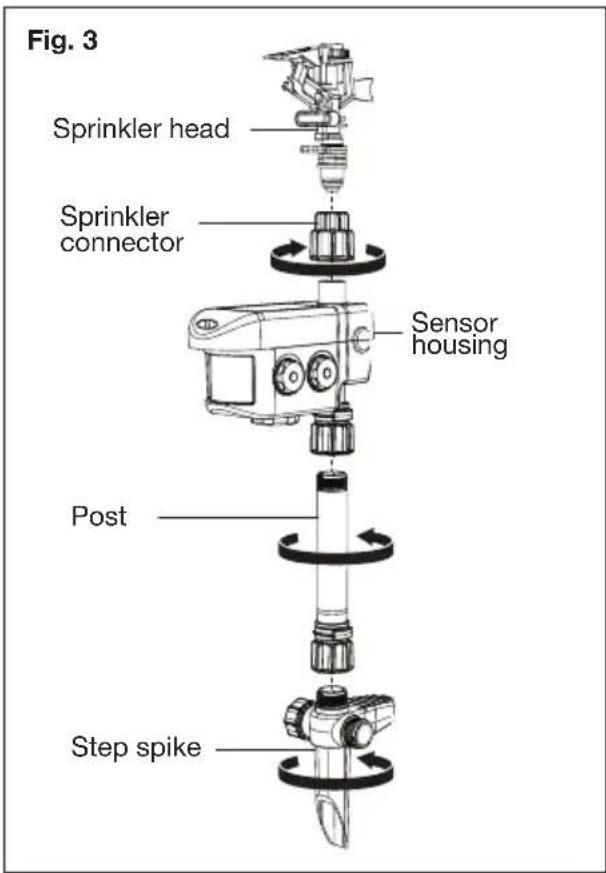
- Follow (Fig. 3) to assemble your pest deterrent sprinkler. These fittings should only be hand-tightened. No tools are required.
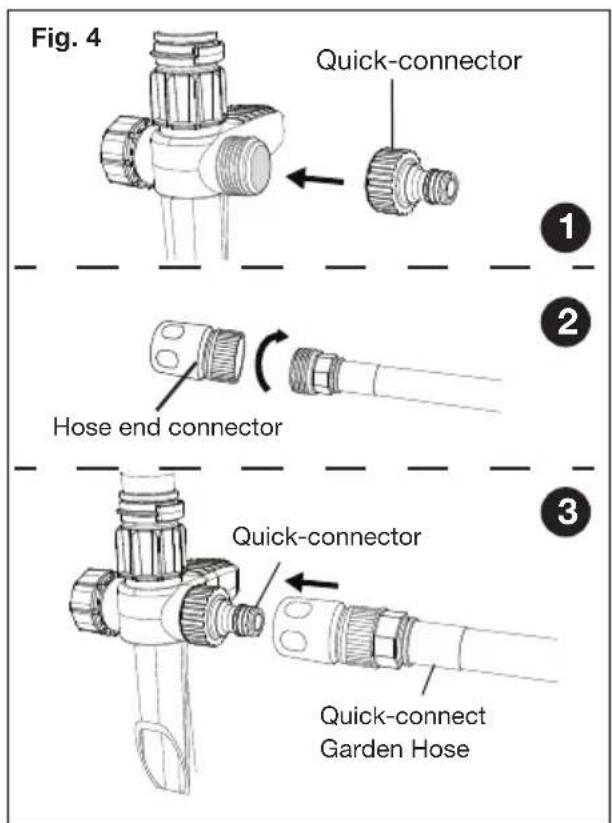
- Thread the quick-connector onto the water inlet of the step spike, then attach the hose-end connector to the male end of the garden hose. Insert the hose-end connector to the quick-connector until hear the click sound. (Fig.4)
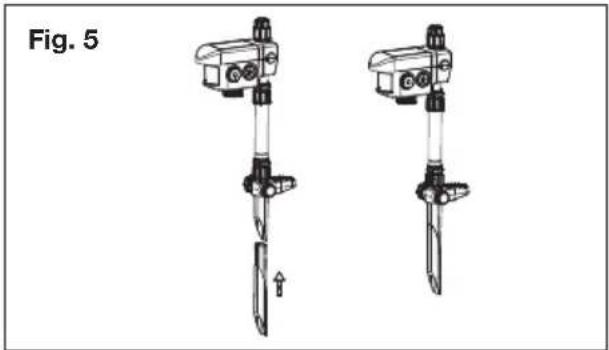
- Drive the step spike into soft terrain such as soil, gravel or sand by putting your body weight onto the foot pedal. If needed, use an extended spike to keep the sprinkler more upright and stable. Refer to Fig. 5 to install extended spike.
natural_image
Technical line drawing of two mechanical device components, possibly a pump or sensor device, with no visible text or symbols.⚠️FRAGILE! Do not push down on the sensor housing or sprinkler head. If the ground is too hard or unsuitable for the ABS plastic step spike, try placing the sprinkler in a flower pot filled with a weighted material like sand or gravel.
Daisy-Chaining
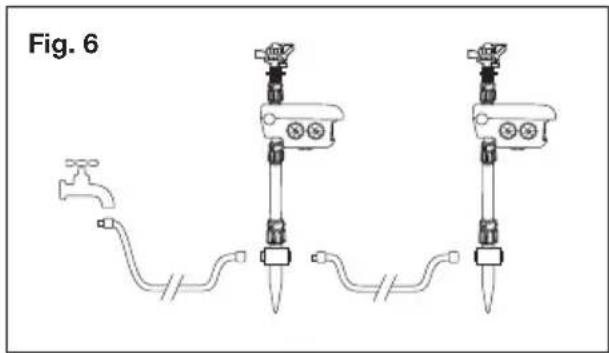
If you have more than one pest deterrent sprinkler, you can daisy-chain them up in a series by removing the flow-through cap and connecting them together with a hose (Fig. 6).
natural_image
Technical line drawing of a mechanical device with three vertical arms and a central valve, labeled Fig. 6 (no text or symbols on the diagram itself)Sticker Sheet (optional)
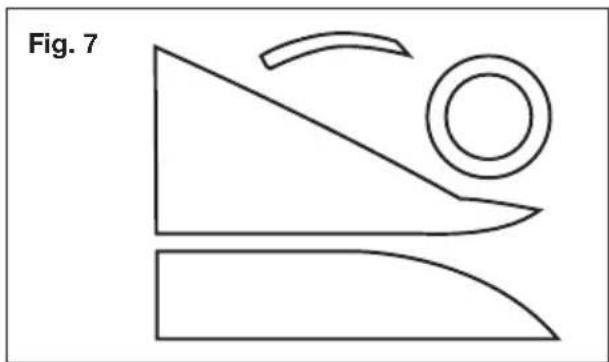
As an extra deterrent, apply the optional predator stickers onto the sensor housing (Fig. 7).
natural_image
Simple line drawing of a ramp and roller with an arrow indicating motion (no text or symbols)Operation
Detection Modes
To avoid getting wet, you can calibrate your desired detection mode without turning on the water as long as you can hear the activation click from 33 ft (10 m) away.
- Set the desired detection mode using the detection + sprinkler mode dial (Fig. 8) based on the chart below.
Mode Distance Animals
| 10 – 16 ft (3 – 5 m) Large-Sized Animals | |
| 26 – 33 ft (8 – 10 m) Medium-Sized Animals | |
| 33 – 39 ft (10 – 12 m) All Animals |
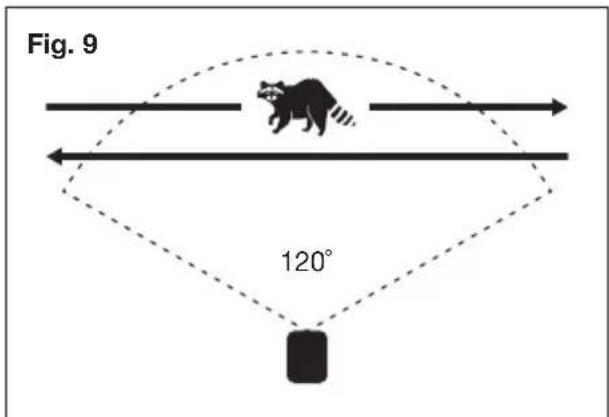
- The pest deterrent sprinkler has a field of view of 120^ . Position the motion sensor lens based on your desired coverage area (Fig. 9).
Sprinkler Modes
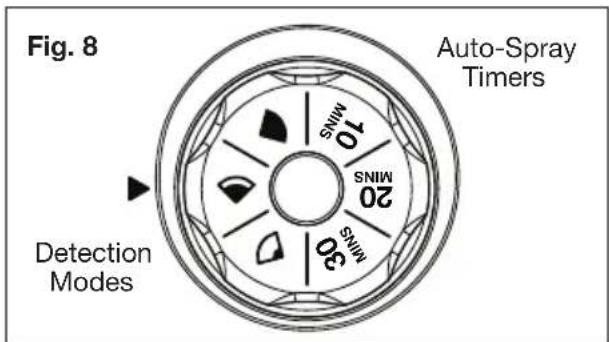
To use your pest deterrent sprinkler as a regular sprinkler, you can set 10/20/30 minute auto-spray timers, after which it will stop (Fig. 8).
Activation Modes
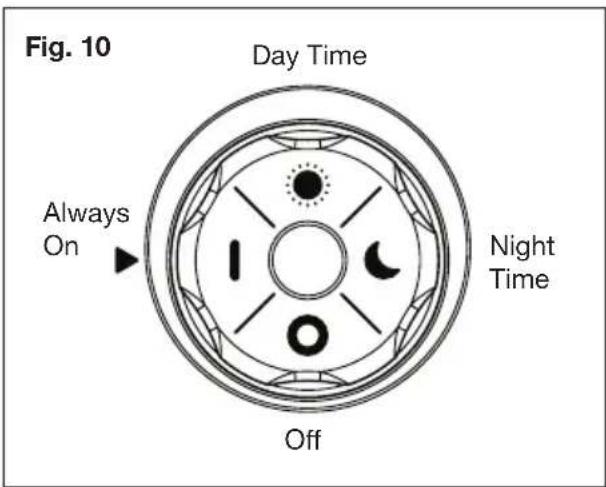
The pest deterrent sprinkler has 4 activation modes: ○ - Off, | - Always On, ● Day Time and ⬇ - Night Time (Fig. 10).
NOTE: The pest deterrent sprinkler automatically reduces its sensitivity after 5 minutes in order to preserve battery life. To minimize false triggers, avoid pointing it towards moving objects, windy areas or very large areas.
Water Coverage
NOTE: Turn the water on and test from behind unless you want to get wet!
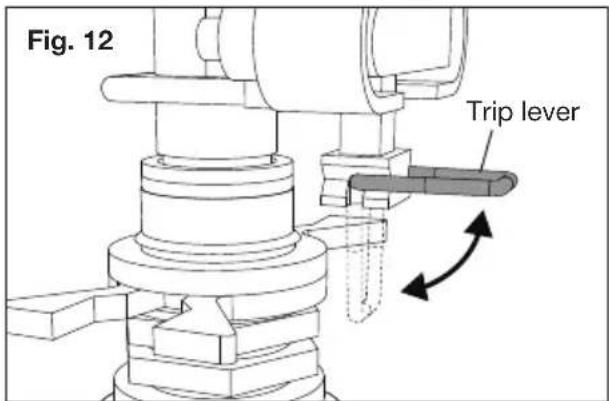
After setting up and positioning your pest deterrent sprinkler, you may wish to adjust the rotation, distance and arc of the sprinkler.
- Position the trip lever towards the area you wish to protect. Turn the friction collars on either side of the trip lever to control the sprinkler's angle of rotation, between 0^-300^ (Fig. 11).
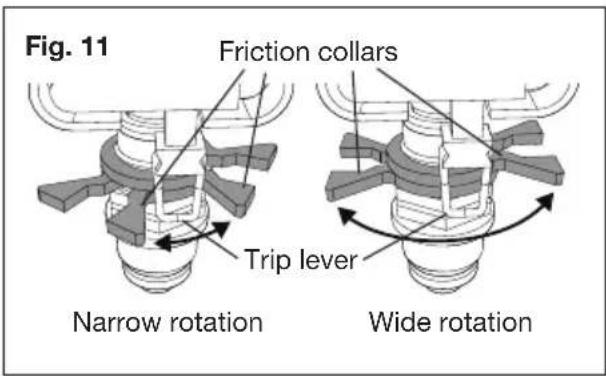
- Flip the trip lever up out of the way of the friction collars to achieve full 360° rotation (Fig. 12).
-
To increase the sprinkler's spray distance, raise the deflector shield and turn the distance control knob clockwise simultaneously. To decrease spray distance, lower the deflector shield and turn the distance control knob counter-clockwise simultaneously (Fig. 13).
-
To vary the spray pattern, turn the diffuser screw clockwise to adjust the spray from narrow jet to wide mist and vise versa (Fig. 13).
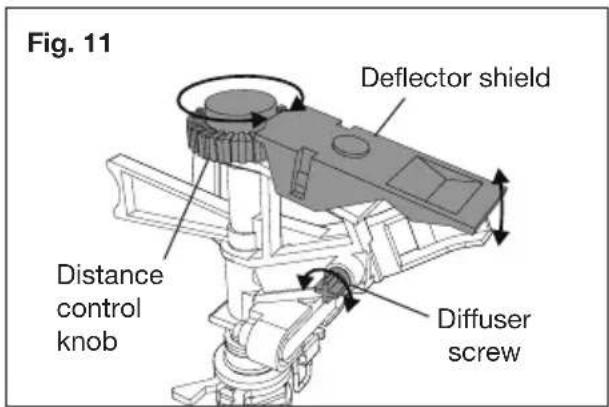
NOTE: The spray distance will depend heavily on your water pressure. Do not exceed this product's maximum rated pressure of 100 PSI.
Watering Tips
Water only when necessary, preferably in the morning to minimize water loss through evaporation.
⚠️CAUTION! Poor placement or malfunctioning sprinklers carry a risk of causing water damage to your property. Mitigate risks by limiting the amount of water available to the product (open valve 3/4), use good quality hoses and ensure there is adequate drainage in the area. Install a pressure reducing valve on your tap if your water pressure exceeds 100 PSI. Partially opening your tap does NOT change the water pressure.
Maintenance
Since water expands when it freezes, completely drain water from your sprinkler and hose to avoid damage if temperature falls below 32^ F ( 0^ C).
CAUTION! Have servicing performed by a qualified repair person using only identical replacement parts. This will ensure that the safety of the product is maintained.
CAUTION! Do not modify or attempt to repair the appliance or the battery pack (as applicable) except as indicated in the instructions for use and care.
Service + Support
If your Aqua Joe® AJYP101 YardGuard Pest Deterrent Sprinkler requires service or maintenance, please call Snow Joe® + Sun Joe® customer service at 1-866-SNOWJOE (1-866-766-9563) for assistance.
Model + Serial Numbers
When contacting the company or arranging service from an authorized dealer, you will need to provide the model and serial numbers, which can be found on the registration card. Copy these numbers into the space provided below.

SNOW JOE® + SUN JOE® CUSTOMER PROMISE
ABOVE ALL ELSE, Snow Joe, LLC (“Snow Joe”) is dedicated to you, our customer. We strive to make your experience as pleasant as possible. Unfortunately, there are times when a Snow Joe ^® , Sun Joe ^® , or Aqua Joe ^® product (“Product”) does not work or breaks under normal operating conditions. We think it’s important that you know what you can expect from us. That’s why we have a Limited Warranty (“Warranty”) for our Products.
OUR WARRANTY:
Snow Joe warrants new, genuine, powered and non-powered Products to be free from defects in material or workmanship when used for ordinary household use for a period of two years from the date of purchase by the original, end-user purchaser when purchased from Snow Joe or from one of Snow Joe's authorized sellers with proof of purchase. Because Snow Joe is unable to control the quality of its Products sold by unauthorized sellers, unless otherwise prohibited by law, this Warranty does not cover Products purchased from unauthorized sellers. If your Product does not work or there's an issue with a specific part that is covered by the terms of this Warranty, Snow Joe will elect to either (1) send you a free replacement part, (2) replace the Product with a new or comparable product at no charge, or (3) repair the Product. How cool is that!
This Warranty gives you specific legal rights, and you may also have other rights which vary from State to State.
PRODUCT REGISTRATION:
Snow Joe strongly encourages you to register your Product. You can register online at snowjoe.com/register, or by printing and mailing in a registration card available online from our website, or calling our Customer Service Department at 1-866-SNOWJOE (1-866-766-9563), or by e-mailing us at help@snowjoe.com. Failure to register your Product will not diminish your warranty rights. However, registering your Product will allow Snow Joe to better serve you with any of your customer service needs.
WHO CAN SEEK LIMITED WARRANTY COVERAGE:
This Warranty is extended by Snow Joe to the original purchaser and original owner of the Product.
WHAT IS NOT COVERED?
This Warranty does not apply if the Product has been used commercially or for non-household or rental applications. This Warranty also does not apply if the Product was purchased from an unauthorized seller. This Warranty also does not cover cosmetic changes that do not affect performance. Wearing parts like belts, augers, chains and tines are not covered under this Warranty, and can be purchased at snowjoe.com or by calling 1-866-SNOWJOE (1-866-766-9563).

AQUAJOE®

natural_image
Technical line drawing of two identical precision irrigation sprinkler devices (no text or symbols)natural_image
Line drawing of hands using a tool to adjust or install a component, labeled 'Fig. 2' (no text or symbols on the diagram itself)natural_image
Technical line drawing of two mechanical device components, possibly a pump or sensor device, with no visible text or symbols.natural_image
Technical line drawing of a mechanical device with three vertical supports and a faucet, labeled Fig. 6 (no text or symbols on the diagram itself)natural_image
Simple line drawing of a ramp and roller with an arrow indicating motion (no text or symbols)Operación
Modos de detección
LA PROMESA DE SNOW JOE® + SUN JOE® AL CLIENTE
natural_image
Technical line drawing of two identical precision irrigation sprinkler devices (no text or symbols)natural_image
Line drawing of hands using a tool to adjust or install a mechanical component, labeled 'Fig. 2' (no text or symbols on the diagram itself)natural_image
Technical line drawing of two mechanical device components, possibly a pump or sensor device, with no visible text or symbols.natural_image
Technical line drawing of a mechanical device with three vertical supports and a faucet, labeled Fig. 6 (no text or symbols on the diagram itself)natural_image
Simple line drawing of a ramp and roller with an arrow indicating motion (no text or symbols)Utilisation
Modes de détection
- Know Your Pest Deterrent Sprinkler
- Technical Data
- Unpacking
- Carton Contents
- Assembly
- No Tools Required
- Daisy-Chaining
- Sticker Sheet (optional)
- Operation
- Detection Modes
- Sprinkler Modes
- Activation Modes
- Water Coverage
- Watering Tips
- Maintenance
- Service + Support
- Model + Serial Numbers
- SNOW JOE® + SUN JOE® CUSTOMER PROMISE
- OUR WARRANTY:
- PRODUCT REGISTRATION:
- WHO CAN SEEK LIMITED WARRANTY COVERAGE:
- WHAT IS NOT COVERED?
- AQUAJOE®
- Operación
- Modos de detección
- LA PROMESA DE SNOW JOE® + SUN JOE® AL CLIENTE
- Utilisation
- Modes de détection
Brand : Aqua Joe
Model : AJYP101
Category : Motion detector