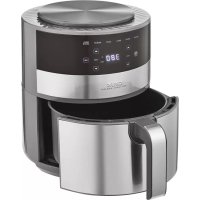
Artisan Series 4.6 Qt Air - Deep fryer CRUX - Free user manual and instructions
Find the device manual for free Artisan Series 4.6 Qt Air CRUX in PDF.


| Product Type | Air Fryer |
| Brand | CRUX |
| Model | Artisan Series 4.6 Qt Air |
| Capacity | 4.6 quarts (approx. 4.35 L) |
| Power | 120 V ~, 60 Hz |
| Temperature Range | 90 °F to 400 °F (32 °C to 200 °C) |
| Timer | 1 to 60 minutes (up to 24 h in dehydrate mode) |
| Preset Programs | 6: Air Fry, Roast, Grill, Bake, Reheat, Dehydrate |
| Control Type | Digital Touch Screen |
| Control Panel | Temperature and time adjustment buttons, Menu button, Power/Start button |
| Frying Basket | With insulated, lockable handle |
| Cooking Tray | Nonstick, removable, with rubber tips |
| Safety | Polarized plug, automatic shut-off when drawer is opened |
| Cleaning | Basket and tray dishwasher safe (top rack) |
| Maintenance | Wipe body with damp cloth, do not immerse |
| Warranty | 2-year limited (SENSIO Inc.) |
| Use | Household use only |
Frequently Asked Questions - Artisan Series 4.6 Qt Air CRUX
User questions about Artisan Series 4.6 Qt Air CRUX
0 question about this device. Answer the ones you know or ask your own.
Ask a new question about this device
Download the instructions for your Deep fryer in PDF format for free! Find your manual Artisan Series 4.6 Qt Air - CRUX and take your electronic device back in hand. On this page are published all the documents necessary for the use of your device. Artisan Series 4.6 Qt Air by CRUX.
USER MANUAL Artisan Series 4.6 Qt Air CRUX
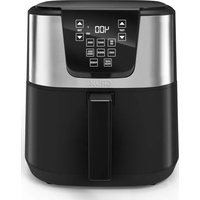
4.6 QT DIGITAL AIR FRYER WITH TOUCHSCREEN
FREIDORA DE AIRE DE 4.6 CUARTOS CON PANTALLA TÁCTIL FRITEUSE À AIR CHAUD 4,6 PINTES AVEC ÉCRAN TACTILE
Instruction manual and recipes / Manual de instrucciones y recetas / Manuel d'instructions et recettes
www.cruxkitchen.com
Register your product and get support

Contents
Índice
Table des matières
Contents
Important safeguards 3
For household use only 3
Save these instructions....3
Additional important safeguards....4
Notes on the Plug 5
Notes on the Cord 5
Plasticizer Warning 5
Electric Power 5
Getting to know your 4.6 Qt air fryer with touchscreen....6
Control panel details 7
Timer control buttons....7
Temperature control buttons....7
Menu [MENU] presets button....7
Menu preset choices....7
Digital display....7
Adjustable control (temperature and timer)....7
Control panel settings 8
Before using for the first time....8
Operating instructions....8-9
Manual operation....9
6 Preset options: air fry, roast, broil, bake reheat and dehydrdate 9
Air frying technique....9
A note on air frying pre-packaged frozen foods....9
Air frying chart (includes preset food menu items)....10
User maintenance instructions....11
Care & cleaning instructions....11
Storing instructions....11
Recipes 12-17
Warranty 17
Índice
Additional importantsafeguards....36
When using electrical appliances, basic safety precautions should always be followed, including the following:
- READ ALL INSTRUCTIONS.
- Do not touch hot surfaces. Use handles or knobs. Use oven mitts or potholders.
- To protect against electric shock do not immerse cord, plugs, or appliance in water or other liquid.
-
This appliance is not intended for use by persons (including children) with reduced physical, sensory or mental capabilities, or lack of experience and knowledge, unless they have been given supervision or instruction concerning use of the appliance by a person responsible for their safety.
-
Children should be supervised to ensure that they do not play with the appliance.
-
Unplug from outlet when not in use and before cleaning. Allow to cool before putting on or taking off parts, and before cleaning the appliance.
-
Do not operate any appliance with a damaged cord or plug or after the appliance malfunctions, or has been damaged in any manner. Bring it to a qualified technician for examination, repair or electrical or mechanical adjustment.
-
The use of accessory attachments not recommended by the appliance manufacturer may cause injuries.
-
Do not use outdoors.
-
Do not let cord hang over edge of table or counter, or touch hot surfaces.
-
Do not place on or near a hot gas or electric burner, or in a heated oven.
-
Extreme caution must be used when moving an appliance containing hot oil or other hot liquids.
-
To disconnect, turn both the timer dial and temperature dial to OFF. Then remove plug from wall outlet.
-
Do not use appliance for other than intended use.
-
Make sure the crisping tray is in place before adding food to be air fried.
-
Make sure the frying basket is locked securely into the front of the Air Fryer, while the Air Fryer is in operation.
WARNING: The Air Fryer will not operate unless frying basket is fully closed.
CAUTION: After hot air frying, extreme caution must be used when handling the hot frying basket, crisping tray, and cooked foods.
FOR HOUSEHOLD USE ONLY SAVE THESE INSTRUCTIONS
ADDITIONAL IMPORTANT SAFEGUARDS
CAUTION, HOT SURFACES: This appliance generates heat and escaping steam during use. Proper precautions must be taken to prevent the risk of burns, fires or other injury to persons or damage to property.
CAUTION: This appliance is hot during operation and retains heat for some time after turning OFF. Always use oven mitts when handling hot materials and allow metal parts to cool before cleaning. Do not place anything on top of the appliance while it is operating or while it is hot.
- All users of this appliance must read and understand this instruction manual before operating or cleaning this appliance.
- The cord to this appliance should be plugged into a 120V AC electrical outlet only.
- If this appliance begins to malfunction during use, immediately unplug the cord. Do not use or attempt to repair the malfunctioning appliance.
- Do not leave this appliance unattended during use.
- Do not immerse power cord in any liquid. If the power cord to this appliance is damaged, it must be replaced by contacting Consumer Service.
- Keep the cord out of reach from children and infants to avoid the risk of electric shock and choking.
- Place the Air Fryer on a flat, heat-resistant work area.
- Do not obstruct the air outlet or air inlets on the back and sides of the Air Fryer, with any objects. Avoid escaping steam from the air outlet during air frying.
- Keep appliance at least 4 inches away from walls or other objects during operation.
- Always use the frying basket handle to remove the frying basket.
- WARNING: After air frying, make sure to place the frying basket on a flat, heat-resistant surface.
- WARNING: Under or over-filling the frying basket may damage the Air Fryer and could result in serious personal injury.
- Never move a hot Air Fryer or an Air Fryer containing hot food. Allow to cool before moving.
WARNING! This Touchscreen Air Fryer should not be used to boil water.
WARNING! This Touchscreen Air Fryer should never be used to deep fry foods.
Notes on the Plug
This appliance has a polarized plug (one blade is wider than the other). To reduce the risk of electric shock, this plug will fit in a polarized outlet only one way. If the plug does not fit fully into the outlet, reverse the plug. If it still does not fit, contact a qualified electrician. Do not modify the plug in any way.
Notes on the Cord
A. A short power-supply cord (or detachable power-supply cord) is to be provided to reduce the risk resulting from becoming entangled in or tripping over a longer cord.
B. Longer detachable power-supply cords or extension cords are available and may be used if care is exercised in their use.
C. If a long detachable power-supply cord or extension cord is used :
1. The marked electrical rating of the cord or extension cord should be at least as great as the electrical rating of the appliance;
2. If the appliance is of the grounded type, the extension cord should be a grounding-type3-wire cord;
3. The longer cord should be arranged so that it does not drape over the countertop or table top where it can be pulled on by children or tripped over unintentionally
Plasticizer Warning
CAUTION: To prevent Plasticizers from migrating from the finish of the counter top or table top or other furniture, place NON-PLASTIC coasters or place mats between the appliance and the finish of the counter top or table top. Failure to do so may cause the finish to darken; permanent blemishes may occur or stains can appear.
Electric Power
If the electrical circuit is overloaded with other appliances, your appliance may not operate properly. It should be operated on a separate electrical circuit from other appliances.
GETTING TO KNOW YOUR 4.6 QT AIR FRYER WITH TOUCHSCREEN
Product may vary slightly from illustration
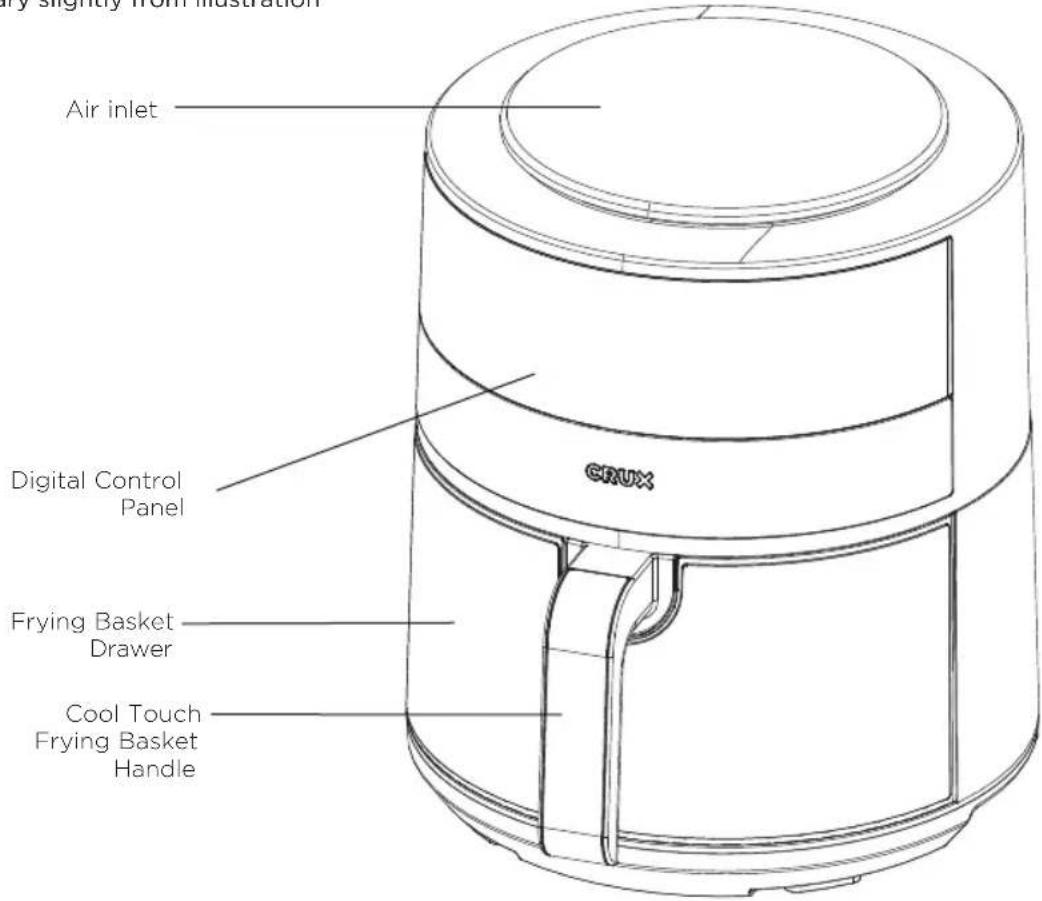
Power Cord with Polarized Plug (Not shown)
CONTROL PANEL DETAILS
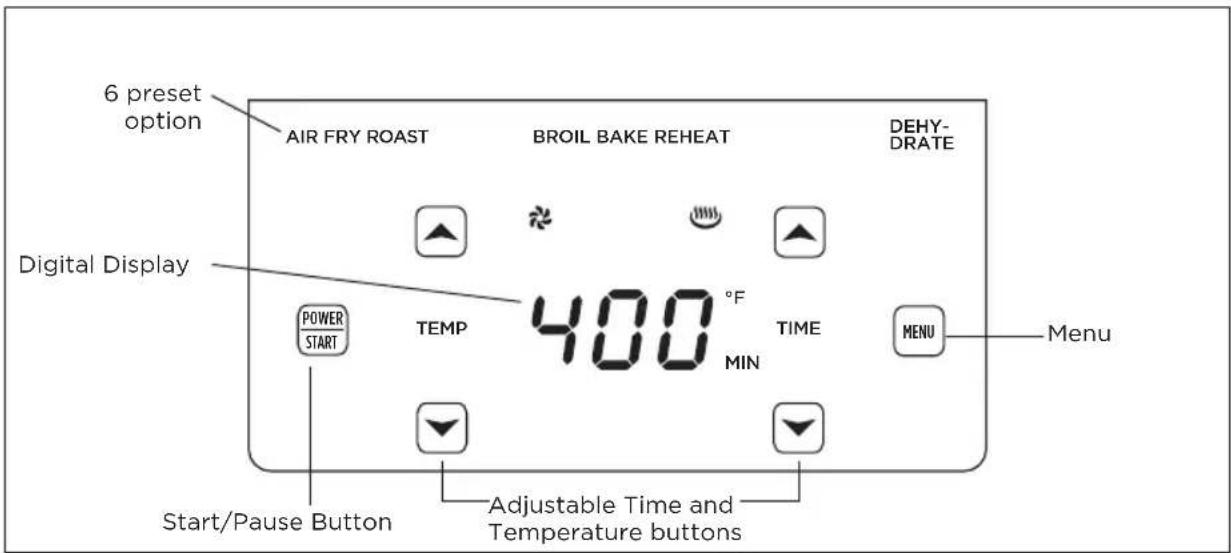
- Plug cord in the wall outlet, the white POWER/START button will start flashing.
- Press the POWER/START button. The control panel will illuminate.
- Press the MENU MENU button and select the desired preset option.
- Once the selected preset option illuminates, press the POWER/START button
TIMER CONTROL BUTTONS
Selecting the timer control or , add or decrease cooking time using the and symbols. This enables you to add or decrease cooking time, one minute at a time. Keeping the button held down will rapidly change the time.
TEMPERATURE CONTROL BUTTONS
Selecting the temperature control ☑, add or decrease temperature using the and symbols. This enables you to add or decrease cooking temperature 5°F at a time. Keeping the button held down will rapidly change the temperature. Temperature control range: 90°F - 400°F.
MENU MENU PRESETS BUTTON
Selecting the MENU Ⓜ presets button enables you to scroll through the 6 preset menu options. Once selected, press the POWER/START Ⓜ button. NOTE: You can override the MENU presets by increasing or decreasing TIME and TEMP manually.
MENU PRESET CHOICES
6 presets to choose from: Air Fry, Roast, Broil, Bake, Reheat and Dehydrate
DIGITAL DISPLAY
This display will keep track of the temperature and remaining cook time.
ADJUSTABLE CONTROL (TEMPERATURE AND TIMER)
The and symbols enable you to add or decrease cooking temperature and time.
CONTROL PANEL SETTINGS
| Menu Default | Temp/F | Default time/min | Temp range/F | Time range/mins | Recommend the time of turn over |
| Air Fry 400 °F 20 mins | 170-400 °F 1-60 mins | Shake half way | |||
| Roast 400 °F 35 mins | 350-400 °F 1-60 mins | Turn over half way | |||
| Broil 400 °F 10 mins | 400 °F 1-30 mins | Turn over half way | |||
| Bake 350 °F 25 mins | 170-400 °F 1-60 mins | None | |||
| Reheat | 250 °F 6 mins | 170-400 °F 1-60 mins | None | ||
| Dehydrate | 130 °F | 8 hours | 90-170 °F | 1-24 hours | None |
IMPORTANT! Depending on the thickness and/or density of foods, it may be necessary to use a meat thermometer to check cooking progress after preset TIME has expired.
BEFORE USING FOR THE FIRST TIME
- Your Air Fryer is shipped with the frying basket locked into the front of the Air Fryer body. Firmly grasp the handle to open frying basket; then remove the basket from the machine and place on a flat, clean work area.
- Remove all packing material and labels from the inside and outside of the Air Fryer. Check that there is no packaging underneath and around the frying basket.
- Wash the frying basket and crisping tray in hot, soapy water.
- DO NOT IMMERSE THE AIR FRYER BODY IN WATER. Wipe Air Fryer body with a damp cloth. Dry all parts thoroughly.
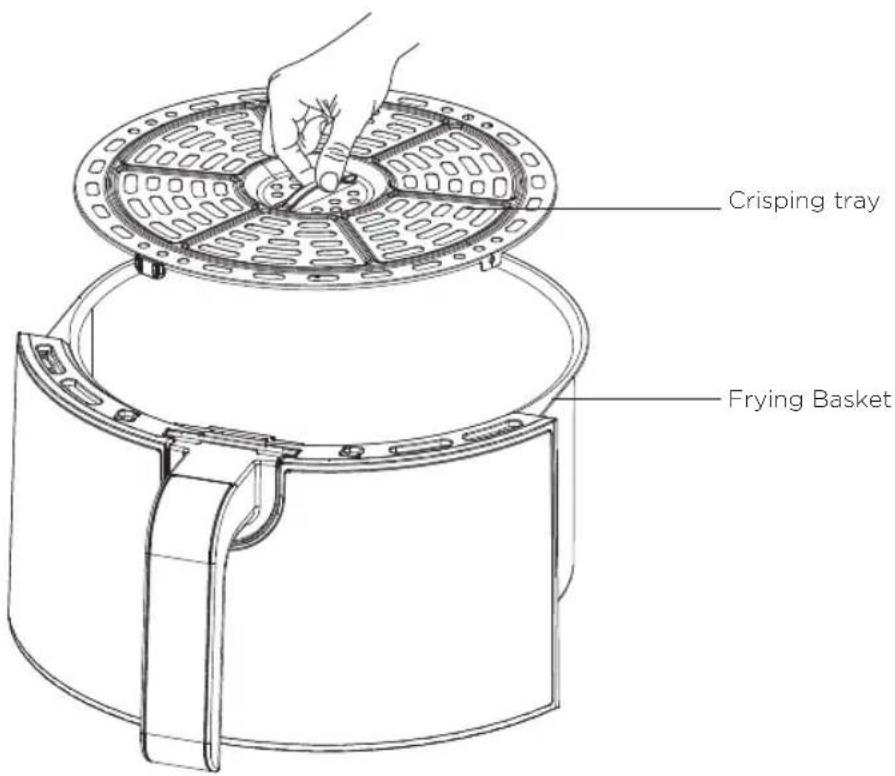
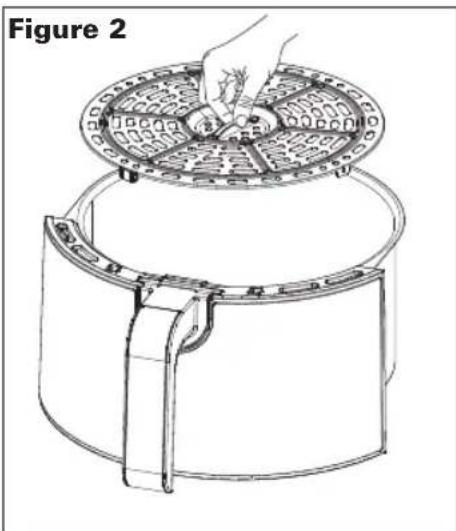
- To ensure the crisping tray fits snugly into the frying basket drawer, there are 3 rubber tips attached to the sides of the tray. Before using, check to make sure all 3 rubber tips are in place. If they become separated from the tray, simply slide onto the tabs as shown.
OPERATING INSTRUCTIONS
WARNING! This Air Fryer should not be used to boil water.
WARNING! This Air Fryer should never be used to deep fry foods.
- Place the Air Fryer on a flat, heat-resistant work area, close to an electrical outlet.
- Firmly grasp the frying basket handle to open frying basket; then remove from the machine and place on a flat, clean surface.
- Place the crisping tray into the base of the frying basket.
- Arrange food on top of the crisping tray. Do not overfill frying basket with food. To ensure proper cooking and air circulation, NEVER fill any frying basket more than 2/3 full. When air frying fresh vegetables, we do not recommend adding more than 1-1/2 cups of food to the frying basket.
- Fully insert the frying basket into the front of the Air Fryer.
- Plug cord in the wall outlet. An audible beep will sound and the POWER/START button will appear on a black background.
- To begin, press the POWER/START button.
- The touchscreen control panel will appear.
MANUAL OPERATION
- To adjust the default air frying TIME, select UP and DOWN, press the on the right side of the control panel to advance or decrease TIME in 1 minute increments, from 1 to 60 minutes.
Note: Timer can also be adjusted when time reflects on the digital display
- To adjust the default air frying TEMPERATURE, select UP and DOWN, press the ▲ or ▼ on the left side of the control panel to adjust the TEMP from 90°F to 400°F in 5 degree increments.
Note: Temperature can also be adjusted when temperature reflects on the digital display using
-
When the desired TIME and TEMP appear on the digital display, press the POWER/START button. The preset TIME will begin to count down after preheat. TEMP and remaining TIME will alternate on the digital display.
-
To turn the Air Fryer OFF at any time, simply press the white POWER/START button.
NOTE: To halt air frying immediately, pull the frying basket drawer out of the body at any time. When the drawer is replaced, air frying will resume.
- When the remaining TIME reaches 00:00, the white POWER/START POWER START button will appear.
6 PRESET OPTIONS: AIR FRY, ROAST, BROIL, BAKE REHEAT AND DEHYRDATE
-
To select a preset program, simply press MENU 📄. Each time MENU 📄 is pressed, the next preset program will flash.
-
When the desired preset program icon is flashing, press the white POWER/START button. NOTE: The quantity, density, weight of food will alter the total cooking time necessary. Remember, frying smaller batches will result in shorter cooking times and higher food quality. IMPORTANT: Always check food halfway through cooking time to determine final cook TIME and TEMP.
-
To adjust the air frying TIME during operation, press the or on the right side of the control panel to advance or decrease time in 1 minute increments to 60 minutes. Press the or on the left side of the control panel to adjust TEMP in 5 degree increments.
AIR FRYING TECHNIQUE
-
Please consult the Air Frying Chart and/or follow package directions for suggested TIME and TEMP.
-
Always pat food dry before cooking to encourage browning and avoid excess smoke.
-
To assure even cooking/browning, ALWAYS open the basket drawer halfway through the cook time and check, turn or shake foods in the frying basket. Some recipes may call for brush or spray oil halfway through cooking. Adjust TIME or TEMP if needed.
CAUTION: Always use oven mitts when handling the hot air fryer basket.
CAUTION: Hot oil can collect at the base of the drawer. To avoid risk of burns or personal injury, or to avoid oil from contaminating air fried foods, always unlock and remove the frying basket from the drawer before emptying. NEVER turn the drawer upside down with the frying basket attached.
-
Allow cooked foods to rest for 5 to 10 minutes. Remove the drawer from the machine and place on a flat, heat resistant surface. Then remove crisping tray from the drawer.
-
Shake air fried foods out onto serving area. Promptly return the frying basket to the drawer and lock into place. Continue air frying subsequent batches, if any.
-
To avoid excess smoke, when cooking naturally high fat foods, such as bacon, chicken wings or sausages, it may be necessary to empty fat from the frying basket drawer between batches.
-
For crispier results, air fry small batches of freshly breaded foods. Create more surface area by cutting food into smaller pieces. Press breading onto food to help it adhere. Refrigerate breaded foods for at least 30 minutes before frying.
-
Arrange breaded food in frying basket so that food is not touching to allow air flow on all surfaces.
-
Spray oils work best. Oil is distributed evenly and less oil is needed. Canola, olive, avocado, coconut, grapeseed, peanut, or vegetable oil work well.
-
Unplug the Air Fryer when not in use.
A NOTE ON AIR FRYING PRE-PACKAGED FROZEN FOODS
-
Where microwave ovens often produce hot, mushy results and toaster ovens take forever, air frying assures reasonably fast, crispy, delicious results!
-
As a rule, depending on the food and amount to be cooked, suggested cook TIMES may have to be reduced slightly. Always check food halfway through cooking time to determine final cook TIME and TEMP.
-
Always check cooking progress after TIME has expired.
AIR FRYING CHART (INCLUDES PRESET FOOD MENU ITEMS)
WARNING! Times are estimated and based on average sizes and weights.
ALWAYS USE A MEAT THERMOMETER TO ENSURE THAT MEAT, POULTRY AND FISH ARE COOKED THOROUGHLY BEFORE SERVING.
NOTE: Frying smaller batches will result in shorter cooking times and higher food quality. Adjust air frying temperatures and times as necessary to suit your taste.
NOTE: Unless food is pre-packaged and pre-oiled, for browned and crispy results, all foods should be lightly oiled before air frying.
| FOOD TEMP AIR FRY TIME ACTION | |||
| Root Vegetables,3 - 4 cups fresh (roasted) | 370°F 15 - | 20 min toss with oil, | shake 3x |
| Asparagus,3 - 4 cups, fresh thin stems | 370°F 7 - | 9 min spray with oil, | shake 2x |
| Green Beans, Sugar Snap Peas,3 - 4 cups fresh | 370°F 7 - | 9 min spray with oil, | shake 1x |
| Broccoli, - 4 cups fresh (roasted) | 370°F 5 - | 7 min spray with oil, | shake 3x |
| Brussels Sprouts, halved, 3 - 4 cups fresh | 370°F 8 - | 10 min spray with oil, | shake 2x |
| Butternut Squash, seeded,1/2 inch chunks, 3 - 4 cups fresh | 370°F 15 | min spray with oil, | shake 3x |
| Fennel, fresh, chopped,3 - 4 cups fresh | 370°F 7 - | 9 min spray with oil, | shake 2x |
| Fried Sweet Potato Fries(fresh, hand cut, 1/8 to 1/4-inch thick) | 400°F 13 - | 15 min spray with oil, | shake 3x |
| French Fries, Idaho Potatoes,2 - 3 (fresh, hand cut, 1/4 to 1/3 inch thick) (frozen, 1/4 to 1/3 inch thick) | 400°F400°F | 12 min12 min | spray with oil, shake 3xspray with oil, shake 3x |
| Meat, Roast, Chops | 360°F 25 | min | rub or spray with oil,add seasoning, turn over test for doneness |
| Ribeye Steaks, (2) 1.25 lb,1-1/2 inch thick, room temp.medium raremediumwell done | 400°F400°F400°F | Preheat +6 minPreheat +10 minPreheat +14 min | rub or spray with oil,add seasoning, turn over test for doneness, rest15 minutes - check at 12minutes, rest 15 minutes |
| Hamburgers, 1/3 lb (up to 4),rare - well | 350°F | Preheat+3 - 6 min | spray with oil, addseasoning, turn over testfor doneness |
| Chicken Wings, 2-3 lb(fresh/thawed) | 360°F 20 | min | spray with oil, shake 2xtest for doneness |
| Chicken Tenders/Fingers, boneless | 360°F 18 - | 20 min spray with oil, | shake 1x |
| Chicken Pieces,bone in | 360°F 20 | - 30 min | spray with oil, turn over test for doneness |
| Fish Filet (fresh, thawed, battered) | 400°F 10 | min | spray with oil, turn over test for doneness |
| Shrimp (thawed, battered), 1- 2 lb | 320°F 8 | min | spray with oil, turn over,shake |
PLEASE NOTE:
The USDA recommends that meats such as beef and lamb, etc. should be cooked to an internal temperature of 145° F/ 63° C. Pork should be cooked to an internal temperature of 160° F/ 71° C and poultry products should be cooked to an internal temperature of 170° F/ 77° C - 180° F/ 82° C to be sure any harmful bacteria has been killed. When reheating meat/poultry products, they should also be cooked to an internal temperature of 165° F/ 74° C.
USER MAINTENANCE INSTRUCTIONS
This appliance requires little maintenance. It contains no user-serviceable parts. Any servicing requiring disassembly other than cleaning must be performed by a qualified appliance repair technician.
CARE & CLEANING INSTRUCTIONS
WARNING! Allow the Air Fryer to cool fully before cleaning.
- Unplug the Air Fryer. Remove frying basket. Make sure the frying basket and crisping tray have cooled completely before cleaning. Use the center hole of the crisping tray to lift crisping tray up and out of the frying basket.
- Wash the frying basket and crisping tray in hot soapy water. Do not use metal kitchen utensils or abrasive cleansers or cleaning products as this may damage the non-stick coating.
IMPORTANT: After cleaning, always check to make sure all 3 rubber tips are securely fastened to the 3 tabs on the crisping tray. - The frying basket and crisping tray are dishwasher-safe. For best results, place in the top rack of your dishwasher to clean.
STORING INSTRUCTIONS
- Make sure the Air Fryer is unplugged and all parts are clean and dry before storing.
- Never store the Air Fryer while it is hot or wet.
- Store Air Fryer in its box or in a clean, dry place.
Recipes
Lemon Za'atar Chicken with Eggplant & Zucchini
Za'atar is popular Middle Eastern spice mixture dating back to ancient times. We have enveloped the chicken with this aromatic blend of thyme, sumac, wild oregano and toasted sesame seeds. Fresh lemon adds moist citrus notes.
The Air Fryer is the perfect tool for preparing moist and luscious, roasted chicken, the frying basket allows drippings (liquid flavor) to permeate the vegetables and stream down into the easy-to-clean drawer.
Serves 6
1 (3 1/2 - 4 1/2 lb) whole chicken
1 lemon, zested and halved
1 teaspoon salt, divided
1 Chinese eggplant
1 zucchini
1 cup za'atar seasoning
-
Remove the chicken giblets.
-
Rinse the chicken inside and out. Trim all excess fat and use paper towels to pat dry. Work your hands inside the chicken skin to loosen from the meat. Use a sharp paring knife to puncture all fat pockets. Make 3 to 4 slits along the chicken's backbone to relieve extra fat.
-
Liberally coat the chicken inside and out with za'atar. Generously rub za'atar under the chicken skin. Squeeze each lemon half over the chicken; squeeze again and place inside the chicken cavity.
-
Tuck the wing tips under the body of the chicken. To ensure crispy skin, refrigerate the chicken uncovered for 30 minutes before air frying.
-
Trim the eggplant and zucchini, cut into discs, then use to cover the bottom of the Air Fryer basket. Lay the chicken, breast side down, onto the bed of vegetables.
-
Air Fry at 360° F.
-
Turn the chicken over, breast side up. Sprinkle lemon zest over the breast of the chicken.
-
Continue air frying at 365° F for 25 minutes, or until the juices run clear when you cut between a leg and thigh or when a meat thermometer inserted into the thickest part of the thigh reads 170° F/ 77° C - 180° F/ 82° C.
-
Remove the chicken and vegetables to a platter and tent with aluminum foil for about 20 minutes. Slice the chicken onto a platter and serve it with the vegetables.
Recipes
Air Fried Onion Blossom
Aluminum foil to cover onion
3/4 cup rice flour
1 large sweet Vidalia onion
3/4 cup Italian seasoned breadcrumbs
3 teaspoons olive oil
4 tablespoon Cajun
seasoning mix, divided
2 tablespoons yogurt
1 tablespoon water
2 large eggs
- 3 bowl breading station: Mix breadcrumbs with olive oil, 2 tablespoons Cajun seasoning.
- In a small bowl, mix 2 tablespoons Cajun seasoning into the flour.
- In another bowl, beat yogurt, water and eggs.
- Create the Blossom. Peel onion, cut off top. Place cut side down onto a cutting board.
- Starting 1/2 inch from the root, cut downward, all the way to the cutting board. Repeat to make 4 evenly spaced cuts around the onion.
- Continue slicing between each section until there are 8 cuts in total.
- Place sliced onion in an ice water bath for at least 2 hours to overnight. Remove from water, pat dry. Open onion so petals are exposed.
- Place onion in a large bowl. Sprinkle onion generously with flour mixture. Make sure to get in between all petals. Turn onion upside down to remove excess flour.
- Using a ladle, ladle the egg mixture into every crevice. Lift up onion and turn to make sure excess egg drips away.
- Sprinkle onion very generously with breadcrumb mixture. Press breadcrumbs between every petal.
- Place the breaded onion blossom into the frying basket.
- Cover and tent the top of the onion with aluminum foil.
- Air Fry at 360° F for 20 minutes.
- Check doneness of the onion.
- Remove foil. Increase TEMP to 400° F and continue air frying for an additional 5 minutes until browned and crisp.
Recipes
General's Tso's Wife's Air Fried Cauliflower
If General's Tso had a wife, and she had an Air Fryer, she would surely air fry this scrumptious dish.
1 head (4 cups) cauliflower
2 tablespoons canola oil
4 to 6 seeded and stemmed dried red chilies
Sauce
2 tablespoon unseasoned rice vinegar
2 teaspoon sesame oil
1/4 cup oyster sauce
2 tablespoons water, or more as needed
2 tablespoon grated ginger
4 cloves garlic, grated
Garnish
Brown rice Toasted sesame seeds
- Combine all sauce ingredients in a large bowl. Trim cauliflower into florets and toss into the bowl. Add chilies. Coat the florets well and add to the Air Fryer basket.
- Air fry for 12 to 14 minutes at 365° F, shake halfway.
Recipes
Spicy Air Fried Pizza Rolls
Crispy, spicy bites of goodness, dipped in a flavorful tomato sauce, these Pizza Rolls will be the hit of any party or gathering. A great way to use leftovers, the possibilities are endless.
removed, chopped
Olive oil spray
1/2 lb mushrooms, sliced
2 spicy hot Italian sausages, casings removed
Won ton wrappers
2 cups shredded Mozzarella cheese, or any cheese of your choice
Creamy Tomato Spaghetti Sauce, for dipping
4 jalapeño peppers, seeds, stems
1 egg, whisked, to seal the rolls
- Cook the Italian sausage, mushrooms and peppers in the frying basket.
- Air Fry at 400° F, stirring every 5 minutes for 10 - 15 minutes until fully browned.
- Drain sausage and veggies onto a plate of paper towels. When cool enough to handle, crumble cooked sausage into small pieces. Combine sausage, mushrooms, peppers in a small bowl.
- Place a won ton wrapper flat onto the working surface. In the lower portion of the wrapper, form a line of ingredients: sausage mixture topped with a handful of cheese.
- Roll once around, then fold in the sides. Continue rolling until the Pizza Roll is formed. Brush a small amount of egg wash onto the end of the wrapper to seal. Repeat until the frying basket is filled.
- Place assembled Pizza Rolls seam-side-down into the Air Fryer basket. Spray with olive oil.
- Air fry at 370° F for 8 to 10 minutes. Turn Pizza Rolls over halfway through air frying.
- Serve with your favorite tomato sauce for dipping.
Recipes
Air Fried Zucchini Fries
Serves 4
2 zucchini squash, trimmed into spears
Salt
Kosher salt, to taste
2 tablespoons olive oil
1/2 cup panko breadcrumbs
2 tablespoons Parmesan herb seasoning
Yogurt Pesto Dip
3 tablespoons plain yogurt 1 tablespoon basil pesto
- Cut zucchini in half lengthwise. Cut each half into 3 long spears. Cut the spears in half to form zucchini fries.
- Sprinkle the zucchini fries with salt and place in a colander for at least 10 minutes to 2 hours, to draw out excess moisture.
- Blot zucchini dry with paper towels; then add to a large mixing bowl.
- Drizzle olive oil over the zucchini fries and stir until they are all well coated.
- Add panko breadcrumbs, oil and seasoning to a plate, mix well.
- Roll the oiled zucchini into the panko, coating all sides and pressing firmly so that the crumbs adhere.
IMPORTANT: Work in batches, do not overcrowd the Air Fryer basket.
- Air fry at 360° F, until slightly crisp and golden brown, about 10 minutes, turning the spears over halfway through air frying.
- Transfer zucchini fries to a platter, sprinkle with salt. Combine yogurt and pesto in a small dish. Serve immediately.
Recipes
8 Minute Banana Chocolate Chip Cupcakes
Fresh, moist banana goodness in every bite. Light and sweet, these cup cakes are so easy to make and they bake in 8 just minutes! These sweet bites go anywhere. Grab one with a cup of coffee, kids with a glass of milk. Air fry as many little cakes as you need, then store the remaining batter and air fry fresh cupcakes tomorrow!
Foil cupcake liners
Coconut oil baking spray
1 (16 oz.) box white cake mix, your favorite brand
1 egg white
1 egg
3 tablespoons vegetable oil
1 ripe banana, mashed
1 1/4 cup unsweetened vanilla or plain almond milk
1 cup crushed chocolate chip or chocolate sandwich cookies
1/4 cup chocolate chips
1/4 cup butterscotch chips
- Mash the banana in a large bowl. Add the remainder of the ingredients and mix until well blended.
- Place foil cupcake liners into the frying basket. Generously spray foil cupcake liners with coconut oil. Fill cupcake liners equally, no more than 2/3 full with batter.
- Air fry at 365° F, until golden, about 8 minutes.
- Check for doneness. Insert a toothpick in the center of the cupcake; if it comes out clean cupcakes are fully baked. If not, continue to air fry for 1 additional minute if needed.
Limited TWO-YEAR Warranty
SENSIO Inc. hereby warrants that for a period of TWO YEARS from the date of purchase, this product will be free from mechanical defects in material and workmanship, and for 90 days in respect to non-mechanical parts. At its sole discretion, SENSIO Inc. will either repair or replace the product found to be defective, or issue a refund on the product during the warranty period.
The warranty is only valid for the original retail purchaser from the date of initial retail purchase and is not transferable. Keep the original sales receipt, as proof of purchase is required to obtain warranty validation. Retail stores selling this product do not have the right to alter, modify, or in any way revise the terms and conditions of the warranty.
EXCLUSIONS:
The warranty does not cover normal wear of parts or damage resulting from any of the following: negligent use of the product, use of improper voltage or current, improper routine maintenance, use contrary to the operating instructions, disassembly, repair, or alteration by anyone other than qualified SENSIO Inc. personnel. Also, the warranty does not cover Acts of God such as fire, floods, hurricanes, or tornadoes.
SENSIO Inc. shall not be liable for any incidental or consequential damages caused by the breach of any express or implied warranty. Apart from the extent prohibited by applicable law, any implied warranty of merchantability or fitness for a particular purpose is limited in time to the duration of the warranty. Some states, provinces or jurisdictions do not allow the exclusion or limitation of incidental or consequential damages, or limitations on how long an implied warranty lasts, and therefore, the above exclusions or limitations may not apply to you. The warranty covers specific legal rights which may vary by state, province and/or jurisdiction.
HOW TO OBTAIN WARRANTY SERVICE:
You must contact Customer Service at our toll-free number: 1-866-832-4843. A Customer Service Representative will attempt to resolve warranty issues over the phone. If the Customer Service Representative is unable to resolve the problem, you will be provided with a case number and asked to return the product to SENSIO Inc. Attach a tag to the product that includes: your name, address, daytime contact telephone number, case number, and description of the problem. Also, include a copy of the original sales receipt. Carefully package the tagged product with the sales receipt, and send it (with shipping and insurance prepaid) to SENSIO Inc.'s address. SENSIO Inc. shall bear no responsibility or liability for the returned product while in transit to SENSIO Inc.'s Customer Service Center.
Envoltorios de won ton
ADDITIONAL IMPORTANT SAFEGUARDS
FONCTIONNEMENT MANUEL
For customer service questions or comments: 1-866-832-4843
For Recipes and Cooking tips cruxkitchen.com
Sensio Inc.
New York, NY 10016/USA
All rights reserved
17271, 17449, 17450 Rev. 10
- 4.6 QT DIGITAL AIR FRYER WITH TOUCHSCREEN
- CONTENTS
- ÍNDICE
- TABLE DES MATIÈRES
- FOR HOUSEHOLD USE ONLY SAVE THESE INSTRUCTIONS
- ADDITIONAL IMPORTANT SAFEGUARDS
- NOTES ON THE PLUG
- NOTES ON THE CORD
- PLASTICIZER WARNING
- ELECTRIC POWER
- TIMER CONTROL BUTTONS
- TEMPERATURE CONTROL BUTTONS
- MENU MENU PRESETS BUTTON
- MENU PRESET CHOICES
- DIGITAL DISPLAY
- ADJUSTABLE CONTROL (TEMPERATURE AND TIMER)
- BEFORE USING FOR THE FIRST TIME
- OPERATING INSTRUCTIONS
- MANUAL OPERATION
- 6 PRESET OPTIONS: AIR FRY, ROAST, BROIL, BAKE REHEAT AND DEHYRDATE
- AIR FRYING TECHNIQUE
- A NOTE ON AIR FRYING PRE-PACKAGED FROZEN FOODS
- AIR FRYING CHART (INCLUDES PRESET FOOD MENU ITEMS)
- PLEASE NOTE
- USER MAINTENANCE INSTRUCTIONS
- CARE & CLEANING INSTRUCTIONS
- STORING INSTRUCTIONS
- RECIPES
- LEMON ZA'ATAR CHICKEN WITH EGGPLANT & ZUCCHINI
- SERVES 6
- AIR FRIED ONION BLOSSOM
- GENERAL'S TSO'S WIFE'S AIR FRIED CAULIFLOWER
- SAUCE
- GARNISH
- SPICY AIR FRIED PIZZA ROLLS
- AIR FRIED ZUCCHINI FRIES
- SERVES 4
- YOGURT PESTO DIP
- 8 MINUTE BANANA CHOCOLATE CHIP CUPCAKES
- LIMITED TWO-YEAR WARRANTY
- EXCLUSIONS
- HOW TO OBTAIN WARRANTY SERVICE
- FONCTIONNEMENT MANUEL
Brand : CRUX
Model : Artisan Series 4.6 Qt Air
Category : Deep fryer