
RFPJ300 - Projector Renkforce - Free user manual and instructions
Find the device manual for free RFPJ300 Renkforce in PDF.

User questions about RFPJ300 Renkforce
0 question about this device. Answer the ones you know or ask your own.
Ask a new question about this device
Download the instructions for your Projector in PDF format for free! Find your manual RFPJ300 - Renkforce and take your electronic device back in hand. On this page are published all the documents necessary for the use of your device. RFPJ300 by Renkforce.
USER MANUAL RFPJ300 Renkforce
natural_image
Abstract geometric star-like pattern with five dots and petal-like shapes (no text or symbols)renkforce
GB Operating Instructions
RF-PJ-300 Mini projector
Item No. 2301166 Page 2 - 28
F Notice d'emploi
- Introduction......3
- Explanation of symbols ....3
- Intended use....4
- Package contents......4
- Features and functions....5
- Safety information ....5
a) General information....5
b) Connected devices....6
c) LED light....6
d) Electrical safety....6
e) Persons and product....7
f) Batteries 7
- Product overview....8
- Pin assignment for VGA connection....9
- Positioning the projector....9
a) General information....9
b) Determining the projection distance....11
- Installation and connection .... 12
a) Overhead mounting....12
b) Wall mounting....13
c) Ventilation openings....13
d) Keystone correction....14
e) Connections....14
- Remote control....18
a) Inserting/changing the batteries....18
b) Using the remote control....18
- Setup....19
a) Turning the projector on/off ....19
- Operation....20
a) Selecting the signal source (video) 20
b) Configuring the projection settings....20
c) Manually changing the volume....20
d) Playing video content....20
- Settings 21
a) Operating the menu (general)....21
b) Setting the menu language 22
c) Audio settings....22
d) Configuring the image mode....22
e) Setting the duration of the menu display....23
f) Setting the colour temperature....23
g) Setting the image format....23
h) Configuring the noise reduction settings....24
i) Screen (VGA settings)....24
j) Changing the projection size....24
k) Restoring factory settings....25
I) Software update....25
-
Care and cleaning ....25
-
Disposal....26
a) Product....26
- Technical data ....26
1. Introduction
Dear customer,
Thank you for purchasing this product.
This product complies with statutory, national and European regulations.
To ensure that the product remains in this state and to guarantee safe operation, always follow the instructions in this manual.

These operating instructions are part of this product. They contain important information on setting up and using the product. Do not give this product to a third party without the operating instructions. Keep these operating instructions in a safe place for future reference.
If there are any technical questions, please contact:
www.conrad.com/contact
2. Explanation of symbols
The symbol with the lightning in a triangle indicates that there is a risk to your health, e.g. due to an electric shock.

The symbol with an exclamation mark in a triangle is used to highlight important information in these operating instructions. Always read this information carefully.

The arrow symbol indicates special information and tips on how to use the product.
3. Intended use
This product is intended for projecting, displaying and playing back multimedia content from suitable signal sources, e.g. for presentations. The projector is powered by a 100 - 240 V/AC mains voltage. The LED light source offers up to 30,000 hours of operating time with a brightness of 3200 lumens, ensuring a long lifespan. A remote control is provided for convenient operation. This requires two 1.5 V AAA batteries (not included with the product) as a power supply. The projector also comes with stands, which enable fast and simple setup for convenient projection in almost any environment. The device can be mounted on ceilings and walls using brackets. A built-in microSD card slot and a USB port allow you to view electronic documents, videos and other multimedia content. The video signal input can be connected via HDMI, VGA or AV inputs.
This product is intended for indoor use only. Do not use it outdoors. Contact with moisture, for example in bathrooms, must be avoided.
For safety and approval purposes, do not rebuild and/or modify this product. Using the product for purposes other than those described above may damage the product. In addition, improper use can cause hazards such as a short circuit, fire or electric shock. Rea instructions carefully and store them in a safe place. Only make this product available to third parties together with its operating instructions.
All company and product names contained herein are trademarks of their respective owners. All rights reserved.
HDMI is a registered trademark of HDMI Licensing L.L.C.
4. Package contents
- Mini projector
- Network cable
- HDMI cable
- AV cable
- Remote control
- User manual
Up-to-date operating instructions
Download the latest operating instructions at www.conrad.com/downloads or scan the QR code shown. Follow the instructions on the website.

text_image
QR code image containing encoded data, no visible human-readable text5. Features and functions
- 800 x 480 Mini projector
- Works with computers, laptops, tablets, smartphones, amplifiers and game consoles via an AV, VGA or HDMI connection
- Plays videos, photo and audio files via USB
- Manual focus setting (focal length)
6. Safety information
Read the operating instructions carefully and especially observe the safety information. If you do not follow the safety information and information on proper handling in these operating instructions, we will assume no liability for any resulting personal injury or damage to property. Such cases will invalidate the warranty/guarantee.
a) General information
- This product is not a toy. Keep it out of the reach of children and pets.
- Do not leave packaging material lying around carelessly. It may become a dangerous toy for children.
- Protect the product from extreme temperatures, direct sunlight, strong jolts, high humidity, moisture, flammable gases, vapours and solvents.
- Do not place the product under any mechanical stress.
-
If it is no longer possible to operate the product safely, stop using it and prevent unauthorised use. Safe operation can no longer be guaranteed if the product:
-
is visibly damaged,
- is no longer working properly,
- has been stored for extended periods in poor ambient conditions or
-
has been subjected to any serious transport-related stress.
-
Handle the product carefully. Jolts, impacts or a fall even from a low height may damage the product.
- Consult a technician if you are not sure how to use or connect the product, or if you have concerns about safety.
- Maintenance, modifications and repairs may only be carried out by a technician or a specialist repair centre.
- If you have questions which remain unanswered by these operating instructions, contact our technical support service or other technical personnel.
b) Connected devices
Always observe the safety information and operating instructions of any other devices which are connected to the product.
c) LED light
- Do not look directly into the light of the lens while the projector is in use, as this may cause eye damage.
- Attention, LED light:
- Do not look directly at the LED light!
- Do not look into the beam directly or with optical instruments!
d) Electrical safety
- This device was constructed according to protection class II. Only connect the mains plug to a standard mains socket (100 - 240 V/AC, 50 Hz) connected to the public grid.
- Never pour any liquids over electrical devices or put objects filled with liquid next to the device. If liquid or an object does get inside the device, power down the respective socket (e.g. switch off the circuit breaker), and then remove the mains plug from the mains socket. Discontinue use and take the product to a specialist repair centre.
- Never use the product immediately after it has been taken from a cold room into to a warm one. This may cause condensation to form, which can destroy the product. Allow the product to reach room temperature before connecting it and putting it into use. This may take several hours.
-
The mains socket must be located near to the device and be easily accessible.
-
Never unplug the mains plug by pulling on the cable. Always use the grips on the plug.
- Unplug the mains plug from the mains socket if you do not plan to use the product for an extended period of time.
- For safety reasons, disconnect the mains plug from the mains socket during thunderstorms.
- Ensure that the mains cable is not squeezed, bent, damaged by sharp edges or subjected to mechanical stress. Avoid excessive thermal stress on the mains cable from extreme heat or cold. Do not modify the mains cable. Failure to adhere to these instructions may lead to damage of the mains cable. A damaged mains cable can cause a fatal electric shock.
- Do not touch the mains cable if there are any signs of damage. Power down the respective mains socket (e.g. via the respective circuit breaker), and then carefully unplug the mains plug from the mains socket. Never use the product if the mains cable is damaged.
- Damaged mains cables must be replaced by the manufacturer, an authorised repair centre or a qualified electrician.
- Never plug in or unplug the mains plug when your hands are wet.
e) Persons and product
- Do not cover the ventilation openings (air inlet and outlet) on the product.
- Do not place the product too close to equipment that is susceptible to electromagnetic interference. This may result in malfunctions.
f) Batteries
- Correct polarity must be observed while inserting the batteries.
- To prevent battery leakage, remove the batteries when you do not plan to use the product for an extended period. Leaking or damaged batteries may cause acid burns if they come into contact with your skin. Always use suitable protective gloves when handling damaged batteries.
- Batteries must be kept out of the reach of children. Do not leave batteries lying around, as there is a risk that children or pets may swallow them.
- All batteries must be replaced at the same time. Mixing old and new batteries can cause the batteries to leak and damage the product.
- Batteries must not be dismantled, short-circuited or thrown into open. Never recharge non-rechargeable batteries. This may cause an explosion!
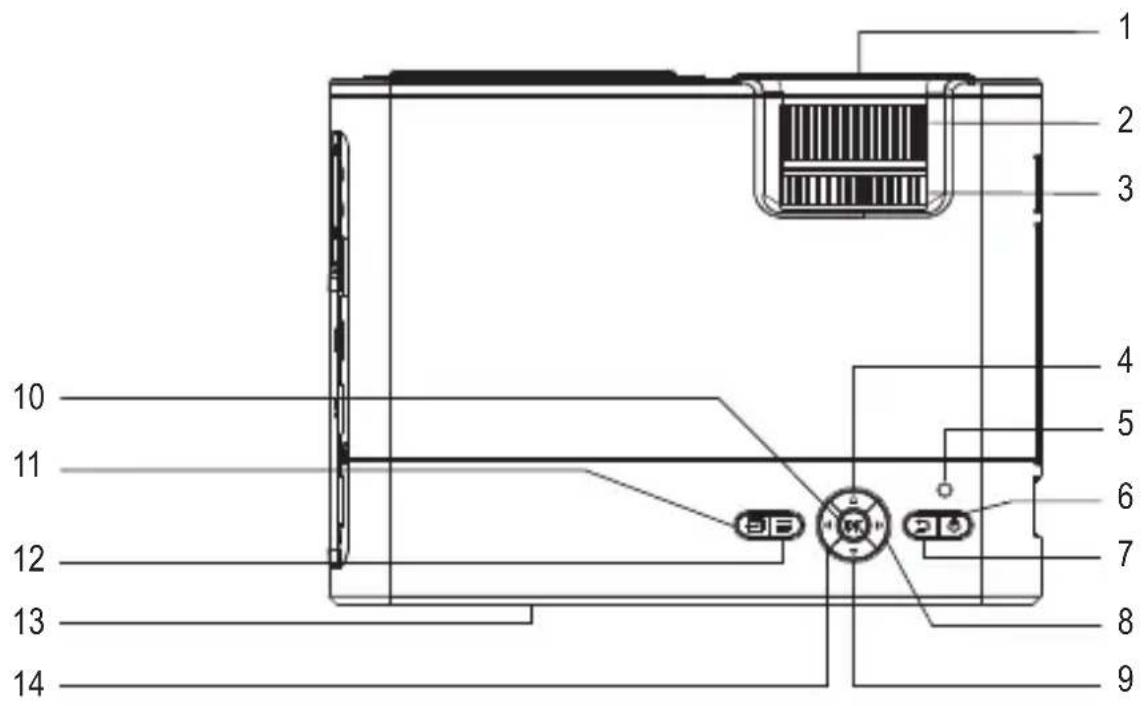
7. Product overview
text_image
Technical diagram of a device rear panel with numbered labels pointing to internal components such as ventilation slots, buttons, and control buttons.1 Lens
2 Focus selection wheel
3 Keystone selection wheel
4 Up button
5 LED
6 On/off button
7 ESC button
8 Volume + button
9 Down button
10 OK button
11 Signal selection button
12 Menu button
13 Infrared sensor
14 Volume - button
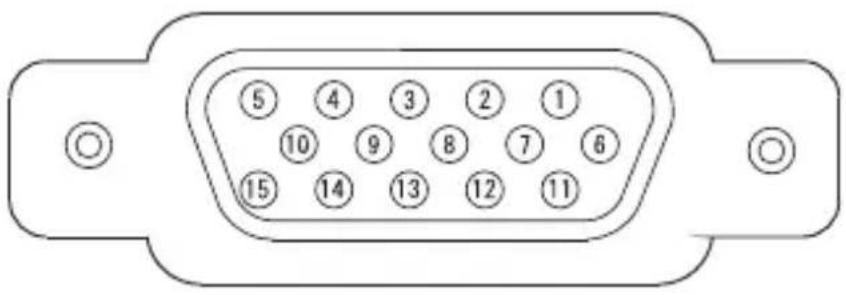
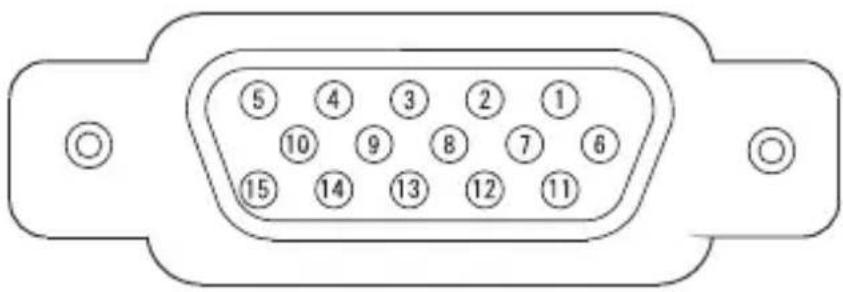
8. Pin assignment for VGA connection
text_image
⑤ ④ ③ ② ① ⑩ ⑨ ⑧ ⑦ ⑥ ⑮ ⑭ ⑬ ⑭ ⑮| 1 R (red) 2 G (green) | |
| 3 B (blue) 4 Monitor ID2 | |
| 5 Earth (horizontal) 6 R (red earth) | |
| 7 G (green earth) 8 B (blue earth) | |
| 9 5 V 10 Earth (vertical) | |
| 11 Monitor ID0 12 DDC data | |
| 13 Horizontal sync. 14 Vertical sync. | |
| 15 DDC time |
9. Positioning the projector
a) General information
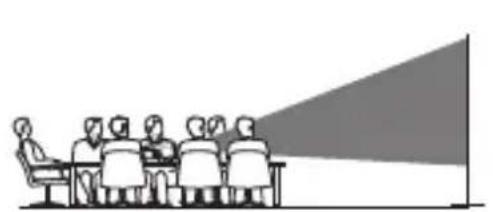
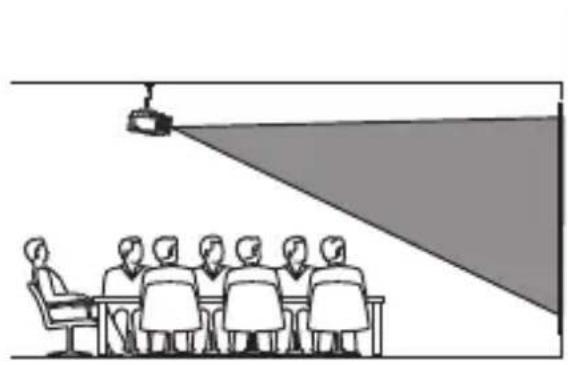
You can place the projector on a surface such as a table or other similar piece of furniture. Overhead mounting in front of or behind the projection surface is also possible. Refer to the next section for details. The requisite brackets are not included with the product. Suitable products are available from specialist retailers.
natural_image
Illustration of a meeting with a large screen and audience (no text or symbols)
natural_image
Illustration of a meeting room with a projection screen and audience (no text or symbols)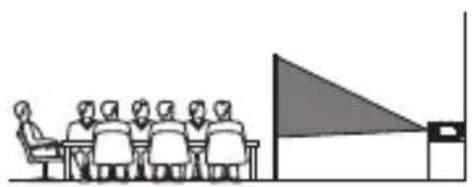
natural_image
Illustration of a group of people seated at desks facing a large screen with a triangular pointer (no text or symbols)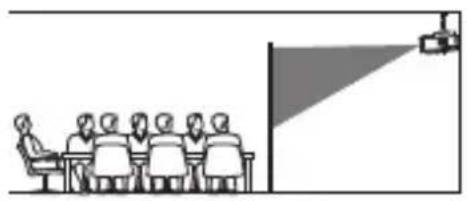
natural_image
Illustration of a meeting room with a speaker at the front and a projection screen on the right (no text or symbols)Ensure that the ventilation openings on the projector are not obstructed or blocked during the installation/mounting process. The projector should be placed at least 10 cm away from other objects to ensure adequate cooling by air circulation.
natural_image
Illustration of a meeting with a projection screen and audience (no text or symbols)
natural_image
Diagram showing a container with internal particles and connecting lines, no text or symbols presentb) Determining the projection distance
When setting up the projector, observe the correct ratio between the distance of the projector from the projection screen (e.g. screen or similar) and the image size. Refer to the following figure.
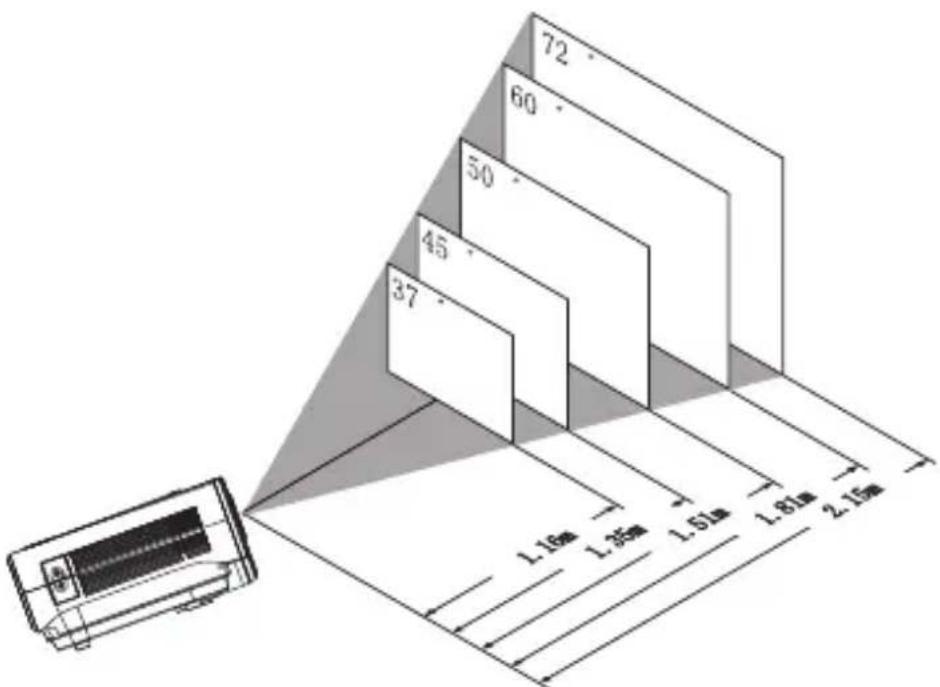
bar
| Value | |---| | 72 | | 60 | | 50 | | 45 | | 37 | | 1.16m | | 1.35m | | 1.51m | | 1.81m | | 2.15m |In addition, bear in mind that the ambient brightness has a significant impact on the visibility of the image. If the brightness of the projector bulb is not sufficient for projecting a clear image, darken the room and/or avoid glare from strong sunlight.
10. Installation and connection
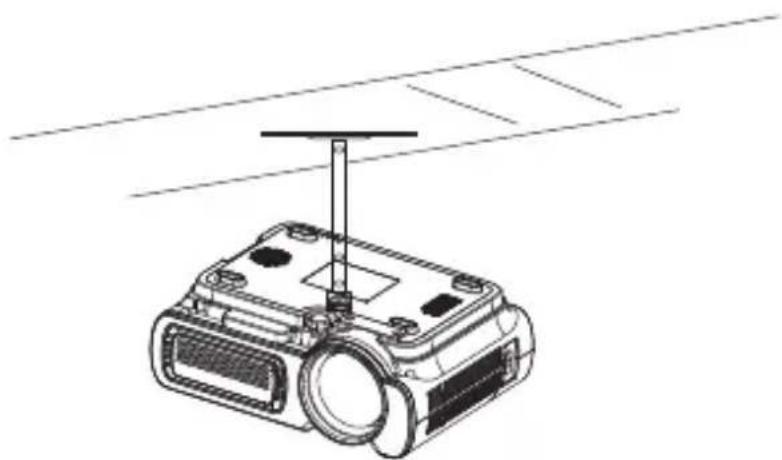
a) Overhead mounting
natural_image
Line drawing of a projector with a vertical support structure (no text or symbols)- Mount the projector with a projector ceiling bracket (not included with the product).
- Make sure that the load-bearing strength of the mounting surface and the fastening elements (e.g. screws) is sufficient.

Do not mount the projector in the vicinity of air conditioning, ventilation or heating systems. This can cause the device to overheat and power off.
b) Wall mounting
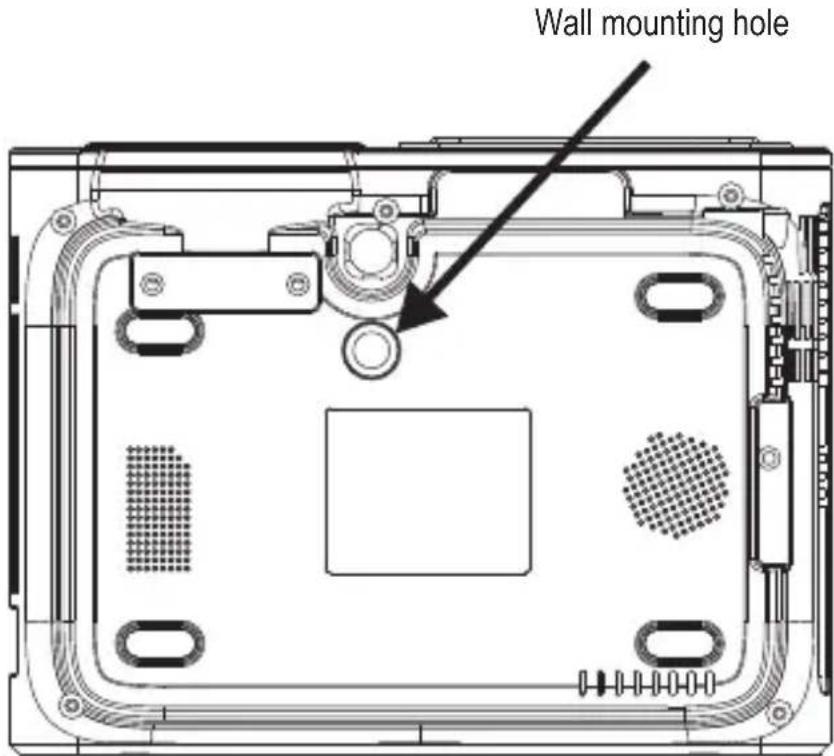
text_image
Wall mounting hole- Use the wall mounting hole to attach the projector to a wall.
- In addition, make sure that the load-bearing strength of the mounting surface and the fastening elements (e.g. screws) is sufficient.
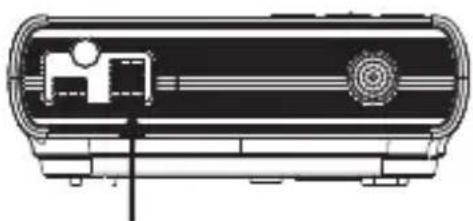
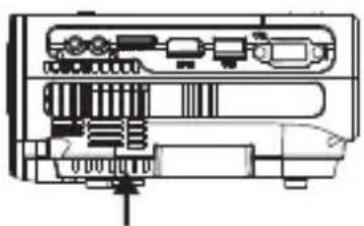
c) Ventilation openings
Do not cover the air cooling openings during use, as this may cause the device to overheat or even cause a fire. There must be a continuous flow of air between the air inlet and outlet.
natural_image
Technical line drawing of a cylindrical device with internal components and mounting base (no text or symbols)Air inlet Air outlet
natural_image
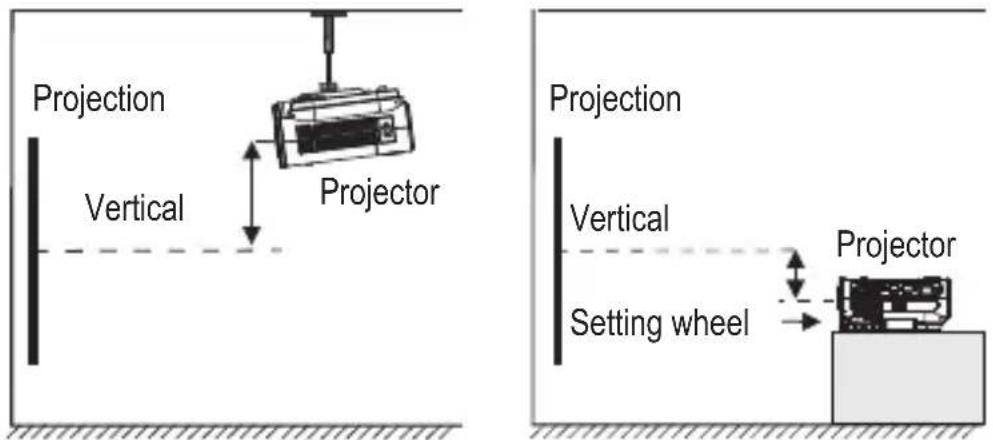
Technical line drawing of an electronic device internal components (no text or symbols)d) Keystone correction
Position the projector as perpendicular as possible to the projection surface. If the projector is not exactly perpendicular to the projection screen, the projected image will appear distorted. The image will appear wider (or higher) on one side than on the opposite side. To compensate for this, use the keystone correction on the device. This creates a distortion in the image that compensates for the existing distortion and creates a normal image for the viewer.
- Turn the Keystone selection wheel (3) to correct the image for an undistorted view. You can correct the image up to a maximum of ± 15^ .
text_image
Projection Vertical Projector Projection Vertical Setting wheel Projectore) Connections
Connect the desired signal source devices to the projector.
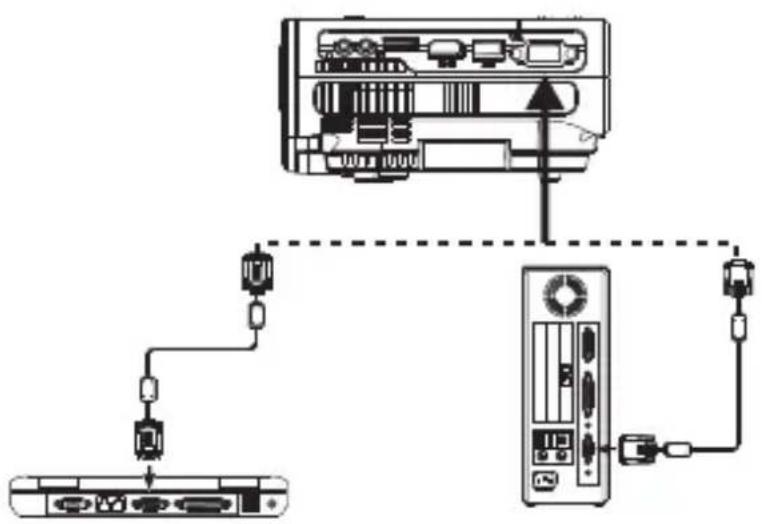
VGA video signal
flowchart
graph TD
    A["Device 1"] -->|Data Link| B["Server"]
    B -->|Data Link| C["Device 2"]
    C -->|Data Link| D["Device 3"]
    D -->|Data Link| E["Device 4"]
    E -->|Data Link| F["Device 5"]
    F -->|Data Link| G["Device 6"]
    G -->|Data Link| H["Device 7"]
    H -->|Data Link| I["Device 8"]
    I -->|Data Link| J["Device 9"]
    J -->|Data Link| K["Device 10"]
    K -->|Data Link| L["Device 11"]
    L -->|Data Link| M["Device 12"]
    M -->|Data Link| N["Device 13"]
    N -->|Data Link| O["Device 14"]
    O -->|Data Link| P["Device 15"]
    P -->|Data Link| Q["Device 16"]
    Q -->|Data Link| R["Device 17"]
    R -->|Data Link| S["Device 18"]
    S -->|Data Link| T["Device 19"]
    T -->|Data Link| U["Device 20"]
You can use a VGA signal source such as computer.
VGA signal parameters for adjusting a computer output signal
Resolution Frequency (kHz) Half-frame frequency (Hz)
VGA 640 x 480 31.5 60
34.7 70 37.9 72 37.5 75
SVGA 800 x 600 31.4 50
35.1 56 37.9 60 46.6 70 48.1 72 46.9 75
XGA 1,024 x 768 40.3 50
48.4 60 56.5 70
If the projector is connected to a laptop, the image may not be displayed on both devices at the same time. If so, adjust the display attributes of the laptop and select the CRT output mode.
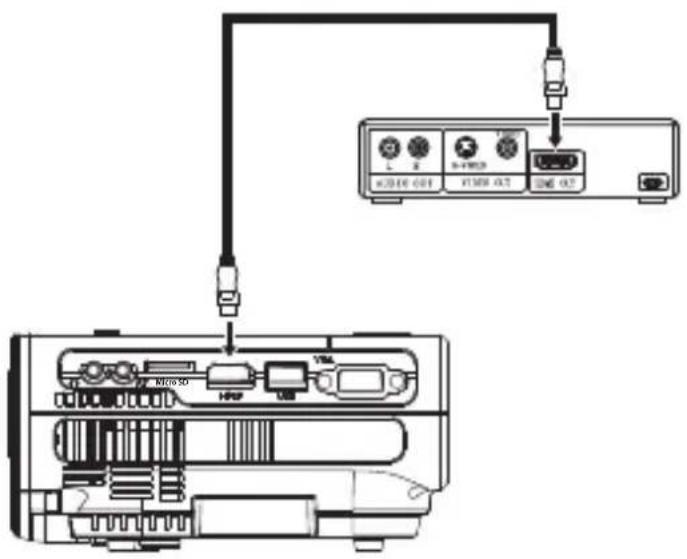
HDMI source signals
text_image
Diagram showing audio device connections with labeled ports and connectors, including a USB interface and CD output port.Connect the supplied HDMI cable to a suitable HDMI signal source.
USB port
The USB port on the projector can be used to connect USB storage devices.
Audio output signal

natural_image
Pure electrical circuit lines without any symbols3.5 mm jack socket 📋 Use this socket to connect analogue audio devices (e.g. headphones, speakers or amplifiers) to the projector. The diagram shows an example of a connection.
Video source signal
text_image
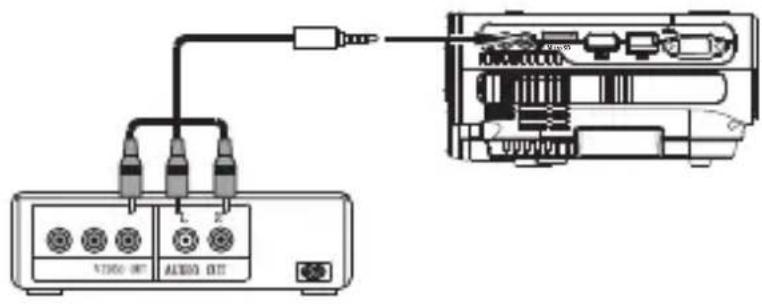
AUDIO OUT AUDIO OUTAV 3.5 mm jack socket: Use this socket to connect video source devices such as DVD players, video cameras or video recorders (a suitable AV cable is included with the product).
→ Video cable = yellow, left audio channel = white, right audio channel = red
MicroSD card slot
text_image
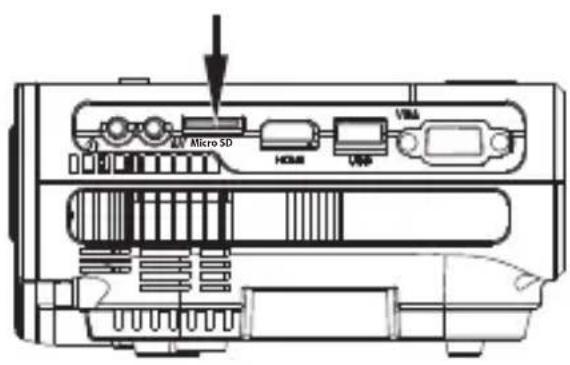
Micro SD HDMI USB VBAInsert a suitable microSD card. Pay attention to the orientation of the card and do not use force when inserting it.
The projector can then access the contents stored on the microSD card.
Connecting the power supply
natural_image
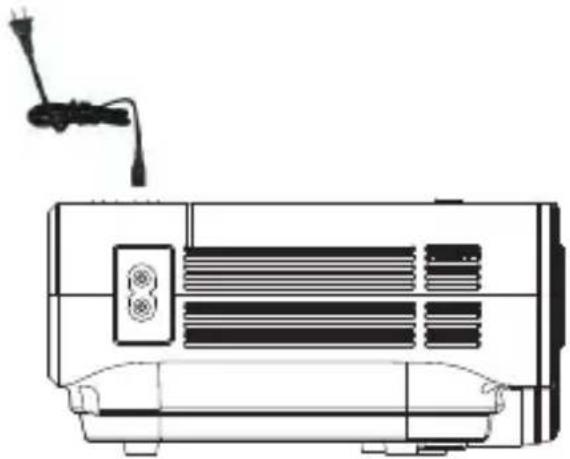
Line drawing of a portable air conditioner unit with a mounted microphone (no text or symbols)Connect the power cable to the power-in socket on the product (a suitable power cable is included with the product).
Then connect the power cable to a mains socket. The LED will turn on. The device is now in standby mode.
a) Inserting/changing the batteries
Before first use, insert two new 1.5 V batteries into the remote control.
- Open the battery compartment cover on the back of the remote control.
- Insert two AAA batteries (not included) with correct polarity into the battery compartment (observe the plus/+ and minus/- markings).
- Replace the battery compartment cover.
→ Replace the batteries when the range of the remote control decreases noticeably.
- To change the batteries, remove the battery compartment cover from the back of the remote control.
- Remove the used batteries before inserting the new batteries. Proceed as described above.
b) Using the remote control
text_image
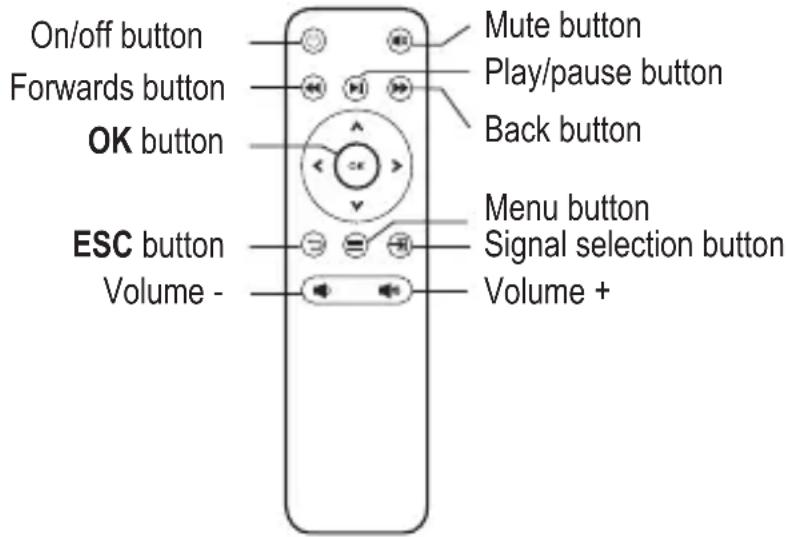
On/off button Forwards button OK button ESC button Volume - Mute button Play/pause button Back button Menu button Signal selection button Volume +- Direct the remote control at the infra-red sensor on the product. The remote control has a range of approx. 6 m at an angle of inclination of up to 30^ .
- You can also configure the settings using the buttons on the projector.
Tips
- Make sure that there is an unobstructed line of sight between the remote control and the infrared sensor. The signal must not be blocked by opaque objects.
- To ensure unobstructed reception, point the remote control towards the rear left of the device or directly at the infrared sensor.
- To prevent damage to the remote control, do not store it in places where it may be exposed to high temperatures or moisture.
12. Setup
→ The lens cap must be removed before the image can be projected. Replace the lens cap when you have finished using the projector.
a) Turning the projector on/off
- Wait for approx. 3 seconds after connecting the device to the mains voltage. The LED will turn red.
- Press the on/off button (6) to switch the device on. The LED will turn green.
- Press the on/off button to switch the device off.
- You can also switch off the projector via the on/off button on the remote control.
- The LED will turn red to indicate that the projector is in standby mode.
Before disconnecting the power plug, make sure that the projector fan has turned off. If this is not the case, this indicates that the device has not yet cooled down sufficiently. Never unplug the mains plug from the mains socket before the fan has switched off, as the device could still be too hot without further cooling. This excess heat will affect the lifespan of the device.
a) Selecting the signal source (video)
→ Verify that you have connected the correct signal cable for the desired video signal source.
Select the input signal to be displayed by the projector. Proceed as follows:
- Press the signal selection button (1) on the device or the signal selection button on the remote control to display the selection menu of the input signal sources.
- Use the ▼▲ buttons in the menu to navigate through the menu options for the video signal sources. You can choose between VGA, HDMI, AV, USB and microSD.
- Use the ◀buttons to select the desired source signal.
b) Configuring the projection settings
- Turn the Focus selection wheel (2) to adjust the image setting.
- Turn the Keystone selection wheel (3) to adjust the keystone correction.
c) Manually changing the volume
- Press the Volume + (plus) button ▶ (8) or - (minus) button ◀ (14) to increase or decrease the volume.
→ These buttons can also be used in the menu as a selection key and for setting the parameters.
- Press the ☑mute button on the remote control to turn the sound off. Press again to switch the sound back on.
d) Playing video content
- If you have selected the memory card or USB as the signal source, use the ◀▶ buttons to select the desired file type (photo, music, film text) and confirm with the OK button.
- Use the ◀▶ and ▼▲ buttons to select the location of the file you want to open. Confirm your selection by pressing the OK button.
- Press the button on the remote control to play the selected media content.
Playback mode
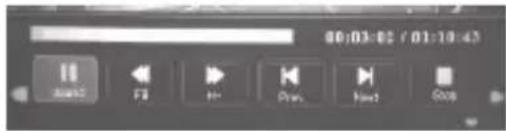
- Press the OK button on the remote control to display the OSD navigation bar.
text_image
00:03:02 / 01:10:43 Audio File Play Drawn Reset Goss- Use the ◀▶ buttons to select a function. Confirm the selected function by pressing the OK button.
- Play/pause: Play or pause video (button also available on the remote control)
- "FB": Rewind at 2x, 4x, 8x or 16x speed (button also available on the remote control)
- "FF": Fast forward at 2x, 4x, 8x or 16x speed (button also available on the remote control)
- "Prev": Play the current video
- "Next": Play the next video
- "Stop": Stop playing the video
- Press the ⓣ button to cancel the function/operation.
14. Settings
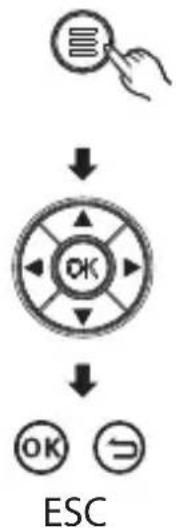
a) Operating the menu (general)
flowchart
graph TD
    A["User Interface"] --> B{OK}
    B --> C["Down"]
    C --> D["OK"]
    C --> E["Down"]
- Press the menu button (2) on the device or the remote control to access the OSD menu.
- Use the ◀▶(8 & 14) and ▼▲(4 & 9) buttons to navigate through the menu items.
- Select the menu item and confirm with the OK button.
- Set the available parameters and confirm your setting with the Menu key, or cancel with the ESC key.
b) Setting the menu language
- Use the ◀▶ and ▼▲ buttons to navigate through the menu. Select the language setting option. Confirm your selection with the OK button (10).
- Use the ◀ and ▼ buttons to select the desired language.
- Press the menu ⏻ button to confirm your selection and exit the menu. Press the ESC button to cancel.
c) Audio settings
- Press the OK button to select the audio settings option.
- Use the ▼ buttons to select the parameters you want to configure.
-
Use the ◀ buttons to change a setting.
-
Treble and bass (adjustable between 0 - 100).
- Balance
- Switch off automatic volume adjustment
- Confirm your setting with the Menu ⏻ button, or press the ESC button to cancel.
d) Configuring the image mode
Set the different display parameters of the image as follows:
- Use the ▼ buttons to select the parameters you want to configure. - Use the ◀▶ buttons to adjust a setting. Change the following image parameters according to your needs:
- Contrast (0 - 100)
- Brightness (0 - 100)
- Colour (0 - 100)
- Sharpness (0 - 100)
- Tint (0 - 100)
- Confirm each setting with the Menu ⏻ button, or press the ESC button to cancel.
e) Setting the duration of the menu display
Use this option to set how long the menu is displayed for when you press the OK button. The menu then switches off automatically.
- Use the ▼ buttons to select the display duration of the OSD menu.
- Use the ◀ buttons to change the setting. The following options are available:
- 5 seconds
- 10 seconds
- 15 seconds
- Off
f) Setting the colour temperature
- Use the ▼▲ buttons to select the colour temperature adjustment option. Confirm your selection with the OK button.
- Use the ▼ buttons to select menu items.
-
Use the ◀▶ buttons to adjust a colour component setting. The following values can be selected:
-
Red (0 - 100)
- Green (0 - 100)
- Blue (0 - 100)
- Confirm your setting with the Menu ⏱ button, or press the ESC button to cancel.
g) Setting the image format
- Press the OK button to select the image format for the projection image.
-
Use the ▼ buttons to change the image format. The following options are available:
-
Automatic
-4:3
-16:9
- Confirm your setting with the Menu ⏰ button, or press the ESC button to cancel.
h) Configuring the noise reduction settings
- Use the ▼▲ buttons to select the noise reduction option. Confirm your selection with the OK button.
-
Use the ▼▲ buttons to change the noise reduction setting. The following options are available:
-
Off
- Low
- Medium
- High
- Default
- Confirm your setting with the Menu ⏻ button, or press the ESC button to cancel.
i) Screen (VGA settings)
Set the display options for the VGA image signal. VGA must be selected as the video signal source.
- Use the ▼▲ buttons to select the "Screen" setting from the menu. Confirm your selection with the OK button.
-
Press the ▼ buttons to set
-
Automatic positioning
- Horizontal position (0 - 100)
- Vertical position (0 - 100)
- Size (0 - 100)
-
Phase of the displayed image (0 - 100)
-
Adjust the parameter with the <buttons.
- Confirm your settings with the Menu button or cancel with the ESC key.
j) Changing the projection size
- Use the ▼▲ buttons to select the projection size option, and then confirm your selection with the OK button.
- Use the ◀buttons to adjust the projection size in percent.
- Confirm your settings with the Menu button or cancel with the ESC key.
k) Restoring factory settings
Follow the steps below to restore the projector to the factory settings:
- Use the ◀▶ and ▼▲ buttons to navigate through the menu and select the "Factory settings" option, and then confirm the reset with the OK button.
I) Software update
If a software update is available, you can perform the update via USB. Insert the USB stick with the update into the USB port.
- Use the ◀▶ and ▼▲ buttons to select the "Software update" option in the menu, and then confirm your selection with the OK button.
- The update will be installed.
15. Care and cleaning

Never use aggressive detergents, rubbing alcohol or other chemical solutions, as these could damage the housing or stop the product from functioning properly.
- Do not disassemble the product into its individual components.
- Disconnect the product from the mains before each cleaning session.
- Use a dry, lint-free cloth to clean the product.
- Clean the lens with a lint-free lens cloth.
- If you do not plan to use the product for an extended period, switch it off and disconnect it from the power supply.
- Only transport the product in its original packaging.
a) Product
Electronic devices are recyclable waste and must not be placed in household waste. At the end of its service life, dispose of the product according to the relevant statutory regulations.
Remove any inserted (rechargeable) batteries and dispose of them separately from the product. Batteries

You are required by law (Battery Directive) to return all used batteries. They must not be placed in household waste.
Batteries containing hazardous substances are labelled with this symbol to indicate that disposal in household waste is forbidden. The abbreviations for heavy metals in batteries are: Cd = Cadmium, Hg = Mercury, Pb = Lead (indicated on the battery, e.g. below the waste bin icon on the left).
Used batteries can be returned to local collection points, our stores or battery retailers.
You thus fulfil your statutory obligations and contribute to environmental protection.
17. Technical data
Operating voltage 100 - 240 V/AC, 50/60 Hz
Rated power 48 W
Output power (speakers)....2 W (rms)
Batteries 2 x 1.5 V AAA
(for remote control)
Resolution....800 x 480 dpi,
max. 1920 x 1080 (1080i)
Aspect ratio....4:3/16:9 (adjustable)
Projector LED brightness....3200 lm
Brightness (projection)....80 lm (average)
Contrast....2000:1
Sound pressure (operating)......≤35 dB
Sound pressure level....92 dB
LED lifespan 30,000 hours of operation
Projection distance 1.25 - 3 m
Connections.... 1 x VGA, 1 x AV, 1 x HDMI, 1 x USB
OSD languages .... German, English, France, Czech, Danish, Spanish, Croatian, Greek, Italian, Hungarian, Polish, Romanian, Dutch, Portuguese, Slovenian, Norwegian, Russian, Finnish, Chinese, Japanese, Simplified Chinese, Korean
HDMI input resolutions 480i, 480p, 576i, 720p, 1080i, 1080p
Supported video formats ....MPEG1, MPEG2, MPEG4, RM, AVI, RMVB, MOV, MKV, DIVX, VOB, M-JPEG
Supported audio formats .... MP3, M4A (AAC)
Supported image formats ...... Pictures: JPEG, BMP, PNG
Memory card....microSD, max. 64 GB
Dimensions (L x W x H) 205.7 x 165 x 79 mm
Weight 860 g
Page
France (email): technique@conrad-france.fr
text_image
QR code image containing encoded data, no visible human-readable texttext_image
Technical diagram of a device rear panel with numbered labels pointing to internal componentsnatural_image
Illustration of a meeting with a large projection screen and audience members (no text or symbols)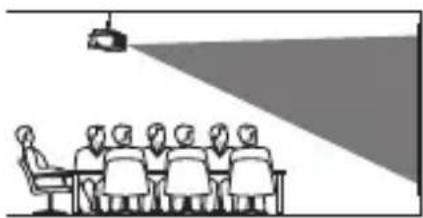
natural_image
Illustration of a meeting with a projection light and audience members (no text or symbols)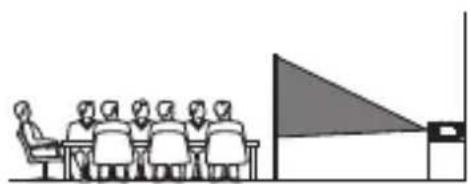
natural_image
Illustration of a meeting scene with a group of people seated at a table facing a large screen (no text or symbols visible)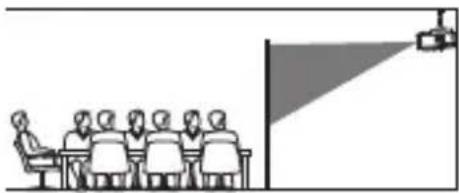
natural_image
Illustration of a meeting scene with a speaker at the front and projection screen on the right (no text or symbols)natural_image
Illustration of a meeting scene with a projection screen and a group of people seated at a table (no text or symbols present)
natural_image
Diagram of a suspended object with arrows indicating motion or force, no text or symbols presentnatural_image
Line drawing of a projector with a vertical support and mounting holes (no text or symbols)natural_image
Technical line drawing of a device rear panel with labeled components and an arrow indicating a specific part (no text or symbols present)natural_image
Technical line drawing of a cylindrical device with internal components and mounting feet (no text or symbols)natural_image
Cross-sectional diagram of a mechanical device showing internal components (no text or labels)d) Correction de trapèze verticale (correction Keystone)
text_image
Diagram showing connections between an audio device and a physical audio device with labeled ports and connectorsnatural_image
Pure electrical circuit lines without any symbolsnatural_image
Line drawing of a portable air conditioner unit with a mounted probe and fan (no text or symbols)text_image
QR code image containing encoded data, no visible human-readable texttext_image
Diagram of a device rear panel with numbered labels pointing to internal components such as ventilation slots, buttons, and connectors.1 Lens 8 Knop volume +
2 Stelwiel Focus 9 Omlaag-knop
3 Stelwiel Keystone 10 Knop OK
4 Omhoog-knop 11 Knop signaalkeuze
5 LED 12 Menuknop
6 Aan/uit-knop 13 Infraroodsensor
7 Knop ESC 14 Knop volume -
8. Pinbezetting VGA-connector
text_image
⑤ ④ ③ ② ① ⑩ ⑨ ⑧ ⑦ ⑥ ⑮ ⑭ ⑬ ⑭ ⑮natural_image
Illustration of a meeting with a large screen and audience (no text or symbols)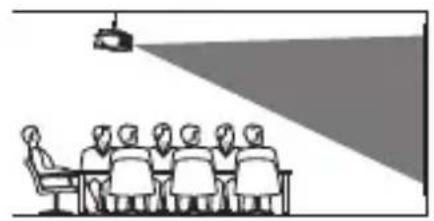
natural_image
Illustration of a meeting room with a projection beam and audience (no text or symbols)
natural_image
Illustration of a group of people seated at desks facing a large screen with a triangular pointer (no text or symbols)
natural_image
Illustration of a meeting room with a speaker at the front and a projection screen on the right (no text or symbols)natural_image
Illustration of a meeting with a projection screen and audience (no text or symbols)
natural_image
Diagram showing a container with internal particles and connecting lines, no text or symbols presentnatural_image
Line drawing of a projector with a vertical support and mounting holes (no text or symbols)text_image
Ophangopeningnatural_image
Technical line drawing of a cylindrical air conditioner unit with internal components (no text or symbols)natural_image
Cross-sectional diagram of a mechanical device showing internal components (no text or labels)text_image
Diagram showing connections between an audio device and a monitor, with labeled ports and connectorsnatural_image
Pure electrical circuit lines without any symbolstext_image
V200 m1 AUXED OUTnatural_image
Line drawing of a portable air conditioner unit with a mounted probe and fan (no text or symbols)text_image
00:03:02 / 01:10:45 7:00:02 F2 H- Pw. Read SOSThis is a publication by Conrad Electronic SE, Klaus-Conrad-Str. 1, D-92240 Hirschau (www.conrad.com).
All rights including translation reserved. Reproduction by any method, e.g. photocopy, microfilming, or the capture in electronic data processing systems require the prior written approval by the editor. Reprinting, also in part, is prohibited. This publication represent the technical status at the time of printing.
Copyright 2021 by Conrad Electronic SE.
F
Copyright 2021 by Conrad Electronic SE.
NL
Copyright 2021 by Conrad Electronic SE.