
THSM2015M - Steam cleaner THOMSON - Free user manual and instructions
Find the device manual for free THSM2015M THOMSON in PDF.

| Product type | Multifunction steam cleaner |
| Brand | Thomson |
| Model | THSM2015M |
| Color | White and gray |
| Power supply | 220-240 V ~ 50/60 Hz |
| Power | 1500 W |
| Water tank capacity | 330 ml |
| Heating time | 30 seconds |
| Steam flow rate | 30 g/min |
| Steam settings | 3 levels (Low, Medium, High) |
| Compatible floor types | Tile, vinyl, laminate flooring, marble, stone |
| Included accessories | Floor head, microfiber cloths (2), window squeegee, precision nozzle, flat brush, round nylon brush, round brass brush, angled adapter, hose, measuring cup, adapter |
| Cable length | Approximately 5 m |
| Dimensions (L x W x H) | 30 x 12 x 120 cm (assembled) |
| Weight | 2.5 kg |
| Body material | Plastic and metal |
| Maintenance | Monthly descaling recommended |
| Noise level | Approximately 75 dB |
| Warranty | 2 years |
Frequently Asked Questions - THSM2015M THOMSON
User questions about THSM2015M THOMSON
0 question about this device. Answer the ones you know or ask your own.
Ask a new question about this device
Download the instructions for your Steam cleaner in PDF format for free! Find your manual THSM2015M - THOMSON and take your electronic device back in hand. On this page are published all the documents necessary for the use of your device. THSM2015M by THOMSON.
USER MANUAL THSM2015M THOMSON
natural_image
Black and white photo of a vacuum cleaner with handle and control panel (no visible text or symbols)INFORMATIONS DE PRODUIT
natural_image
Line drawing of a handheld tool with a lever and handle, showing a mechanical assembly (no text or symbols)BASE DU TUBE
A
natural_image
Line drawing of a mechanical tool or clamp with handle and grip (no text or symbols)B
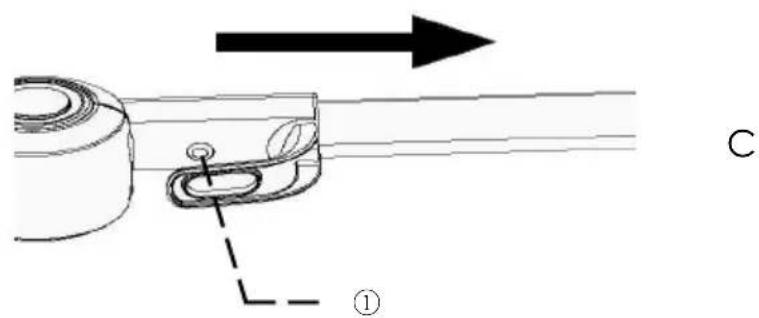
FIGURE 1
natural_image
Diagram of a car door handle assembly with two hanging weights and a directional arrow indicating motion (no text or symbols)FIGURE 2
flowchart
graph TD
    A["Pinning Pin"] --> B["Assembly Step 1"]
    B --> C["Assembly Step 2"]
    C --> D["Final Assembly"]

    subgraph Top Section
        E["Top Section Pin"] --> F["Bottom Section Pin"]
    end

    subgraph Middle Section
        G["Top Section Pin"] --> H["Bottom Section Pin"]
    end

    subgraph Bottom Section
        I["Bottom Section Pin"] --> J["Bottom Section Pin"]
    end

    E --> F --> H --> J
    G --> H --> J
    style E fill:#f9f,stroke:#333
    style F fill:#ccf,stroke:#333
    style G fill:#cfc,stroke:#333
    style H fill:#fcc,stroke:#333
    style I fill:#ffc,stroke:#333
UTILISATION DES EMBOUTS

natural_image
Close-up of a white cylindrical object against a plain background (no text or symbols visible)La BUSE PRESICION
natural_image
Close-up of a white cylindrical object with a small protrusion, resting on a black horizontal line (no text or symbols visible)BROSSES NYLON
natural_image
Close-up of a white plastic object with a diagonal line extending from it, against a plain background (no text or symbols visible)RACLETTE À VITRES
natural_image
Two white toilet covers with different designs, one showing a curved handle and the other a flat cover (no text or symbols visible)RACLETTE A VITRE AVEC MICROFIBRE
natural_image
Close-up of a white mechanical component with a base and threaded end, mounted on a grid-like surface (no visible text or symbols)BROSSE SPECIALE JOINTS
natural_image
Symbol of a trash bin crossed with a diagonal line, no text or numbers presentMultifunction steam mop
THSM2015M
User manual
natural_image
Black and silver vacuum cleaner with extended handle and base (no visible text or symbols)Read the instructions for use carefully before first use.
This product complies with the requirements of Directive 2014/35/EU (repealing Directive 73/23/EEC amended by Directive 93/68/EEC) and 2014/30/EU (repealing Directive 89/336/EEC).
IMPORTANT WARNINGS PLEASE READ THE SAFETY INSTRUCTIONS CAREFULLY BEFORE USING THE APPLIANCE AND SAVE FOR FUTURE REFERENCE.
We invite you to read this user guide carefully and completely before installing and using your device.
It is important that this user guide be kept with the device for any further consultation. If this device were to be transferred to another person, make sure that the user guide follows the device so that the new user can be informed of its operation.
In this user guide, the following symbols are used:
 | Important information regarding your safety and how to avoid damaging the device |
 | General information and advice |
 | Risk of electric shock |
 | CAUTION: Danger of burns from hot liquid. |
IMPORTANT
• To extend the life of the product, we recommend the use of deionized water.
- If demineralized water is not used, we recommend replacing the anti-limescale filter every 6 months.
- Low steam flow suitable for : laminate parquet, stone, marble.
- High steam output indicated for : tiles and vinyl.
• Use and precautions:
- The steam mop is an electrical device, it must be used in accordance with the conditions of the manual, the manual must be kept correctly for future reference.
- Check and confirm that the steam mop is using a voltage compatible with the voltage of the power supply.
- To clean, repair or stop using the steam mop, the power supply must be switched off. When you turn off the power, pull the plastic part of the plug instead of pulling the power cable.
- Avoid submerging the steam mop in water and placing the appliance near heating equipment.
- Prevent children from playing with the steam mop to avoid accidents.
- Please do not use the steam mop in the following situations:
- The steam mop appears damaged or does not work correctly. - Broken power cord.
- Avoid blocking the steam outlet to avoid damaging the appliance and
causing deformation due to heat.
- If the power cable is damaged, special equipment is required to replace it, or you can contact our after-sales service to repair it.
- Liquid or steam should not be directed towards equipment with electrical components, such as the interior of ovens.
- The appliance must be unplugged after use and before servicing the appliance.
- Do not use in swimming pools containing water.
- This device can be used by people with reduced physical, sensory or mental abilities, or lack of experience and knowledge if they have been trained and supervised to use this device safely and understand the risks involved. . Children must not play with the device.
- The device should not be left unattended when connected to the mains supply.
- The device must not be used if it has been dropped. If it shows visible signs
of deterioration or if it is leaking.
- Keep the appliance out of the reach of children when it is switched on or cooling down.
IMPORTANT
It is absolutely forbidden to replace the power cable yourself. If it is damaged, it must be replaced by the after-sales service of your dealer, the manufacturer, its after-sales service or a similarly qualified person in order to avoid any danger.
If your device is dropped, have it professionally examined before turning it on again. Internal damage can represent a risk of accident.
For any problem or repair, please contact the after-sales service of your retailer, the manufacturer, its after-sales service or a similarly qualified person in order to avoid any danger.
For installation, handling, cleaning and disposal of the device, refer to the following chapters of the user guide.
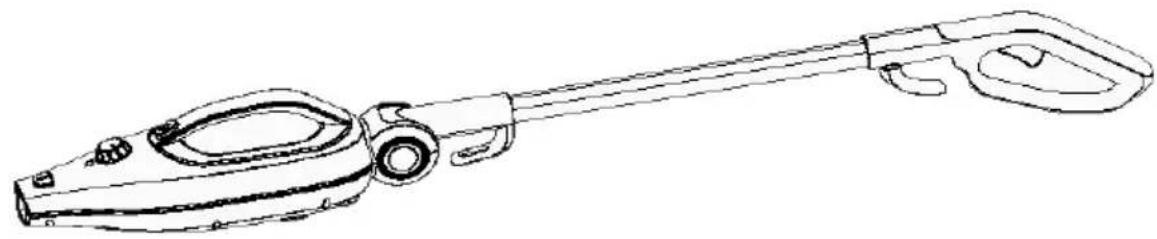
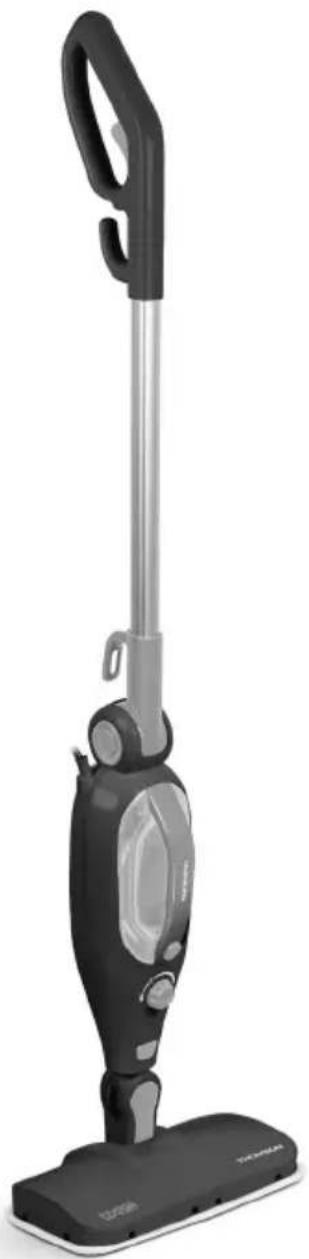
DESCRIPTION OF THE APPLIANCE
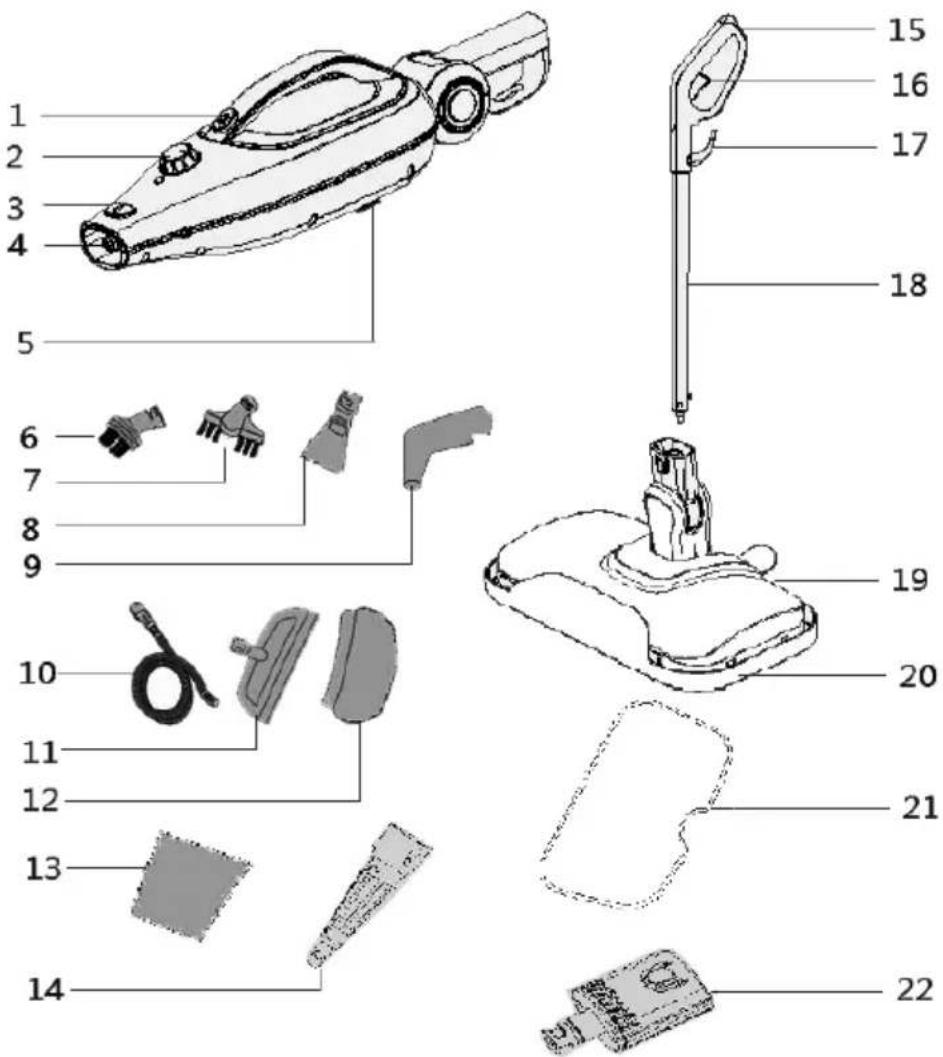
-
Steam button in hand-held mode
-
Steam adjustment dial
-
Brush release button
-
Steam nozzle
-
Anti-limescale filter
-
Nylon round brush
-
Special flat brush for seals
-
Flat precision tip
-
Angled tip
-
Flexible tube
-
Window squeegee
-
Microfiber window squeegee
-
Measuring cup
-
Precision nozzle
-
Handle
-
Steam button in hand-held mode
-
Power cord holder
-
Adjustable handle
-
Floor head
-
Special sliding pad for carpets and rugs
-
Microfiber pads
-
Accessory adapter
PRODUCT INFORMATION
(1) The steam nozzle emits a stream of hot steam capable of penetrating materials. The mop head, jet nozzle and multifunction head attach to the steam nozzle.
(2) The water tank is the tank containing the water before it is transferred to the boiler where it is transformed into steam. The water tank holds 380 mL of water.
(3) The water tank cap covers the water tank fill hole and should be removed before filling the water tank with water.
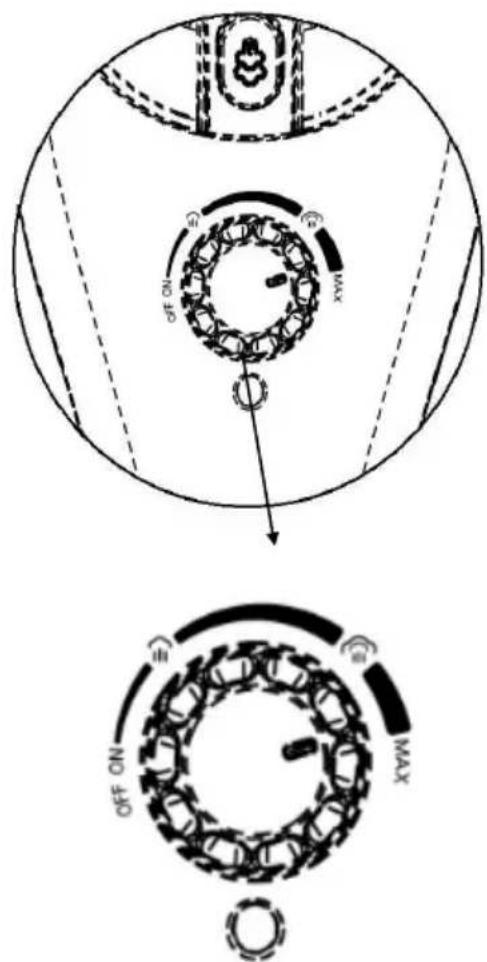
(4) The power indicator(3) illuminates when the steam control dial is set to one of the three steam intensity settings. It indicates whether the device is on and heating up.
(5) The steam control dial turns the unit on or off. It is used to select the desired steam intensity (three settings available - HIGH and LOW).
(6) The ignition handle is convenient to assemble and disassemble to get the device ready as quickly as possible.
(7) Cord clips provide a safe and convenient way to store the power cord when not in use. (under the hook)
(8) The handle is comfortable when using the extension tube.
(9) The flexible tube Connects to the main housing of the steam mop and is designed to make washing floors, windows, ceilings and other hard-to-reach surfaces more convenient.
(10) The two microfiber pads attach to the mop head and are used to clean scratches and stains from hard surface floors. Microfiber fabrics are reusable and machine washable.
NOTE : Microfiber wipes are designed to absorb and collect dirt. For best results, we recommend you vacuum the floor before mopping.
(11) The precision nozzle & flat brush attach to the precision nozzle and are designed to remove stubborn stains. You have a nylon round brush for brushing (a carpet, for example) and a copper round brush for brushing metal surfaces (the interior of an oven and grill racks, for example).
NOTE : The copper round brush can damage some delicate surfaces, such as stainless metal. Make sure the copper round brush can be used on the surface you want to clean. If you are not sure if any surface can be damaged by this brush, we recommend that you do a small area test first.
(12) The small fabricAttaches to the multi-function head, to absorb excess moisture and prevent water from staining delicate materials. This allows the appliance to act as an efficient steam iron.
(13) The window squeegee Attaches to the multifunction head, and is intended for cleaning windows, mirrors and other smooth surfaces.
(14) The multifunction head attaches to the steam outlet, and acts as an adapter to receive the window squeegee and the microfiber wipe.
(15) The jet nozzle attaches to the steam wand, and is intended to concentrate the flow of steam for concentrated cleaning.
(16) The main floor head attaches to the steam outlet, for steam cleaning various hard surface floors.
NOTE : We do not recommend using this tool on floating floors. Be careful when steam cleaning floors, as the floors can be warped by heat and humidity. Limit the use of this unit on these types of surfaces.
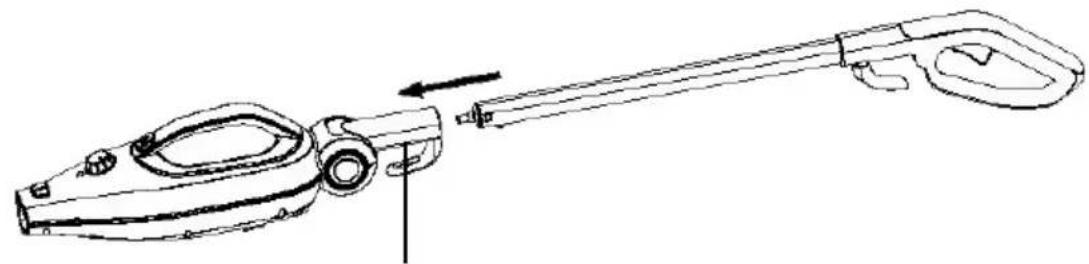
ASSEMBLE THE MULTIFUNCTIONAL STEAM BROOM
Extension tube
-
Insert the threaded connector of the extension tube base into the main unit (FIGURE 1-A).
-
Attach the handle firmly (FIGURE 1-B)
a. To adjust the tube correctly: Push the button①, to verify that the metal tube has been firmly installed b. push it to pop it out (FIGURE 1-C)
natural_image
Line drawing of a mechanical tool with a lever and handle, showing a shaft and adjustment arrow (no text or symbols)TUBE BASE
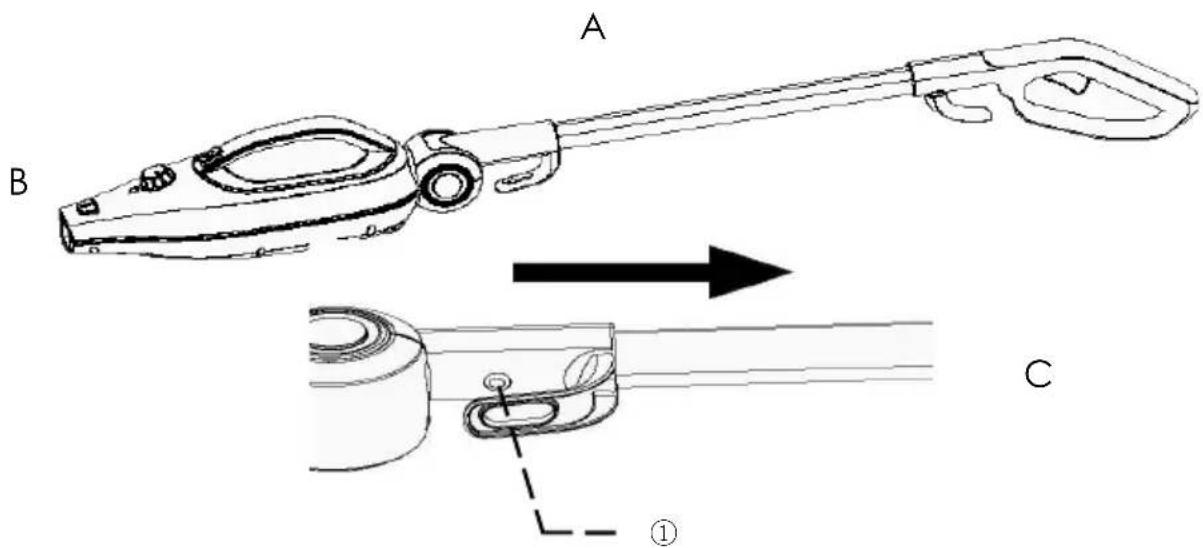
FIGURE 1
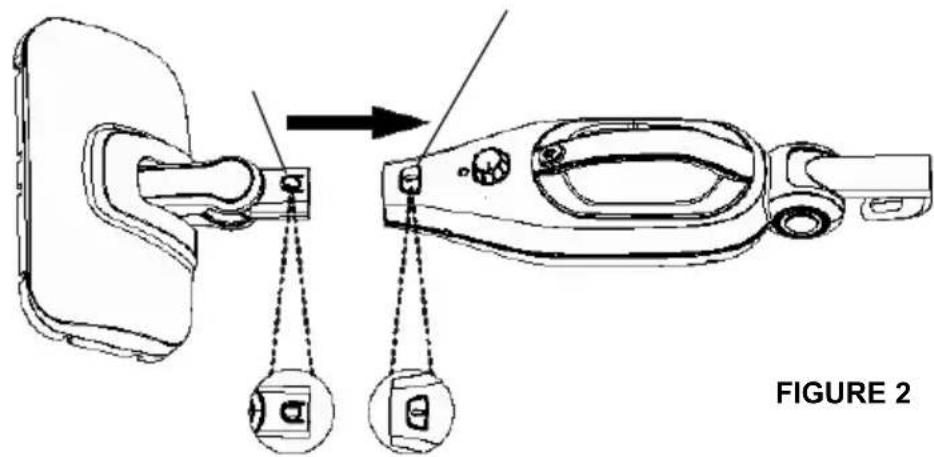
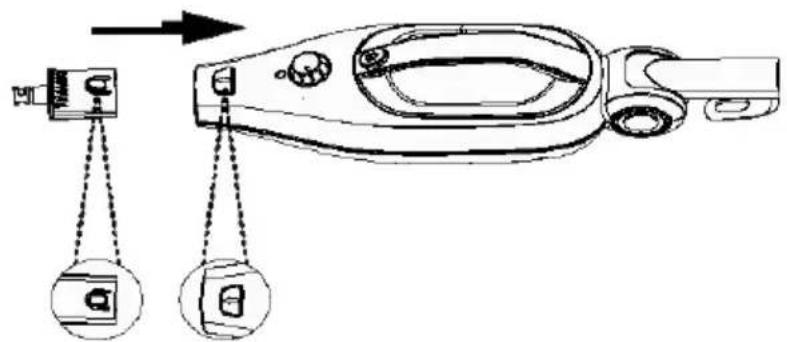
Main head for the floor
-
Align the mop head with the main unit as shown in (FIGURE 2), so that the neck is positioned over the steam wand.
-
Slide the main head into the steam outlet, pressing firmly until the release button clicks into the hole.
-
To remove the mop head, firmly press the release button while pulling on the mop head to release it from the steam wand.
Bit adapter
CAUTION: The metal end of the jet nozzle heats up during use. Do not touch it to avoid burns.
- Align the jet nozzle with the Steam outlet as shown below.
- Slide the jet nozzle into the steam nozzle, pressing firmly until the release button clicks into the hole.
- To remove the jet nozzle, firmly press the release button while pulling out the jet nozzle.
Bit adapter
Bit adapter
- The nozzle adapter attaches to the steam outlet. It can allow you to add the precision nozzle or the flexible tube.

flowchart
graph TD
    A["Pinning Pin"] --> B["Assembly Step 1"]
    B --> C["Assembly Step 2"]
    C --> D["Final Assembly"]

    subgraph Top Section
        E["Pinning Pin"] --> F["Assembly Step 3"]
        F --> G["Assembly Step 4"]
    end

    subgraph Bottom Section
        H["Pinning Pin"] --> I["Assembly Step 5"]
        I --> J["Final Assembly"]
    end

    E --> F --> G --> H
    F --> G --> I
    G --> J
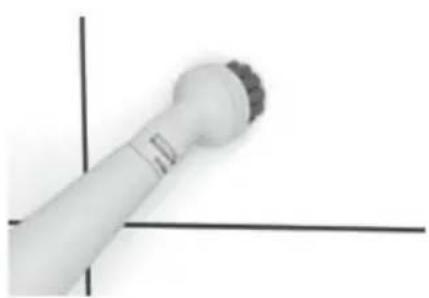
USE OF TOOLS-ACCESSORIES

natural_image
Close-up of a white cylindrical object against a plain background (no text or symbols visible)The PRESICION NOZZLE
The precision nozzle helps loosen dirt. Can be used on cars to remove stubborn stains. The nozzle emits a powerful jet of steam capable of removing dirt in hard-to-reach places. Can be used on the device in hand-carried mode, and can act as a connector for other tools.
natural_image
Close-up of a white cylindrical object with a small protrusion, resting on a black horizontal line (no text or symbols visible)NYLON BRUSHES
Hard bristles for heavily soiled surfaces.
Always test this brush on a small, inconspicuous area before use.

natural_image
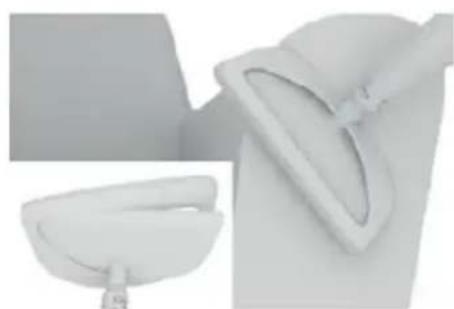
Close-up of a white plastic object with a curved handle, partially visible against a plain background (no text or symbols)To clean your windows and mirrors quickly and easily. The window squeegee diffuses steam evenly to clean and then wipes the surface to prevent streak formation. The tool can be used on any glass surface, for example on shower doors, oven windows or in your car.
natural_image
Exterior view of a modern office building (no signage)WINDOW SQUEEGEE WITH MICROFIBER
Attach the fabric to the window squeegee for use on furniture and furnishings
natural_image
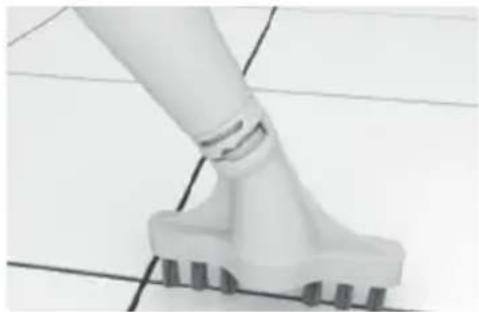
Close-up of a white plastic tool with a base and screw base, mounted on a grid surface (no text or symbols visible)SPECIAL SEAL BRUSH
Straight brush in width to clean the joints of floors and tiled surfaces.
Loosens dirt between tiles and joints. Can be used in hand-held mode and with the tube.
INSTRUCTIONS OF USE
FILL THE WATER TANK
NOTE: Do not remove or cut the small rubber valve on the top of the water tank cap (FIGURE 9-A). Do not turn the unit over when the water tank is full - water may escape through the valve.
- Make sure the steam control dial is in the "OFF" position.
- Twist the water tank cap a quarter of a turn in the "Unlock" direction (counterclockwise) indicated by the marking on the cap, then remove it.
- Carefully fill the cup to the maximum with water and pour the contents through the filling hole. Repeat the operation up to two times to fill the water tank to the maximum (the tank can hold 380 ml of water).
- NOTE: To minimize lime build-up and extend the life of your multifunction steam mop, we strongly recommend that you use distilled or deionized water.
- Replace the water tank cap. Press the cap on the water tank and make sure it is securely closed. Turn the plug a quarter turn clockwise (as indicated by the "Lock" mark) to lock it.
NOTE: The tube transferring water from the water tank to the boiler has a copper ball that acts as a weight. This is intended specifically to improve the efficiency of water use. It is therefore normal to hear a clicking sound from the water tank during use.
If you suspect the copper ball has dislodged from the tube, see the Troubleshooting Guide for the solution and reconnect it.
USING THE MULTIFUNCTIONAL STEAM BROOM
ASSEMBLE THE MULTIFUNCTIONAL STEAM BROOM
GENERAL INFORMATION
NOTE: Verify that the tank has been filled and that all desired accessories are connected before following these steps.
- Before first use, remove the plastic cover attached to the electrical plug, then plug it into an easily accessible wall outlet.
- Place the steam control dial from the "OFF" position to one of the following settings: LOW or HIGH (FIGURE 10). The Power LED will illuminate immediately to indicate that the unit is on and starting to heat up.
NOTE: Which steam setting to use depends on the task at hand. See general tips for the best steam setting for the job at hand.
- After about 30 seconds, you will hear a hum when the unit begins to emit steam.
- Orient the steam wand (with desired accessory if applicable) towards the surface you wish to steam. See the section on steaming the mop, as well as the sections on cleaning and steaming clothes for more information.
WARNING: Always make sure your accessories are pointed in a safe direction (away from yourself, other people, pets, and plants) when the appliance is spraying steam.
NOTE: It is recommended that you vacuum the floors before mopping them to remove dust and dirt particles.
- Check that the extension tube, mop head and microfiber cloth are properly installed. See “ASSEMBLING THE MULTIFUNCTIONAL STEAM BROOM” section
- To mop, make sure the extension tube is securely connected.
- Follow the General Instructions for Use to start using steam. See tips Select Steam Setting to choose the correct steam intensity setting for the surface you want to clean.
- Use a regular back and forth motion on the floor, pushing and pulling the broom. Work backwards to prevent you from stepping on the surface you just cleaned.
- The microfiber cloth is present to absorb the humidity generated during the passage of the mop. However, depending on the type of surface cleaned and the steam intensity setting used, residual moisture may persist. If so, we recommend that you simply allow the floor to air dry. You can use a fan to speed up the drying process.
•
NOTE: Set the steam control dial to the LOW setting to minimize the amount of moisture left on the floor.
NOTE: To avoid warping or damage from heat and humidity, use the Multi-Function Steam Mop on properly sealed surfaces.
The mop head is large, and it might be difficult to clean some types of floors (such as ceramic tiles) with deep joints.
To clean the joints between tiles more properly, it is recommended to use the multifunction steam mop in steam cleaning mode. See the Steam Cleaning section for more information.
ASSEMBLE THE MULTIFUNCTIONAL STEAM MOP
STEAM CLEANING
- Check that the desired cleaning accessories (jet nozzle, brush, multifunction head with window squeegee) are properly installed.
- For generally easier cleaning, remove the extension tube so that the steam mop can be used in hand-held mode.
-
Follow the General Instructions for Use to start using steam. See tips Select Steam Setting to choose the correct steam intensity setting for the surface you want to clean.
-
Direct the jet nozzle towards the surface to be steamed. Use a gentle back-and-forth motion on the surface to be cleaned to improve steam efficiency. To disinfect surfaces, turn the steam control dial to UP and hold the steam outlet about 20cm from the surface to be cleaned for at least 5 seconds. It will kill germs and bacteria with great efficiency.
- When using the window squeegee, first treat the glass or mirror thoroughly with steam, then turn off the steam. Then squeeze the squeegee against the top of the glass or mirror and gently pull it down. Do this by moving slowly from side to side until the entire surface is clean.
- Wipe the steamed surfaces with a clean cloth to remove loosened dirt. We recommend that you wipe down the surface in question while it is wet, but be careful when wiping metal surfaces, for example, as they can be hot.
STEAM TREATMENT OF CLOTHING
• Install the window squeegee with the microfiber wipe.
- For generally easier steam passage, remove the extension tube to use the steam mop in hand-held mode. However, you can use the extension tube to reach hard-to-reach places, such as tall curtains. MAKE SURE TO HOLD THE EXTENSION TUBE IN BOTH HANDS WHEN LIFTING IT.
- Follow the General Instructions for Use to start using steam. See tips Select Steam Setting to choose the correct steam intensity setting for the material you want to clean.
- For fabrics and bed linen, point the multifunction head towards the surface to be steamed and leave it there for three seconds. Use a gentle back-and-forth motion across the surface to be steamed to improve steam efficiency.
For the clothes :
- Hang the garment on a clean, rust-free hanger.
- Point the window squeegee with its microfiber cloth towards the bottom of the garment. Steam will rise on the interior and exterior
surfaces of the fabric, removing wrinkles. Gently slide the window squeegee with its microfiber wipe from the bottom to the top of the garment. Lift the multifunction head away from the garment and flatten it with your free hand.
- Repeat the operation as many times as necessary until the garment is cool and smooth.
General steaming tips:
- Curtains and draperies can be steamed as long as they are still hanging.
- To remove wrinkles from towels, handkerchiefs and napkins, wrap them around a rod or towel bar and gently steam them.
- Thicker fabrics may require multiple passes for best results.
• To remove the most stubborn folds, treat each side of the fabric. - Take special care when steaming delicate fabrics, as these are more fragile and can be stained by water.
SELECT STEAM SETTING
Below is a general list of possible use cases for the multifunction steam mop, organized by the intensity setting of the steam control dial. This list serves only as general advice for using your steam mop. You will likely find even more use cases for the unit all around your home. See the section on general steaming tips to learn more about what steam can do for you.
| LOW | Varnished / laminated parquetDelicate fabricsWooden furniture |
| MEDIUM | Most floors (sealed marble, stone and ceramic, vinyl, etc.)Counter surfacesBathroom fittingsThe majority of classic cleaning tasks |
| HIGH | Floors in high traffic areas (the HIGH setting is not recommended for parquet floors)Dirt and stubborn stains (stuck-on grease, etc.)Bed linen and thick fabrics |
NOTE: When passing steam, it is recommended to use the lowest possible setting on the steam control dial to achieve desired results in an easy and convenient way. Start with a lower setting and increase it only as needed to easily and quickly perform the task you want.
The higher steam setting increases the amount of moisture accompanying the steam.
GENERAL STEAM TREATMENT TIPS
You will find an almost limitless number of use cases for your multifunction steam mop. There is no rule regarding steam cleaning and / or the use of the accessories included with your appliance. Just use the attachment that seems to produce the best results, quickly and easily. Here are some tips to get started:
- For the majority of surfaces, it is usually sufficient to clean them with steam to disinfect them. Then simply wipe them off with a dry cloth, towel or paper towel.
Example: kitchen counters, microwaves, hobs, sinks and bathroom or kitchen fittings.
- Nylon brushes can be used on most surfaces to remove stubborn dirt, grime or general stains.
For example: burnt food stuck to oven doors or walls, burnt spills on hobs, stains on bathtubs and / or grease and grime in the kitchen, rubber seals on refrigerator doors, under / around bathtubs and bathroom fittings, and seams or joints between bathroom tiles.
- Nylo n brushes are also very effective in removing marks and stains from clothing and furniture. This can be done either with steam only or with a stain remover designed specifically for this. DO NOT put any type of chemicals or liquids in the steam mop. He can only accept water.
- The special floor main head with its microfiber fabric is designed primarily for working on floors, which includes linoleum, tile, marble, stone and more.
- When they have dried, some stains (on carpets or other surfaces) may need to be scraped off with one of the brushes and / or with a product intended to remove the mark / stain. It may be helpful to dab the area of the carpet or fabric in question with a clean towel. It may be helpful to dab the area of the carpet or fabric in question with a clean towel to remove the mark or stain.
- The copper round brush is useful for tough jobs like barbecue grill, oven rack, vehicle wheels, etc. DO NOT use this brush on a surface that may be damaged or scratched by hard bristles.
- The extension tube should be used for mopping floors, but it is also useful for reaching areas above you or hard to reach. When lifting the device to work on high areas, it is recommended to hold the tube with both hands to improve support.
CORRECT STORAGE
It's easy to prepare your multifunction steam mop for storage. When you are done using steam, follow the steps below.
- Unplug the electrical plug from the electrical outlet.
- Wait for the unit to cool down (at least 5 minutes)
- Remove all accessories from the unit.
- Remove the cap from the water tank and dispose of any remaining water in a sink or bathtub to limit lime build-up. Replace the water tank cap when finished.
- Retract the extension tube as far as possible (if space is limited), and wrap the power cord around the cord retainers.
- Store the multifunction steam mop in a cool, dry place with all the accessories.
REMOVE LIMESTONE
The most common maintenance task for appliances using steam is the removal of limescale which is formed by the high minerality of water from the water service. Lime build-up can limit the effectiveness of your multifunction steam mop and shorten its useful life.
The best way to combat lime build-up is to use distilled or deionized water in your multifunction steam mop. In any case, we recommend that you perform the cleaning procedure described below at least once a month to remove any deposits that form there. This will help extend the useful life of your multifunction steam mop and ensure that it works with the best performance.
- Follow the steps described in Correct Storage section above. However, do not replace the water tank cap at the end of STEP 4.
- Use the tip of a needle to remove the lime that has formed in the steam wand. You can do this with all the accessories like the jet nozzle.
- Use the measuring cup to make a solution consisting of approximately 100 ml of distilled water and 50 ml of white vinegar.
- Slowly pour this solution into the water tank through the fill hole, then replace the cap.
- Plug in the power cord, turn the steam control dial to HIGH, then spray the entire contents of the tank into a sink or tub.
- When the tank is completely empty, turn off the unit and fill it with 380 ml of distilled water. Return the steam control dial to UP and repeat the operation. If you used the water-vinegar solution, it may be necessary to repeat this step until the odor dissipates.
- Replace the water tank cap, unplug the power cord and store the multifunction steam mop as usual.
IMPORTANT: On average, it is recommended to perform this limescale removal operation once a month (if the device is used once a week). If you use it more frequently, it may be necessary to do it more often to ensure that the multifunction steam mop remains fully effective. Do not exceed 20 hours of use without performing the limescale removal operation.
TROUBLESHOOTING
| PROBLEM | POSSIBLE CAUSE | SOLUTION |
| The steam mop does not heat up. The power light does not turn on. | Unit is not plugged in. | Plug the electrical plug into the electrical outlet. |
| The circuit breaker / grounding switch has tripped or a lead has melted. | Turn on the breaker / groundswitch, or replace the fuse. If you need assistance, contact a qualified electrician. | |
| The steam mop heats up, but does not produce steam. The power indicator trun on.(NOTE: Always give the unit enough time to heat up and start producing steam.) | The water tank is empty. | Fill the water tank by following the procedure set out in this manual. |
| Limestone formation in the unit. | See the Limescale Removal section of this manual and follow the removal procedure. | |
| The copper ball acting as a weight at the end of the water tube may have come off. | If the copper ball comes loose from the tube, simply reattach it by snapping it into the black nozzle at the end of the tube. | |
| Steam production is weak or intermittent. | The steam control dial is in the DOWN position.Limestone formation in the unit. | Increase the steam control dial setting to MEDIUM or HIGH for a more powerful (and also wetter) steam flow.See the Limescale Removal section of this manual and follow the removal procedure. |
| Liquid water is mixed with the vapor stream. | The steam control dial is in the UP position. | On the HIGH setting, a small amount of water may be emitted with the steam. Reducing the steam control dial setting to MEDIUM or LOW will also reduce the presence of liquid water in the steam. |
| A clicking sound can be heard from the water tank. | This noise is produced by the copper ball connected to the end of the water tube in the water tank. | The copper ball is present precisely to help the unit use all the water in the tank more efficiently. |
TECHNICAL CHARACTERISTICS
- Voltage : 220-240V \~ 50-60Hz
- Power : 1500 W
- Water tank volume : 330ml
- Steam ready : 30 seconds
- Steam flow : 30g / min
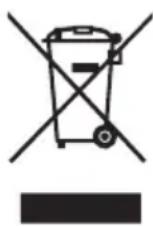
If this logo appears on the device, it means that it must be disposed of in accordance with Directive 2012/19 / EU on electronic and electrical equipment (WEEE).
All hazardous substances contained in electrical and electronic equipment can have adverse effects on the environment and human health.
Consequently, when this device is out of use, it should not be disposed of with unsorted municipal waste.
As the end consumer, your role is essential to ensure reuse, recycling or any other form of value creation for this device. You have several collection and recovery systems set up by your local authorities (recycling centers) and distributors.
You have an obligation to use these systems.
GUARANTEE:
The warranty does not cover wearing parts of the product, nor problems or damage resulting from:
(1) surface deterioration due to normal wear and tear of the product
(2) defects or deterioration due to contact of the product with liquids and due to corrosion caused by rust or the presence of insects;
(3) any unauthorized incident, abuse, misuse, modification, disassembly, repair;
(4) any improper maintenance operation, use not in accordance with the instructions concerning the product or connection to an incorrect voltage;
(5) any use of accessories not supplied or not approved by the manufacturer
The warranty will be void if the nameplate and / or serial number of the product is removed.
THOMSON is a trademark of Technicolor SA used under license By SCHNEIDER CONSUMER GROUP
Imported by: SCHNEIDER CONSUMER GROUP
12 rue Jules Ferry - 93110 Rosny-sous-Bois, FRANCE
- INFORMATIONS DE PRODUIT
- UTILISATION DES EMBOUTS
- La BUSE PRESICION
- BROSSES NYLON
- RACLETTE À VITRES
- RACLETTE A VITRE AVEC MICROFIBRE
- BROSSE SPECIALE JOINTS
- Multifunction steam mop
- IMPORTANT WARNINGS PLEASE READ THE SAFETY INSTRUCTIONS CAREFULLY BEFORE USING THE APPLIANCE AND SAVE FOR FUTURE REFERENCE.
- IMPORTANT
- DESCRIPTION OF THE APPLIANCE
- PRODUCT INFORMATION
- ASSEMBLE THE MULTIFUNCTIONAL STEAM BROOM
- Extension tube
- Main head for the floor
- Bit adapter
- CAUTION: The metal end of the jet nozzle heats up during use. Do not touch it to avoid burns.
- USE OF TOOLS-ACCESSORIES
- The PRESICION NOZZLE
- NYLON BRUSHES
- WINDOW SQUEEGEE WITH MICROFIBER
- SPECIAL SEAL BRUSH
- INSTRUCTIONS OF USE
- FILL THE WATER TANK
- USING THE MULTIFUNCTIONAL STEAM BROOM
- GENERAL INFORMATION
- ASSEMBLE THE MULTIFUNCTIONAL STEAM MOP
- STEAM CLEANING
- STEAM TREATMENT OF CLOTHING
- For the clothes :
- General steaming tips:
- SELECT STEAM SETTING
- GENERAL STEAM TREATMENT TIPS
- CORRECT STORAGE
- REMOVE LIMESTONE
- TECHNICAL CHARACTERISTICS
- GUARANTEE:
Brand : THOMSON
Model : THSM2015M
Category : Steam cleaner