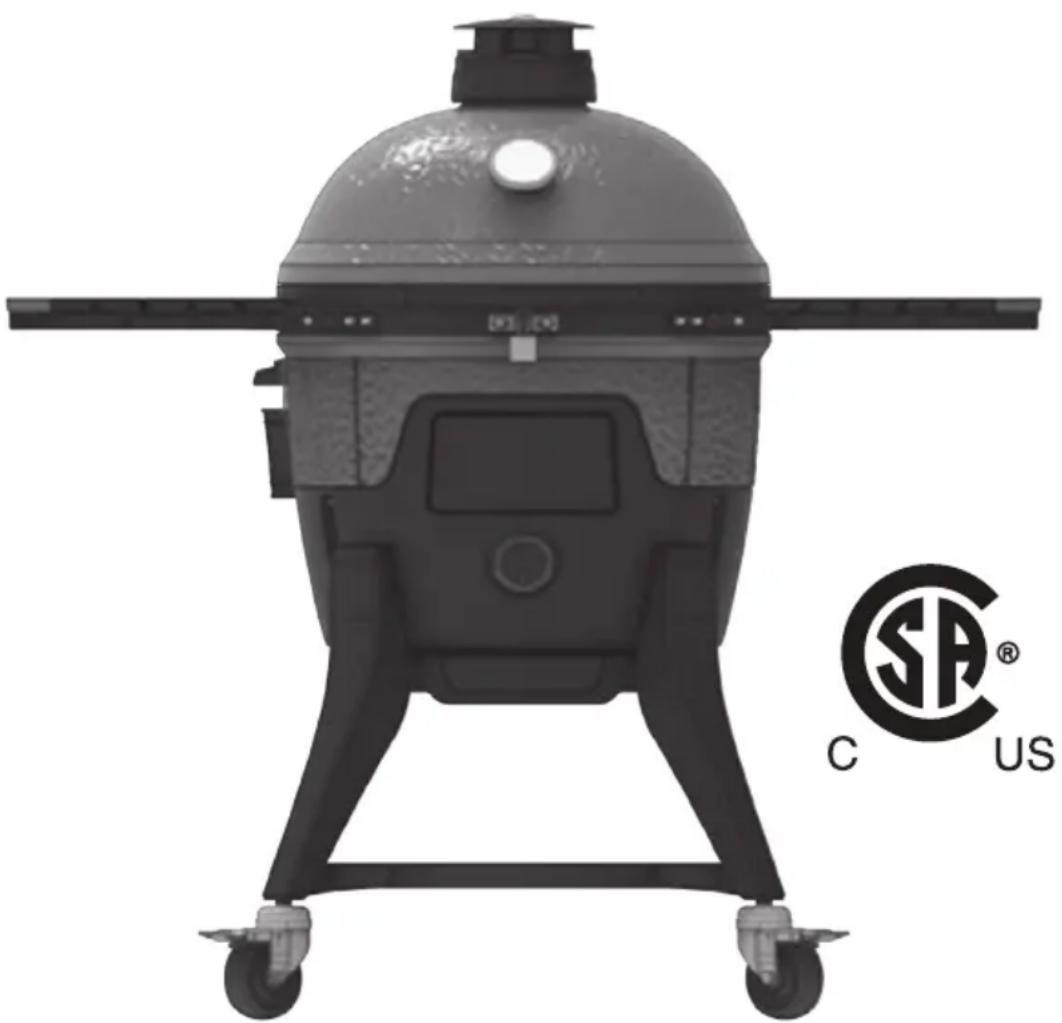
Pellet - Barbecue Kamado Joe - Free user manual and instructions
Find the device manual for free Pellet Kamado Joe in PDF.

| Product type | Kamado-style wood pellet barbecue |
| Brand | Kamado Joe |
| Model | Pellet Joe |
| Usage | Outdoor use only |
| Fuel | Food-grade wood pellets (natural, no additives) |
| Hopper capacity | 4.5 kg maximum |
| Power supply | 100-120 V~, 5 A, 50/60 Hz, 120 W |
| Control | Rotary knob with preset positions (Off, Smoker, BBQ, Sear, WiFi) and Kamado Joe app via WiFi |
| Temperature range | 95°C to 315°C (zones: smoking, roasting, searing) |
| Cooking surface | 2 half-moon grates (chrome-plated steel) |
| Included accessories | Drip pan, heat deflector, meat thermometer, WiFi antenna, grease bucket with aluminum liners |
| Shell material | Ceramic and steel |
| Cleaning | High-temperature self-cleaning (cycle at 315°C for 10 min); brush the grates |
| Safety | Automatic shut-off with cooling fan, overheat detection, auger lock, temperature probe, error codes |
| Warranty | See Kamado Joe website for details |
Frequently Asked Questions - Pellet Kamado Joe
User questions about Pellet Kamado Joe
0 question about this device. Answer the ones you know or ask your own.
Ask a new question about this device
Download the instructions for your Barbecue in PDF format for free! Find your manual Pellet - Kamado Joe and take your electronic device back in hand. On this page are published all the documents necessary for the use of your device. Pellet by Kamado Joe.
USER MANUAL Pellet Kamado Joe
A GUIDE TO KAMADO COOKING
text_image
C US SA®PELLETJOE
Table of Contents
Warnings 2
Parts List & Tools Required 8
Grill Set-Up Instructions 9
Assembly Instructions 10
Quick Start Guide 16
Wifi 17
Air Lift Hinge Adjustments 18
Latch Adjustments 19
Cleaning & Care 20
Part Replacement 21
Trouble Shooting 22
WARNING
- This manual contains important information necessary for the proper assembly and safe use of the appliance.
- READ AND FOLLOW ALL WARNINGS AND INSTRUCTIONS BEFORE ASSEMBLING AND USING THE APPLIANCE.
- KEEP THIS MANUAL FOR FUTURE REFERENCE.
- Contact local building or fire officials about restrictions and installation inspection requirements in your area.
Failure to follow these instructions could result in fire, explosion or burn hazard which could cause property damage, personal injury or death.
CARBON MONOXIDE HAZARD
Burning pellets gives off carbon monoxide, which has no odor and can cause death. Use only outdoors where it is well ventilated. Follow these guidelines to prevent this colorless, odorless gas from poisoning you, your family or others. Pellets do not come with this grill.
- Know the symptoms of carbon monoxide poisoning: headache, dizziness, weakness, nausea, vomiting, sleepiness and confusion. Carbon monoxide reduces the blood's ability to carry oxygen. Low blood oxygen levels can result in loss of consciousness and death.
- See a doctor if you or others develop cold or flu-like symptoms while cooking or in the vicinity of this appliance. Carbon monoxide poisoning, which can easily be mistaken for a cold or flu, is often detected too late.
- Alcohol consumption and drug use increase the effects of carbon monoxide poisoning.
- Carbon monoxide is especially toxic to mother and child during pregnancy, infants, the elderly, smokers and people with blood or circulatory system problems, such as asthma or heart disease.

WARNINGS AND IMPORTANT SAFEGUARDS READ ALL INSTRUCTIONS
- WARNING! This grill will become very hot. Do not move it during operation.
- WARNING! Do not use indoors!
- WARNING! Never use gasoline-type lantern fuel, kerosene, charcoal lighter fluid, or similar liquids to start or freshen up a fire in this grill. Keep all such liquids well away from the grill when in use.
- WARNING! Keep children and pets away from grill at all times. Do NOT allow children to use grill. Close supervision is necessary when children or pets are in the area where grill is being used.
text_image
Warning symbols and pictograms for outdoor activities including heating, cooking, and gathering with icons• A MAJOR CAUSE OF FIRES IS FAILURE TO MAINTAIN REQUIRED CLEARANCES (AIR SPACES) TO COMBUSTIBLE MATERIALS. IT IS OF UTMOST IMPORTANCE THAT THIS PRODUCT BE INSTALLED ONLY IN ACCORDANCE WITH THESE INSTRUCTIONS.
- Do not use the grill in a confined and/or habitable space e.g. houses, tents, caravans, motor homes, boats. Danger of carbon monoxide poisoning fatality.
- Always use grill in accordance with all applicable local, state and federal fire codes.
- Before each use check all nuts, screws and bolts to make sure they are tight and secure.
- Never operate grill under overhead construction such as roof coverings, carports, awnings or overhangs.
- Grill is for OUTDOOR USE ONLY.
- Keep a minimum 10 ft. (3m) clearance of all combustible materials such as wood, dry plants, grass, brush, paper or canvas. Extension cords may be used if care is exercised in their use (See page 7).

WARNINGS AND IMPORTANT SAFEGUARDS
- Never use grill for anything other than its intended use. This grill is NOT for commercial use.
- Accessory attachments that are not expressly designed for this grill are NOT recommended and may cause injury.
- Use of alcohol, prescription or non-prescription drugs may impair user's ability to assemble or safely operate grill.
- Keep a fire extinguisher accessible at all times while operating grill.
- When cooking with oil or grease, have a type BC or ABC fire extinguisher readily available.
- In the event of an oil or grease fire do not attempt to extinguish with water. Immediately call the fire department. A type BC or ABC fire extinguisher may, in some circumstances, contain the fire.
- Use grill on a level, non-combustible, stable surface such as dirt, concrete, brick or rock. An asphalt surface (blacktop) may not be acceptable for this purpose.
- Grill MUST be on the ground. Do not place grill on tables or counters. Do NOT move grill across uneven surfaces.
- Do not use grill on wooden or flammable surfaces.
- Keep grill clear and free from combustible materials such as gasoline and other flammable vapors and liquids.
- Do not leave grill unattended.
- Do NOT allow anyone to conduct activities around grill during or following its use until it has cooled.
- Never use glass, plastic or ceramic cookware in grill. Never place empty cookware in grill while in use.
- Never move grill while in use. Allow grill to cool completely (below 115°F (45°C)) before moving or storing.
- Do not store grill with hot ashes or pellets inside grill. Store only when fire is completely out and all surfaces are cold.
- Never use grill as a heater. READ CARBON MONOXIDE HAZARD.
- Use only food grade wood pellets. Do not use heating fuel pellets labeled as having additives.
- The grill is HOT while in use and will remain HOT for a period of time afterwards and during cooling process. Use CAUTION. Wear protective gloves/mitts.
- DO NOT bump or impact the grill to prevent personal harm, damage to grill or spillage/splashing of hot cooking liquid.

WARNINGS AND IMPORTANT SAFEGUARDS
- Be careful when removing food from grill. All surfaces are HOT and may cause burns. Use protective gloves/mitts or long, sturdy cooking tools for protection from hot surfaces or splatter from cooking liquids.
- Do not touch HOT surfaces.
- Grill is HOT during use. To avoid burns, keep face and body away from vents and when opening lid. Steam and hot air are expelled during use.
- When cooking above 350°F (175°C), carefully open the grill (or burp the grill) each time you lift the grill dome to prevent flashback – a surge of white-hot heat caused by a rush of oxygen. Partially opening the lid 2-3 inches (5-8cm) and allowing heat to escape for about 5 seconds should prevent this.
- Air dampers are HOT while the grill is in use and during cooling. Wear protective gloves when adjusting.
- Grill has an open flame. Keep hands, hair and face away from flame. Loose hair and clothing may catch fire.
- DO NOT obstruct flow of combustion and ventilation.
- Do not cover cooking racks with metal foil. This will trap heat and may cause damage to the grill.
- Always use appliance in accordance with all applicable local, state and federal fire codes.
- Disposal of Ashes - Ashes should be placed in a metal container with a tight fitting lid. The closed container of ashes should be placed on a noncombustible floor or on the ground, well away from all combustible materials, pending final disposal. If the ashes are dispersed of by burial in soil or otherwise locally dispersed, they should be retained in the closed container until all cinders have thoroughly cooled.
- Do not store appliance with HOT ashes inside appliance. Store only when all surfaces are cold.
- When using electrical appliances, basic safety precautions should always be followed including the following: 1) Do not plug in the appliance until fully assembled and ready for use. 2) Use only approved grounded electrical outlet. 3) Do not use during an electrical storm. 4) Do not expose appliance to rain or water at anytime.

WARNINGS AND IMPORTANT SAFEGUARDS
- To protect against electrical shock do not immerse cord, plug or control panel in water or other liquid.
- Do not operate any appliance with a damaged cord or plug, or after appliance malfunctions or has been damaged in any manner.
- Extension cords may be used if care is exercised in their use.
- If an extension cord is used: 1. The marked electrical rating of the extension cord should be at least as great as the electrical rating of the appliance; and 2. The cord should be arranged so that it will not drape over a counter top or tabletop where it can be pulled by children or tripped over unintentionally.
- The extension cord must be a grounding-type 3-wire cord.
- Outdoor extension cords must be used with outdoor use products and are marked with suffix "W" and with the statement "Suitable for Use with Outdoor Appliances."
- CAUTION - To reduce the risk of electric shock, keep extension cord connection dry and off the ground.
- Do not let cord hang on or touch hot surfaces.
- Do not place cord on or near a hot gas or electric burner, or in a heated oven.
- Fuel, such as charcoal briquettes, wood chips or chunks, or heating fuel pellets, are not to be used in the appliance.
- To disconnect, turn controller "OFF" then remove plug from outlet.
- Unplug from outlet when not in use and before cleaning. Allow appliance to cool completely before adding/removing racks, grease deflector or water tray.
- Do not clean this product with a water sprayer or the like.
• Always operate grill on a level surface. - You must only use all natural wood pellets that have been designed for burning in pellet barbecue grills. Do not use pellet fuel with additives.

ELECTRIC REQUIREMENTS
- USA/CA 100-120VAC, 5AMP, 50/60HZ, 120W, 3-Prong Grounded Plug.
⚠️ WARNINGS AND IMPORTANT SAFEGUARDS
CREOSOTE - FORMATION AND NEED FOR REMOVAL.
When wood pellets are burned slowly, they produce tar and other organic vapors that combine with expelled moisture to form creosote. The creosote vapors condense in the relatively cool air damper exhaust of a slow burning fire. As a result, creosote accumulates on the air damper and grill lining. When ignited, this creosote makes an extremely hot fire. The drip tray should be inspected often for signs of grease buildup. When creosote or grease has accumulated, it should be removed to reduce the risk of fire.
WARNING! It is important to follow these steps if, at any time, the smoker fails to light, or the fire in the crucible goes out while cooking or smoking, when sufficient pellets are still in the pellet hopper. Failure to do so may cause a hazardous “over-firing” of your grill due to an excess of unburned pellets in the crucible.
1) Turn the ON/OFF dial to turn OFF the grill. Once the fan has stopped, unplug the power cord. If the grill is still hot, allow it to thoroughly cool. Open the lid and remove all food, all grates, drip tray and the heat deflector.
2) WARNING! Remove all unburned pellets and ash from inside and around the crucible (see instructions for proper handling and disposal of ash in CLEANING and CARE INSTRUCTIONS).
3) Before replacing the heat deflector, drip tray and all grates, plug the power cord into an appropriate, grounded electrical outlet and restart the grill. Pellets should fall into the crucible and the element should begin to heat CAUTION! Do not touch it.
4) If this procedure is successful, you will soon see flames come out of the crucible. Then turn the ON/OFF dial to turn OFF the grill. Let the grill cool down. Position the heat deflector, the drip tray and grates in their proper locations. Turn the ON/OFF dial to ON position. Set the temperature. In approximately 2 minutes you will notice whitish-gray smoke coming out of the grill as the pellets ignite.
SAVE THESE INSTRUCTIONS

text_image
MAINTAIN A MINIMUM DISTANCE OF 10 FT. (304.8CM) FROM OVERHEAD CONSTRUCTION, WALLS, RAILS OR OTHER STRUCTURES.
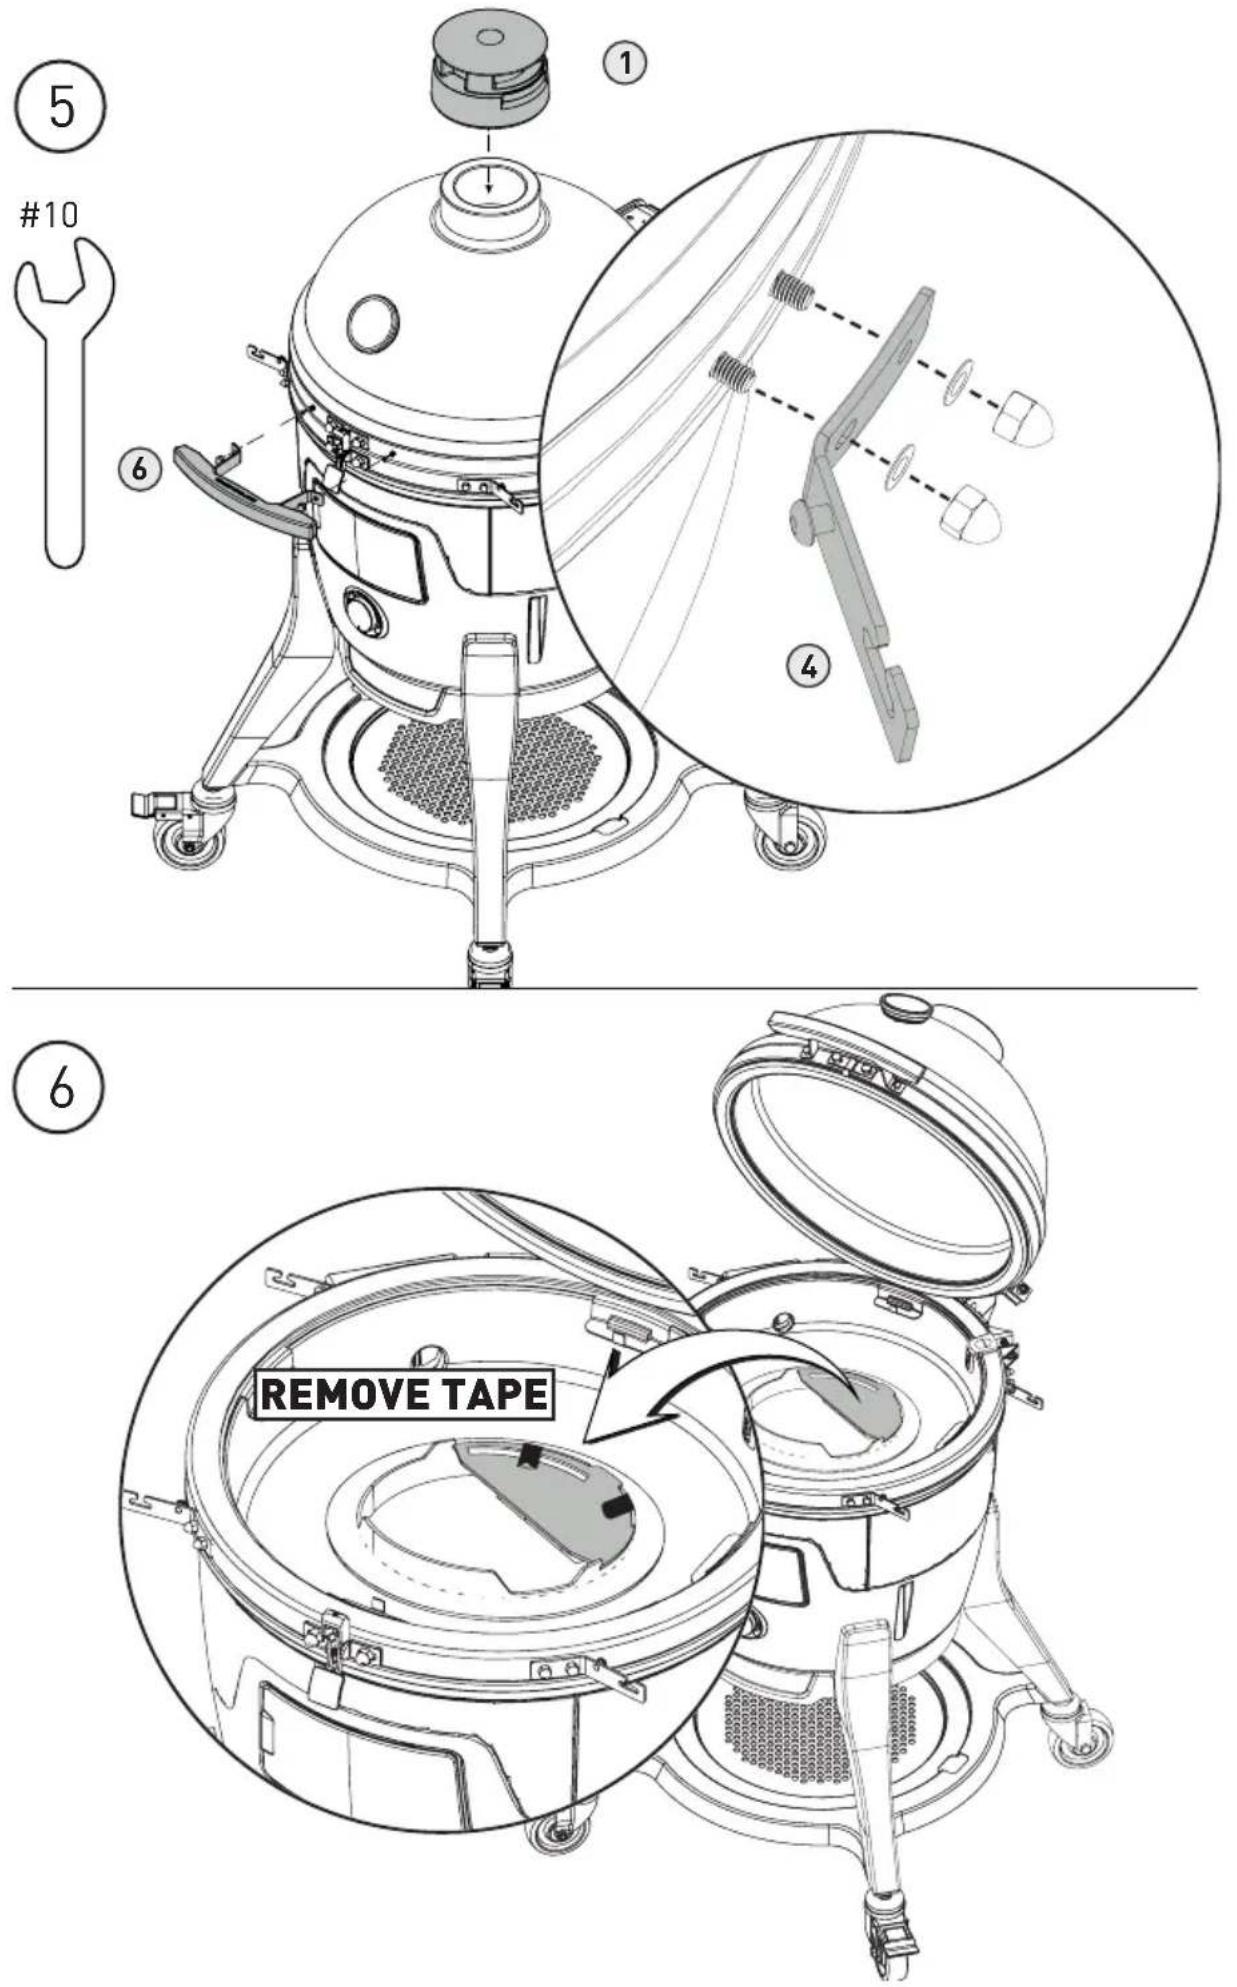
- PELLET JOE TOP VENT (1)
- DRIP TRAY (1)
- HALF GRATES (2)
- SIDE SHELF BRACKETS (4)
- PELLET JOE ASSEMBLY (1)
- FRONT HANDLE (1)
- LEGS (4)
- TOP PLATE (1)
- BOTTOM PLATE (1)
- CASTERS (2)
- LOCKING CASTERS (2)
- LEFT SIDE SHELF (1)
- RIGHT SIDE SHELF (1)
- PELLET SCOOP (1)
- GRATE GRIPPER TOOL (1)
- GREASE ROOF (1)
- GREASE BUCKET (1)
- FOIL GREASE BUCKET LINER (3)
- MEAT PROBE (2)
- WIFI ANTENA (1)
- POWER CORD (1)
- HINGE DISENGAGEMENT TOOL KIT (1)
Grill Set-Up
PELLET JOE GRILL
1 Due to the weight of this grill, we highly recommend two people lift the grill. Do NOT lift the grill by the side shelf tabs. Use the rear hinge and front hopper opening as lifting points.
2 Remove the plastic wrapping from the base of the grill cart.
3 Assemble the grill cart and lock the casters on the grill cart.
4 With the same lifting technique used previously, lift the grill into the cart. Adjust the grill in the cart so the pellet hopper is facing the front of the cart. The front side of the cart is the side with the two locking casters.
UNBOXING YOUR GRILL
- Assemble the grill cart and lock the front casters on the grill cart. See assembly steps 1 - 3.
- Due to the weight of this grill, it is recommended two people lift the grill. Use the rear hinge and front hopper opening as lifting points. Pull out the pellet load chute and use the hopper opening.
- Place the grill in the cart so the pellet hopper is facing the front. The front side of the cart is the side with the two locking casters.
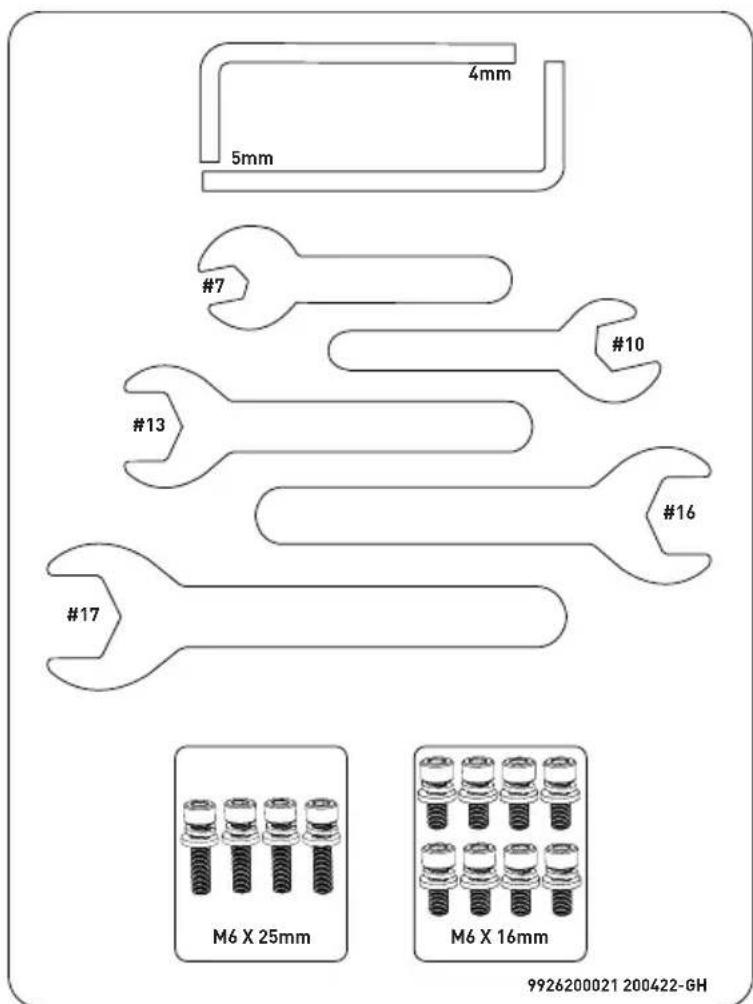
Hardware
text_image
4mm 5mm #7 #10 #13 #16 #17 M6 X 25mm M6 X 16mm 9926200021 200422-GH
text_image
M6X16 X4 M6 X4 M6 X4 ① ⑦ ⑦ ⑦ ⑧ ⑧ 5mm ⑦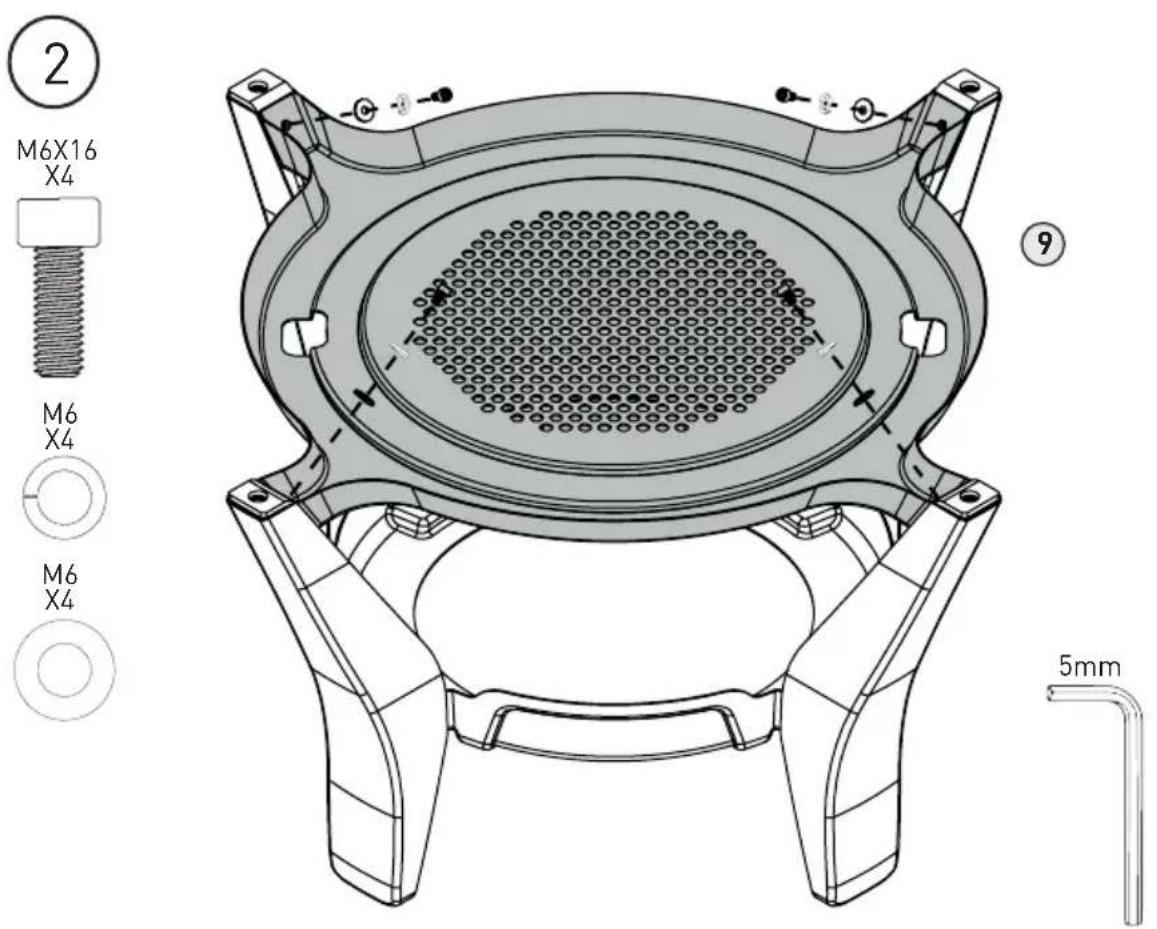
text_image
2 M6X16 X4 M6 X4 M6 X4 9 5mm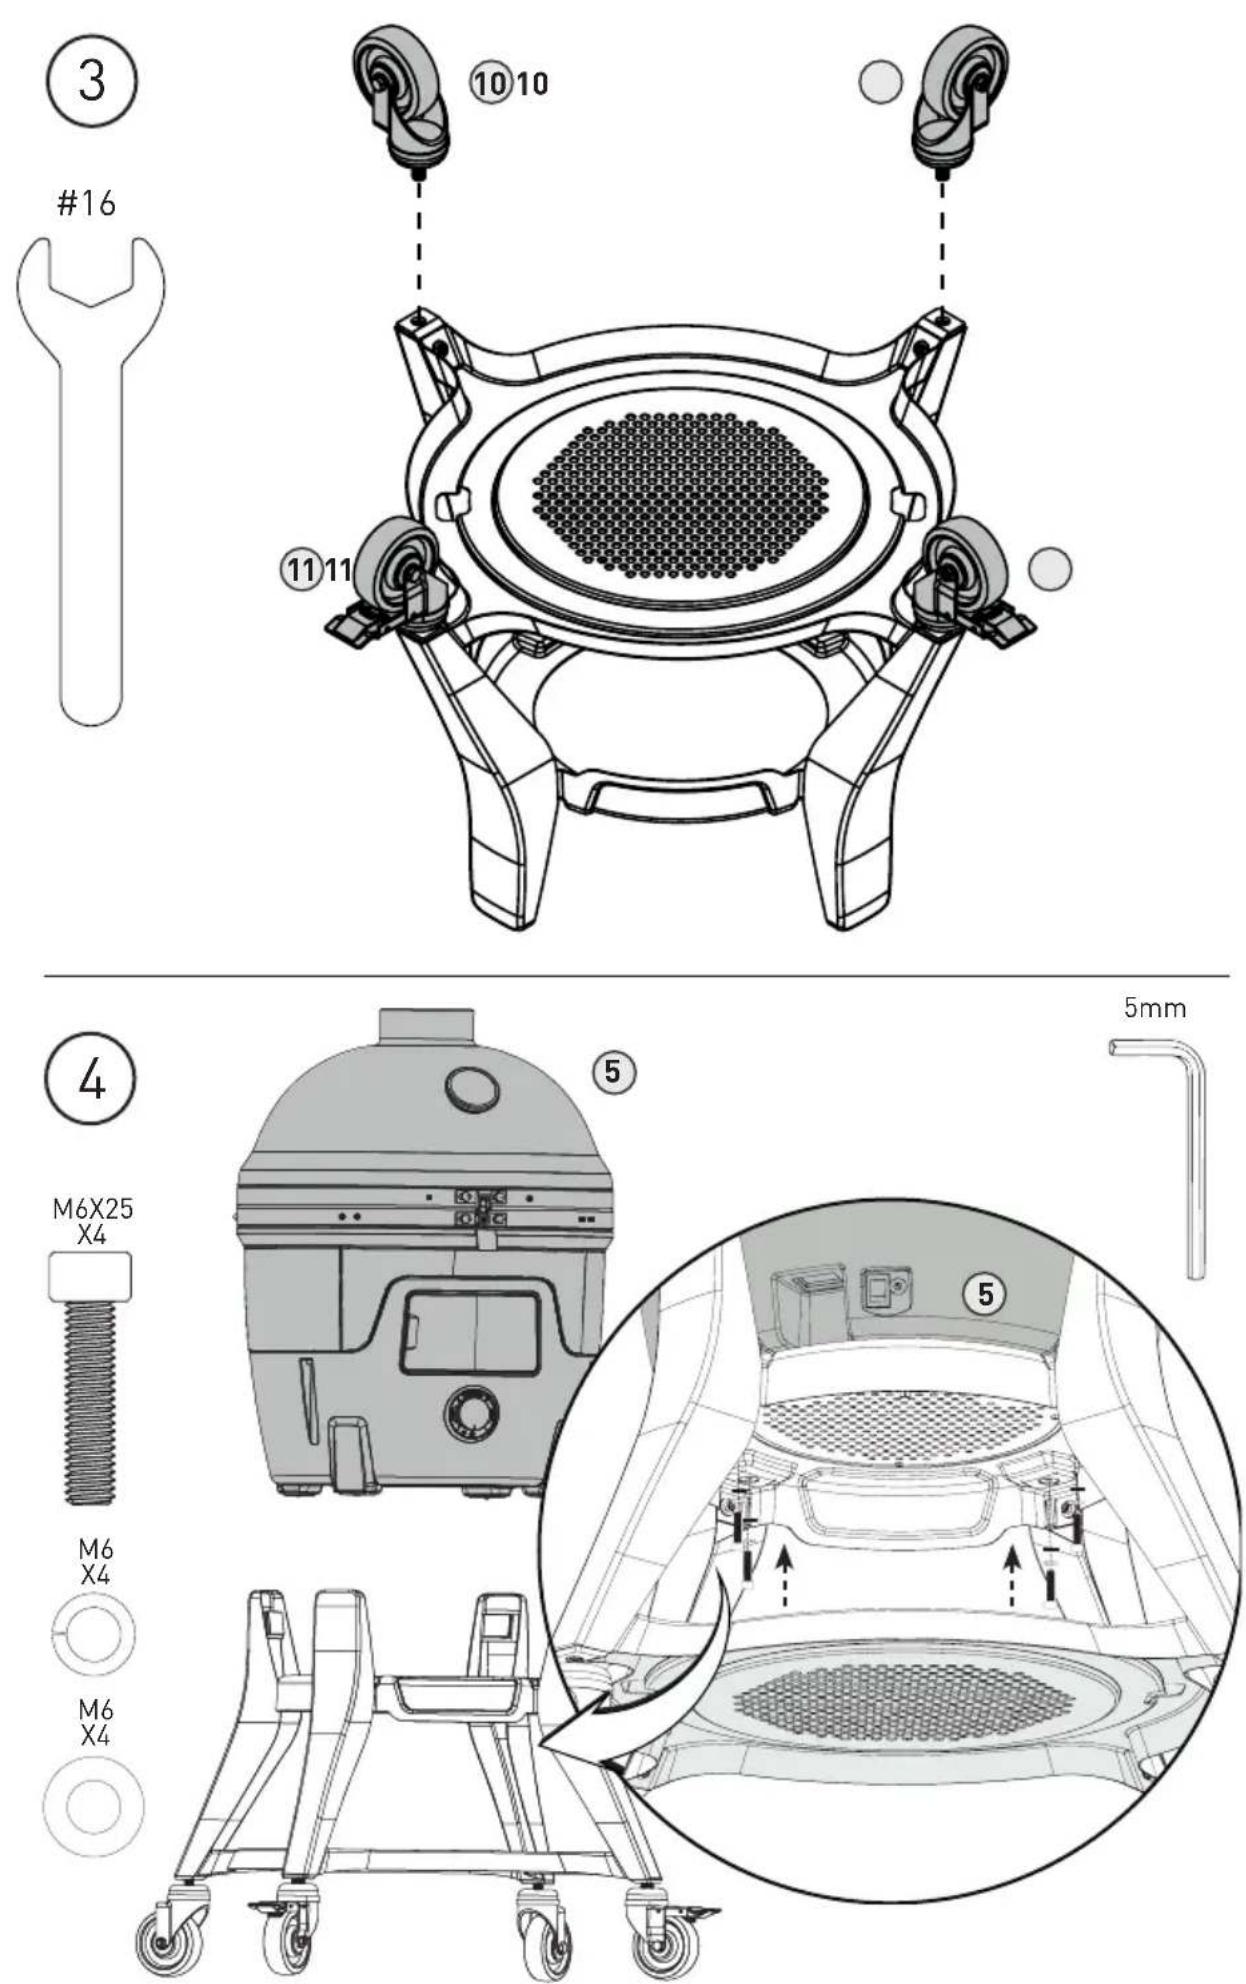
text_image
Technical diagram of a vacuum cleaner with labeled parts and exploded view, including wrench, wrench handle, and component details.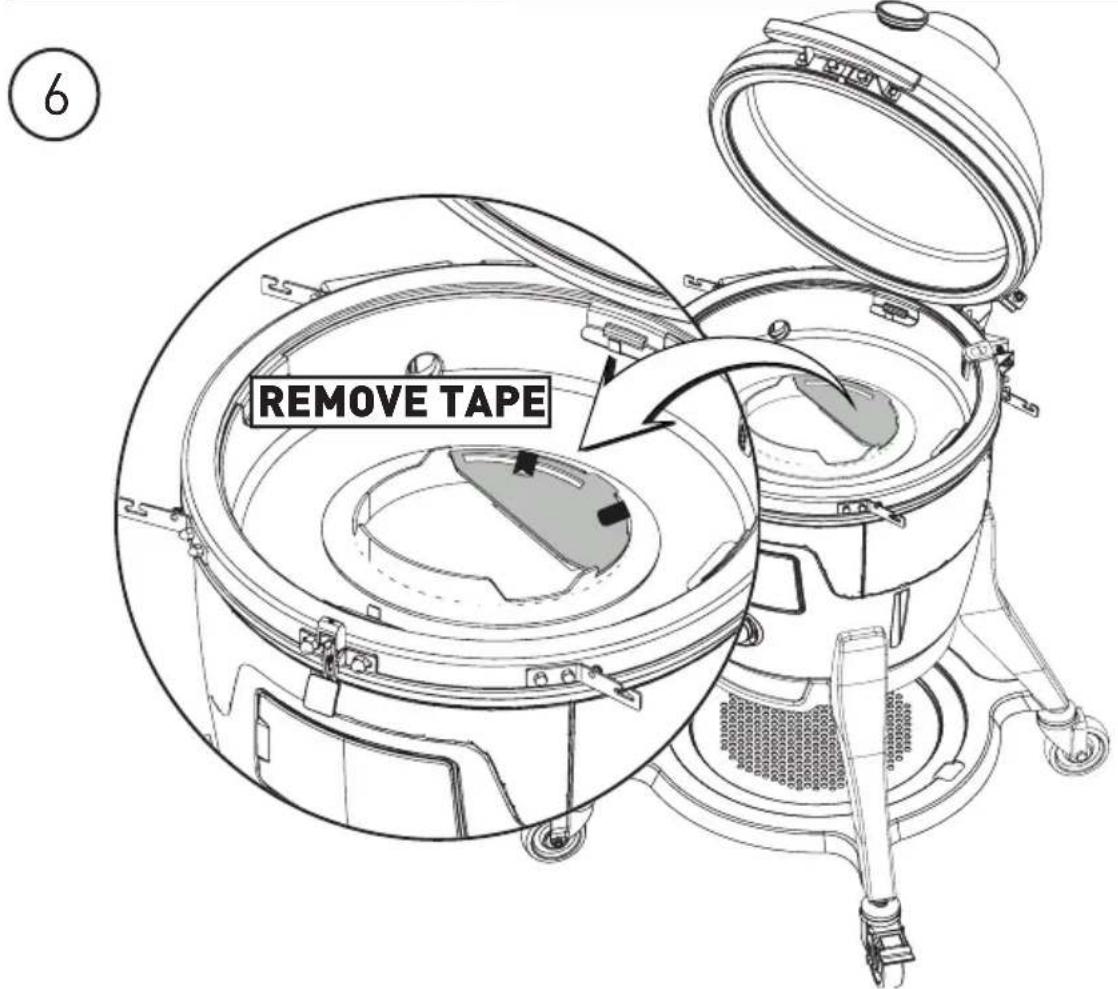
text_image
6 REMOVE TAPE
text_image
Technical diagram of a vacuum cleaner with labeled parts and a circular inset showing the internal mechanism.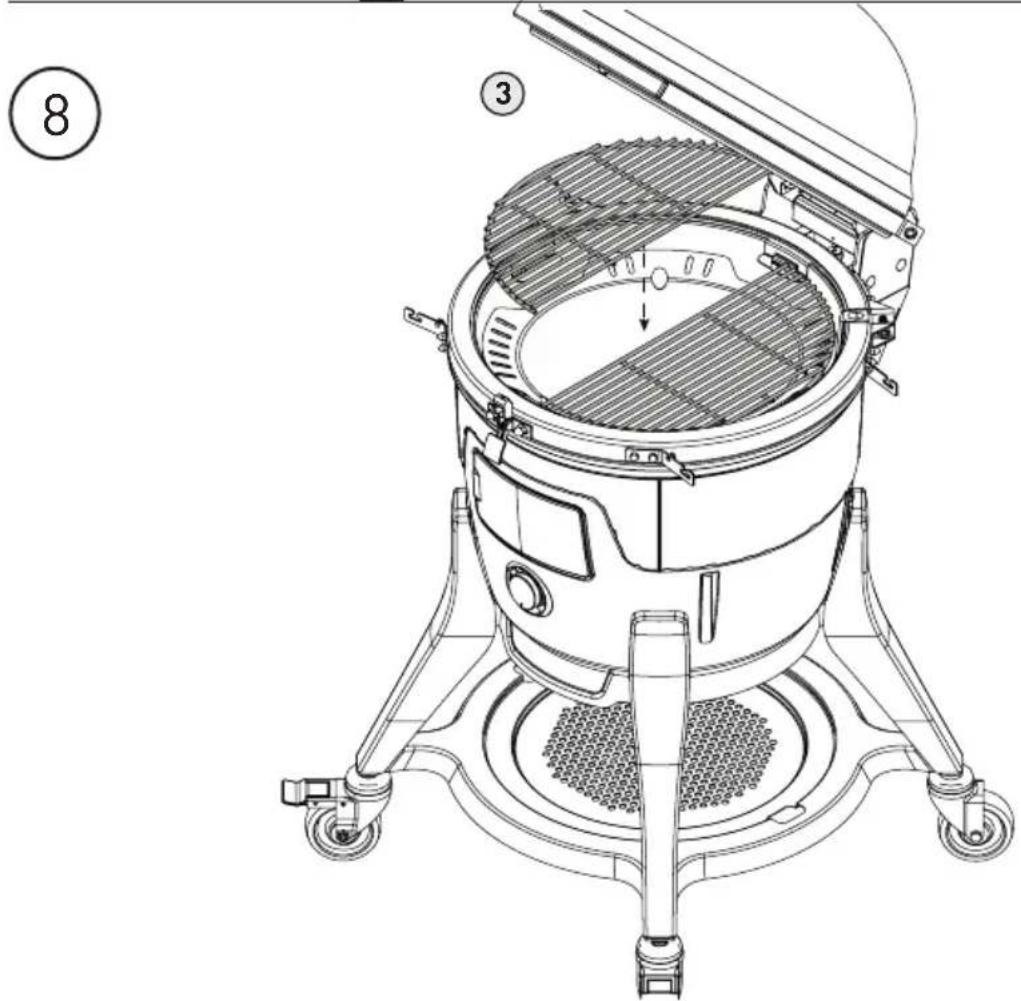
natural_image
Technical line drawing of a vacuum cleaner with labeled parts (8 and 3), showing internal structure and mounting base (no text or symbols beyond labels)
text_image
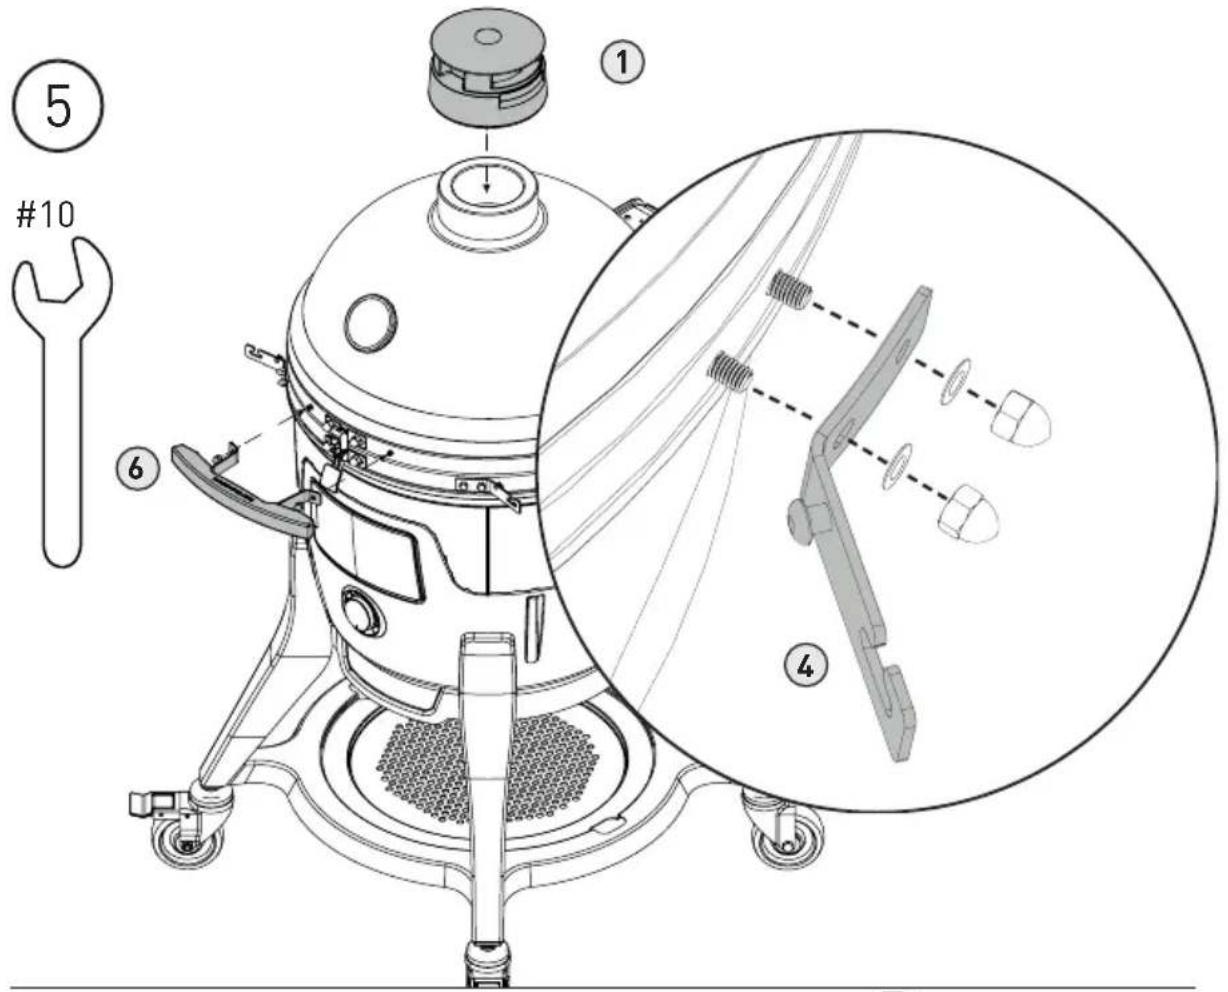
9 M5X10 X2 4mm 16 18 17
text_image
10
Quick Start Guide
1 Before turning the grill on, fill the hopper with up to 10lbs. of food grade wood pellets.
2 To turn the grill on, plug it in and flip the switch on the back of the grill. A status light will illuminate near the Probe Ports on the back of the grill.
3 Turn the front knob to the desired temperature or, turn the knob to the wifi setting to control wirelessly via the app. If the knob is not turned to wifi, the app will not be able to control the grill.
4 ALWAYS KEEP TOP VENT IN OPEN POSITION WHEN OPERATING THE GRILL.
5 Vent should be opened anytime the grills ON.
6 Once cooking is complete turn the knob to the off position. Do not unplug or power off the grill at this time. The grill is off, but the fan will continue to run for 15 minutes. This will prevent any burn back in the auger. Once the fan has automatically shut off, flip the switch on the back of the grill. Once the grill has cooled, unplug the grill, cover, and store in dry environment.
7 Close vent after grill is OFF and has completed the shutdown sequence.
8 Always store pellets in a cool dry place. Any contact or exposure to moisture will result in lower heat output or cause the pellets to swell and break apart. Use a moisture proof, resealable tub or bucket for proper storage.
9 If the grill is stored outside during the rainy season or seasons of high humidity, care should be taken to insure that water does not get into the hopper. When wet or exposed to high humidity, wood pellets will expand greatly, decompose, and may jam the feed system. Always disconnect the power, before performing any service or maintenance.
ADDITIONAL INFO:
1 Hopper door must be closed in order for the Pellet Joe to run.
2 The Pellet Joe takes approximately 10 minutes for the pellets to fully ignite. An additional 10 minutes is required to reach the set temperature.
3 Convection air can cause the temperature on the Lid Thermometer to vary slightly from the set temperature.
4 Never open grill lid while the grill smoking heavily, this could cause the pellets suddenly ignite which could result in injury. Keeping the lid closed will control and contain the pellet ignition.
5 Clean-burning barbecue wood pellets generate about 8200 BTU's per pound with very little ash, a low moisture content (5-7%), and are carbon neutral.
text_image
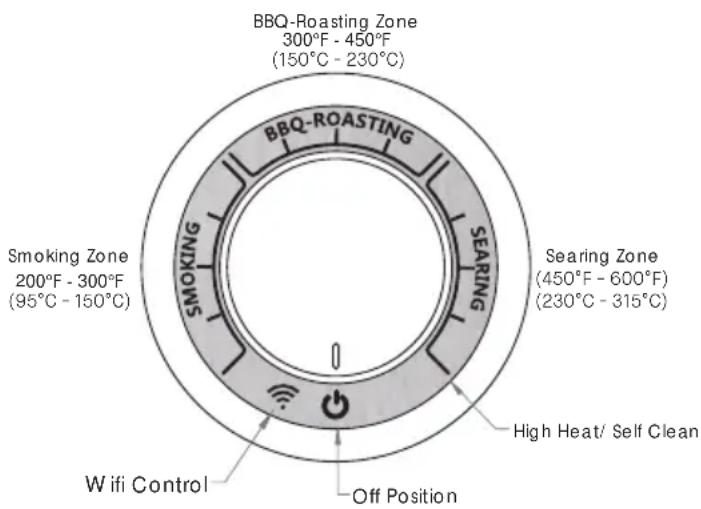
BBQ-Roasting Zone 300°F - 450°F (150°C - 230°C) BBQ-ROASTING SEARING Smoking Zone 200°F - 300°F (95°C - 150°C) Searing Zone (450°F - 600°F) (230°C - 315°C) High Heat/ Self Clean Wifi Control Off PositionWiFi
DEVICE PROVISIONING
- Download the Kamado Joe app from the Apple App Store or Google Play Store onto your smart device(s).
- Once the download is complete, open the Kamado Joe app and follow the instructions for provisioning grill and smart device(s).
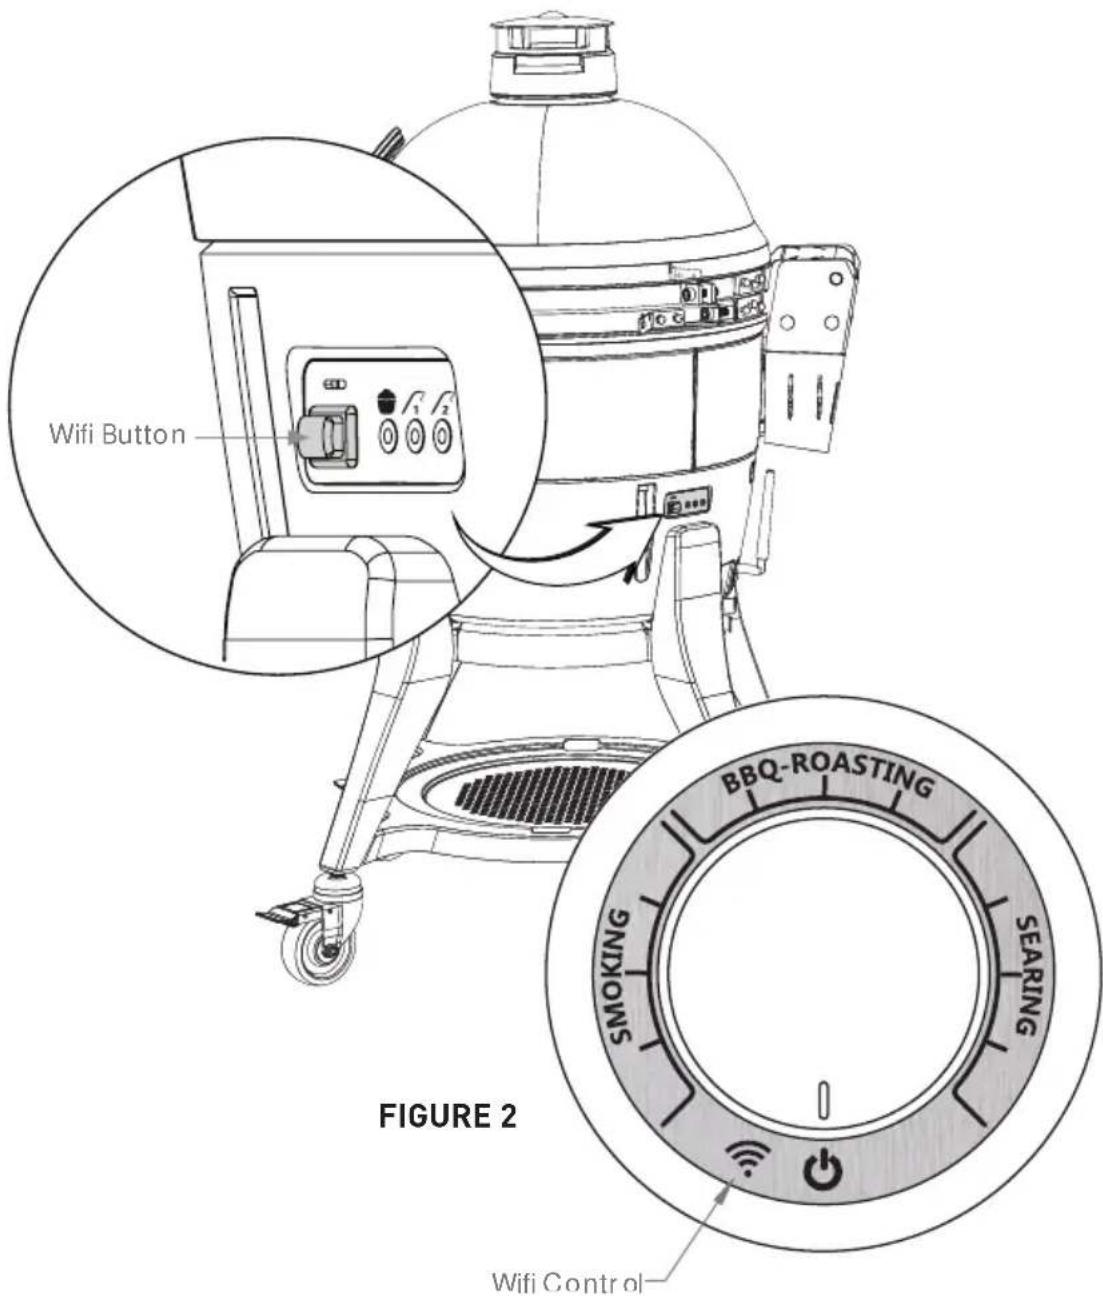
USING WIFI TO CONTROL GRILL
-
Rotate the front knob to the wifi setting. [see figure 2] if the knob is not turned to wifi, the app will not be able to control the grill.
-
Follow in app directions.
text_image
Wifi Button BBQ-ROASTING SEARING SMOKING WiFi Control FIGURE 2Classic Air Lift Hinge Adjustments
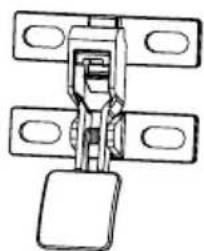
The Air Lift Hinge on your Pellet Joe is already pre-adjusted for ideal balance and stability. Follow these instructions for any additional adjustment to suit your personal preferences.
Caution: Air Lift Hinge under high tension.
PELLET JOE HINGE
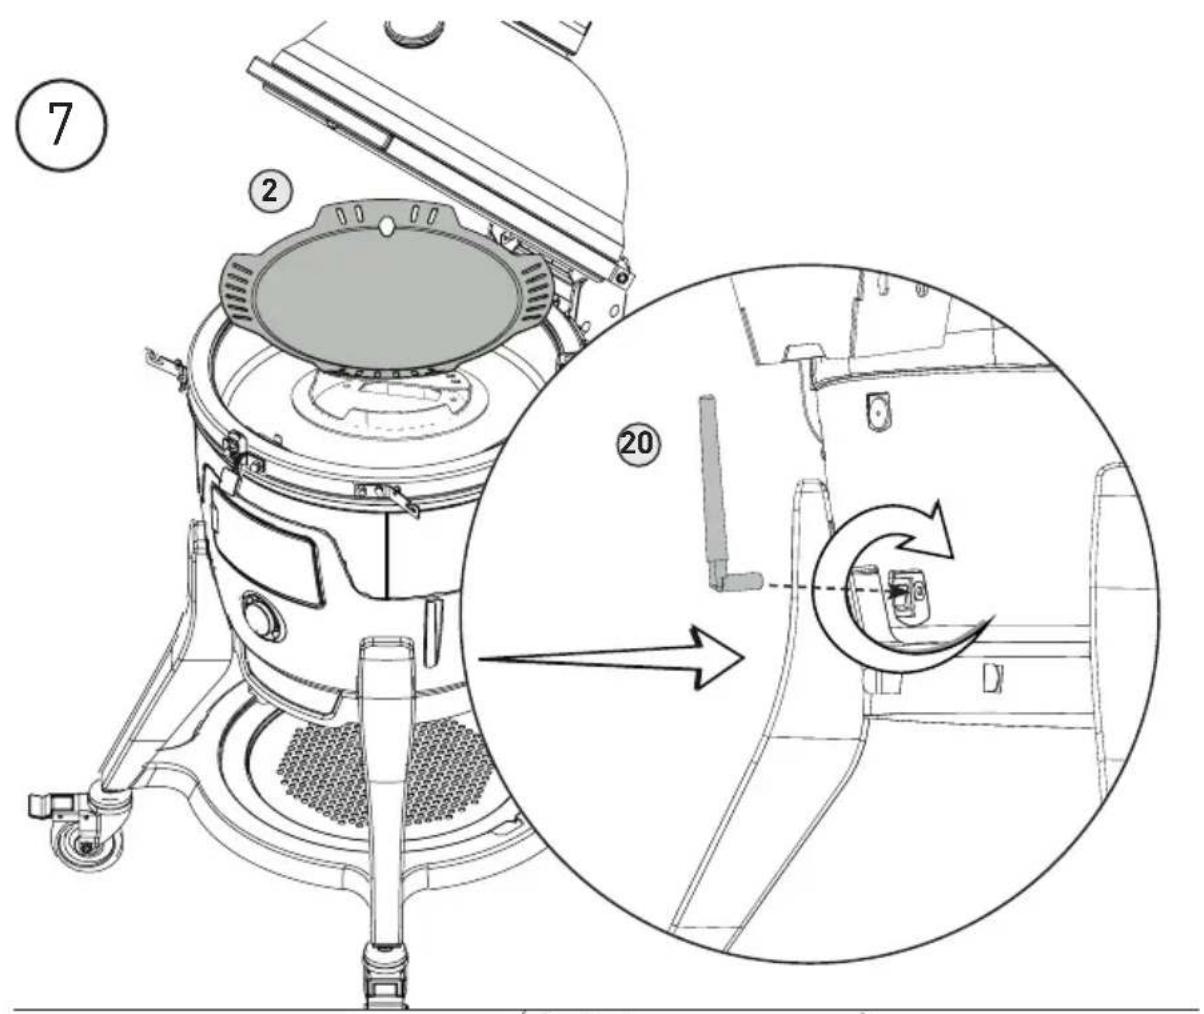
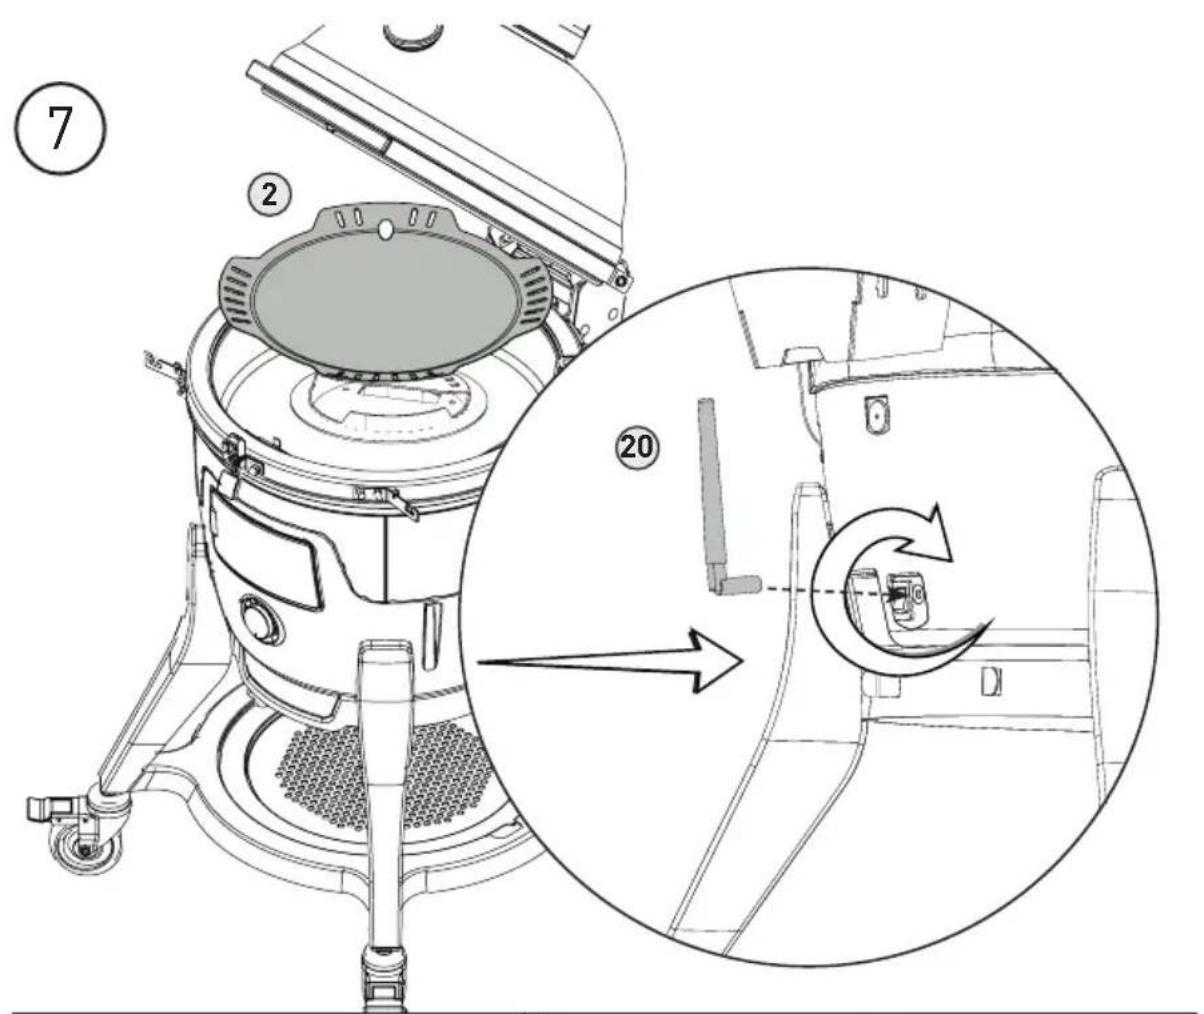
1 Open the dome of your Pellet Joe grill.
2 With the dome open, place wrench on the flats on the screw (see Inset 1). If your unit does not have the flats, place a socket wrench on the bottom end of the screw instead wrench (see Inset 2).
3 Place wrench on the nut on top of the spring retainer (see Inset 1).
4 To make the dome easier to raise, hold one wrench stationary and rotate the other wrench clockwise as shown. Remove the wrenches and check the dome action for every full rotation of the nut. If you want the dome to feel heavier, rotate the nut counter-clockwise. Remove the wrenches and check the dome action for every full rotation of the nut. Do not adjust the nut so that it contacts the nut under the connector (see Inset 1).
HINGE SAFETY INFORMATION
Do not attempt to disassemble the hinge from your grill
without the proper hardware. If attempting to use the hinge as a lifting point, grasp the hinge near the mounting point and/or bands, not the bottom. Only minor adjustments to the weight of the dome should be made per the instructions on the previous page.

Latch Adjustments
The latch on your Pellet Joe is already preset for an ultra-tight seal. Use these instructions if any adjustments should be needed.
PELLET JOE LATCH
To tighten and loosen the latch setting, use a small Allen wrench. Adjust the set screw to lower the latch plate and add the spacer. Once the spacer is added, reinstall the latch plate by tightening the set screw.
natural_image
Pure mechanical diagram of a hinge or latch mechanism without any text, numbers, or symbols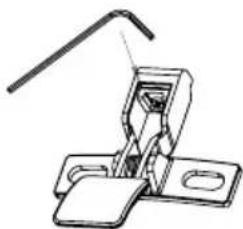
natural_image
Mechanical clamp or bracket assembly diagram (no text or symbols)Safety Information
CAUTION
Hinge and band is under high tension, failure to follow instruction steps in order may result in severe injury.
HINGE
Do not attempt to disassemble the hinge or loosen bands from your grill without the hinge disengagement tool kit.
NOTE: Hinge disengagement tool kit (spacer, washer, and hex nut are included). Store these parts in case the hinge needs to be removed later. The hinge cannot be removed safely without these parts.

Use the bottom face and the front lower vent opening as lifting points (Do not lift the grill by the hinge, bands brackets or handle as this could cause the dome to become dislodged from the band).
Only minor adjustments to the weight of the dome should be made per the instructions on page 18.
GASKET
Self-cleaning through natural heat cycle recommended.
Do not use chemical based cleaners on the gasket.
If absolutely necessary, gently wipe off any spills or moisture. Do not scrub or abrade the gasket if cleaning. Excessive rubbing can cause wear.
Cleaning & Care
We have designed and crafted your Pellet Joe grill with quality materials, so general care and maintenance is minimal. Do the easy, self-clean maintenance process regularly and be sure to protect your Pellet Joe from the elements with a grill cover.
MAINTENANCE CLEANING
1 Make sure that the heat deflector and drip tray are in place.
2 Turn the knob to the highest heat setting and allow the temperature inside the grill to rise to at least 600^ F ( 315^ C) with the dome closed.
3 Hold the temperature at around 600^ F ( 315^ C) for 10 minutes.
4 Turn the knob to the OFF position.
This self-cleaning process will burn off any unwanted residue from the inside of the grill and drip tray. Before cooking again, brush the the cooking grate with a standard grill brush. Use a soft bristle brush on the ceramics, drip tray, and heat deflector to remove any residue.
GENERAL CLEANING
After every cook, there may be ashes left inside the grill from the burning of pellets. Use a vacuum to clean the inside of the grill after every cook. ONLY do this when the grill is completely cool.
Once or twice a year, you should do a more thorough cleaning of the inside of the grill. Remove the internal components and remove any residual ash or debris that has collected between the grill body and the internal components. Use a plastic bristle brush to clean the inside ceramic surface and scoop or vacuum debris from the bottom of the grill before replacing the internal components. Empty the hopper. Vacuum all the pellet debris that have collected inside the hopper.
Part Replacement
PIT PROBE REPLACEMENT
1 Remove the damaged probe, reinstall the Pit probe.
2 Make sure to plug the new probe into the corresponding probe port behind the grill.
IGNITOR PROBE REPLACEMENT
1 Remove the two thumb screws that secure the firebox.
2 Lift out the firebox and unscrew the small set-screw underneath the firebox. Reach into the grill crucible area and un-clip the igniter wire
3 Replace the damaged ignitor probe, tighten the set screw, and secure the firebox. Igniter should protrude into the firebox by 3/4" [20MM]

text_image
Pit Probe Ignitor Probe set screw Firebox
Troubleshooting
If something goes wrong, the LED near the probe ports will flash a specific color or an alarm will sound, corresponding to one of the error codes below. These codes will also display in the app.
| Symptom Color Alarm Cause Possible Solution | ||||
| Err 1 SOLID | RED ON Pit Probe is not connected | 1. Check connection is fully seated.2. Unplug pit probe from grill, wait 10 seconds and reconnect.3. Pit Probe is defective. Please contact Customer Service. | ||
| Err 2 | FLASHING RED & YELLOW | OFF | Meat Probe Malfunction | 1. Meat probe damaged or over heated, replace meat probe. |
| Err 3 | FLASHING RED | ON | Grill overheated. Pit Probe reached temperature greater than 800F. | 1. Fan will run at 50%, auger will remain off until set temperature is reached.2. Turn off your grill by turning the control dial to the OFF position.3. Check for potential cause of overheat.*Grease fire.*Too many pellets in the crucible4. Restart the grill. |
| Err 4 | SOLID YELLOW | ON5 Minutes | Pit Probe has not reached 150F in 20 minutes. | Your grill needs 3 things to start a cook:*Air (oxygen)*Fuel (pellets)*Heat (smoke or fire)1. Once grill has cooled and is safe to touch, remove the cooking surface and drip tray assembly from the grill. Remove the heat deflector. Look in to the firebox to ensure the firebox is clean and there is full visibility of the ignitor element.2. Ensure pellet hopper is full of pellets and grill is powered on (plugged in, switched on, and your control dial is set to high heat).3. Turn control dial to high heat. Look in to firebox carefully, to see if pellets are dropping in to the firebox [fuel]. Feel 3 inches above firebox to ensure fan is on and blowing air through fire box (oxygen). Smell the air for smoke or look for visual signs of smoke or fire (heat).4. If your grill is not heating, check ignitor connection, or change out the ignitor element.5. If pellets are not dropping into the crucible, check for jams in the auger, check auger connections, or replace auger motor.6. If the fan is not blowing air, check connections for fan, or replace fan. |
| Err 5 | FLASHING GREEN & YELLOW | OFF | Meat Probe temperature is greater than 300F. | 1. Using protective gloves, remove meat probe from grill.2. Unplug meat probe from controller.3. Allow meat probe to cool before plugging back in. |
| Err 6 | SOLID PURPLE | OFF | Hopper Door is open. Auger motor and pellet agitators will not operate while hopper door is open. | 1. Shut hopper door.2. Check connection for hopper door.3. Replace hopper door switch. |
| Err 7 | FLASHING YELLOW | ON | Auger has sensed a pellet jam and is attempting to remove the jam. Grill will try to unjam twice, then will enter shut down sequence. | 1. If your grill has entered shut down sequence, allow it to cool completely.2. Try to remove jam in auger by removing all pellets from pellet hopper, then turn the grill off and back on with the hopper door closed.3. If you cannot remove the jam from the auger, take your grill apart to remove the auger and clean.*See detailed instructions on how to do this here: www.kamadojoe.com /pages/support |
| Err 8 | FLASHING PURPLE | ON Fan is blocked. | 1. Make sure the grill does not have anything blocking the lower air intake grate on the bottom of grill.2. Make sure top vent is in the open position.3. Check connections for fan. | |
| Err 9 | FLASHING BLUE THEN YELLOW | ON | Agitator is jammed and not able to turn. | 1. Remove any jammed pellets around agitator arms to fix jamming issue. |
| Err 10 | FLASHING BLUE | OFF Weak | WiFi signal. 1. Angle the antenna on back of the grill to point at the ground. | |
| Err 11 | FLASHING GREEN | 5 BEEPS WHEN COMPLETE | Grill is updating firmware. Please allow grill to finish update before continuing to use. | 1. Do not try and cook while the grill is updating.2. Grill needs to complete the update before you can continue cooking. |
| Err 12 | FLASHING PURPLE & YELLOW | ON | Grill could not complete the firmware update. | 1. Turn grill off to allow the grill to reboot with the old firmware.2. Turn grill back on and try to update again. |
| EXCESSIVE SMOKING | OFF Grill may be preheating. | 1. Pellets will cause a large amount of smoke in the ignition process.2. Please allow the grill to reach set temperature before adding food.3. If excessive smoke continues, restart your grill. | ||
| MANUAL MODE ENABLED | SOLID GREEN OFF | Grill is in manual cook mode.Lid is open. | 1. The grill is operating in manual cook mode.2. The grill is cooking at the selected temperature on the control dial3. You cannot use the app to set the grill temperature in manual mode. | |
| WiFi MODE ENABLED | SOLID BLUE OFF Grill is in WiFi Mode. | 1. Use the app to control the temperature of the grill.2. The grill is cooking at the set temperature in the app.3. If you do not wish to use the app, put your grill in manual mode by selecting a temperature on the control dial. | ||
FIRE IT UP.
SLOW IT DOWN.
UN GUIDE POUR LA CUISSON SUR UN BARBECUE KAMADO JOE
natural_image
Front view of a Gorka grill with visible wheels and top handle, no text or symbols on the main body.PELLETJOE
Table des matières
Avertissements 2
text_image
Warning symbol set with pictograms of people, a van, a house, a tent, and trees, all marked with X symbols and an exclamation mark.• LE NON-RESPECT DES DEGAGEMENTS (ESPACES LIBRES) REQUIS POUR LES MATERIAUX COMBUSTIBLES EST L'UNE DES PRINCIPALES CAUSES D'INCENDIE. IL EST EXTREMEMENT IMPORTANT D'INSTALLER CE PRODUIT CONFORMEMENTA CES INSTRUCTIONS SEULEMENT.
text_image
4mm 5mm #7 #10 #13 #16 #17 M6 X 25mm M6 X 16mm 9926200021 200422-GH
text_image
M6X16 X4 M6 X4 M6 X4 ① ⑦ ⑦ ⑦ ⑧ ⑧ 5mm ⑦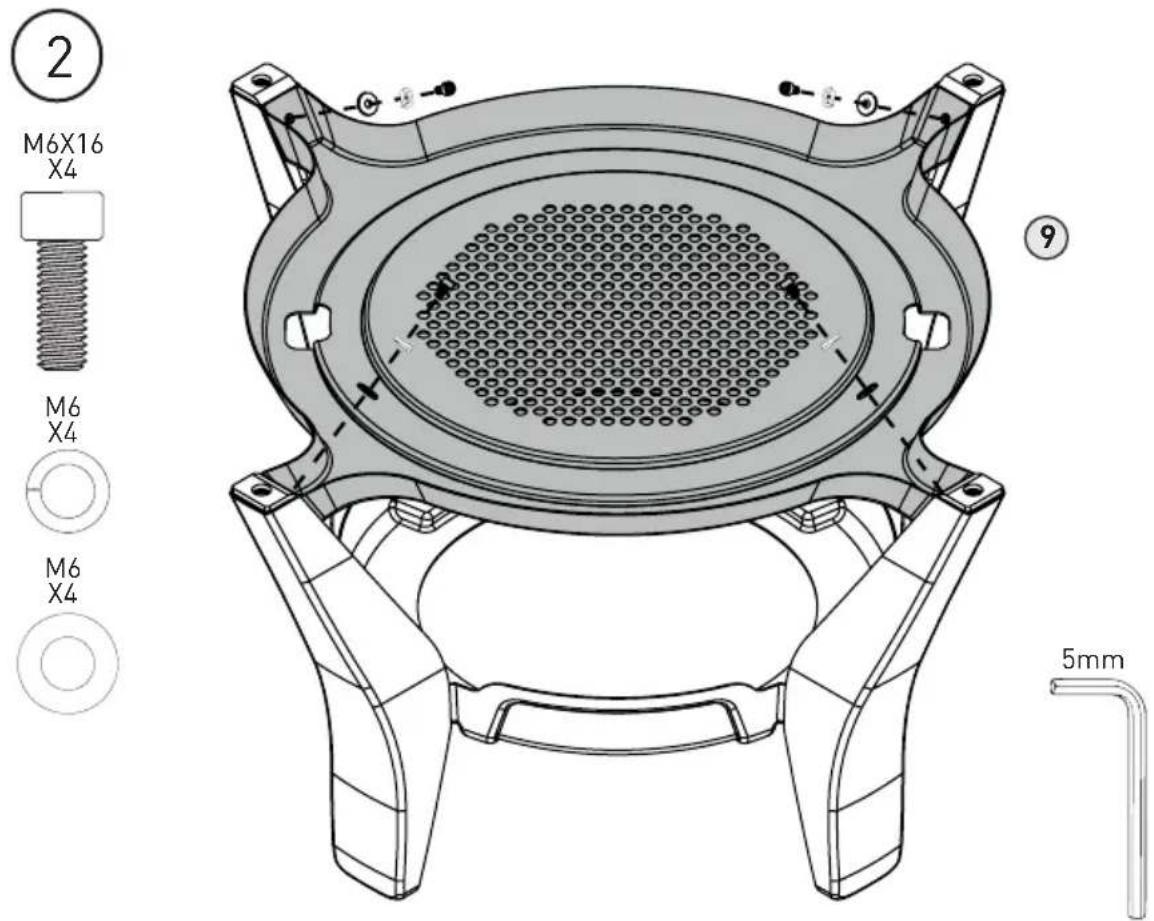
text_image
2 M6X16 X4 M6 X4 M6 X4 9 5mm
text_image
Technical diagram of a vacuum cleaner with labeled parts and a circular inset showing the internal mechanism.
text_image
Technical diagram of a vacuum cleaner with labeled parts and numbered callouts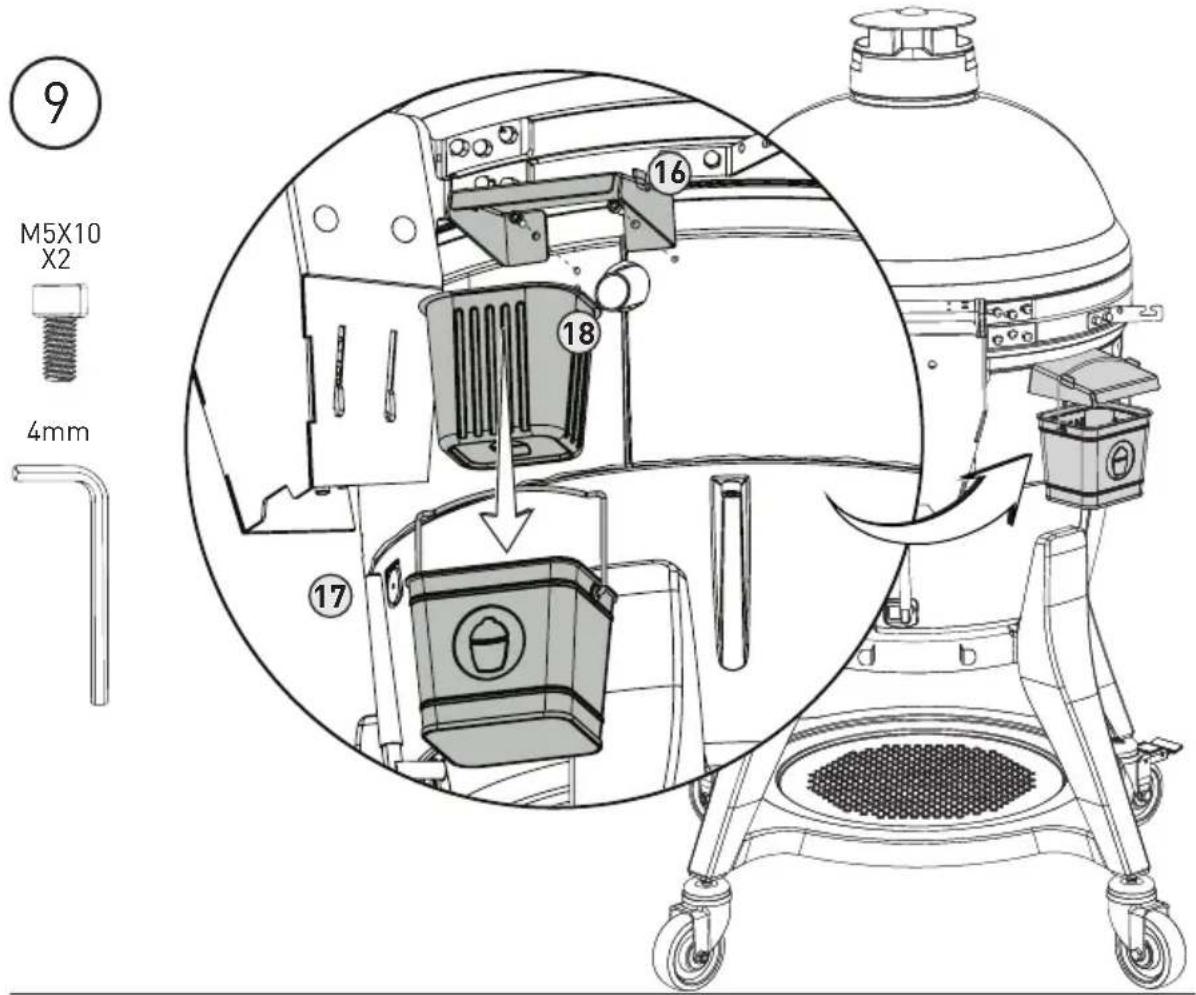
text_image
9 M5X10 X2 4mm 16 18 17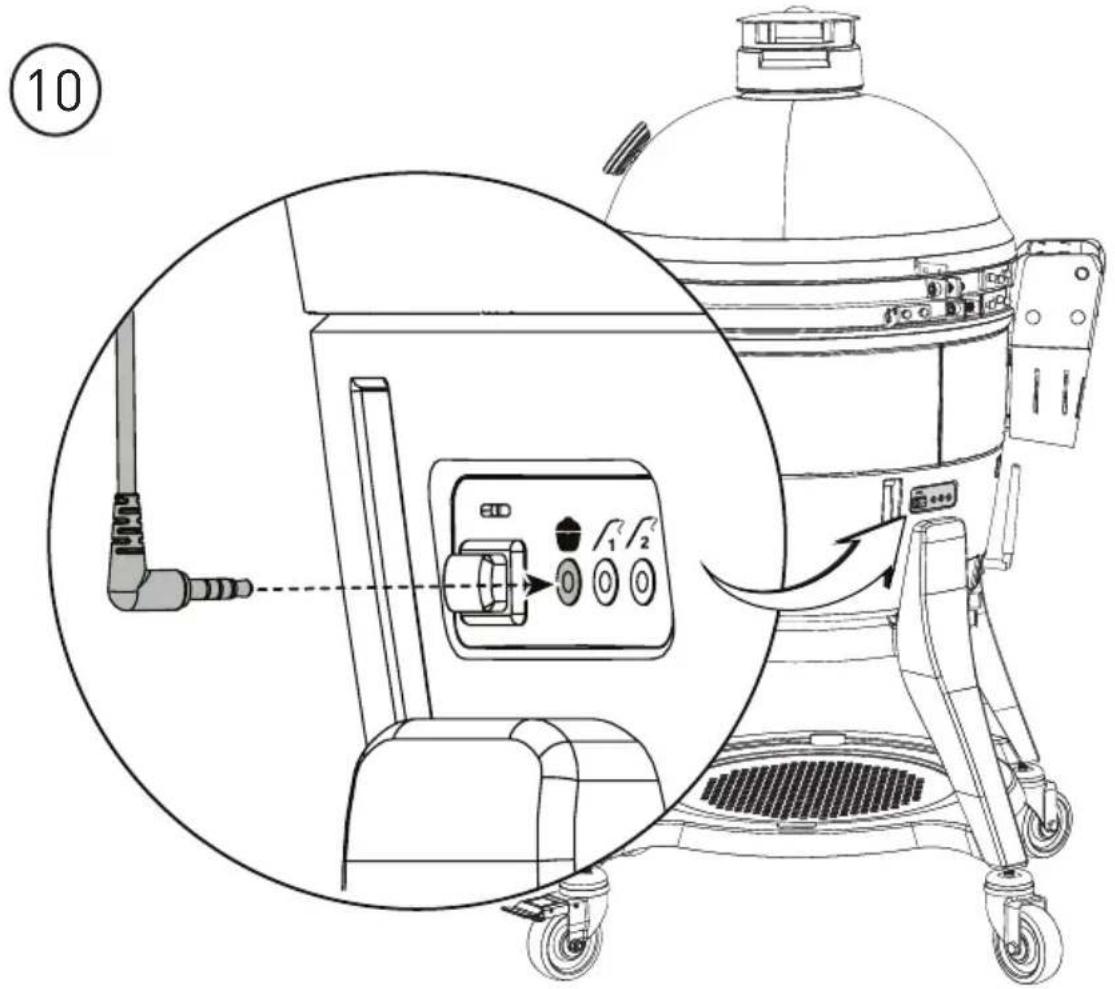
text_image
Technical diagram of a Kevlar grill with control panel and motor, showing component insertion and operation steps
natural_image
Pure mechanical diagram of a double-headed switch or latch mechanism without any text, labels, or symbols
natural_image
Technical line drawing of a mechanical clamp or bracket assembly (no text or symbols)text_image
Pit Probe Ignitor Probe set screw Firebox
Dépannage
natural_image
Top-down view of a Gorka grill with visible wheels and a brand logo (no text on body)PELLETJOE
Índice
Advertencias 2
text_image
Warning symbols and pictograms for cooking, heating, and camping activities- UNA CAUSA IMPORTANTE DE INCENDIOS ES NO MANTENER LOS ESPACIOS DESPEJADOS (ESPACIOS ABIERTOS) REQUERIDOS PARA LOS MATERIALES COMBUSTIBLES. ES DE SUMA IMPORTANCIA QUE ESTE PRODUCTO SE INSTALE SOLAMENTE EN CONFORMIDAD CON ESTAS INSTRUCCIONES.
text_image
4mm 5mm #7 #10 #13 #16 #17 M6 X 25mm M6 X 16mm 9926200021 200422-GH
text_image
M6X16 X4 M6 X4 M6 X4 ① ⑦ ⑦ ⑦ ⑧ ⑧ 5mm ⑦
text_image
2 M6X16 X4 M6 X4 M6 X4 9 5mm

text_image
Technical diagram of a vacuum cleaner with labeled parts and a circular inset showing the internal mechanism.
natural_image
Technical line drawing of a portable air purifier with labeled components (no text or symbols beyond numbers)
text_image
9 M5X10 X2 4mm 16 18 17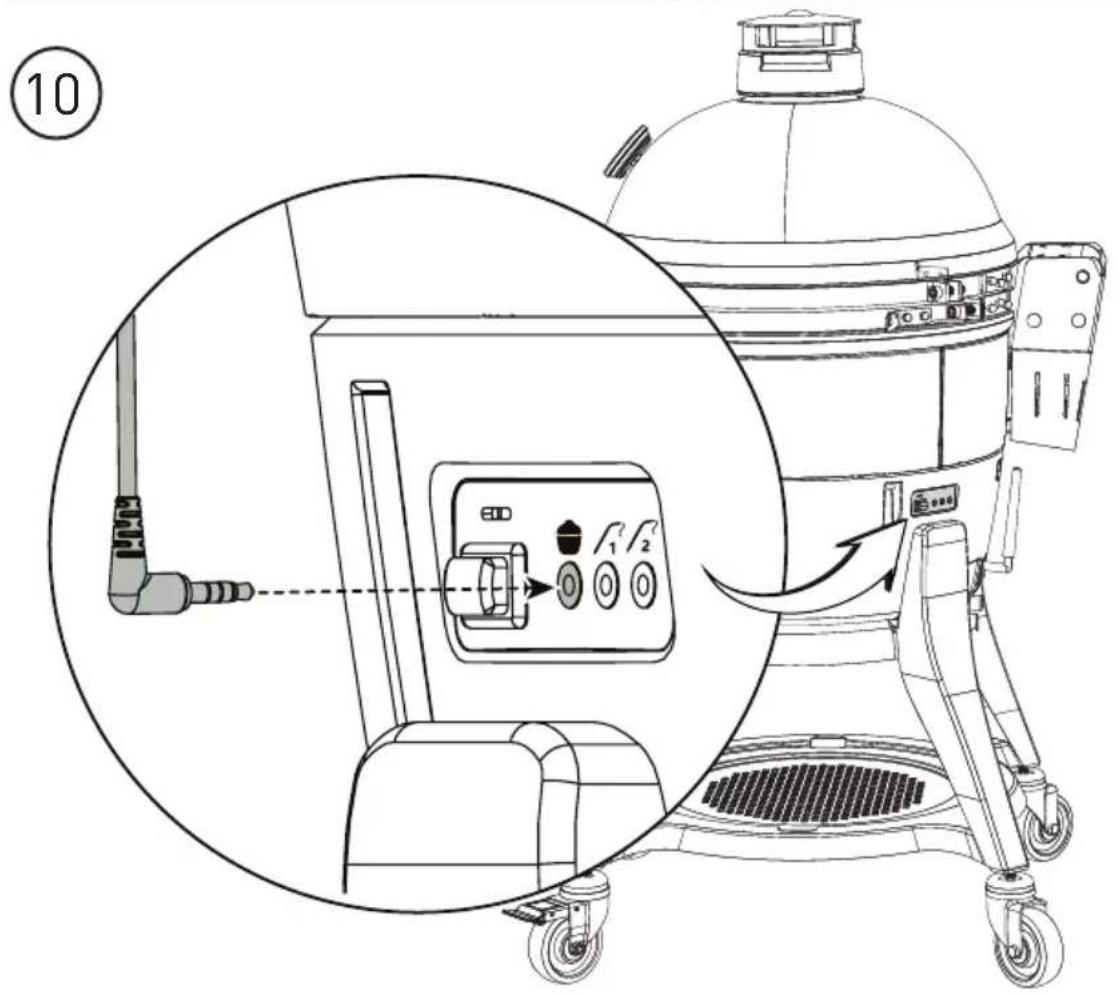
text_image
Technical diagram of a Kevlar grill with control panel and fan mechanism, showing operation instructions and component labels
natural_image
Technical line drawing of a mechanical bracket or housing component (no text or symbols)INSERTO 2
INSERTO 1