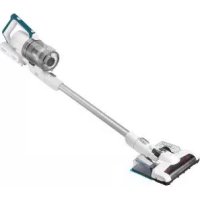
Joran Aqua VM 9003 - Vacuum Cleaner AMICA - Free user manual and instructions
Find the device manual for free Joran Aqua VM 9003 AMICA in PDF.


| Product type | Cordless stick vacuum |
| Brand | Amica |
| Model | Joran Aqua VM 9003 |
| Rated power | 150 W |
| Maximum power | 150 W |
| Supply voltage | 25.2 V / 230 V (charger) |
| Frequency | 50/60 Hz |
| Net weight | 3 kg |
| Battery type | Lithium-ion 25.2 V |
| Runtime (minimum mode) | Approximately 40 minutes |
| Runtime (maximum mode) | Approximately 17 minutes |
| Charging time | 4 to 6 hours |
| Suction system | Bagless, transparent dust container |
| Filters | Foam filter, fiber filter, motor filter (washable) |
| Main brush | Electric brush with LED lighting |
| Included accessories | 2in1 crevice/books nozzle, upholstery nozzle, mopping attachment with water tank, wall mount |
| Features | Variable power mode, LED battery level indicator, parking function |
| Recommended use | Domestic, hard floors and carpets |
| Maintenance | Clean the dust container after each use; wash filters regularly; clean the brush roll |
| Safety | Brush motor overheat protection; automatic shut-off in case of blockage |
| Warranty | According to manufacturer's conditions (not specified) |
Frequently Asked Questions - Joran Aqua VM 9003 AMICA
User questions about Joran Aqua VM 9003 AMICA
0 question about this device. Answer the ones you know or ask your own.
Ask a new question about this device
Download the instructions for your Vacuum Cleaner in PDF format for free! Find your manual Joran Aqua VM 9003 - AMICA and take your electronic device back in hand. On this page are published all the documents necessary for the use of your device. Joran Aqua VM 9003 by AMICA.
USER MANUAL Joran Aqua VM 9003 AMICA
PL INSTRUKCJA OBSŁUGI 2
EN USER MANUAL 6
CS NÁVOD K OBSLUZE 10
SK NÁVOD NA OBSLUHU 14
Montaż
Wskazówki:
- If the power cord or plug is damaged, it should be replaced by a professional repair shop in order to avoid hazard.
- This appliance is not intended for use by persons (including children) with physical, mental or sensory handicaps, or by persons inexperienced or unfamiliar with the appliance, unless under supervision or in accordance with the instructions as communicated to them by persons responsible for their safety. Children shall not play with the appliance.
- This appliance can be used by children aged 8 years and older or by persons with physical, mental or sensory handicaps, or by those who are inexperienced or unfamiliar with the appliance, provided they are supervised or have been instructed how to safely use the appliance and are familiar with risks associated with the use of the appliance. Ensure that children do not play with the appliance. Do not allow children to clean and maintain the appliance unless they are 8 years or older and are supervised by a competent person.
- Do not use the appliance if it shows any signs of damage to the power cord, or if the appliance has been dropped on the floor.
- Do not expose the appliance to rain or humidity, and do not
use it outdoors. Do not operate the appliance with wet hands.
- This appliance is not intended for use at altitude greater than 2000 metres above sea level
- If you want to turn off the appliance completely, pull the plug out of the wall outlet.
In accordance with European Directive 2012/19/EU and Polish legislation regarding used electrical and electronic goods, this appliance is marked with the symbol of the crossed-out waste container. This marking indicates that the appliance must not be disposed of together with other household waste after it has been used. The user
is obliged to hand it over to waste collection centre collecting used electrical and electronic goods. The collectors, including local collection points, shops and local authority departments provide recycling schemes. Proper handling of used electrical and electronic goods helps avoid environmental and health hazards resulting from the presence of dangerous components and the inappropriate storage and processing of such goods.
Carefully read this instruction before using the appliance.
This appliance is for household use only.
Note! Packaging materials (bags, polyethylene, polystyrene, etc.) should be kept away from children during unpacking.
Children do not realize the dangers that can arise when using electrical appliances; therefore keep the appliance out of reach of children.
Do not immerse the body of the appliance in water or other liquids. Immersing in water may cause an electric shock.
If water spills on the external components of the appliance, dry it thoroughly before switching back on. Do not touch wet surfaces in contact with the appliance connected to power supply, immediately disconnect it from the mains.
When pulling out the plug from the wall outlet, never pull by the cord, only the plug, holding the socket with your other hand.
Do not attempt to remove any parts of the housing.
Using attachments that were not supplied with the product may cause damage to the appliance.
Never place the appliance on hot surfaces.
Do not place the cord over sharp edges or near hot surfaces.
Before you put the plug into the wall outlet, make sure your hands are dry.
Do not put any objects inside the appliance.
Make sure that the voltage indicated on the nameplate corresponds to that of your home electrical mains. Alternating current must be used, typically marked \~.
This appliance is intended for use at home or in facilities, such as kitchen for employees; in shops, offices and other working environments, use by the customers of hotels, motels and other residential facilities, in rural residential buildings, in the accommodation facilities.
Pull the plug from the wall outlet before replacing accessories.
Do not pull the vacuum cleaner or move it by the cord, do not use the cord as a handle, do not close the door squeezing the cord, do not place the cord over sharp edges or near hot surfaces. Be careful not to move the vacuum cleaner on the cord.
Do not insert any objects into the openings in the vacuum cleaner. Do not use the vacuum cleaner when any opening is blocked, dispose of dust, lint, hair and anything that may restrict air flow. Keep hair, loose clothing parts, fingers and other body parts away from the openings and moving parts.
Do not use the vacuum cleaner to collect flammable substances such as petrol, and do not use it in places where similar substances may be present.
If the appliance has a winder, hold the plug while winding up the cord. Do not let the plug was left loose during retracting.
Do not collect any items that burn or smoke, such as cigarettes, matches or hot ashes.
Do not use the vacuum cleaner without a dust bag and/or filters. If the opening, which sucks air, hose or telescopic tube are clogged, you should immediately turn off the vacuum cleaner Before restarting the vacuum cleaner, first remove the blocking item.
Do not use the vacuum cleaner too close to heaters, radiators, cigarette butts, etc.
Before using the vacuum cleaner, remove sharp objects from the floor to avoid damaging the dust bag.
Do not collect fine particles such as: flour, gypsum, printer toners, etc., as this may clog filters and damage the vacuum cleaner.
Make sure that extension tube is fully withdrawn before you put away your vacuum cleaner either in vertical or horizontal position. Store the lithium ion battery in a cool and dry place.
The lithium-ion battery comes pre-charged by the manufacturer to 40%. After purchase, charge it up to 100%. This is to extend the life of the battery.
Liquids leaking from the battery may cause irritation and burns. If the liquid contacts your skin, seek medical attention, wash and rinse off the liquid as soon as possible with soap and water, and neutralize with a weak acid such as lemon juice or vinegar. If the liquid gets into your eyes, rinse your eyes immediately with clean water for at least 10 minutes.
When not in use, keep the battery away from metal objects such as paper clips, coins, keys, nails, screws, or other small metal objects that could short-circuit the two battery terminals. Short circuit between battery terminals may cause burns or fire.
The appliance is designed for operation at temperature from 4.5°C to 40°C,
Do not use a damaged or modified appliance or battery. Damaged or modified batteries may be unreliable, causing fire, explosion, or injury.
Do not expose the appliance or battery to heat or fire. Temperature above 130° C may cause an explosion. Recycling and proper disposal of the battery helps to conserve natural resources. The product contains a lithium-ion battery. You must dispose of the battery properly. Before disposing of the vacuum cleaner, dispose of the battery in an environmentally safe manner. Do not dispose of the battery with domestic municipal waste.
The properties of lithium-ion batteries may slightly deteriorate over time depending on use. You can purchase a 25.2 V / 230 V battery or have it replaced by authorised service centre. For detailed information, please go to our website: https://czescizamienne.amica.pl/Product/Part
SPECIFICATION:
| Power specification: 25,2V/230V | / 50/60Hz |
| Nominal power: 150W | |
| Maximum power: 150W | |
| Net weight: 3 kg |
Note! Figures are for illustrative purposes only Individual models may vary.
* depending on model
Features and components
-
Handle
-
Power on/off
-
Select mode
-
Dust bin release button
-
Dust bin
-
Dust bin lid release lever
-
Bottom cover
-
Release button for handheld vacuum cleaner
-
Tube
-
Floor brush release button
-
Electric brush
-
Electric brush LED backlight
-
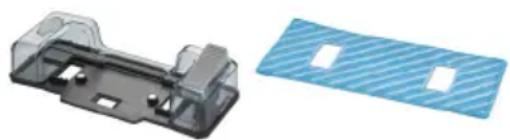
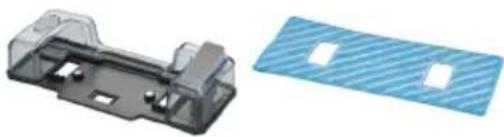
Mopping attachment
-
Electric brush roller
-
Mopping pad for the mopping attachment
-
Charger
-
Upholstery nozzle
-
Wall mount
-
2-in-1 crevice and book attachment
-
Crevice attachment
-
Pump filter cover
-
Lithium ion battery
-
Charging socket

Assembly
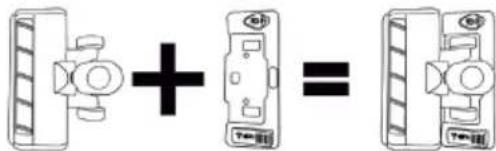
- Place the motor unit on a flat surface. Connect the adapter to the charging socket on the battery and insert the plug into a power socket. While charging, the power indicator flashes, one minute after charging, the indicator turns off.

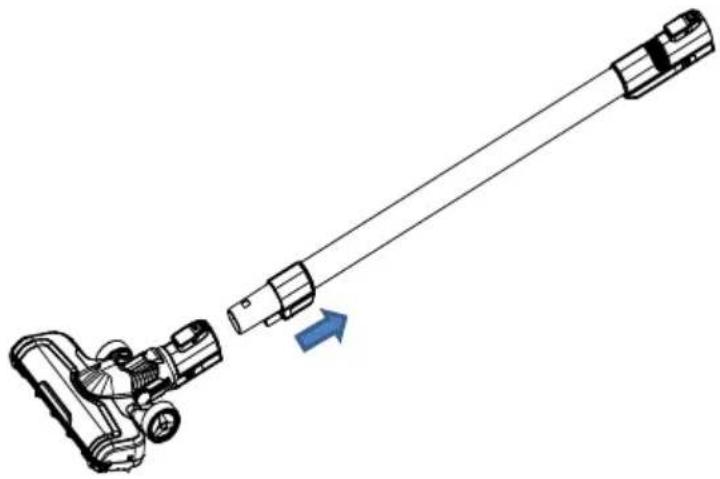
- Insert the tube into the hand vacuum cleaner until it clicks into place.
- Insert the tube into the floor brush until you hear a click.
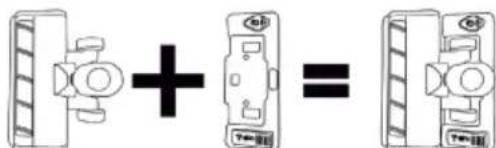
Install a wall bracket
- Choose a place near an electrical outlet.
- The height should be sufficient so that the brush tube hangs freely.
- Place the bracket on the wall and use a pencil to mark the holes to be drilled.
- Drill holes and insert wall plugs. Put the bolts through the holes in the handle and tighten.

Attention:
The location of the handle should be away from potential sources of high and low temperatures, such as a radiator.
Charge the battery and store accessories
- Hang the assembled vacuum cleaner on the wall bracket.
- Plug the charger into an electrical socket and then into the charging socket on the handheld vacuum cleaner.
- Place the accessories in the appropriate places on the wall bracket.
Battery indicators show the charge level.
- When fully charged, the indicators stop flashing.
- Fully charge the battery before first use. This may take 4-6 hours. Duration: At maximum power: approx. 17 minutes. At lowest power: approx. 40 minutes The operating time of the vacuum cleaner may vary depending on the brushes used and the conditions of use.
ON/OFF power button
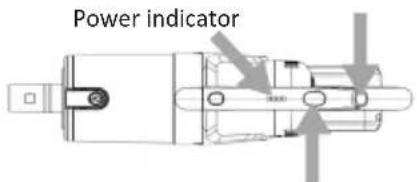
Mode change button
Operation
- Press ON/OFF to start the appliance.
- Press ON/OFF again to turn off the appliance.
- Press the "Mode Change Button" to change the mode.
- Charge the appliance when only one power indicator flashes.
CLEANING AND CARE
Empty the dust bin
Instructions:
- To maintain the suction power of the vacuum cleaner, empty the dust bin regularly.
- Press the release button, open the bottom cover and dispose of the dust.
Use the vacuum cleaner and accessories
- Moving parts! Always turn the vacuum cleaner off before attaching accessories.
Cleaning and maintenance
- Press the dust bin release button and remove the bin.
- Remove the filter from the dust bin.
• Dismantle the filter and clean it. All parts of the filter are washable. - When all parts are cleaned, reassemble them in the reverse order.

Electric brush cleaning and maintenance
Note!
In order to ensure proper operation of the brush, regularly clean the brush roller and wheels from dust and tangled hair and threads. Make sure the appliance is turned off before removing the main brush. Press the release button and remove the brush. Open the brush cover, then remove and clean the brush roller. After cleaning the roller, replace it in the reverse order.

Note! Figures are for illustrative purposes only Individual models may vary.
Instructions:
- Do not wash the brush. If hair is caught in the brush, remove it with scissors or a knife.
Clean the dust filter at least once a month, depending on frequency of use.
- Turn the dust bin and remove it.
- Twist the strainer and remove it.
- Remove the foam filter and bracket.
- Separate the foam filter from the fleece filter by sliding them apart.
- Rinse and dry thoroughly. Assemble when dry.
Clean a filter behind the motor every about 6 months, depending on the frequency of use.
- Turn the filter cover and remove it.
- Remove the filter located behind the motor
- Shake off the dust.
- Every about 6 months, replace the filter or rinse and dry it thoroughly.
- Put the filter and cover back in and turn to the "locked" position.
How to work with the mopping attachment?
Note!
- Fill the mopping attachment with clean water;
- Moisten the mopping pad and place it on the mopping attachment;
- Place the vacuum cleaner brush in the mopping attachment;
- Start vacuuming by turning on the vacuum cleaner with the power button, set the mode according to your preference;
- When the mopping pad starts to dry, pump water using the footswitch on the mopping attachment;
- When you finish vacuuming and mopping, turn off the vacuum cleaner, then remove the mopping attachment with the pad, wash or rinse the pad and pour out the water from the mopping attachment.
- NOTE 1: Before working with the mopping attachment, you should soak and thoroughly wring the mopping pad for better result. When the pad is not wet enough, pump water using the footswitch on the mopping attachment.
- NOTE 2: Only add clean water to the mopping attachment, no detergents can be added.
| Description of the problem Procedure: | |
| 1. The vacuum cleaner does not clean well.. | Empty the dust container.Remove excess dust from the filters.Wash the filter and tank components.Check that items such as the tube, vacuum inlet or brush are not blocked. |
| 2. The vacuum cleaner has turned off or is not working. | Charge the vacuum cleaner(check that the mains socket is working and that the switch is on).Roller brush motor overheated due to heavy load. This may be due to prolonged use on a long-pile carpet or soft rug. Allow the vacuum cleaner to cool down for a minimum of an hour before using it again. |
| 3. The floor brush motor turns off. | The floor brush is blocked— refer to the “Electric brush cleaning and maintenance” section of this manual.Brush motor overheat protection has tripped. Turn off the vacuum cleaner, remove the brush and let it cool down for an hour, then try again. |

Montáž
Pokyny:
Montáž
- Zasuňte trubicu do ručného vysávača, kým nebudete počut charakteristický zvuk zapadnutia.
Pokyny:


Aufmerksamkeit:
Hinweise:


Montage
Installation du support mural
Attention:
Consignes :


Montaje
Atención:
Indicaciones:

Монтаж
Указания:

Felszerelés


Монтаж
Вказівки:

Montajul
Atentie:
- MONTAŻ
- WSKAZÓWKI
- FEATURES AND COMPONENTS
- ASSEMBLY
- INSTALL A WALL BRACKET
- ATTENTION
- CHARGE THE BATTERY AND STORE ACCESSORIES
- BATTERY INDICATORS SHOW THE CHARGE LEVEL
- OPERATION
- CLEANING AND CARE
- EMPTY THE DUST BIN
- INSTRUCTIONS
- USE THE VACUUM CLEANER AND ACCESSORIES
- CLEANING AND MAINTENANCE
- ELECTRIC BRUSH CLEANING AND MAINTENANCE
- NOTE
- CLEAN THE DUST FILTER AT LEAST ONCE A MONTH, DEPENDING ON FREQUENCY OF USE
- CLEAN A FILTER BEHIND THE MOTOR EVERY ABOUT 6 MONTHS, DEPENDING ON THE FREQUENCY OF USE
- HOW TO WORK WITH THE MOPPING ATTACHMENT
- MONTÁŽ
- POKYNY
- AUFMERKSAMKEIT
- HINWEISE
- MONTAGE
- INSTALLATION DU SUPPORT MURAL
- CONSIGNES
- MONTAJE
- ATENCIÓN
- INDICACIONES
- МОНТАЖ
- УКАЗАНИЯ
- FELSZERELÉS
- ВКАЗІВКИ
- MONTAJUL
- ATENTIE
Brand : AMICA
Model : Joran Aqua VM 9003
Category : Vacuum Cleaner