Avante SW6020 - Sandwich maker TEFAL - Free user manual and instructions
Find the device manual for free Avante SW6020 TEFAL in PDF.

| Product type | Panini press / Waffle maker / Grill |
| Brand | Tefal |
| Model | Avante SW6020 |
| Dimensions (approx.) | 25 x 25 x 10 cm |
| Weight (approx.) | 2 kg |
| Power supply | 220-240 V, earthed plug |
| Power (estimated) | 800-1000 W |
| Main functions | Panini press, waffles, grilling, interchangeable plates |
| Indicator lights | Red (power on), green (temperature reached) |
| Included plates | Plates for panini, waffles, grill / depending on model |
| Care and cleaning | Plates dishwasher-safe; body cleaned with sponge and dish soap; do not immerse appliance |
| Safety | Automatic shut-off not mentioned; always use on a stable surface; earthed cord; do not touch hot surfaces |
| Spare parts and repairability | Removable plates (release button); locking clasp for vertical storage; power cord replaceable by a professional |
| Storage | Vertical storage possible with locking |
| General information | Household use only; manual available in several languages; 63 pages |
Frequently Asked Questions - Avante SW6020 TEFAL
User questions about Avante SW6020 TEFAL
0 question about this device. Answer the ones you know or ask your own.
Ask a new question about this device
Download the instructions for your Sandwich maker in PDF format for free! Find your manual Avante SW6020 - TEFAL and take your electronic device back in hand. On this page are published all the documents necessary for the use of your device. Avante SW6020 by TEFAL.
USER MANUAL Avante SW6020 TEFAL
natural_image
Assorted food and salad dishes arranged on a golden table, including sausages, burgers, cherry tomatoes, and condiments (no text or symbols visible)natural_image
Diagram showing two directional arrows labeled 1 and 2 pointing at a rectangular object with internal grid pattern (no text or symbols)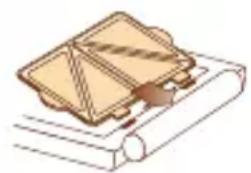
natural_image
Illustration of a sandwich with a bandage and rolled dough (no text or symbols)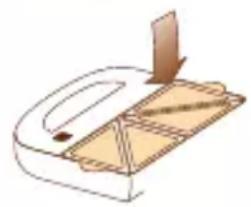
natural_image
Simple line drawing of a mechanical component with a handle and internal structure (no text or symbols)natural_image
Simple line drawing of a trash bin with two crossed diagonal lines crossing the base (no text or symbols)natural_image
Diagram showing two directional arrows labeled 1 and 2 pointing at a rectangular object with internal grid pattern (no text or symbols)natural_image
Illustration of a wooden tray placed on a rolled sheet of paper (no text or symbols)natural_image
Simple line drawing of a mechanical device with a handle and internal components (no text or symbols)natural_image
Simple line drawing of a trash bin with two crossed x-axes (no text or symbols)natural_image
Simple line drawing of a trash bin with two crossed X marks (no text or symbols)natural_image
Simple line drawing of a trash bin with diagonal lines crossing it, no text or symbols present.natural_image
Simple line drawing of a trash bin with two crossed lines indicating no waste or prohibition (no text or symbols)- Para desmontar as placas:
natural_image
Simple line drawing of a trash bin with no text or symbolsnatural_image
Simple line drawing of a trash bin with no text or symbolsÖnce çevre koruma!
Thank you for buying this appliance, designed exclusively for domestic use only. Please read these instructions for use carefully and keep them readily available.
For your safety, this appliance is compliant with enforceable standards and regulations (concerning low voltage directives, electromagnetic compatibility, materials in contact with foodstuffs, the environment, etc.).
Our company reserves the right to modify the characteristics or components of our products.
Household accident prevention
For children, even a slight burn can sometimes be serious.
As they grow older, it is necessary to teach your children to be careful with hot appliances that can be found in the kitchen.
If you use your appliance in the company of children:
• Always do so under the supervision of an adult.
- Do not touch the hot parts of the appliance.
- Never plug the appliance into a power socket when not in use.
If an accident occurs, immediately run the burn under cold water and seek medical advice if necessary.
Installation
Place the appliance on a flat, stable heat resistant surface: avoid using the appliance on unsuitable surfaces such as rubber table pads, tea towels or any surfaces which might be damaged by heat.
Do not place the appliance on or near slippery or hot surfaces; never leave the electrical cord over a source of heat (hotplates, gas cookers, etc.).
Open the appliance.
Remove all packaging, stickers or various accessories from the interior and exterior of the appliance.
Never place your appliance directly on a delicate surface (glass-top table, table cloth, varnished furniture, etc.).
Choice of plates
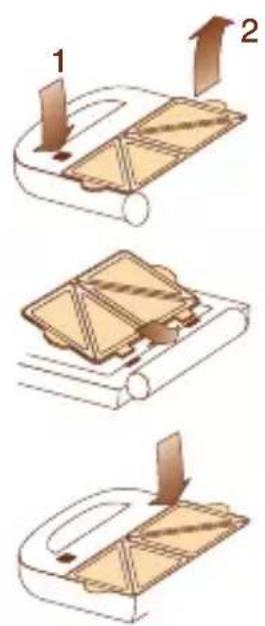
According to the model, you may use different sets of plates.
• To remove the plates:
Hold the plates by the handles on each side and press the release button.
• To replace the plates:
Place the plate at an angle with the slots below the stops.
Press down on the plate to lock it down.
When using for the first time, wipe the plates using kitchen paper towel moistened with cooking oil. Remove the surplus cooking oil using clean kitchen paper towel.
Make sure that the appliance is not hot and unplugged before changing the plates.
Connection, switching on and pre-heating
Close the appliance.
Fully unroll the electrical cord.
Check that the electrical installation is compatible with the wattage and voltage stated on the bottom of the appliance.
Only plug the appliance into an earthed socket.
If it is necessary to use an electrical extension cord:
- it must have an earthed socket, and be suitably rated.
- take the necessary precautions to avoid people tripping over it.
If the power cord is damaged, it must be replaced by the manufacturer, their after sales service centre or a person with similar electrical qualifications in order to avoid any hazards.
Plug the electrical cord into the wall socket and switch on, the red light comes on.
When using for the first time, a slight odour or small amount of smoke may be given off; this is normal.
Leave the appliance to pre-heat: the green light comes on when the correct cooking temperature is reached. During cooking, it is normal for the green light to go on and off. Do not touch the hot surfaces of the appliance: use the handles.
After use
Unplug the electrical cord from the wall socket.
Leave the appliance open to cool.
Clean the plates and body of the appliance with a sponge and washing-up liquid. The plates can be washed in a dish-washer. Reapply cooking oil after drying.
Do not use a scouring pad or scouring powder.
Never immerse the appliance or electrical cord in water.
Storage
The appliance can be stored vertically to save space.
Close the appliance and lock it shut with the closing clip.
Coil the electrical cord in the space designed for this purpose.
Environment
natural_image
Simple line drawing of a trash bin with diagonal lines crossing through it, no text or symbols present.Help to protect the environment!
Your appliance contains several materials which can be reused or recycled. Take it to a local civic waste collection point so that it can be processed accordingly.
HELPLINE:
If you have any problem problems or queries, please contact our Customer Relations Team first for expert help and advice:
0845 602 1454 - UK
(01) 461 0390 - Ireland
or consult our website - www.tefal.co.uk
Toasted sandwiches
Fit the sandwich plates.
Place the sandwiches in the hollows of the plates with the butter on the outside surface of the bread.
Close the appliance and gradually clamp the handles together to seal the slices of bread together.
Leave to cook for around 3 to 4 minutes according to the desired degree of cooking.
Croque-monsieur
- 4 slices of white bread • 20 g of butter • 70 g of gruyere cheese • pepper
Butter the slices of bread on the outer surfaces. Cut the gruyere into thin slices and place half of it on the unbuttered side of two slices of bread. Season with pepper. Add more gruyere then cover with the other slices of bread, with the butter on the outside.
Croque-monsieur Virginia
- 4 slices of white bread • 20 g of butter • 1 small onion • chives • 4 tblsp of drained cottage cheese • 1 tblsp of cream • salt • paprika
Butter the slices of bread on the outer surfaces. Peel the onion and cut it into thin slices. Wash the chives and cut them into small pieces using scissors. In a dish, mix the onion and chives with the cottage cheese, the cream, a pinch of salt and half a teaspoon of paprika. Spread the mixture onto the unbuttered side of two slices then cover them with the other two slices, so the butter is on the outside.
Croque dessert
- 4 slices of white bread • 20 g of butter • 2 bars of plain chocolate • half a banana
Butter the slices of bread on the outer surfaces. Place two chunks of chocolate, the banana cut into round slices and two more chunks of chocolate onto the unbuttered side of two slices of bread. Then cover with the other slices of bread, with the butter on the outside.
Waffles
Install the waffle plates.
Pour on the mixture, taking care to fill each plate without it overflowing. Leave to cook for around 4 minutes according to the desired degree of cooking.
Avoid opening the appliance during cooking. Place the waffles on a cooling rack and wait for 1 minute before eating them: this makes them crunchier.
Cooks note: 1 American cup is equivalent to 237 ml or 8 fl oz. In the UK you can use a breakfast cup.
Chocolate waffles
- 2 cups of packet pancake or waffle mix (about 210 g) • 3 tablespoons of unsweetened cocoa • 2 tablespoons of sugar • a quarter of a cup of chocolate chips (about 40g) • a third of a cup of finely chopped walnuts (about 40g) • one and a half cups of milk (255ml) • a third of a cup of vegetable oil (about 80ml) • 2 large eggs • half a teaspoonful of vanilla essence
In a large bowl, mix the pancake mix, cocoa powder, sugar, chocolate and walnuts according to taste. In another bowl, mix the milk, oil, eggs and vanilla essence. Add the liquid ingredients to the pancake mix and stir until even. Leave the mixture to rest for 5 minutes. Pour the desired amount of mixture into the waffle-maker. Leave to cook until there is no more steam, i.e. after around 4 minutes. Serve with whipped cream and chocolate sauce. Makes about 12 waffles.
Banana and Pecan nut waffles
- 2 very ripe crushed bananas • 1 cup of milk (about 237 ml) • 2 tablespoons of vegetable oil • 1 large egg • half a teaspoon of vanilla essence • 2 cups of packet pancake or waffle mix (about 210g) • quarter of a cup of finely chopped Pecan nuts (about 30g)
In a large bowl, mix the bananas, milk, oil, eggs and vanilla essence. Stir the pancake mixture and the walnuts evenly. Leave the mixture to settle for 5 minutes. Pour the desired amount of mixture into the waffle-maker. Leave to cook until there is no more steam, i.e. after around 4 minutes. Serve with maple syrup. Makes about 12 waffles.
Oat, apple and cinnamon waffles
- 2 cups of packet pancake or waffle mix (about 210g) • quarter of a cup of oats (quick-cooking type) • 2 tablespoons of caster sugar • 1 teaspoon of ground cinnamon • one and a half cups of milk • 2 tablespoons of vegetable oil • 1 large egg • three quarters of a cup of peeled McIntosh or Braeburn apples cut into small pieces
In a large bowl, stir in the pancake mix, oats, sugar, and cinnamon. In another bowl, mix the milk, oil, egg and apples. Add the liquid ingredients to the pancake mix and stir until even. Leave the mixture to settle for 5 minutes. Pour the desired amount of mixture into the waffle-maker. Leave to cook until there is no more steam, i.e. after around 4 minutes. Serve with maple syrup. Makes about 12 waffles.
Grilled meats or fish
Install the grill plates (depending on the model).
Place the meat, poultry or fish on the plates.
Close the appliance and leave to cook according to the recipe and to your personal taste.
Cordon bleu grilled chicken
- 2 chicken breasts • 2 slices of Swiss cheese • 1 tablespoon of olive oil • 1 tablespoon of Dijon mustard • half a sprig of dried thyme
Pre-heat the grill. Cut a slit in each of the chicken breasts. Fold the slices of cheese so that they are small enough to be placed into the cuts. Place the cheese in the slits. Mix the oil, mustard and thyme in a small bowl and brush both sides of the chicken breasts with this mixture. Grill the breasts for about 7 minutes or until they are cooked. Serves 2 portions.
Garlic shrimp kebab
• Half a pound of medium-sized peeled shrimps or prawns • 2 tablespoons of olive oil • 2 finely sliced cloves of garlic • half a teaspoon of ground chilli pepper or chilli powder • 1 tablespoon of chopped parsley • salt and pepper • 12 to 15 cherry tomatoes • 2 slices of lemon
Pre-heat the grill. In a medium-sized bowl, mix the shrimps or prawns, olive oil, garlic, chilli pepper, and parsley, then season with salt and pepper according to taste. Leave the mixture to stand for 20 minutes. Slide the shrimps or prawns onto a small bamboo skewer with 3 cherry tomatoes. Grill them for 5 minutes or according to taste. Serve with the slices of fresh lemon and toasted bread. Serves 2 portions.
Toasted Sandwich tips
- Only use butter or ordinary margarine when making toasted sandwiches. Low fat spreads or butter substitutes are unsuitable as they overheat at a lower temperature and form dark brown deposits. This causes the bread to stick to the cooking plates.
- For best results, use medium sliced bread with or without crusts. Remember to increase the cooking slightly for thick bread and to reduce slightly for thin bread.
- Unlike conventional sandwiches the bread is buttered on the outside.
- Brown or wholemeal bread can also be used but the cooking time may be slightly different.
• Take care not to add too much filling otherwise it will leak from the toasted sandwiches.
- Avoid using delicate salad fillings that wilt when cooked, such as lettuce and cucumber. However, tomatoes and onions give good results.
| 100 | |
| 100 | 100 |
| 200 | 100 |
| 300 | 100 |
| 400 | 100 |
| 500 | 100 |
| 600 | 100 |
| 700 | 100 |
| 800 | 100 |
| 900 | 100 |
| 1000 | 100 |
| 500 | 100 |
| 600 | 100 |
| 700 | 100 |
| 800 | 100 |
| 900 | 100 |
| 1000 | 100 |