
68821 - Heating HYUNDAI - Free user manual and instructions
Find the device manual for free 68821 HYUNDAI in PDF.

| Product type | Electric heater on stand for bar table |
| Brand | Hyundai |
| Model | 68821 |
| Rated power | 1600 W |
| Adjustable power | 800 - 1600 W (2 levels) |
| Supply voltage | 230 V ~ 50 Hz |
| Protection rating | IP55 (splash-proof) |
| Net weight | 24.1 kg |
| Control type | Control panel + remote control |
| Remote control batteries | 2 AAA batteries (not included) |
| Indicator light | Yes (green for low, red for high) |
| Housing material | Steel (top plate steel) |
| Assembly required | Yes (assembly of foot and tabletop) |
| Usage | Indoor only |
| Safety distance | At least 1 m from walls and combustible materials |
| Cleaning | Soft cloth or vacuum for the grille |
| Safety | Do not cover, do not use for drying clothes |
| Warranty | Refer to the enclosed warranty conditions |
| Package contents | Parts (screws, wheels, base, tabletop, etc.) and manual |
Frequently Asked Questions - 68821 HYUNDAI
User questions about 68821 HYUNDAI
0 question about this device. Answer the ones you know or ask your own.
Ask a new question about this device
Download the instructions for your Heating in PDF format for free! Find your manual 68821 - HYUNDAI and take your electronic device back in hand. On this page are published all the documents necessary for the use of your device. 68821 by HYUNDAI.
USER MANUAL 68821 HYUNDAI
natural_image
Line drawing of a vertical outdoor stand with a circular top and circular base (no text or symbols)HYUNDAI
Nederlands 5
Français 8
Deutsch 11
English 14
Declaration of conformity
B
C
STATAFEL MET ELEKTRISCHE VERWARMING 68821
WAARSCHUWING

BESCHRIJVING (FIG. A-C)

Read all safety warnings and all instructions. Failure to follow the warnings and instructions may result in electric shock, fire and/or serious injury. Save all warnings and instructions for future reference.
The following symbols are used throughout this manual:

Denotes risk of personal injury or damage to the machine.

Important information about the use of the machine.
SAFETY WARNINGS
Always follow the safety instructions below carefully when using the device.
- Do not use this appliance if the cord or plug is damaged.
- Keep the device and cord away from heat sources, sharp objects or anything that can cause damage.
- Have a defective device repaired only by an authorized service company.
- Make sure the device is turned off before connecting it to the mains.
- Unplug from outlet when not in use, before cleaning or other maintenance.
- Some parts of this product can become very hot; the appliance remains warm for a while after it is turned off. Do not touch the hot surfaces.
- Keep this in mind with children and vulnerable people.
- Only use a suitable extension cord.
- Do not wrap the power cord around the device.
- Do not use timers to switch the heater on or off automatically.
-
Do not place the device in front of or directly below a socket.
-
Do not use the device in wet areas or near a swimming pool or water feature.
- Always make sure hands are dry before operating or adjusting any switch on the product or touching the plug and outlet.
- Do not mount the device near combustible materials.
- Do not place the device near curtains and/or other flammable objects.
- The device must be placed at least 1 m from a wall.
- The appliance is for household use only. It is not permitted to use it on construction sites, greenhouses or spaces where combustible dust is present.
- Do not place the device in areas where gasoline, paint or other flammable liquids are used or stored.
- Do not use this device as a sauna heater or room heater.
- Do not immerse this device in water to clean it.
- Always place the appliance on a horizontal and stable surface.
- This appliance can be used by children aged 8 years and older and by persons with reduced physical, sensory or mental capabilities or lack of experience and knowledge, provided they are given supervision or instruction regarding the safe use of the appliance and understand the dangers.
- Children should always be closely supervised when they are around electrical appliances. Do not let children play with the appliance.

Do not cover. NEVER use the appliance to dry clothing or similar items.
ELECTRICAL SAFETY

Check that the voltage stated on the rating plate of the appliance corresponds to the locally available mains voltage. Only connect the device to an earthed wall socket.
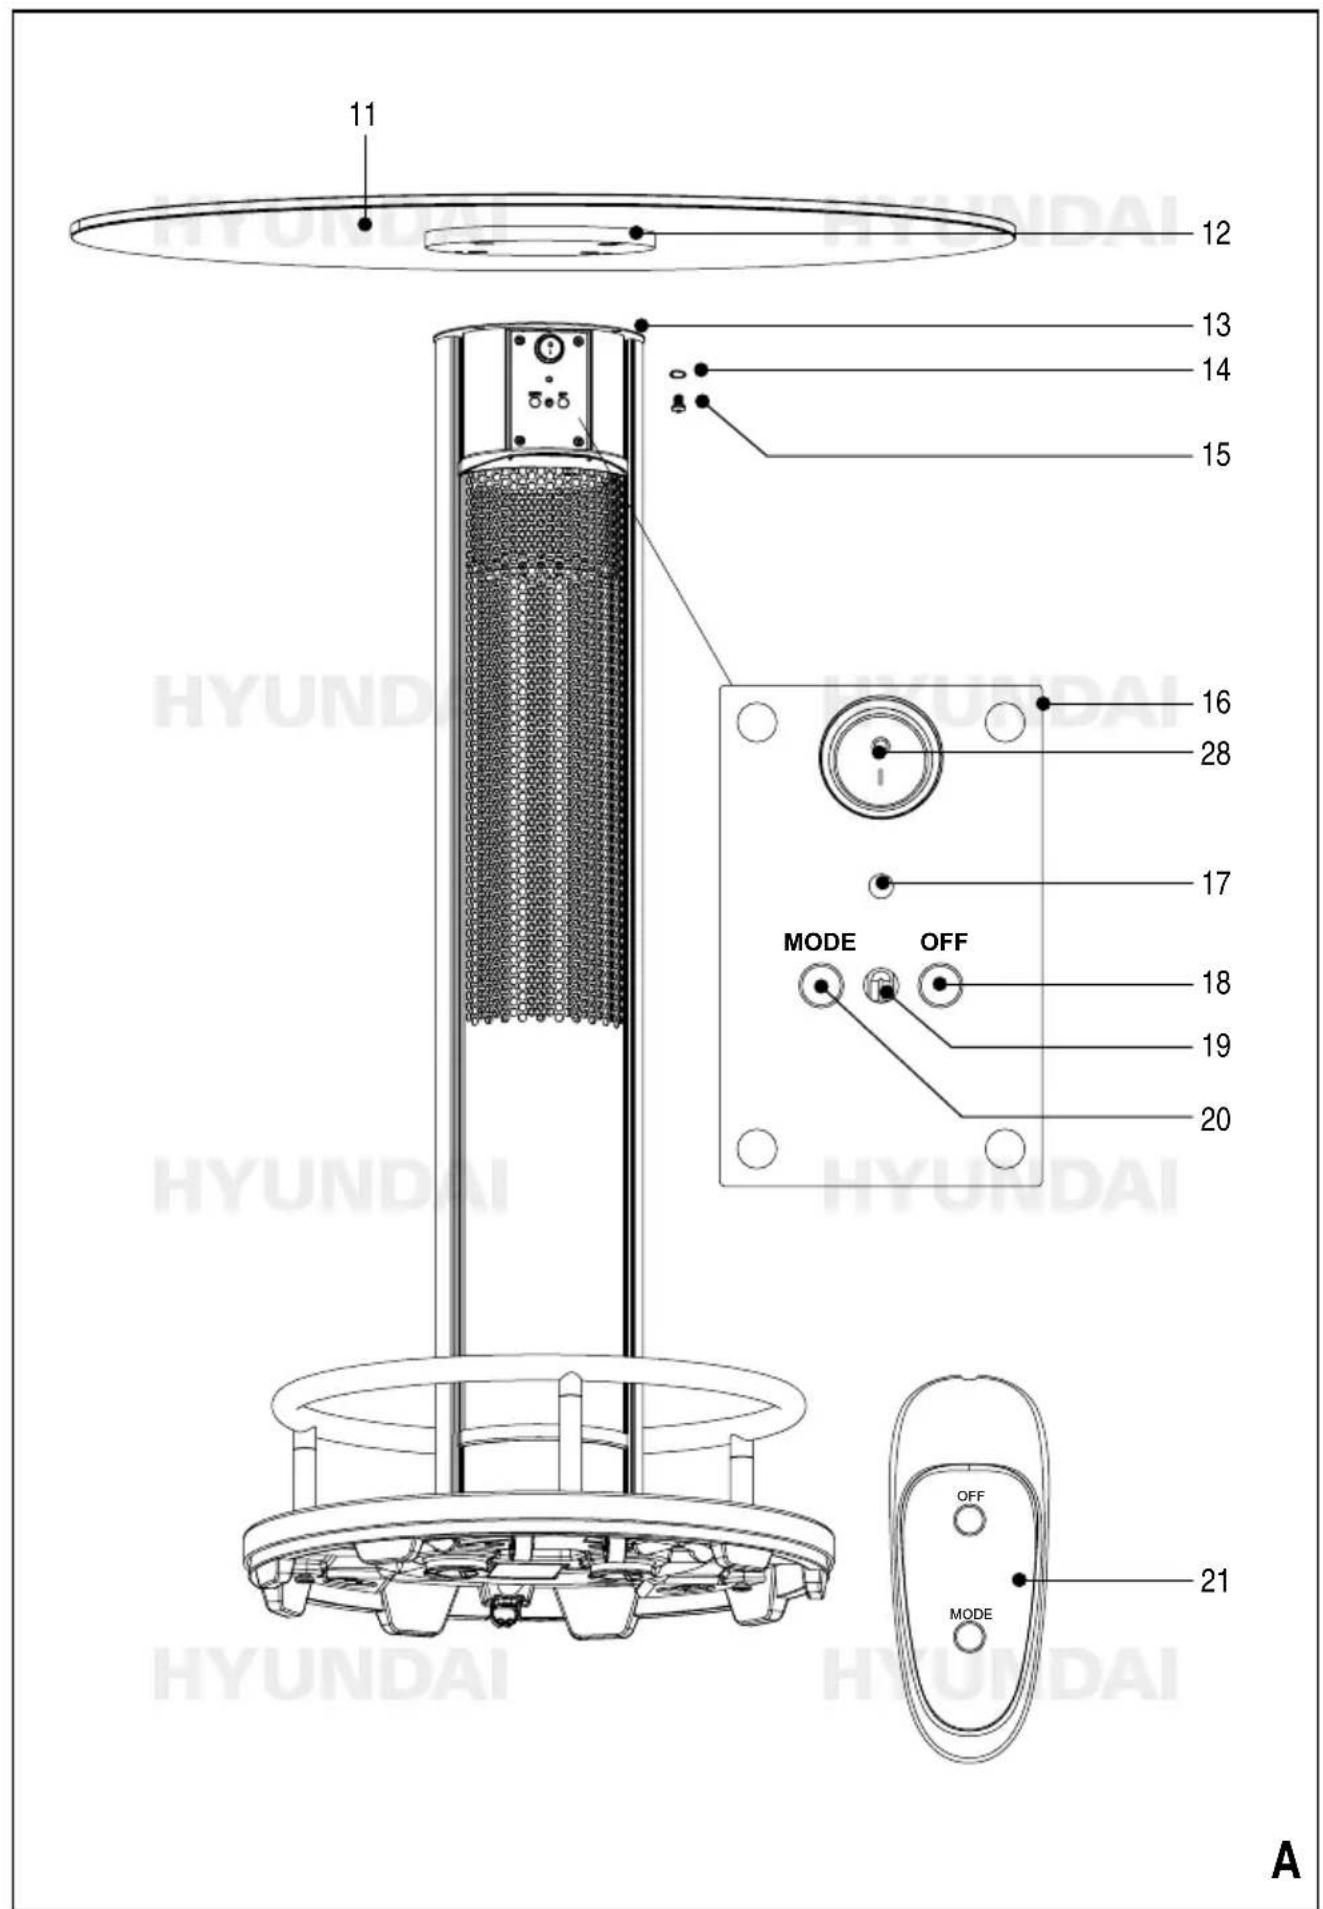
DESCRIPTION (FIG. A-C)

This device provides pleasant warmth when extra heating is required.
Package contents
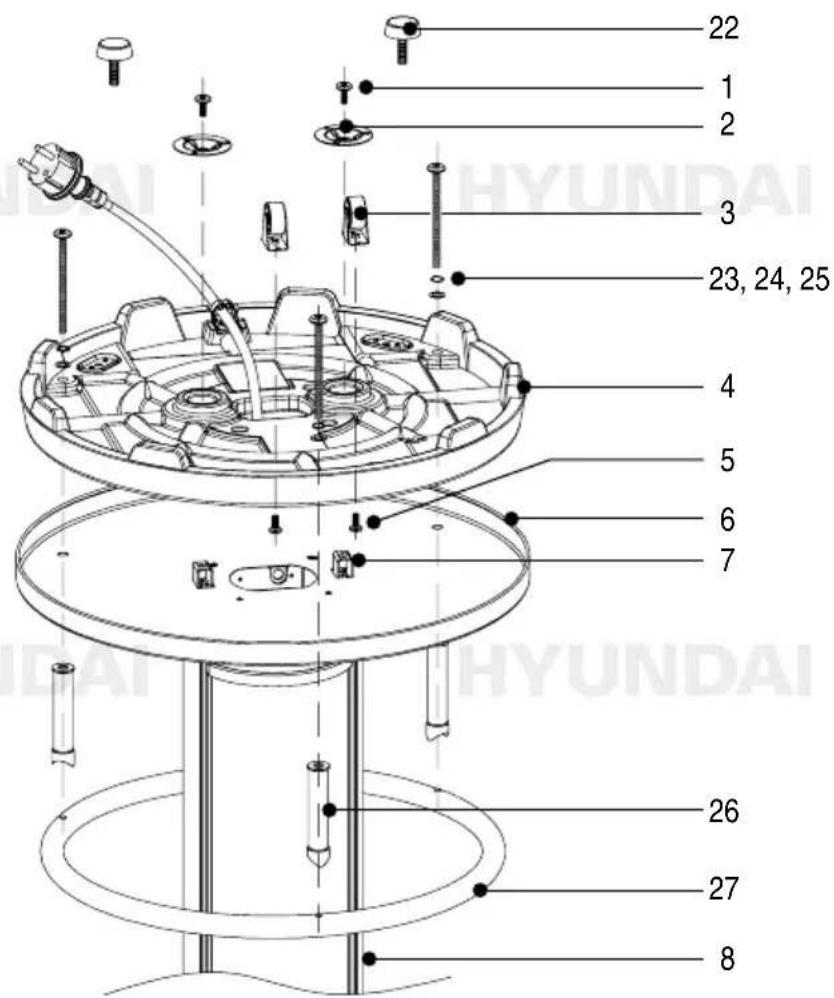
Part number description amount
1 Screw M6x20 2
2 Washer 2
3 Wheel 2
4 Base 1
5 Screw M6x12 2
6 Cover plate 1
7 Base bracket
8 Heating element
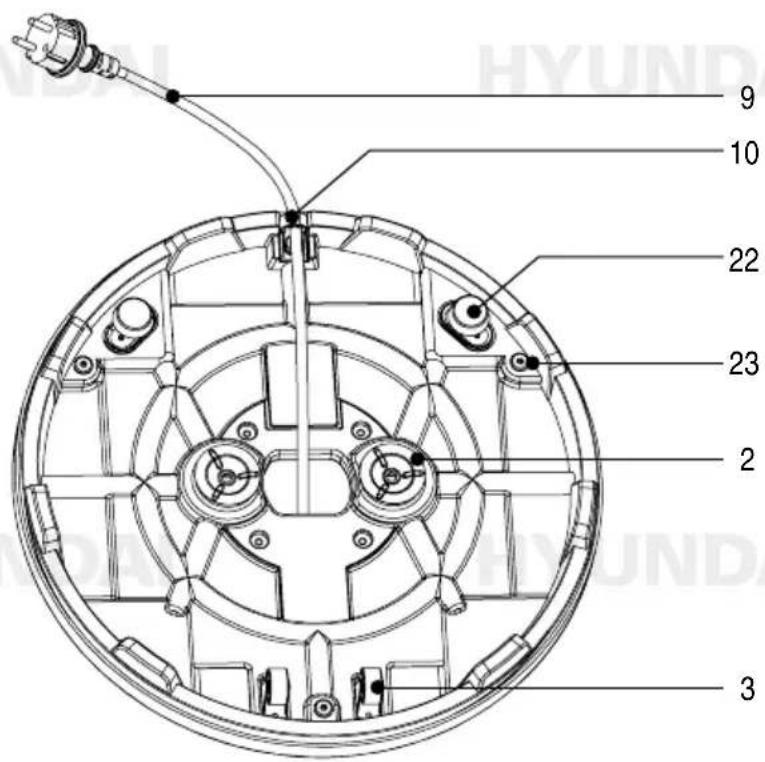
9 Power cable
10 Cord clip
11 Table top 1
12 Mounting plate
13 Steel top plate
14 Spring washer ø6.2 4
15 Screw M6x8 4
16 Control panel
17 Indicator light
18 On/off switch
19 Receiver
20 Mode button
21 Remote control 1
22 Screw foot M6x30 2
23 Screw M8x120 3
24 Washer ∅8.5 3
25 Spring washer ∅8.2 x ∅16 3
26 Stainless steel bus 3
27 Footrest 1
28 Switch
Allen key M6 1
Allen key M8 1
- Instruction manual
• Warranty and service conditions
ASSEMBLY (FIG. A-C)
-
Start assembling the foot, follow exactly the instruction as shown on fig. B
-
When the foot is completely installed, mount the two screw feet (22) and secure the power cable with the cord clip (10), see fig. C
-
Stand the table leg upright. Then mount the table top using the four remaining screws (15) and spring washers (14), see fig. A
Installing and replacing the batteries in the remote control
- Slide the battery compartment cover.
- Insert 2 AAA batteries according to the + and - indications in the battery compartment.
- Slide the cover back onto the remote control.
Safety warnings for batteries
- Always replace the complete set when changing batteries. Do not mix old and new batteries.
- Remove batteries if the remote control will not be used for an extended period of time.
- Avoid short circuiting removed batteries.
- Do not store batteries where the temperature may rise above 50 °C, e.g., in a car parked in the sun.
- Do not burn batteries.
• Never try to open batteries. - If battery leakage occurs, carefully remove the liquid with a cloth. Avoid skin or eye contact. Do not swallow. In case the battery fluid contacts the skin or the eyes, flush with running water for at least 10 minutes and consult a doctor immediately.
OPERATION (FIG. A)
- Connect the device to an earthed socket.
- Press the main switch (28) to switch on the appliance. The device is in standby mode. The indicator light (17) starts flashing.
- Press the mode button (20) on the control panel or on the remote control to turn the unit on or off, for low (green light) or high power (red light).
- Press the on/off button (18) to put the device in standby mode. The indicator light starts flashing again.
- Press the switch (28) again to turn off the power completely if the unit will not be used for a long time.
CLEANING

Regular cleaning extends the life of the device.
- Clean the housing with a soft cloth or soft paper. If dirt is difficult to remove, use a soft cloth with a little soapy water.
- Use a vacuum cleaner to vacuum dust and lint from the grille.
- Never try to clean the inside of the heater.
- Store the device in a cool, dry place.
Do not use chemical cleaners, gasoline or other solvents. These can irreparably damage the housing.

Always remove the plug from the socket and let the heater cool down completely before cleaning or performing maintenance.
TECHNICAL DATA
Mains voltage Vac 230
Mains frequency Hz 50
Power input W 1600
Settings W 800-1600
Splash-proof IP55
Weight kg

GUARANTEE
Refer to the enclosed guarantee conditions for the terms and conditions of guarantee.
ENVIRONMENT
product, accessories and packaging should be sorted for environmental-friendly recycling.
Only for EC countries
Do not dispose of power tools into domestic waste. According to the European Guideline 2002/96/EC for Waste Electrical and Electronic Equipment and its implementation into national right, power tools that are no longer usable must be collected separately and disposed of in an environmentally friendly way.
Subject to change; specifications can be changed without further notice.
24.1

HYUNDAI HYUNDAI
HYUNDAI HYUNDAI
HYUNDAI HYUNDAI
HYUNDAI HYUNDAI

CE
VERKLARING VAN OVEREENSTEMMING CERTIFICAT DE CONFORMITÉ
KONFORMITÄTSERKLÄRUNG DECLARATION OF CONFORMITY
ART. NR. HYUNDAI 68821
TYPE NR. SH16110J7R-2
Dvize bv declares under its sole responsibility that this product is in conformity with the following standards or standardization documents:
EN 55014-1:2006,+A1:2009+A2:2011, EN 55014-2:2015, EN 61000-3-2:2014, EN 61000-3-3:2013, EN 60335-2-30:2009+a11, EN 60335-1:2012+A11+A1+A14+A2, EN 62233:2008
Volgens de bepalingen van de richtlijnen: Selon les dispositions des directives :
SGS-CSTC Standards Technical Services Co., Ltd.


- HYUNDAI
- STATAFEL MET ELEKTRISCHE VERWARMING 68821
- WAARSCHUWING
- BESCHRIJVING (FIG. A-C)
- SAFETY WARNINGS
- ELECTRICAL SAFETY
- DESCRIPTION (FIG. A-C)
- Package contents
- ASSEMBLY (FIG. A-C)
- Installing and replacing the batteries in the remote control
- Safety warnings for batteries
- OPERATION (FIG. A)
- CLEANING
- TECHNICAL DATA
- GUARANTEE
- ENVIRONMENT
- Only for EC countries
- CE
- VERKLARING VAN OVEREENSTEMMING CERTIFICAT DE CONFORMITÉ
- KONFORMITÄTSERKLÄRUNG DECLARATION OF CONFORMITY
Brand : HYUNDAI
Model : 68821
Category : Heating