KS 45046 - Saw Güde - Free user manual and instructions
Find the device manual for free KS 45046 Güde in PDF.

User questions about KS 45046 Güde
0 question about this device. Answer the ones you know or ask your own.
Ask a new question about this device
Download the instructions for your Saw in PDF format for free! Find your manual KS 45046 - Güde and take your electronic device back in hand. On this page are published all the documents necessary for the use of your device. KS 45046 by Güde.
USER MANUAL KS 45046 Güde
natural_image
Three blue and gray chainsawes displayed against a white background, with a blue circular icon featuring an open book (no text or symbols on the main objects)KS 400-41
94883
KS 450-46
94886
KS 500-55
94889
GÜDE GmbH & Co. KG
Birkichstrasse 6
74549 Wolpertshausen
Deutschland


text_image
Güde

text_image
1 2 3 4 5 7 Sude KS 450-46 12 11 9 8 6 10
ENGLISH Please read the instructions carefully before starting the machine.
text_image
Scanned document with Chinese text and a blue circular icon, likely a form or report section1

natural_image
Close-up of a blue industrial machine with attached hoses and control panel (no visible text or symbols)2

3

4

natural_image
Simple line drawing of a rounded rectangular shape with evenly spaced small dots along its edges (no text or symbols)56

natural_image
Mechanical component with attached bracket and circular housing (no visible text or symbols)The image is too blurry to recognize any text content.

The image is too blurry to recognize any text content.

89

natural_image
Close-up of a gray plastic electronic component with a U-shaped body and internal slots (no visible text or symbols)The image is too blurry to recognize any text content.
The image is too blurry to recognize any text content.

The image is too blurry to recognize any text content.


natural_image
Illustration of a worker cutting a tree with a warning sign above (no text or symbols on the diagram itself)2
DE INBETRIEBNAHME HU ÜZEMBE HELYEZÉS
GB STARTING-UP THE MACHINE
SI UVEDBA V POGON
FR MISE EN SERVICE HR PUŠTANJE U RAD
natural_image
Simple line drawing of a skull and two elongated shapes (no text or symbols)7
DE BETRIEB HU ÜZEMELTETÉS
GB OPERATION SI DELOVANJE
FR FONCTIONNEMENT
HR RAD
IT ESERCIZIO
BG РАБОТА
NL GEBRUIK
RO FUNCTIONARE
CZ PROVOZ
SK PREVÁDZKA
text_image
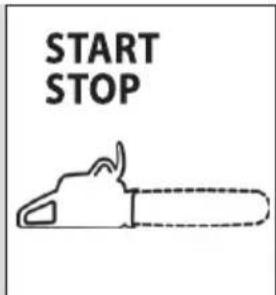
START STOP11
DE WARTUNG
GB MAINTENANCE
HU KARBANTARTÁS
FR ENTRETIEN
SI VZDRŽEVANJE
IT MANUTENZIONE BG ПОДДРЬЖКА
HR ODRŽAVANJE
NL ONDERHOUD
RO ÎNTRETINERE
CZ ÚDRŽBA
SK ÚDRZBA
natural_image
Silhouette of a wrench tool against a white background (no text or symbols)14
natural_image
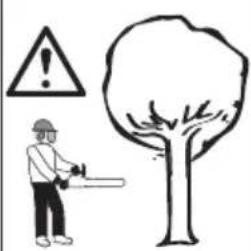
Illustration of a worker using a power shaver next to a tree with warning symbols (no text or labels)DE SÄGEANWEISUNGEN HU VÁGÁSI UTASÍTÁSOK
GB INSTRUCTIONS FOR CUTTING SI NAPOTKI ZA ŽAGANJE
FR CONSIGNES DE SCIAGE HR UPUTE ZA REZANJE
natural_image
Illustration of a blue saw cutting through a black cross-shaped tool, with a circular cutter on the ground (no text or symbols)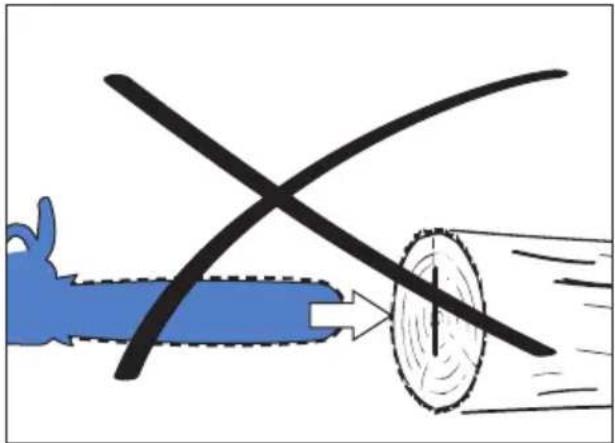
natural_image
Illustration of a blue tool with a black X mark passing through a circular object, no text or symbols present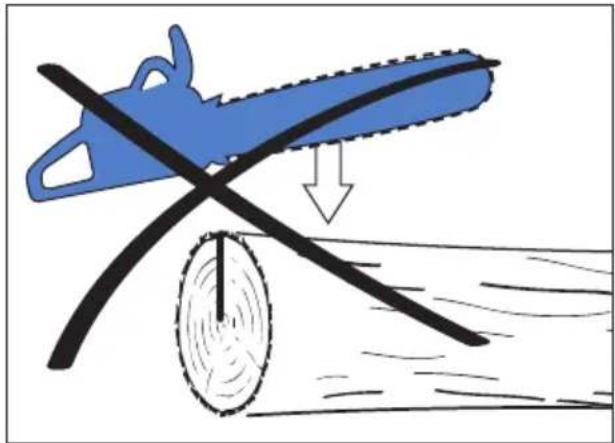
natural_image
Illustration of a blue chainsaw cutting through water with a downward arrow indicating motion (no text or symbols)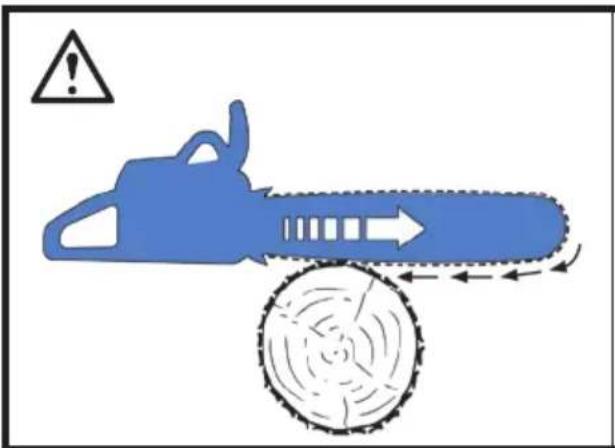
text_image
Warning sign with a blue chainsaw and circular gear, indicating hazard or safety warning
natural_image
Illustration of a blue chainsaw cutting through a circular cutterhead with motion arrows indicating blade movement (no text or symbols)DE RÜCKSCHLAG HU VISSZACSAPÓDÁS
GB BACK KICK SI POVRATNI SUNEK
FR REBOND HR POVRATNI UDAR
IT CONTRACOLPO
BG ОБРАТЕН УДАР
NL TERUGSLAG RO RECUL
CZ ZPĚTNÝ NÁRAZ
SK SPÄTNÝ NÁRAZ

natural_image
Illustration of a person using a manual power tool next to a tree with an exclamation mark (no text or symbols present)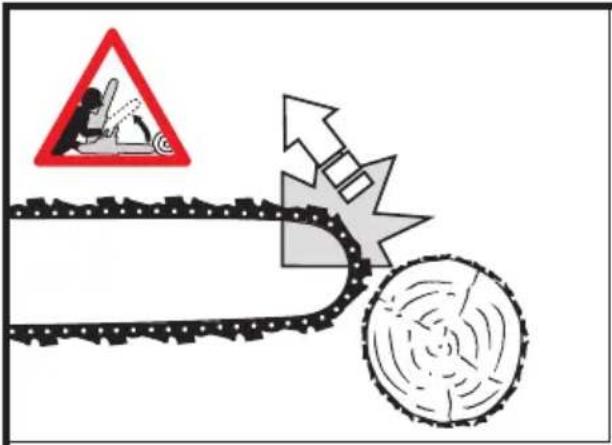
text_image
Diagram illustrating a mechanical collision with a warning sign and gear mechanism, including a hazard symbol.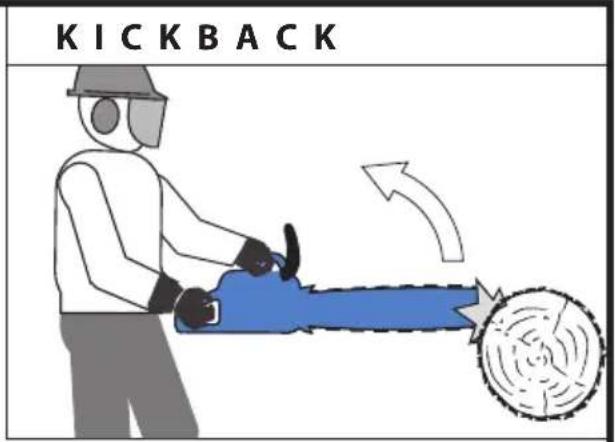
text_image
KICKBACK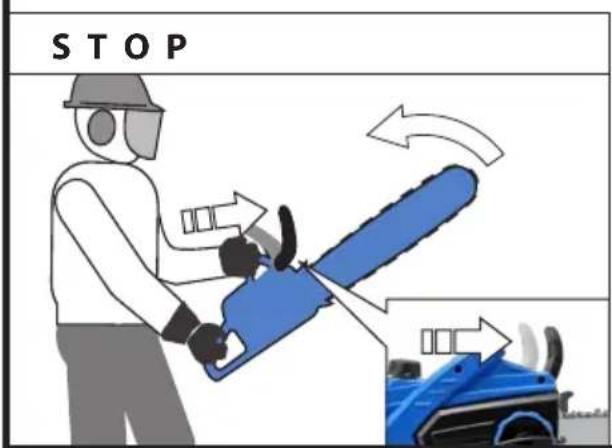
text_image
STOP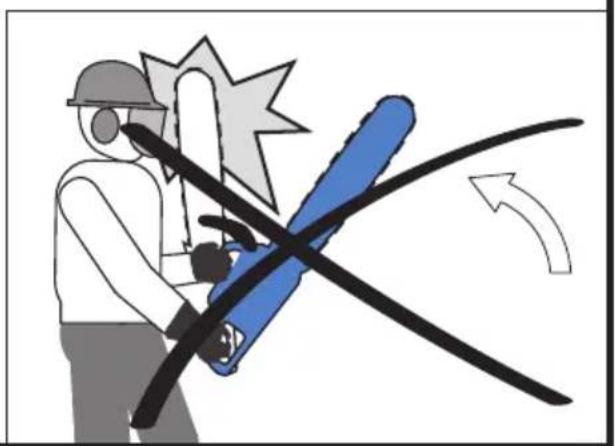
natural_image
Illustration of a person using a blue tool to cut a saw, with motion arrows indicating direction (no text or symbols)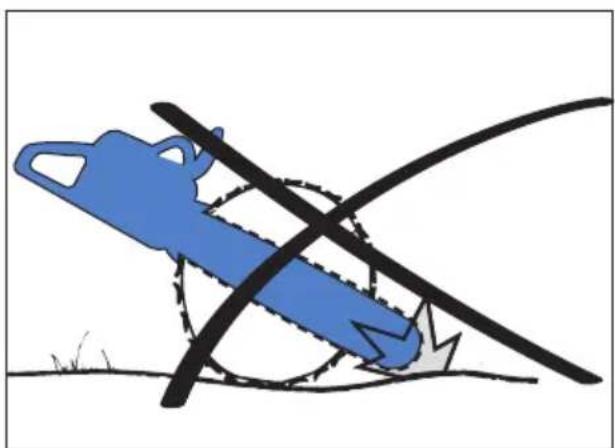
natural_image
Illustration of a blue chain-linking tool with a black crossbar, no text or symbols present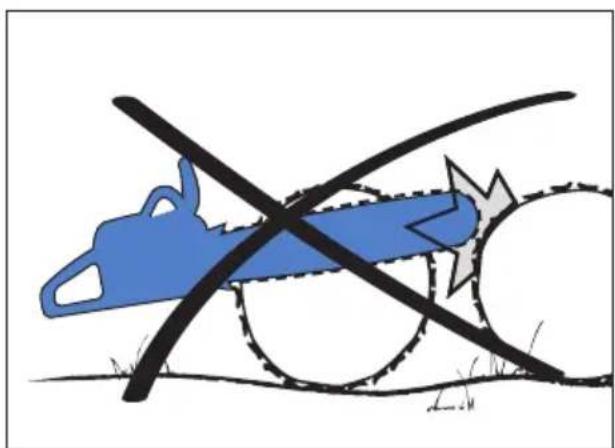
natural_image
Diagram of a blue gear cutting through a circular saw blade with a black tool, no text or symbols present
natural_image
Illustration of a worker using a manual power tool next to a tree with warning symbols (no text or labels)DE BAUM FÄLLEN HU FA KIVÁGÁS
GB TREE LOGGING SI PODIRANJE DREVES
FR ABATTAGE D'ARBRES HR RUŠENJE STABLA
IT TAGLIO DELL'ALBERO BG CEЧЕНЕ НА ДЪРВЕТА
NL BOOM KAPPEN
CZ KÁCENÍ STROMU
SK KÁLANIE STROMU
RO TÄIEREA COPACILOR
text_image
1 min 2 ½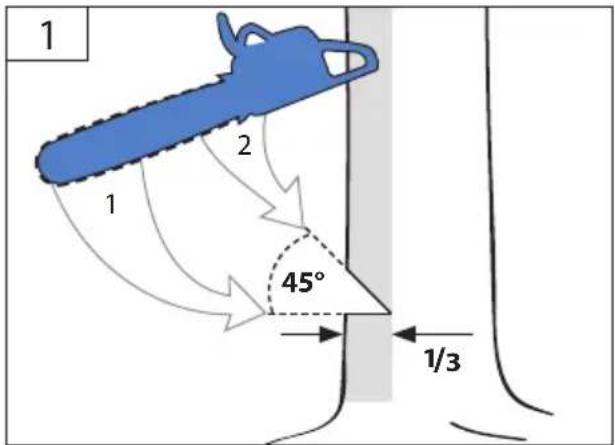
text_image
1 2 1 45° 1/3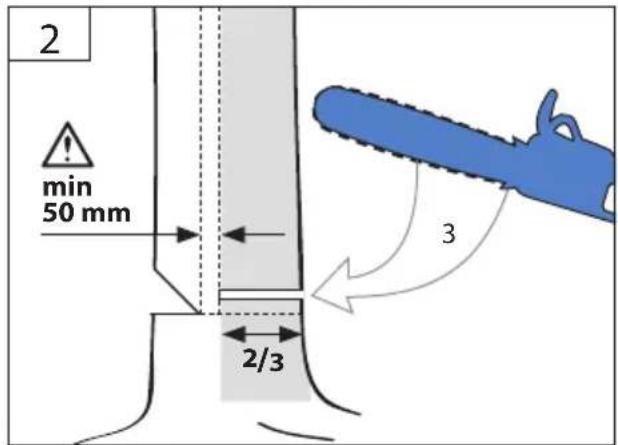
text_image
2 min 50 mm 3 2/3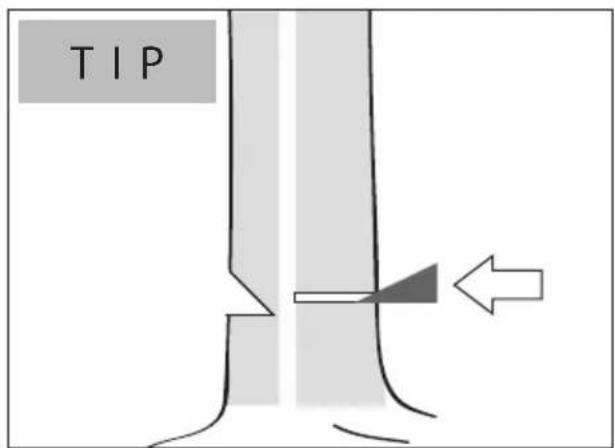
text_image
TIP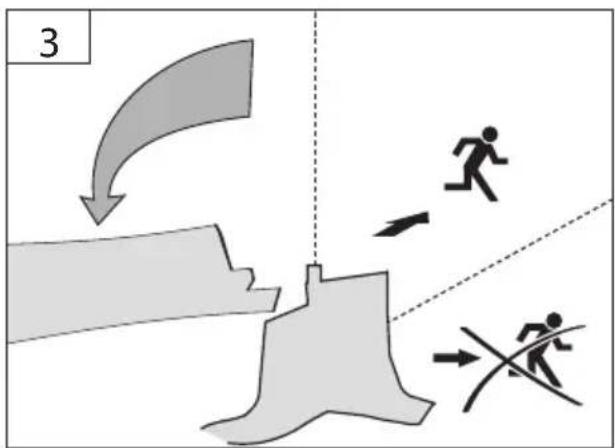
text_image
3natural_image
Illustration of a person using a power tool next to a tree with an exclamation mark (no text or symbols on the diagram itself)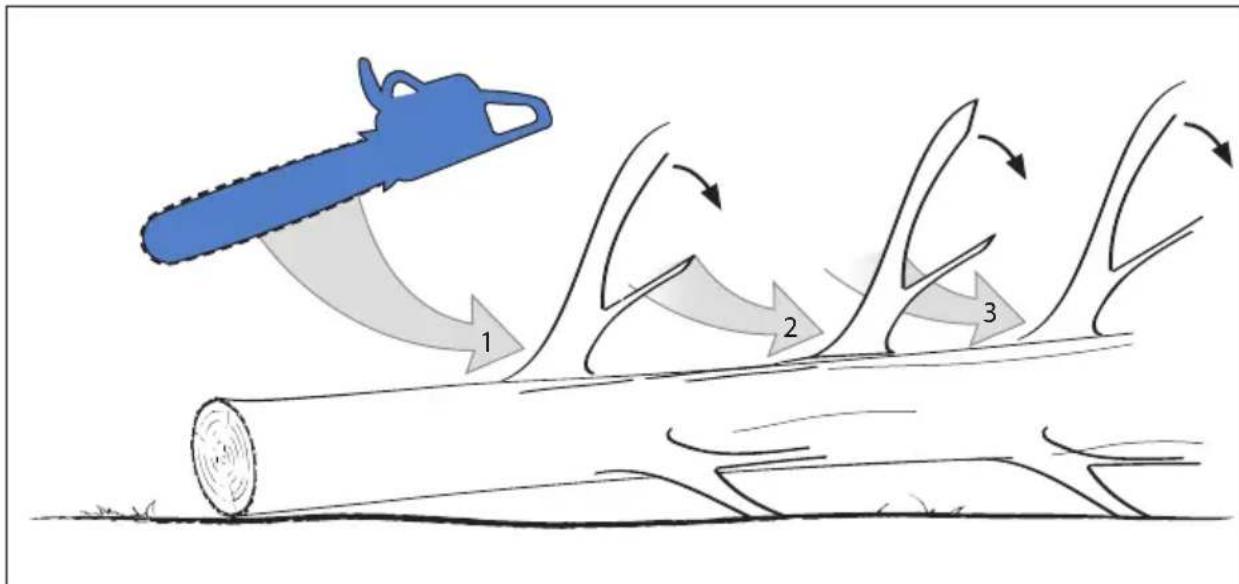
text_image
Diagram illustrating a logging process with a chainsaw and three moving logs labeled 1, 2, and 3.
natural_image
Illustration of a blue-handled saw cutting through water with a black crossbar, showing motion and impact (no text or symbols)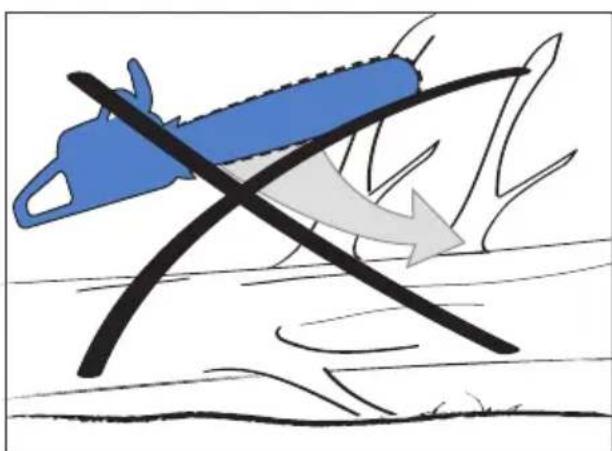
natural_image
Illustration of a blue-handled tool cutting through water with a black cross and arrow indicating flow (no text or symbols)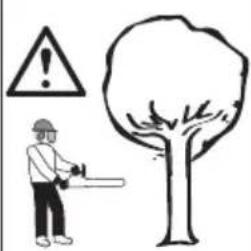
natural_image
Illustration of a worker using a power saw next to a tree with warning symbol (no text or labels)natural_image
Illustration of a wooden log rolling down with a chainsaw and moving a ball, showing motion direction (no text or symbols)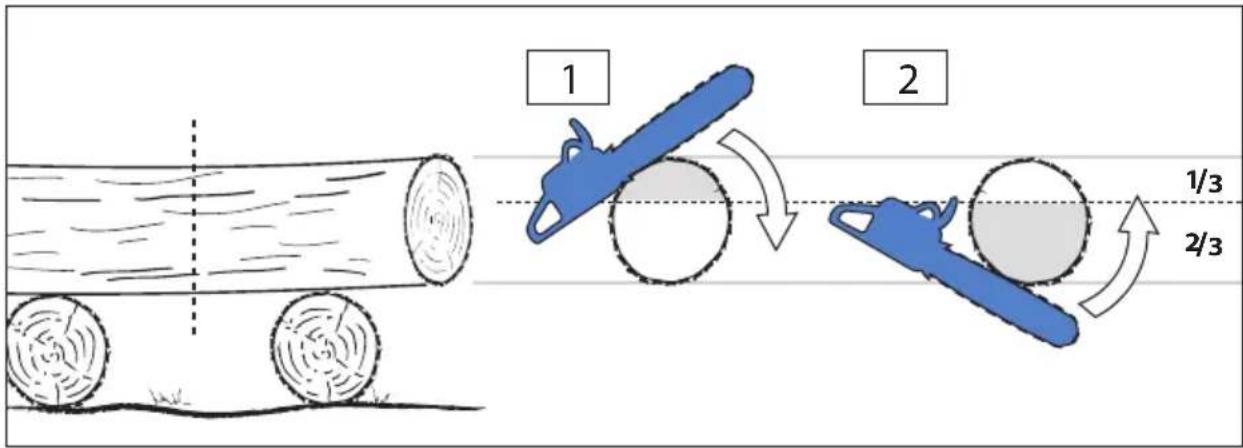
text_image
1 2 1/3 2/3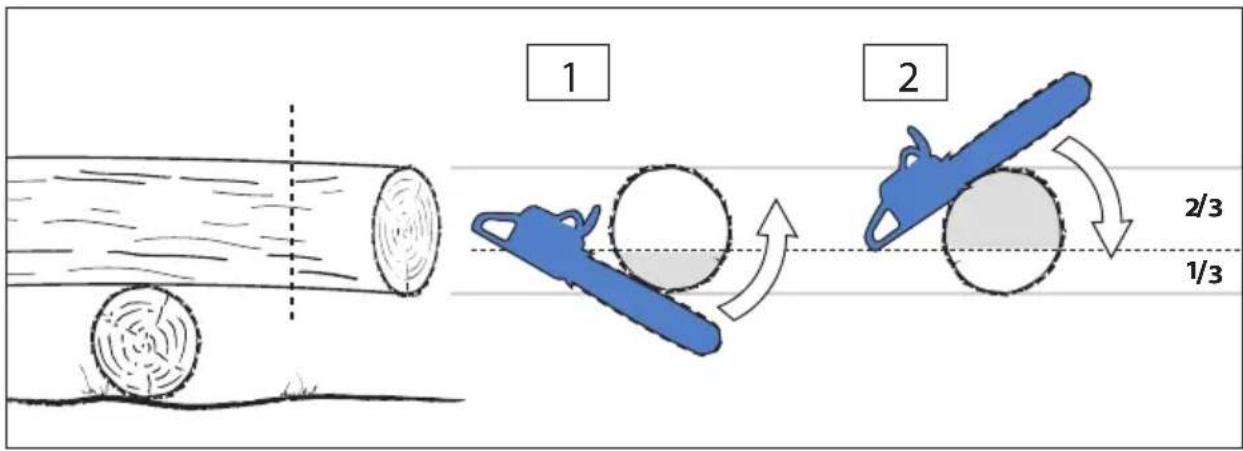
text_image
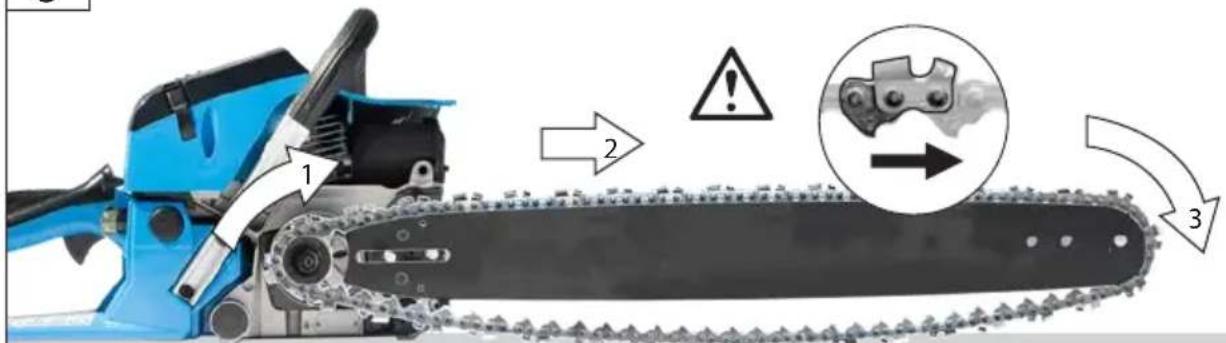
1 2 2/3 1/3GB ASSEMBLY OF CHAIN BAR AND CHAIN
FR MONTAGE DU GUIDE-CHAÎNE ET DE LA CHAÎNE
IT MONTAGGIO DELLA LISTA DI SEGA E DELLA CATENA
NL INBOUW KETTINGBALK EN KETTING
CZ MONTÁŽ ŘETĚZOVÉ LIŠTY A ŘETĚZU
SK MONTÁŽ RETAZOVEJ LIŠTY A RETAZE
natural_image
Blue chain-linking machine with visible internal components and a circular arrow indicating rotation (no text or symbols)2

natural_image
Close-up of a blue chain-linking tool with two black blades and a circular head (no text or symbols visible)3
text_image
Diagram of a blue chain-linking machine with labeled parts and warning indicators
natural_image
Simple line drawing of a jaw and two elongated objects (no text or symbols)GB ASSEMBLY OF CHAIN BAR AND CHAIN
FR MONTAGE DU GUIDE-CHAÎNE ET DE LA CHAÎNE
IT MONTAGGIO DELLA LISTA DI SEGA E DELLA CATENA
NL INBOUW KETTINGBALK EN KETTING
CZ MONTÁŽ ŘETĚZOVÉ LIŠTY A ŘETĚZU
SK MONTÁŽ RETAZOVEJ LIŠTY A RETAZE
natural_image
Close-up of a blue chain-linking machine with chains extending into the distance (no text or symbols visible)
text_image
Diagram illustrating eye detection and inspection process with labeled eye components and a green checkmark
text_image
Diagram illustrating a chainmailing machine with tool, tool icons, and safety check indicators in Chinese.
text_image
9 CC10

DE KETTENSPANNUNG
HU LÁNC FESZÜLTSÉGÉT
GB CHAIN TENSION SI VERIGA NAPETOSTI
FR TENSION DE LA CHAÎNE HR LANAC NAPETOSTI
IT TENSIONE DELLA CATENA BG ОБТЯГАНЕТО НА ВЕРИГАТА
NL KETTINGSPANNING
RO LANTULUI DE TENSIUNE
CZ NAPNUTÍ ŘETĚZU
SK NAPNUTIE RETAZE
GB ASSEMBLY OF CHAIN BAR AND CHAIN
FR MONTAGE DU GUIDE-CHAÎNE ET DE LA CHAÎNE
IT MONTAGGIO DELLA LISTA DI SEGA E DELLA CATENA
NL INBOUW KETTINGBALK EN KETTING
CZ MONTÁŽ RETĚZOVÉ LIŠTY A RETĚZU
SK MONTÁŽ RETAZOVEJ LIŠTY A RETAZE
natural_image
Simple line drawing of a tool with a handle and two horizontal bars, no text or symbols present.DE KETTENSPANNUNG
HU LÁNC FESZÜLTSÉGÉT
GB CHAIN TENSION SI VERIGA NAPETOSTI
FR TENSION DE LA CHAÎNE HR LANAC NAPETOSTI
IT TENSIONE DELLA CATENA BG ОБТЯГАНЕТО НА ВЕРИГАТА
NL KETTINGSPANNING
RO LANTULUI DE TENSIUNE
CZ NAPNUTÍ ŘETĚZU
SK NAPNUTIE RETAZE


TIP

text_image
P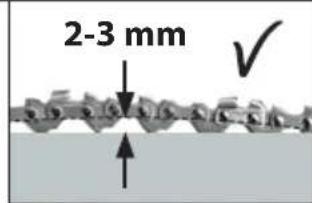
text_image
2-3 mmGB Repeat tensioning of new chain after approx. 5 cuts. With the engine off, check and adjust the chain tension after every 50 cuttings.
text_image
4 CHECK STOP
natural_image
Simple line drawing of a tool or device with a handle and two stacked rectangular blocks (no text or symbols)DE KETTENSPANNUNG
HU LÁNC FESZÜLTSÉGÉT
GB CHAIN TENSION SI VERIGA NAPETOSTI
FR TENSION DE LA CHAÎNE HR LANAC NAPETOSTI
IT TENSIONE DELLA CATENA BG ОБТЯГАНЕТО НА ВЕРИГАТА
NL KETTINGSPANNING
RO LANTULUI DE TENSIUNE
CZ NAPNUTÍ ŘETĚZU
SK NAPNUTIE RETAZE


KS 400-41
1

natural_image
Close-up of a blue-handled chain-linking cutter with a magnified inset showing tool positioning (no text or symbols)2

natural_image
Blue chain-linking machine with crosshair inset showing surface condition check (no text or symbols on the machine itself)3
text_image
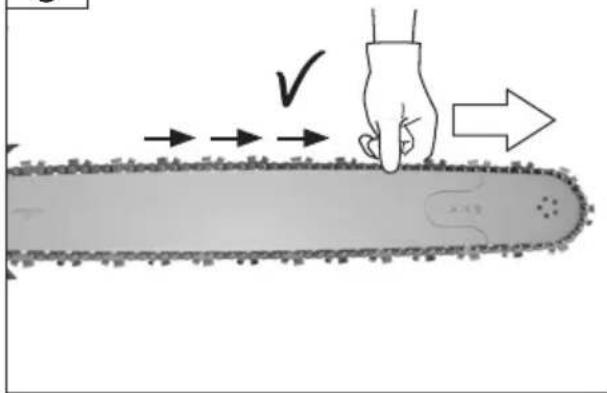
Diagram illustrating a hand pressing down on a chain with directional arrows and a checkmark indicating action.4

natural_image
Close-up of a blue mechanical device with black and gray components, no visible text or symbols
text_image
Diagram illustrating mechanical or electrical components with symbols including a curved line, plus/minus signs, and a blue knob.DE TANKEN HU TANKOLÁS
GB FUEL TANK FILLING
FR RAVITAILLEMENT
IT RABBOCCO BG ЗАРЕЖДАНЕ
NL TANKEN
CZ TANKOVÁNÍ
SK TANKOVANIE
SI DOLIVANJE GORIVA
HR DOPUNJAVANJE GORIVA
RO ALIMENTAREA CU COMBUSTIBIL


KS 450-46
KS 500-55

text_image
GUGE KS 450-46 waterdrop + - 6 5KS 400-41

text_image
GUGE KS 400-41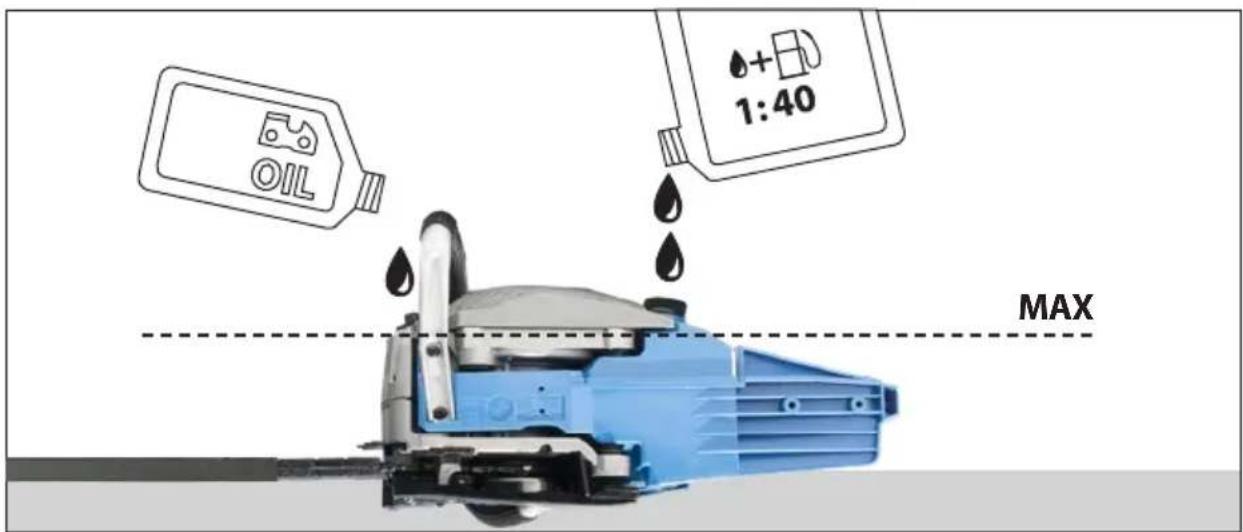
text_image
OIL 1:40 MAXSTART STOP
DE BETRIEB HU ÜZEMELTETÉS
GB OPERATION SI DELOVANJE
FR FONCTIONNEMENT HR RAD
IT ESERCIZIO BG PABOTA
NL GEBRUIK RO FUNCTIONARE
CZ PROVOZ
SK PREVÁDZKA


text_image
OIL 1:40 min. 3,00 m START1


natural_image
Close-up of a blue and gray GUDS chain-linker (KS 459-46) with no visible text or symbols on the device itself.2
text_image
Image showing a document icon with an exclamation mark and an arrow pointing to it, likely indicating a warning or alert symbol.

3
DE KALTSTART
GB COLD START
FR DÉMARRAGE À FROID
IT START A FREDDO
NL KOUDE START
CZ STUDENÝ START
SK STUDENÝ ŠTART
HU HIDEG STARTOLÁS
SI HLADNI ZAGON
HR HLADNI START
BG СТУДЕН СТАРТ
RO START LA RECE


6
DE WARMSTART
GB WARM START
FR DÉMARRAGE À CHAUD
IT START A CALDO
NL WARME START
CZ TEPLY START
SK TEPLY ŠTART
HU MELEG STARTOLÁS
SI TOPLIZAGON
HR TOPLI START
BG ТОПЪЛ СТАРТ
RO START LA CALD
DE BETRIEB / KALTSTART
natural_image
Blue chain-linking machine with attached gear and a circular dial indicator (no visible text or symbols)START STOP
DE BETRIEB / KALTSTART
natural_image
Illustration of a person using a blue chain-linking power tool, with an inset showing the same tool (no text or symbols present)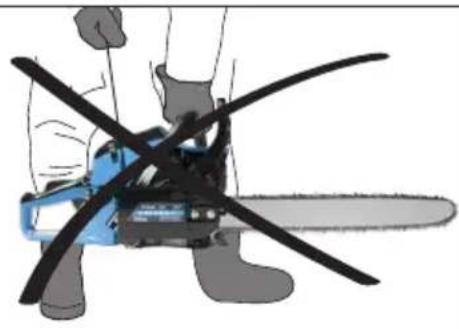
natural_image
Illustration of a person using a blue chainsaw with black blades (no text or symbols)GB Pull firmly the starting rope approx. 3-5 times till the first noise of running is evident.
natural_image
Blue and black chain-linking machine with visible blades and headstock (no text or symbols)DE BETRIEB/WARMSTART
GB Start-up of warm engine. Start-up of cool engine.
natural_image
Illustration of a person using a blue chain-linking power tool with a house symbol in the background (no text or symbols on the diagram itself)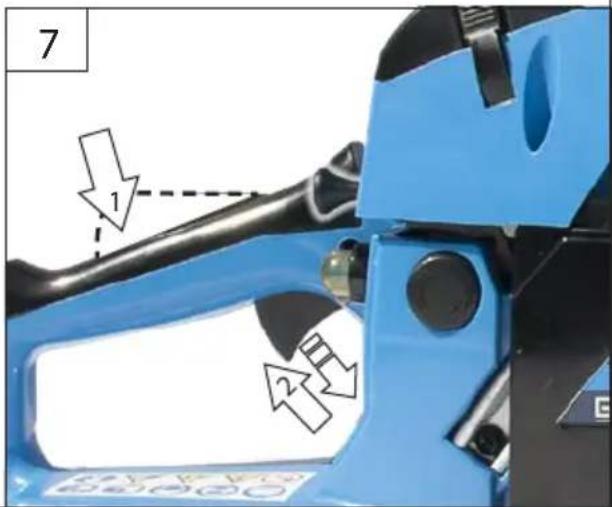
text_image
7 1 2GB If the engine does not start after first 2-3 attempts, repeat completely the cold start-up procedure.
natural_image
Close-up of a blue and black chain-linking machine with a white arrow pointing to the blade (no text or symbols visible)2
START
text_image
Close-up of a blue industrial machine handle with numbered annotations indicating parts of the component.
natural_image
Blue chain-linking tool with black handle and gear, shown in side profile with motion arrows (no text or symbols on the tool itself)
text_image
4 CHECK → STOPDE BETRIEB HU ÜZEMELTETÉS
GB OPERATION SI DELOVANJE
FR FONCTIONNEMENT HR RAD
IT ESERCIZIO BG PABOTA
NL GEBRUIK RO FUNCTIONARE
CZ PROVOZ
SK PREVÁDZKA
START STOP


STOP
natural_image
Close-up of a blue mechanical component with a black handle and arrow indicator (no readable text or symbols)STOP


natural_image
Close-up of a blue and black industrial machine component with a white arrow pointing to a detail (no visible text or symbols)
text_image
!
natural_image
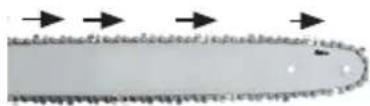
Simple diagram showing three arrows pointing upward and downward on a curved surface, with no text or symbols present.GB Chain runs out briefly after switching off!
natural_image
Silhouette of a wrench tool against a white background (no text or symbols)GB CHAIN LUBRICATION ADJUSTMENT
FR RÉGLAGE DU GRAISSAGE DE LA CHAÎNE
natural_image
Blue and black chain-linking machine with visible blade and handle (no text or symbols)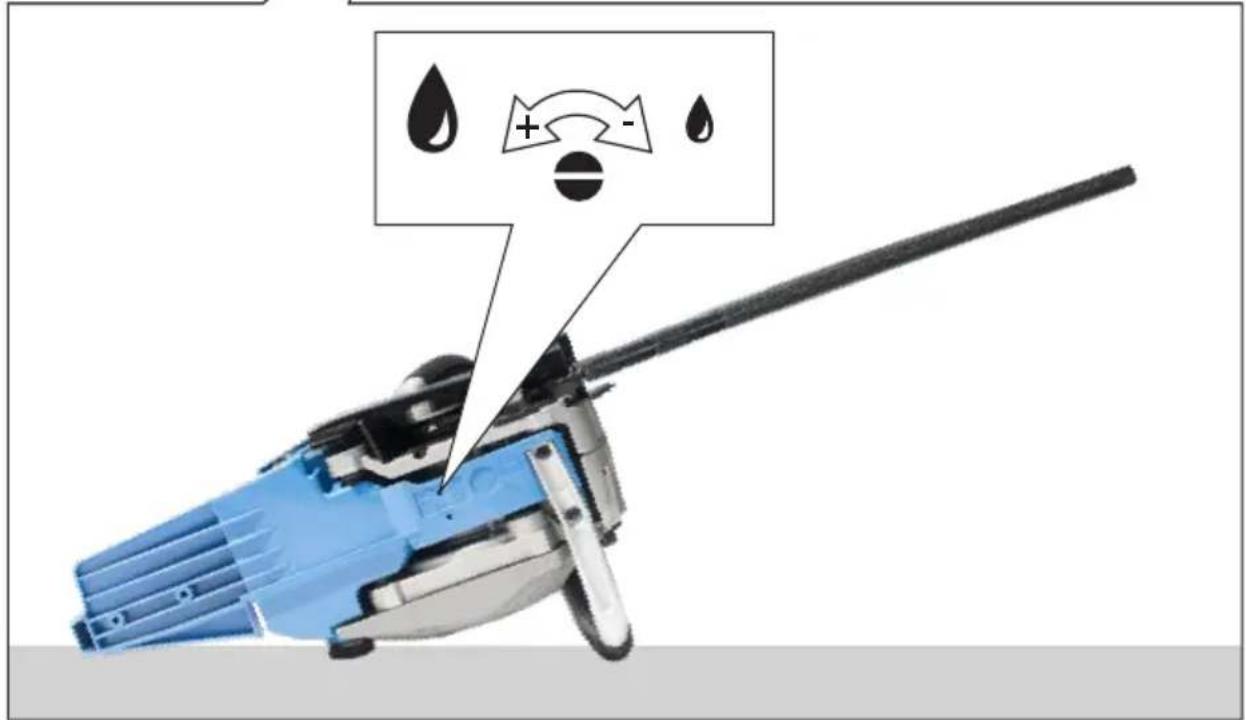
text_image
Diagram of a robotic arm with water droplets and control symbols, showing mechanical components and action indicators.flowchart
graph TD
    A["Lock Icon"] --> B["Arrow Up"]
    A --> C["Arrow Down"]
    B --> D["Downward Arrow"]
    C --> E["Downward Arrow"]

natural_image
Close-up of a blue chain-linking machine with black handle and control panel (no visible text or symbols)Technische Daten
* without claw
^1) At work place, Measured according to ISO 22868, Uncertainty K=3 dB (A),
2) Measured according to 2000/14/EC, 2005/88/EC
3) Measured according to EN ISO 22867, Uncertainty K=1.5 m/s²
WARNING: The vibration emission level will vary because of the ways in which a power tool can be used and may increase above the level given in this information sheet.
The vibration emission level may be used to compare one tool with another.
It may be used for a preliminary assessment of exposure.
An accurate estimate of the vibratory load should also take into account the times when the tool is shut down or when it is running but not actually in use. This may significantly reduce the vibratory load over the total working period.
Identify additional safety measures to protect the operator from the effects of vibration such as: maintain the tool and the accessories, keep the hands warm, organisation of work patterns.


Read and understand the operating instructions before using the appliance. Familiarise with the
control elements and how to use the appliance properly. Abide by all the safety measures stated in the service manual. Act responsibly toward third parties.
The operator is responsible for accidents or risks to third parties.
Persons over 18 years of age can only work on the appliance. An exception includes youngsters trained in order to reach knowledge under supervision of the trainer during occupational education.
In case of any doubts about connection and operation refer please to our customer center
You should get used to your new chain saw by making simple cuts on securely supported wood. Do this whenever you have not operated the saw for some time.
Some regions have regulations that restrict the use of the machine. Check with your local authority for advice.
Never allow children or people unfamiliar with the instructions to use the machine. Local regulations may restrict the age of the operator.
WARNING! When using the chain saw, the safety rules must be followed. For your own safety and that of bystanders, you must read and fully understand these instructions before operating the chain saw.
You should attend a professionally organized safety course in the use, preventative actions, first-aid, and maintenance of chain saws. Please keep these instructions safe for later use
WARNING! Do not use the appliance if you are tired, ill, under influence of drugs, alcohol drinks or medicaments.
Device description
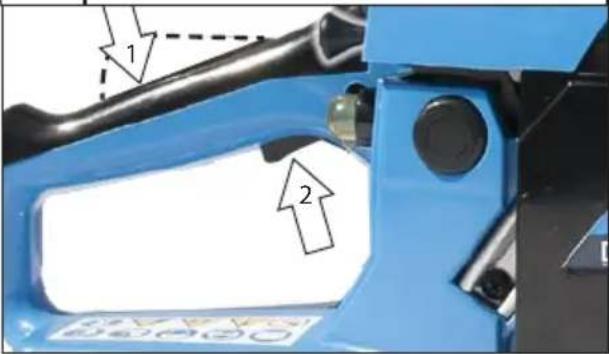
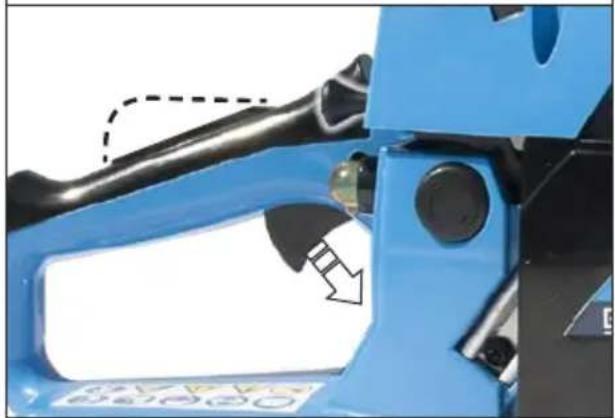
① Chain break/Front hands protection
② Handle
③ Bowden starter
④ Choke
⑤ Safety switch
⑥ throttle-lever
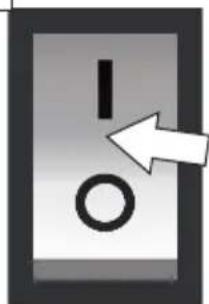
⑦ ON/OFF switch
⑧ Fuel top-up funnel
⑨ Chain oil top-up funnel
10 Krallenanschlag
⑪ Saw chain
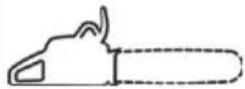
12 Saw bar
Specified Conditions Of Use
The chainsaw may only be used for cutting wood – across the fibres, with regard to the technical specifications and safety instructions.
Do not use the chain saw for any purpose not listed in the specified conditions of use. It is not to be used for professional tree services.
The chain saw is not to be used by children or by persons not wearing adequate personal protective equipment and clothing.
Do not use this product in any other way as stated for normal use. Not observing general regulations in force and instructions from this manual does not make the manufacturer liable for damages.

Use the appliance only outside, never use it confined and bad ventilated areas.
Residual risks

Damage to health arising from vibrations, hand and arms if the device is used for a single time or if the device is not guided and evaluated properly.
Vibration damping systems are no guaranteed protection against white finger disease or carpal tunnel syndrome. Therefore, it is necessary to carefully check the state of your fingers and wrist if you have regularly used the appliance for a long time. If any symptom of the diseases above appears, seek medical advice immediately. To reduce the white finger disease risk, keep your hands warm and take regular breaks during your work.

Hearing damage
A longer stay in the immediate vicinity of the running unit may cause hearing damage. Wear ear protectors!

Risk of poisoning!!
Exhaust gases, fuel and lubricants are toxic. Inhaling exhaust gases may be fatal!
Do not operate the unit in closed spaces where dangerous carbon monoxide gases may accumulate.

Risk of fire!!
Never operate the unit near highly flammable materials.
Fuel is highly flammable.
Keep the fuel in suitable containers only.
The appliance may only be refuelled outdoors and not near open fire or burning cigarettes.
Refuel the engine only when switched off. Refuel before starting the appliance. If the engine is running or still hot, it must not be refuelled or the tank cover opened.
After use, let the unit cool down for at least 10 minutes before refuelling.
Make sure the fuel does not overflow. If the fuel overflows, the engine must not be started. Remove any dirt from the appliance and prevent any attempt at ignition until fuel fumes have evaporated.
Replace all fuel tank and container caps securely.
Fuel tank to be emptied outdoors only.
Fuel must not come into contact with clothing. If your clothing has come into contact with fuel, change the clothing immediately.

Risk of explosion!
Petrol and petrol vapours are highly flammable, explosive.
Do not work with the unit in an environment with a risk of explosion where there are flammable liquids, gases or dust.
Refuel the engine only when switched off.
Do not store any fuel near the unit.
Never keep the unit with petrol in the tank inside a building where petrol vapours could get in contact with open fire or sparks.

Danger of injury!
Contact with the saw chain can cause casualties.
Never touch moving chain by hands.

Danger of kickback!
Kickback can lead to casualties.

Danger of burns!
Chain and guiding groove warm up in operation.
Emergency procedure
Conduct a first-aid procedure adequate to the injury and summon qualified medical attendance as quickly as possible. Protect the injured person from further harm and calm them down. If you seek help, state the following pieces of information
- Accident site, 2. Accident type, 3. Number of injured persons, 4. Injury type(s)
Symbols

WARNING / Caution!

Read the operating instructions to reduce the risk of injury.

Wear eye protective goggles! Wear ear protectors!

Wear protective helmet!

Wear gloves!

Wear safety cut through resistant shoes with safety sole and steel toe!

Wear protective clothing with cut through resistant ply!

Warning against dangerous kickback

Keep distance of persons! Observe to keep out of dangerous zone

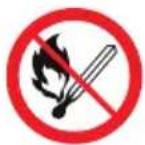
Risk of fire!: Prohibited smoking and open fire using.

Switch off the engine before any work on it.

Warning against dangerous voltage

Warning about inflammable substances

CE marking
Safety instructions

WARNING
Read all safety warnings and all instructions. Failure to follow the warnings and instructions may result in electric shock, fire and/or serious injury.
Save all warnings and instructions for future reference.
- Keep all parts of your body in safe distance from the saw when running. Before starting the saw, make sure the saw chain does not touch anything. A moment of inattention when working with the chainsaw is able to cause the saw chain to catch your clothes or parts of your body.
- Use your right hand to hold the chainsaw by its rear handle and your left hand to hold it by its front handle. Holding the chainsaw the opposite way increases the risk of injury and you must not do that.
- Wear protective glasses and ear protectors. Further, wearing head, hand and leg protection equipment is recommended. Suitable protective clothing minimises the risk of injury by thrown-away wood chips and possible contact with the saw chain.
- Do not work on trees with the chainsaw.There is a risk of injury when working on a tree.
- Provide safe posture at all times and use the chainsaw only when standing on a solid, safe and level surface. A slippery or unstable surface, such as ladder, may lead to loss of balance or loss of control over the chainsaw.
- When cutting a tense branch, be sure to know that the branch will bounce back. If tension in the wood fibres gets released, the tense branch may hit the operator and/or cause a loss of control over the chainsaw.
- Be especially careful when cutting scrubs and saplings. Thin material may get caught in the chainsaw and hit you or you may lose your balance.
- Carry the chainsaw by the front handle in a switched-off condition and the saw chain must be deflected from your body. Fit a protection cover on the chainsaw whenever it is transported or stored. Careful chainsaw treatment reduces the likelihood of an accidental contact with the running saw chain.
- Follow the lubrication, chain tension and accessory equipment replacement instructions. A chain that is not tightened or lubricated in a professional manner may crack or increase the risk of backlash.
- Keep the handles dry, clean and with no oil and fat. Handles dirty with fat or oil are slippery and lead to loss of control.
- Wood to be cut only. Do not use the chainsaw for works for which it has not been designed – example: do not use the chainsaw to cut plastic material, masonry or building materials not made of wood. Using the chainsaw for works that
are in conflict with the designation may lead to dangerous situations.
Backlash causes and prevention:
Backlash may take place when the saw bar point touches an item or when the wood bends and the saw chain gets stuck in the cutting.
In many cases, a contact with the bar point may lead to a situation when the operator unexpectedly bends backward and the bar is ejected upward toward the operator as a result.
Sticking of the saw chain on the upper edge of the bar may throw the bar intensely off toward the operator.
Each such reaction may lead to losing control over the saw and you may get seriously injured. Do not fully rely on the safety equipment fitted in the chainsaw. As the chainsaw user, you should take various measures to be able to work without any accident and injury.
Kickback is the result of tool misuse and/or incorrect operating procedures or conditions and can be avoided by taking proper precautions as given below.
- Hold the saw firmly with both hands; clamp the chainsaw handle with thumbs and fingers. Position your body and arms so that you could absorb the back impact. If appropriate measures are taken, the operator is able to control the back impact force. Never drop the chainsaw.
- Avoid abnormal body posture and do not cut above the shoulder level. This will prevent a contact with the bar point and the chainsaw will be controlled better in unexpected situations.
- Spare bars and saw chains specified by the manufacturer to be used at all times. Wrong spare bars and saw chains may lead to chain overloading and/or backlash.
- Follow the manufacturer instructions for chain-saw sharpening and maintenance. Too low depth limiters increase the tendency to back impact.
Observe national regulations and instructions for chain saws operation.
Take care to prevent from fuel and oil leakage during transport.
The dust that arises when working with this tool can be detrimental to health and therefore not reach the body. Wear a suitable dust protection mask.
Check the tension frequently. The length of the chain depends on the temperature. The length of the chain depends on the temperature.
Checking the chain brake
Engage the chain brake by rotating your left hand around the front handle. Allow the back of your hand to push the chain brake lever/hand guard toward the bar while the chain is rotating rapidly. Be sure to maintain both hands on the saw handles at all times.
WARNING! If the chain brake does not stop the chain immediately, or if the chain brake will not stay in the run position without assistance, bring the chain
saw to an service station for repair prior to use.
⚠️ Check all screw and plug-in connections and protective equipment if firm and tightened properly and whether all moving parts are running smooth whenever the appliance is to be put into operation.
⚠ It is strictly prohibited to disassemble, modify and purposely remove the protective equipment on the unit and fit other protective equipment instead.
The appliance must not be used if damaged or safety equipment is defective. Replace any worn-out and damaged parts.
Provide adequate lighting or good lighting conditions when working with the machine.
Be careful when going backwards – risk of tripping!
Do not run! Immediately remove cut branches/knots from the work area to prevent injuries. Watch out for falling branches!
The ON/OFF switch and safety switch must not be locked.
Work instructions
Felling a tree
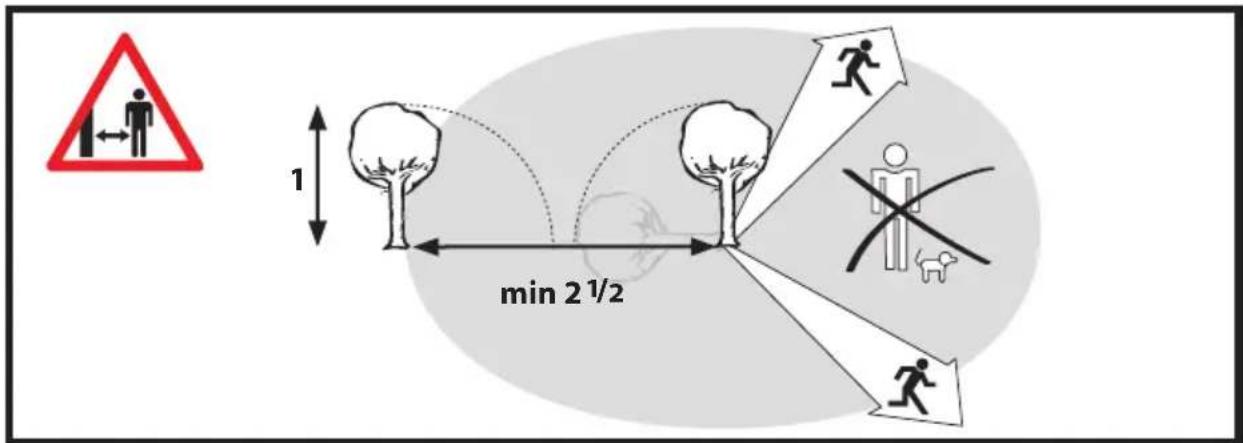
When bucking and felling operations are being performed by two or more persons at the same time, the felling operations should be separated from the bucking operation by a distance of at least twice the height of the tree being felled. Trees should not be felled in a manner that would endanger any person, strike any utility line, or cause any property damage. If the tree does make contact with any utility line, the company should be notified immediately. The chain saw operator should keep on the uphill side of the terrain as the tree is likely to roll or slide downhill after it is felled.
An escape path should be planned and cleared as necessary before cuts are started. The escape path should extend back and diagonally to the rear of the expected line of fall.
Before felling starts, consider the natural lean of the tree, the location of larger branches, and the wind direction to judge which way the tree will fall.
Remove dirt, stones, loose bark, nails, staples, and wire from the tree.
Do not attempt to fell trees which are rotten or have been damaged by wind, fi re, lightning, etc. This is extremely dangerous and should only be completed by professional tree surgeons.
1. An escape path should be planned and cleared as necessary before cuts are started. The escape path should extend back and diagonally to the rear of the expected line of fall.
Before felling starts, consider the natural lean of the tree, the location of larger branches, and the wind direction to judge which way the tree will fall.
2. Remove dirt, stones, loose bark, nails, staples, and wire from the tree.
Do not attempt to fell trees which are rotten or have been damaged by wind, fire, lightning, etc. This is extremely dangerous and should only be completed by professional tree surgeons.
When the tree begins to fall remove the chain saw from the cut, stop the motor, put the chain saw down, and use the retreat path planned. Be alert for falling overhead limbs and watch your footing.
Removing buttress roots
A buttress root is a large root extending from the trunk of the tree above the ground. Remove large buttress roots prior to felling. Make the horizontal cut into the buttress first, followed by the vertical cut. Remove the resulting loose section from the work area. Follow the correct tree felling procedure after you have removed the large buttress roots.
Bucking a log
Bucking is cutting a log into lengths. It is important to make sure your footing is firm and your weight is evenly distributed on both feet. When possible, the log should be raised and supported by the use of limbs, logs or chocks. Follow the simple directions for easy cutting. When the log is supported along its entire length, it is cut from the top (overbuck). When the log is supported on one end, cut 1/3 the diameter from the underside (underbuck). Then make the finished cut by overbucking to meet the first cut.
When the log is supported on both ends, cut 1/3 the diameter from the top (overbuck). Then make the finished cut by underbucking the lower 2/3 to meet the first cut.
When bucking on a slope always stand on the uphill side of the log. To maintain control when "cutting through", release the cutting pressure near the end of the cut without relaxing your grip on the chain saw handles. Don't let the chain contact the ground. After completing the cut, wait for the saw chain to stop before you move the chain saw. Always stop the motor before moving from tree to tree.
After completing the cut, wait for the saw chain to stop before you move the chain saw. Always stop the motor before moving from tree to tree.
Limbing a tree
Limbing is removing the branches from a fallen tree. When limbing, leave larger lower limbs to support the log off the ground. Remove the small limbs in one cut. Branches under tension should be cut from the bottom up to avoid binding the chain saw.
Cutting springpoles
A springpole is any log, branch, rooted stump, or sapling which is bent under tension by other wood so that it springs back if the wood holding it is cut or removed. On a fallen tree, a rooted stump has a high potential of springing back to the upright position during the bucking cut to separate the log from the stump. Watch out for springpoles—they are dangerous. Springpoles are dangerous and could strike the operator, causing the operator to lose control of
the chain saw. This could result in severe or fatal injury to the operator. This should be done by trained users.
Krallenanschlag 10
The integral bumper spike may be used as a pivot when making a cut. It helps to keep the body of the chain saw steady while cutting. When cutting, push the machine forward until the spikes dig into the edge of the wood, then by moving the rear handle up or down in the direction of the cutting line it can help ease the physical strain of cutting.
Maintenance
⚠️ Switch the engine off and remove the socket plug before any work on the engine. Wait until the unit has cooled down.
Repairs and works specified in these Instructions may only be performed by qualified authorised staff. Use only original accessories and original spare parts.
Biodegradable oil for chains to be used only.
Keep the device, in particular the air vents, clean at all times. Never spray water on the device body!
Never clean the machine and its components with solvents, flammable or toxic liquids. Us only a damp cloth making.
Apply environment-friendly oil to all moving parts.
After each use, clean the saw and sword chain carefully. Wipe it with a cloth moistened in oil or apply metal treatment spray on it.
Blunt, bent or damaged chains and swords must be replaced.
Only a regularly maintained and treated appliance can serve as a satisfactory aid. Insufficient maintenance and care can lead to unforeseen accidents and injuries.
If necessary, a list of spare parts can be found at www.guede.com.
Machine to be stored in a dry place.
Guarantee
Warranty period of 12 months applies to commercial use and 24 months applies to private use and commences on the day of purchase of the device.
The guarantee solely covers inadequacies caused by material defect or manufacturing defect. Original payment voucher with the sales date needs to be submitted for any claim in the guarantee period.
The guarantee does not cover any unauthorised use such as appliance overloading, use of violence, damage as a result of any unauthorised interference or caused by foreign items. Failing to follow the operating and assembly instructions and common wear are also not included in the guarantee.
Important information for the customer
Please be sure to know that returning the product in or after the warranty period must be made in the original packaging.
Service
Do you have any technical questions? Any claim? Do you need any spare parts or operating instructions? We will quickly help you and without needles bureaucracy at our web pages at www.guede.com in the Servicing part. Please help us be able to help you. In order to identify your device in case of claim we need the serial No., product No. and year of production. All this data can be found on the type label.
Tel.: +49 (0) 79 04 / 700-360
Fax: +49 (0) 79 04 / 700-51999
E-Mail: support@ts.guede.com
Inspection and maintenance plan
| Generally Complete saw | Regularly clean the outer partLet regularly checked by authorized workshopCheck for cracks and fissuresLet regularly sharpen.Clean regularlyClean regularlyRegular functional testRegular functional test (Chain can not move in idle run). | |
| Plastic bodySaw chainChain saw barChain saw wheelChain breakClutch | ||
| Before any start-up Saw chain | Check for damages and sharpnessCheck the chain tensionFunctional testFunctional testFunctional testFunctional testCheck for tightnessIn case damage let repaired in authorized workshop | |
| Chain saw barChain lubricationChain breakFollow-up brakeON/OFF switchOil tank cap | ||
| After every take out of service | Chain saw barBar fixture | Clean the oil top-up openingClean above all guiding oil groove |
| Storage Chain oil tank | DrainDismount, clean and lubricate slightly by oil Clean the saw guiding grooveCleaned chain saw store safely in dry room - out of children reach.Let the chain saw checked by authorized workshop after long term storage (remaining oil can be resinous and clog the oil pump valve) |
Failure removal
| Failures Causes Removal | ||
| The motor does not start 1. Put the operational switch to OFF position2. Empty fuel tank3. Over floated motor4. Sooted spark plug (carbon residues on electrodes), electrodes distance too big5. Dirty carburettor, dirty carburettor nozzles6. Damaged spark plug contact, faulty ignition cable7. Missing spark | 1. Put the operational switch to ON position2. Top-up fully the fuel tank3. Reduce throttle, start couple times, in case of necessity dismantle spark plug, clean and dry it4. Clean the spark plug, check the plug thermal value, possibly change the plug, set the electrodes distance to 0.6-0.7 mm5. Let the carburettor cleansed, blow through by air in authorized workshop6. let changed in authorized workshop7. Check the switch-off button, cable and ignition module, poss. Let replaced in authorized workshop, let adjusted gap to 0.3-0.4 mm | |
| Idle speed too high 1. Cold engine 1. Heat up slowly, poss. Close slightly choke | ||
| Engine does not give max. output | 1. Sooted spark plug (carbon residues on electrodes), electrodes distance too big2. Dirty carburettor, dirty carburettor nozzles3. Dirty air filter4. Exhaust, exhaust channel of cylinder5. Leaky sealing gasket in crankcaset6. Worn-down cylinders, pistons, piston rings7. Bad fuel/oil mix (too much oil)8. Bad ignition | 1. Clean the spark plug, check the plug thermal value, possibly change the plug, set the electrodes distance to 0.6-0.7 mm2. Let the carburettor cleansed, blow through by air in authorized workshop3. Clean4. Let the exhaust dismantle and clean in authorized workshop, let clean the carbon residues5. let changed in authorized workshop6. Let replaced cylinders, pistons and piston rings in authorized workshop, let the cylinders ground with end lap and let installed oversize piston7. Fill the fuel tank according to the manual8. Contact gap size of ignition module (0.3-0.4 mm) let adjusted in authorized workshop |
| Motor can not be switched off | 1. Light-grey spark plug with traces of burning (melting pearls)2. residues of carbon in the combustion chamber | 1. Install spark plug of higher thermal value2. Let cleaned the cylinder head, piston top and cylinder channels in authorized workshop |
| The chain runs despite idling | 1. Too high idle speed 1. Set / reduce idle speed | |
Attentions substances inflammables

symbole CE
WAARSCHUWING / Opgelet!

Translation of the EC-Declaration of Conformity
We, hereby declare the conception and construction of the below mentioned appliances correspond - at the type of construction being launched - to appropriate basic safety and hygienic requirements of EC Directives.
In case of any change to the appliance not discussed with us the Declaration expires.