GV 1431 2in1 - Scarifier Güde - Free user manual and instructions
Find the device manual for free GV 1431 2in1 Güde in PDF.

User questions about GV 1431 2in1 Güde
0 question about this device. Answer the ones you know or ask your own.
Ask a new question about this device
Download the instructions for your Scarifier in PDF format for free! Find your manual GV 1431 2in1 - Güde and take your electronic device back in hand. On this page are published all the documents necessary for the use of your device. GV 1431 2in1 by Güde.
USER MANUAL GV 1431 2in1 Güde
natural_image
Red and black lawn mower with attached power cord and red buttons (no text or symbols visible)GV 1431 2 in 1
95128
GÜDE GmbH & Co. KG
Birkichstrasse 6
74549 Wolpertshausen
Deutschland


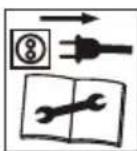
text_image
Güde

ENGLISH Please read the instructions carefully before starting the machine.
text_image
Scanned document page with placeholder text and a blue circular logo, likely a software interface or report.
natural_image
Red and black robotic device with wheels and a digital display (no visible text or symbols)3

natural_image
Pure diagram of two black bars with three red circular shapes below, no text or symbols present67
natural_image
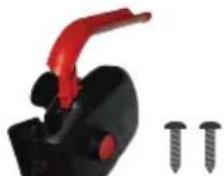
Close-up of a red-handled clamp tool with two screws attached (no text or symbols visible)The image is too blurry to recognize any text content.

2

natural_image
Two black L-shaped metal bars with screw holes, no text or symbols present5

text_image
Image showing two red mushrooms next to a vertical line of black lines, likely indicating equivalence or measurement.8

natural_image
Close-up of a black cylindrical mechanical component with multiple protruding pins (no visible text or symbols)| D | Montage | SLO | Montaža |
| GB | Assembly | HR | Montaža |
| F | Assemblage | BG | Монтаж |
| I | Montaggio | RO | Montaj |
| NL | Montage | BIH | Montaža |
| CZ | Montáž | ||
| SK | Montáž | ||
| H | Szerelés |
1
2-3
| D | Inbetriebnahme | SLO | Uvedba v pogon |
| GB | Starting-up the machine | HR | Puštanje u rad |
| F | mise en service | BG | Пускане в действие |
| I | Messa in funzione | RO | Punerea în funcțiune |
| NL | Inbedrijfstelling | BIH | Puštanje u rad |
| CZ | Uvedení do provozu | ||
| SK | Uvedenie do prevádzky | ||
| H | Üzembe helyezés |
2
4-5
| D | Betrieb | SLO | Delovanje |
| GB | Operation | HR | Rad |
| F | Fonctionnement | BG | Pábota |
| I | Esercizio | RO | Functionare |
| NL | Gebruik | BIH | Rad |
| CZ | Provoz | ||
| SK | Prevádzka | ||
| H | Üzemeltetés |
3
6
| D | Arbeitsanweisungen | SLO | Napotki za delo |
| GB | Work instructions | HR | Radne upute |
| F | Instructions | BG | Инструкции за експлоатация |
| I | Istruzioni di lavoro | RO | Instrucțiuni de lucru |
| NL | Werkaanwijzing | BIH | Radna uputstva |
| CZ | Pracovní instrukce | ||
| SK | Pracovné inštrukcie | ||
| H | Munkavégzési utasítások |
4
7-9
| D | Reinigung / Wartung | SLO | Čiščenje / Vzdrževanje |
| GB | Cleaning / Maintenance | HR | Čiščenje / Održavanje |
| F | Nettoyage / Entretien | BG | Чистене / Поддръжка |
| I | Pulizia / Manutenzione | RO | Curățare / Întreținere |
| NL | Schoonmaken / Onderhoud | BIH | Čiščenje / Održavanje |
| CZ | Čištění / Údržba | ||
| SK | Čistenie / Údrzba | ||
| H | Tisztítás / Karbantartás |
5
10
| D | Montage | SLO | Montaža |
| GB | Assembly | HR | Montaža |
| F | Assemblage | BG | Монтаж |
| I | Montaggio | RO | Montaj |
| NL | Montage | BIH | Montaža |
| CZ | Montáž | ||
| SK | Montáž | ||
| H | Szerelés |

text_image
1 1
flowchart
graph TD
    A["2"] --> B["2"]
    B --> C["2"]
    C --> D["2"]
    D --> E["2"]
    E --> F["2"]
    style A fill:#f9f,stroke:#333
    style B fill:#ccf,stroke:#333
    style C fill:#cfc,stroke:#333
    style D fill:#fcc,stroke:#333
    style E fill:#cff,stroke:#333
    style F fill:#ffc,stroke:#333
text_image
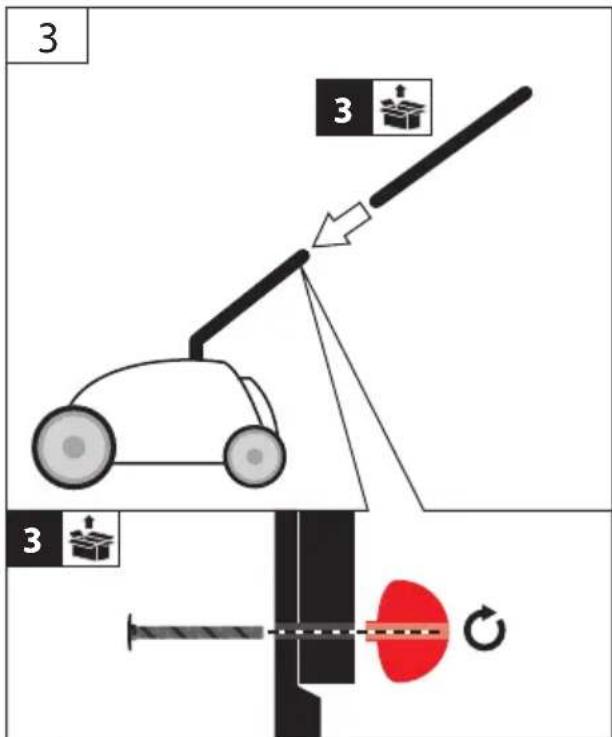
3 3 3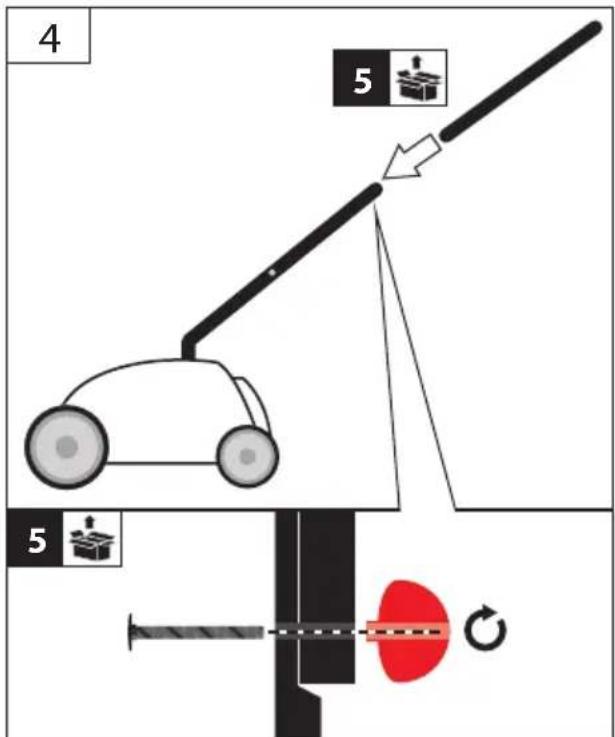
text_image
4 5 5| D | Montage | SLO | Montaža |
| GB | Assembly | HR | Montaža |
| F | Assemblage | BG | Монтаж |
| I | Montaggio | RO | Montaj |
| NL | Montage | BIH | Montaža |
| CZ | Montáž | ||
| SK | Montáž | ||
| H | Szerelés |
text_image
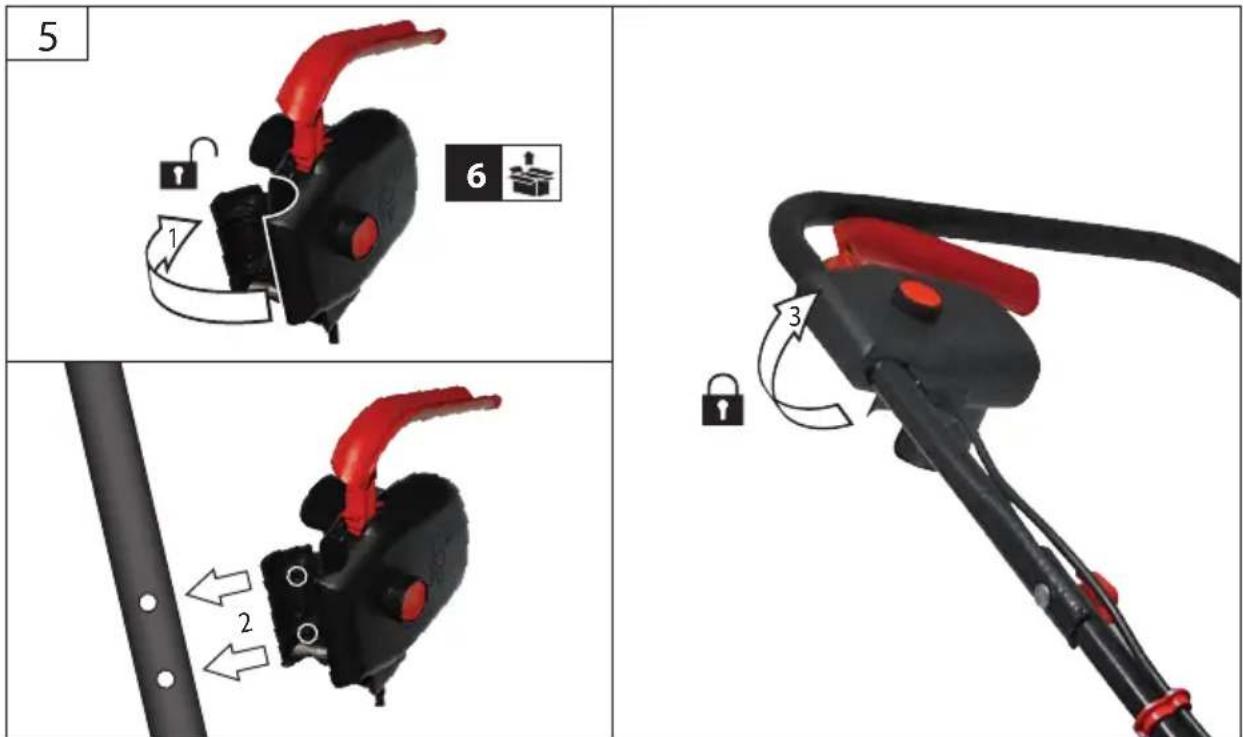
5 6 1 2 3
text_image
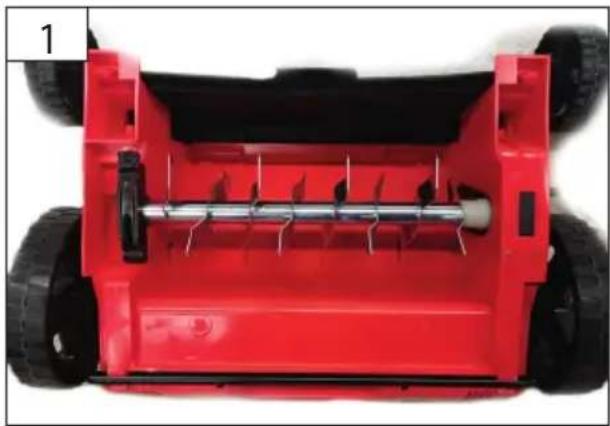
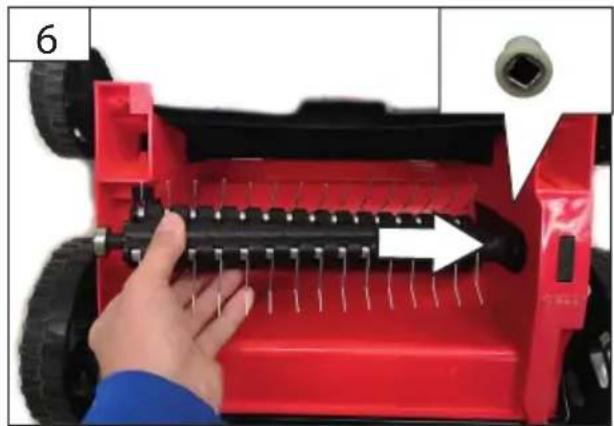
6 6 7 2 x| D Walze wechseln | SLO Zamenjati valj | |
| GB Change roller | HR Promjena valjka | |
| F Remplacer le cylindre | BG Сменете режещия цилиндър | |
| I Sostituire il rullo | RO Schimbarea valțului | |
| NL Wals vervangen | BIH Promjena valjka | |
| CZ Vyměňte válec | ||
| SK Vymeňte valec | ||
| H Henger cseréje |
natural_image
Top-down view of a red toy car with visible wheels and internal components (no text or symbols)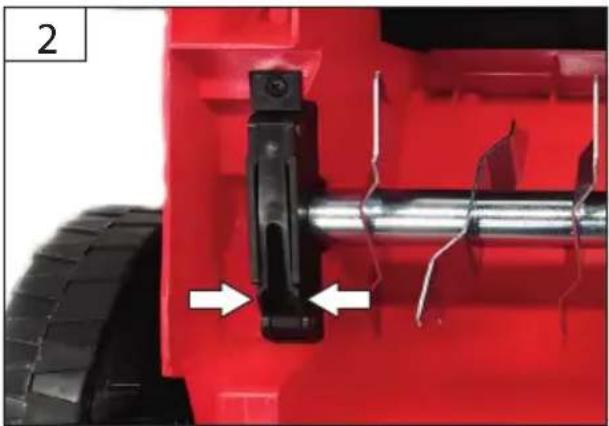
natural_image
Close-up of a red toy vehicle's wheel and mechanical component with arrows indicating movement or assembly (no text or symbols)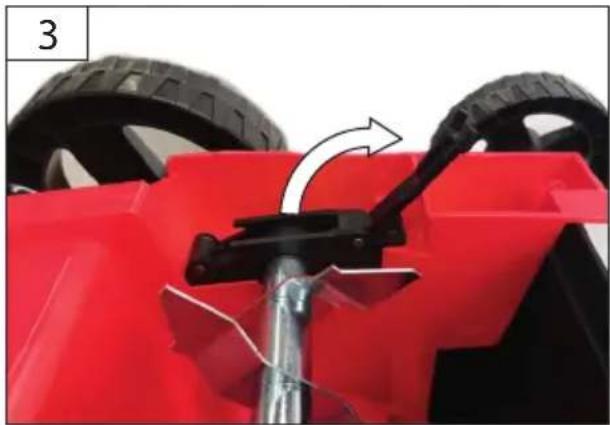
natural_image
Red toy vehicle with black tires and a lever mechanism, no visible text or symbols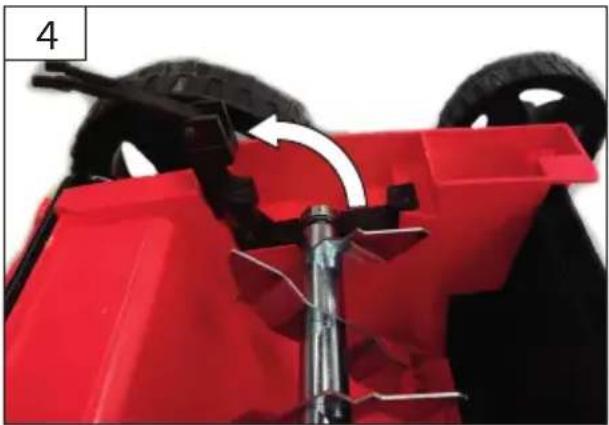
natural_image
Close-up of a red toy car with wheels and a mechanical lever, no visible text or symbols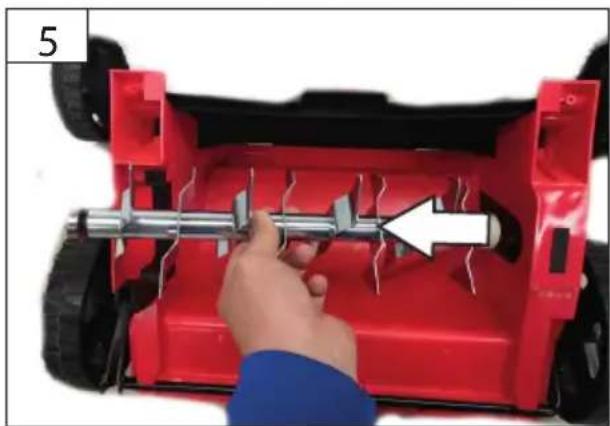
natural_image
Close-up of a red robotic vehicle with a hand using a tool to adjust internal components (no text or symbols visible)| D | Walze wechseln | SLO | Zamenjati valj |  |
| GB | Change roller | HR | Promjena valjka | |
| F | Remplacer le cylindre | BG | Сменете режещия цилиндър | |
| I | Sostituire il rullo | RO | Schimbarea valțului | |
| NL | Wals vervangen | BIH | Promjena valjka | |
| CZ | Vyměňte válec | |||
| SK | Vymeňte valec | |||
| H | Henger cseréje |
natural_image
Close-up of a red agricultural machine with a hand adjusting its side panel, showing mechanical components and a white arrow indicating direction (no text or symbols visible)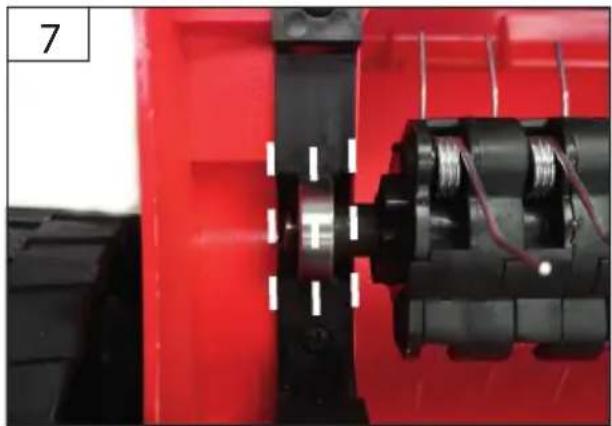
natural_image
Close-up of a red industrial machine with black components and wiring (no visible text or symbols)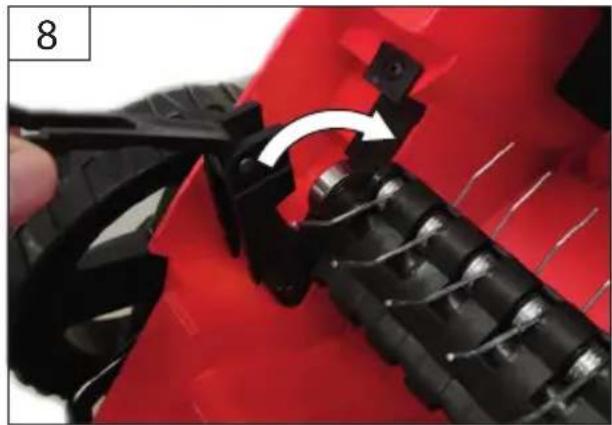
natural_image
Close-up of a red electric motor with black plastic components being adjusted by a tool (no text or symbols visible)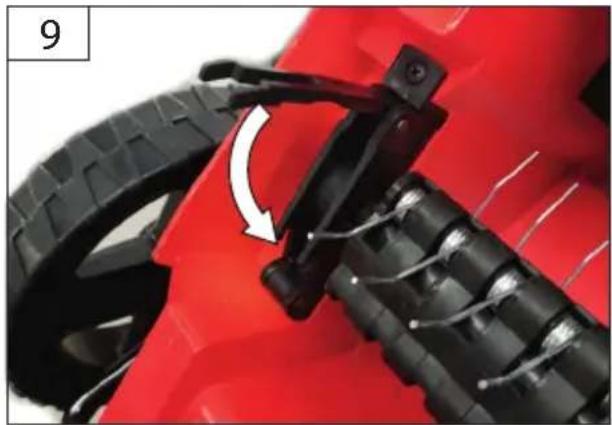
natural_image
Close-up of a red toy car tire with black brake clips and a white arrow indicating rotation (no text or symbols)
text_image
10 CLICK
natural_image
A green curved line on a white background, no text or symbols present.| 2 | D ArbeitshöheneinstellungGB Working height adjustmentF Réglage de la hauteur de travailI Regolazione dell'altezza di lavoroNL Instelling werkhoogteCZ Nastavení pracovní výškySK Nastavenie pracovnej výšky | H A munkavégzési magasság beállításaSLO Nastavitev delovne višineHR Podešavanje radne visineBG Pergyliране на работната височинаRO Reglarea înăltimii de lucruBIH Podešavanje visine sječenja |
natural_image
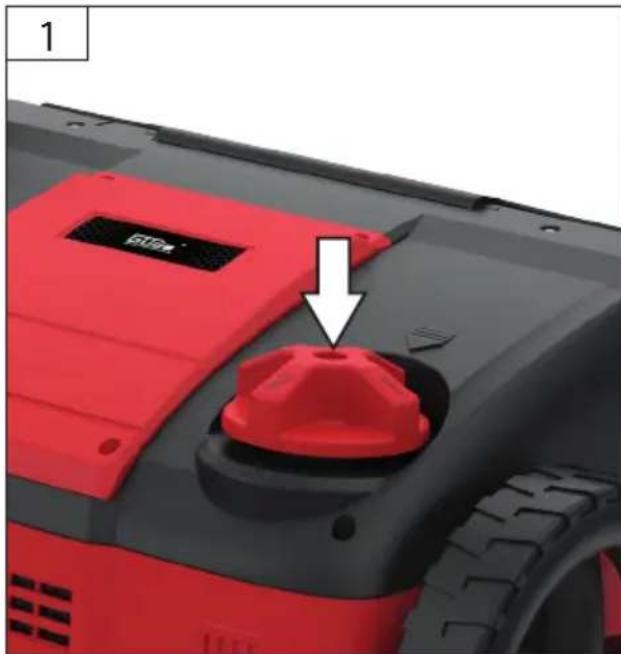
Close-up of a red and black electric vehicle battery with a red knob, showing mechanical components and a white arrow pointing to the knob (no text or symbols visible)
natural_image
Close-up of a red circular device with four labeled buttons (0, 1, 2, 3) and white directional arrows indicating rotation or movement (no text or symbols beyond labels)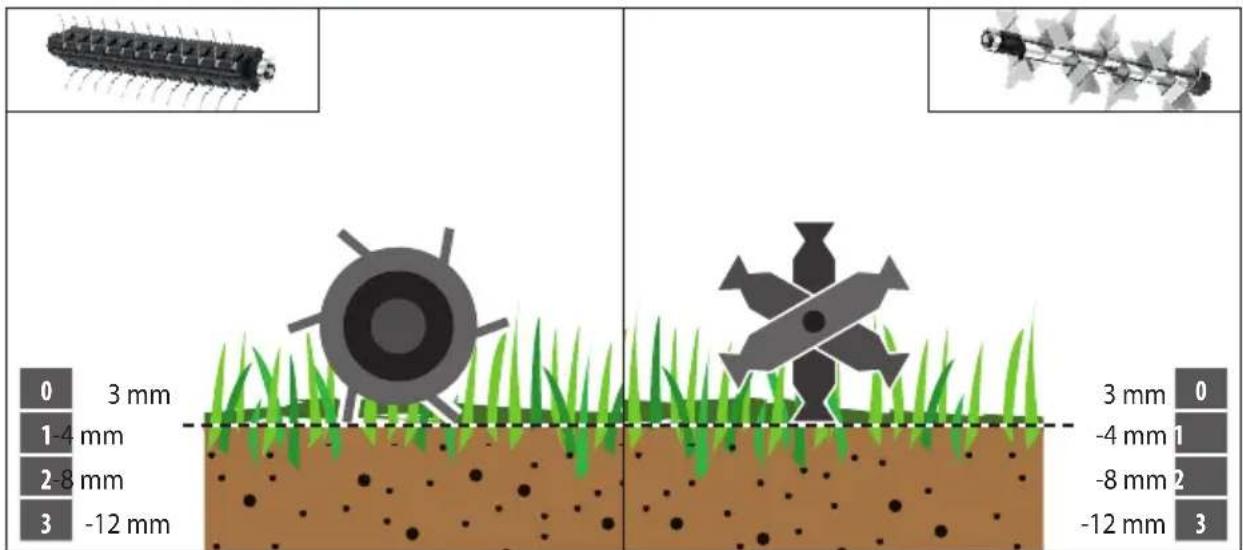
text_image
0 3 mm 1-4 mm 2-8 mm 3 -12 mm 3 mm 0 -4 mm 1 -8 mm 2 -12 mm 3| D | Betrieb | SLO | Delovanje |  |
| GB | Operation | HR | Rad | |
| F | Fonctionnement | BG | Pabota | |
| I | Esercizio | RO | Functionare | |
| NL | Gebruik | BIH | Rad | |
| CZ | Provoz | |||
| SK | Prevádzka | |||
| H | Üzemeltetés |


natural_image
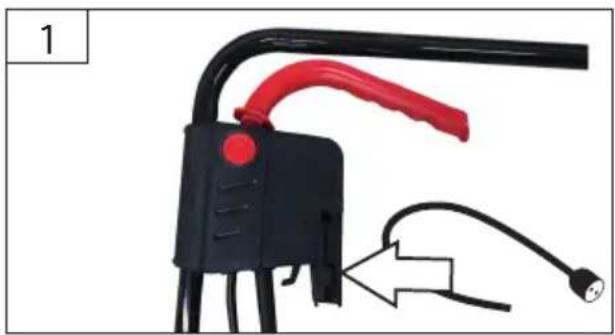
Close-up of a black electrical clamp with red handle and cable, no visible text or symbols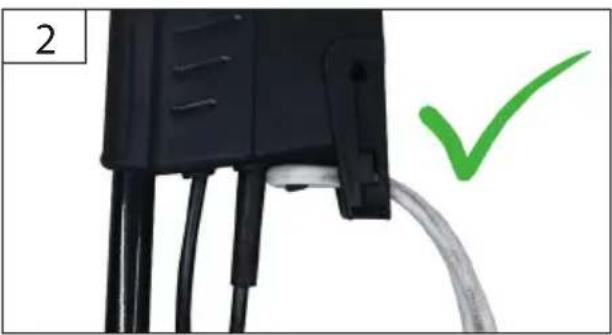
natural_image
Close-up of a black electrical plug with wires and a green checkmark indicating a detail (no text or symbols on the plug itself)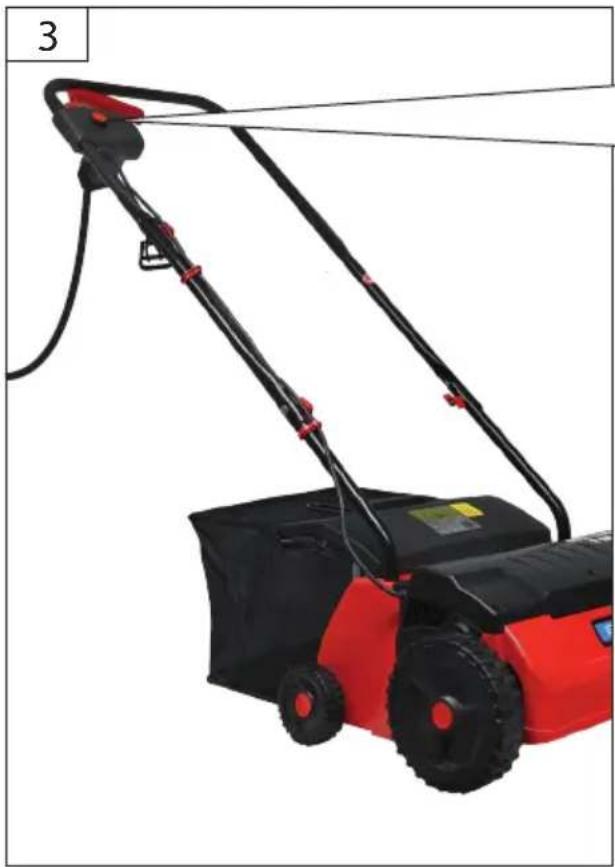
natural_image
Red and black lawn mower with attached hose and base (no visible text or symbols)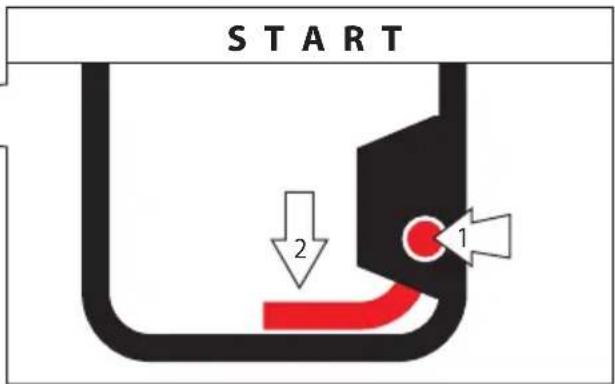
text_image
START 2 1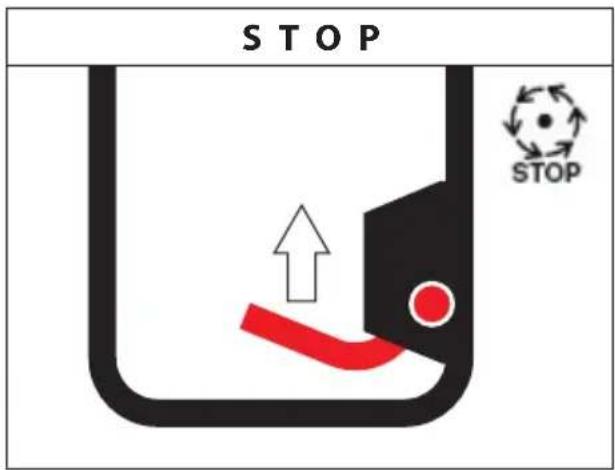
text_image
STOP STOP
text_image
i 4D Vertikutieren
GB Scarifying
F Scarifier
Scarificare
NL Verticuteren
cz Prořezávání
SK Prerezávanie
H Vertikulálás
SLO Rahljanje
HR Vertikuliranje
BG Вертикутиране
RO Afânare
BIH Vertikuliranje

natural_image
Five safety and hazard symbols: warning triangle, helmet, boots, blade, and roller rack (no text or labels)
natural_image
Illustration of a manual lawn mower on a grassy field with a tool, no text or symbols present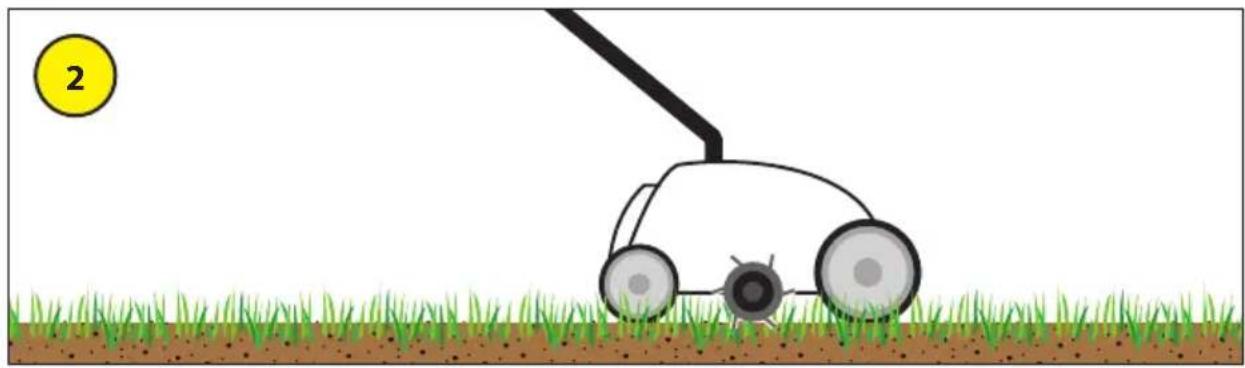
natural_image
Illustration of a small robot pulling a large wheel on a grassy field, with a yellow circle labeled '2' in the top-left corner (no text or symbols on the robot or ground)text_image
Safety warning illustration showing a person using a lawn mower to reduce noise and trash, with no symbols for no litter, trash, or waste.
text_image
Illustration showing a person using a lawn mower to walk, with correct and incorrect actions below.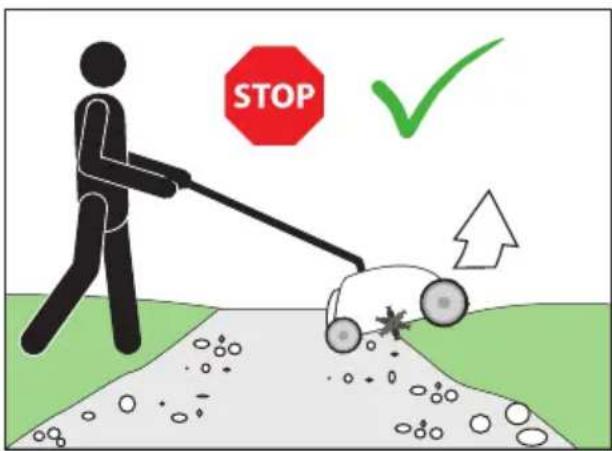
text_image
STOP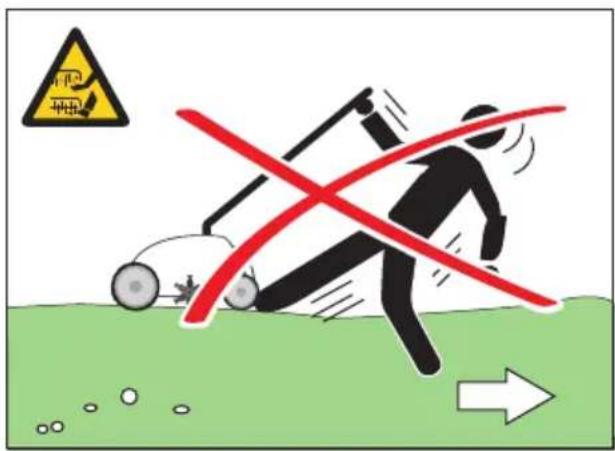
text_image
Safety warning illustration showing a person crossing a red cross over a lawn, with a warning sign and directional arrow.
text_image
Two-panel cartoon showing a person using a walker and a robot crossing over a ball, with checkmarks indicating correct and incorrect actions.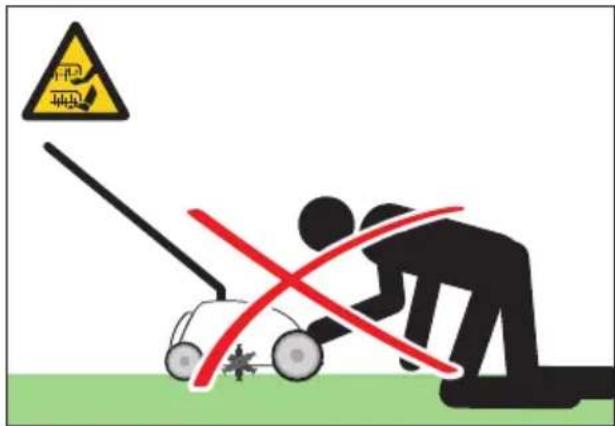
text_image
PP HR | D | Reinigung / Wartung | SLO | Čiščenje / Vzdrževanje |
| GB | Cleaning / Maintenance | HR | Čišćenje / Održavanje | |
| F | Nettoyage / Entretien | BG | Чистене / Поддръжка | |
| I | Pulizia / Manutenzione | RO | Curătare / Întreținere | |
| NL | Schoonmaken / Onderhoud | BIH | Čišćenje / Održavanje | |
| CZ | Čištění / Údržba | |||
| SK | Čistenie / Údrzba | |||
| H | Tisztítás / Karbantartás |

natural_image
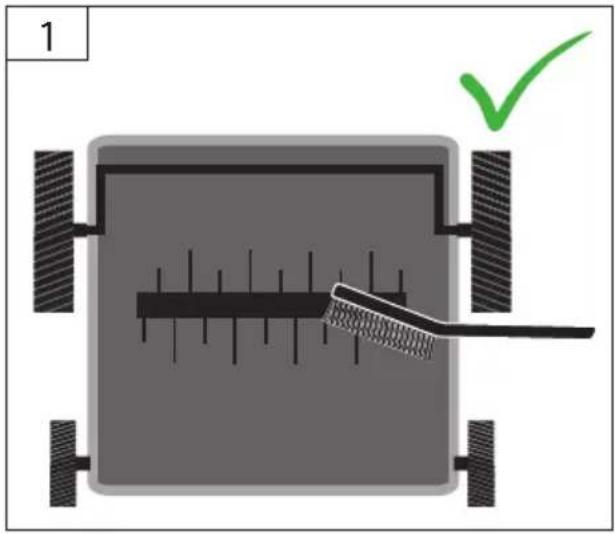
Top-down diagram of a mechanical or structural component with a green checkmark indicating a detail (no text or symbols present)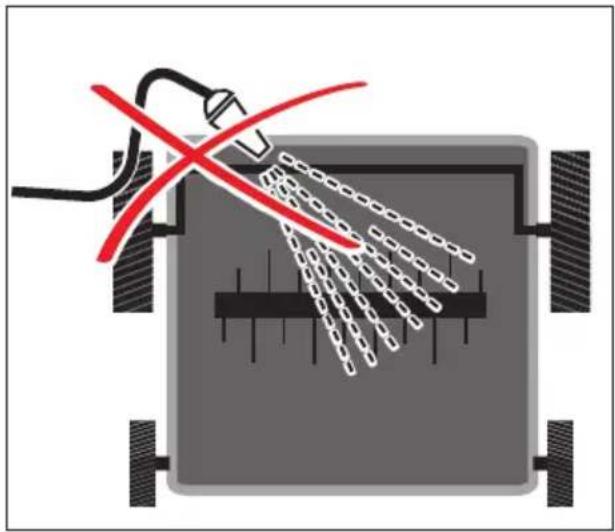
natural_image
Diagram of a mechanical device with chains and a red cross symbol indicating a dissection or explosion (no text or labels present)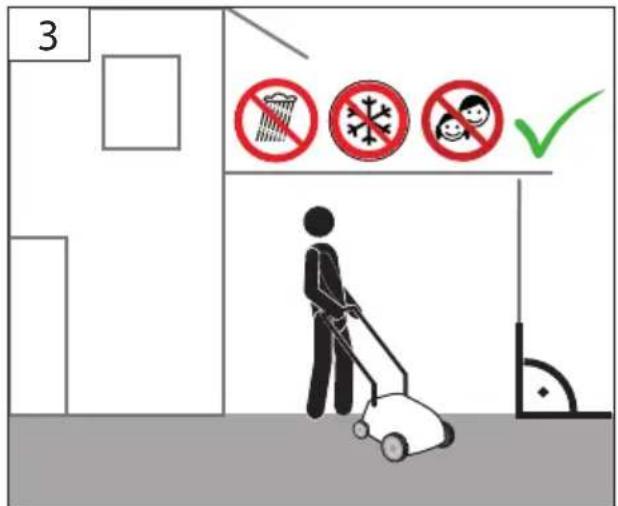
text_image
3 No No No ✓Technische Daten
WARNING: The vibration emission level will vary because of the ways in which a power tool can be used and may increase above the level given in this information sheet.
The vibration emission level may be used to compare one tool with another.
It may be used for a preliminary assessment of exposure.
An accurate estimate of the vibratory load should also take into account the times when the tool is shut down or when it is running but not actually in use. This may significantly reduce the vibratory load over the total working period.
Identify additional safety measures to protect the operator from the effects of vibration such as: maintain the tool and the accessories, keep the hands warm, organisation of work patterns.


Read and understand the operating instructions before using the appliance. Familiarise with the
control elements and how to use the appliance properly. Abide by all the safety measures stated in the service manual. Act responsibly toward third parties.
The operator is responsible for accidents or risks to third parties.
In case of any doubts about connection and operation refer please to our customer center
This appliance is not intended for use by children.
The machine may not be used by persons with reduced physical, sensory or mental capabilities or persons with a lack of knowledge or experience unless they are supervised by a person responsible.
Children must be supervised in order not to play with the machine.
Specified Conditions Of Use
The scarifier is designed for scarifying and aerating small to medium lawn areas at homes and allotments.
Aerator - designed for removing thatch (moss, leaves, weeds, etc.).
Scarifier - designed for treating turf and regenerating lawn and grass areas.
The scarifier must not be used for any other purposes as it may present a risk of physical injury to the user and others.
Do not use this product in any other way as stated for normal use. Not observing general regulations in force and instructions from this manual does not make the manufacturer liable for damages.

The scarifier must not be used to trim hes, hedges and shrubs, for cutting and bedding creepers or lawns on greened roofs or balcony boxes. In addition, the scarifier must be used as a shredder for shredding tree and ridge cuttings or for levelling uneven surfaces.
Requirements for operating staff
The operating staff must carefully read the Operating Instructions before using the appliance.
Qualification: Apart from the detailed instructions by a professional, no special qualification is necessary for appliance using.
Minimum age: Persons over 18 years of age can only work on the appliance. An exception includes youngsters trained in order to reach knowledge under supervision of the trainer during occupational education.
Local regulations may stipulate the minimum age of the user.
Training: Using the appliance only requires corresponding training by a professional or the Operating Instructions. No special training is necessary.
Residual risks

Rotating blades may lead to serious injuries cutting or amputating parts of the body.
Never touch under the housing body when the engine is running. Wear safety goggles when working. Never remove the collection bag when the machine is being operated.

Thrown-off stones or soil may lead to aries.
Before mowing, check the area to be mowed for any undesirable objects. Make sure the collection bag is properly suspended. Wear safety goggles when working.

Poor lighting/light conditions represent a h safety risk.
Provide adequate lighting or good lighting conditions when working with the machine.
Emergency procedure

Danger of injury!
Never put your hands and feet near the rotating parts. Keep a distance from the ejection opening at all times.
Conduct a first-aid procedure adequate to the injury and summon qualified medical attendance as quickly as possible. Protect the injured person from further harm and calm them down. For the sake of eventual accident, in accordance with DIN 13164, a workplace has to be fitted with a first-aid kit. It is essential to replace any used material in the first-aid kit immediately after it has been used. If you seek help, state the following pieces of information:
- Accident site
- Accident type
- Number of injured persons
- Injury type(s)
Symbols

Warning/caution!

Read the Operating Instructions

Caution! Blades run down. Wait until all rotating parts have stopped.

Keep the connecting cable out of reach of the cutting blades.

Always keep children and unauthorised persons out of reach of the appliance.

Protect against humidity Never expose tool to rain.
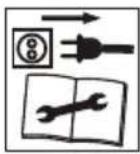
Always pull the plug out of the socket before completing any setting, cleaning or maintenance work on the machine.

Wear eye protective goggles! Wear ear protectors!

Wear protective gloves!

Wear safety cut through resistant shoes with safety sole and steel toe!

Warning against thrown-off items

Warning against sharp knives. Knives keep running for a short time after the appliance is switched off.

Warning against cutting injuries

Keep bystanders in safe distance from the appliance (at least 5 m)

In case of cable damage or nock, immediately pull out plug from socket

Protection class II

CE marking
Any damaged or disposed electric or electronic devices must be delivered to appropriate collection centres.

Protect against humidity

This side up
General Power Tool Safety Warnings

WARNING
Read all safety warnings and all instructions. Failure to follow the warnings and instructions may result in electric shock, fire and/or serious injury.
Save all warnings and instructions for future reference.
The term „power tool“ in the warnings refers to your mains-operated (cordepower tool or battery-operated (cordless) power tool.
1) Work area safety
a) Keep work area clean and well lit. Cluttered or dark areas invite accidents.
b) Do not operate power tools in explosive atmospheres, such as in the presence of flammable liquids, gases or dust. Power tools create sparks which may ignite the dust or fumes.
c) Keep children and bystanders away while operating a power tool. Distractions can cause you to lose control.
2) Electrical safety
a) Power tool plugs must match the outlet. Never modify the plug in any way. Do not use any adapter plugs with earthed (groundepower tools. Unmodified plugs and matching outlets will reduce risk of electric shock.
b) Avoid body contact with earthed or grounded surfaces, such as pipes, radiators, ranges and refrigerators. There is an increased risk of electric shock if your body is earthed or grounded.
c) Do not expose power tools to rain or wet conditions. Water entering a power tool will increase the risk of electric shock.
d) Do not abuse the cord. Never use the cord for carrying, pulling or unplugging the power tool. Keep cord away from heat, oil, sharp edges or moving parts. Damaged or entangled cords increase the risk of electric shock.
e) Wenn Sie mit einem Elektrowerkzeug im Freien arbeiten, verwenden Sie nur Verlängerungskabel, die auch für den Außenbereich geeignet sind. Die Anwendung eines für den Außenbereich geeigneten Verlängerungskabels verringert das Risiko eines elektrischen Schlages.
f) When operating a power tool outdoors, use an extension cord suitable for outdoor use. Use of a cord suitable for outdoor use reduces the risk of electric shock.
g) If operating a power tool in a damp location is unavoidable, use a residual current device (RCprotected supply. Use of an RCD reduces the risk of electric shock.
3) Personal safety
a) Stay alert, watch what you are doing and use common sense when operating a power tool. Do not use a power tool while you are tired or under the influence of drugs, alcohol or medication. A moment of inattention while operating power tools may result in serious personal injury.
b) Use personal protective equipment. Always wear eye protection. Protective equipment such as dust mask, non-skid safety shoes, hard hat, or hearing protection used for appropriate conditions will reduce personal injuries.
c) Prevent unintentional starting. Ensure the switch is in the off-position before connecting to power source and/or battery pack, picking up or carrying the tool. Carrying power tools with your finger on the switch or energising power tools that have the switch on invites accidents.
d) Remove any adjusting key or wrench before turning the power tool on. A wrench or a key left attached to a rotating part of the power tool may result in personal injury.
e) Do not overreach. Keep proper footing and balance at all times. This enables better control of the power tool in unexpected situations.
f) Dress properly. Do not wear loose clothing or jewellery. Keep your hair, clothing and gloves away from moving parts. Loose clothes, jewellery or long hair can be caught in moving parts.
g) If devices are provided for the connection of dust extraction and collection facilities, ensure these are connected and properly used. Use of dust collection can reduce dust-related hazards.
4) Power tool use and care
a) Do not force the power tool. Use the correct power tool for your application. The correct power tool will do the job better and safer at the rate for which it was designed.
b) Do not use the power tool if the switch does not turn it on and off. Any power tool that cannot be controlled with the switch is dangerous and must be repaired.
c) Disconnect the plug from the power source and/or the battery pack from the power tool before making any adjustments, changing accessories, or storing power tools. Such preventive safety measures reduce the risk of starting the power tool accidentally.
d) Store idle power tools out of the reach of children and do not allow persons unfamiliar with the power tool or these instructions to operate the power tool. Power tools are dangerous in the hands of untrained users.
e) Maintain power tools. Check for misalignment or binding of moving parts, breakage of parts and any other condition that may affect the power tool's operation. If damaged, have the power tool repaired before use. Many accidents are caused by poorly maintained power tools.
f) Keep cutting tools sharp and clean. Properly maintained cutting tools with sharp cutting edges are less likely to bind and are easier to control.
g) Use the power tool, accessories and tool bits etc. in accordance with these instructions, taking into account the working conditions and the work to be performed. Use of the power tool for operations different from those intended could result in a hazardous situation.
5) Service
a) Have your power tool serviced by a qualified repair person using only identical replacement parts. This will ensure that the safety of the power tool is maintained.
Safety instructions for Scarifier
Operation is only allowed with a safety switch against stray current (RCD max. stray current of 30mA).
Extension cables must have a cable cross-section of at least 1.5 mm ^2 . We advise against the use of extension cables of different lengths and cross-sections and the use of adapters and multi-plugs.
Keep children and other persons including animals in a safe distance when using the appliance. Minimum safe distance is 5 m.
Wear personal protective equipment. Wear solid shoes and long trousers. Never use the appliance when barefooted or in light sandals. Wear protective gloves if necessary.
Carefully check the terrain where the appliance is going to be used and remove all objects that could get caught or thrown off by the appliance such as stones, branches, wires, animals, etc.
Avoid operating the equipment in wet grass, where feasible;
Always inspect the machine before use to ensure that the rollers and screws are not blunt, worn or damaged. Replace worn or damaged rollers and screws to ensure that the machine remains balanced.
The protective equipment on the appliance is strictly prohibited to be disassembled, changed, used in conflict with the designation and it is prohibited to attach any protective equipment of other manufacturers.
The appliance must not be used if damaged or safety equipment is defective. Replace any worn-out and damaged parts.
Do not start the engine before your feet are in a safe distance from the cutting tools.
Do not incline the appliance when being started.
Do not start the appliance when you are standing in front of the ejection opening.
Walk! Never run!
Ensure that you have stable footing, particularly on slopes. Do not use the machine on excessively steep slopes. Take special care when changing direction on slopes.
Be extremely careful when turning and pulling the machine towards you.
Always switch off the machine when you are carrying it, tipping it or moving it when it is not on the lawn. Wait until all the rotating parts have reached a standstill.
If an undesirable item is encountered or the appliance starts vibrating, the appliance must be switched off and the power plug removed. Check whether the appliance is not damaged. Repair any damage.
Switch the appliance immediately off after finishing your work.
- Stop the machine and take out the contact key. Wait until all rotating parts have stopped and the unit has cooled down.
• Whenever you leave the lawnmower
• To release a blocked blade.
• To adjust the mowing height.
• To empty the collection bag. - Check the machine if working perfectly after catching an undesirable object. Repairs must be executed before putting the machine into operation again.
• To lift the machine or take it away..
- To flip the mower over or carry it (e.g. from lawn to lawn or across a road).
- Clean the mower or do any other works before checking the mower.
The ON/OFF switch and safety switch must not be locked.
Please observe the legal provisions of regulations on protection against noise. These provisions can be different in various places.
Warning: This power tool generates an electromagnetic field during operation. The field may under certain conditions affect the function of active or passive medical implants. To reduce a risk of serious or fatal injury, we recommend persons with medical implants to consult the matter with their doctor and medical implant producer before operating the appliance.
Do not use the device near flammable liquids or gases. Risk of fire and explosion in case of short circuit.
Maintenance

Rotating blade
Only carry out setting, cleaning and maintenance work on the machine when the motor has been switched off, the plug removed from the socket and the cutting blade is at a standstill.

Always pull the plug out of the socket before completing any setting, cleaning or maintenance work on the machine.
Keep the machine clean. Regularly clean the grass ejection chute and machine body.
Apply environment-friendly oil to all moving parts.
Check the collection bag at regular intervals for any wear and aging.
Repairs and works specified in these Instructions may only be performed by qualified authorised staff.
Use only original accessories and original spare parts.
Only a regularly maintained and treated appliance can serve as a satisfactory aid. Insufficient maintenance and care can lead to unforeseen accidents and injuries.
Disposal
The disposal instructions are based on the icons placed on the appliance or its package.
Any damaged or disposed devices must be delivered to appropriate collection centres.
Transport packaging disposal
The packaging protects the machine against damage during transport. Packaging materials are usually chosen based on environment aspects and waste treatment principles and are therefore recyclable. Returning the packaging into material circulation saves raw materials and reduces waste production. Parts of packagings (e.g. foils, styropor®) can be dangerous for children.
Risk of suffocation!
Keep parts of the packagings out of reach of children and dispose them as soon as possible.
Guarantee
Warranty period of 12 months applies to commercial use and 24 months applies to private use and commences on the day of purchase of the device.
The guarantee solely covers inadequacies caused by material defect or manufacturing defect. Original payment voucher with the sales date needs to be submitted for any claim in the guarantee period.
The guarantee does not cover any unauthorised use such as appliance overloading, use of violence, damage as a result of any unauthorised interference or caused by foreign items. Failing to follow the operating and assembly instructions and common wear are also not included in the guarantee.
Important information for the customer
Please be sure to know that returning the product in or after the warranty period must be made in the original packaging.
Service
Do you have any technical questions? Any claim? Do you need any spare parts or operating instructions? We will quickly help you and without needles bureaucracy at our web pages at www.guede.com in the Servicing part. Please help us be able to help you. In order to identify your device in case of claim we need the serial No., product No. and year of production. All this data can be found on the type label. Please enter it here for future reference:
Serial No.:
Art. No:
Year of production:
Tel.: +49 (0) 79 04 / 700-360
Fax: +49 (0) 79 04 / 700-51999
E-Mail: support@ts.guede.com
Defects searching
| Defect | Cause | Removal |
| The motor does not start | Missing power supply Check the cable, connect it to the power supply and if necessary replace it or have it repaired by an expert. | |
| Broken cable Check the cable, connect it to the power supply and if necessary replace it or have it repaired by an expert. | ||
| Defective supply Electric cable is too long or its cross section is too small | ||
| Main switch or safety arch is not controlled | See „Operation" below → 7 | |
| On/Off switch defective Have it replaced in a Güde authorised service centre | ||
| Unsteady running, strong vibrationsMotor cuts out | Blade is damaged Replace the blade | |
| Roller loose Check and tighten roller mounting | ||
| Blocks by foreign bodies Locking release | ||
| Poor work performance Blade is blunt Have the blade sharpened or replaced | ||
| Working height not set | Set working height → 6 | |
| Lawn too high Mow lawn first | ||
Translation of the EC-Declaration of Conformity
We, hereby declare the conception and construction of the below mentioned appliances correspond - at the type of construction being launched - to appropriate basic safety and hygienic requirements of EC Directives.
In case of any change to the appliance not discussed with us the Declaration expires.