PCWK 1231 - Fridge PROFICOOK - Free user manual and instructions
Find the device manual for free PCWK 1231 PROFICOOK in PDF.
| Brand | ProfiCook |
| Model | PCWK 1231 |
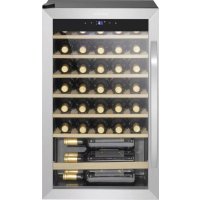
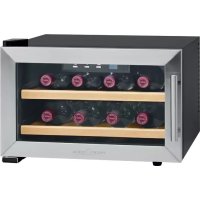
| Product type | Glass door refrigerator (beverage cooler) |
| Dimensions (H x W x D) | 39.5 x 24.6 x 50.0 cm |
| Net weight | Approx 9.2 kg |
| Power supply voltage | 220-240 V~, 50 Hz |
| Rated current | 0.42 A |
| Climate class | N (ambient temperature 16°C to 32°C) |
| Adjustable temperature range | +1°C to +18°C (+52°F to +65°F) |
| Maximum capacity | 6 bottles of 0.75 litre |
| Refrigerant | Isobutane (R600a) – flammable natural gas |
| Main functions | Refrigeration, electronic temperature control, interior LED lighting, automatic defrost |
| Temperature display | Digital display, switchable °C/°F |
| Interior lighting | LED, automatically turns off after 10 minutes |
| Door handle | Included, self-assembly required |
| Shelves included | 2 bottle shelves |
| Maintenance and cleaning | Clean with warm water and mild detergent; automatic defrost; never use steam cleaner |
| Safety | Child lock (not specified); automatic shutdown in case of overheating (via fuse); protected refrigerant circuit |
| Spare parts and repairability | LED lamp not user-replaceable; repair by authorized technician |
| Electrical connection | Grounded plug, fixed cable, do not use extension cord |
| General information | Domestic and similar use; do not build-in; do not use outdoors |
Frequently Asked Questions - PCWK 1231 PROFICOOK
User questions about PCWK 1231 PROFICOOK
0 question about this device. Answer the ones you know or ask your own.
Ask a new question about this device
Download the instructions for your Fridge in PDF format for free! Find your manual PCWK 1231 - PROFICOOK and take your electronic device back in hand. On this page are published all the documents necessary for the use of your device. PCWK 1231 by PROFICOOK.
USER MANUAL PCWK 1231 PROFICOOK
natural_image
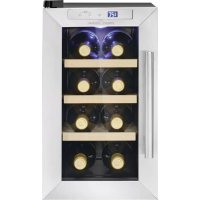
Exterior view of a modern stainless steel double-wire refrigerator with red wine bottles on the glass doors (no visible text or symbols)Glastürkühlschrank PC-WK 1231
Thank you for choosing our product. We hope you will enjoy using the appliance.
Symbols in these Instructions for Use
Important information for your safety is specially marked. It is essential to comply with these instructions to avoid accidents and prevent damage.

WARNING:
This warns you of dangers to your health and indicates possible injury risks.

CAUTION:
This refers to possible hazards to the machine or other objects.

NOTE: This highlights tips and information.
General Notes

Read the operating instructions very carefully before putting the appliance into operation and keep the instructions including the warranty and the receipt. If you give this device to other people, also pass on the operating instructions.

NOTE:
- Due to constant product modifications, your device may differ slightly from these operating instructions; Functions and methods of use remain unchanged.
- The illustrations in these operating instructions may differ from the original device.
- The appliance is designed exclusively for private use and for the envisaged purpose. This appliance is not fit for commercial use.
- The appliance is only to be used as described in the user manual. Do not use the appliance for any
other purpose. Any other use is not intended and can result in damages or personal injuries.
- This appliance is not intended to be used as a built-in appliance.
- Do not use it outdoors. Keep it away from sources of heat, direct sunlight and humidity.
- When not in use, for cleaning, user maintenance works or with disruption, switch off the appliance and disconnect the plug (pull the plug itself, not the lead) or turn off the fuse.
- The appliance and if possible the mains lead have to be checked regularly for signs of damage. If damage is found the appliance must not be used.
- For safety reasons, alterations or modifications of the appliance are prohibited.
- To ensure your children's safety, please keep all packaging (plastic bags, boxes, polystyrene etc.) out of their reach.

WARNING:
Do not allow small children to play with the foil. There is a danger of suffocation!
Special safety Information for this Unit
- This unit is intended to be used in household and similar applications such as
- staff kitchen areas in shops, offices and other working environments;
- farm houses and by clients in hotels, motels and other residential type environments;
- bed and breakfast type environments;
- catering and similar non-retail applications.

WARNING:
- Keep ventilation openings, in the appliance enclosure or in the built-in structure, clear of obstruction.
- Do not use mechanical devices or other means to accelerate the defrosting process (if necessary), except those described in this manual (depending on the model included the scope of delivery).
- Do not damage the refrigerant circuit.
- Do not operate any electrical devices inside the appliance.
- Do not store explosive substances such as aerosol containers with flammable propellant in the appliance.
- This appliance can be used by children aged from 8 years and above and persons with reduced physical, sensory or mental capabilities or lack of experience and knowledge if they have been given supervision or instruction concerning use of the appliance in a safe way and understand the hazards involved.
• Children shall not play with the appliance.
- Cleaning and user maintenance shall not be made by children unless they are older 8 years and supervised.
- NOTE: Children aged from 3 to 8 years are allowed to load and unload refrigerating appliances.
- When positioning the appliance, ensure the supply cord is not trapped or damaged.
- Do not locate multiple portable socket-outlets or portable power supplies at the rear of the appliance.
- Do not try to repair the appliance on your own. Always contact an authorized technician. To avoid the exposure to danger, always have faulty cable be replaced only by the manufacturer, by our customer service or by qualified person and with a cable of the same type.
- Use the provided collection points of electrical equipment for the disposal of the appliance.
Coolant

WARNING: Risk of fire / flammable
materials
The coolant circuit of this unit contains the refrigerant Isobutane (R600a), a natural gas that is flammable and of high environmental compatibility. Make sure no parts of the coolant circuit get damaged during transport and installation of the appliance.
If the coolant circuit is damaged:
- avoid any open flames or ignition source,
- disconnect the plug,
- thoroughly air the room in which the appliance is installed and
- contact an authorized technician.
Transport and Packaging
Transport the appliance
Transport the appliance, if possible, in vertical position. Otherwise, it is absolutely necessary to allow the appliance standing upright for a few hours before installation "Prior to first use". Protect the appliance during transport against weather influences.
Unpacking the appliance
- Remove the appliance from its packaging.
- Remove all packaging material, such as foils, filler and cardboard packaging.
- To prevent hazards, check the appliance for any transport damage.
- In case of damage, do not put the appliance into operation. Contact your distributor.
NOTE:
Production residue or dust may have collected on the appliance. We recommend cleaning the appliance according to chapter "Cleaning and Maintenance".
Appliance Equipment
Appliance overview
text_image
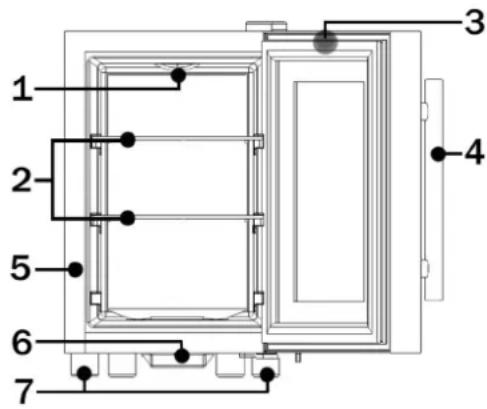
1 2 5 6 7 3 41 Lighting
5 Unit housing
2 Bottle racks
6 Condensation collection
3 Control panel
tray
4 Door handle
7 Feet
Delivery scope
2x bottle rack, 1x door handle incl. mounting material
Installation
Conditions for the installation location
- Good ventilation is required around the appliance to dissipate the heat properly and to guarantee efficient cooling operation at low power consumption. Enough clearance is necessary.
- Gap to the back approx. 50 \~ 70 mm, to the side walls and above the device each approx. min. 100 mm;
- Place the appliance so that the appliance door can open without being impeded.
- Only install at a location with an ambient temperature suitable for the climate class of the appliance.
The climate class can be found under "Technical Data" and on the rating label located in the interior or on the appliance rear.
- Place the appliance on a steady and safe surface. If the appliance is not horizontally leveled, adjust the feet accordingly.
- Avoid the installation:
- near heaters, next to a stove, direct sunlight or any other heat sources;
- at locations with high humidity (e.g. outdoors, bathroom), as metal parts would be susceptible to corrosion under such circumstances;
- near volatile or flammable materials (e.g. gas, fuel, alcohol, paint, etc.), in rooms which may have poor air circulation (e.g. garages).
- Do not expose the appliance any weather.
Assembly of the door handle
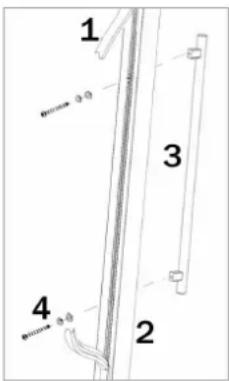
text_image
1 2 3 41 Door rubber seal
2 Door frame
3 Door handle
4 Screws incl. washers
- Open the appliance door and slightly remove the door rubber seal on the inner door frame. Note the holes underneath for the positioning of the door handle.
- Fasten the handle with the enclosed screws incl. washers and bring the door rubber seal back to its original position.
Electrical connection

WARNING:
- The installation to the mains supply must conform to the local standards and regulations.
- Improper connection may cause to an electric shock!
- Do not modify the appliance plug. If the plug does not fit properly to the outlet, let install a proper outlet by an authorized specialist.
-
The accessibility of the power plug must be ensured to disconnect the appliance from the power supply in case of emergency.
-
Make sure that the voltage supply matches the specifications on the rating label before connecting.
- Connect the mains cable to a properly installed and earthed wall outlet.
- If the plug after installation is not accessible, a corresponding disconnect device must be available to meet the relevant safety regulations.
Startup / Operation
Prior to first use

CAUTION:
After transport, the appliance should be left standing upright for approx. four hours before connecting to the power supply. Nonobservance could lead to malfunction of the cooling system and causes an appliance breakdown.
Clean the appliance interior including all accessory parts. Consider the instructions which we provide in the chapter "Cleaning and Maintenance".
Starting the appliance
- Connect the appliance to the power supply.
- Set the desired indoor temperature. Read the following sections.
Operation overview

text_image
1 2 3 4 °C/°F| 1 | Display |
| 2 | Switch interior lighting on and off |
| 3 | Increase temperature stepwise by 1°C (1°F) |
| 4 | Decrease temperature stepwise by 1°C (1°F) |
| 3+4 | Switch display between °C and °F |
- Press the button (2) to switch the interior lighting off and on again.
The indoor lighting will turn off automatically after about 10 minutes, saving energy.
- Use the buttons (3) and (4) to set the interior temperature. The display (1) shows the selection.
A few seconds after the last button press, the temperature display will automatically change to the actual temperature value currently in the appliance.
The next time the button is pressed, the display will first show the last set temperature value.
- By pressing the button combination (3+4), you can change the temperature display to Fahrenheit or Celsius.
Settings
The temperature value is adjustable between:
$$ + 1 1 ^ {\circ} \mathrm{C} \text { to } + 1 8 ^ {\circ} \mathrm{C} (+ 5 2 ^ {\circ} \mathrm{F} \text { to } + 6 5 ^ {\circ} \mathrm{F}) $$
The reachable value cannot be higher than the ambient temperature at the place of installation.
During initial startup, longer standstill of the device or temperature adjustment, there may be a deviation of a few degrees between the temperature you have selected and the temperature shown on the display.
It takes some time until the desired temperature has been set.
Basically, the temperature changes depending on the ambient temperature (place of installation), the frequency of opening the door and the equipment.
Storage
The appliance is exclusively suitable for cooling and storing drinks.
Model dependent: Several storage levels for inserting the grid shelves, allows individual storage. Depending on requirements, the shelves can be (partially and depending on model) adjusted in height or removed to optimize the storage space.
Store the bottles horizontally with the opening facing forward.
NOTE:
For the most efficient use of energy, place all shelves in their original position.
Capacity
The number of bottles that can be placed in the appliance varies depending on the size and shape of the bottles.
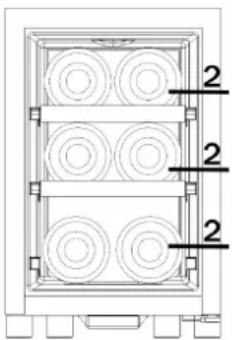
text_image
2 2 2The maximum number of bottles that can be stored is based on standard 0.75 liter bottles:
max. 6 bottles x 0.75 liter.
General storage recommendations for wine
| Type of wine Temp. °C Temp. °F | |
| Red wine | 15 – 18°C 58 – 65°F |
| White wine | 9 – 14°C 48 – 57°F |
| Sparkling wine / champagne | 4 – 8°C 39 – 47°F |
- The most important thing when storing wine is that the storage temperature remains continuously stable.
- Vibrations, temperature variations, light exposure and humidity are factors that can cause wine to tip over.
- Wine that is stored at a higher temperature matures faster. Wines which are stored at more than 18°C lose their flavor and aroma.
- If wine is stored at too low a temperature, this can lead to the development of residues that are harmful to health. An air humidity of 60% - 70% is ideal to prevent corks from shrinking.
- After a wine bottle has been opened, the wine comes into contact with air. It is therefore recommended to store the rest of the wine upright in the bottle to minimize the surface area that comes into contact with air.
- Once a wine bottle has been opened, white wines can be drunk for another 2 days and red wines for another 3 days if the bottle has been closed.
- Special stoppers, which keep wine and champagne fresh, can be purchased in most wine shops.
- If white wine is stored correctly, it can be kept for up to 2 years. Full-bodied red wines can be stored for up to 10 years and dessert wines for up to 20 years.
Operating noise
| Type of sound | Cause |
| Liquid sounds | Circulation of the refrigerant |
| Disturbing noises | Vibration of the shelves or cooling coils |
Switching off
To switch off the appliance disconnect the appliance from the power supply.
If the appliance is out of use for long periods:
- Remove the appliance content.
- Defrost (model dependent) and clean the appliance thoroughly (see "Cleaning and Maintenance").
- Leave open the appliance door to avoid formation of mold and unpleased odor.
Tips for Energy saving
- Disconnect the appliance from the power supply if it isn't in use.
- Do not install the appliance near stoves, heaters or other heat sources. In case of higher ambient temperatures, the appliance will run more frequently and longer.
- Ensure enough ventilation at the bottom and rear side. Never block ventilation openings.
- Place all shelves, racks or drawers (depending on the model) in their original position.
- Adjust the temperature not colder than necessary.
- Open the unit door only as necessary.
- Defrost the unit regularly (model dependent).
- Switch on the lighting only if necessary.
- The seal of the appliance door must be completely intact, so that the door closes properly.
Cleaning and Maintenance
WARNING:
- Always disconnect the appliance from the power supply before cleaning and user maintenance.
- Do not use steam cleaners for cleaning the appliance; moisture could enter electrical components. Risk of electric shock! Hot steam could damage the plastic parts.
- The unit must be dry before restarting operation.
CAUTION:
- Do not use a wire brush or other sharp, abrasive items.
- Do not use any acidic or abrasive detergents.
- Do not damage the refrigerant circuit.
Cleaning the appliance including interior
- Clean the appliance interior, the exterior surfaces, the accessories and the door seal regularly with warm water and mild detergent; or with a clean, damp microfiber cloth without cleaning agent.
- Remove for that the appliance content and storage at a cool location.
- After everything was thoroughly dried, you can restart the operation.
- Dust and anything else that blocks the exhaust air openings will reduce the cooling capacity of the unit. If necessary, suck off the exhaust air opening.
Defrosting
CAUTION:
Never use metal objects (e.g. knives) for removing ice from the vaporizer. The vaporizer could be damaged.
The appliance has an automatic defrosting. During the defrosting process, the water drops flow through a drainage channel into a catch tray on the back of the appliance, from which it then evaporates.
Changing the bulb
CAUTION:
Do NOT remove the cover of the interior light.
The LED light may be replaced / repaired in case of failure / defect only by an authorized specialist.
Troubleshooting
Before you contact an authorized specialist
| Problem Cause / Action | |
| Unit is not working properly or at all | · Check the power supply / temperature setting / ambient temperature. · Unblock the ventilation openings, install the appliance freely. |
| Loading is too warm | · Check the temperature setting / ambient temperature. · Open the door only as long as necessary. |
| Loud noise during operation | · Check the appliance position. · See the section “Operating noise”. |
| Water under the unit | · Check the condensation collection tray on the appliance back, empty if necessary. |
| Light does not work | · Check the power supply. · See “Changing the bulb”. |
NOTE:
If a problem persists after following the steps above, contact your trader or an authorized technician.
Technical Data
Climate class N: this appliance is intended to be used at ambient temperature ranging from 16°C to 32°C.
Electrical connection....
Power voltage: 220-240 V\~ / 50 Hz
Rated current: 0.42 A
Dimension H x W x D / Weight.....
Appliance size: 39.5 x 24.6 x 50.0 cm
Net weight: ....approx. 9.2 kg
For more information about the product, scan the QR code on the supplied energy label and/or visit the official website of the product data bank:
https://eprel.ec.europa.eu
The right to make technical and design modifications during continuous product development remains reserved.
This appliance has been tested according to all relevant current CE guidelines, such as electromagnetic compatibility and low voltage directives, and has been constructed in accordance with the latest safety regulations.
Disposal
Meaning of the "Dustbin" Symbol
Protect our environment; do not dispose of electrical equipment in the domestic waste.
Please return any electrical equipment that you will no longer use to the collection points provided for their disposal.
This helps avoid the potential effects of incorrect disposal on the environment and human health.
This will contribute to the recycling and other forms of reutilization of electrical and electronic equipment.
Information concerning where these can be disposed of can be obtained from your local authority. Your dealer and contractual partner is also obliged to take back the old appliance free of charge.
WARNING:
Remove or disable any existing snap and bolt locks if you take the unit out of operation or dispose it.
Introduktion
CTC Clatronic Sp. z o.o
Ul. Brzeska 1
45-960 Opole