Effortless Batch Juicer JC2022 - Juicer OMEGA - Free user manual and instructions
Find the device manual for free Effortless Batch Juicer JC2022 OMEGA in PDF.
| Product type | Slow juicer |
| Brand | Omega |
| Model | Effortless Batch Juicer JC2022 |
| Dimensions (W x D x H) | 229 x 221 x 462 mm |
| Weight | 6.2 kg |
| Power supply | 120 V, 60 Hz, 150 W |
| Rotation speed | 70 rpm |
| Juice container capacity | 1000 ml |
| Hopper capacity | 2 liters |
| Automatic reverse function | Automatic reverse rotation in case of blockage |
| Manual reverse function | Reverse rotation activated by long press on the switch |
| Safety timer | Automatic shut-off after 5 minutes of continuous operation |
| Safety lock | Appliance only works if the bowl and lid are correctly assembled |
| Material of parts in contact with food | Stainless steel and BPA-free plastic |
| Strainer type | Strainerless, screw filtration system |
| Grounding | 3-prong plug with adapter for 2-prong outlets |
| Replaceable silicone gasket | Extraction gasket, sealing gasket, hopper gasket, bowl gasket |
| Included pusher | Yes, to push ingredients |
| Included cleaning brush | Yes, to clean parts |
| Maintenance and cleaning | Immediate cleaning after use with clear water and brush; do not put in dishwasher |
| Maximum cleaning temperature | 80°C |
| Recommended operating time | Less than 30 minutes continuous, then 5-minute break |
Frequently Asked Questions - Effortless Batch Juicer JC2022 OMEGA
User questions about Effortless Batch Juicer JC2022 OMEGA
0 question about this device. Answer the ones you know or ask your own.
Ask a new question about this device
Download the instructions for your Juicer in PDF format for free! Find your manual Effortless Batch Juicer JC2022 - OMEGA and take your electronic device back in hand. On this page are published all the documents necessary for the use of your device. Effortless Batch Juicer JC2022 by OMEGA.
USER MANUAL Effortless Batch Juicer JC2022 OMEGA
natural_image
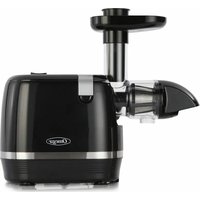
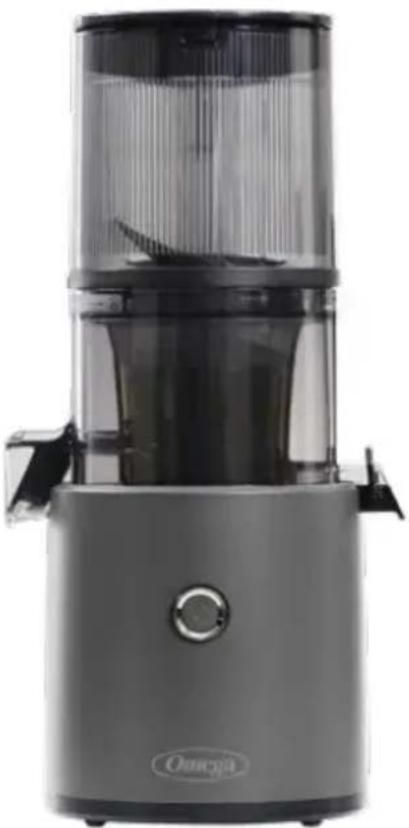
Exterior view of a modern Omega juice maker with clear glass and black casing (no text or symbols visible on the device body)JC2022
USER MANUAL
Effortless™ Batch Juicer
LOW SPEED MASTICATING COLD PRESS JUICER
MODE D'EMPLOI
PRESSE-AGRUMES PAR LOT SANS EFFORT™
PRESSE A FROID A MASTICATION A BASSE VITESSE
MANUAL DEL USUARIO
CONGRATULATIONS on the purchase of your new Omega product.
At Omega, we strive to develop technologically advanced machines that help deliver nutrition and flavor of the highest kind and closest to nature's purest form.
We are driven by you, our brand supporters. Your enthusiasm helps us continue to reinventandrenewourlineofjuicers,highspeedblendersandbeverageequipment.
Our team at Omega thanks you for supporting us for over 50 years!
www.omegajuicers.com/omega-warranty-registration
RECIPES, VISIT:
www.omegajuicers.com/recipes
www.omegajuicers.com
After using your Omega, we kindly ask you to rate the machine on
www.OmegaJuicers.com
TABLE OF CONTENTS
04 - 05 Important Safeguards
06 - 07 Precautions for Safe Use
08 - 09 Precautions Before Juicing
10 - 11 Power Button Guide
12 - 13 Know Your Omega
14 - 15 Quick Start Assembly
16 - 17 How to Assemble
18 - 19 How to Use
20 - 21 When Auger Stops During Use
22 - 23 Assembly and Disassembly of Silicone
24 - 25 How to Disassemble and Clean
26 - 27 Troubleshooting
28 - 29 Product Specifications
30 - 35 Recipes & Notes
36 - 69 French Manual
70 - 103 Spanish Manual

IMPORTANT SAFEGUARDS
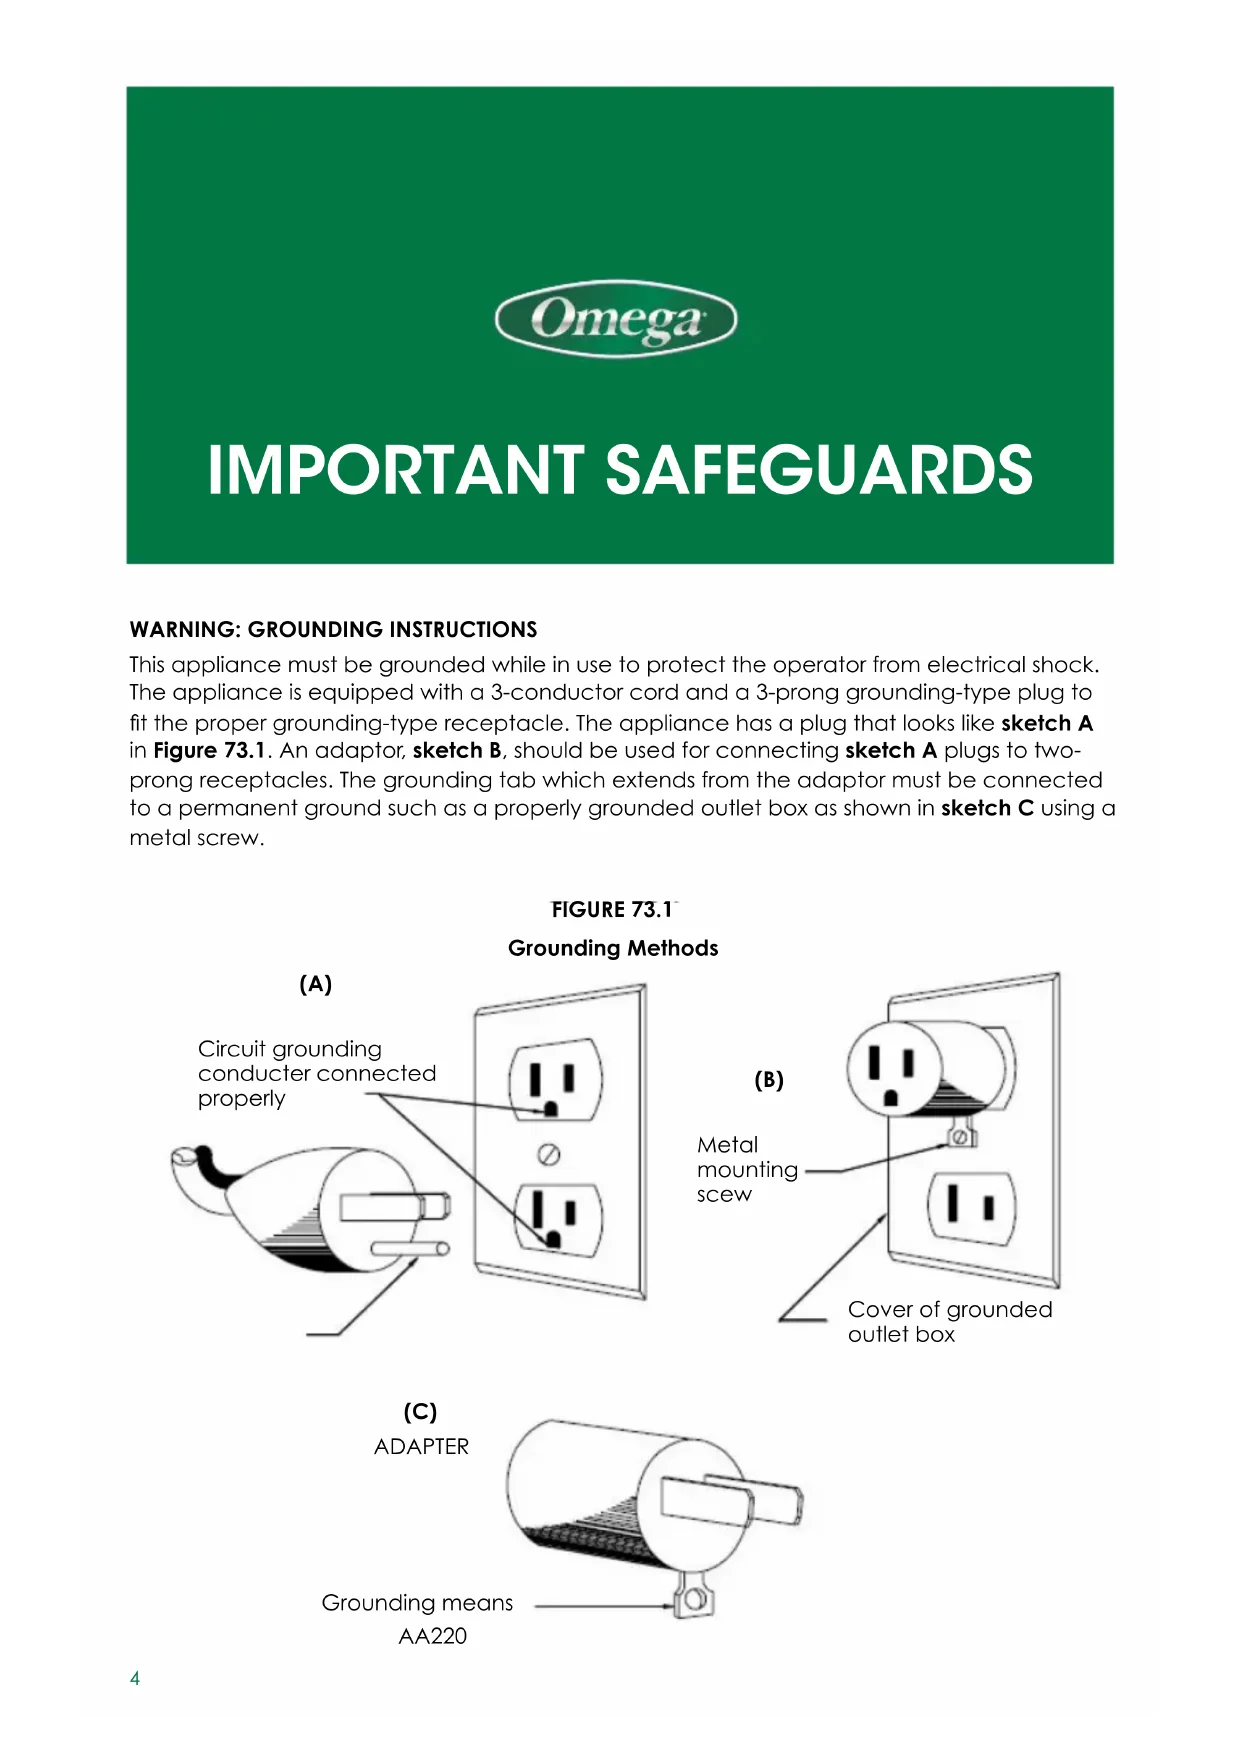
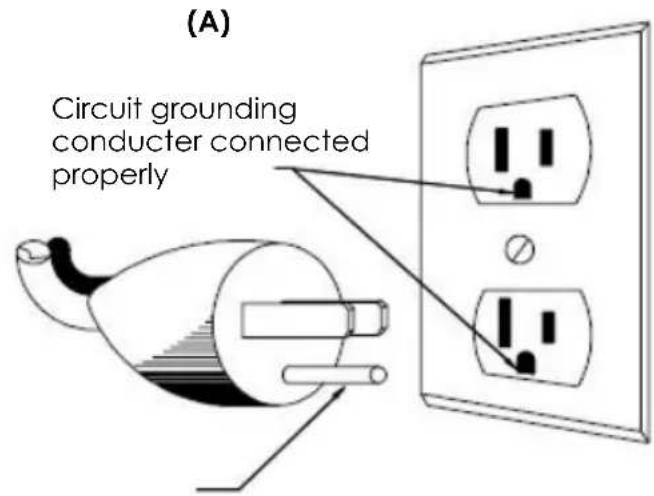
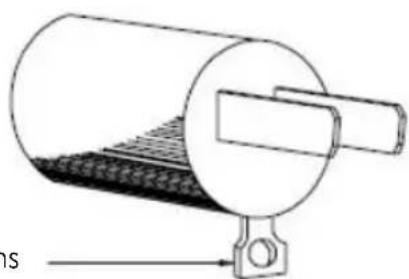
WARNING: GROUNDING INSTRUCTIONS
This appliance must be grounded while in use to protect the operator from electrical shock. The appliance is equipped with a 3-conductor cord and a 3-prong grounding-type plug to fit the proper grounding-type receptacle. The appliance has a plug that looks like sketch A in Figure 73.1. An adaptor, sketch B, should be used for connecting sketch A plugs to two-prong receptacles. The grounding tab which extends from the adaptor must be connected to a permanent ground such as a properly grounded outlet box as shown in sketch C using a metal screw.
FIGURE 73.1
Grounding Methods
text_image
(A) Circuit grounding conductor connected properly
text_image
(B) Metal mounting screw Cover of grounded outlet box(C)
ADAPTER
natural_image
Technical line drawing of a cylindrical device with a meshed base and mounting bracket (no text or symbols)Grounding means
AA220
IMPORTANT SAFEGUARDS
When using electrical appliances, basic safety precautions should always be followed including the following.
- READ ALL INSTRUCTIONS BEFORE USING.
- To protect against electrical shock, do not immerse cord, plug, or main body (motor) in water or other liquid.
- Close supervision is necessary when any appliance is used by or near children.
- Unplug from outlet when not in use, before putting on or taking off parts, and before cleaning.
- Avoid contact with moving parts.
- Do not operate any appliance with a damaged cord or plug or after the appliance malfunctions or has been damaged in any manner. Please contact Omega Customer Service for Support.
- The use of attachments not recommended or sold by manufacturer may cause fire, electric shock or injury.
- Do not let cord hang over edge of table or counter or touch heated surfaces.
- Always make sure juicer cover is clamped securely in place before motor is turned on. Do not unfasten clamps while juicer is in operation.
- Be sure to turn button to OFF position after each use of your juicer. Make sure the motor stops completely before disassembling.
- Do not put your fingers or other objects into the juicer while it is in operation. If food becomes lodged in opening, use food pusher or another piece of fruit or vegetable to push down the lodged food. When this method is not possible, turn off the machine, remove the plug from wall outlet and disassemble juicer to remove the remaining food.
- Do not use outdoors.
- Do not place on or near a hot gas or electric burner or in a heated oven.
- Do not use appliance for anything other than its intended use.
- Keep hands and utensils away from moving blades or discs while processing food to reduce the risk of severe injury to persons or damage to the food processor.
A scraper may be used but must be used only when the food processor is not running. - Blades are sharp. Handle carefully.
- Keep the appliance clean. Refer to the Care & Cleaning instructions in this manual.
- DO NOT plug in until familiar with all the instructions and operating procedures.
- DO NOT unplug from electrical outlet by pulling on the cord. To unplug, grasp the plug, not the cord, and pull.
- Turn off all controls before unplugging from or plugging into an electrical outlet.
- This appliance cannot grind meat.
- Check hopper for presence of foreign objects before using.
- Moving parts – Keep fingers out of discharge openings.
- Sharp blade – Always use food pusher.
SAVE THESE INSTRUCTIONS
Omega
PRECAUTIONS FOR SAFE USE
BEFORE READING MANUAL
- Read all safety precautions (p. 04\~09) and use the appliance properly.
- After reading the manual, keep it in a convenient location for future reference.
- Do not use it abroad which has different power supply and voltage.
- Any quality improvements is subject to change without notice

1. PRECAUTIONS FOR SAFE USE
- Make sure to read Precautions for Safe Use.
- Follow Precautions for Safe Use.
- Precautions are classified as follows.

WARNING A violation of any of the warning marks may cause a serious injury or death.
- Do not insert or pull the power cord with wet hands.
- Do not use any current other than that specified on the warranty card and product specifications. It may cause electric shock, fire and/or performance impairment. Connecting to a different voltage may reduce the motor's lifespan or lead to a malfunction.
- Securely insert the power cord plug all the way into an outlet.
- Do not bend, tie, damage or pull the power cord by force, or place it near a high temperature or heat such as a gas stove. Also, do not place any heavy object on top of the product, wedge it into a narrow space, or alter it.
- Do not remodel it under any circumstances. Also, do not attempt to dismantle or repair it yourself.
- Do not insert any foreign objects such as a finger or iron pin into any crack or hole in the product body. It may cause a fire, electric shock, injury and/or malfunction. For after-sales service and maintenance of a product, contact Omega Customer Service.
- When the power plug is damaged, do not repair or remodel it yourself and, instead, visit an after-sales service center or branch store.
- Do not get wet or splash water on the product body. Make sure that no water or foreign material goes into the product's power button.
- Do not control the power button with wet hands. For safety, ground the power outlet at all times. Also, do not ground it to a gas pipe, plastic water pipe, or telephone line. Make sure to use a grounded outlet.
- Do not attempt to dismantle any parts of the chamber set or insert foreign objects such as a finger or spoon into the inlet or juice outlet during operation.
- Do not use it within children's reach. Children should be carefully supervised so that they do not play with this device. There is a risk of an injury or malfunction if children accidentally hit and knock it down.
- A person who is not familiar with handling the product should not use it him/herself. Anyone with physical or mental problems or who lacks experience and knowledge should not use it without a supervisor present.
- Do not use the product while wearing or holding any items with magnetic force (e.g. magnetic bracelets). Placing magnetic objects near the product may cause malfunction.

CAUTION A violation of any of the caution marks may lead to a serious injury or death.
- Do not operate the product unless the product body set and chamber set are securely connected.
- If there is a gas leak, etc., do not touch the power cord but, instead, open the windows and thoroughly ventilate the area.
- If the auger stops during operation, the product automatically rotates in reverse and then starts normal operation again. If the power is unstable and a reverse rotation does not work while the auger rotation is stopped during operation, press the power button for over 1 second to activate a reverse rotation and then press the power button again briefly to start a normal operation.
- Do not move the product body, or disassemble or assemble the chamber set or parts during operation. Make sure to stop the operation and pull out the power cord beforehand.
- When using the product, be careful so that a tie, long necklace, scarf, etc. doesn't get into the inlet. Place this product on an even and stable surface for use. When inserting ingredients into the inlet, do
PRECAUTIONS FOR SAFE USE
not use a chopstick, spoon, any hard object or anything other than the pusher.
- Do not use the product for more than 30 minutes continuously each time. It may overheat the motor to cause malfunction. To operate it again, completely stop the device for about 5 minutes before use.
- Do not exert any excessive shock to or drop the product.
If the device produces any unusual sounds, excessive heat or smoke, stop using it immediately and contact the Customer Service Center. The smell experienced when using a new product will naturally go away over time. Pull the power cord plug from the outlet when it is not in use. Also, when pulling the power cord, make sure to grab the plug to pull it. - Do not clean the product at a temperature of 80^ or higher.
- Do not place it in a dishwasher, dryer, microwave, etc. It may cause malfunction and/or deformation of parts. The product weighs approximately 13.7lbs. (6.2 kg.) When moving the product, make sure to securely hold the product body with both hands. If you move it by holding just the chamber or the sides of the product body, the body may fall to cause a bodily injury or malfunction.
- Do not use this household-use product for commercial purposes. Excessive extraction of a large amount of ingredients may cause damage to the parts. In case it is to be used for commercial purposes, please contact the Customer Service Center on the method of use.

2. Precautions During Use
- Make sure to thoroughly understand how to prepare ingredients and prepare them properly before inserting them.
-Poorly prepared ingredients may hinder the extraction process and/or cause damage to the product.
- Ingredients in need of extra care
-When using soft ingredients alone such as bananas, ripened kiwi and tomatoes, the juice may stagnate inside the chamber, which can make juicing difficult. Please add other ingredients that are not too soft.
-When inserting walnuts, peanuts, almonds, sunflower seeds, pine nuts, beans, etc., add only a small amount or add them with other ingredients after soaking them in water.
- Ingredients unable to be juiced
- Do not insert ingredients that cannot be juiced such as sesame seeds, coffee beans, Chinese peppers, tree barks and pine needles. Do not insert mudfish, eels, shrimp, marsh snails, squids, etc.
- Do not insert fruits soaked in alcohol, honey or sugar (grapes, raspberries, mulberries, etc.) and enzymes (glasswort, rock pine enzymes, etc.).
- Do not insert ingredients whose attributes make them difficult to be juiced such as silverberries, aloe, cactus, quince, yams, kudzu root, sugar cane, acorn and dandelions.
- Do not insert boiled ingredients such as boiled potatoes and sweet potatoes.
- Do not insert ice made by freezing water. It is recommended that you consume extracted vegetable juice immediately, if possible, and do not refrigerate it for a long period of time.
- Do not use this product for pulverizing grains. It may cause damage or malfunction.
- Do not re-extract juice from pulp that has already been juiced.
- Do not conduct any idle run of the product before inserting any ingredients.
- Do not insert ingredients into the hopper above the guided limit mark.
- Do not use it for more than 30 minutes continuously.
- It may overheat the motor to cause malfunction. However, when using it continuously, pause the operation and use it after a break of over 5 minutes.
- Do not insert a chopstick or spoon into the juice/ pulp outlet during operation.
- When inserting ingredients, do not use anything other than the pusher. It may damage the parts or cause a bodily injury and/or malfunction.
- Do not operate the power button with wet hands.
- It may cause electric shock, short circuit and/or fire.
- Do not get foreign substances on or near the power button.
- Use it with the juice cap open.
- The juice can flow backwards into the hopper if the juice cap is closed while juicing.
Do not use it when the top of the product body is wet from extracted juice or water.
Note
-
Withered ingredients, which have been stored for a long time in the refrigerator, or frozen fruits may produce only a small amount of juice or none at all.
-
If the product is not cleaned immediately after use, the pulp may dry up, which makes it difficult to disassemble and clean it and also cause performance impairment. So, if possible, clean it immediately after use.
Omega
PRECAUTIONS BEFORE JUICING
- If you have an allergy, make sure to select proper ingredients for your body when preparing the ingredients.
- For the method of and notes on using the device for each ingredient, please refer Omega recipes.
- Prepare ingredients in sizes able to be inserted into the hopper. If you want to juice a large volume or perform fast juicing, cut the ingredients into smaller pieces before inserting them. For about 2.2lbs. (1 kg), repeat the “disassemble and clean after juicing” step for use.
- Do not insert ingredients into the hopper above the guided limit mark.
- When juicing soft fruits, the juice of the ingredients may stagnate inside the chamber.
- When juicing fibrous fruits and vegetables, the juice may thicken.
- Inserting the following ingredients, which are impossible to be juiced, may lead to damage or malfunction.
- Ingredients that cannot be juiced such as sesame seeds, coffee beans, Chinese peppers, tree barks and pine needles, as well as mudfish, eels, shrimp, marsh snails, squids, etc.
- Fruits soaked in alcohol, honey or sugar (grapes, raspberries, mulberries, etc.) and enzymes (glasswort, rock pine enzymes, etc.)
- Ingredients whose attributes make them difficult to be juiced such as silverberries, aloe, cactus, quince, bananas, yams, kudzu root, sugar cane, acorns and dandelions
- Boiled ingredients such as boiled potatoes and sweet potatoes
- Ice made by freezing water
- Do not use it for pulverizing grains.
• Refer to the instructions in Precautions During Use (refer to p.7).
- As certain ingredients need extra care during preparation, please refer to the following instructions on how to prepare the ingredients.
- When juicing several times or in bulk, make sure to cut ingredients into small pieces, and then repeat the "disassemble and clean after juicing" step.
- For faster juicing, mince the ingredients into fine pieces.
CITRUS FRUITS
Grapefruit, oranges, lemons, etc. Prepare the ingredients by peeling and cutting them into smaller pieces to fit in the hopper inlet. Remove all hard, unchewable seeds before insertion.
FRUITS WITH THICK PEEL
Pineapples, dragon fruit, melons, watermelons, pomegranate, etc. Prepare the ingredients by peeling and cutting the into smaller pieces to fit in the hopper inlet. Remove all hard, unchewable seeds before insertion.
PRECAUTIONS BEFORE JUICING
SEEDED FRUITS
Grapes, apples, peaches, persimmons, plums, cherries, pears, melons, etc.
For ingredients containing hard, unchewable seeds or large-sized seeds such as those in peaches, make sure to remove the seeds first and cut and prepare only the flesh. Hard seeds may stop the operation or damage the parts. Apple seeds contain toxicity so remove them as much as possible. For grapes, pluck each grape from the bunch after cleaning them thoroughly. Do not extract only the ingredients that are too soft; instead, mix them with other fruits and vegetables.
SOFT FRUITS
Single extraction (berries, cherry tomatoes, etc.)
- Thoroughly clean and cut the ingredients into small pieces that can fit in the hopper inlet. For fruits and vegetables with stalks, remove the stalks first.
Mixed extraction (strawberries, kiwi, tomatoes, mangoes, etc.)
- For dry and viscous ingredients, mix them with other ingredients for extraction. Remove the peel and stalks, and also remove seeds, if there are any.
ROOT VEGETABLES
Carrots, beets, ginger, sweet potatoes, potatoes, garlic, etc. Wash the ingredients in running water to remove dirt and other foreign substances. For fibrous ingredients such as ginger, peel the outer skin and cut them into small pieces. For long ingredients, cut them vertically for extraction.
LEAF AND STEM VEGETABLES
Celery, kale, cabbage, water parsley, wheatgrass, chives, etc. Cut the ingredients into 3-cm or shorter pieces for extraction. Since leaf and stem vegetables are rough and fibrous, they are not easily juiced and can get caught in the auger.
- When juicing ingredients other than root, leafy and stem vegetables, the juice may stagnate.
FROZEN FRUITS
Fruits with thick peels, such as watermelons and melons
Peel the outer skin and cut the ingredients into smaller pieces to fit in the hopper inlet before freezing them.
Seeded fruits, such as mangoes, peaches and grapes
Use only frozen, seedless fruits. For fruits that have hard, unchewable seeds, such as mangoes, peaches and lemons, make sure to remove the seeds and then freeze them before use. For grapes, freeze the seedless kind for use.
Soft fruits and vegetables, such as bananas, strawberries, kiwi and tomatoes
Peel bananas, kiwi, etc. completely and cut them into pieces that are 3 to 4cm-long that can fit in the inlet before freezing them. For cherry tomatoes, strawberries, etc., remove the stalks and then freeze them.
- It is used to make slushes, smoothies, ice cream, etc. that use frozen fruits.
- Cut the fruits into 2-cm pieces and freeze them before use.
- Never use it for crushing or grinding ice or other ingredients.
- Adding a large amount or large chunks at once may jam the product so please add the ingredients in small portions.

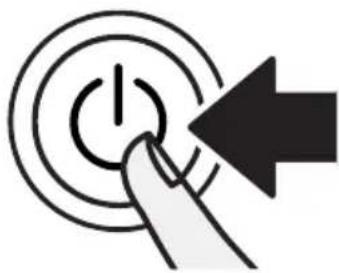
POWER BUTTON GUIDE
POWER BUTTON GUIDE
natural_image
Hand icon showing a finger pressing a button with a power symbol and an arrow (no text or symbols)Before operating the product, press the power button.
text_image
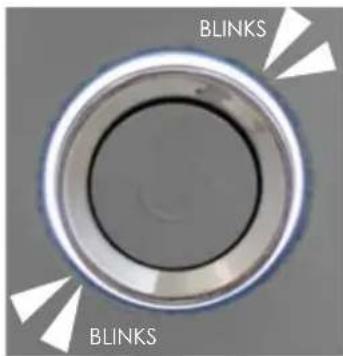
BLINKS BLINKSOPERATE / WHITE LED BLINKS
- It works when the power button is briefly pressed in the Standby Mode.
- It is used when activating the product for juicing.
• During operation, the white light blinks. - If the hopper cover is opened during operation, the
- product stops and the white light is lit. If the hopper cover is closed again within 60 seconds, the operation continues. But, if 60 seconds elapse, the operation automatically stops and it switches to the Standby (stop) state.
natural_image
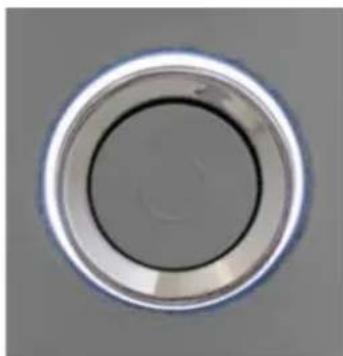
Circular metallic button or dial with a black centerline, no text or symbols visibleSTOP / WHITE LED ON
- This is used to stop the product's operation.
- The product stops when the power button is briefly pressed in the operation state.
- When stopped, the white light is lit.
- If the hopper cover is open or the chamber set is not assembled, the white light is turned off.
- When 1 minute has elapsed from the Standby (stop) state, the product enters the power saving mode (light turned off). If the power button is pressed or the chamber set is assembled, the power saving mode is deactivated and it switches to the Standby (stop) state.
natural_image
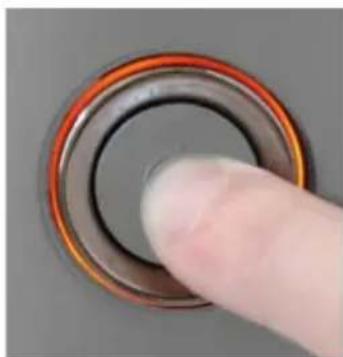
Close-up of a finger pressing a circular button (no text or symbols visible)REVERSE ROTATION / ORANGE LED BLINKS
- This is used when the operation pauses or a reverse rotation is needed due to excessive insertion of ingredients during extraction.
- During a reverse rotation, the orange light blinks.
- It works only when the power button is pressed for over 1 second, and it stops when the button is released.
- If the Auger stops during operation, the product automatically rotates in reverse but, if the power is unstable, the reverse rotation may not work. In such a case, press the power button for over 1 second to activate a reverse rotation and then press the power button again briefly to activate.

KNOW YOUR OMEGA
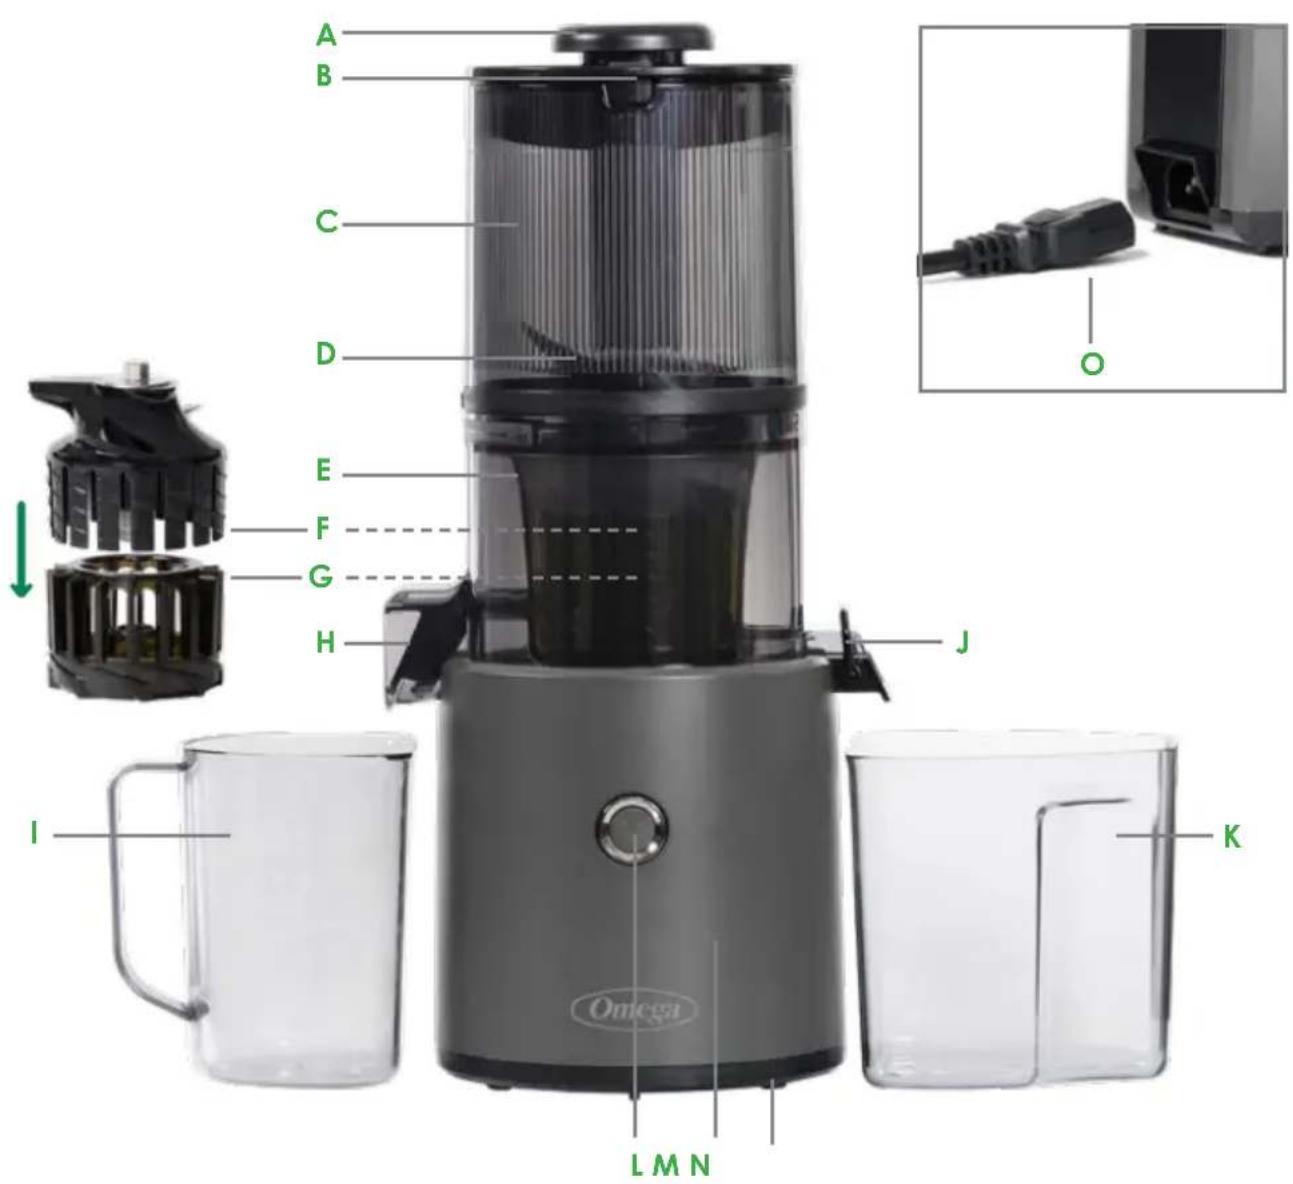
text_image
A B C D E F G H J I K Omica LMNA Pusher
B Hopper Cover
C Hopper
D Blade
E Chamber
F All-in-one Auger (top part)
G All-in-one Auger (bottom part)
H Juice Outlet with Flap
I Juice Container
J Easy-Clean Pulp Outlet
K Pulp Container
L ON/REV/OFF Button
M Housing / Motor
N Sturdy Nonslip Feet
- Detachable Power Cord
P Cleaning Brush (not pictured)

QUICK START ASSEMBLY
QUICK START ASSEMBLY
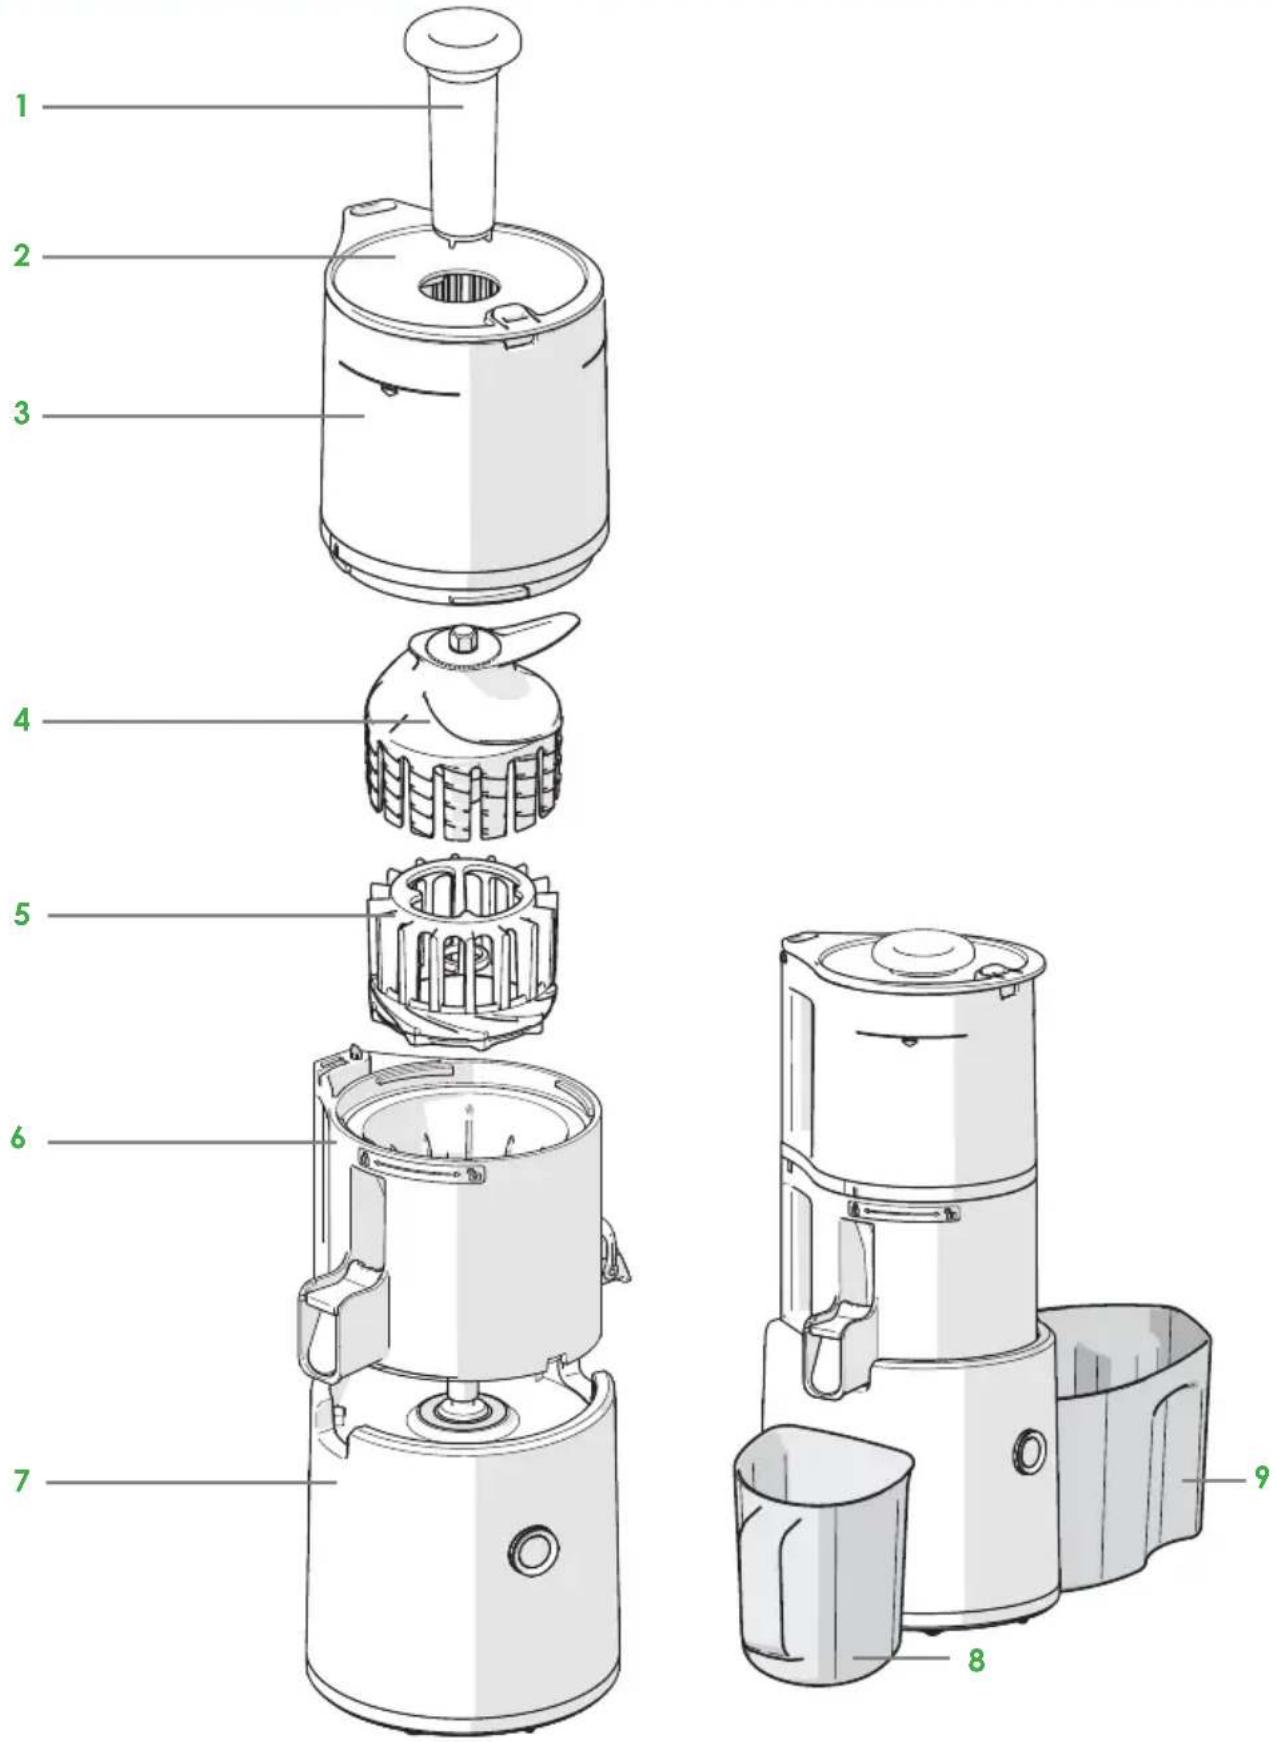
1 Pusher
2 Hopper Cover
3 Hopper
4 All-in-one Auger (top)
5 All-in-one Auger (bottom)
6 Chamber
7 Housing
8 Juice Container
9 Pulp Container

HOW TO ASSEMBLE
natural_image
Technical illustration of a mechanical device with a downward arrow indicating motion or assembly (no text or symbols present)
natural_image
Illustration of a hand placing a small component into a cylindrical container with a green circular icon (no text or symbols)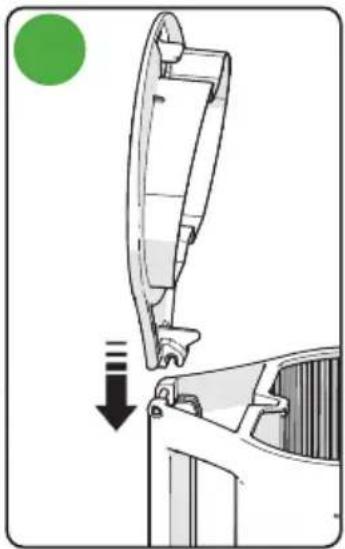
natural_image
Diagram showing a car's side panel with a green circular indicator and a downward arrow, no text or symbols present.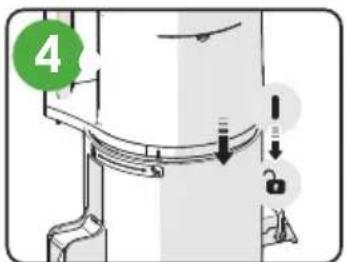
text_image
4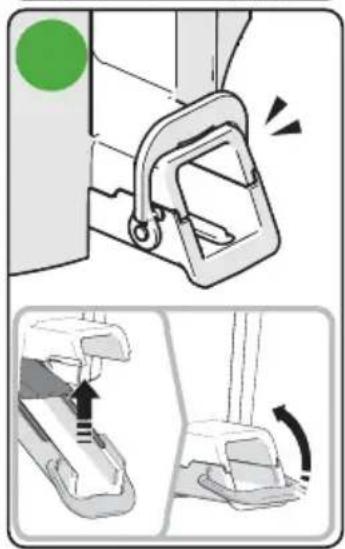
natural_image
Diagram showing a mechanical clamp mechanism with green circular indicator and directional arrows (no text or symbols)
natural_image
Diagram of a kitchen brush with a green circular mark and black arrow indicating downward motion (no text or symbols)
text_image
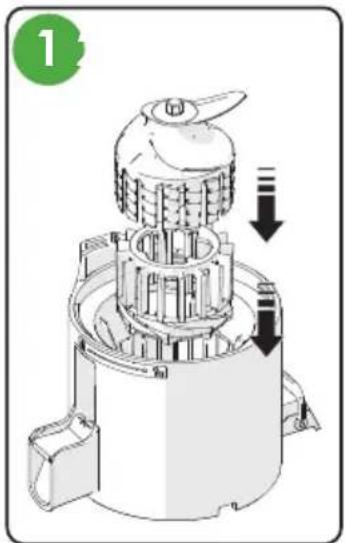
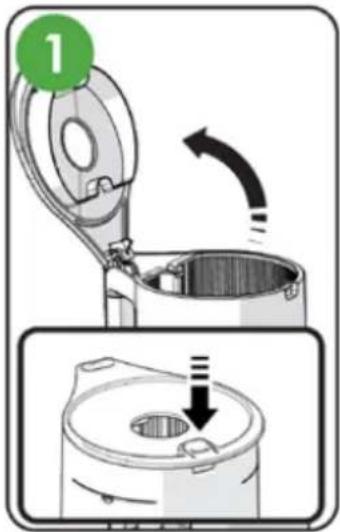
51 Insert the bottom part of auger into the chamber, and insert the top part of the auger as shown in the figure.
2 Firmly press down the top part of the auger and the bottom part of auger assembled in the chamber.
3 Assemble the hopper cover vertically onto the hopper.
4 Align the hopper assembly guide mark with the chamber assembly guide mark to assemble them.
5 Turn the assembled hopper clockwise up to the chamber assembly guide mark. If the internal parts are not assembled correctly, the hopper will not close.
6 Check if the discharge cover and the loop of the chamber are properly closed.
-
Lift the discharge cover to close it and fasten it with the loop.
-
If the packing is not correctly assembled or the lever is not properly closed, juice may leak or the lever may open during extraction.
7 Place the correctly assembled chamber set onto the top housing.
Assemble the chamber set first and then install it on the product body.

HOW TO USE
text_image
11. Open the hopper cover.
- Press the lever of the hopper cover to open it. Insertion of an excessive amount of ingredients may damage the product.
natural_image
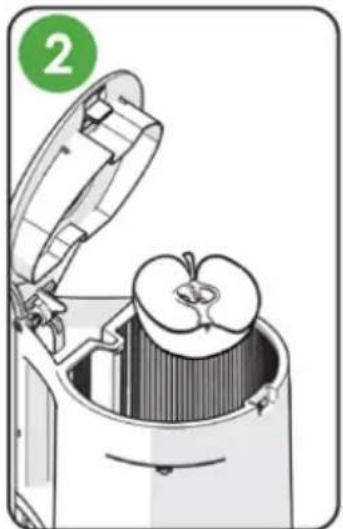
Illustration of an apple inside a trash bin with open lid, no text or symbols present2. Add ingredients only up to the limit mark of the hopper.
- For soft ingredients, mix them with other ingredients for extraction.

natural_image
Illustration of a water dispenser with directional arrows indicating motion (no text or symbols)3. Close the hopper cover and keep the juice cap open.
- Before pressing the power button, place the juice container and pulp container first.
• The juice may flow backwards into the hopper if the juice cap is closed during extraction. If the juice does not come out even after opening the juice cap, open the hopper cover and empty out the contents. When the hopper cover is closed, the white light is lit.
text_image
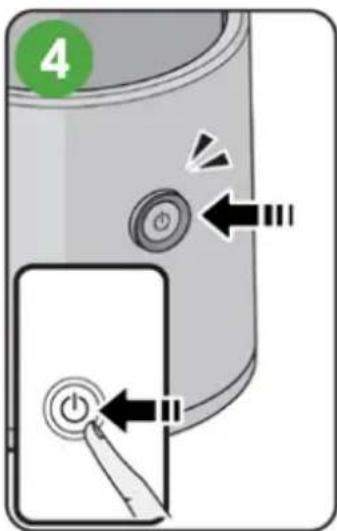
44. Press the power button briefly to start operation.
- The "click" sound during the operation of the product is the sound of the chamber set and the motor being locked together.
- During operation, the white light blinks on the power button part. - If the auger stops during operation, the product automatically rotates in reverse but, if the power is unstable, the reverse rotation may not work. In such a case, press and hold the power button for over 1 second to activate the reverse rotation and then press the power button again briefly to activate.
- A timer, which automatically stops after about 5 minutes from the start of operation, is set. If the power button is controlled during operation or the hopper cover is opened and then closed, which pauses and then restarts the machine, the timer is reset to 5 minutes again.
HOW TO USE
natural_image
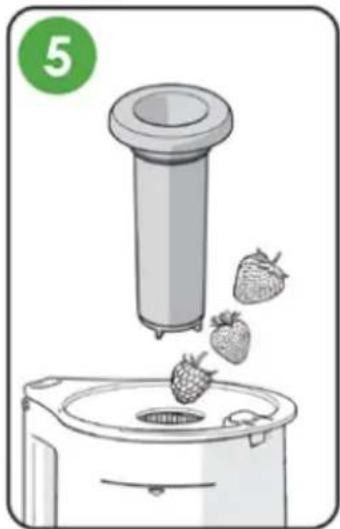
Illustration of a strawberry being placed into a processing machine with a green circle labeled '5' (no text or symbols on the diagram itself)5. To add more ingredients during operation, use the additional inlet or open the hopper cover.
- When the hopper cover is opened, the operation stops.
- Do not use anything other than the designated pusher.
- In case the Auger spins but the ingredients fail to be ground in the hopper during extraction, use the pusher to press the ingredients down.
natural_image
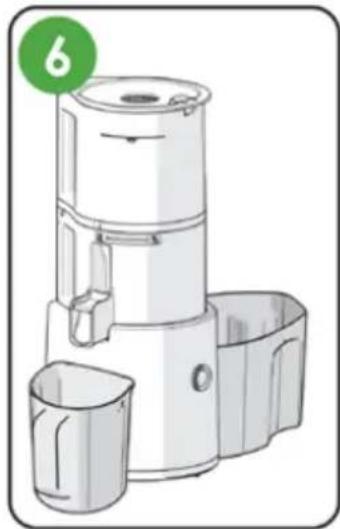
Illustration of a modern kitchen brush unit with a green circular badge labeled '6' (no text or symbols on the device itself)- Empty out the pulp container and juice container so that they are not filled up.
natural_image
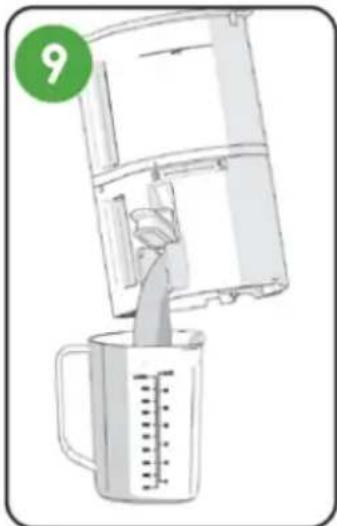
Illustration of a kitchen mixer blending liquid into a measuring cup (no text or symbols)7. Let the machine operate for about 1 more minute after all ingredients go down in the hopper.
- It slowly presses and squeezes the ingredients so it takes some time until the last ingredient is juiced.
- Removing the remaining pulp by additionally operating the machine after extraction makes it more convenient to detach the hopper and clean the parts.
text_image
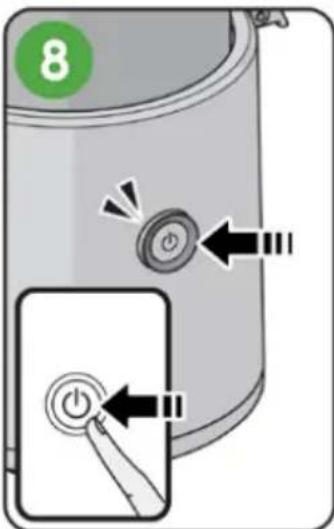
88. Once the juicing and pulp removal are finished, press the power button to stop the machine.
- The machine stops 3 seconds after it is stopped by the power button.
natural_image
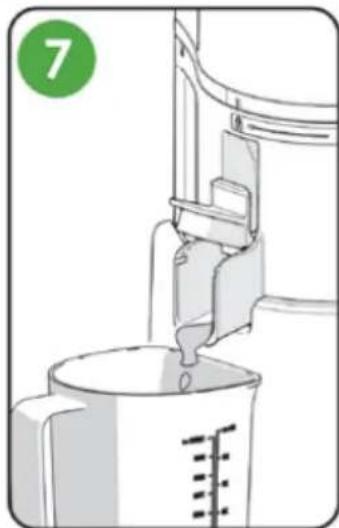
Illustration of a kitchen blender being filled with a measuring cup, with a green circular badge showing number 9 (no text or symbols on the diagram itself)9. Pour any remaining juice by tilting the chamber forward.
• For thickly concentrated juice made of tomatoes, etc., the juice may still remain in the chamber.

WHEN AUGER STOPS DURING USE
WHEN AUGER STOPS DURING USE
text_image
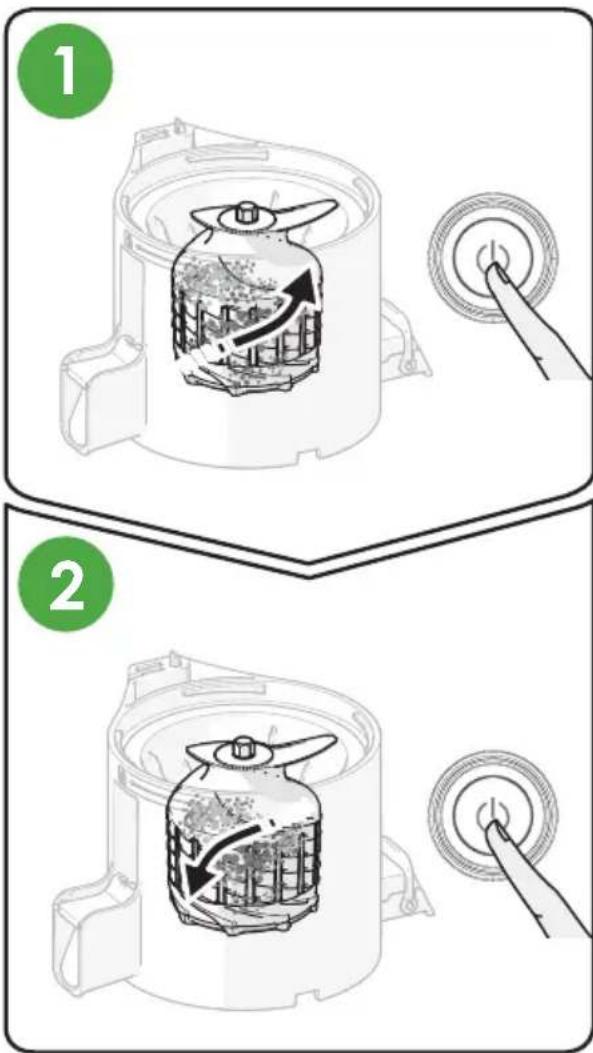
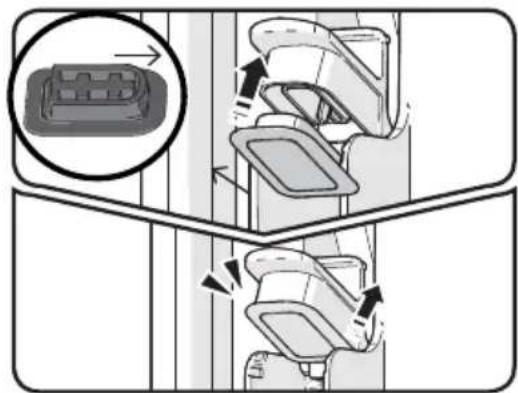
Diagram illustrating two steps of a kitchen appliance with labeled parts and directional arrows indicating process flow.- If the Auger stops during operation, the product automatically rotates in reverse and then goes into a normal operation. But, if the power is unstable, the reverse rotation may not work. In such a case, press the power button for over 1 second to activate a reverse rotation.
The reverse rotation is a function that returns the ingredients upward. It only works while the power button is pressed and, once you lift your finger from the button, the Auger stops rotating.
- After the auger is completely stopped after a reverse rotation, press the power button briefly to start the operation again.
When operating the extraction or reverse rotation function, make sure to press the power button after the auger has completely stopped moving.
Note
If the machine does not work even after following the above steps, pull the power cord plug from the outlet, detach the chamber set, wash it and use it again. Due to its characteristics, the motor will not stop at once but, instead, continue to spin slowly in the direction of operation before coming to a complete stop.

ASSEMBLY AND DISASSEMBLY OF SILICONE
ASSEMBLY AND DISASSEMBLY OF SILICONE
Silicone packings are consumables that are recommended to be replaced once every 6 to 12 months. They are available for purchase through the Customer Service Center. (The juicer may leak if the product is not assembled properly.)
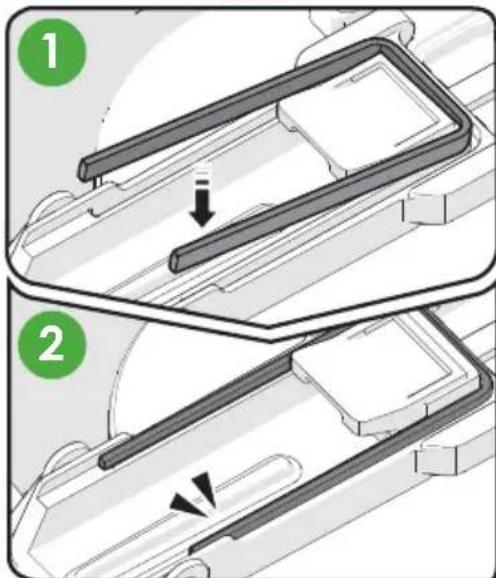
EXTRACTION PACKING
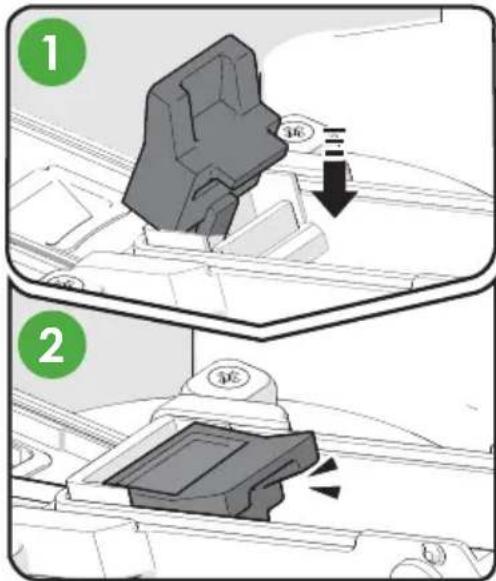
text_image
Diagram illustrating two steps of a mechanical or electrical component, labeled 1 and 2, with arrows indicating motion direction.JUICE CAP PACKING
text_image
Diagram showing a vehicle door lock mechanism with directional arrows and component placementAfter cleaning, insert in a way that the round side of the packing faces outward while the grid grooves face upward.
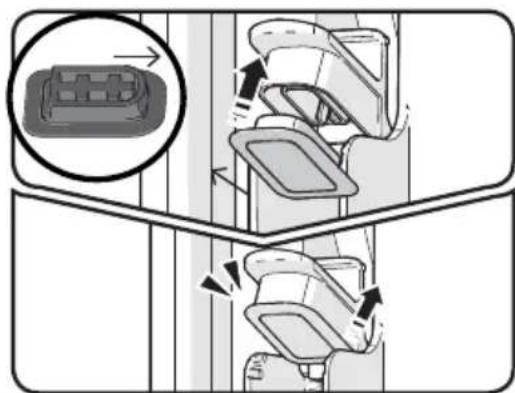
SEAL PACKING

text_image
Technical diagram showing two steps of a mechanical component with arrows indicating direction and movement, labeled 1 and 2.HOPPER PACKING
natural_image
Diagram of two mechanical components with circular features and directional arrows, no readable text or symbols present.Assemble the packing as shown in the figure.
1 Hold and take out the packing as if you are pulling it back.
2 After cleaning, insert one side of the packing first as if you are hooking it.
3 Insert the remaining part and press down the perimeter.
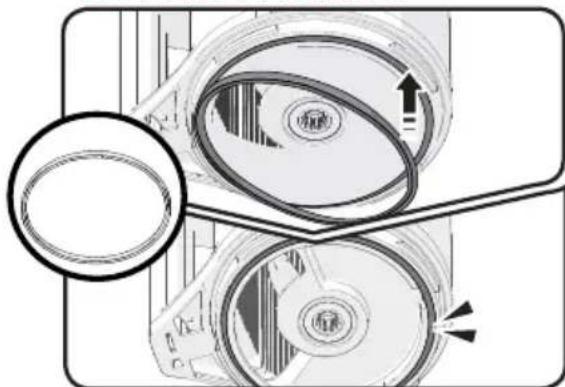
CHAMBER PACKING
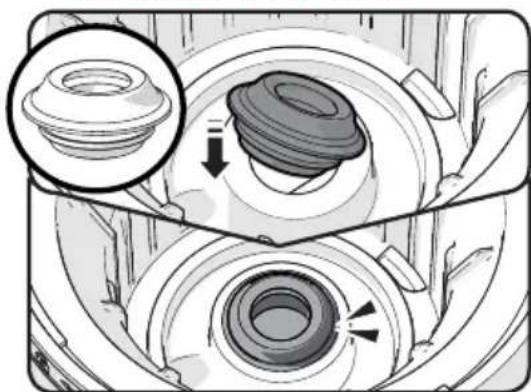
natural_image
Mechanical assembly diagram showing a component with a magnified inset (no text or symbols)1 Grab one side and pull it back to detach it.
2 After cleaning, check the top and bottom of the packing and insert it as if you are hooking one side.
3 Firmly press the remaining part of the packing without any folded area.

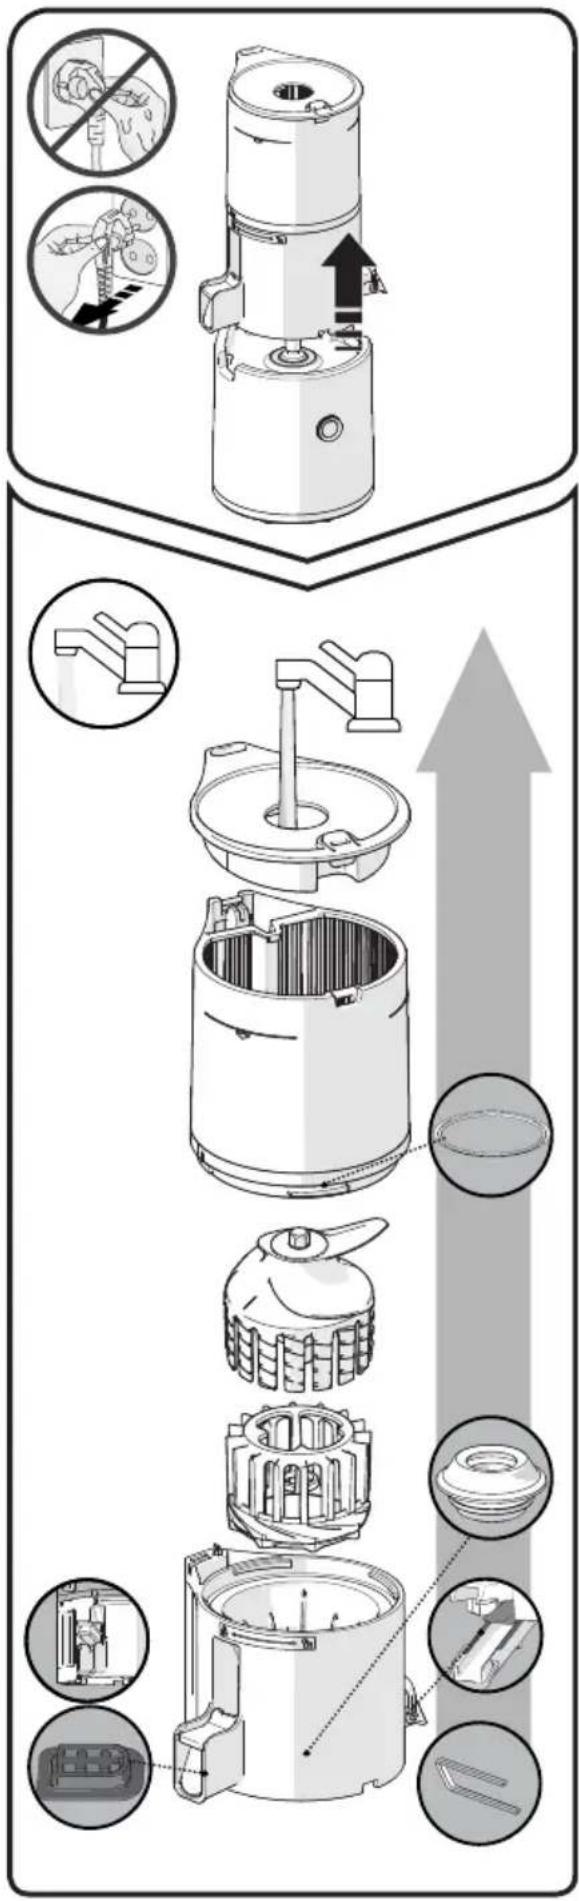
HOW TO DISASSEMBLE AND CLEAN
HOW TO DISASSEMBLE AND CLEAN
text_image
Technical diagram illustrating the internal structure and assembly of a blender, with labeled parts and directional arrows indicating process flow.
natural_image
Illustration of a hand cleaning a small appliance with no visible text or symbolsAfter the product stops operating completely, pull the power cord plug with dry hands. Even after the product is stopped, the motor will slowly come to a stop so wait about 3 seconds before detaching the chamber set.
1 Detach the chamber set from the product body. Turn the hopper to open it and then sequentially pull each of the parts to disassemble them.
2 Wash the parts with a cleaning brush under running water.
3 Open the discharge cover and juice cap to clean the chamber.
4 Wipe the product body with a damp towel or soft cloth.
5 Detach and wash silicone packings after use.
- Residue may still be stuck. (hopper packing, juice cap packing, extraction packing, seal packing, chamber packing).
6 You can sterilize the parts by soaking them in warm water diluted with baking soda, citric acid or vinegar.
Failure to clean the product immediately after use may cause its stainless steel parts and other parts to corrode or become discolored due to salt and pulp from the ingredients. Also, contaminants may be dried up and stuck inside, which makes it difficult to disassemble and clean them and may also cause performance impairment. Be sure to clean and air dry it completely immediately after use and store it in a clean place. For long-term storage, use a cleaning brush to wash it. Do not clean with boiling or high temperature water or use a cleansing sponge, steel sponge, abrasives and other sharp cleaning tools. Do not place parts in dishwasher.

TROUBLESHOOTING
- When it starts operating, a "click" sound is heard.
It is the sound of the motor being assembled with the auger. This is not a malfunction.
- It does not operate only with the product body.
Check if the chamber set and product body are properly assembled. Make sure to turn the power off when assembling or disassembling the product.
- Assemble it so that it is aligned with the safety sensor.
Check if it is assembled in accordance with the guide mark. Make sure to turn the power off when assembling or disassembling the product.
- It does not work.
Check if the power cord is properly inserted. The machine may not work after a long period of (30 minutes or longer). It will operate normally after the heat of the product body (motor) cools down.
- It stops during a normal operation.
Check if the hopper is properly assembled. If the hopper is assembled incorrectly, the product will not work. It will operate only when the lock symbol on the chamber and the hopper's assembly guide mark are assembled in a way that they face each other. Check if the product is assembled according to the steps specified in the assembly guide. Refer to the assembly guide section on page 15-17. Have an excessive amount of ingredients or extremely thick ingredients inserted? Refer to page 21 of the manual to activate a reverse rotation. For safety, a timer, which automatically stops after about 5 minutes from the start of operation, is set. Press the button again briefly to start operation.
- There are crack marks caused by auger or scratch marks at the top of the auger.
In the process of making the molding, curve-shaped marks are created on the sides and top of the auger in addition to the straight-lined mold marks. They are normal parts and do not affect the operation at all.
- Juice leaks through the pulp outlet immediately after the ingredients are inserted.
Depending on the inserted ingredients, small amounts of juice may leak through the pulp outlet. This is not a product defect but, rather, a phenomenon caused by the characteristics of the ingredients. The leakage will stop once the product starts running. If the leakage continues, contact Customer Service.
TROUBLESHOOTING
8. Juice flows back into the hopper.
Did you extract juice with the juice cap closed? When juicing with the juice cap closed, the juice may flow backward into the hopper. If the contents are not sufficiently discharged even after opening the juice cap again, open the hopper cover and empty out the contents.
9. Juice leaks between the hopper and the chamber, or between the chamber and the product body.
Is the hopper packing or chamber packing assembled correctly? The juice will leak if the hopper packing or chamber packing has been assembled upside-down or incompletely. Check if the packing is assembled properly.
10. The hopper does not open.
There may be excessive pulp remaining inside. Operate the produce to discharge the pulp inside or repeat the process of activating a reverse rotation for about 10 seconds and then stopping 2 to 3 times. Then, the hopper will open without any issue.
Weren't any foreign substances or solid matters (hard seeds such as persimmon seeds) inserted? If any foreign substances or solid matters are inserted, parts may be damaged more seriously when attempting a reverse rotation so contact Customer Service and request for after-sales service.
11. The chamber shakes (during juicing).
The product may wobble slightly due to the motions of the product body's motor. Depending on the ingredients' characteristics (hard or tough), motions are generated in various magnitudes. This is not a malfunction but, rather, a normal phenomenon observed when the Auger rotates. Compared to soft ingredients with much water content, relatively harder ingredients may seem to produce a greater shaking (e.g., carrots, potatoes, radishes, beet, kohlrabi, etc.)
12. The discharge cover is closed but the pulp is discharged.
Even if the lever is closed, pulp will be discharged naturally. Depending on the ingredients used, there may be a difference in the amount and speed of discharge.
13. An unusual noise is heard while juicing.
It is a natural sound produced when ingredients are being crushed. If the ingredients are hard or tough like apples, carrots, cabbage, celery, beets, etc., the extraction noise may be louder than that heard when juicing softer ingredients.
14. The auger stopped during operation but a reverse rotation does not work automatically.
If the power is unstable, the product may not perform a reverse rotation automatically. Refer to Page 21 of the manual and activate a reverse rotation.
15. During straining, it automatically ends before the 5-minute timer ends.
It is a function that automatically shuts down to protect the product in case the automatic reverse rotation is operated often during straining. This may occur if it is impossible to strain or if uncut ingredients are added. Please refer to Page 8-9 of the manual for the instructions on each ingredient and insert the ingredients accordingly.

PRODUCT SPECIFICATIONS
PRODUCT SPECIFICATIONS
Product Name Effortless
^TM Batch Juicer
Model Name JC2022
Rated Voltage 120 V
Rated Frequency 60 Hz
Rated Power Consumption 150 W
RPM 70 RPM
Capacity Juice Cup 35oz (1000ml), Hopper is 1.8Qt (2L)
Cord Length 55" (1.4 m)
Weight 13.7 lb (6.2 kg)
Outward Dimension 9" Width (229 mm)
8.7" Depth (221 mm)
18.2" Height (462 mm)
Rated Operating Time Less than 30 minutes
natural_image
Exterior view of a modern Omega brand juice maker with clear glass and control panel (no text or symbols visible on device body)
NOTES & RECIPES
NOTES
For Recipes, visit www.OmegaJuicers.com/recipes
Clean Boost
What You'll Need:
12 a beetroot
5 spinach leaves
1/4 cabbage
1 broccoli stick
12 a grapefruit (peeled and seeded)
1 / 2 a lemon
1 orange (peeled and seeded)
1 kiwi fruit
2 small pieces of ginger
How To Prepare:
1 Cut product to fit into hopper.
2 Juice in an Omega Juicer.
3 Pour over ice.
4 Enjoy!
PREP 2 minutes JUICE 4 minutes
Australian Dream
What You'll Need:
2 beets (australian beetroot)
2 organic carrots
1 cup organic strawberries
2 cups kale leaves (6-8 leaves)
(australia tuscan cabbage)
How To Prepare:
1 Wash all produce well.
2 Cut as needed to fit into hopper.
3 Juice in an Omega Juicer.
4 Pour over ice and enjoy!
PREP 3 minutes JUICE 6 minutes
Morning Glory Citrus
What You'll Need:
2 grapefruits (peeled and seeded) 1 red bell pepper (seeded)
2 pears 6 carrots
How To Prepare:
1 Wash all produce well.
2 Juice all produce in an Omega Juicer and enjoy!
Serving Size: 16 - 18 oz.
Bursting with vitamin C and beta-carotene, as well as vitamins A & K and even copper.
PREP 5 minutes JUICE 5 minutes
Salsa in a Glass
What You'll Need:
2 Tomatoes
^1/_4 Onion
1 / 2 Lime
1 Jalapeno Pepper
5 Sprigs of Fresh Cilantro
How To Prepare:
1 Wash all produce well.
2 Peel lime (optional).
3 Add all ingredients into your Omega Juicer and juice.
4 Serve and enjoy!
PREP 5 minutes JUICE 5 minutes
Total Health Booster
What You'll Need:
1 medium apple (cored and seeded) 2 medium soft pears (cored and seeded) 12 cup fresh cherries (pits removed or frozen and thawed)
How To Prepare:
In your Omega Juicer, juice apple, pears, and cherries.
Before serving, garnish with fresh cherries, if desired.
PREP 5 minutes JUICE 5 minutes
Cukelear Power
What You'll Need:
1 cucumber 2 collard green leaves 1 handful of cauliflower florets 12 lemon (peeled and seeded)
How To Prepare:
1 Wash all produce.
^2 Add all ingredients into your Omega Juicer and juice.
3 Pour into your glass and enjoy!
PREP 5 minutes JUICE 5 minutes
Tropical Morning
What You'll Need:
1 peach (remove pit) 1 mango (peeled and seed removed) 1 orange (skin removed) 12 cup coconut water 1 teaspoon agave nectar
How To Prepare:
1 Cut produce to fit hopper.
2 In your Omega Juicer, juice peach, mango and orange.
3 Add remaining ingredients and stir.
4 Serve chilled and garnish with a peach slice.
PREP 5 minutes JUICE 5 minutes
Apple & Kiwi Juice
What You'll Need:
2 apples (cored and seeded) 3 kiwis (skin removed)
How To Prepare:
1 Wash all produce.
2 Juice ingredients in your Omega Juicer.
3 Stir before drinking.
PREP 5 minutes JUICE 5 minutes
Omega
Félicitations!
natural_image
Technical line drawing of a cylindrical industrial device with a meshed base and mounting bracket (no text or symbols)natural_image
Hand pressing a button with a black arrow symbol (no text or labels)natural_image
Circular metallic button or dial with a black centerline, no visible text or symbolsARRÊT / LED BLANCHE ALLUMÉE
natural_image
Close-up of a finger pressing a circular button (no text or symbols visible)ROTATION INVERSE / LA LED ORANGE CLIGNOTE
text_image
A B C D E F G H J I K Omica LMNA Poussoir
natural_image
Technical illustration of a mechanical device with internal components and directional arrows (no text or symbols)
natural_image
Illustration of a hand pressing down on a cylindrical container with a green circular icon (no text or symbols)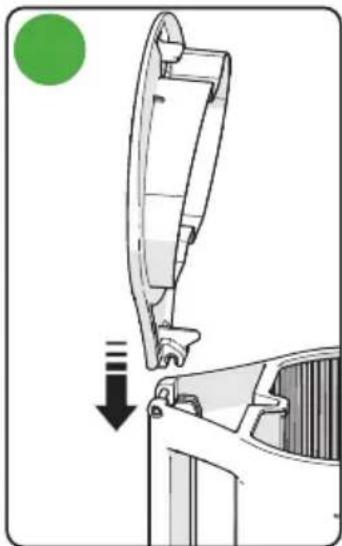
natural_image
Diagram showing a car's side panel with a green circular indicator and a downward arrow, no text or symbols present.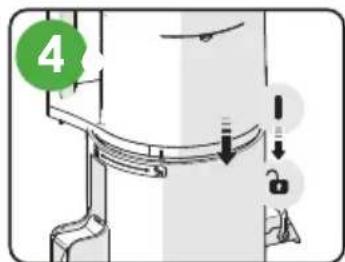
text_image
4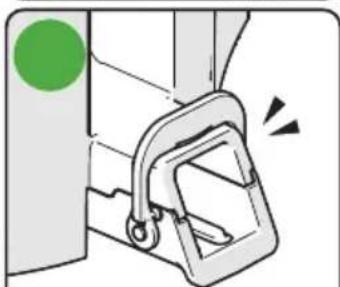
natural_image
Diagram of a mechanical clamp or bracket with a green circular marker and motion arrows (no text or symbols)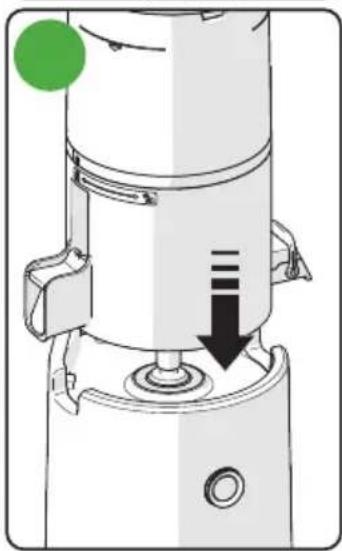
natural_image
Diagram of a kitchen brush with a green circular mark and black arrow indicating downward motion (no text or symbols)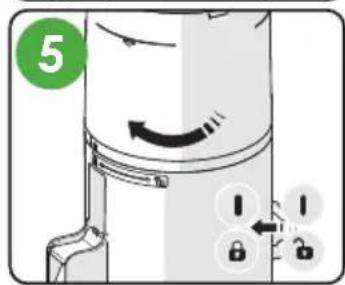
text_image
5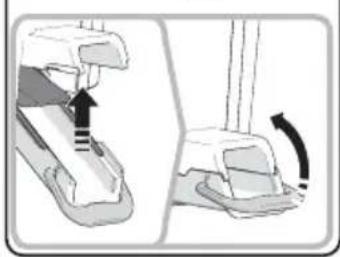
natural_image
Diagram showing a mechanical component with an arrow indicating motion, no text or symbols presentnatural_image
Illustration of an apple inside a trash bin with open lid, no text or symbols presentnatural_image
Illustration of a water dispenser with directional arrows indicating motion (no text or symbols)natural_image
Illustration of a strawberry being placed into a processing machine with a green circle labeled '5' (no text or symbols on the diagram itself)natural_image
Illustration of a modern kitchen brush unit with a green circular badge labeled '6' (no text or symbols on the device itself)natural_image
Illustration of a kitchen mixer blending liquid into a measuring cup (no text or symbols)natural_image
Illustration of a kitchen blender being poured into a measuring cup (no text or symbols)text_image
Diagram illustrating two steps of a kitchen appliance with labeled parts and directional arrows indicating process flow.text_image
Diagram illustrating two steps of a mechanical or electrical component assembly, labeled 1 and 2, with arrows indicating process direction.JOINT DU BOUCHON DE SORTIE DU JUS
text_image
Diagram showing a mechanical assembly with labeled components and directional arrows indicating movement or force.text_image
Technical diagram showing two steps of a mechanical component with arrows indicating motion or assembly, labeled 1 and 2.natural_image
Diagram of a mechanical device with two circular components and directional arrows, no visible text or symbolsnatural_image
Mechanical assembly diagram showing a gear-like component with a magnified inset view (no text or symbols)text_image
Technical diagram illustrating the internal structure and assembly of a blender, with labeled parts and directional arrows indicating process flow.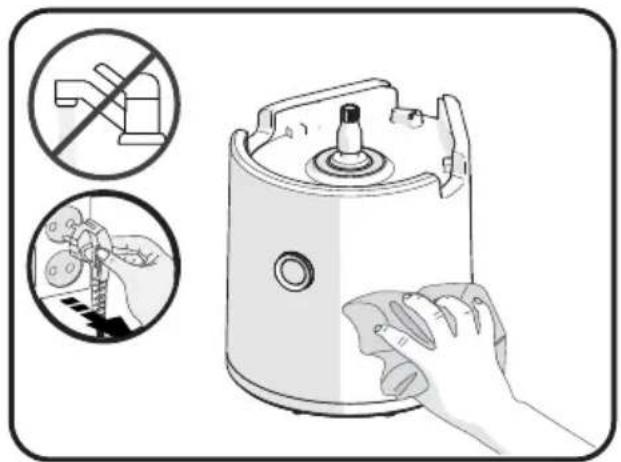
natural_image
Illustration of a hand cleaning a small appliance with no visible text or symbolsSPÉCIFICATIONS DU PRODUIT
SPÉCIFICATIONS DU PRODUIT
natural_image
Exterior view of a modern Omega brand juice maker with clear glass and control panel (no text or symbols visible on device body)
RECETTES ET NOTES
NOTES
Pour des recettes, consultez www.OmegaJuicers.com/recipes
Boost Revigorant
Ingrédients:
1/2 betterave
natural_image
Diagram of a cylindrical device with internal components and a labeled arrow pointing to it (no text or symbols present)natural_image
Hand icon showing a finger pressing a button with a power symbol and an arrow (no text or symbols)natural_image
Circular metallic button or dial with a black centerline, no text or symbols visiblePARADA / LED BLANCO ENCENDIDO
natural_image
Close-up of a finger pressing a circular button (no text or symbols visible)text_image
A B C D E F G H J I K Omica LMNnatural_image
Technical illustration of a mechanical device with a downward arrow indicating motion or force (no text or symbols present)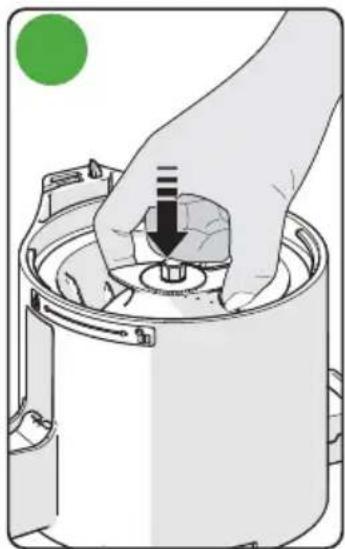
natural_image
Illustration of a hand placing a small component into a cylindrical container with a green circular icon (no text or symbols)
natural_image
Diagram showing a car's side panel with a green circular indicator and a downward arrow, no text or symbols present.
text_image
4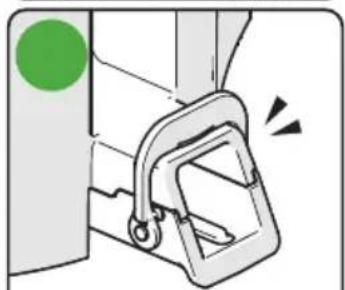
natural_image
Diagram of a mechanical clamp or bracket with a green circular marker and motion arrows (no text or symbols)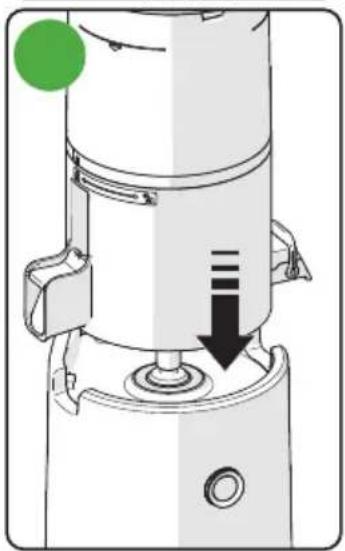
natural_image
Diagram of a kitchen brush with a green circular mark and black arrow indicating downward motion (no text or symbols)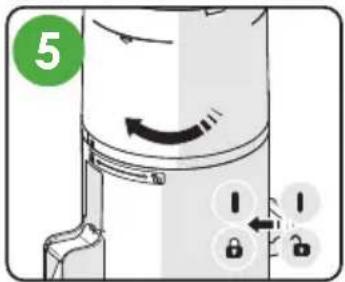
text_image
5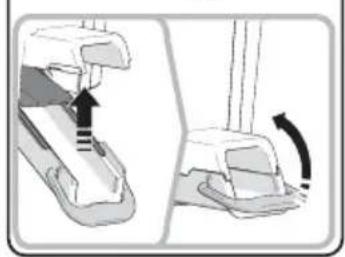
natural_image
Diagram showing a mechanical component with an arrow indicating rotation, no text or symbols presentnatural_image
Illustration of an apple inside a trash bin with open lid, no text or symbols presentnatural_image
Illustration of a water dispenser with directional arrows indicating motion (no text or symbols)natural_image
Illustration of a strawberry being placed into a processing machine with a green circle labeled '5' (no text or symbols on the diagram itself)natural_image
Illustration of a modern kitchen brush unit with a green circular badge labeled '6' (no text or symbols on the device itself)natural_image
Illustration of a blender being filled with a measuring cup, no text or symbols presentnatural_image
Illustration of a kitchen mixer blending liquid into a measuring cup (no text or symbols)text_image
Diagram showing two steps of a kitchen appliance with labeled parts and directional arrows indicating process flow.text_image
Diagram illustrating two steps of a mechanical or electrical component, labeled 1 and 2, with arrows indicating motion direction.JUNTA DE SELLADO
text_image
Technical diagram showing two mechanical assembly steps with labeled arrows and numbered calloutstext_image
Diagram showing a vehicle door lock mechanism with directional arrows and a magnified inset of the lock component.natural_image
Diagram of two circular components with internal rings and a directional arrow, no text or symbols presentnatural_image
Mechanical component diagram showing a cylindrical housing with internal components and directional arrows (no text or symbols)text_image
Technical diagram illustrating the internal structure and assembly of a blender, with labeled parts and directional arrows indicating process flow.
natural_image
Illustration of a hand cleaning a small appliance with no visible text or symbolsnatural_image
Exterior view of a modern Omega brand juice maker with clear glass and control panel (no text or symbols visible on device body)
RECETAS Y NOTAS
NOTAS
Para recetas, visite www.OmegaJuicers.com/recipes
Impulso Limpio
natural_image
Abstract gradient background with green and white curved bands (no text or symbols)Omega®
NOURISH YOUR BODY
Enrich Your Soul
NOURISSEZ VOTRE CORPS
Prop. 65 Warning for California Residents

WARNING: CANCER AND REPRODUCTIVE HARM - www.P65Warnings.ca.gov
www.OmegaJuicers.com
The Legacy Companies, Weston, FL 33331 U.S.A.