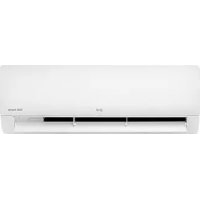
AC18BK - Air conditioner LG - Free user manual and instructions
Find the device manual for free AC18BK LG in PDF.



| Product type | Wall-mounted split air conditioner |
| Brand | LG |
| Model | AC18BK |
| Power supply | 220-240 V ~, 50/60 Hz |
| Main functions | Cooling, Heating (depending on model), Dehumidification, Ventilation |
| Wireless remote control | Yes, with AAA 1.5 V batteries |
| Display | LED on indoor unit |
| On/Off timer | Yes, programmable up to 24 h |
| Air filter cleaning | Every 2 weeks recommended |
| Emergency ON/OFF button | Yes, on indoor unit |
| °C / °F conversion | Yes, by holding the Swing button |
| Indoor unit dimensions (approx.) | 800 x 300 x 200 mm (W x H x D) |
| Indoor unit weight (approx.) | 10 kg |
| Outdoor unit dimensions (approx.) | 700 x 500 x 250 mm |
| Outdoor unit weight (approx.) | 30 kg |
| Refrigerant | R32 |
| Indoor noise level (approx.) | 32 dB(A) |
| Outdoor noise level (approx.) | 55 dB(A) |
| Set temperature range | 18-30 °C (cooling), 16-30 °C (heating) |
| Spare parts and repairability | Washable air filter, remote control batteries, professional maintenance for the refrigeration circuit |
Frequently Asked Questions - AC18BK LG
User questions about AC18BK LG
0 question about this device. Answer the ones you know or ask your own.
Ask a new question about this device
Download the instructions for your Air conditioner in PDF format for free! Find your manual AC18BK - LG and take your electronic device back in hand. On this page are published all the documents necessary for the use of your device. AC18BK by LG.
USER MANUAL AC18BK LG
Read this owner's manual thoroughly before operating the appliance and keep it handy for reference at all times.
This manual is the simplified version of original manual. You can obtain the original manual from www.lg.com.
TYPE: WALL MOUNTED
Original instruction
EN ENGLISH
IT ITALIANO
ES ESPAÑOL
FR FRANÇAIS
DE DEUTSCH
EL EΛΛΗΝΙΚΑ
PT PORTUGUÊS
NL NEDERLANDS
PL POLSKI
RO ROMÂNĂ
LG Electronics Inc. Single Point of Contact (EU/UK) & EU Importer:
LG Electronics European Shared Service Center B.V.
Krijgsman 1, 1186 DM Amstelveen, The Netherlands

5401521249 Rev.: a
※ When installed, enter the model name and send it to the customer.

Model Name
:
- Read the QR Code.
- Enter the model name.
- Select the manual that you want to see.
TABLE OF CONTENTS
This manual may contain images or content different from the model you purchased.
This manual is subject to revision by the manufacturer.
OPERATION 3
Notes for Operation .... 3
Parts and Functions....3
Wireless Remote Control....4
OPERATION
EN
Notes for Operation
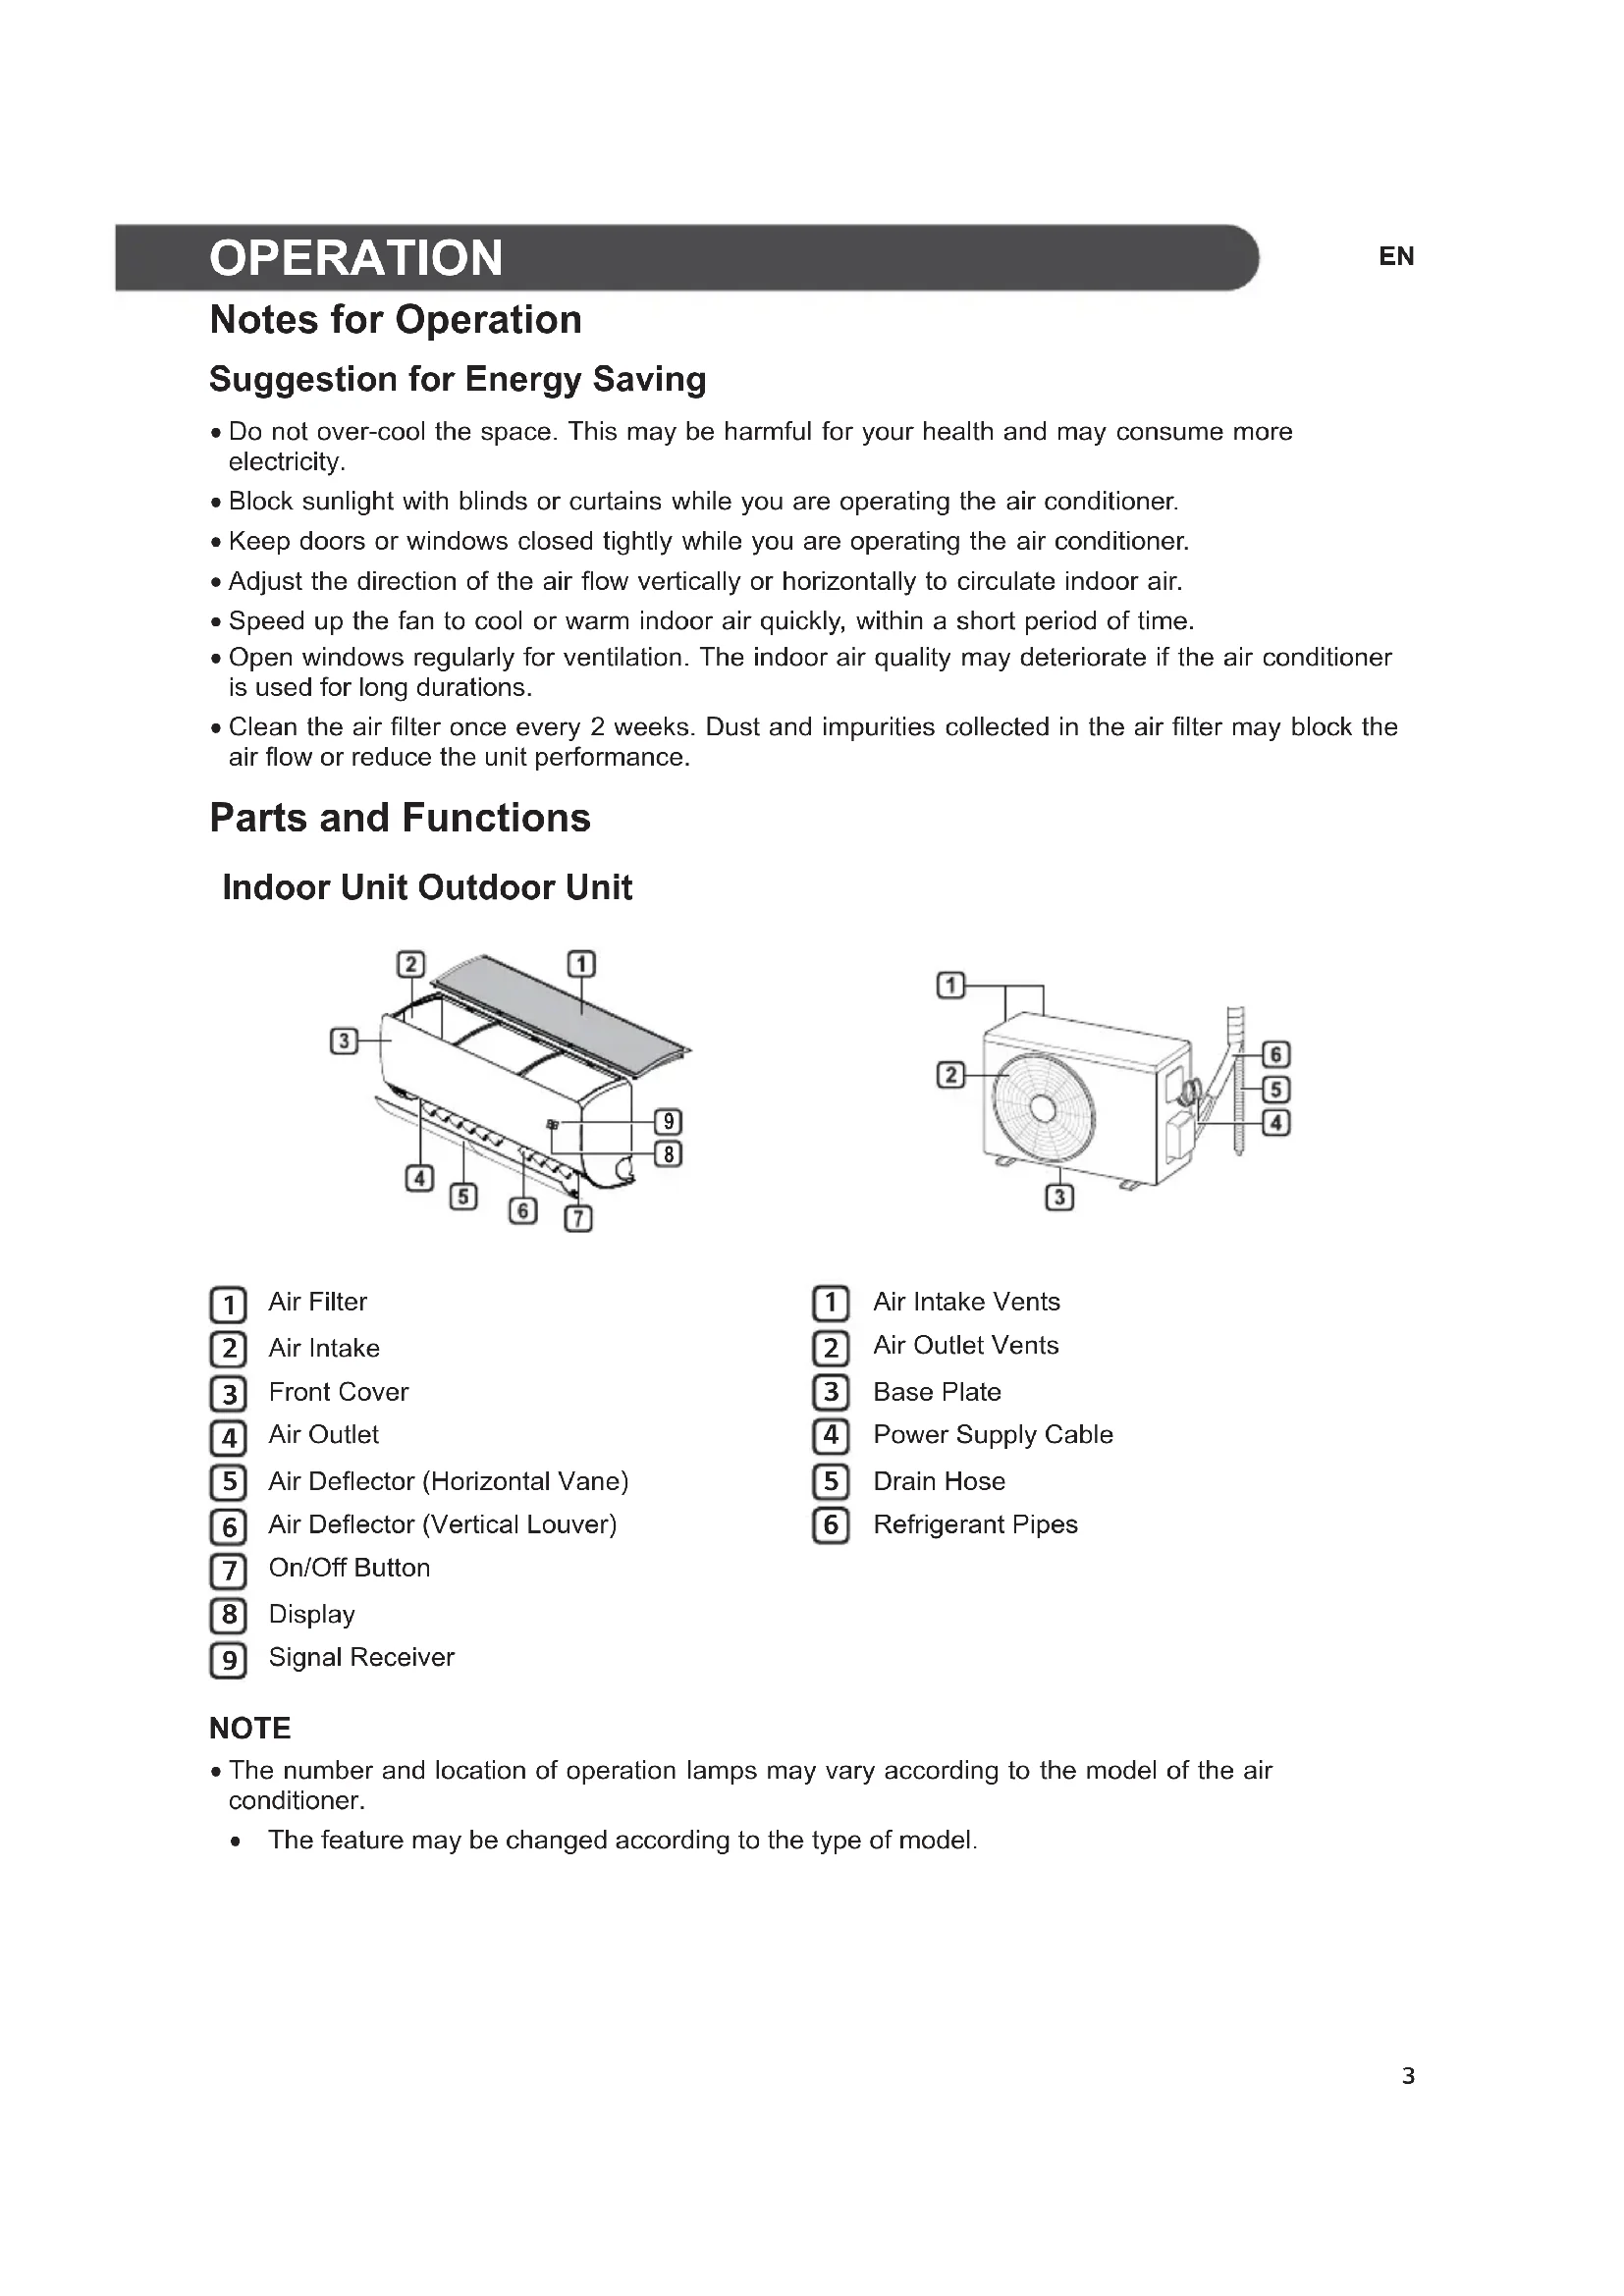
Suggestion for Energy Saving
- Do not over-cool the space. This may be harmful for your health and may consume more electricity.
- Block sunlight with blinds or curtains while you are operating the air conditioner.
- Keep doors or windows closed tightly while you are operating the air conditioner.
- Adjust the direction of the air flow vertically or horizontally to circulate indoor air.
- Speed up the fan to cool or warm indoor air quickly, within a short period of time.
- Open windows regularly for ventilation. The indoor air quality may deteriorate if the air conditioner is used for long durations.
- Clean the air filter once every 2 weeks. Dust and impurities collected in the air filter may block the air flow or reduce the unit performance.
Parts and Functions
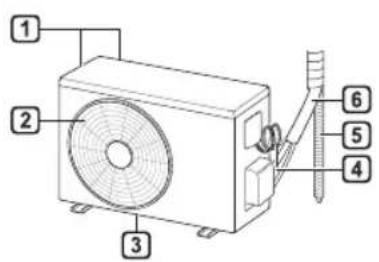
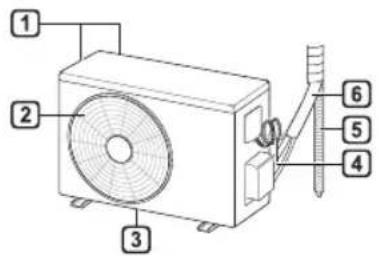
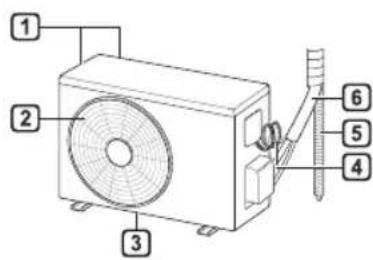
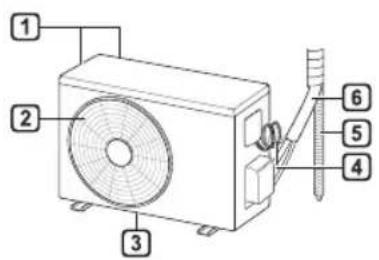
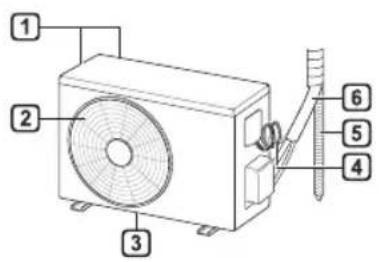
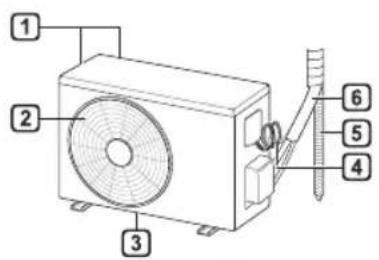
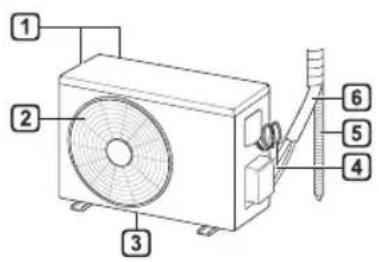
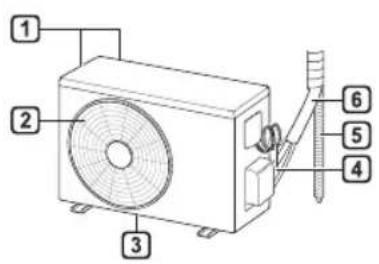
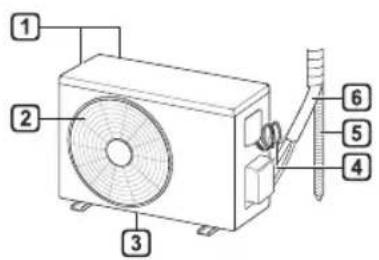
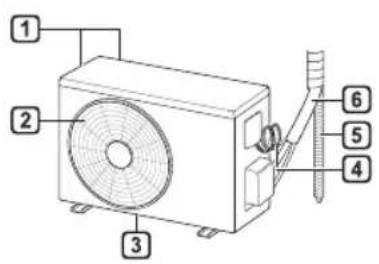
Indoor Unit Outdoor Unit
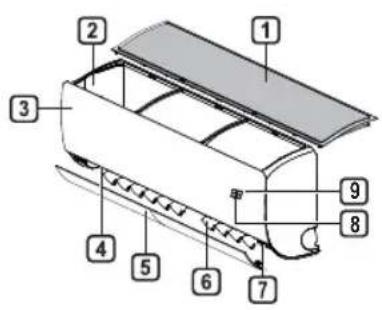
1 Air Filter
2 Air Intake
3 Front Cover
4 Air Outlet
5 Air Deflector (Horizontal Vane)
6 Air Deflector (Vertical Louver)
7 On/Off Button
8 Display
9 Signal Receiver
1 Air Intake Vents
2 Air Outlet Vents
3 Base Plate
4 Power Supply Cable
5 Drain Hose
6 Refrigerant Pipes
NOTE
- The number and location of operation lamps may vary according to the model of the air conditioner.
- The feature may be changed according to the type of model.
Wireless Remote Control
Inserting Batteries
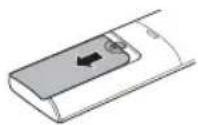
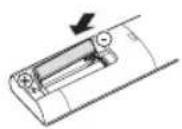
If the display screen of the remote control begins to fade, replace the batteries. Insert AAA (1.5 V) batteries before using the remote control.
1 Remove the battery cover.
2 Insert the new batteries and make sure that the + and - terminals of the batteries are installed correctly.
Installing the Remote Control Holder
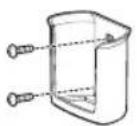
To protect the remote control, install the holder where there is no direct sunlight.
1 Choose a safe and easily accessible location.
2 Fix the holder by fastening 2 screws firmly with a screwdriver.
Operating Method
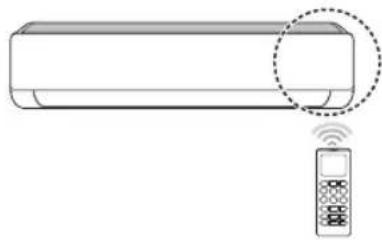
Point the remote control towards the signal receiver at the right side of the air conditioner to operate it.
natural_image
Line drawing of a rectangular air conditioner with a remote control unit emitting signal waves (no text or symbols)NOTE
- The remote control may operate other electronic devices if it is directed towards them. Make sure to point the remote control towards the air conditioner signal receiver. - For proper operation, use a soft cloth to clean the signal transmitter and receiver.
- In case of a function not provided in the product, no buzzer sound occurs from the product when a button for such function on the remote control is pressed except for Air Flow Direction (Swing), Energy Display (Air Purification function).
Setting the Current Time
1 Insert batteries.
- The icon below blinks at the bottom of the display screen.

2 Press or button to select the minutes.
3 Press Set/Cancel button to finish.
NOTE
- The On/Off Timer is available after setting the current time.
Using the °C/°F Conversion Function (Optional)
This function changes unit between ^ C and ^ F
- Press and holding button about 5 seconds.
Operating the Air Conditioner without the Remote Control
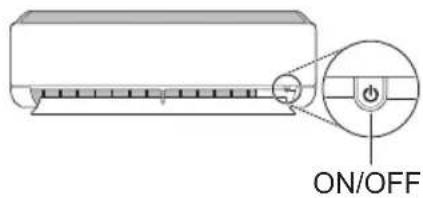
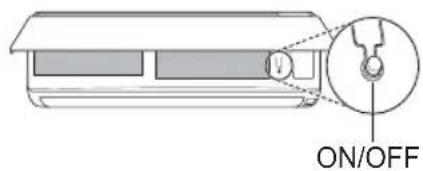
You can use the ON/OFF button of the indoor unit to operate the air conditioner when the remote control is unavailable.
1 Open the front cover (Type2) or horizontal vane (Type1).
2 Press the ON/OFF button.
Type1
Type2
NOTE
- The stepping motor may be broken, if the horizontal vane opens rapidly.
• The fan speed is set to high.
- The feature may be changed according to the type of model.
- The temperature cannot be altered when using this emergency ON/OFF button.
- For cooling & heating models, the temperature is set from 22 °C to 24 °C
Using Wireless Remote Control
You can operate the air conditioner more conveniently with the remote control.
| 2 | |
| 1 | |
| Reset |
NOTE
- * buttons may be changed according to the type of model.
- When connected to the Multi Outdoor unit, the Energy Display, Energy Control, Silent and Smart Diagnosis function may not be supported.
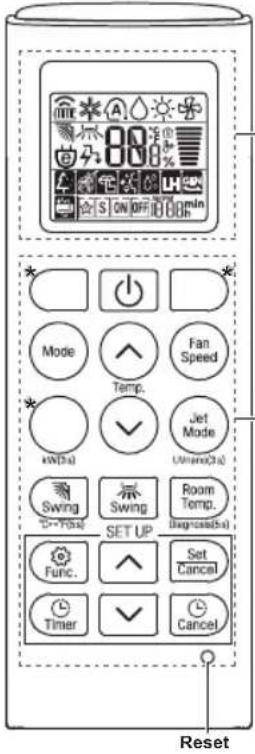 | 1Button | 2DisplayScreen | Description | Available Function | |
| Single Split | Multi | ||||
| To turn on/off air conditioner automatically at desired time. | O | O | |||
| Set/ Cancel | - | To set/cancel the special functions and timer. | O | O | |
| - | To cancel the timer settings. | O | O | ||
| - To adjust time. O O | |||||
| *Light Off | - | To set the brightness of the display on the indoor unit. | O | O | |
| Room Temp. | To display the room temperature. | O | O | ||
| °C←°F (5 s) | To change unit between °C and °F | O | O | ||
| *Comfort Air | To adjust the air flow to deflect wind. | O | O | ||
| kW(3 s) - | To set whether or not to display information regarding energy. | O | X | ||
| *Energy Ctrl. | To bring the effect of the power saving. | O | X | ||
| Diagnosis (5 s) | - | To conveniently check maintenance information of a product. | O | X | |
| UVnano (3 s) | - To keep the fan clean. | O(Optional) | O(Optional) | ||
| 1 Button | 2 Display Screen | Description | Available Function | ||
| Single Split | Multi | ||||
| Func. | The lon generator uses millions of ions to help improve indoor air quality. | O (Optional) | O (Optional) | ||
| To reduce noise from outdoor units. | O | X | |||
| To remove moisture generated inside the indoor unit. | O | O | |||
| Reset - | To initialize the remote control settings. | O | O | ||
MANUALE D'USO
CLIMATIZZATORE

1 Filtro dell'aria
2 Presa d'aria
3 Coperchio anteriore
4 Uscita dell'aria
natural_image
Line drawing of a rectangular air conditioner with a remote control unit below (no text or symbols)NOTA
natural_image
Line drawing of a rectangular air conditioner with a remote control unit emitting signal waves (no text or symbols)NOTA
natural_image
Line drawing of a rectangular air conditioner with a remote control unit emitting signal waves (no text or symbols)REMARQUE
natural_image
Line drawing of a modern air conditioner with a remote control unit and a circular annotation highlighting the portion of the device (no text or symbols present)HINWEIS
1 Φίλτρο Αέρα
2 Είσοδος αέρα
3 Μπροστινό κάλυμμα
4 Έξοδος αέρα
natural_image
Line drawing of a modern air conditioner with a remote control unit and a circular annotation highlighting the portion of the device (no text or symbols present)ΣΗΜΕΙΩΣΗ
natural_image
Line drawing of a modern air conditioner with a remote control unit and a circular annotation highlighting the portion of the device (no text or symbols present)OBSERVAÇÃO
1 Luchtfilter
2 Luchttoevoer
3 Voorpaneel
4 Luchtafvoer
5 Luchtdeflector (horizontale klep)
natural_image
Line drawing of a rectangular air conditioner with a remote control unit emitting signal waves (no text or symbols)OPMERKING
natural_image
Line drawing of a rectangular air conditioner with a remote control unit emitting signal waves (no text or symbols)UWAGA
natural_image
Line drawing of a rectangular air conditioner with a remote control unit emitting signal waves (no text or symbols)NOTĂ
※ When installed, enter the model name and send it to the customer.


Model Name
:
- Read the QR Code.
- Enter the model name.
- Select the manual that you want to see.
- TABLE OF CONTENTS
- OPERATION 3
- OPERATION
- Notes for Operation
- Suggestion for Energy Saving
- Parts and Functions
- Indoor Unit Outdoor Unit
- NOTE
- Wireless Remote Control
- Inserting Batteries
- Installing the Remote Control Holder
- Operating Method
- Setting the Current Time
- Insert batteries.
- Using the °C/°F Conversion Function (Optional)
- Operating the Air Conditioner without the Remote Control
- Type1
- Type2
- Using Wireless Remote Control
- MANUALE D'USO
- CLIMATIZZATORE
- NOTA
- REMARQUE
- HINWEIS
- ΣΗΜΕΙΩΣΗ
- OBSERVAÇÃO
- OPMERKING
- UWAGA
- NOTĂ
Brand : LG
Model : AC18BK
Category : Air conditioner