
BKS 5423 - Vacuum Cleaner BEKO - Free user manual and instructions
Find the device manual for free BKS 5423 BEKO in PDF.
| Vacuum cleaner type | Canister vacuum cleaner |
| Brand | Beko |
| Model | BKS 5423 |
| Nominal power | 1,550 W |
| Supply voltage | 220–230 V ~ 50/60 Hz |
| Dust bag capacity | 1.8 L |
| Collection type | Disposable dust bag |
| Main filter | Washable HEPA filter |
| Secondary filter | Foam filter |
| Air exhaust filter | Yes |
| Bag full indicator | Red indicator light |
| Suction power adjustment | Rotary dial on the body |
| Telescopic tube | Yes, adjustable |
| Hard floor/carpet brush | Yes, adjustable |
| Cable rewinder | Yes, button |
| Included accessories | Crevice tool, wide nozzle, dusting brush |
| Intended use | Household |
| Filter cleaning | Wash with water, dry completely before reassembling |
| Safety instructions | Do not vacuum liquids, do not use without filter |
| Weight | Approximately 4.5 kg |
Frequently Asked Questions - BKS 5423 BEKO
User questions about BKS 5423 BEKO
0 question about this device. Answer the ones you know or ask your own.
Ask a new question about this device
Download the instructions for your Vacuum Cleaner in PDF format for free! Find your manual BKS 5423 - BEKO and take your electronic device back in hand. On this page are published all the documents necessary for the use of your device. BKS 5423 by BEKO.
USER MANUAL BKS 5423 BEKO
natural_image
Simple line drawing of a decorative patterned square with circular motifs (no text or symbols)BKS 5423
BKS 5423 K
EN - KK - RU - BS - MK - SQ - SR - TH - FR - AR
01M-8832073200-5021-08
01M-8835423200-5021-03
Please read this user manual first!
Dear Customer,
Thank you for preferring a Beko product. We hope that you get the best results from your product which has been manufactured with high quality and state-of-the-art technology. Therefore, please read this entire user manual and all other accompanying documents carefully before using the product and keep it as a reference for future use. If you handover the product to someone else, give the user manual as well. Follow all warnings and information in the user manual.
Explanation of symbols
Throughout this user manual the following symbols are used:

Important information or useful hints about usage.

Warning for hazardous situations with regard to life and property.

Protection class for electric shock.
CONTENTS
| ENGLISH | 4-10 |
| KAZAKH | 11-19 |
| РУССКИЙ | 20-31 |
| BOSNIAN | 32-40 |
| MAKEДОНСКИ | 41-51 |
| SHQIPTARE | 52-60 |
| СРПСКИ | 61-68 |
| Інү | 69-77 |
| FRANÇAIS | 78-86 |
1 Important safety and environmental instructions
This section contains safety instructions that will help protect from risk of personal injury or property damage.
Failure to follow these instructions invalidates the granted warranty.
1.1 General safety
- This appliance complies with the international security standards.
-
This appliance can be used by the children who are at the age of 8 or over and by the people who have limited physical, sensory or mental capacity or who do not have knowledge and experience, provided that they are supervised or they understand the instructions with regard to safe use of the product and potential dangers. Children should not play with the appliance. Cleaning and maintenance works should not be performed by children unless they are supervised by an adult.
-
Do not use it if the power cable or the appliance itself is damaged. Contact an authorized service.
- Your mains power supply should comply with the information supplied on the rating plate of the appliance.
- The mains supply of the appliance must be secured with a minimum 16 A fuse.
- Do not use the appliance with an extension cord.
- In order to prevent the power cable from getting damaged, make sure that it doesn't get stuck, twisted or rub against sharp surfaces.
- Do not touch the plug of the appliance with damp or wet hands.
- Do not pull the power cable when unplugging the appliance.
- Do not vacuum flammable materials and when vacuuming cigarette ashes make sure that it got cold.
1 Important safety and environmental instructions
- Do not vacuum water or other liquid materials.
- Protect the appliance from rain, humidity and heat sources.
- Never use the appliance in or near to combustible or inflammable places and materials.
- Unplug the appliance before cleaning and maintenance. (WEEE). This sym
- Do not dip the appliance or its cable in water to clean it.
- Check the hose of the appliance regularly. Do not use if it is damaged and contact an authorized service.
- Do not attempt to dismantle the appliance.
- Only use the original parts or parts recommended by the manufacturer.
- Do not use the appliance without filters; otherwise it can get damaged.
- When vacuuming the stairs, the appliance should be located below the user.
- If your store the package material, keep it out of the reach of children.
1.2 Compliance with the WEEE Directive and disposal of waste products
This product complies with EU WEEE Directive (2012/19/EU). This product bears a classification symbol for waste electrical and electronic equipment
This symbol indicates that this product shall not be disposed with other household wastes at the end of its service life. Used device must be returned to official collection point for recycling of electrical and electronic devices. To find these collection systems please contact to your local authorities or retailer where the product was purchased. Each household performs important role in recovering and recycling of old appliance. Appropriate disposal of used appliance helps prevent potential negative consequences for the environment and human health.
1.3 Package information

Package of the product is made of recyclable materials in accordance with our National Legislation. Do not dispose of the packaging materials together with domestic or other wastes. Take them to the working material collection points designated local authorities.
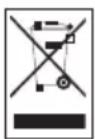
2 Your vacuum cleaner
2.1 Overview
text_image
Technical diagram of a vacuum cleaner with numbered parts for identification- Hose
- Power cable winding button
- Suction power adjustment and dust container removal button
- Carrying handle
- Park channel
- On/Off button
- Wheel
- Dust container
- The hose cap
- Dust container carrying handle
- Upper cover
- Parquet/carpet brush
- Parquet/carpet brush adjustment latch
- Telescopic pipe
- Telescopic pipe adjustment latch
- Accessory carrier
- Suction control
- Handle
2.2 Technical data
Nom. power : 1550 W
Supply voltage: 220-230V\~50/60Hz
Dust container volume : 1.8 L
Rights to make technical and design changes are reserved.
The values which are declared in the markings affixed on your product or the other printed documents supplied with it represent the values which were obtained in the laboratories pursuant to the pertinent standards. These values may vary according to the usage of the appliance and ambient conditions.
3 Use
3.1 Intended use
The appliance was designed to be used in houses, and is not fit for industrial use.
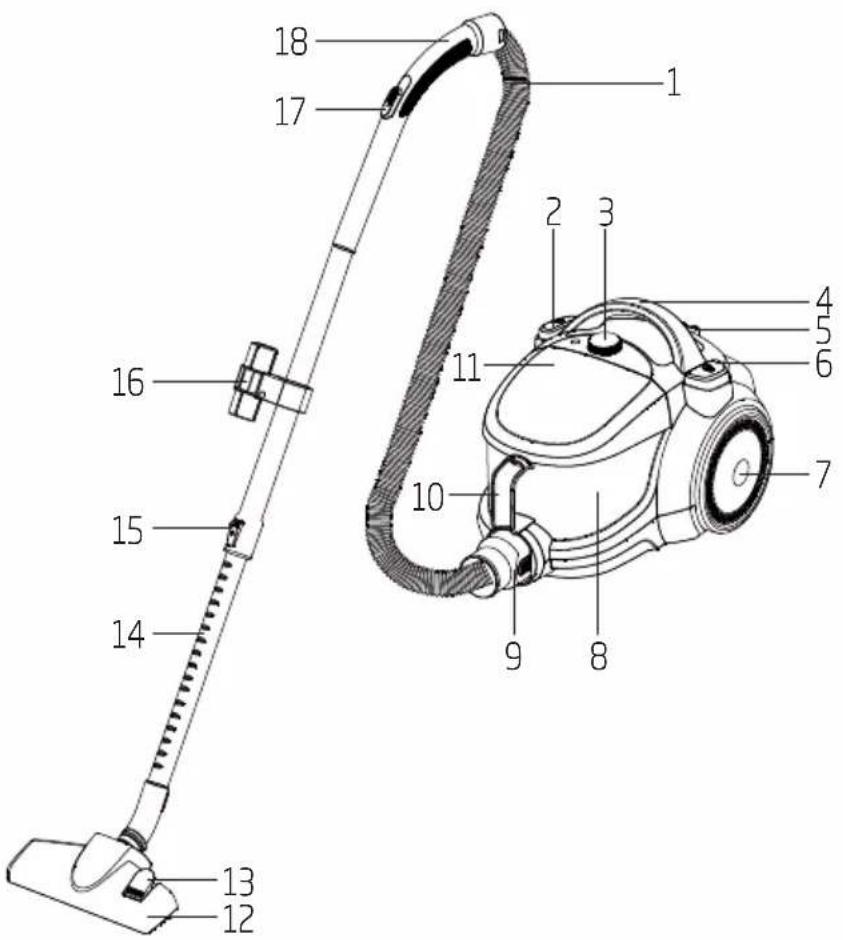
3.2 Attaching/removing the hose
- To attach the hose (1) pull the hose cap (9) in the direction of arrow until it is aligned with the housing.
natural_image
Line drawing of a vacuum cleaner with attached hose and pipe (no text or symbols)- The tabs on the hose cap (9) must be seated correctly.
- To remove the hose (1) press on the tabs on the hose cap (9) and pull it.
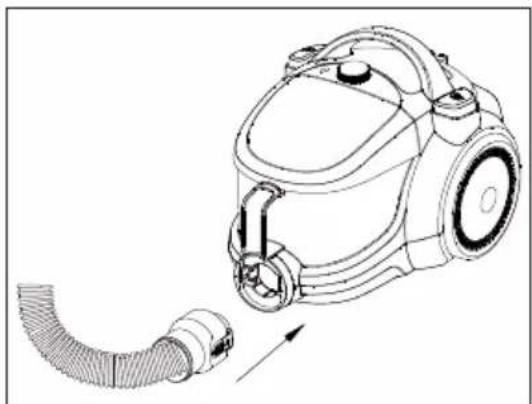
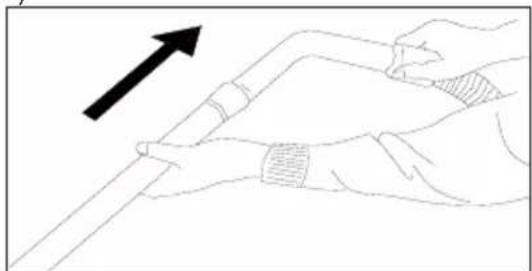
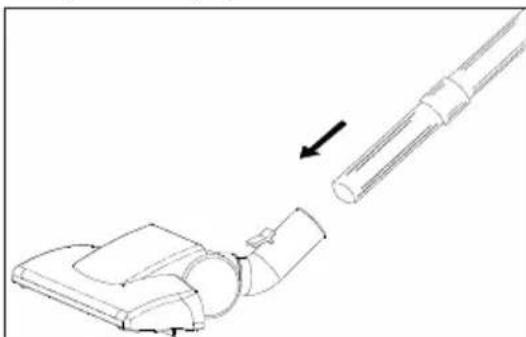
3.3 Attaching/removing the telescopic pipe
- Attach the telescopic pipe (14) to the handle (18).
natural_image
Line drawing of a hand holding a tool with an arrow indicating upward motion (no text or symbols)-
Pull the telescopic pipe (14) from the handle (18) to remove it.
-
Push the telescopic pipe adjustment latch (15) and pull the telescopic pipe (14) to adjust its length.
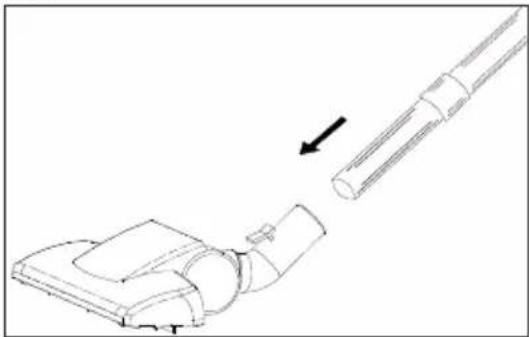
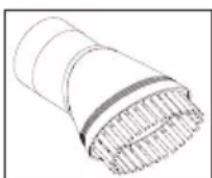
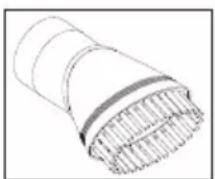
3.4 Attaching/removing the parquet/carpet brush
- Attach the parquet/carpet brush (12) to the telescopic pipe (14) in the direction of the arrow.
natural_image
Diagram showing a mechanical component being inserted into a cylindrical tube, with an arrow indicating the insertion direction (no text or symbols present)- You can remove the telescopic pipe (14) from the parquet/carpet brush (12) by pulling it.
3.5 Adjusting the parquet/ carpet brush
By pressing the adjustment latch (13) located on the parquet/carpet brush (12);
- To vacuum on firm ground and parquet, extend the brush before vacuuming.
- To vacuum on carpets and rugs, retract the brush before vacuuming.
3.6 Operation
- Plug the appliance after pulling the power plug located at the back of the appliance.

WARNING: Stop pulling the appliancecable when it comes to the yellow mark located on it. After the yellow mark the red mark comes. Do not pull any more after reaching the red mark.
- Press on/off button (6) to switch on your appliance.
3 Use
3.6.1 Adjusting the suction power
You can adjust the suction power of the appliance by turning the suction power button (3) located on the body of the device clockwise according to the type of the surface to be cleaned. To decrease the suction power turn the button counterclockwise.
3.7 Accessories
There is an accessory carrier (16) on the telescopic pipe (14) of the appliance. You can use it by attaching 2 accessories supplied with the appliance.

If you do not want to use accessory carrier (16), unscrew it with the aid of a screwdriver and remove it from the telescopic pipe (14).
Crevice tool
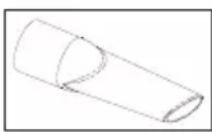
Suitable for the cleaning of the surfaces which are difficult to clean, such as the areas remaining under the sofas and furniture.
Wide-mouth nozzle
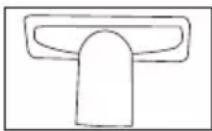
Suitable for the cleaning of the floorings, stair steps, inside of the cars, sofas, armchairs etc.
Dust brush
Suitable for the cleaning of curtains, and sensitive and fragile objects.

WARNING: Do not make cleaning by using the handle's (18) end part.
3.8 Switching off and parking the vacuum cleaner
- Switch off the appliance with the on/off button (6) and unplug it.
- Wind the electric cable inside the appliance by gently pulling and releasing the cable (the appliance will automatically take the cable inside) or by pressing the cable winding button (2)
Vertical parking
Insert the hook of the parquet/carpet brush (12) into the parking channel located at the bottom section of the appliance.
Horizontal parking feature
Insert the hook of the parquet/carpet brush (12) into the parking channel (5) located at the rear section of the appliance.
You can carry the appliance by holding it from the carrying handle (4).
4 Cleaning and maintenance
Switch off and unplug the appliance, before cleaning it.

WARNING: Never use gasoline, solvent, abrasive cleaning agents, metal objects or hard brushes to clean the appliance.
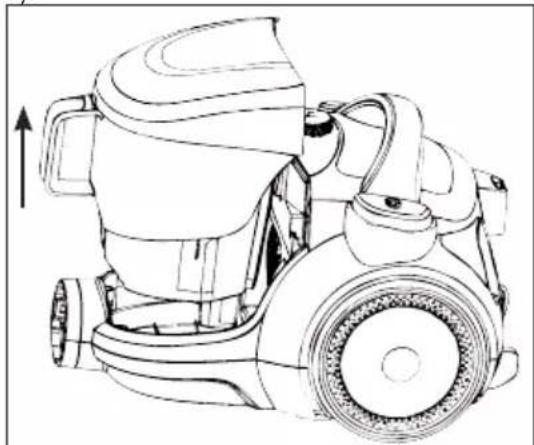
4.1 Discharging the dust container
When the dust container is full, the dust indicator "luminates.
- Press the dust container removal button (3) to remove the dust container (8) and remove the dust container in the direction of the arrow by holding from the Dust container carrying handle (10).
natural_image
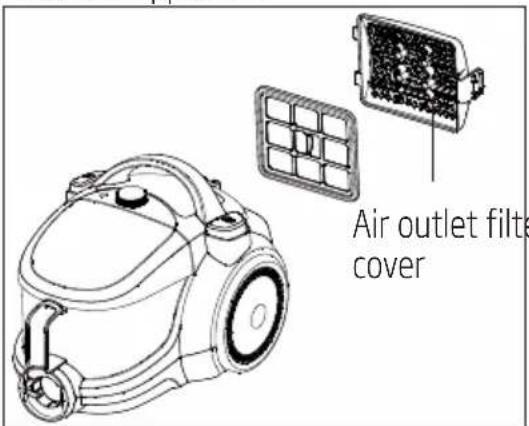
Line drawing of a vacuum cleaner with attached fan and wheels (no text or symbols)- Remove the upper cover (11) from the dust container (8) by pushing it in the direction of the arrow.

natural_image
Technical line drawing of a mechanical device with internal components and directional arrows (no text or symbols)- Grip the dust container from its carrying handle (10) and turn it upside down to discharge.
- Close the appliance's upper cover (11).
- Insert the dust container (8) into its place by holding it from the handle (18).
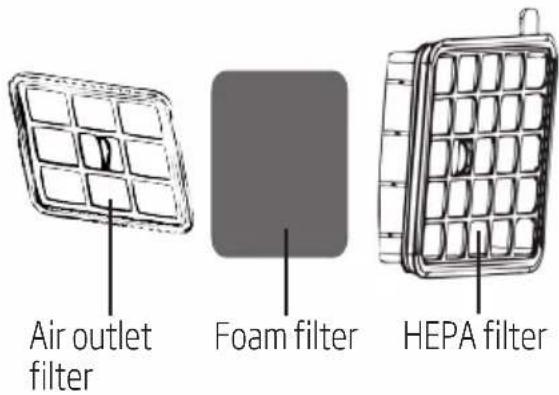
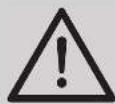
4.2 Cleaning the filters
text_image
Air outlet filter Foam filter HEPA filter
WARNING: Do not use appliances producing hot air such as hair dryer or heater to dry the filters.

WARNING: Do not install the filters without completely drying them; otherwise smell of moisture may occur during the use, water can leak from the back of the appliance or the filters may get damaged.
4 Cleaning and maintenance
WARNING: When the filters dry, replace them into their positions.
4.2.1 Air outlet filter
- Open the air outlet filter's cover located at the back of the appliance.
text_image
Air outlet filter cover-
Remove the air outlet filter by holding it from the handle located on it.
-
Reinstall it after shaking it off.
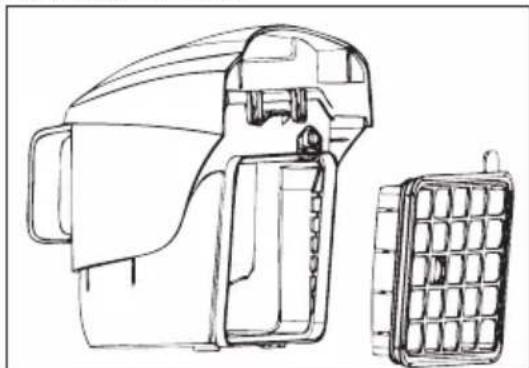
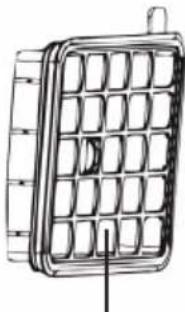
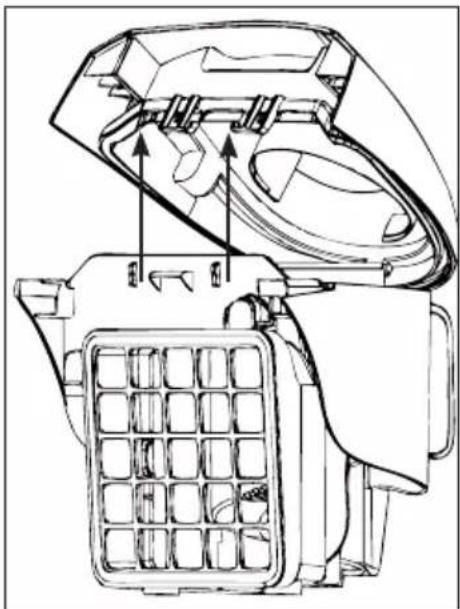
4.2.2 HEPA filter
-
Remove the dust container (8) (see 4.1).
-
Remove the HEPA filter by holding it from the handle located on it.
natural_image
Technical line drawing of a mechanical device with internal components and a grid-patterned base (no text or symbols)-
Wash it under running water after shaking it off.
-
Leave the HEPA filter to dry after washing it.
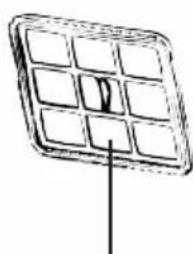
4.2.3 Foam filter
-
After removing the HEPA filter, you can see the foam filter located behind it.
-
Remove and wash the foam filter.
-
After washing the foam, gently wring it and leave it to dry.
4.3 Storage
- If you do not intend to use the appliance for a long time, store it carefully.
• Pull the appliance's plug out.
- Keep the appliance out of the reach of children.
text_image
Technical diagram of a vacuum cleaner with numbered parts for identificationnatural_image
Line drawing of a medical device with a coiled tube and attached tubing (no text or symbols)natural_image
Line drawing of a hand holding a tool with an arrow indicating upward motion (no text or symbols)natural_image
Diagram showing a mechanical component being inserted into a cylindrical tube, with an arrow indicating the insertion direction (no text or symbols present)natural_image
Line drawing of a vacuum cleaner with handle and wheels (no text or symbols)natural_image
Technical line drawing of a mechanical device with internal components and directional arrows (no text or symbols)natural_image
Technical line drawing of a mechanical device with two views: front view and side view (no text or symbols)text_image
Technical diagram of a vacuum cleaner with numbered parts for identificationnatural_image
Line drawing of a vacuum cleaner with attached hose and pipe (no text or symbols)natural_image
Line drawing of a person using a tool to grip a cylindrical object, with an upward arrow indicating motion (no text or symbols)natural_image
Technical line drawing of a mechanical component with an arrow indicating assembly or insertion (no text or symbols present)natural_image
Line drawing of a vacuum cleaner with handle and wheels (no text or symbols)natural_image
Technical line drawing of a mechanical device with internal components and directional arrows (no text or symbols)natural_image
Three technical line drawings of a solar panel with grid panels, shown from different angles (no text or symbols)natural_image
Technical line drawing of a mechanical device with internal components and a grid-patterned base (no text or symbols)text_image
Technical diagram of a vacuum cleaner with numbered parts for identification- Crijevo
- Dugme za namotavanje kabla
- Dugme za podešavanje snage usisavanja i za skidanje posude za prašinu
- Ručica za prenošenje uređaja
- Kanal za čuvanje uređaja
- Dugme On/Off
- Točkić
- Posuda za prašinu
- Konektor crijeva
- Ručica za držanje posude za prašinu
- Gornji poklopac
- Četka za tepih/parket
- Poluga za podešavanje četke za tepih/parket
- Teleskopska cijev
- Poluga za podešavanje teleskopske cijevi
- Nosač dodataka
- Kontrola usisavanja
- Ručica
2.2 Tehničke specifikacije
Nom. snaga : 1550 W
Napajanje : 220-230V\~ 50/60Hz
Zapremina posude za prašinu : 1.8 L
Proizvođač zadržava pravo na tehničke izmene i promenu dizajna.
Oznake na uređaju ili vrijednosti navedene u dokumentaciji koju ste dobili uz uređaj su vrijednosti dobijene u laboratorijskim uslovima i uz relevantne standarde. Ove vrijednosti se mogu razlikovati u zavisnosti od upotrebe uređaja i uslova u okruženju.
3 Upotreba uređaja
3.1 Namjena uređaja
Uređaj je dizajniran za upotrebu u domaćinstvu i nije pogodan za industrijsku upotrebu.
natural_image
Line drawing of a vacuum cleaner with attached hose and pipe (no text or symbols)- Klipse na konektoru (9) moraju pravilno da nalegnu.
- Da biste skinuli crijevo (1) pritisnite klipse na konektoru za crijevo (9) i izvucite ga.
natural_image
Line drawing of hands holding a tool with an upward arrow, no text or symbols presentnatural_image
Diagram showing a mechanical component being inserted into a cylindrical tube, with an arrow indicating the insertion direction (no text or symbols present)- Možete odvojiti teleskopsku cijev (14) i četku za tepih/parket (12) tako što ćete je izvući.
3.5 Prilagođavanje četke za tepih/parket
natural_image
Line drawing of a vacuum cleaner with handle and wheels (no text or symbols)- Skinite gornji poklopac (11) sa posude za prašinu (8) tako što ćete ga pogurati u smjeru strelice.

natural_image
Technical line drawing of a mechanical device with internal components and directional arrows (no text or symbols)- Odvojite posudu za prašinu od ručice za prenošenje (10) i okrenite je naopako da biste je ispraznili.
- Zatvorite gornji poklopac uređaja (11).
- Ubacite posudu za prašinu (8) na svoje mjesto držeći je za ručicu (18).
4.2 Čišćenje filtera
natural_image
Simple line drawing of a solar panel with grid layout and central pointer (no text or symbols)Filter na izlazu za vazduhv
Pjenasti filter HEPA filter
natural_image
Technical line drawing of a rectangular grid device with a small protrusion and a pointer arrow (no text or symbols)
UPOZORENJE: Ne koristite aparate koji proizvode vruć vazduh, poput fena za kosu ili grijalice, za sušenje opranih filtera.
natural_image
Technical line drawing of a mechanical device with internal components (no text or symbols)- Operite filter pod mlazom vode nakon što istresete prašinu iz filtera.
4.3. Operite HEPA filter i ostavite ga da se potpuno osuši.
4.2.3 Pjenasti filter
-
Nakon skidanja HEPA filtera, možete videti pjenasti filter koji se nalazi odmah iza njega.
-
Skinite ga i operite.
-
Nakon pranja pjenastog filtera, nežno ga ocjedite i ostavite da se osuši.
4.3 Čuvanje
- Ako ne planirate da koristite uređaj duže vrijeme, pažljivo ga odložite.
- Izvucite utikač uređaja iz struje
- Držite uređaj van domjeta dece.
text_image
Technical diagram of a vacuum cleaner with numbered parts for identificationnatural_image
Line drawing of a vacuum cleaner with attached hose and valve (no text or symbols)natural_image
Line drawing of hands holding a tool with an arrow indicating upward motion (no text or symbols)natural_image
Diagram showing a mechanical component being inserted into a cylindrical tube, with an arrow indicating the insertion direction (no text or symbols present)natural_image
Line drawing of a vacuum cleaner with handle and wheels (no text or symbols)natural_image
Technical line drawing of a mechanical device with internal components and directional arrows (no text or symbols)natural_image
Technical line drawing of a mechanical device with internal components (no text or symbols)text_image
Technical diagram of a vacuum cleaner with numbered parts for identificationnatural_image
Line drawing of a vacuum cleaner with attached hose and valve (no text or symbols)natural_image
Line drawing of a person holding a tool with an arrow indicating upward motion (no text or symbols)natural_image
Diagram showing a device being inserted into a cylindrical component, with an arrow indicating the insertion direction (no text or symbols present)Suitable for the cleaning of the floorings, stair steps, inside of the cars, sofas, armchairs etc.
Furça pluhuri
natural_image
Line drawing of a vacuum cleaner with attached fan and wheels (no text or symbols)natural_image
Technical line drawing of a mechanical device with internal components and directional arrows (no text or symbols)natural_image
Technical line drawing of a mechanical device with internal components and a separate grid-patterned housing (no text or symbols)1 Important safety and environmental instructions
- Ne usisavajte zapaljive supstance, a kada usisavate pepeo cigareta, proverite da li je potpuno hladan.
- Zaštitite uređaj od kiše, vlage i izvora toplote.
- Nikada ne koristite uređaj unutar ili u blizini zapaljivih mesta ili materijala.
text_image
Technical diagram of a vacuum cleaner with numbered parts for identification- Crevo
- Dugme za namotavanje kabla
- Dugme za podešavanje snage usisavanja i za skidanje posude za prašinu
- Ručica za prenošenje uređaja
- Kanal za čuvanje uređaja
- Dugme On/Off
- Točkić
- Posuda za prašinu
- Konektor creva
- Ručica za držanje posude za prašinu
- Gornji poklopac
- Četka za tepih/parket
- Poluga za podešavanje četke za tepih/parket
- Teleskopska cev
- Poluga za podešavanje teleskopske cevi
- Nosač dodataka
- Kontrola usisavanja
- Ručica
2.2 Tehničke specifikacije
Nom. snaga : 1550 W
Napajanje : 220-230V\~ 50/60Hz
Zapremina posude za prašinu : 1.8 L
Proizvođač zadržava pravo na tehničke izmene i promenu dizajna.
natural_image
Line drawing of a vacuum cleaner with attached tubing (no text or symbols)- Klipse na konektoru (9) moraju pravilno da nalegnu.
- Da biste skinuli crevo (1) pritisnite klipse na konektoru za crevo (9) i izvucite ga.
natural_image
Line drawing of a hand holding a tool with an upward arrow, no text or symbols present-
Izvucite teleskopsku cev (14) iz ručice (18) da biste je skinuli.
-
Pogurajte polugu za prilagođavanje teleskopske cevi (15) i izvucite teleskopsku cev (14) kako biste podesili njenu dužinu.
3.4 Stavljanje/skidanje četke za tepih/parket
- Postavite četku za tepih/parket (12) na teleskopsku cev (14) u smeru strelice na slici.
natural_image
Diagram showing a device being inserted into a cylindrical component, with an arrow indicating the insertion direction (no text or symbols present)natural_image
Line drawing of a vacuum cleaner with handle and wheels (no text or symbols)- Skinite gornji poklopac (11) sa posude za prašinu (8) tako što ćete ga pogurati u smeru strelice.
natural_image
Technical line drawing of a mechanical device with internal components and grid layout (no text or symbols)natural_image
Technical line drawing of a mechanical device with internal components (no text or symbols)-
Operite filter pod mlazom vode nakon što istresete prašinu iz filtera.
-
Operite HEPA filter i ostavite ga da se potpuno osuši.
4.2.3 Penasti filter
- Nakon skidanja HEPA filtera, možete videti penasti filter koji se nalazi odmah iza njega.
- Skinite ga i operite.
- Nakon pranja penastog filtera, nežno ga ocedite i ostavite da se osuši.
4.3 Čuvanje
- Ako ne planirate da koristite uređaj duže vreme, pažljivo ga odložite.
- Izvucite utikač uređaja iz struje
- Držite uređaj van dometa dece..
text_image
Technical diagram of a vacuum cleaner with numbered parts for identificationnatural_image
Line drawing of a vacuum cleaner with attached hose and valve (no text or symbols)natural_image
Line drawing of a hand holding a tool with an arrow indicating upward motion (no text or symbols)natural_image
Diagram showing a device being inserted into a cylindrical component, with an arrow indicating the insertion direction (no text or symbols present)natural_image
Line drawing of a vacuum cleaner with handle and wheels (no text or symbols)natural_image
Technical line drawing of a mechanical device with internal components and directional arrows (no text or symbols)natural_image
Simple line drawing of a solar panel with grid layout and central pin (no text or symbols)natural_image
Technical line drawing of a rectangular device with internal grid structure and mounting bracket (no text or symbols)HePA

natural_image
Technical line drawing of a mechanical device with internal components and a separate grid-patterned housing (no text or symbols)natural_image
Line drawing of a vacuum cleaner with attached hose and pipe (no text or symbols)natural_image
Line drawing of hands holding a tool with an arrow indicating upward motion (no text or symbols)natural_image
Diagram showing a mechanical component being inserted into a cylindrical tube, with an arrow indicating the insertion direction (no text or symbols present)natural_image
Line drawing of a cylindrical object with a textured outer ring and a flat middle band (no text or symbols)natural_image
Line drawing of a vacuum cleaner with attached fan and wheels (no text or symbols)natural_image
Technical line drawing of a mechanical device with internal components and directional arrows (no text or symbols)natural_image
Simple line drawing of a solar panel with grid layout and central slot (no text or symbols)natural_image
Technical line drawing of a rectangular grid device with internal compartments (no text or symbols)à Filtre HEPA
natural_image
Technical line drawing of a mechanical device with internal components (no text or symbols)natural_image
Technical line drawing of a mechanical device with internal components and a grid-patterned base (no text or symbols)من الغبار... 3
natural_image
Line drawing of a vacuum cleaner with attached fan and wheels (no text or symbols)natural_image
Line drawing of a vacuum cleaner with attached hose and valve (no text or symbols)natural_image
Line drawing of a person holding a tool with an arrow indicating upward motion (no text or symbols)2.٠٤٣٥
3. الأنبوب
text_image
Technical diagram of a vacuum cleaner with numbered parts for identificationnatural_image
Abstract geometric pattern composed of interlocking black lines on white background (no text or symbols)
natural_image
Simple line drawing of a grid pattern with circular motifs (no text or symbols)BKS 5423
BKS 5423 K