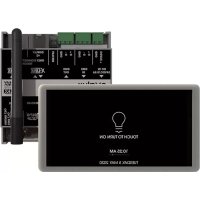
Control Touch - Lighting Exalux - Free user manual and instructions
Find the device manual for free Control Touch Exalux in PDF.


| Product Type | Lighting Control System |
| Brand | Exalux |
| Model | Control Touch |
| Components | Control Hub and Control HMI 5" Touch Screen |
| DMX Universe | 1 |
| Wireless Interface | LumenRadio™ CRMX™ (Wireless DMX) |
| Control Hub Power Supply | 24 VDC via 2-position terminal block (3.81 mm pitch) |
| Control HMI Power Supply | 7 to 30 VDC via RJ45 port (X-LINK) |
| Control Hub Consumption | 1.2 W max without screen; 7 W max with 2 HMI screens |
| Control HMI Consumption | 2.1 W max |
| Touch Screen | 5.0" TFT, 480×854, capacitive |
| Control Hub Protection Rating | IP2X |
| Control HMI Protection Rating | IP4X |
| Trigger Inputs | 3-position terminal block (3.81 mm pitch) |
| Relay Outputs | 2 relays, 4-position terminal block (3.81 mm pitch), max 3 A / 24 VDC or 240 VAC |
| Ports | USB-A, MicroSD card reader, SMA antenna (CRMX), 2 RJ45 X-LINK ports |
| Main Functions | DMX control, sequence recording, schedule/trigger programming, DMX bypass, dual screen |
| Cleaning | Dry, soft cloth; do not use cleaning products |
| Safety | Indoor use only; avoid liquids, humidity, heat sources |
| Warranty | EXALUX disclaims all liability in case of misuse |
| Spare Parts and Repairability | Not specified; contact EXALUX for any intervention |
Frequently Asked Questions - Control Touch Exalux
User questions about Control Touch Exalux
0 question about this device. Answer the ones you know or ask your own.
Ask a new question about this device
Download the instructions for your Lighting in PDF format for free! Find your manual Control Touch - Exalux and take your electronic device back in hand. On this page are published all the documents necessary for the use of your device. Control Touch by Exalux.
USER MANUAL Control Touch Exalux
Interface: DMX (DMX512-A), CRMX™ by LumenRadio™
Power input: 2 position terminal block, 3.81mm
DMX in/out: 3 position terminal block, 3.81mm
Triggers in: 3 position terminal block, 3.81mm
Relay out: 4 position terminal block, 3.81mm
Input voltage: 24VDC
Power rating : 1,2W max (without HMI)
7W max (with 2 HMI)
IP Rating : IP2X
Certifications: CE, RoHS
Dimensions: 88 x 90 x 32.5mm
Weight: 125g
CONTROL HMI 5"
EN
FR
text_image
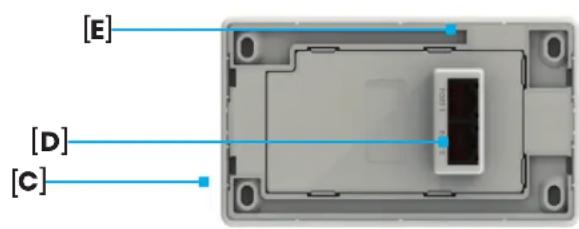
[E] [D] [C](A): Proximity sensor
(D): X-LINK Port
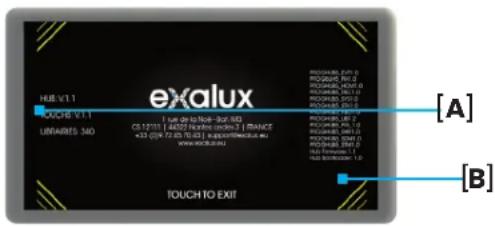
(B): 5" Capacitive display
(E): MicroSD slot
text_image
HUB V.1.1 EXALUX [1] TUR 20 to Non-30, 6/2, 8/3 C8.12121 [45072 N/A] (non-000) [BRANCE] +33 (209 72.05 70.03) [N/A] (non-000) (non-000) [2] PROCEDURE: RPT. 0 PROCEDURE: RPT. 0 PROCEDURE: RPT. 0 PROCEDURE: RPT. 0 PROCEDURE: RPT. 0 PROCEDURE: RPT. 0 PROCEDURE: RPT. 0 PROCEDURE: RPT. 0 PROCEDURE: RPT. 0 PROCEDURE: RPT. 0 PROCEDURE: RPT. 0 PROCEDURE: RPT. 0 PROC ------------- [A] PROC ------------- [B](c): Wall mount enclosure
SPECIFICATIONS
Display: TFT 5.0", 480x854, Capacitive Touch
DMX universe : 1
Power / data Input: RJ45 (X-LINK port)
Input voltage : 7.0VDC to 30VDC
Power rating : 2,1W max
IP Rating: IP4X
Certifications: CE, RoHS
Dimensions: 76.2 x 139.4 x 24.8mm
Weight: 130g

HOME
The HOME screen is the main interface to use once the system has been configured. It allows simple control of the lights using the programmed memories.
Home off screen
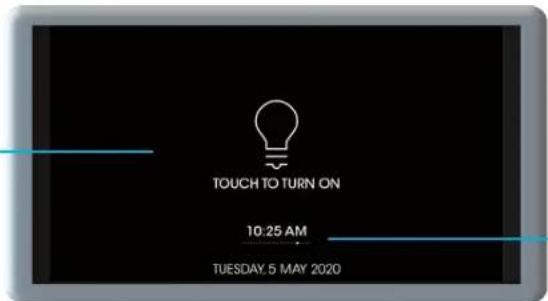
Touch anywhere on the display to go back to the HOME screen and turn on the lights using the programmed memories.
text_image
TOUCH TO TURN ON 10:25 AM TUESDAY 5 MAY 2020Shows the current time and date, in 12h or 24h format. The clock and calendar are setup in the SYSTEM app. Thanks to an internal backup battery, the clock will not be lost in case of power down.
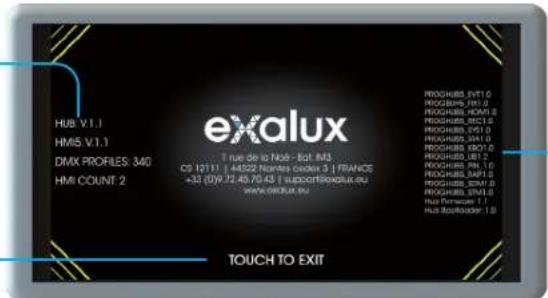
Home about screen
Current firmware version of the CONTROL HUB, CONTROL HMI, DMX profiles library and number of CONTROL HMI connected.
text_image
HUB V.1.1 HM5 V.1.1 DMX PROFILES: 340 HMI COUNT 2 exalux I rue de la Nôé - Bât. M3 CS 12111 1 44322 Nomès cédex 3 | FRANCE +33 (0)9.72.45/70.43 | Supportirexalux.eu www.exalux.eu PROGHB8_VVT 0 PROGHB8_VNT 0 PROGHB8_RECI 0 PROGHB8_VST 0 PROGHB8_JET 0 PROGHB8_DGT 0 PROGHB8_JBT 2 PROGHB8_RN 10 PROGHB8_SAP 0 PROGHB8_BZM 0 PROGHB8_RVI 0 Hua Tourist 1.1 Hua Bookloader 1.8 TOUCH TO EXITVersions of all the software components loaded in the system.
Touch anywhere on the display to go back to the HOME screen.
HOME
EN FR
The HOME screen is the main interface to use once the system has been configured. It allows simple control of the lights using the programmed memories.
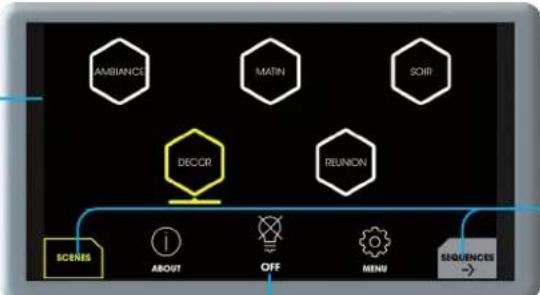
Home scenes screen
Touch the buttons to select the memory to apply. The memory currently in use is highlighted in yellow.
flowchart
graph TD
    A["AMBIANCE"] --> B["DECOR"]
    C["MATIN"] --> B
    D["SOIR"] --> B
    E["REUNION"] --> B
    F["SCENS"] --> G["ABOUT"]
    G --> H["OFF"]
    H --> I["MENU"]
    I --> J["SEQUENCES"]
Navigation tabs, used to switch between scenes (static) and sequences (dynamic) memories. If only one type of memory is used, the tabs are hidden.
Switch off all the lights.
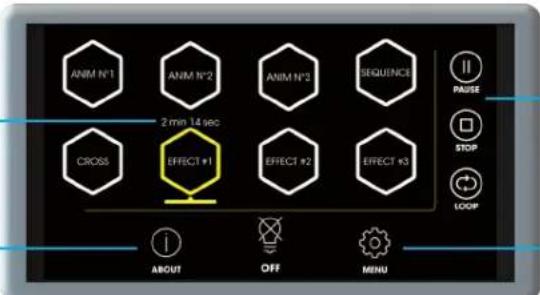
Home sequences screen
Countdown of the remaining duration until the end of the sequence.
text_image
ANIM N°1 ANIM N°2 ANIM N°3 SEQUENCE 2 min. 14 sec CROSS EFFECT #1 EFFECT #2 EFFECT #3 ABOUT OFF MENU PAUSE STOP LOOPControls for the sequences player (Play, Pause, Stop). Once a sequence ends, it automatically restarts if the loop option is selected.
Opens the ABOUT screen, in order to read the firmware version.
Opens the MENU, in order to access all the apps to configure the system.

MENU
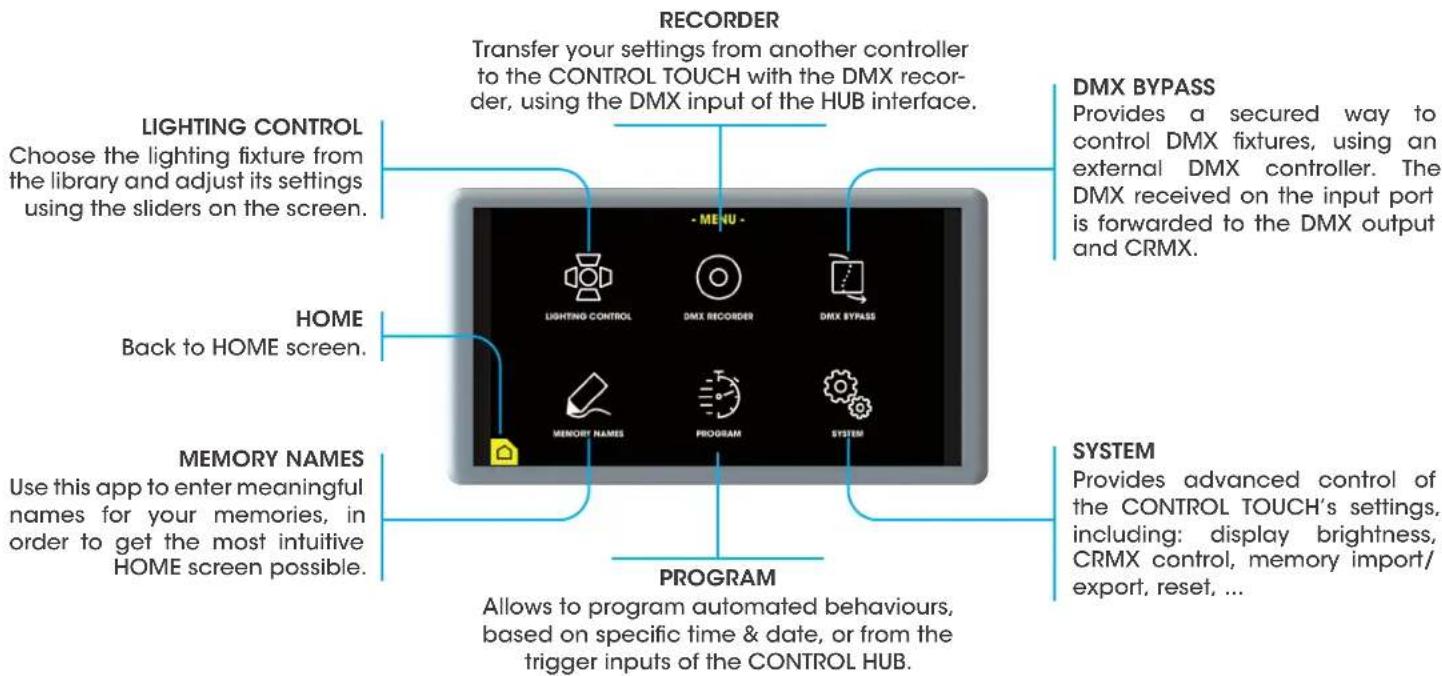
Menu is the entry point to select which app you want to use. Its access can be restricted by a pin code, to prevent unauthorized user to access the settings.
text_image
RECORDER Transfer your settings from another controller to the CONTROL TOUCH with the DMX recorder, using the DMX input of the HUB interface. LIGHTING CONTROL Choose the lighting fixture from the library and adjust its settings using the sliders on the screen. HOME Back to HOME screen. MEMORY NAMES Use this app to enter meaningful names for your memories, in order to get the most intuitive HOME screen possible. PROGRAM Allows to program automated behaviours, based on specific time & date, or from the trigger inputs of the CONTROL HUB. DMX BYPASS Provides a secured way to control DMX fixtures, using an external DMX controller. The DMX received on the input port is forwarded to the DMX output and CRMX. SYSTEM Provides advanced control of the CONTROL TOUCH's settings, including: display brightness, CRMX control, memory import/export, reset, ...SYSTEM
EN FR
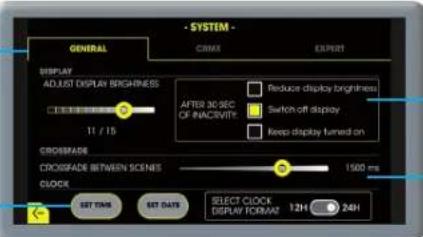
Provides advanced control of the CONTROL TOUCH's settings, including : display brightness, CRMX control, memory import/export, reset, ...
Switch between the tabs to access all the settings available.
text_image
SYSTEM - GENERAL COMEX EXPORT DISPLAY ADJUST DISPLAY BRIGHTNESS 11 / 15 AFTER 30 SEC OF INACESIVE: REDUCE DISPLAY BRIGHTNESS Switch off display Keep display turned on CROSSFADS CROSSFADS BETWEEN SCENES 1500 ms CLOCK SET TIME SET DATE SELECT CLOCK DISPLAY FORMA? 12H 24HAdjust the brightness of the display, and select the inactivity behaviour. This behaviour is only applied on the HOME screen.
Clock and calendar setup.
Select the crossfade duration to apply when switching between two SCENE memories on the HOME screen.
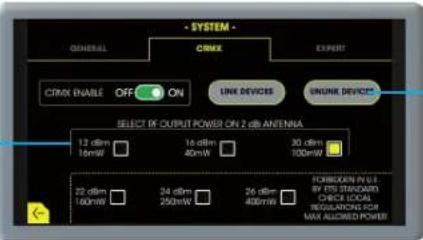
Select the radio output power, which maximum can be limited by local regulation.
text_image
SYSTEM - GENERAL CANX EXPERT CANX ENABLE OFF ON UNK DEVICES UNNK DEVICES SELECT OF OUTPUT POWER ON 2 dB ANENIA 12 dBm 10mW 14 dBm 40mW 30 dBm 100mW 22 dBm 100mW 24 dBm 250mW 26 dBm 400mW FORCORN IN U.S. BY ETS STANDARD CHECK LOCAL REGULATIONS: POP MAX ALLOWED POWEREnable or disable wireless operations (CRMX). Link/unlink CRMX devices.
EXALUX recommends keeping the default setting (20dBm/100mW).
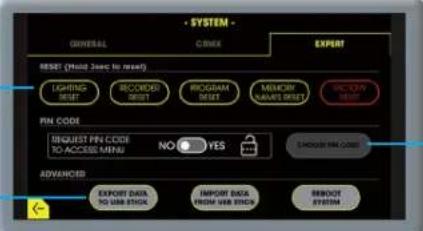
Individual resets and factory reset (hold button 3 seconds).
text_image
SYSTEM - GENERAL CIRCU EXPORT RESET (Main Base to read) LIGHTING RESET RECORDER RESET PROGRAM RESET MEMORY LABELS RESET SYNC HERE PIN CODE REQUEST PIN CODE TO ACCESS MENU NO YES SHOWN PIN CODE ADVANCED EXPORT DATA DO VAR STOCK IMPORT DATA HOW VAR STOCK IMPORT SYSTEMWhen PIN CODE is enabled, the access to the MENU will only be allowed if the user enters the expected pin code. This feature can be used to prevent unauthorized users to access settings and/or modify memories. Default pin code : 0000
The import/export feature allows to save/restore all the memories and settings on an external USB stick, plugged in the CONTROL HUB.

text_image
EN FR | FIXTURE CONTROLChoose the lighting fixture from the library and adjust its settings using the sliders on the screen.
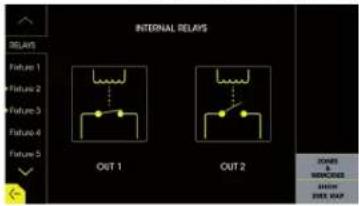
The RELAY page provides control of the two internal relay outputs of the CONTROL HUB.
text_image
INTERNAL RELAYS RELAYS Failure 1 Failure 2 Failure 3 Failure 4 Failure 5 OUT 1 OUT 2 JONES & MATCHERS SELL SEE MAPSelect the fixture to control (60 fixtures maximum). Long press on the tab of the selected fixture to enter a custom nickname.
A fixture already in use is marked with a yellow triangle.
Back to MENU.
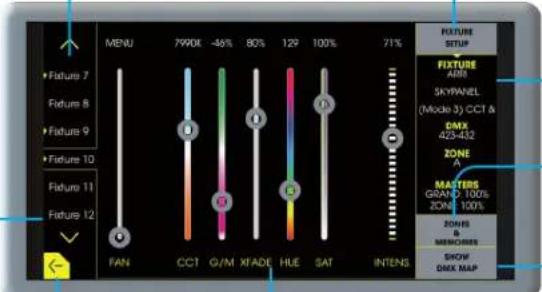
text_image
MENU 7990E -46% 80% 129 100% 71% FIXTURE SETUP FIXTURE 400 SKYRANEL (Mode 3) CCT & GMX 423-452 ZONE A MAETERS GRAM & 100% DCAM 100% ZONES & MEMORIES & SHOW DMX MAP FAN CCT G/M XFADE HUE SAT INTENSAdjust the fixture settings using the sliders.
Opens the fixture setup page, in order to choose the fixture parameters:
• Type of fixture, from the library
- DMX address
- Zone
Summary of the parameters of the selected fixture.
Opens the zone adjustment and memory saving page.
Overview of all the DMX channels used by the fixtures.
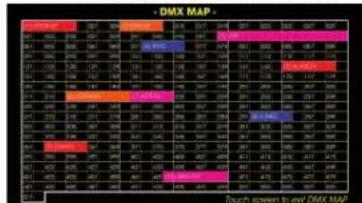
FIXTURE CONTROL
EN FR
The FIXTURE SETUP screen is used to choose all the parameters of a fixture. The ZONES & MEMORIES screen provides zone adjustment and memory management.
Fixture setup screen
Enable / Disable the fixture.
Select the profile of the fixture to control, from the DMX library. Using the navigation arrows, select the brand, then select the fixture + mode.
Go back to the main window ignoring any changes made.
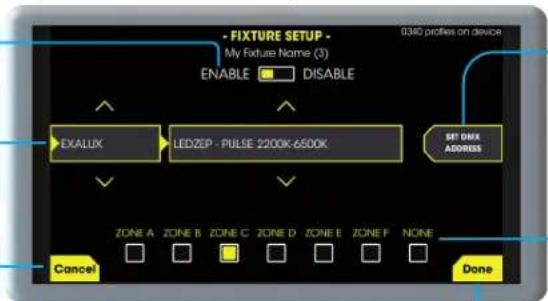
text_image
- FIXTURE SETUP - My Fixture Name (3) ENABLE DISABLE EXALUX LEDZEP - PULSE 2200K-6500K SET DMX ADDRESS ZONE A ZONE B ZONE C ZONE D ZONE E ZONE F NONE Cancel DoneEnter the DMX address of the fixture.
The address should match the one set on the fixture itself. If no address is specified, the system will automatically assign the first address available.
Assign a zone to the fixture. The brightness of each zone can be controlled on the dedicated page (see below).
Saves all the settings made and go back to the main window.
Pick a memory to unlock its control: - Erase: deletes the memory's content. - Save: saves all the current settings (including zones and grand master). - Apply: restores a saved memory.
The memory state is defined by its colour: - Yellow: Memory currently selected. - Grey: Memory is free, ready to be used. - White: Memory already used.
Zones and memories screen
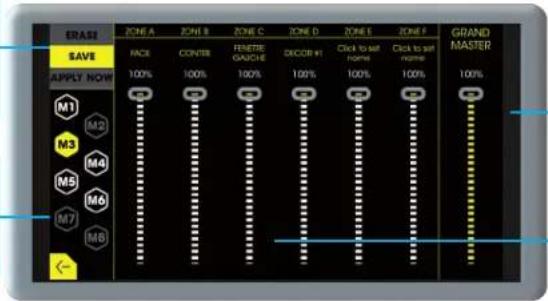
text_image
ERASE SAVE APPLY NOW M1 M2 M3 M4 M5 M6 M7 M8 ZONE A ZONE B ZONE C ZONE D ZONE E ZONE F GRAND MASTER FACE CONTB FENETE GAUGE DIACOR H1 Click to set name Click to set name 100% 100% 100% 100% 100% 100% 100% 100% 100% 100% 100% 100% 100% 100% 100% 100% 100% 100% 100% 100% 100% 100% 100% 100% 100% 100%Grand master: adjust the brightness of all fixtures (independently of their zone selection).
Zone adjustment: control the brightness of all the fixtures assigned to the zone.

EN FR
DMX BYPASS
Provides a secured way to control DMX fixtures, using an external DMX controller. The DMX received on the input port is forwarded to the DMX output and CRMX.
INFO
- This app can be used as backup, in order to still be able to control DMX fixtures, even if no memorie has been programmed, or if the touch screen is faulty.
- When a CONTROL HUB is installed without any HMI (touchscreen), it automatically enters «standalone mode», providing the same behaviour than in the DMX BYPASS app.
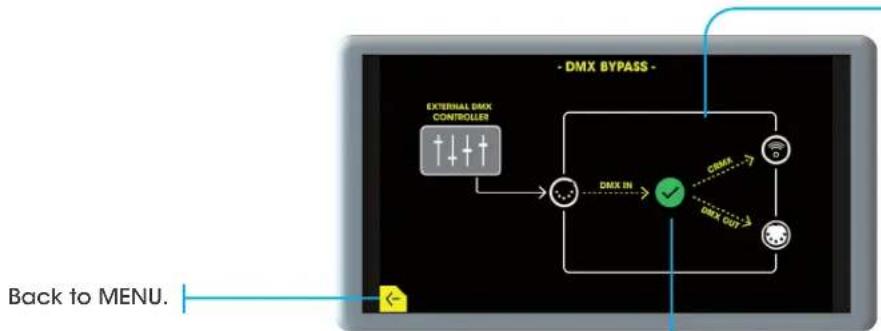
flowchart
graph TD
    A["EXTERNAL DMX CONTROLLER"] --> B["DMX IN"]
    B --> C["DRX OUT"]
    C --> D["DRX IN"]
    D --> E["DMX BYPASS"]
    F["Back to MENU."] --> G["Arrow pointing left"]
Shows the state of the DMX input.
Visual diagram of the operations.
Any DMX frame received on the DMX input is forwarded to DMX output.
If the wireless feature is enabled, the DMX is also generated on CRMX. Refer to SYSTEM for details on how to enable CRMX.
RECORDER
EN FR
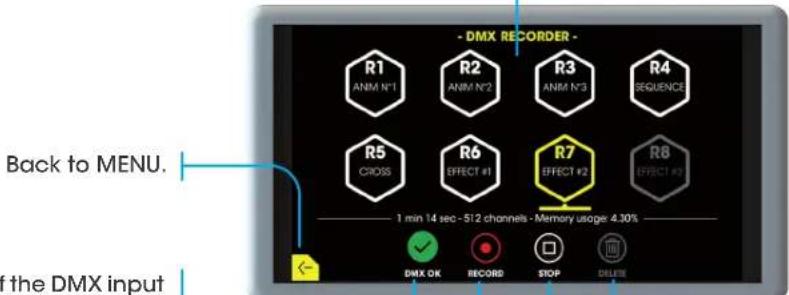
Transfer your settings from another controller to the CONTROL TOUCH with the DMX recorder, using the DMX input of the HUB interface.
INFO
- The recorder stores the data into an internal micro-SD card, allowing very long recording sequences. The memory usage is shown on the display.
- The recordering will be automatically stopped if the DMX source is disconnected, or if the memory is full.
Select the memory slot to use.
• Grey: Memory free, ready to be used.
- White: Memory already used. contains some DMX. It is necessary to erase its content in order to use it again.
• Yellow: Memory selected.
text_image
- DMX RECORDER - R1 ANM N°1 R2 ANM N°2 R3 ANM N°3 R4 SEQUENCE R5 CROSS R6 EFFECT #1 R7 EFFECT #2 R8 EFFECT #3 Back to MENU. 1 min 14 sec - 512 channels - Memory usage: 4.30% of the DMX input DMX OK RECORD STOP DELUXShows the state of the DMX input of the CONTROL HUB. If no DMX is detected, the record button is disabled.
Used to start recording DMX in the selected memory.
Deletes the content of the selected memory.
Stops the current recording.

EN FR
MEMORY NAMES
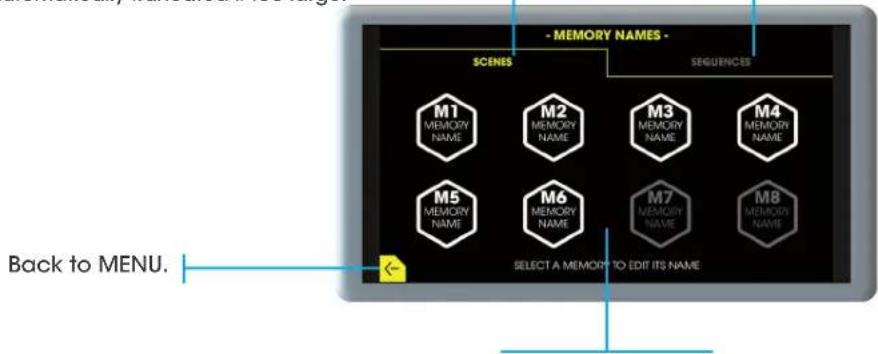
Use this app to enter meaningful names for your memories, in order to get the most intuitive HOME screen possible.
INFO
- A memory name can be set even if the memory is currently empty. This allows two different workflows:
- Set the memory name, then fill the memory with DMX.
- Fill the memory with DMX, then choose a name.
• The memory names are 18 character long, and printed inside the memory button on two lines.
The text is automatically truncated if too large.
Switch between the tabs to access the two types of memories:
• Scenes, from LIGHTING CONTROL
• Sequences, from RECORDER
text_image
- MEMORY NAMES - SCENES M1 MEMORY NAME M2 MEMORY NAME M3 MEMORY NAME M4 MEMORY NAME M5 MEMORY NAME M6 MEMORY NAME M7 MEMORY NAME M8 MEMORY NAME Back to MENU. SELECT A MEMORY TO EDIT ITS NAMEMemory selection:
- White: Memory already used.
• Grey: Memory is empty.
PROGRAM
EN FR
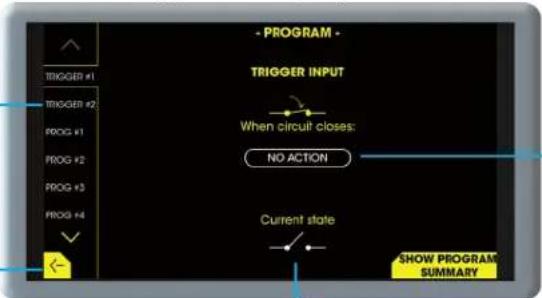
Allows to program automated behaviours, based on specific time & date, or from the trigger inputs of the CONTROL HUB.
Trigger based programs
Scroll and select a program to set up, among two trigger inputs based programs, and nine time based ones.
Back to MENU.
text_image
- PROGRAM - TRIGGER INPUT When circuit closes: NO ACTION Current state SHOW PROGRAM SUMMARYSelect the action to carry when the trigger input closes.
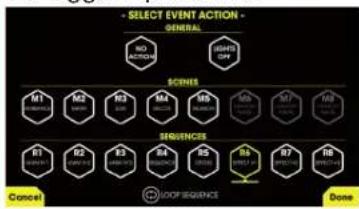
flowchart
graph TD
    A["Select EVENT ACTION - GENERAL"] --> B["NO ACTION"]
    A --> C["WM Action"]
    A --> D["DM Action"]
    B --> E["M1"]
    B --> F["M2"]
    B --> G["M3"]
    C --> H["M4"]
    C --> I["M5"]
    C --> J["M6"]
    D --> K["M7"]
    D --> L["M8"]
    D --> M["SB"]
    D --> N["SB"]
    E --> O["Cancel"]
    F --> P["OK/Sequence"]
    G --> Q["Done"]
    H --> R["Sequences"]
    I --> S["Sequences"]
    J --> T["Sequences"]
    K --> U["Sequences"]
    L --> V["Sequences"]
    M --> W["Sequences"]
Visual feedback of the trigger input's current state.
Select on which day the current program needs to be enabled.
Select the timestamp for the current program. Select the action associated to the current program.
Time based programs
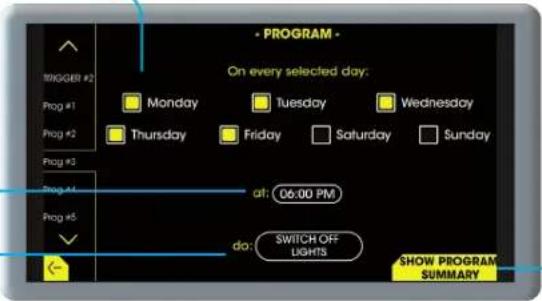
text_image
PROGRAM On every selected day: Monday Tuesday Wednesday Thursday Friday Saturday Sunday at: 06:00 PM do: SWITCH OFF LIGHTS SHOW PROGRAM SUMMARYOverview of all the time based programs in use.
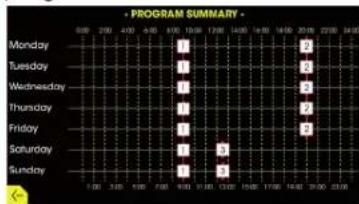

DUAL DISPLAY
INFO
- The CONTROL TOUCH system can be used with either one or two CONTROL HMI5" displays.
• Each display offers the same control capabilities detailed in this manual. There is no « master/slave » concept. - When using the HOME app:
• The memory selection can made on any display.
• The displays are mirrored: any memory selection made on one display is automatically synchronized on the other.
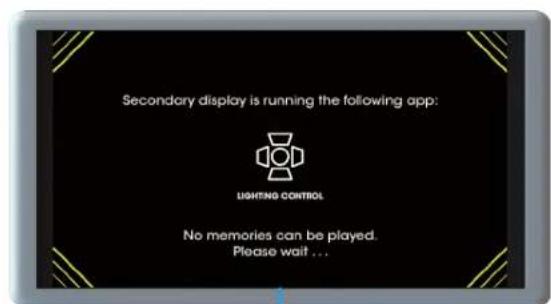
- When opening any other app, the secondary display can no longer be used to select the memories. This state remains until the first displays goes back to HOME.
• The memories are automatically saved on the CONTROL HUB's microSD card, in order to ensure proper synchronization of the two displays. - When adding or removing a display from the system, the CONTROL HUB must be restarted to ensure proper operations. This is done by pressing the « restart » button for 0.5 second. This button is located close to the RJ45 connectors.
text_image
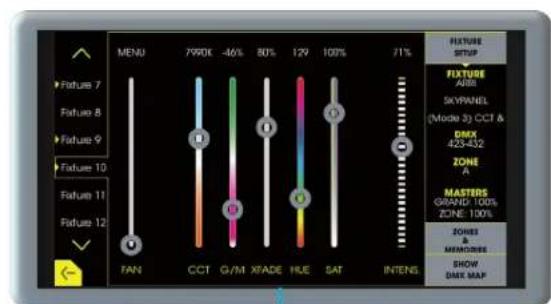
MENU 7950€ -46% 80% 129 100% 71% FIXTURE SETUP FIXTURE AUM SKYPANEL (Mode 3) CCT & DMX 423-432 ZONE A MASTERS GRAND: 100% ZONE: 100% ZONES & MEMORIES SHOW DAX MAP FATUA 7 FATUA 8 FATUA 9 FATUA 10 FATUA 11 FATUA 12 FAN CCT G/M X/ADE HUE SAT INTENSWhen one display is accessing any app other than HOME (MENU, FIXTURE CONTROL, RECORDER, ...)
text_image
Secondary display is running the following app: LIGHTING CONTROL No memories can be played. Please wait ...The second display remains inhibited, until the first display goes back to the HOME app.
INSTALLATION DIAGRAM
EN FR
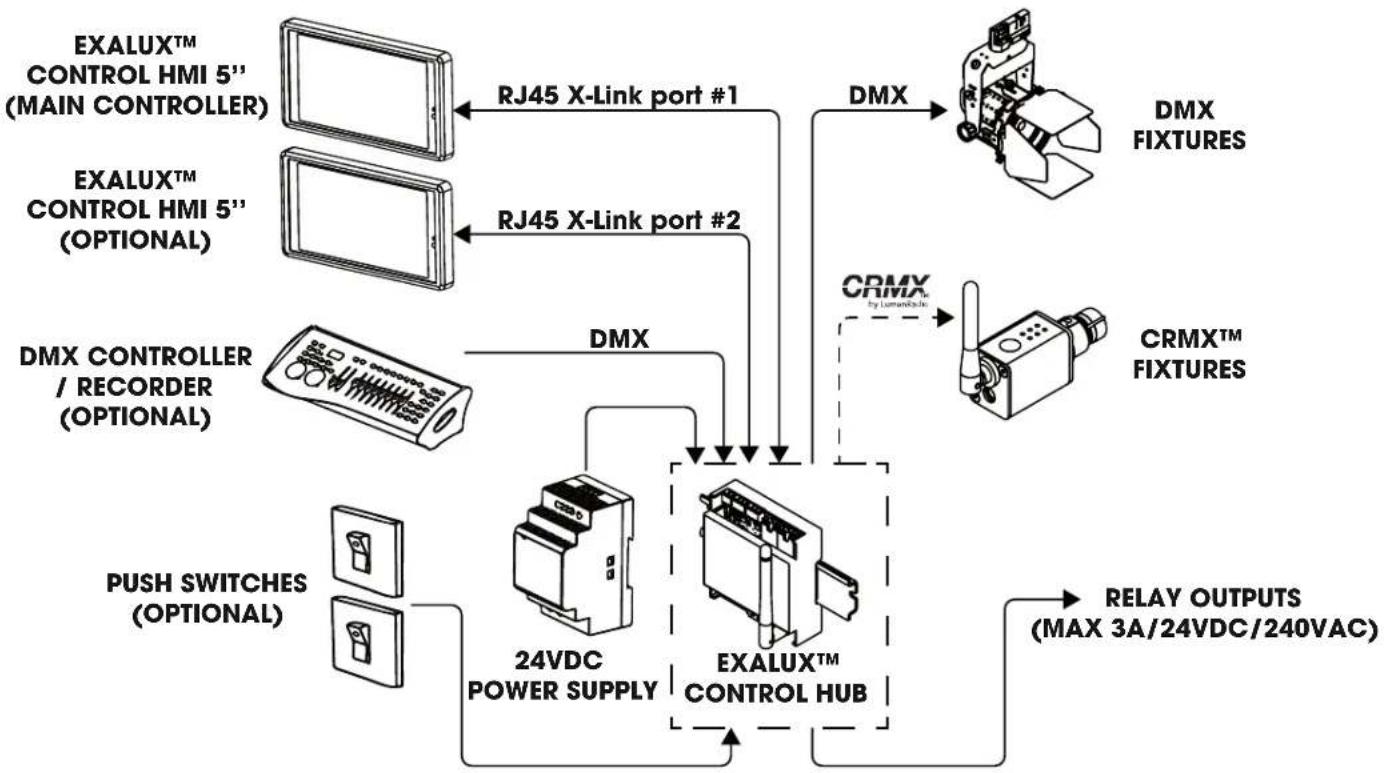
flowchart
graph TD
    A["EXALUX™ CONTROL HMI 5'' (MAIN CONTROLLER)"] -->|RJ45 X-Link port #1| B["DMX"]
    C["EXALUX™ CONTROL HMI 5'' (OPTIONAL)"] -->|RJ45 X-Link port #2| D["DMX"]
    E["DMX CONTROLLER / RECORDER (OPTIONAL)"] --> F["DMX"]
    G["PUSH SWITCHES (OPTIONAL)"] --> H["24VDC POWER SUPPLY"]
    H --> I["EXALUX™ CONTROL HUB"]
    I --> J["RELAY OUTPUTS (MAX 3A/24VDC/240VAC)"]
    K["DMX FIXTURES"] --> L["CRMX™ FIXTURES"]
    M["CRMX™ FIXTURES"] --> N["DRMIX FIXTURES"]
    O["RELINK OUTPUTS MAX 3A/24VDC/240VAC"] --> P["EXALUX™ CONTROL HUB"]

CONTROL HUB
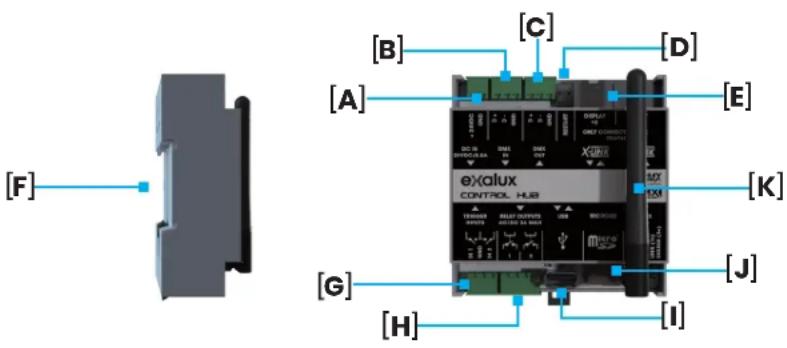
text_image
[F] [B] [A] [C] [D] [E] [K] [G] [H] [J] [I]Certifications: CE, RoHS
Dimensions : 88 x 90 x 32.5mm
Poids: 125g
CONTROL HMI 5"
EN
FR

text_image
[E] [D] [C] HUE V1.1 EXALUX [OUE V1.1 LIBRARIES 340 1 bus de to Noe-368, 163 CS 57011 (4002) [Noble-0000] / [MANT +33 (09/72/03/10/03)] / [RUBERTON/OCEUT NO. www.exaluxv1.1] [OUE V1.1 LIBRARIES 340 EXALUX [OUE V1.1 LIBRARIES 340 EXALUX [OUE V1.1 LIBRARIES 340 EXALUX [OUE V1.1 LIBRARIES 340 EXALUX [OUE V1.1 LIBRARIES 340 EXALUX [OUE V1.1 LIBRARIES 340 EXALUXCertifications: CE, RoHS
Dimensions: 76.2 x 139.4 x 24.8mm
Poids: 130g

HOME
bar
DMX MAP* | Year | Month | Revenue (M) | Growth (%) | Qtr (%) | Total Revenue (M) | Qtr (%) | Total Revenue ($M) | |---|---|---|---|---|---|---|---| | 2018 | Jan | 450 | 1.6% | 1.7% | 450 | 1.7 | 450 | | 2018 | Feb | 450 | 1.6% | 1.7% | 450 | 1.7 | 450 | | 2018 | Mar | 450 | 1.6% | 1.7% | 450 | 1.7 | 450 | | 2018 | Apr | 450 | 1.6% | 1.7% | 450 | 1.7 | 450 | | 2018 | May | 450 | 1.6% | 1.7% | 450 | 1.7 | 450 | | 2018 | Jun | 450 | 1.6% | 1.7% | 450 | 1.7 | 450 | | 2018 | Jul | 450 | 1.6% | 1.7% | 450 | 1.7 | 450 | | 2018 | Aug | 450 | 1.6% | 1.7% | 450 | 1.7 | 450 | | 2018 | Sep | 450 | 1.6% | 1.7% | 450 | 1.7 | 450 | | 2018 | Oct | 450 | 1.6% | 1.7% | 450 | 1.7 | 450 | | 2018 | Nov | 450 | 1.6% | 1.7% | 450 | 1.7 | 450 | | 2018 | Dec | 450 | 1.6% | 1.7% | 450 | 1.7 | 450 | | 2019 | Jan | -330 | -3.3% | -3.3% | -330 | -3.3% | -330 | | 2019 | Feb | -330 | -3.3% | -3.3% | -330 | -3.3% | -330 | | 2019 | Mar | -330 | -3.3% | -3.3% | -330 | -3.3% | -330 | | 2019 | Apr | -330 | -3.3% | -3.3% | -330 | -3.3% | -330 | | 2019 | May | -330 | -3.3% | -3.3% | -330 | -3.3% | -330 | | 2019 | Jun | -330 | -3.3% | -3.3% | -330 | -3.3% | -330 | | 2019 | Jul | -330 | -3.3% | -3.3% | -330 | -3.3% | -330 | | 2019 | Aug | -330 | -3.3% | -3.3% | -330 | -3.3% | -330 | | 2019 | Sep | -330 | -3.3% | -3.3% | -330 | -3.3% | -330 | | 2019 | Oct | -330 | -3.3% | -3.3% | -330 | -3.3% | -330 | | 2019 | Nov | -330 | -3.3% | -3.3% | -330 | -3.3% | -330 | | 2019 | Dec | -330 | -3.3% | -3.3% | -330 | -3.3% | -330 | | 2020-2/26: Revenue ($M) | | Jan-26: Revenue ($M) | | Jan-26: Revenue ($M) | | Feb-26: Revenue ($M) | | Mar-26: Revenue ($M) | | Apr-26: Revenue ($M) | | May-26: Revenue ($M) | | Jun-26: Revenue ($M) | | Jul-26: Revenue ($M) | | Aug-26: Revenue ($M) | | Sep-26: Revenue ($M) | | Oct-26: Revenue ($M) | | Nov-26: Revenue ($M) | | Dec-26: Revenue ($M) | | Jan-27: Revenue ($M) | | Feb-27: Revenue ($M) | | Mar-27: Revenue ($M) | | Apr-27: Revenue ($M) | | May-27: Revenue ($M) | | Jun-27: Revenue ($M) | | Jul-27: Revenue ($M) | | Aug-27: Revenue ($M) | | Sep-27: Revenue ($M) | | Oct-27: Revenue ($M) | | Nov-27: Revenue ($M) | | Dec-27: Revenue ($M) | | Jan-28: Revenue ($M) | | Feb-28: Revenue ($M) | | Mar-28: Revenue ($M) | | Apr-28: Revenue ($M) | | May-28: Revenue ($M) | | Jun-28: Revenue ($M) | | Jul-28: Revenue ($M) | | Aug-28: Revenue ($M) | | Sep-28: Revenue ($M) | | Oct-28: Revenue ($M) | | Nov-28: Revenue ($M) | | Dec-28: Revenue ($M) | | Jan-29: Revenue ($M) | | Feb-29: Revenue ($M) | | Mar-29: Revenue ($M) | | Apr-29: Revenue ($M) | | May-29: Revenue ($M) | | Jun-29: Revenue ($M) | | Jul-29: Revenue ($M) | | Aug-29: Revenue ($M) | | Sep-29: Revenue ($M) | | Oct-29: Revenue ($M) | | Nov-29: Revenue ($M) | | Dec-29: Revenue ($M) | | Jan-30: Revenue ($M) | | Feb-30: Revenue ($M) | | Mar-30: Revenue ($M) | | Apr-30: Revenue ($M) | | May-30: Revenue ($M) | | Jun-30: Revenue ($M) | | Jul-30: Revenue ($M) | | Aug-30: Revenue ($M) | | Sep-30: Revenue ($M) | | Oct-30: Revenue ($M) | | Nov-30: Revenue ($M) | | Dec-30: Revenue ($M) | | Jan-31: Revenue ($M) | | Feb-31: Revenue ($M) | | Mar-31: Revenue ($M) | | Apr-31: Revenue ($M) | | May-31: Revenue ($M) | | Jun-31: Revenue ($M) | | Jul-31: Revenue ($M) | | Aug-31: Revenue ($M) | | Sep-31: Revenue ($M) | | Oct-31: Revenue ($M) | | Nov-31: Revenue ($M) | | Dec-31: Revenue ($M) | | Jan-32: Revenue ($M) | | Feb-32: Revenue ($M) | | Mar-32: Revenue ($M) | | Apr-32: Revenue ($M) | | May-32: Revenue ($M) | | Jun-32: Revenue ($M) | | Jul-32: Revenue ($M) | | Aug-32: Revenue ($M) | | Sep-32: Revenue ($M) | | Oct-32: Revenue ($M) | | Nov-32: Revenue ($M) | | Dec-32: Revenue ($M) | | Jan-33: Revenue ($M) | | Feb-33: Revenue ($M) | | Mar-33: Revenue ($M) | | Apr-33: Revenue ($M) | | May-33: Revenue ($M) | | Jun-33: Revenue ($M) | | Jul-33: Revenue ($M) | | Aug-33: Revenue ($M) | | Sep-33: Revenue ($M) | | Oct-33: Revenue ($M) | | Nov-33: Revenue ($M) | | Dec-33: Revenue ($M) | | Jan-44: Revenue ($M) | | Feb-44: Revenue ($M) | | Mar-44: Revenue ($M) | | Apr-44: Revenue ($M) | | May-44: Revenue ($M) | | Jun-44: Revenue ($M) | | Jul-44: Revenue ($M) | | Aug-44: Revenue ($M) | | Sep-44: Revenue ($M) | | Oct-44: Revenue ($M) | | Nov-44: Revenue ($M) | | Dec-44: Revenue ($M) | | Jan-45: Net income (loss), net profit (loss), net profit (loss), net profit (loss), net profit (loss), net profit (loss), net profit (loss), net profit (loss), net profit (loss), net profit (loss), net profit (loss), net profit (loss), net profit (loss), net profit (loss), net profit (loss), net profit (loss), net profit (loss), net profit (loss), net profit (loss), net profit (loss), net profit (loss), net loss (loss), net loss (loss), net loss (loss), net loss (loss), net loss (loss), net loss (loss), net loss (loss), net loss (loss), net loss (loss), net loss (loss), net loss (loss), net loss (loss), net loss (loss), net loss (loss), net loss (loss), net loss (loss), net loss (loss), net loss (loss), net loss (loss), net loss (loss), net gain (loss), net gain (loss), net gain (loss), net gain (loss), net gain (loss), net gain (loss), net gain (loss), net gain (loss), net gain (loss), net gain (loss), net gain (loss), net gain (loss), net gain (loss), net gain (loss), net gain (loss), net gain (loss), net gain (loss), net gain (loss), net gain (loss), net gain (loss), net loss (loss), net loss (loss), net loss (loss), net loss (loss), net loss (loss), net loss (loss), net loss (loss), net loss (loss), net loss (loss), net loss (loss), net loss (loss), net loss (loss), net loss (loss), net loss (loss), net loss (loss), net loss (loss), net loss (loss), net loss (loss), net loss (loss), net losses, net gains, net gains, net gains, net gains, net gains, net gains, net gains, net gains, net gains, net gains, net gains, net gains, net gains, net gains, net gains, net gains, net gains, net gains, net gains, net gains, net gains, net gains, net gains, net gains, net gains, net gains, net gains, net gains, net gains, net gains, net gains, net gains, net gains, net gainsFIXTURE CONTROL
EN FR
text_image
Secondary display is running the following app: LIGHTING CONTROL No memories can be played. Please wait ...This system is designed to control lighting sources, for indoor use only. To prevent damage, do not expose it to liquid or moisture and keep the device away from open flames and heat sources. Avoid clogging and strong vibrations. Use the devices only in its intended use as described in this manual. Any other use, as well as use in other conditions, will be considered non-compliant and can cause injury and damage. No liability will be assumed for damages resulting from improper use.
CONTROL HUB Controller
This device requires DC voltage, which can result in an electrical shock. Do not remove cover when powered. The parts inside the device are maintenance free.
Check the feature compliancy and correct operation of the power supply before connecting it to the device. Before connection, check if the voltage corresponds to the voltage of your local power network and if the socket is equipped with a GFCI. In case of non-compliance, the device may be damaged and the user may be injured. Do not modify the power cables nor the plugs in order to avoid short-circuits. In case of non-compliance, there is a risk of electric shock and fire hazard. If in doubt, contact a certified technician.
CONTROL HMI 5" Display
Always use the mounting holes on the display when mounting it to a wall, enclosure or panel. Do not apply undue tightness to the screws when fixing it to the chosen wall/enclosure, the display case is made of plastic and may be damaged if screws are fastened too tightly. Displays are susceptible to mechanical shock and any force exerted on the module may result in deformed zebra stripes, a cracked display cell and broken backlight.
Avoid having to display the same image/object on the screen for lengthy periods of time. This will cause a burn-
in which is a common problem with all types of display technologies. Therefore, it is strongly advised to use the screen saver function, which is able to dim down or turn off the display when no one is nearby, based on proximity sensor. This will also maximize display endurance.
Moisture and water can damage the display. Moisture on the surface of a powered display may cause the electrodes to corrode. Wipe off any moisture gently or let the display dry before usage. The performance of the display will degrade under high temperature and humidity. Avoid such conditions when using or storing.
Care
Unplug CONTROL HUB before cleaning it. Do not use cleaning product, use a dry cloth and rub gently. Dirt from fingerprint oil and fat can easily stain the surface of the display. Gently wipe off any stains with a soft lint-free cloth. Store the devices in a clean and dry place, away from exposure to direct sunlight and dust.
Maintenance
Unplug the devices from power during all maintenance operations. The devices should only be installed and opened by people in full possession of their physical, sensory and mental abilities who must have the required knowledge and experience. All the other persons are only allowed to operate the devices under the supervision or direction of a person responsible for their safety.
Warranty
EXALUX cannot be responsible for material or personal damage resulting from improper use of the product or non-compliance to the instructions. The warranty will not be applied in these cases.