
HCR410 - Alarm Clock HAMILTON BEACH - Free user manual and instructions
Find the device manual for free HCR410 HAMILTON BEACH in PDF.

| Product Type | Clock Radio |
| Brand | Hamilton Beach |
| Model | HCR410 |
| Main Power | Mains (AC adapter included) |
| Backup Batteries | 2 AAA batteries (not included) |
| Frequency Bands | AM and FM |
| Alarm | Radio or buzzer |
| Snooze | Yes, via Snooze/Dimmer button |
| Station Memory | 5 presets (4 programmable + 1 iPod/Aux) |
| iPod Connectivity | Dedicated iPod connector (on some models) |
| Auxiliary Input | 3.5mm jack (on back) |
| Universal Connector | For external MP3 players (on some models) |
| Display | LCD screen with adjustable brightness |
| Daylight Saving Time Adjustment | Yes, DST switch (+1 h) |
| FM Antenna | Wire antenna |
| Anti-Theft Bracket | Yes (mounts to wall or furniture) |
| Maintenance | Unplug and wipe with a dry cloth |
| Warranty | 1 year (USA and Canada) |
| Safety | Do not use near water, do not block ventilation openings |
Frequently Asked Questions - HCR410 HAMILTON BEACH
User questions about HCR410 HAMILTON BEACH
0 question about this device. Answer the ones you know or ask your own.
Ask a new question about this device
Download the instructions for your Alarm Clock in PDF format for free! Find your manual HCR410 - HAMILTON BEACH and take your electronic device back in hand. On this page are published all the documents necessary for the use of your device. HCR410 by HAMILTON BEACH.
USER MANUAL HCR410 HAMILTON BEACH
840189503 ENV02.qxd:840168500 Ev01.qxd 1/26/12 10:33 AM Page|1
Deluxe Clock Radio Page 2
Radio-Réveil de Luxe Page 13
natural_image
Line drawing of a portable toaster with control panel and display (no text or symbols)
The Lightning symbol refers to "dangerous voltage."
The Exclamation symbol means there are important instructions within this manual.
WARNING: TO REDUCE THE RISK OF ELECTRICAL SHOCK, DO NOT REMOVE COVER. NO USER-SERVICEABLE PARTS INSIDE. REFER SERVICING TO QUALIFIED SERVICE PERSONNEL.
- Use only with the cart, stand, tripod, bracket, or table specified by the manufacturer or sold with the apparatus. When a cart is used, use caution when moving the cart/apparatus combination to avoid injury from tip-over.
- Unplug this apparatus during lighting storms or when unused for long periods of time.
- Refer all servicing to qualified service personnel. Servicing is required when the apparatus has been damaged in any way, such as power-supply cord or plug is damaged, liquid has been spilled or objects have fallen into the apparatus, the apparatus has been exposed to rain or moisture, does not operate normally, or has been dropped.
SAVE THESE INSTRUCTIONS!
IMPORTANT SAFETY INSTRUCTIONS
- Read these instructions.
- Keep these instructions.
- Heed all warnings.
- Follow all instructions.
- Do not use this apparatus near water.
- Clean only with dry cloth.
- Do not block any ventilation opening. Install in accordance with the manufacturer's instructions.
- Do not install near any heat source such as radiators, heat registers, stoves, or other apparatus (including amplifiers) that produce heat.
- Do not defeat the safety purpose of the polarized or grounding-type plug. A polarized plug has two blades with one blade wider than the other. A grounding-type plug has two blades and a third grounding prong. The wide blade or the third prong is provided for your safety. If the provided plug does not fit your outlet, consult an electrician for replacement of the obsolete outlet.
- Protect the power cord from being walked on or pinched particularly at plugs, convenience receptacles, and the point where they exit from the apparatus.
- Only use attachments/accessories specified by the manufacturer.
Parts and Features
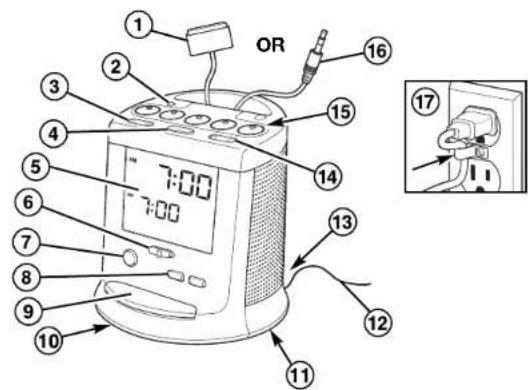
- iPod® Connector (on select models)
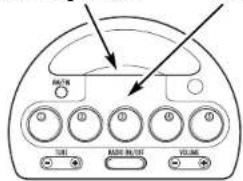
- AM/FM Button
- Tune -/+ Button
- Radio ON/OFF Button
- Display
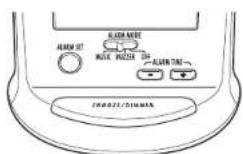
- Alarm Mode Switch
- Alarm Set Button
- Alarm Time +/- Buttons
- Snooze/Dimmer Button
-
Battery Cover (located on bottom of radio)
-
Daylight Savings Time Switch (located on bottom of radio)
- FM Wire Antenna
- Aux-In Connector (located on back of radio on select models)
- Volume Button
- 1-5 Preset Buttons
- Universal Connector (on select models)
- Anti-Theft Clip
Parts and Features (cont.)
Removable Top Cover
With Finger Latch
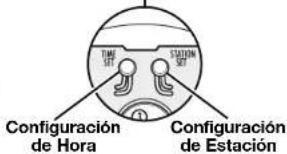
Time Set and Station Set Buttons (located under the top cover)
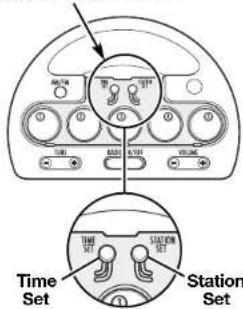
Remove top cover and button covers, and place radio genre icons onto button.
Radio Genre Icons

840189503 ENv02.qxd:840168500 Ev01.qxd 1/26/12 10:33 AM Page|6
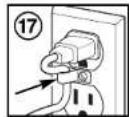
Anti-Theft Clip
The Anti-Theft Clip is used to prevent theft.
- Plug power cord into outlet.
- Remove existing screw from outlet faceplate.
- Replace screw with provided Phillips head screw and secure tightly.
Setting Clock Time
- Set Daylight Savings Time (DST) switch to proper position.
- Remove top cover by grasping finger latch and lifting up.
- Press and hold the Time Set button.
- Use the Alarm Time + and - buttons to to set current time.
- Release the Time Set button.
ADJUSTING FOR DAYLIGHT SAVINGS TIME:
- Slide the DST switch to +1 to advance the time 1 hour.
- Slide back to OFF position to turn the clock back 1 hour.
Setting Alarm Time
- Press and hold the Alarm Set button.*
- Adjust the time using the Alarm Time + and - buttons.
- Release Alarm Set button and set Alarm Mode.
SELECTING RADIO/iPod FOR ALARM:
Follow steps 1 and 2 above under "Setting Alarm Time."
*Select Station will appear on the display. If waking to music is desired, music choice and time preference can be set in any order. Radio preset can only be selected when slide switch is in Music position.
Setting Alarm Time (cont.)
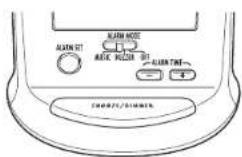
SETTING ALARM MODE:
Slide Alarm Mode switch to desired setting: Music or Buzzer. The corresponding mode will be indicated on the LCD display.
TO SNOOZE:
Press the Snooze/Dimmer button after the alarm sounds.
TO DEACTIVATE THE ALARM:
Current alarm time and wake mode can be viewed on the display. Slide the Alarm Mode to OFF position to deactivate.
Setting the Brightness of the Display
Press the Snooze/Dimmer button during normal operation to adjust the brightness of the LCD display.
Operation
HOW TO INSTALL/REPLACE BATTERY:
Remove the plastic tab from the battery cover; then remove the battery cover on the bottom of the unit using a screwdriver.
This unit contains 2 AAA batteries as a backup power source. The battery keeps the clock and the alarm operating in the event of a power interruption.
PLAYING THE RADIO:
- Press the Radio ON/OFF button.
- Select AM or FM mode.
- For manual tuning, use the Tune + and - buttons to select station.
- For preset tuning, select preset buttons 1–5.
- Adjust volume using the Volume + and - buttons.
Operation (cont.)
SETTING RADIO STATIONS:
Remove top cover using the finger latch.
- Turn on radio.
- Select AM/FM mode.
- Tune the radio to a desired station using the Tune + and - buttons.
- To program the selected station as a preset, press and hold the Station Set button that is located under the top cover. While holding the Station Set button, press one of the 1–4 preset buttons. The corresponding number (1–4) should appear in the display.
- Repeat steps 1–4 for setting the other radio stations.
- Remove clear plastic button covers and place punched-out cardboard cutouts of radio genres onto button.
- Replace clear plastic button covers; then replace top cover onto unit.
CHARGING AN iPod: (on select models)
- Connect an iPod to the iPod connector. The iPod will begin charging.
- To remove the iPod from the iPod line, squeeze the sides of the connector and pull away from the iPod.
PLAYING AN iPod: (on select models)
- Connect an iPod to the iPod connector.
- Press the Radio ON/OFF button.
- Press the iPod #5 preset button.
- To use an iPod, refer to the user's guide for your iPod.
NOTE: Hamilton Beach cannot accept responsibility in the event that data recorded on an iPod is lost or damaged when using an iPod connected to this unit.
Operation (cont.)
PLAYING AN MP3 PLAYER OR OTHER PORTABLE DEVICE USING AUX-IN CONNECTOR:
If you are using an MP3 player or other portable audio device, you can play it through the unit via the Aux-in connector located on the back of the clock radio.
- Plug one end of the connection cable (not included) into the headphone jack on your audio device.
- Plug the other end of the connection cable into the Aux-in connector located on the back of the clock radio.
- Press the Radio ON/OFF button to turn on radio.
- Press the MP3/Aux #5 preset button.
- Turn on and play the external audio device.
PLAYING AN MP3 PLAYER OR OTHER PORTABLE DEVICE USING UNIVERSAL CONNECTOR:

- Plug the universal connector into the headphone jack on your audio device.
- Press the Radio ON/OFF button to turn on radio.
- Press the MP3/Aux #5 preset button.
- Turn on and play the external audio device.
Troubleshooting
| SYMPTOM | POSSIBLE PROBLEM | SOLUTION |
| Unit does not turn on. | AC adapter not plugged into working wall outlet or not plugged into the power supply jack, located on the back of the unit. | Plug AC adapter into working wall outlet and plug connector into supply jack on the unit. |
| Battery Low icon displayed. | Batteries weak or not installed properly. | Replace with new batteries and/or check to ensure + and - ends match the diagram in the battery compartment. |
| iPod does not play (on select models). | iPod not connected properly or software is too old. | Ensure nothing is obstructing iPod connector. Unplug and reconnect. Upgrade software on iPod. Visit www.apple.com or iTunes on your computer. |
| No sound from clock radio. | Volume may be set too low. | Adjust the Volume button to turn up the radio. |
Troubleshooting (cont.)
| SYMPTOM | POSSIBLE PROBLEM | SOLUTION |
| Cannot set alarm to wake up to music. | Alarm Mode switch not set to Music or radio station is not set. | Slide Alarm Mode switch to Music. Use Tune +/- buttons to set radio station when holding down Station Set button that is located under the top cover. |
| iPod did not charge (on select models). | iPod not connected properly. | Ensure nothing is obstructing iPod connector. Unplug and reconnect. |
| Noise or static. | Fluorescent lamps and other electrical appliances may cause radio interference or static. | Move unit away from the source of interference. |
Care and Cleaning
Unplug clock radio and wipe with a dry cloth. Do not leave clock radio in direct sunlight or in hot, dusty, or humid areas. Avoid placing near heating vents or heating appliances.
840189503 ENv02.qxd:840168500 Ev01.qxd 1/26/12 10:33 AM Page 12
LIMITED WARRANTY
This warranty applies to products purchased and used in the U.S. and Canada. This is the only express warranty for this product and is in lieu of any other warranty or condition.
This product is warranted to be free from defects in material and workmanship for a period of one (1) year from the date of original purchase.
If you have a claim under this warranty please contact our TECHNICAL SERVICES DEPARTMENT at 1-866-285-1087 or 010-693-4277. For faster service, loceto the model, type
of 910-693-4277. For faster service, to and series numbers on your appliance.
This warranty does not cover glass, filters, wear from normal use, use not in conformity with the printed directions, or damage to the product resulting from accident, alteration, abuse, or misuse, or subjecting it to any voltage and waveform other than as specified on the rating label (for example, 120V \~ 60 Hz). This warranty extends only to the original purchaser. Keep the original sales receipt, as proof of purchase is required to make a warranty claim or the warranty term will be based on the date of manufacture plus one (1) year.
We exclude all claims for special, incidental, and consequential damages caused by breach of express or implied warranty. All liability is limited to the amount of the purchase price. Every implied warranty, including any statutory warranty or condition of merchantability or fitness for a particular purpose, is disclaimed except to the extent prohibited by law, in which case such warranty or condition is limited to the duration of this written warranty. This warranty gives you specific legal rights. You may have other legal rights that vary depending on where you live. Some states or provinces do not allow limitations on implied warranties or special, incidental, or consequential damages, so the foregoing limitations may not apply to you.
840189503 FRv02.qxd:840168500 Ev01.qxd 1/26/12 10:30 AM Page|13

AVERTISSEMENT
RISQUE D'ÉLECTROCUTION NE PAS OUVRIR

INSTALLATION/REEMPLACEMENT DES PILES :
- Deluxe Clock Radio Page 2
- Radio-Réveil de Luxe Page 13
- SAVE THESE INSTRUCTIONS!
- IMPORTANT SAFETY INSTRUCTIONS
- Anti-Theft Clip
- Setting Clock Time
- ADJUSTING FOR DAYLIGHT SAVINGS TIME:
- Setting Alarm Time
- SELECTING RADIO/iPod FOR ALARM:
- Setting Alarm Time (cont.)
- SETTING ALARM MODE:
- TO SNOOZE:
- TO DEACTIVATE THE ALARM:
- Setting the Brightness of the Display
- Operation
- HOW TO INSTALL/REPLACE BATTERY:
- PLAYING THE RADIO:
- Operation (cont.)
- SETTING RADIO STATIONS:
- PLAYING AN MP3 PLAYER OR OTHER PORTABLE DEVICE USING AUX-IN CONNECTOR:
- PLAYING AN MP3 PLAYER OR OTHER PORTABLE DEVICE USING UNIVERSAL CONNECTOR:
- Care and Cleaning
- LIMITED WARRANTY
- AVERTISSEMENT
- RISQUE D'ÉLECTROCUTION NE PAS OUVRIR
- INSTALLATION/REEMPLACEMENT DES PILES :
Brand : HAMILTON BEACH
Model : HCR410
Category : Alarm Clock