HMI200 - Blender HAMILTON BEACH - Free user manual and instructions
Find the device manual for free HMI200 HAMILTON BEACH in PDF.

User questions about HMI200 HAMILTON BEACH
0 question about this device. Answer the ones you know or ask your own.
Ask a new question about this device
Download the instructions for your Blender in PDF format for free! Find your manual HMI200 - HAMILTON BEACH and take your electronic device back in hand. On this page are published all the documents necessary for the use of your device. HMI200 by HAMILTON BEACH.
USER MANUAL HMI200 HAMILTON BEACH
natural_image
Line drawing of a handheld electric shaver with handle and base, against a black background (no text or symbols)Immersion Mixer
Operation Manual Page 2
8 a.m. — 5:00 p.m. EST Monday—Friday www.commercial.hamiltonbeach.com
Immersion Mixer Safety
IMPORTANT: This operation manual should be reviewed with all equipment operators as part of your operator training program.
IMPORTANT SAFETY INSTRUCTIONS
WARNING: When using electrical appliances, basic safety precautions should be followed, including the following:
- Read the operation manual before using mixer. Keep the manual handy.
- Do not use an extension cord.
- Do not use to prepare drugs or in laboratory or pharmaceutical applications.
- Do not use appliance for other than intended use.
- To protect against electrical shock, do not immerse the motor housing, cord, or plug in water or other liquid.
- Not intended for use by or near children.
- To reduce risk of personal injury, unplug cord from outlet when not in use, and before putting on or taking off parts.
- Avoid contacting moving parts.
- To prevent possibility of serious personal injury, keep hands, hair, clothing, and utensils away from the blade while using the mixer. A spatula may be used when the unit is NOT running.
- Inspect attachments daily, including blades and seals.
-
Replace blades every 90 days to avoid broken blades.
-
Do not use outdoors.
- The use of accessory attachments not recommended by Hamilton Beach may cause injuries.
- Disconnect power before cleaning or servicing.
- Do not let the cord hang over the edge of the table or counter. Do not let the cord contact hot surfaces, including a stovetop.
- Blades are SHARP. Handle carefully.
- When mixing liquids, especially hot liquids, use a tall container or make only small quantities at a time to reduce spills and the possibility of injury.
- Do not use a high-pressure spray gun on this product.
- Do not carry the unit by the power cord.
- Double insulation: no serviceable parts.
- Do not operate any appliance with a damaged cord or plug or after the appliance malfunctions, or is dropped or damaged in any manner.
- SAVE THESE INSTRUCTIONS -
Parts and Features
text_image
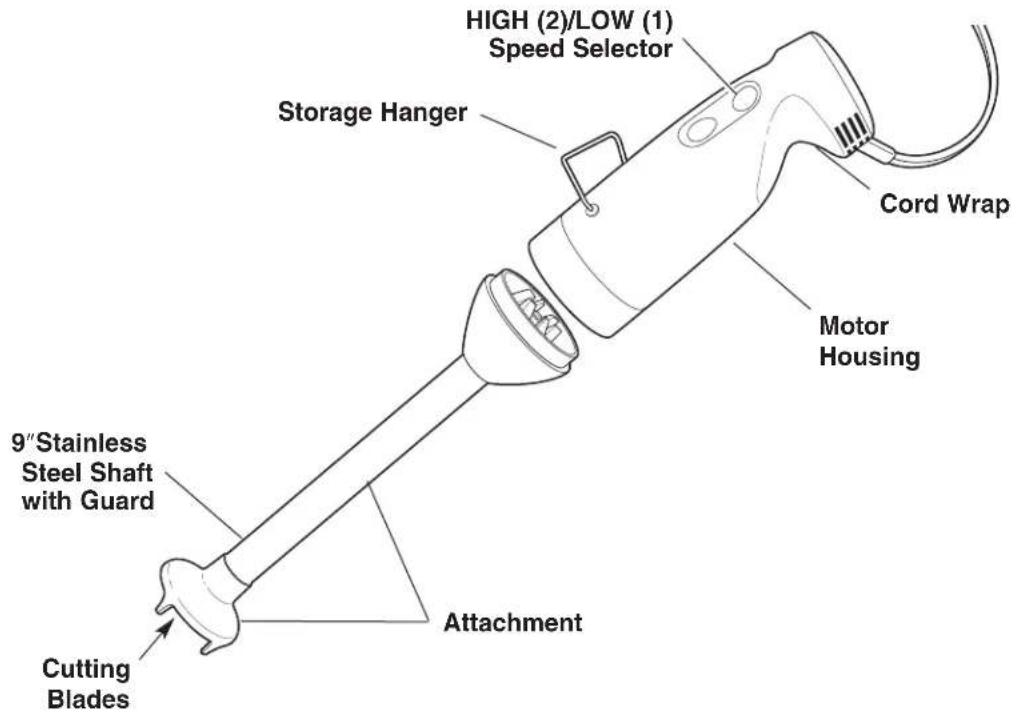
HIGH (2)/LOW (1) Speed Selector Storage Hanger Cord Wrap Motor Housing 9" Stainless Steel Shaft with Guard Attachment Cutting BladesBefore Using for the First Time
WARNING

Electrical Shock Hazard
Do not use an extension cord.
Do not immerse motor housing, cord, or plug in water or any other liquid.
Failure to follow these instructions can result in death, fire, or electrical shock.
Electrical Requirements
Observe all governing codes and ordinances. This unit is double insulated and features a polarized plug. The plug will only fit into the electrical socket one way. Do not modify the plug in any way.
Preparing for use:
Always keep the appliance unplugged during assembly and disassembly.
- Before use, wipe the unit with a clean damp cloth.
- The cutting blade may be washed in hot, sudsy water. Rinse thoroughly and dry. Refer to the Cleaning and Sanitizing Instructions on page 6.
Choosing and Installing Attachments—Cutting Blades
WARNING

Pinch and Cut Hazard
Make sure that the mixer is off and unplugged before installing or removing attachments and parts.
Blades are sharp! Use extreme care when handling.
Failure to follow these instructions can result in broken bones, cuts, or other serious injury.
Always keep the appliance unplugged during assembly and disassembly.
When to use the blades:
The cutting blades are used for most chopping, shredding, and mixing operations.
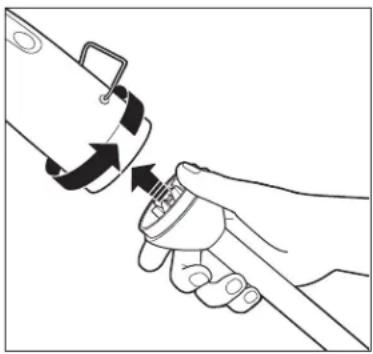
To install the cutting blades:
- Fit the attachment into the end of the motor housing, aligning the three tabs on the blade assembly with the notches in the motor housing.
- While holding the motor housing in one hand, turn the shaft base clockwise until it locks into place.
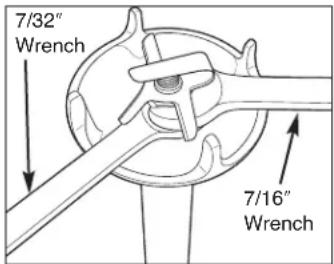
The cutting blades can be removed from the stainless steel shaft for cleaning or replacement. The cutter head shaft has left-hand threads to prevent it from coming loose or slipping during operation.
-
Use a 7/32" wrench or a pair of needle nose pliers to hold the flat portion of the shaft between the cutter head and the guard.
-
While holding the shaft in place, use a 7/16"wrench to turn
text_image
7/32" Wrench 7/16" Wrenchthe blades clockwise to loosen the blades.
- When reinstalling the blades, thread the cutter head into the shaft counterclockwise, and make sure it is tightened securely in place.
natural_image
Line drawing of a hand holding a tool with a knob, showing mechanical adjustment (no text or symbols)Using the Mixer With the Cutting Blades
WARNING

Pinch, Cut, and Crush Hazard
Make sure that the mixer is off and unplugged before installing or removing attachments and parts.
Blades are sharp! Use extreme care when handling.
DO NOT reach or insert utensils into the container while the mixer is running.
Failure to follow these instructions can result in broken bones, cuts, or other serious injury.
Using the cutting blades
WARNING: Inspect blades daily. Replace if damaged or every 90 days to avoid broken blades.
Always keep the appliance unplugged during assembly and disassembly.
• Install the stainless steel shaft and cutting blades as described in the instructions on page 4.
- When using cutting blades make sure that the blades do NOT come in contact with the bottom or sides of the container.
For mixing and blending
- Add the ingredients to the container or bowl, following recipe instructions. Ingredients mix best when liquids are added first, and solid ingredients are "stirred" in.
- Position the cutting head of the mixer in the container so that the guard is covered by food. NEVER submerse the vents on the motor housing.
- Start the mixer on LOW (1) speed, then switch to HIGH (2) speed (if desired). Use a gentle up and down motion while slowly turning the container to "stir" the food until it has all been mixed to the desired consistency.
WARNING

Electrical Shock Hazard
Do not use an extension cord.
Do not immerse motor housing, cord, or plug in water or any other liquid.
Failure to follow these instructions can result in death, fire, or electrical shock.
Tips for Mixing
- Use deeper containers for mixing and blending to help prevent splashing and spattering.
- Using a gentle up and down motion when mixing helps circulate and "draw up" ingredients to provide more consistent mixing results.
- Do not use to crush ice.
Cleaning and Sanitizing Instructions
WARNING

Electrical Shock Hazard
Do not immerse motor housing, cord, or plug in water or any other liquid.
Failure to follow these instructions can result in death, fire, or electrical shock.
General Cleaning with the Attachment in Place
Between batches, clean the cutting blades by running the unit in a washing solution*, then rinsing the attachment in clear water as follows:
- Make sure the mixer is off and unplugged.
- Rinse the stainless steel exterior of the attachment under running water. Flush and/or scrub to remove as much food residue as possible.
- Wipe down the motor housing with a clean, damp cloth. Take care not to allow water to enter the motor vents. Dry with a soft cloth.
- Plug in the unit, immerse the attachment approximately 1/2 of the length of the stainless steel portion in a container of warm (less than 115^ F, 46^ C) washing solution*, and run on high speed for two minutes.
- Unplug the unit and repeat steps 3 and 4 using clean rinse water (95°F, 35°C) in place of the washing solution.
* Use 1 drop of household dishwashing liquid per 16 oz. (1/2 liter) water or the equivalent.
Attachment may also be cleaned in a dishwasher.
Sanitizing
If the immersion mixer will not be used again within one hour, sanitize in the following manner:
- Wash as instructed in "General Cleaning with the Attachment in Place".
-
Immerse attachment approximately 1/2 of the length of the stainless steel portion in a container of a cold chlorine-based sanitizing solution that has a minimum chlorine concentration of 100 parts per million. (See recommended solution below.) Operate unit on high speed for two minutes.
-
Do not rinse. Allow unit to air dry before use.
Weekly Attachment Cleaning
Once every week, stand the attachment, blade down, in 3 inches of boiling water for one minute. Wear protective gloves when removing attachment from water as it will be hot. Allow to air dry.
Recommended Sanitizing Solution
The sanitizing solution should consist of one tablespoon of household bleach per one gallon of clean, cool water (60°F, 16°C) mixed according to the instructions on the bleach. When using a sanitizing solution other than that recommended, the sanitizing solution concentration should be tested using commercially available test strips and should indicate a chlorine concentration between 100 and 200 parts per million.
Autoclave
The stainless steel shaft/blade assembly can be steam sterilized using an autoclave. Refer to the autoclave equipment supplier and facility operating instructions if this method is used. The frequency of sterilization is determined by each user's "best practices"; however, replace the assembly once it has been sterilized 500 times.
DO NOT use this method for the motor unit.
Special Operating and Cleaning Instructions for Institutional Use
Preparing Infant Formulas and Similar Nutritional Adult Products
Refer to the instructions for installing and mixing with the cutting blades. Be sure that the mixer and any containers have been properly cleaned and sanitized before using.
Follow the additional guidelines below:
- Always clean the cutter attachment thoroughly between different formula types to avoid cross contamination. The attachment should be removed and washed with detergent, then rinsed thoroughly, before mixing a new type of product.
- Measure powder or liquid ingredients for the formula mixture. Add approximately half of the final volume of water to the mixing container.
- Mix formula for 15–60 seconds on low power until all traces of powder have been incorporated into the liquid, or until all liquid ingredients are thoroughly blended.
- Add remaining water and blend 15–30 seconds on low power.
NOTE: Some very difficult to blend powdered formulas may require using a slightly longer blending time or high power.
Special Cleaning Instructions for Hospital and Institutional Use
To ensure that the mixer and blades remain sanitary, follow the special cleaning instructions below.
- Wash the cutter attachment with an approved detergent after every use, including when changing formula types, as described in the section "General Cleaning with the Attachment in Place" on page 6.
- At least once per day, sanitize the cutter attachment per the "Sanitizing" instructions on page 6, or as required to meet local sanitation codes.
- After cleaning, attachments should be air dried and stored in a closed container or wrapped to protect them from contamination.
The cutter attachment may also be washed and autoclaved by the hospital's central processing department. Be sure to follow all required safety and sanitation codes.
Troubleshooting Guide
| Problem . . . | Solution . . . |
| Immersion mixer will not turn on | Make sure the mixer is plugged in.Check for a blown fuse. |
| Excessive noise or vibration | Make sure that the blade assembly is properly installed.Make sure that the blade does not contact the sides or bottom of the container. |
| Motor strains or stops | Reduce the amount of product in the bowl. Mix thick products in smaller batches.Make sure ingredients are prepared properly for mixing.Reduce the amount of product. |
| Poor results(See also Tips) | Process for a longer or shorter period of time.Adjust the mixing speed. |
Accessories
| Part Number Description | |
| HMIA 200B Detachable blade/shaft assembly |
Product Warranty
This Warranty supersedes all other Product Warranties
LIMITED WARRANTY
This product is warranted to be free from defects in material and workmanship for a period of one (1) year from the date of original purchase, except as noted below. During this period, we will repair or replace this product, at our option. THE FOREGOING WARRANTY IS IN LIEU OF ANY OTHER WARRANTY OR CONDITION, WHETHER EXPRESS OR IMPLIED, WRITTEN OR ORAL INCLUDING WITHOUT LIMITATION ANY STATUTORY WARRANTY OR CONDITION OF MERCHANTABILITY OR FITNESS FOR A PARTICULAR PURPOSE, ANY LIABILITY IS EXPRESSLY LIMITED TO AN AMOUNT EQUAL TO THE PURCHASE PRICE PAID, AND ALL CLAIMS FOR SPECIAL, INCIDENTAL AND CONSEQUENTIAL DAMAGES ARE HEREBY EXCLUDED. There is no warranty with respect to parts subject to wear, including without limitation: motor brushes, container and cutter assembly, clutches, bristle brushes, funnel, stainless steel cup, agitators, carafes, etc. This warranty extends only to the original purchaser and does not cover any condition resulting from abuse, misuse, neglect, unauthorized repair, or use not in conformity with the printed directions. Always use this product in accordance with the printed directions. This warranty gives you specific legal rights and you may also have other legal rights which vary from state to state, or province to province. Some states do not allow limitations on implied warranties or special, incidental or consequential damages, so the foregoing limitations may not apply to you.
If you have a claim under this warranty please contact our TECHNICAL SERVICE DEPARTMENT at 1-866-285-1087 or 910-693-4277. (For faster service please have model, series, and type numbers ready for operator to assist you.) Reasonable proof of date of purchase must be presented; otherwise the effective date of the warranty will be based upon the date of manufacture plus ninety (90) days. You are responsible for paying shipping and handling charges to return the product to us.
Hamilton Beach/Proctor-Silex, Inc.
Commercial Technical Service
261 Yadkin Road
Southern Pines, NC 28387
natural_image
Line drawing of a hand holding a tool with a knob, showing a circular motion around the handle (no text or symbols)Hamilton Beach/Proctor-Silex, Inc. Commercial Technical Service 261 Yadkin Road Southern Pines, NC 28387
natural_image
Line drawing of a hand holding a tool with a curved arrow indicating rotation (no text or symbols)Commercial Technical Service
261 Yadkin Road
Southern Pines, NC 28387
Hamilton Beach®
COMMERCIAL
261 Yadkin Road
Southern Pines, NC 28387