JA4SC - Oven Doyon - Free user manual and instructions
Find the device manual for free JA4SC Doyon in PDF.
Document temporarily unavailable
The manual is currently being transferred to our new server. It will be accessible again in a few hours. Thank you for your patience.
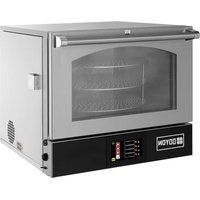
| Product Type | Convection Oven |
| Brand | Doyon |
| Model | JA4SC |
| Category | Oven |
| Convection System | Jet Air (reversible fan) |
| Power Supply | According to nameplate (1PH 240V, 3PH 208V, 1PH 220/380V) |
| Main Functions | Cooking, automatic steam, 12-menu programming (Watlow), cooking and steam timer |
| Thermostat | Digital Omron E5CS with precise display and adjustment |
| Cooking Timer | Electronic H5CL with green (desired time) and red (countdown) display |
| Steam Timer | H3DE, preset injection, manually injectable |
| Automatic Steam Option | Yes (additional timer with interval and duration settings) |
| Safety | Overheat alarm, 5A circuit breaker, door switch |
| Recommended Maintenance | Dirt Buster III cleaner, silicone oven protector, Brasso glass cleaner, stainless steel cleaner |
| Spare Parts Available | Doors, hinges, magnets, casters, timers, thermostats, buzzers, etc. (see section B) |
| Warranty | 1 year parts and labor, FOB Linière (Canada) |
| Installation | Rear/side clearance 1 inch, top 12 inches, floor 4 inches |
| Included Accessories | Grids (quantity not specified) |
Frequently Asked Questions - JA4SC Doyon
User questions about JA4SC Doyon
0 question about this device. Answer the ones you know or ask your own.
Ask a new question about this device
Download the instructions for your Oven in PDF format for free! Find your manual JA4SC - Doyon and take your electronic device back in hand. On this page are published all the documents necessary for the use of your device. JA4SC by Doyon.