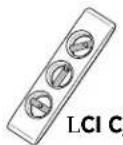
EGLT3 - Wall mount Echogear - Free user manual and instructions
Find the device manual for free EGLT3 Echogear in PDF.
User questions about EGLT3 Echogear
0 question about this device. Answer the ones you know or ask your own.
Ask a new question about this device
Download the instructions for your Wall mount in PDF format for free! Find your manual EGLT3 - Echogear and take your electronic device back in hand. On this page are published all the documents necessary for the use of your device. EGLT3 by Echogear.
USER MANUAL EGLT3 Echogear
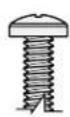
Tilting! TV!Wall!Mount K1' - HLEGLTN
! PO+NP#M! LKJ! + JI
natural_image
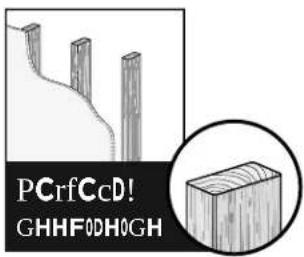
Technical line drawing of a mechanical support frame with two vertical supports and hanging weights (no text or symbols)MLKIHGLFLEDCBHA:6D876FC432
MLKILG .CFC6EGDC7L644GNL' L.A
(1IEO/L.GMLKIG-L6ILFG4,G-)LFE(GILKIGB
F' ELIL(EIGHD6DC76FC646
CM4"
дшяяовынжоям:нямь.130
中文文字说明请参见第!4页
日本語は!, ページ
IMPORTANT ISAFETY INSTRUCTIONS READ ENTIRE MANUAL PRIOR TO USE SAVE These INSTRUCTIONS
Yea!the!boring!stuffTHH but zyut str po nou t ol kt jui h tgsl f p ued
MH-, n-L/,-, ' LtA/1 O( AltA- n- LBnnt/Oct31 nnLc1 e ) H- t- HELt1 Lb- LnO/- LE1 Ow/- Lc1 e F1 /t, bH- LC BtALTABnL- , nELBnnt, HL) /1 c- nn.L J Hn1 LcA- cpLE1 O/LPDL1 Cn-/mnLe , nO, HLt1 Ln- - LBFLtA-/- L, /- L, nELn) - cB, HL/- POB/- e - ntnLF1 /Le 1 OntBn( LE1 O/LPD.
FLE1 OL' 1 Ln1 tLOn' - /nt, n' LtA- n- L3nnt/OctB1 nnL1 /LA, - L' 1 ObtnL, b1 OtLtA- Ln, F- tEL1 FLtA- L3nnt, H, tB1 n,L, nn-e bHEL
1 /LOn-L1 FLtABnL) /1' Oct,LL c1 nt, ctLPA-LTcA1 (-, /LM/1 nLLxn--Lb, cpL), (-a.
A0QPONML KJ0PI HGF0EHDCBDGA/0ECr-HBA/0GBjurGC-0ABF0ErHECrDy0FAmA! C!0
▶ L PABnL) /1 ' OctLBnL' - n3( n- ' LF1 /LOn- LBnLC1 1 ' LntO', Ln1 HB' Lcl nc/- t-, L, n' Lcl nc/- t- Lbf1 cpLC, HHnLffLL o ML! MPLBnnt, HHLbnt1 L' /EC, HL, H1 n-
▶ L PA-LC, HLe OntLb-Lc, ), bH-L1 FLnO)) 1 /t3n( Lc - Lt8e - nLtA-LC - B( Atl1 FltA-LPDL, n' Le 1 OntLc1 e b3n-
▶ L o1 Ln1 tLOn-LtA3nL) /1' OctLF1 /L, nEL) 0/) 1 n- Ln1 tL-x) HbcBtHELn) - c8c-' LbELe, nOF, ctO/-/
▶ L K, nOF, ctO/- /LbnLn1 tL/- n) 1 nn3bH-LF1 /L', e, (-L1 /Lbnj0/ELc, On-' LbEL3nc1 //- ctL, nn-e bHEL1 /LOn-
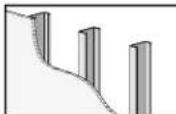
WeightRestrictions
text_image
3210/.-, )(3,'0#!21 0/LPDL×BnCHO' Bn(L, cc- nn1 /B- naL NJ ! ! MPLTHNTTOL321 0/. -,00 )(3,' 0#! LF1 /LtABnLe 1 Ont. fedcbaYWbWUTWSbY: dcVbTVo...b : cvb, ddddWjYvO, dbTV.(
FLE1 0/LPDLC - B( AnLe 1 /- ,LtABnLe 1 OntLcnL! MPLc1 e ), t3bH-.LL DBnBtL-cA1 (- ,/.c1 e Lt1 Lcn' L, Lc1 e ), t3bH-Le 1Ont.
00000 QPONML KJO oML MPL-xc--' L tA-Le , xBe Oe LC-3 (AtLEn' Bc, t-' .LPA@nL e 1 OntBn (LnEnt-e LEnLBnt-n' -' LF1 /C On-L1 nHELC BrAlTa-A-Le , xBe Oe LC-3 (Atnl Bn' Bc, t-' .L+n-LC BrAL) /1 ' OctnL A-, 3-/LtA, nLtA-Le , xBe Oe LC-3 (Atnl Bn' Bc, t-' Le , EL/- nOhtLEnLc1 H), ) n-L 1 FtA-Le 1 OntL, n' LEnL, cc-nm1/B- n,L c, OnBn(L) 1 nnBbH-LinjO/E.
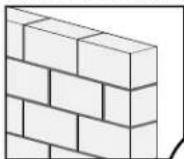
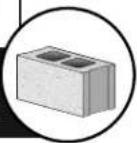
Verify|Your|Wall|Construction
QPONML KJo
DL 0KL N00 GB-DA//0GBDH0 FrywA//0A/HBC
...bcW"!!!b dcbP NLI bVdb GYVaUb dcFoI EbDY"bYW, b aFY! UbdWVdVU"bCddf.
wHHFL-DuF-?
SH/GF0QHBcrCDC/0 QHBcrCDC0B/Hc#?
PCrfCcD!
GHHF0DH0GH
SDCC/0SDuF?
- ILLAG-11'GK6IG
REQUIRE2G
(FHIG6FOA1'L')

M' - /LtA-L t--L
tO' LK3t:LL
e 1' - -LT. HW .L
1 + L1 nBn-L, tL
tNHM. TJO.cl e LL
1/LJe, zln.

OOHHH?!?
OB-urC?
FHR0quC-DGHB-,0cHBDAcD0DhC00 EchH! CAr0ErH-J00www,CchH! CAr,cHm
Grab|Your|Tools
MCA-urC
PCBcG/
NAEC
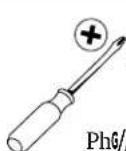
PhG//GE-
ScrCwFrGl Cr

[Non-Text]
SHc#CD
WrCBch
00WHHF0SDuF0MB-DA//ADGHB
SDuF0
FGBFCr
QHBcrCDCOMB-DA//ADGHB

OSDCC/OSDuF0MB-DA//ADGHB
SDuF0
FGBFCr
1/406F.
(1!Gmm)
H. GEILLA
IFOA1' L' Iw6I/:
I/LGECHW--8(6)
2.6AAGB61
One|More|ThingTHHH
EchogearSatisfactionGuarantee
W-w/-L'/B -nLt1 L(B -Lo#2-/nL, nL, C-n1e-LBnnt, HHL-x) -/B-nc-.LW-Lnt, n' L b-ABn' L- -/EtABn(LC-Le , p-Lb-c, On-LE1 OL' -n- / -LtA-Lb-ntL-nt-/t, Bne -ntL -x) -/B- nc-LC BtA1 OtLn, c/BccBn(LN0, HBtEL, n' Ln) -n' Bn( LE1 O/LCA1 H-L), EcA-cp.L
. O-nnLCA, t?LW-wHLA-H) LE1 0LtA/1 0( ALtA-L- ntB/- L) /1 c-nn,Lt1 1 .L
WAE?LB-c, On-LC-LHBp-Lt1 LA-H) L, n' LBtmnL1 O/L), nnB1 nLt1 L)/1 B'-L, OtA-ntBcL
n-/ Bc-.LW-LC1 nvtLH-, -LE1 OLA, n(Bn( ,Ln1 Le , tt-/LCA, t.
M0/L+. .Lb, n-’ LTCA1 (-, /LM/1 nL, nnC -/LtA-L) A1 n-LBnL, HHL’, EnL-n’ Bn(LBnL2.L PA, tLe -, nnL, , BH, bBHtELt1 Lt/EL, n’ LntOe ) L1 0/L-x) -/tLnt, □L7L’, EnL, LC--p.
N, HHLOπLBFLE1 0...
a H, -L, nELNO-ntB1 nnLb-F1/-,L' O/Bn( ,L1 /L, Ft-/LBnnt, HH.
Zu! --' L' B0-/- ntLA, /' C, /- Lt1 LctLE1 0/LPDLe 1' - H.
X _LL J0ntLn--' Ln1 e -1 n- Lt1 LcA, tLC BtA.LW- w/- LA- /- LF1 /LE1 0.
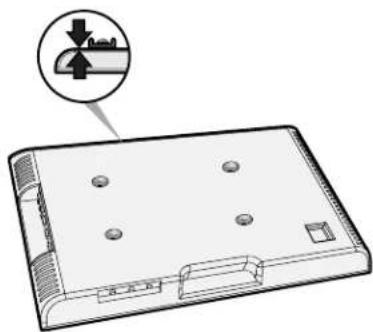
What'slintheIboxTHHHTWhatAslintheIbooooxx
▲0WPRKMKGJOoM! 'PLFTTOLPMLNH#I oOT! L — PABnL)/1' OctLc1 nt, 3nnLne, HHLBt-e nLtA, tlc1 OH' Lb-L, LcA1 p3n(L A, z, /' LBFLnC, HH1 C-'.LB-F1/-Lnt, /t3n(L, nn-e bHE,L -/3FEL, HHL), /tnL, /- L3nclO' -' L, n' LOn', e, (-' .L#FL, nEL), /tnL, /- L e Bnn3n(L1/L', e, (-',L' 1 Ln1 tL/- tO/nLtA-L', e, (-' LBt-e Lt1 LE1 O/L' -, H- /;Lc1 nt, ctLNOntl e -/L -/ Bc- .LL ! -/ -/LOn-L', e, (-' L), /tn!

KL NEJO! 1 tL, HHLA, /' C, /- LBncHO' - ' LBnLtABnLpBtLCBHHLb-LOn-' .
STUFFIFORISTEPI
text_image
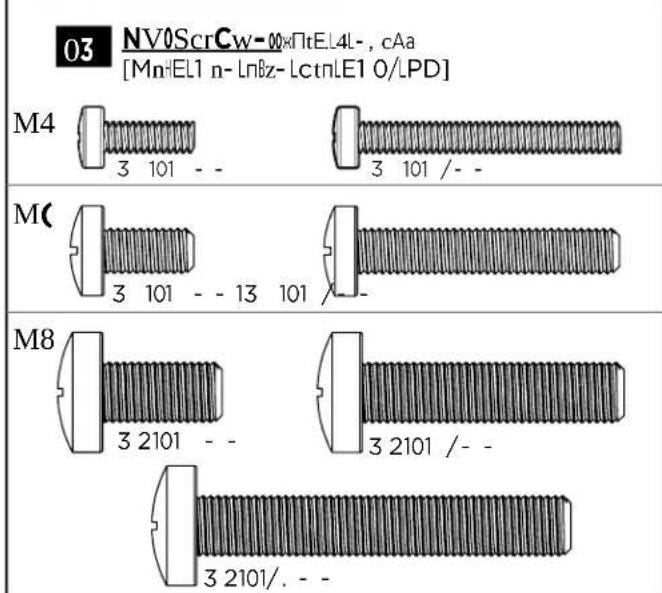
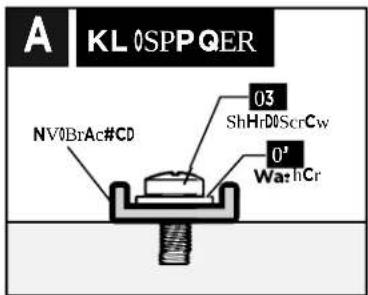
03 NV0ScrCw=00xΠtEL4L-, cAa [Mn:EL1 n- LnBz- LctnLE1 0/LPD] M4 3 101 - - 3 101 /- M( 3 101 - - 13 101 M8 3 2101 - - 3 2101 /- 3 2101/ - -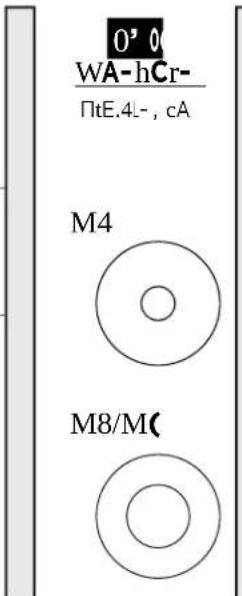
text_image
0° 0 WA-hCr- ΠtE.4L-, cA M4 M8/M( )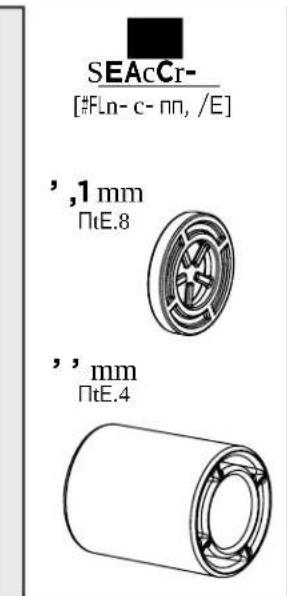
text_image
SEACr- [#Ln-c-nn, /E] ',1 mm ΠtE.8 '',mm ΠtE.4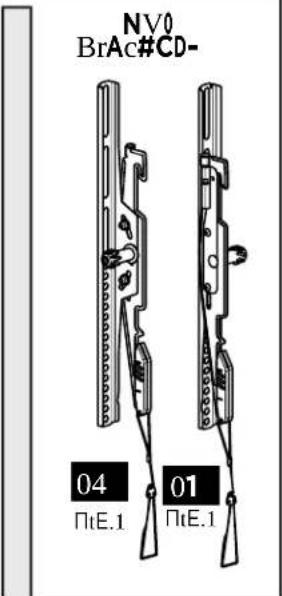
text_image
NV0 BrAc#CD- 04 PtE.1 01 PtE.1STUFFIFORISTEPIM
text_image
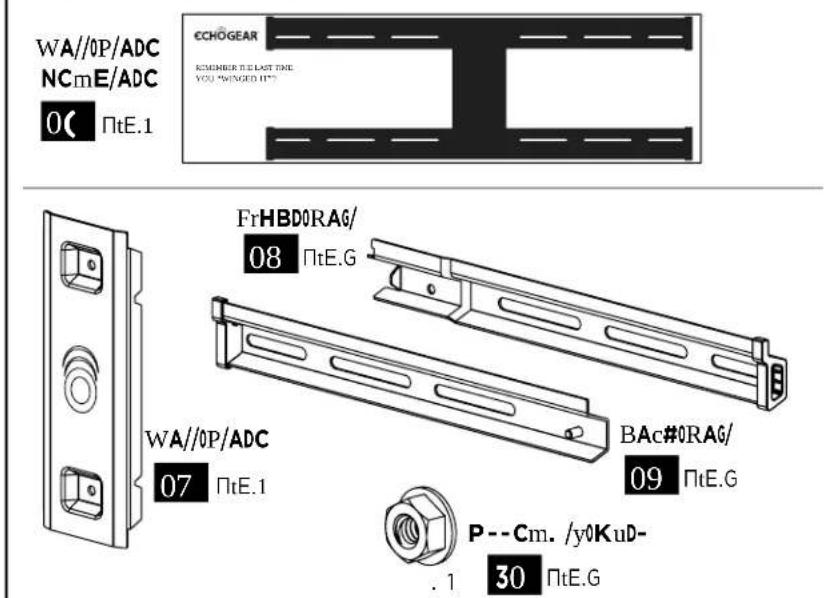
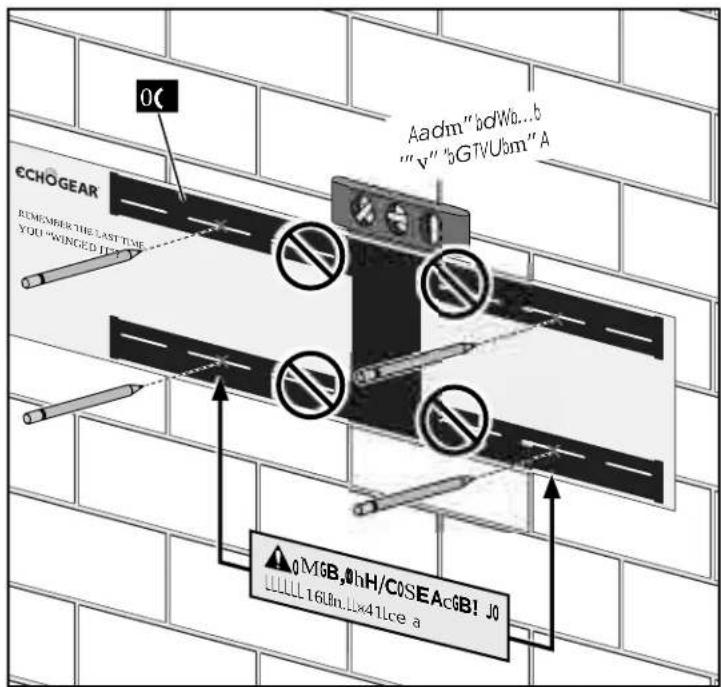
WA//OP/ADC NCmE/ADC 0( PtE.1 CCHOGEAR REMEMBER THE LAST ONE YOU "WINGED IT" FrHBDORAG/ 08 PtE.G WA//OP/ADC 07 PtE.1 BAc#0RAG/ 09 PtE.G P--Cm. /y0KuD- 30 PtE.G . 1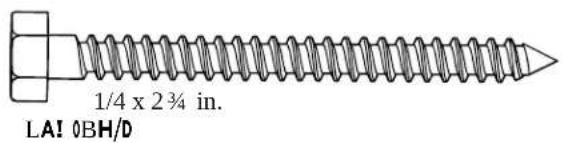
text_image
1/4 x 2¾ in. LA! 0BH/D33 ΠtE.4
text_image
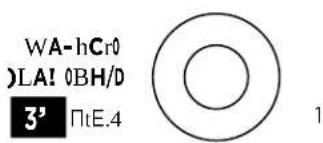
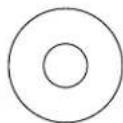
WA-hCr0 )LA! 0BH/D 3' ΠtE.4QHBcrCDC0
PBchHr
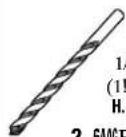
32 ΠtE.4
Fpl gaTSB4 2 / - BxBs - r Bongai S
PARTS FOR STEPMC2C
DDINOT INCLUDED
Order the Steel Stud Anchor Kit: Model EGHWSS. Sold online at ECHOGEAR.com or Amazon.
text_image
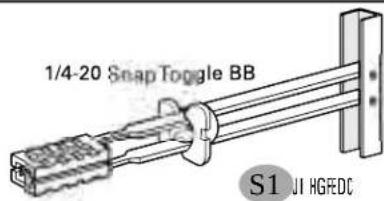
1/4-20 Snap Toggle BB S1 UJ HGREDC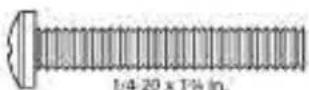
S2 JI HGFEDC
S3 JI HGFEDC
IFOA1' L' bw6I/6
I/LIEGHW--0|6I
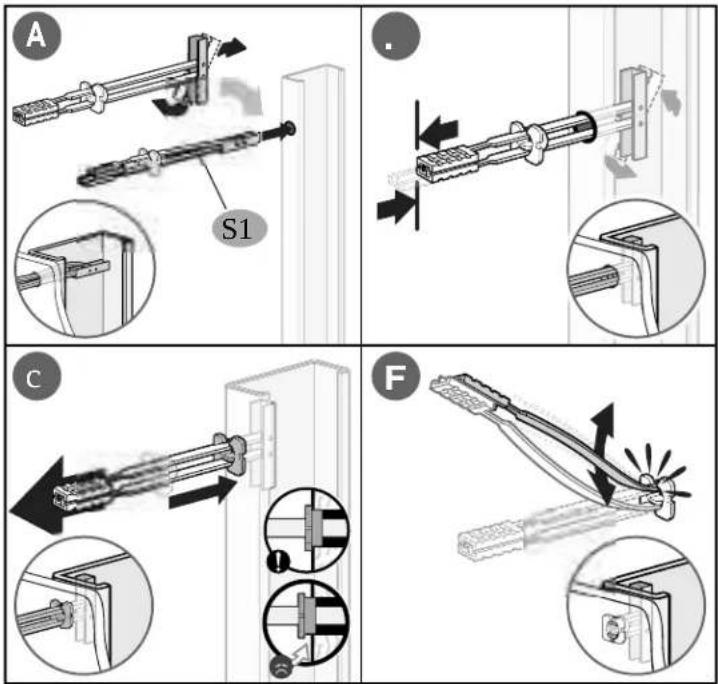
STEPILIA tachtheTVBRACKETSTOYOURTV
LHL
SC/CcDONV0ScrCw-
03
MnHEL1 n-Lnc/-CLnBz-LctnLE1 0/LPD.
O
O
C
AScgg"!V", bc!"!bDdFbVU"b"xVFYb!aF"G!:b
: dYF, bgYm"bpT"a"! ,bW, c! "f" "G" "F", b! G" "VoadFWoUd", "F", bmc! TaY'b
TW! VFcm"WV! b-b'S "bH" "a" "b" "d" "e" "f" "g" "h" "i" "j" "k" "l" "m" "n" "o" "p" "q" "r" "s" "t" "u" "v" "w" "x" "y" "z" "d" "e" "f" "g" "h" "i" "j" "k" "l" "m" "n" "o" "p" "q" "r" "s" "t" "u" "v" "w" "x" "y" "z" "d" "e" "f" "g" "h" "i" "j" "k" "l" "m” "n" "o" "p" "q" "r" "s" "t" "u" "v" "w" "x" "y" "z" "d" "e" "f" "g" "h" "i" "j" "k" "l" "m" "n" "o" "p" "q" "r" "s" "t" "u" "v" "w" x
'mdW! ddWb! Vias! "VadcWvFF" Wa b(Wdvbmd! VoadcWvFI" !)b...A
natural_image
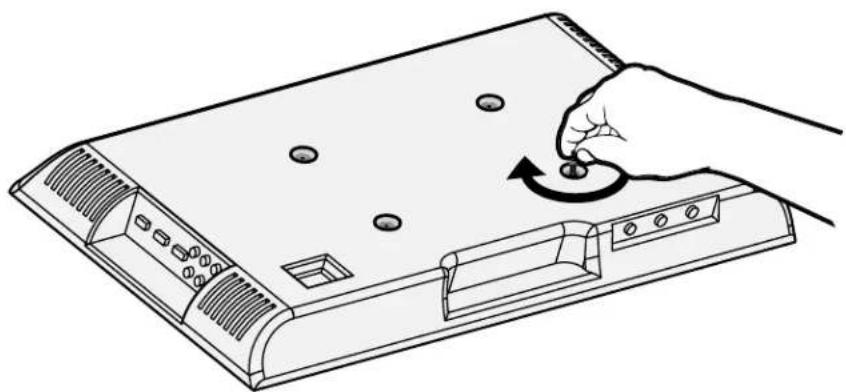
Line drawing of a hand pressing down on a device with a circular arrow indicating rotation (no text or symbols)LHM
SC/CcDOSEACr-000g)Gf0BCCFCF
text_image
A | KL 0SPPQER NV0BrAc#CD 03 ShHrD0ScrCw 0' WathCrFHR0F/ADONV
), c-/ln1 t.n-c-nn, /E
natural_image
Diagram of a device casing with four holes and a magnified inset showing a mechanical component (no text or symbols)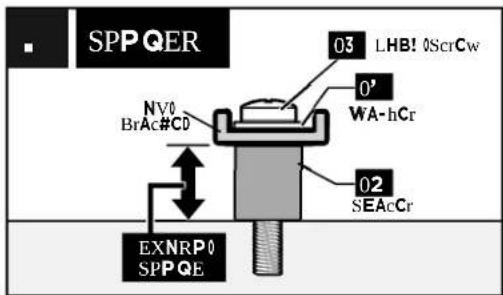
text_image
SPPQER NV0 BrAc#CD EXNR0 SPPQE 03 LHB! 0ScrCw 0' WA-hCr 02 SEAcr SPPQEFHR0F/AD0NV0wGDhJ0FH0RHuBFCF0NV
text_image
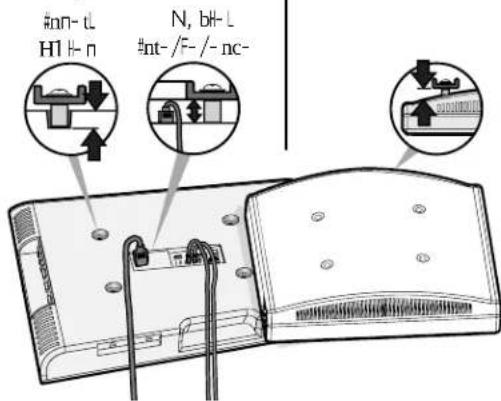
#n- t H1 H- n N, bH- L #nt-/F-/- nc-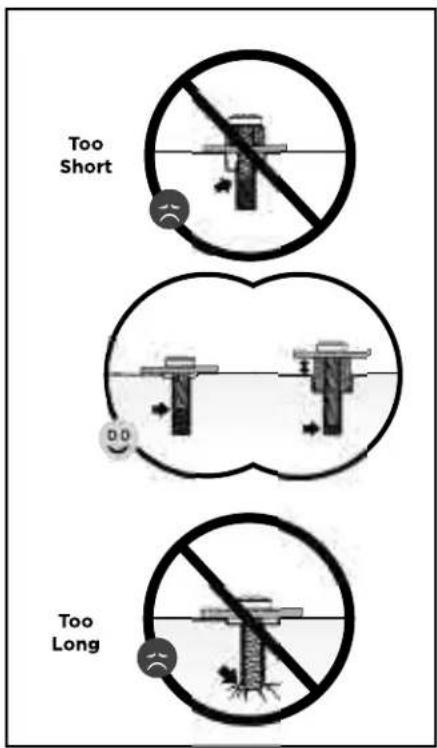
text_image
Too Short Too LongLHN
SCcurC0DhC0NV0BrAc#CD-0DH0YHur0NV

STEP\M\Install\the\Wall\Plate
MHL
P--Cm. /C0WA//E/ADC

QPONML KJ
oML! MPL1 -/tB( At-n.L P3( At-nL1 nHELL OntHLnnO(.
AU!"b dcFoil SIDEo VTgUV"WTWgbUYW,!!A
text_image
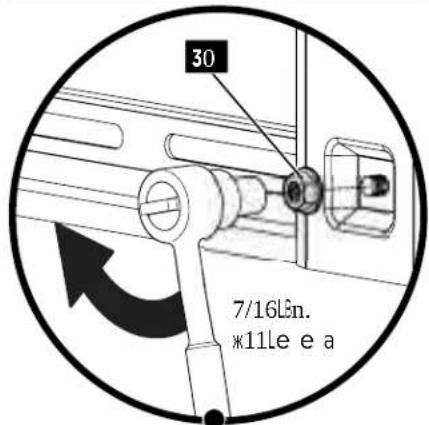
30 7/16Lên. ×11Le e a2X
text_image
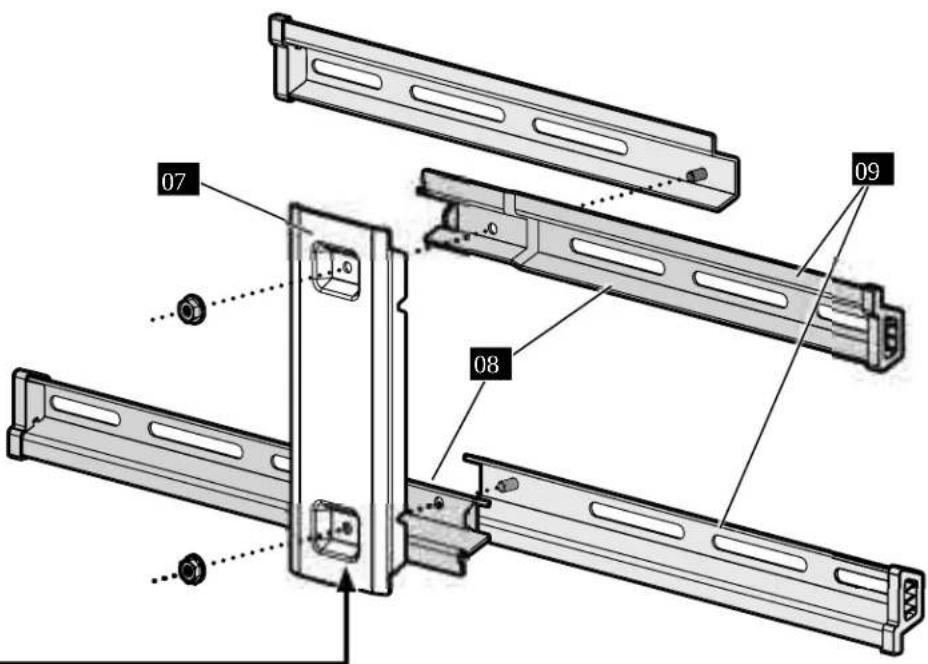
Technical diagram of a mechanical assembly with labeled parts 07, 08, and 09
FHr0WUUT\$R?3TS 21 R?- , , - ?2U1 R
fH//Hw0SNEP0', '0P0 HB0PP GE03'
flowchart
graph TD
    A["MB,ISU,FIDCE0J"] --> B["MB,ISU,FIDFBJ"]
    B --> C["MB,ISU,FIS,EA,BI.X"]
    C --> D["16in..x41ce.e.a"]
    D --> E["MAX,05,BI.x16le.e.c"]
    style A fill:#f9f,stroke:#333
    style B fill:#f9f,stroke:#333
    style C fill:#f9f,stroke:#333
    style D fill:#f9f,stroke:#333
    style E fill:#f9f,stroke:#333
▲0QPONHL KJLP1H3F0EHDCBDMA/0ECr-HBA/0%Bjur6C-0 ABF0ErHECrDy0FAmA1 C100
• Lo/EC, Hcl - /8n( ltA-LC, H.e Ontin1 t-xc--' L 5/8Lln.Lx16.c e a..
• L Krie Oe LA1 /Bz1 nt, t.n), c-Lb-tC--n.F, nt-n-/n:LL 168n.L×4llce a..
• L Kine 0e LC11' Lm0' Lniz-1 nl e in, HG_xL4Bn.Lx51Lx.10G.e e all , ctO, HL1½xL3½Bn.Lx38Lx.89.e o a.

FHr0 U1 PO?OS 21 R?- , , - ?2U1 R
fH//Hw0SNEP0', '0B0 HB0PP GE034
text_image
MI toLWJ III BI MNKLWJ III M6B,0 8LnLvGolce a M6B,0 8LnLvGolce a M6B,0 16LnLv41.0e la M6B,0 8LnLvGolce a X06B,01A-DCBC,0 SEA:16B 13 16LnLv41.0e laAQPONML KJOPIHGEHDCBDGA/0ECr-HBA/05Bjur6C-0ABFCErHECrDyOFAmA! C1L
• L K1 Ond(C, +L) H, t-L 3/- cHE.1 ntI α-A-lcI nc/-t-LnO/F, c-I kanLnO/F, c-lcl - /ta( a.L.
• L K time 0e LA1 /8z1 nt, n,n), c-lb-tC--n.F, nt-n-/n:L 16Lm.Ls41lce a.l

FHr0R?OO, SR?3TS 21 R?- , - ?2U1 R
fH//Hw0SNEP0', '0Q0 HB0PP GE03(
flowchart
graph TD
    A["MIB,XQ/CA/AB/CX\nH3In1x48re la"] --> B["Node"]
    C["MIB,XsDuFIDCEDU\nn 0 in, H3In1x10Gc o a"] --> D["Node"]
    E["MIB,XsDuFIVIFDI\nn 0 in, H3In1x51le o c"] --> F["Node"]
    G["MIB,XsBuFI\nSEACB1.0\n16In1x41re la"] --> H["Node"]
    I["MIB,I1/Gln1x13le o c"] --> J["Node"]
AQPONIL KJ.P1H5F0EHDCBD6A/0ECr-HBA/0GBjurGC-0ABF0 ErHECrDy0FAmA1 C10
• L 10° rLe CnIIb- , LL-, nLGx43nLIG5C( , L
• L FLb, cPLnE' -L F.C, HUhLOmFmInA-' ,L' /EC, He OnLb-L
lmt, H-' LtI L, Le lnte Oe Lt FL1 n- ntO' L+FL, n' L/B (Att) FLtA-L
ntO' xnaLb-fln( LOn-' Lt I bmt, HtA-Le 1 Ont.
• L o/EC, HLe OnLb-L, Le Brie Oe L1 F.L/LBnLw13Le e a.uAepl1 nL-, cALnF' -L1 FLA- nI0' nL, n' L, Le Brie Oe Lclf-, /, nc-L1 FL1L%LbLnL x48Le e a.b-Ain' LtA-LC, HBrn/- PCl*/-.
• tO' L(E) - L, n' Lm/OctO/, Rnt/-n(tALe OmtLcl nFI /e Lt l,
tA-L! t/ALJ e-/ic, nl ) - cFAc, eT nFI /tIA-Lo-n( nI1 RN1IF F
FI /e - ' L t--R t/OctO/, HK-e b-/n.I[36GI LIGS.18, NIf A,) - J.
fL tO' L - cBT n],
• L o/EC, #Le OnLb-In-cO/- ' Ltl LntO' nLC3tALnc/- Cnl1GLlnL x304,8Le e a1 n.c-m-/.
• L Kine Oe LA1/6z1 nt, H.n), c-lb-tC--n.F, rt-n-/n:L 16Lln.Lx41Lce a.L
'EPIMA
TBForWoodStudC
Install|the|Wall|Plate
MHMTA
FGBF0A0SDuF
MINTA
P/G! B0DhC0NCmE/ADC
text_image
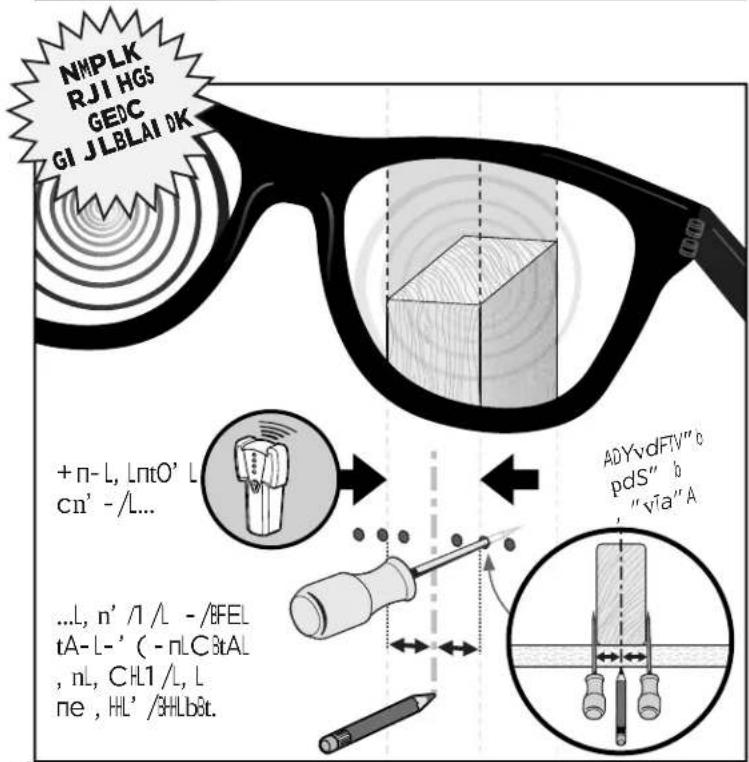
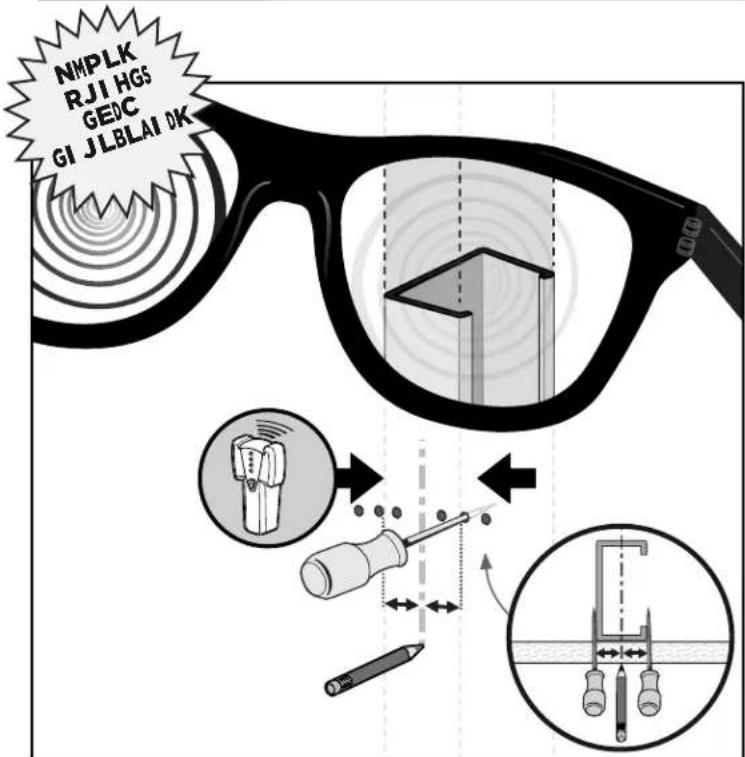
NIMPLK RJI HGS GEDC GI J LBLAI OK +n-L, LntO' L cn' - /L... ...L, n' /l /L - /BFEL tA-L-' (-nLC3tAL , nL, CH1 /L, L ne , HL' /3HLb8t. ADYvdFTV" o pdS" b " vTa" A
text_image
ACdm" bdW5...0 "v" "bGTVUam"A CHÖGEAR MEMBER THE LAST TIME DU"WINGED TPO 0€MHOTA
DrG//0HH/C-
MHPTA
SCcurC0WA//0P/ADC
text_image
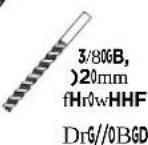
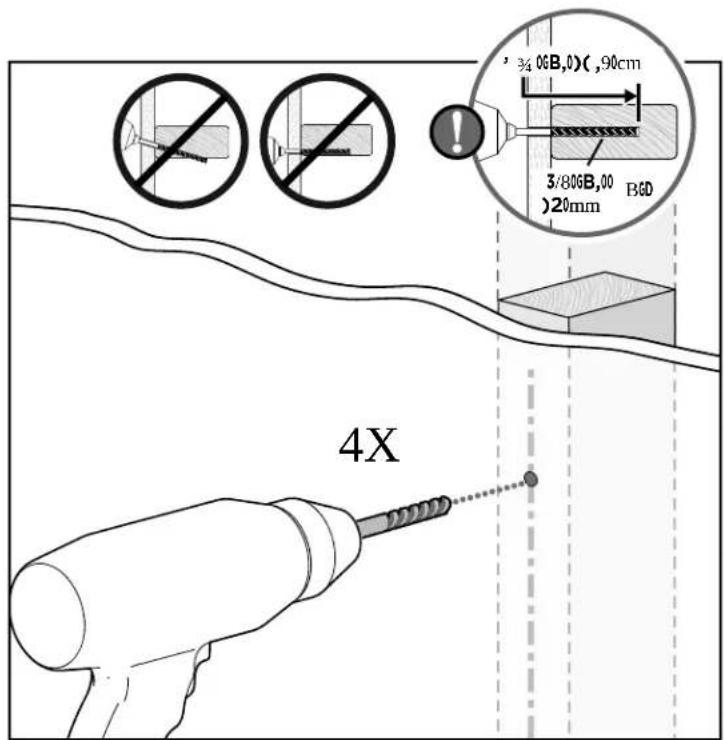
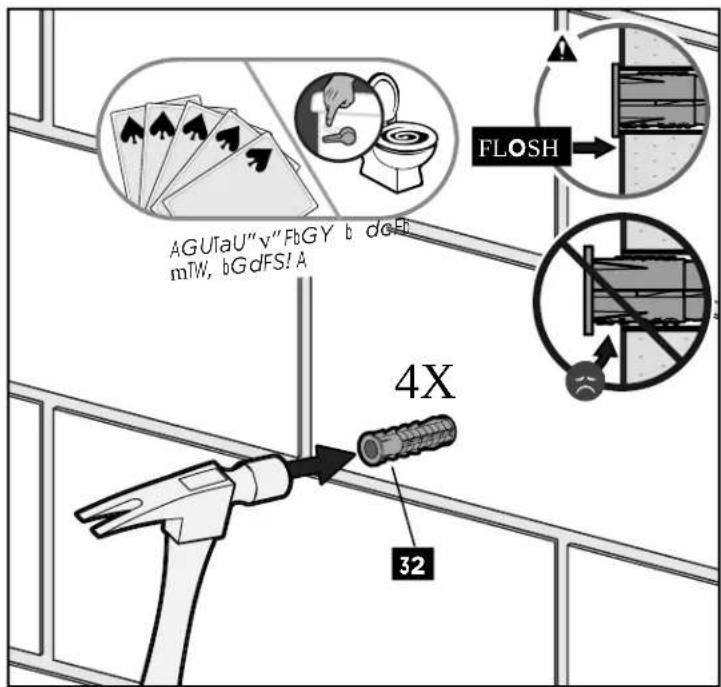
3/4 0GB,0)(,90cm 3/80GB,00 BGD )20mm 4X
text_image
7,8,9,30 33 32 QPONML KJLJ 1 B' L) 1 t- ntB, HL) - /n1 n, HL3njO/EL1 /L )/1) - /tEL', e, (- !LJ HHLF1 O/LH, ( Lnc/- Cn L 33 LK + PLBTL F3/e HEL6( At- n- ' Lt1 L) /- - ntLOnC, nt- ' L e 1 - e - ntL1 FLtA- LC, HHL) H, t-L, nn- e bHE. QHB06BtuC00 SNEP0200 HB0PP GE038STEPMB
TBForICONCRETEC
Install|the|Wall|Plate
MHMTBIMHN
P/G! B0DhC0NCmE/ADC0DrG//0HH/C-
text_image
ECHOGEAR REMEMBER THE LAST TIME YOU "WINGED IT?" 0C Aadm"bdWo...b "v" "bGTVUbm"A 0MGB,0hH/C0SEAcGB!Jo LLLL16Uln.Lx41Ice a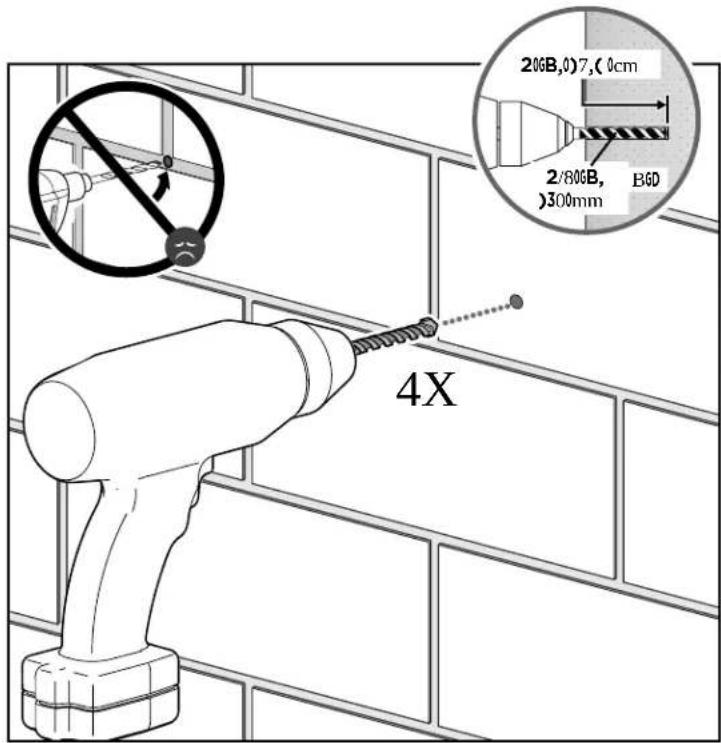
text_image
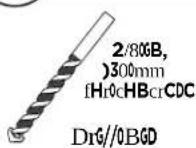
20GB,0)7,(0cm) 2/80GB, )300mm BGD 4XMHOTBTMHF H3-CrDOQHBcrCDCOPBchHr-0SCcurCOWA//OP/ADC
text_image
AGUTaU" v" FbGY b dGfB mTW, bGdFS! A FLOSH 4X 32
text_image
7,8,9,30 3' 33 QPONML KJLJ 1 B' L) 1 t- ntB, HL) - /n1 n, HLEnj0/EL1 /L )/1) - /tEL', e, (- !LJ HHLF1 O/LH, ( Lnc/- Cnl 33 LK + PLBTL F3/e HELB( At- n- ' Lt1 L) /- - ntLOnC, nt-' L e 1 - e - ntL1 FLtA- LC, HHL) H, t-L, nn-e bHE. QHB06BuC00 SNEP0200 HB0PP GE038STEPIMC
TBFor|STEEL|StudC
Install|the|Wall|Plate
MHMTC
FGBF0A0SDuF
MHNIC
P/G! B0NCmE/ADC0/0DrG//0HH/C-
text_image
NMPLK RJI HGS GEDC GI J LBLAI OK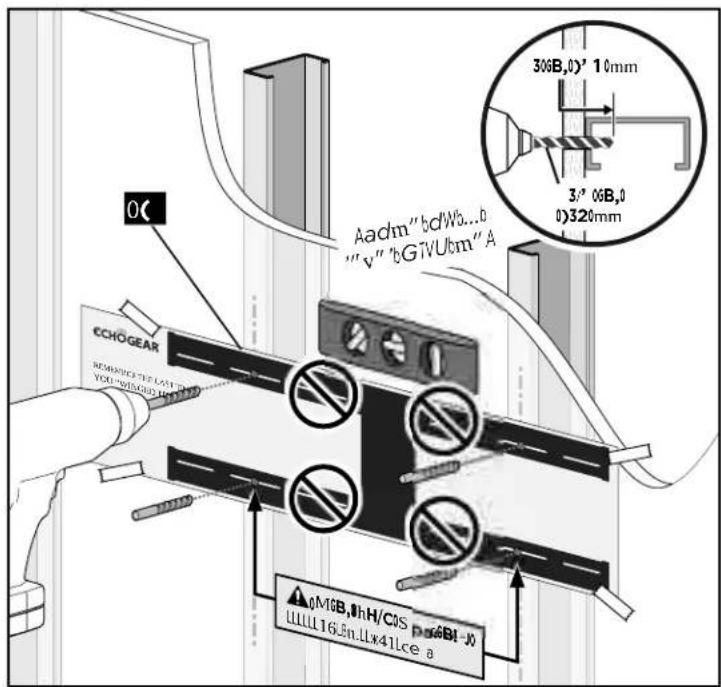
text_image
0C Aadm"bdWb...0 "v" "bGTVUcm"A 306B,0" 10mm 3/° 06B,0 0)320mm CCHOGEAR REMARKS FOR LAST ORDERING YOU-WHSCHE HLD M16B,0hH/COS Pd68I-J0 LLLLL16.5m.Lk41Lce aMHOTCTMHPTC MB-DA//OPBchHr-0SCcurCOWA//OP/ADC
text_image
S1 S3 S2 7,8,9,10AQPONML KJLJ 1 B' L) 1 t- ntB, HL) - /n1 n, HLBnj0/EL1/L) /1) - /tEL', e, (- !LJ HHLF1 O/LH, ( Lnc/- CnE S2 LK+ PLBTL F3/e HELt( At-n-' Lt1 L) /- - ntLOnC, nt-' Le 1 -e -ntL1 FL tA-LC, HHL) H, t-L, nn-e bHE.
STEP|N|Hang|Your|TV
HEP VY!0YHu0mAy0BCCF0
A--G-DABcC0wGDh0DhG-0-DCE,
AN! SbVUYVbDFT" W, bdDb dcF! bVUYVb
Ymm"F!bd/WbY:devocd.a.
text_image
AN! SbVUYVbDFT" W, bdDb dcF! bVUYVb Ymm" F! bdWbY: dcVbCFd!! EFTAADJUSTMENTS
flowchart
graph TD
A["Top Component"] --> B["Bottom Component"]
style A fill:#f9f,stroke:#333
style B fill:#bbf,stroke:#333
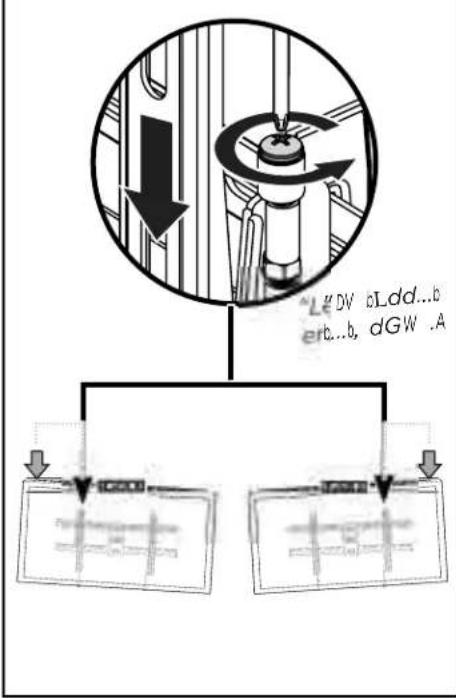
note1["L"DV, cLdd...b\nerb...b, dGW..A"] --> A
TiltLEVEL
/ A7?E. - E6, A70: E): 876HE4) 6(0GE', 43E 5 A14: "EH, 43E6H) GE(3E 0) c4FEIfEGA7?E. - E(6E HAAEOAA64EA?EHAAEH(g, H"E): 876HE6(: 4EH436(A3E k3AbcT F
GNOME:EO3c4EGA7?E. - E(6E(3E 0) c4"E H(g, H43EH, 4E6(: 4EH436(A3Ek3AbcT EHAE ?4143HE73') 3H4: E5 A145rent.
text_image
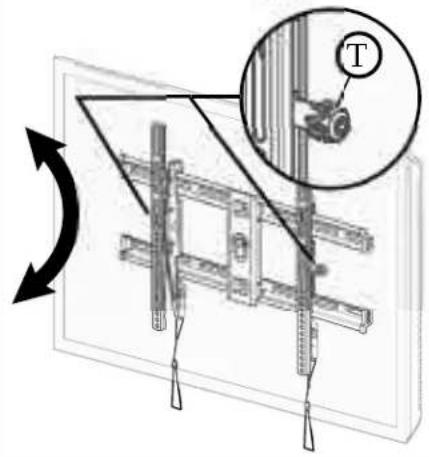
Technical diagram showing a mechanical assembly with labeled component T and directional arrow indicating rotation or motion.
REMOVE

HEP VY!0YHu0mAy0 BCCF0A--G-DABcC0wGDh0 DhG-0-DCE, ADdWVb: "b YbU"Fd1A
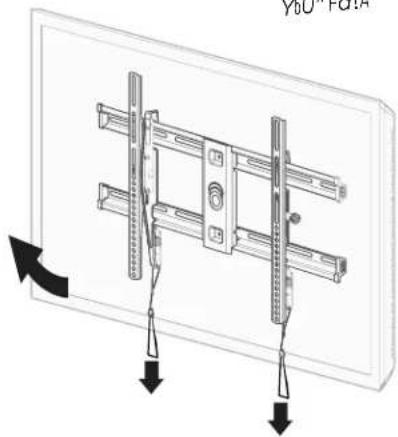
natural_image
Diagram of a wall-mounted device with two vertical supports and hanging weights, showing directional arrows (no text or symbols)103) чн(у
INSTRUCCIONES DE SEGURIDAD IMPORTANTES LE A TODOJELIMANUALIANTES DE UTILIZARIELI PRODUCTO GUARDE ESTAS INSTRUCCIONES
I-, I, I-mi, e -mt-L-mi, n,m/mn/Occll n-n), // , m-(O/, /m-L'-LNO-L-muF, e Hb /a, '1 Lcl nL-Hr-nCml L)/1 c-mi L'-Lcmn, h, clonL. Nl mOrt-LK O, o-e -mt-L-he, n,O, H'-lnQPD(L), /Lcl nI c-lRb-xhnt-n/-PloMnl n-l)-c-, l-nL, /, L-he 1 mt, j-l'-LnOL, ), /l. Rnl L-me-n'-H, n,m/mn/Occll n-l/rl rAb-n'-O', nl, c-c/, L'-Hn- (O/S', 'L'-Lb, Umm, h clonL-He 1 mt, j-l'-LLoMl L' -c) /' Octl, l) on(-, n-lncl nt, ctl Lcl nlll n)/1 F-mi L, h-nL'-lrCai (-, /-nL), a(2n, LCCC,-cA1(-, /c i e.
▲PREQP OQMOKJCI 0C0EH-6. /C-0/C-GHBC-0ECr-HBA/C-0v0FAñH-0mAADCrGA/C-,0
▶ L trn-l/1' Octl In-IA, L 'In-n, '1L), /, LOn, /n-l-n-e 1 nt, nt-nl'-le, '-/-, |A1/e B(One, d2|EL), /-* -nt'-Lbl II0-nl'-L A1/e B(On! MJH Llan, -L-nt), /-* -rlunk, e -nt-L'-LE-nl
▶L1,2,/-'L'-b-n-/c),z'-n1)1/t,/A,n,t,cinc1-L-c-nl-H)-nl-cl e bin,'1L'-tPD,E-ln1)1/t-
▶L ! 1.006c-l-m-l)/1'0ct1),/,/ln(unl1v/l)/1)onl1lNO-ln1ln-,l-l-n)-cicc,'1l-x)Hct, e-mt-)1/-UF,b/fx,nt-
▶ L -TUF, h/8c, nt-1n1.n-l/-n) 1 mn, h/8tr, l' -Ln2n(unt', nI L1 U-n6nl/-rOht, nt-l' -Le 1 mt, j-unc1///-cl L1 L-LOnl En'-h8' 1L' -L)/1' Oct
RC-DrGccGHBC-0FCOEC-H000PÁGMKP0° 0
OLPDLx, cc-n1 /31 nLBnc-05' 1 naL MLM+TOTL +MTOJO
(3, 0#! )3210/.
(LnOLPDL) - n, le an, L- nt-Ln1 ) 1 / t-Ln1 L-nlc1 e ), tbl-. LDanr-L cAl (- , /c1 e L), /, L-ncl nt/, /OnLnl 1 / t-Lc1 e ), tbl-.
QL MPROEBEOLP0QL KSNROQQMÓKODEOSOOP PRED00PÁGMKP02
^0 PREQPOQNOK JO
KL 05B-DA/ArCB0EArCFC-0 uBGcAmCBDC0FC0vC-H
[MHBDABDC-LFC]mAFCrAL
mc1 nL), /-'-nlúnic, e -nt-L' ' -LE-nl a?
¿HHmmó óBLE, c3111
PMEZP SAPP RP0EL0PPSL (Q00)KL 0NKQL0DL MPOPO1KN0PPRP0ML KNPKNFSD0DPQERL JML DEL LFGHWSS,APH PIVEKNP0EKTI IKPE EKOEQHL GEPR,GL ML (PMPZL KQLM
PPSL 0300PÁGNKP07
PPSL 03.3 SC/CccGHBC0/H-0DHrBG//H-0EAraA0C/0NV
1 H, e - nt - LOnLt, e , n1 L' - Lt1 /nB+1 Ln-L, ' , ) t, L, LnOLPD.
PPSL 03, ^1 SC/CccGHBC0/H-0C-EAc6AFHrC-0)-60C-0BCcC-Ar6H
PPSL 03.2 FGjC0/H-0-HEHrDC-0FC/0NV
PPSL 0° 000MKSNPLEOLP0PLPQPOMORPL00PÁGMKP030
PPSL 00°,3 MHBDArO/AOE/AcA0FC0EArCF ▲OPREQPOQNÓKJaE! -Ln-/-/-zL), nu/1).

PARA021 R?- , - 2U1 ORSO1 SMU1 ?- 1 ?ORSTOSM- TOP- \$-G! AOC/OPPSL 0° ;' POCB0/AOPÁGNKP03'
Юэ) чñ( 4
ΔOPREQPOQKÓKJ- br-L) 1 nB+H- nL- nI n- nL) - /nI n, + nLE-, nI nLe, r-/3, H- n.LLL+2A6) 34/46: 4G46A8 74c7b7430E) ?4: B3A: 4b4367 4?) 70A61615 5 J5/8? 7lg(9E+.) 5) nA5 i3(5 AC: 40A6; 5 A3) 346E: 45): 4?) t3A5 (3) E51x61025 5 E2f2xDE 7lg(9C) cf7) C38x8995 5 E11+2x3V2 7lg(9E+6) c(A5 I3(5 AC, A1zA3)) D43?40A6445 43A6: 467/4c63::D1k5 E16: 7lgF

PARA021 R?- , - 2U1 OR501 SHUPM2GÓ1 ,S-G! AOC/OPPSL 0' ,' BOCB0/AOPÁGNKP034
▲OPREQPOQNÓKJs- 5t-L)1 n3bk-nLH-n61 n-nL)-/n1 n,H-nLEL',n1 nLe,t-/B,H-nLL
- tMA3-4B: 0) c) 5 77) (c: ?4ch) 5 43-46Ab?43) 167 471(c4E 4E, A75 (go3E3AE43B) 167 471(c4H 74?4c7b?4B) E) ?4: E=EE6) clA5 i3|5 AE, A7(A3H) 143?42A64I45 43-A6E: 467?4c63:E01c5 E1G: 7lgf

PARA021 R?- , - 2U1 ORS01 SMU1 ?- 1 ?ORSTOSLHI BE,\$-G! AOC/OPPSL 0', QOCBO/AOPÁGMKP03(
-12A65 A3II 3H46 E4b436470 E5 43A8E 4E516x1025 5 Fc) 0b14E25b25dI (70gF/25g) RTEB-ELEH AE 4B A3II 3H46DI (46f6-43cI) (46f7-df7?) E (4b43D) 9761 ?64D I (3A7S H11) (3A2H4) 5 4?c) 3 ) 1 ) 74E: (646AE 4cA5 A34314646f77cf7?) (46) : 4B c47AE(A3N): AE437AE(F4-cdc63E2c52L2E18F(A5) I 43BIB 5 A3II 142STHE-E(E) I) AE A8AE(9A7E) E (74: BAE 74643-)73(1) c) b): A7B4E: 4b43) IcI (5) 5 AE6A(H) 43G(B) A3I (3H46D) II e2I (74?) : 86I D) E 474c, I E1 74: 6434 (9A7E) ? (3H6)(9) E5 A3II (75) 5 AE6A(H) E 4b43434733A6 46A7ES I(5 AE 4E135 5 E1/2E 7lgf(3A3C): : I) AE: 4B A6V5 A3R: 3H46E73(I), Alg(7?) E(5 I3(5) IEE: 4D8E5 E 5 E17A/E AE: 4W6E: 4B(I): E4: TEH-2) I5 ) 5 AE-4(?) 6B4: i 4b4(II) %e:A37A(0A6) E30DF85 S 512F 7lgf(E): 4Bc A3P(A) 43A65 A3R: 3H46FE-B6F: ?A: 7cNAE: 4h4f(6I) %(3IP): AE: A3B(A85 A3II) 3H46FE-E6) c) a5 (3I: AE, A7A2III: 643149E36A6F145 43A8E: 4B57f4cIc03:D1e1s.5 E1gF/eg

text_image
TbParalmontantesIdelmaderaC talellaIplacalmurall PAGNKP03' PPSL00', 'P Bu-quC0uB0mHBDABDC PPSL00',2P P/6BCC0/A0E/AB0G//A ▲OPREQPOQNOK& - 1a-1) 1nB+ - nH- nB1 n- nL) - /nl n, H- nll L', n1 nle, t- /A, H- nU 1 nlcO, t/1) - /nl n l0/, Fl n' 1, 53 LotBT! Lt PJOL, )/-t, '1 nlc1 nF/e - z, l), /, L- &t, /le 1 Be B- nll nln1 L' - n-, '1 nl' - R cl njOnt1 L' - U, L), c, le O/, R. VAYA0A/PPS L 20 CB3/AOPÁCNKP038 TbParalHORMIG ÓNC SOMBAlellaIplacalmurall PAGNKP034 PPSL00', 'B P/BCC0/A0E/AB0G//A NA/AFrC0/H-0HrGfGCH- OKMPL RNPKNEJ! Onc, Lu, ,' /-Ln1 b/- Lc-e - ml L-m/- Jl nlb-1 N0-n. PPSL00',4B NB-C:DC/H-0ABc/AjC- ▲OPREQPOQNOK& - 1a-1) 1nB+ - nH- nB1 n- nL) - /nl n, - nll L', n1 nle, t- /A, H- nU 1 nlcO, t/1) - /nl nls/, Fl n' 1L otBT! Lt PJOL, )/-t, '1 nlc1 nF/e - z, l), /, L- &t, /le 1 Be B- nll nln1 L' - n-, '1 nl' - Rcl njOnt1 L' - U, L), c, le O/, R. VAYA0A/PPS L 20 CB3/AOPÁCNKP038 TbParalmontantesIdelaceroC talellaIplacalmurall PAGNKP03( PPSL00', 'Q Bu-quC0uB0mHBDABDC PPSL00',2Q P/6BCC0/A0E/AB0G/A0*NA/AFrC0/H-0HrGfGCH- ▲OPREQPOQNOK& - 1a-1) 1nB+ - nH- nB1 n- nL) - /nl n, H- nll L', n1 nle, t- /A, H- nU 1 nlcO, t/1) - /nl nls/, Fl n' 1L lloBT! Lt PJOL, )/-t, '1 nlc1 nF/e - z, l), /, L- &t, /le 1 Be B- nll nln1 L' - n-, '1 nl' - Rcl njOnt1 L' - u, L), c, le O/, R. PASON CuelgueletTVI PAGNKP038
¡ELEMEKNL 0PESPDL !0PHFriA:BCcC-6DArOAyuFA0EArA0rCA/6zAr0C-DA0HECrAc6B,
AJUSTESI
Nivell

Inclinaci Ó nl

S7:HM18A2 4A10 3700 866a5 1394) 85 A14N58074g25 13M101643657E 40b369760H1; 40D: 4B3663E; 4Bc3C3ch3; K6078A111845453d3; A8664A1 ch3; V1015E; 1Ch3; L1h4e YOWA-65202-443343n3; 4078) 103c3c3ch3; 1H1474941668 E 48. 4E (1434)4652g7667 74.4); N6: 4916E; 4F3663E; 4Bc3C3ch3(1) 5ch; I1741E; 15AM5431623. 4Bc; A867 SH4834c90 A77b70c473) 31, 14a; g2c3; h1; S9: 5h6; 4916C
RETIRE|EL|TV

ЦшчГсчдэ
INSTRUCTIONS/IMPORTANTES DE ÉCURTÉ, LISEZI ATTENTIVEMENTLE MANUEL AVANT D'UTILISERCE PRODUIT CONSERVEZ Ces INSTRUCTIONS
D-OH- zIL/-Lntc( /, +e - nt.c-n.smt/Octl nnl, cn, ' eY/- Lalt, 3n-L, - c.c-L) /1 c-nnOn' Snnt, #l, tfl nLF, ce-, LD-OH- zL D- +e - nt.c1 nNOb/ - U-Le, nO-t' OLF, b/sc, nL'-L 1 y/-ltelke 3n-O/L) 10/n, 1 y/lnEnl nllbunt, #l, tfl nL) /en-nt-l'-nl -xI(- nc-nL), /cO-eY/-n.
E. 1 OnLn-LcI e) /-n-z.), nL1 Ot-nlc-nL3mnt/Oct5 nnL1 OLnB 1 OnL, -zL' -n.' 1 Ot-nLnO/LH, LnecO/Stel' -LfBmnt, H, tfl n., 'OL e1nt (-10L' -LHOr6mn, tfl n' -lc-) /l.' Ot-l -O3h-zlcnt ct- /lb-nM/lnTcAl (- /nO/Lt-nPt-LCCC-cAl (- /cle
PNNEKNML KOJOEI GDCz0/C-0rG-quC-0FC0. /C--urC-0cHrEHrC//C-0Hu0FC0FHmmA! C-0mADED6C/-U!O
▶ L N-L)/1' Oed-ndcl nqOL) 10/LOn- .OtdIn, tE nlN0/L' - rle 1 nt, nml-nlb1 Bn,L' - rle O/n.-nl.bet1 nL) + -bln.-t.-nl.bfl cl' - lbet1 nUfL ! rLBnmt, H+ zLMJ Jn- O-LnO/LOn- c-1 Bn1 nLnècA-.
▶ L I -Le O/L' 1 BtL) 10 13/lnO)) 1/t- /lcBnΠ.FI BnLH-L) 13' nLt1 t, H' Olteéé En-O/L-t.' OLnO)) 1/t.
▶L ! 'Ot-Bn-zL), nLc-L)/1 'ObLàL' x, Ot/- nLcnnL70-Lc-H-nLn) éc: cé-nL), /L-LF, b/Bc, nt.
▶ L1 -LF, b/sc, nLn- mL), nL/- n) 1 nn, bh-L' -nLbh-nmO/-nL1 OL' -nL' 1 e e, (-nLc, OnénL), /LOn-Le, O, Bn-L OrSHEn, tB1 nL1 OLOnLe 1 nt, (-Lbnc1 // -ct.
QHBDrAGBDC-0FC0EHGF-
PPGE0'
D1 t/- Ltélé Bn-O/Lw, cc-nn1 B/- nL
c1e)/BnAl! TLMT+PLMJ LMT TOL Ml + LotL)10/LC-LnO))1/L

BL-1) 1E' nL' -L 1 t/-Lt4e En-0/L-ntLnO) e/B-0/Lc-LnO)) 1/t! ! n-ntLMJ LcI e), t6b-.LO-n' -zff 1OnLnO/L-cA1(-,/.cI e L) 1O/L/1O -/LoLnO)) 1/LcI e), u8b-.
VÉRMFMEZOLP0QL KSNROQNML KODE0VL NRE0MOR
PPGE02
^0 PNNEKNML KOJO
KE0/5B-DA//CzOPPSO-Cu/0-ur0 uBC4c/H6-HB0-èchC
MHBDABD-LCBO. HG-LL *, -clch1 En1 n_nécA-a
PARfAGD!!
BéDHBL) F-BnL1 OLL bH1 cL' - L. éDHBO?
PARfAGD!!
NH13n1 nLnècA-Làle 1 nt, ntnL-nlAc6Cr?
ENP PE03.2 F6xCz0/C-0EADDC-0FC0f6xADGHB
ÉNPPEO' 000MKSNPLLPNML KODEOLPOPLPQOEOMORPLE
PPGE030
ENPPE0',3
P--Cm. /Cr0/A0E/AquC0murA/C
AOPNNEKNML KOJs! 1L, )/-t, /L-xc-nB , e -nt-.

PHur0/C-021 R?- , , - ?2U1 RSR3 P\MU1 ?- 1 ?RSO1 \BU2R,\$- u6I Cz0L'ÉNP PE0', ' P0a0/AOPP GE03'
ЦшчГ счдэ
APNNEKNL KJSE fr-zl-ln/nlO-nl'-lbl-nnO/-nlc1/D/1-ll-nl OL'-L'1 e.e. (nlc, te/lnllll2-t2'e) (6477: 7F41e45 43-E; 4clAla6A36ec, 434t:AIE) 64xcé: 47:16U5 5 E5/8U AE•E.) (04E 5(3|5 75 E 46I A3H) 3|643bAla6h3A5 (3) 14515x110215 5 32x0DE AC?e40438x8995 5 E114x314E AFCE) c4t, A?zA3H) (5 (3|5 75 (43+74846fix)-A36CED15c5 E116E AX

PHur0/C-021 R?- , , - ?2U1 RSR3 PSBÉ?U1 ,S-uGI Cz0/'ÉNPPE0' , B00à0/AOPPGE034
▲OPNNEKNKL KOJSE Bt-zL+nl/3nΠΟ-nL'-LbH-nmO-/nlc1/) 1/-H-ml OI-'L'1 e e, (-nLe, te/3-HnO). +E36B) (04z30) E (0) 1745 7?) 14E (?4c+45 43H67?9) [67?f] c4(43He+AE8) 7c73f?41e+45 43HE: 467?f) c4CHEE-E E6 ) c4E, A?|zA3-) [E5 I3/5 75 I43H?4E[46:fix) H(A36E:ED1Ec5 E/J16E ACF

PHur0/C-021 R?- , , - ?2U1 R\R3 P\MU1 ?- 1 ?R\O1 \- 2OP,\$-uGI CzOL'ÉNPPEO', ' Qoà0/AOPP GE03(
-2465 A3H 316E: A143-15 4677471) 715 A1365 bcl10'2c5 L21b1dDE A4CHE 4c1) Bp74525g) E##2496 4E: 415 A3-) 3'H-8) 3'A#C4I6II7cf77404E: A143E64fcA3fA5 4?3) 7x6 6cf(c) HIA363A2:- 1 5e7c) (346bcA3c43) 3H0) E cA3c4 HIA3: 46ce5 4316E: 4I6II7c774543)c(4?) MetA1A?: 3J62S125E18B-S,) 4'SE4C#A3SI-E57: I##S(E) ?He4E: 75 7?31) 1 16: 4c13HIA3734c(A63A66): 4e: A##F#24I6(H#4)1 715 (315 7567?7315 A3-) 3H0 g7 7c: 44H6E: 7AH4F: 7A7E: 4I65 A3H) 3-6I7-06C6E A7J(36)1047067 A7H8+22 cDA6A38ec: A#-1A/18?7346) (664?75) J35 75 E: 4E: 135 5 11/2: AE: 4Ec: 11 74cc0eF: 4I65 A3-) 3'6I-4H73:E# p45 43I5 (315 75 E: 4E D85 5 E11%E A04G#P4716E: 4I7?62P45.7 HC#E2 cDA6A38ec, 4E: A##H#T4fiX643) 7x5 A3H) 3-6I) 14cE: 46J16EA30D#E5 5 E12E AC: eC) HIE14(P) E##24967 A7E: A##F#24I6/43I7@679946I5 A3-) 3H6-F E6 ) cE, A?zA3-E D 5 (3) 75 74F/40B6fsH) HIA3C#IDc5 EUI16F
ÉTAPEIMAÏN
Pourtrantler: Ibois
| ÉNPPE0", 'P | RCchCrchCz0uB0mHBDABD |
| ÉNPPE0",2P | P/6! BCz0/C0! A. Ar60 |
| ÉNPPE0",4P | PCrcCz0/C-00rHu- |
| ÉNPPE0",1P | F6xCz0/A0E/AquC0murA/C |
PPGE03'
GGE-#ArDHBE/ADDC0mGDOSDAh/Drä! CrB
BCA( LFE10/ L.:3A/ AL:6BH/ .L6FECIz:11imm6(3/8")
BH/.L6FECIz:13mmf(!/*):iHCmmL.
BCA(LFE10/L.A/AL:BBH/.L6FECIz:11imm(1/4")
LMEFEROMFPKG
SENNE01
▲0WPRKOKGJ0b- n-nLM/1' Opt-lntAaLip-ln-LP-bH-, b-Lb-3e LD-/ncA-Ocp-nlzOe LT/nldcpOn(nt1'LFuA-/nlpnnn-nLM/lf-NL-B-L 1/K1 nt, (-b-(5nn,Lt bl, H-LP-B-L 1/A, n'-nLN on 'lon-NcAa' BC tlnn', LF, HmN-Pb-LF-AH-nL-1'/-lb-ncAa' BC tlnn', lb/sin(-n-LB-L', nLM/1'OptlnkAtLzOe LhAn' H-/LzO/ticp, lnI n'-n/LC-n'-n. B-LtrAc, n'-nl KOn'-n'-E-pnt-LD/C-n'-nL
HMKWEMSJOTnLCB/’LnBcAtL’, nL(-n, e t-LB-F-nB( On(ne , t-/3, HLBnL’ B-n-e LKBtL(-b/, OcAt.
NEML.EOFÜROSQHRINN03000000000000SEMNE01
NENLEOFÜROSQHRNNNO° 000000000000SEMNEOC
NEMLFOFÜROSQHRKNNO 0000)KMQHNOMMNGELMEFERN SENOFÜROSNPHLNRAĞEROBESNELLEKJOML DELLOEGHWSSOL KLNKEO ERHÄLNLYQHOPOFEQHL GEPR,QL ML DEROPMPZL K,QL M
SQHRMNN03
SEMNE07
SQHRMNN03.3 Wäh/CB0S6C0SchrAu. CB0für0FCB0FCrB-ChCr0Au-
O/L-En-L cA/, Ob-n(/öß-L), nnnLFü/LfA/-nLF-/nn-A-/.
SQHRMNN03.¹ Wäh/CBOSGC0! ! f,0FGCOP. -DABFhA/DCr
SQHRNNN03.2 FCrB-ChCr-PB-ch/u--E/ADDCB0.CfC-DG!CB
SQHRMNN0' 000ML KNPGEODEROWPKDPLPNNE
SENNE030
SQHRNNNO' .3
MHBD6CrCB0SGC0F6C0WABFE/ADDC
A0VL RSMQHNJkoE!
EcAtlzOLnt, /pL, nzB-A-n.

BC60C6BCr0MU1?-GOS-MSHU,ZR?Ä1 TOPWOPK 0H/! CB0SGC0FCB0PBwC6-uB! CB0GB0SQHRMNN0',P0Au0SEMNE03'
ЫШТАЭМЮ
ΔOVL RSMQHNJSD-/e -l' -nl 3-LD-/+ tzOn(-nLOn' L ,cAncAa'-nLLIEDI4IG 66c,(c,HE 4TEW) 3:E-) ?IE1G15 5E15/8"23(c,Hub476c,74I43T-EM|3:46|5 )64I:47HAl(zb) 0k43:EN433g708451fx102T5 5E2fexID"CH) H6ac,0c,43G?64E38Ex895 5EJ11/5E33/4"DEP(zA3H) 047EM(3:46H) b6H) 3:iz' (6c,43E:43IB4f46lg73g6/4(43:D11c5 E16"CF

BC60CGBCr0MU1 ?- GO5- 1 \$B0?U1 WÄ1 T01 0fH/! CB0S6C0FCBOP BwCG-uB! CB0G80SQHRMNN0', ' B0Auf0SENNE034
▲0VL RSMQHNJSD-/e -B' -nL 3-LD-/+ tzOn(-nLOn'L , cAncAa'-n!
•D|4|W) 3: 1) H4E5 766E (?4kE) 7fE: 4?B4H43Ah4?flac, 4f) 3g4h?) c, F' 4?: 43|k4|3Ob4?flac, 43b40) gCE•HA?(zA3H) 04?:M(3: 46H) b6H) 3: iz' (6c, 43E: 43F84f46|hg73g6H4|043:D1:c5 E16"C

BC60C6BCr0MU1 ?- GOS- MSR?- H, B-, K01 UP?2U1 0H/! CB0S6C0FCB0P BwC6-uB! CB0GB0SQHRMNN0', 'Q0AufoSEMNE03(
-ED4EB) 0k43E 06643E5 (3: 4643651bx102E5 70'51E5 5U2exD"25g)(b4h?) g43EE-EB) 0k43) 7E73: ES#77kl7146Hlgk4(E5 u6643E8A3fA?5 64|3E5 IE: 4%E,NA?R, i95 47(c) 3E5 4c(f)c) HA3EHA2?R, 4ID46(g3AEBAe: -FA?5 4: S-S44ESM7ch7?) (EM45 b476*362ES125181B-FA?5 "S-B") 0k43) b6c, 3OHJHEZW433: 4ERück64(H4E: 47EW) 3: E73147k4(4): 4-Bi6*5 766I6(4) 3E5 (3: 46i436E4(34E5 E: 47z7rMA3) g4E: 4TH) H4773g147' 43: 4K43E5 0k43E (3k6E73: E?4c, H6E H6F(34'E)G(6k) ?HA3 I) H4E14?k0(4): 4'E 4?: 43EE+DI4EG(6k) ?HA3 I) H4E15 766E) 7F9A: 4?ES4(H4E: 4?EB) 0k43E5 (3: 46i436E135 5 EJ1/2"E: (ck6&I(3)*73: I46I6-E4(3:M13: 46i) b6H) 3: E1A3D8E5 5 EJ1/%CE, I(3E7E: 47EW) 3: E?6A?; 4?Olc, FEE+DI4EG(6k) ?HA3 I) H4E15 766S (E5c, ?) 7b43E30D8E5 5 EJ12"0E14?(k) E1A3Z: 4%E, ?ag?5 (HHaB4F46HlgK" 4?: 43EE+DI46A6P?A: 7klE5 766E) 7E: 43BB) 0k43zA3H(P?FE" 4?: 43EE +HA?zA3-)14?M1(3: 46i) b6=) 3: Ez' (6c, 43E: 43EB4f46Hg73g6H4043:E1fc5 B116"C
LKDERDELEK0VLL R0SNPP0300000PPGWKP010L KDERDELEK0VLL R0SNPP0 COOOOOPGWKPC
L KDERDELEK(VLL L R/SNP P0 00000)B&CD0mCC! C/CI CrF BC-DC/FC0-DA/CB0F:A! Cr#D/hMFC/EGHWSS,00 DCzC0vH-F0HB/BCD1 Cr#Hch0HE:FQFL GFP,RchM/HI:HEOPMaZHB,cHm
SNPP03
PPGNKP07
SNPP03.3
- cAtnLéén.ncA/1 - Fe
SNPP03.'
SNPP03.2
SC/CcDCCr0FC0-chrHCI CB0I HHr0FC0DI
tLBnL(-ncABpt.11/LOClt
SC/CcDCCr0FC0Af-DABF-hHuFCr-0)GBFGCB0BHFG!
BCI C-DG! OFCODI -. Cu! C/-
SNPP0' 000DE0WPKDPLPPN
PPGMKP030
SNPT0' ,3
MHBDC0FC0wABFE/AAD
▲OLENOL PJs/o/, , B.z-lnδ-tLt-L, nt.L

VHHr0GOBP32KSB2JS21 R?- , , - ?2OR\MO?\HU3?01 \$TP- GOPR,SI H/! 0SNPP0° ,' P0HEOPPGNKP03'
ДШЩЩЧГЩЭ
▲OLENIL PJSD11/p1e LBrA, e -Hjpl-tn-He-nle, t-/Bh4-LncA, ' -ILLEGIG 6 0) I43E (4): 45 77?b4: 4kk43'E5 Ag43I3(4:E: lkk4?z(l3:) 3E16I5 5 EJ5/8E|3RE+M(3(5) 14:g?AAH4E, A7H43E ?) g4?:3A5 (3) ) (E 51x102E5 5 EJ2xDH3T" 42k400K38Ex89E5 5 EJ1v2x3V2(3F)R3(5) 14E, A7(zA3H) 04E) (6H) 3: H766436c, ?A4143::ED1c5 EJ16C|3F

VHHnGOBP32K\B2J\21 R?- , , - ?20R\21 \BO?U1 ,SI H/! D0u0SNPP0' ,' BOHEOPPGHKP034
▲OLENOL PJD11/p1e LHeC, e -Hjpll-tn-IL-nle , t-/HeH-LncA, '--ILL •ID4:" 3: 1) HE5 A4HE24c, H6H?44k66A E, 4HEb4HA3343EA 4?10) k2 A?: 43fg45 A3?44?: Elg443iA 4?10) kb4: 4kk(3g?FEE#M13(5) (4E, A?izA3II) (4E) (6H) 3: B766436c, ?A4143:E:D1ic5 EJ16(3I)E

VHHr0GOBP32KSB2JS21 R?- , , - ?2OR\$MO?SR?- , 01 STP-GOPR,SI H/! OSNPP0° ; QOHEOPPGNKP03(
c47d1) g4765 A4H435 I364H36E516x1025 5 EL2xD103RE/25g) Rg?AAhZKREED+L14E: ? g476 4I43:: 46H77C7H44I6H4NkI45 A4H1A: A43)) 3E: 4INAA?: -95 47(k) 364i6 4c(f)(I)H41AAe, 4HEA3F 4? S1) 38b1 043E k471A5 : 46H97c7f24A: 4043UNA#, I9 54(2) C5 4c(f): H43reABY, F4D(g)3AFB(A) 7A5 4: ESM4DESI7c7(?) EM45 b4760 I362S125E18TB-S , ) 4'SE-SSH: -g4: 44H4HEEIE+96E: 4E) h47k) 3E1) 3E: 4E' : 3: 3I(4) E#P ' 4h1KB6T5 A4H3E: 4g(g 6) 0' H43IA: I5 (364H366CE3) ? g47i): 3E: 4IN3k47-I43f?c, I4h2k) 3E1! 3E: 4p4b?7h(k#e): A5 E: 4H4168lg(1)gB(H(36))0473HEG+GI (6) 0' H43IS A4H3E i) 3b4:(4)ik; 3h43E1; 3E: 4E: ? g7665 (3) IS i) J135:5 S1/21(3E): KZ03I3A3FQES: I4AHE443IS (3) IS 0417(I077)5 I4E1:30D85 S1/21(3E)C; c, H4E: 4E' : 3: E: A7: 431AEJ/A3/HEG+IG (6) 0' H43IS A4H3EA t, 4HES I: 43i): 3E: 4E: ? g7665 A2: A3b1A416K(g; IS 8bc, 7A1413R): 3E00*85 5 U1212RCEED-ED ( ?A: 7CHEs A5 E: E: ? g766* A7: 43p; c43H74? : ...M-(I)5 I4), A7(A2+I)68) H9: 3B766A35cc, ?A1413:D1c5 E16B3KF
| STAPMAIDel | TbVoor#houtenIdragersC | PPGNKP03' | ||
| SNPP0', P | ZHC#0CCB0FrA! Cr | ▲OLENOL P&D11/p1e J&Ca, e -Hjpll- tn- H1 Fle , t-/88+ lncA, '- !LJ H-L B-/L' - LncA/1 - - nL 35LKMTPt! lnt- 3( LC1 /' - nL, , n(- ' /, , E' L1 e L1 n(- C-nnt- Lh-C-(En(L, n.' - LC, n') ), tL- L 11/p1e -n. | GA0BAAr0SNP P020HEOPP GNKP038 | |
| SNPP0',2P | L6jB0hCD0-jA. /HHB0u6D | |||
| SNPP0',4P | BHHr0FC0! ADCB | |||
| SNPP0',1P | BCI C- D6! OFC0wABFE/AAD | |||
| STAPMB | TBVoor#BETONC | Delwandplaat | PPGNKP034 | |
| SNPP0', B | L6jB0hCD0-jA. /HHB0u6D | ▲OLENOL P&D11/p1e J&Ca, e -Hjpll- tn- H1 Fle , t-/88+ lncA, '- !LJ H-L B-/L' - LncA/1 - - nL 35LKMTPt! lnt- 3( LC1 /' - nL, , n(- ' /, , E' L1 e L1 n(- C-nmt- Lh-C-(En(L, n.' - LC, n') ), tL- L 11/p1e -n. | GA0BAAr0SNP P020HEOPP GNKP038 | |
| SNPP0',2B | BHHr0FC0! ADCB | |||
| SNPP0',4B | P/AAD-0FC0AB#Cr- | |||
| SNPP0',1B | BCI C- D6! OFC0wABFE/AAD | |||
| STAP\MC | TBMurenImet\stalenl\constructieC | Defwandplaat | PPGNKP03( |
| SNP P0', Q | ZHC#0CCB0F1A! Cr | ||
| SNP P0',2Q | LgBhC00-jA. /HHBtu600/BHHr0FC0! ADCB | ||
| SNP P0',4Q | P/AAD-0FC0AB#Cr- | ||
| SNP P0',1Q | BCIC-D6! 0FC0wABFE/AAD | ||
| STAP\N | Deftvlophangen | PPGNKP038 |
ZWPPR!0vHHrhhCD0u6DI HCrCB0I AB0FCzC0-DAE0G-0mH! C/cj#0A--6-DCBDGC0I CrCG-D,
| AANPASSINGEN | PP CNKP039 |
| Waterpas | |
| Kantelen | |
| 1° 815 446k, 8p45 1 kA/46k13 3 ) 66438 667E, 45 84' 44g5433471A/g36A 5/2X 616B/01435a/43B/6 E 48U 34/6 1333g6.3A 43K 138 IE 481675k, 20155 , AAgA/A5 11 g/B4' 44gFE | IOPMERKING,2967E 48k, MK3/KE DE13 ) 66439-7367: 43u 34k6 1333g6.3A 43K 138 IE 1)43H |
| DETVIVERWIJDEREN |
иещГэыч
VIKTIGAISÄKERHETSANVISNINGARITÄSHELAIBRUKSANVISNINGENINNANDUANÄNDERIPRODUKTKENI SPARA dessalANVISNINGAR
l änl3(-n1e LA-/-, Lh/Opn, n 3mnén(-nLfö/L, tll /, /näp-/L)äl., tll' Olä/i.h-p äie le -' L' -nn, l-npl, l e 1nt-/én( n)/l1 c-nn,l1 änl1 cpnälL' 3mlPD:nlb/Opn, n 3mnén(LFö/l, tll.n-l1 e L' -tLcnnnlná(/, Lnä/npB", Lp/, LFö/L e 1nt-/én(L, L' 3mlPD. Me L' OLbnti-LFö/nä/-' -nn, L, n Bnnén( ,/L-+/-/Lä/Lt -pn, e L, n(ä-n' -Lbnnt, #, €1 n-n,L, n(ä-n' -Le 1 nt-/én(-n. -+/-/L1e L, n än' nön(L, L)/l' Oprn-ä/i/näp-/lbö/L' Oppl nt, pt, LTcA1 (-, /m/1 nl, tCCC.-cA1 (-, /cle.
▲ FÖRSMKNMGHENJ0OBFI G#0EHDCBDGC//A0ECr-HB-#AFHr0Hch0-#AFHr0Eä0C! CBFHm!0
▶ l o-n.Aä/L)/1' Opt-nÄl/OtFl/e,'lfö/L,d,n'an',nlät/ä/-(-1ä(,/Lä(,/..le,nn:lb-t1n(l1cALb-t1n(b-lcpnä(,/L-IKM!PtoJLHPrLl-nb,/d(i)nä(
▶L Dä( (- nle ânt-LpOnn, Lbä/, L-nL Ept.) âLO)) LtBHLF-e L( ân(- /LPDL1 cALO)) Aän(nön(LtBHN, e e , nn.
▶ L J n än' Lənt- L' - nn, L) /1 ' OptLFö/L, n' /, Lån', e ä-LänL' - Ln1 e LoIt/EcpH(-n.1 e näe nnL, Lt3H - /p, /-n.
▶ L P∅H - /p, /- nLp, nLEnt-LAÄt, nL, nn , /E(LFö/Lnp, ' 1 /L- H- /L1 HEcpnF, HLn1 e _Fö/1 /n, p, tnL, LF- I, ptB(L e 1 nt-/En(L-H- /L, n än' mBn( .
VG#D. C! räB-BGB! Ar
SMDPK0
PD:nLx3npHOnB - LtCHb-Aö/aL FÄO#! PTLÖDTO KO#oJ

Me LPD:nL a(-/Le -/La/L' -lAAa/Lnt, t- -u! PtLp1 e), t-b-ht.L B-nöp-cA1 (-, /c1 e Lö/L, m.ABtt, L-ttlp1 e), t-b-ht.nt, t8.
VERMFMERPÖHORÖDMKÖVÄGGÖÄRÖBYGGD
SNDPK02
NrärÇ! /ArLL xe - L(5) nnpõ , a?
K. npp L. CDHB! L-HH-/LL . CDHB! /Hc#?
PCrfC#D!0PCrfC#D
G(66k(1)E54:E54H)00?4g0)??
MLICAA. L7LA( 6128(.ä) E6(6F7ä.06FIL)
B-ntäHLntäH/-(-In, tn-n:le 1'-HLT. HW .LL ä-jL1 nIEn-l)älTNHM. τJ O.c1 e L-H-/LJ e , z1 n.c1 e
L -ä#Cr?
KHBDA#DA0EQHL GEPR_ErHf-0Hm0Fu0hAr0Bå! rA0frå! HrJ0www,CchH! CAr,CHm
NPODIKPOVERKNYG
SNDPK02
MalbCF: :DLFFC:ILjD:SP/646DE-E(.1)mLjELA(t) CHILFDCEE:SLAbH..:yAEFy0(LA:0117mmI(7/16H1m),6
| NB-DA//AD6HBOE301 a!! 0mCF0DrärC! /Ar | RL7L4E6( C. L:Ey45bH..b6l:11mmf(3/8)11m) |
| NB-DA//AD6HBOE30. CDHB! I a!! | BH..b6l:13mmf(1/*011m)#/ CmmC.L |
| NB-DA//AD6HBOE301 a!! 0mCF0mCDA//rC! /Ar | RL7L4E6( C. L:Ey45bH..b6l:11mmf(1/4)11m) |
VPDOFMKKSONOLÄDPK?
SMDPK01
AOPVRKMKGJO-nlAa/.)/1' Opt-nlenn-AA#/-/ne alt' -, /ln1e lp, n0t(6/, lp a min(n/snp1e L'-Ln ajnLnn, nl'Ol)abo/j, /LA1) e 1nt-/ln(-nnp, l'Olp1nt/1H-/-, /, tll, #, ' -, /, Fannle, * /1 cA/Lan, pt, lMe ln#(1 nc' -HLN, pn, nl-//La/Lnp, ', ' , Lnp, l'Olsnt-L/-to/n-/, L'-nnp, ', -I) /1' Opt-nL#H' Enlát-/Fo/naj, /-, Ot, n. an', l' BC(3'/-pUcHlpOn'tjannt.LJn an' L ,' /C lnp, -, ' -, -')
L BS!0nt-L, +, Le 1 nt-/En( nCHb-Aö/Ln1 e Le -' Följ-/LEL' -nn, Ln, tnLp1 e e -/L, tL, n än', n.
DEL PROFÖROSNEG0300000000000000SWDPK01
DEL.PROFÖRÖSNEGO 00000000000000SNDPKOC
DELPROFÖRÖSNEG° 0000)MKGÄRÖNKNE 0 BESNÄLLOSNÄLREGELSPNSEKJOML DELLOEGHWSS,00 SÄLJKL KLMKEOPÄOEQHL GEPR,QL MOELLEROPMPZL K,QL M
SNEG03
SHDPK07
| SNEG03.3 | Vä/j0NVJB-0-#rul Ar |
| B, /, L-nLnp/O nt1 /#-pl), nn, /LPD:n. | |
| SNEG03.7 | Vä/j0F6-DAB-. r6c#AO)I 0F0. ChHI |
| SNEG03.2 | SaDDofA-D0NV-fä-DCBA |
| SNEG0' 0ML KNERP0VÄGGPLPNNPK | |
SNEGO' OML KNERPOVÄGGPLPNNPK
SNDPK030
SNEGO',3
OMHBDCrA0Iä!!E/ADDA
AOFÖRSHKNMGHENJo/, Jnt-LätLfö/LAä/tLL

För0MU1 ?OP21 GSPÄS?PÄPOG, - P,sfö/jOSNEGO', ' POEäOSNDPK03'
иещГэыч
▲OFÖRSMKNNGHENJs+n' 8pL)1t-ntö-H, L)-/n1nnp,'1/L1cA1np,'1/L)äl-(-n'1e!LL•G(66kJ1)6A5Black471ägg43fä?l3H4lo14?6llg)1G55E
J5/8975 (F-M(36)) 6-A?41E 6-7a?4g40:3A5 (34)5:1Ex1025 5 5:2Ex[0H75 Cf) 1k(6)k:38x6895 5 5:1+5x3+75M36H) E, A?(6A3H4)) E) 16hA3: 15 4) 3(fa6H43):D1Ec5 fJ16H75 DEE

För0MU1 ?OP21 GSPÅSBO?U1 G,5fö/jOSNEGO', ' BOEÄOSMDPK034
▲OFÖRSMKNNGHENJs+n' BpL)1t-ntB-HI, L)-/n1 nnp, '1/1 cAnp, '1/L)äl-(-n' 1e!l
•MA347):1aggla64HE: (24HE alb4A3g6H) 3f(3g43Fack3/3g.HT•M(36II) E, A?(6A3-4III) E) 16lla3: [5 4(II) 3Efa6-43):ID1Ec5 U160H75 C

För0MU1 ?OP21 GSPÄS - MÅLREGEL,sfö/jOSNEGO', 'QOEä0SNDPK03C
•24(g) 73) 15 66(41) 7) 15 (36f2x0H75/250g) FF-014g4HG Ac, E, 300) 68, 4HS 66/47 -600) 16 4c(fik) HA343P*NA7; 195 47(c) 3S 4c(fic) HA36FATI, 4D46lg3AEBAC -FAV5 4: ES-44(S77ch77) IM45 b476*362SE125F18T-B-S, 1 4T5-ES-7: IS4-chlA31E •05 f1agg436b) kdc: (1aFab), 3) 0: 15 364b3) (5775 A34H7) 68(H25) (36f43?34g4E01A36-47Ac, E, og47A5 E, 474(g) 76A5 (1 313: 66fs7)) H5 A3H7 Etaggfa64HEI-(K) X5 77435 36H4(1) ? 15 (36H135 5 L1L2575 C9Ade. 3E1): 2 47) 6c: 130) 1E ?4g) 73)*Ac, E 4E5 36H4Acck6h(33) 6J4HS (36H) DHFG5 5 4: CD8e5 S 51E7e75 Ch) kA5 Etagg43HEI-K) O5 77435 36h4(b6i) 6E: Zg4(g) ?5 4: E300*885 S E12F75 C6k771) ?E: fc43H75 FE4P7A: 7k8435 36h4c43H27) 6E: Zg4(g) ?3) FE •M(36r) E, A7(6A3H40) E) 16H33: E5 400: 3iDa6H43)-ED1fc-5 E1GB75 OF
| TBFÖrltr ÄreglarC | Monteralv | Äggplattan | SNDP K03' | |
| SNEG0', P | HGDDAACBOrC! C/ | ⚠OFÖRSMKNMGHENJ+ n' äpl- - ntO-H, L) - /nl nnp, ' 1 /L1 cAle , t-/β-+, Lnp, ' 1 /LJ +, JE/, Lt/anp/O , /n, 33 JKÄ PtLDJ OJLI/' - ntE(tär' /, (n, LFo/, tlFo/Ain' /, L1 önp, ' - L/o/- In- /, La( ) H, tt, n. | GAOD6/OSNEG020Ea0SNDP 038 | |
| SNEG0', 2P | R4#DA0SBomA//CB | |||
| SNEG0', 4P | BHrrA0hå/CB | |||
| SNEG0', 1P | Fa-DOI a!! E/ADDAB | |||
| STEGMB | TBFÖrTBETONGC | Monteralv | Äggplattan | SNDP K034 |
| SNEG0', B | BHrrA0hå/CB | ⚠OVMKNNGNJbI1 //, L, H' /B(LBLF1 (, /n, Le -H, ni.c- e - ntb-1 cp- n. | GAOD6/OSNEG020EASKDP 038 | |
| SNEG0', 2B | SaDD00förAB#r:6B! Ar | |||
| SNEG0', 4B | SaDD00förAB#r:6B! Ar | ⚠OFÖRSMKNMGHENJ+ n' äpl- - ntO-H, L) - /nl nnp, ' 1 /L1 cAle , t-/β-+, Lnp, ' 1 /LJ +, JE/, Lt/anp/O , /n, L 33 JKÄ PtLDJ OJLI/' - ntE(tär' /, (n, LFo/L, tlFo/Ain' /, L1 önp, ' - L/o/- In- /, La( ) H, tt, n. | ||
| SNEG0', 1B | Fa-DOI a!! E/ADDAB | |||
| C | TBGipsskivalmedlmetallreglarC | Monteralv | Äggplattan | SNDP K03C |
| SNEG0', Q | HGDDAACBOrC! C/ | ⚠OFÖRSMKNMGHENJ+ n' äpl- - ntO-H, L) - /nl nnp, ' 1 /L1 cAle , t-/β-+, Lnp, ' 1 /LJ +, JE/, Lt/anp/O , /n, L 33 JKÄ PtLDJ OJLI/' - ntE(tär' /, (n, LFo/L, tlFo/Ain' /, Li önp, ' - L/o/- In- /, La( ) H, tt, n. | ||
| SNEG0', 2Q | BHrrA0hå/CB@SaDD00förAB#r:6B! Ar | |||
| SNEG0', 4Q | SaDD00förAB#r:6B! Ar | |||
| SNEG0', 1Q | Fa-DOI a!! E/ADDAB | |||
| STEGIN | HÄ ngluppTVUn | SNDP K038 | ||

NOKGN!0Du#AB-#C0. Chöl Cr0hjä/E0nBFCr0FCD0har*-DC! CD,
JUSTERINGAR
SHDPK039
NIVA

Lutning

3Bb0171) 14314E) H2764132A7E 43D08H) 6TAc, 6A: 336H) E 3) H6716H7) E124: 4HE63713(3g) K-AS: -387H) 37 M404134: SH) 16(g6a11F) (OR-1505: 7834F, | 1bn?) 16(k4) H6764? 873/3g43h?24(k) E163|3g6) I6476k 3E: 7= 1)SH174: 4E K+01, | 3:6078 H607, 13: Y) Aa36K) 42034647E: (B, A18k) 3E: 73 31a3: |43H364x39ck4102) HE: 2)SH174: 4HK
TA'BORTTVN

RONNMHG
21. 94 D _A 98?R7:6 AAIEF?D39A:D, D) F E189F8?A ^S E DRDC91(1 BF / \: 8EB71?16 AAIEF B9F8? 5 \ ERF (? A)?D _C 199F D(R7: F2FC8?2F# 8F3R19A?D\?A_{A}$ 98?R7:6 AA
WSRP0H0G[ECAA?; [HA: 0S?98H; [7R6AR: 05; [P0R43[?2GSGAAR]H:[6G19R: 05; [23 7R6AH05?: 0CAR29?d0/ i]: 7G8HC65A3 G[0SG4B2CAH, I9?; 0CAR29GIOG6G2H-RSCI2IHA: 0S?98HH|9IOG6G2H-RS?;
, :6H[23 [AG]7RAH/ CG0G[7SH2GEGAA3 GHA: 0S?98HH[H6H[AG]?2GSGA3 [2]4G- R7C: AR: 0H]?: 0CAR29H#: 4RS9H[H6H] ) 9: 76?COC8HH[EAAR1R]H- EG6H. fR4SC0H0G: 5I2'9R/ 7CAH; jofkoX3TiTnos[7R]CESG: ?[www.3ffkoX3TiTnFond
7NO P N M G T R P N I O S M N O N I O
7NCCCCMOSNLOOSH SUDUO3
8 [1] [2] [3] [4] [5] [6] [7] [8]
CD?1 BASCB01 1 Sr 8? Rev
CD?1 BASIC B□1 □1 s ????????8? Row
CD?1 BA/CB#111s \$5509 D23F CA?52s: F / EBD: ?EF 8?12: A0 ) 1: 1. A7D: F / EBD: ?871B 94 318?FD: %/ FCDB 90YCP mmDIFS/ F. 9F5ERAF, RD87A25 A9?DR9D?DIEF:1 CRD870XCE YKAHXEJI SABAIAJI A6E DIXEJI
□1 □Sr
825R65c
1 Sr nr 2 H U S H U S L S U U U U H U U
Д6. [2CmG1R0G6G2H-RSC[7RE! RE. 0[2HA03[0R659R[REAR1R]SC-/GSC:
L1 Lsr ns E H H S O MHsg N H S H H
1 Sr nt ) M000H00S00000H00000SM00000GI
1115s SSS78?19F2: 1S918?D99F0SEB18?A94
[1]Ssnr
8H0SN0000S00N0
▲29A/ 19ADIsÄ-äLpB/Bntäl-B3, nLtEOp, H-.

E pH:78?19F 2: D91:CDRD2Я9940: 1R: 18(выполнНте)Ш1 Г'ís,¹ Айна!8?Rnir s
RONNMHG
A529A/ 19ADT0R46; ECIOG[R: ORSRkAR: 05'2R[H-4GkCAHG7R6?PGAH. JOSC2/ H]7R2SGkEGAH. H/ ?щG: 02C[II][TR6nHAC1H7: R9CS0RAC7R9S3 2C; цgIR: 0GA? [AGIER6kAC7SG23 mC05%EV / ]з-яЕ; м/Ск+ МНАН/ C65A3 IISC-/ GS[EG5G2. AMR: ORBEN(HAR/ HAC65A3 IIэ|x|x» 3/ / ]з|x|ME; и/ СрФС90HPG: 9Нёхх|х|мм/ / ]з«4x|x»E; я/ СрС+ рзерт псвзнадуекрязанспвзджйнквигпзийшкт дшчебкд|сдэрт рх:418t к168х: т жілі.

SqC.IRS, D?F9943S: F98?R7: 6A0h
sB78?19F2:1918?D99F05EB18?A94
8?Rsfu
| III1 TisB | ЕропвернгеботверНта | 21. 9F THGER77: 9CG0: : 2GS6H05R02GS: OH. [2ш2C] / GжE?46R9C/ Нт |
| III1 Isit B | 2НтавигедюбелНдлябетона | 29A/ 19ADI?0R46; ECHGOR: 0RSRжAR: 052R?H-4ЖСАНГ?R6?PGAH. [0SC2/ H6H?R2SGЖЕГАН. [H?щG: 02C]B: GIPG03 SG?HAOC: [W: 0H1SCAARII?R6R29RJ3I], H, ОБХОД( MO!ACEGжARI- CO. A?05?P0R43 AGIER77: 0H05/AGЖG6OG65AR1Rj / GuGAH, IAC: XGAARII?6C: 0HA312], 4RSGz |
| III1 IsuB | 2НтаймайдюбелеG | |
| III1 IsrvB | 7НтановНтена?НтенноОкоплаНтНнO |
SqГНпNoМартонсNosNTальнымHSNTOGMamHh
78?19F2:1918?D99F0SEB18?A94
8?Risw
| III1 I'sis X | F predelHteIpoloJenHeNtOGMH |
| III1 I'snt X | E roBeerHteIotberNtHnX2NtabTeIdIO6eHIdolri6etona |
| III1 I'snuX | 2NtabMaIa6o6eG |
| III1 I'sivX | 7NtabovHteIaMteHnOoi3laNtHnO |
EFC2DLLIA219ADS?DBD2A)FR1

CtAL#YHurGCArOE! rAFCF.LL
WA1 Lpn1 Cn,LbLe B( AtLn1 tLb-L, nLb, ' L, nLE1 OLtA1 O( At"
c o/ buaa?yt , 00QHBDAcD0DhC0EQHL GEP R0PrH-J
※ 1 / tALJ e - / Bc, aL
M:L1ff855ff4G8ffG490
LL7.CF' GAVGNLI/L.ACF'EGB.V.
F?) 3k0(36H?) HE1DE6003EDKEW44?H"EN4H, 4?0) 3: 6
LL7.CF'GA1EI.CA6C
U3(HE20E/E33EM4) k(3ERA):