
HealthProtect 7740i - Air purifier BLUEAIR - Free user manual and instructions
Find the device manual for free HealthProtect 7740i BLUEAIR in PDF.
| Product Type | Air Purifier |
| Brand | Blueair |
| Model | HealthProtect 7740i |
| Dimensions (approx.) | Approx. 600 x 300 x 300 mm (height x width x depth) |
| Weight (approx.) | Approx. 12 kg |
| Power Supply | 220-240 V ~ 50/60 Hz (European model) |
| Power Consumption | 76 W (max) |
| Noise Level | 27 – 55 dB(A) |
| Recommended Room Size | Up to 62 m² |
| CADR Smoke | 735 m³/h (435 cfm) |
| CADR Dust | >675 m³/h (>400 cfm) |
| CADR Pollen | 735 m³/h (435 cfm) |
| Filtration Technologies | Washable pre-filters, SmartFilter main filter, GermShield™ feature |
| Sensors | Particles (PM1, PM2.5, PM10), gases (tVOC), temperature, relative humidity |
| Connectivity | Wi-Fi (compatible with Blueair app) |
| Fan Speeds | 3 manual speeds + auto mode |
| Display | Dynamic control screen (70 series, including 7740i) |
| Filter Maintenance | Pre-filters: monthly vacuum cleaning; main filter: replacement every 6 to 12 months |
| Safety | Automatic shut-off when filter door is opened, child lock via app |
| Spare Parts | Only original Blueair main filters and pre-filters |
| Warranty | Blueair limited warranty (see terms at www.blueair.com/warranty) |
Frequently Asked Questions - HealthProtect 7740i BLUEAIR
User questions about HealthProtect 7740i BLUEAIR
0 question about this device. Answer the ones you know or ask your own.
Ask a new question about this device
Download the instructions for your Air purifier in PDF format for free! Find your manual HealthProtect 7740i - BLUEAIR and take your electronic device back in hand. On this page are published all the documents necessary for the use of your device. HealthProtect 7740i by BLUEAIR.
USER MANUAL HealthProtect 7740i BLUEAIR
Blueair HealthProtect™
User Manual
Manuel utilisateur
Manual del usuario
사용 설명서
使用手册
Blueair HealthProtect™ 7400/7700 Series
Product name: Model number: Model number:
| 10-models 100-127V 220-240V | ||
| 7410i 7411371000 7421371000 | ||
| 7710i 7711371000 7721371000 | ||
| 40-models | ||
| 7440i 7412371000 7422371000 | ||
| 7740i | 7712371000 7722371000 | |
| 70-models | ||
| 7470i | 7413352000 7423352000 | |
| 7475i | 7413352000 7423352000 | |
| 7770i | 7713352000 7723352000 | |
| 7775i | 7713352000 7723352000 |
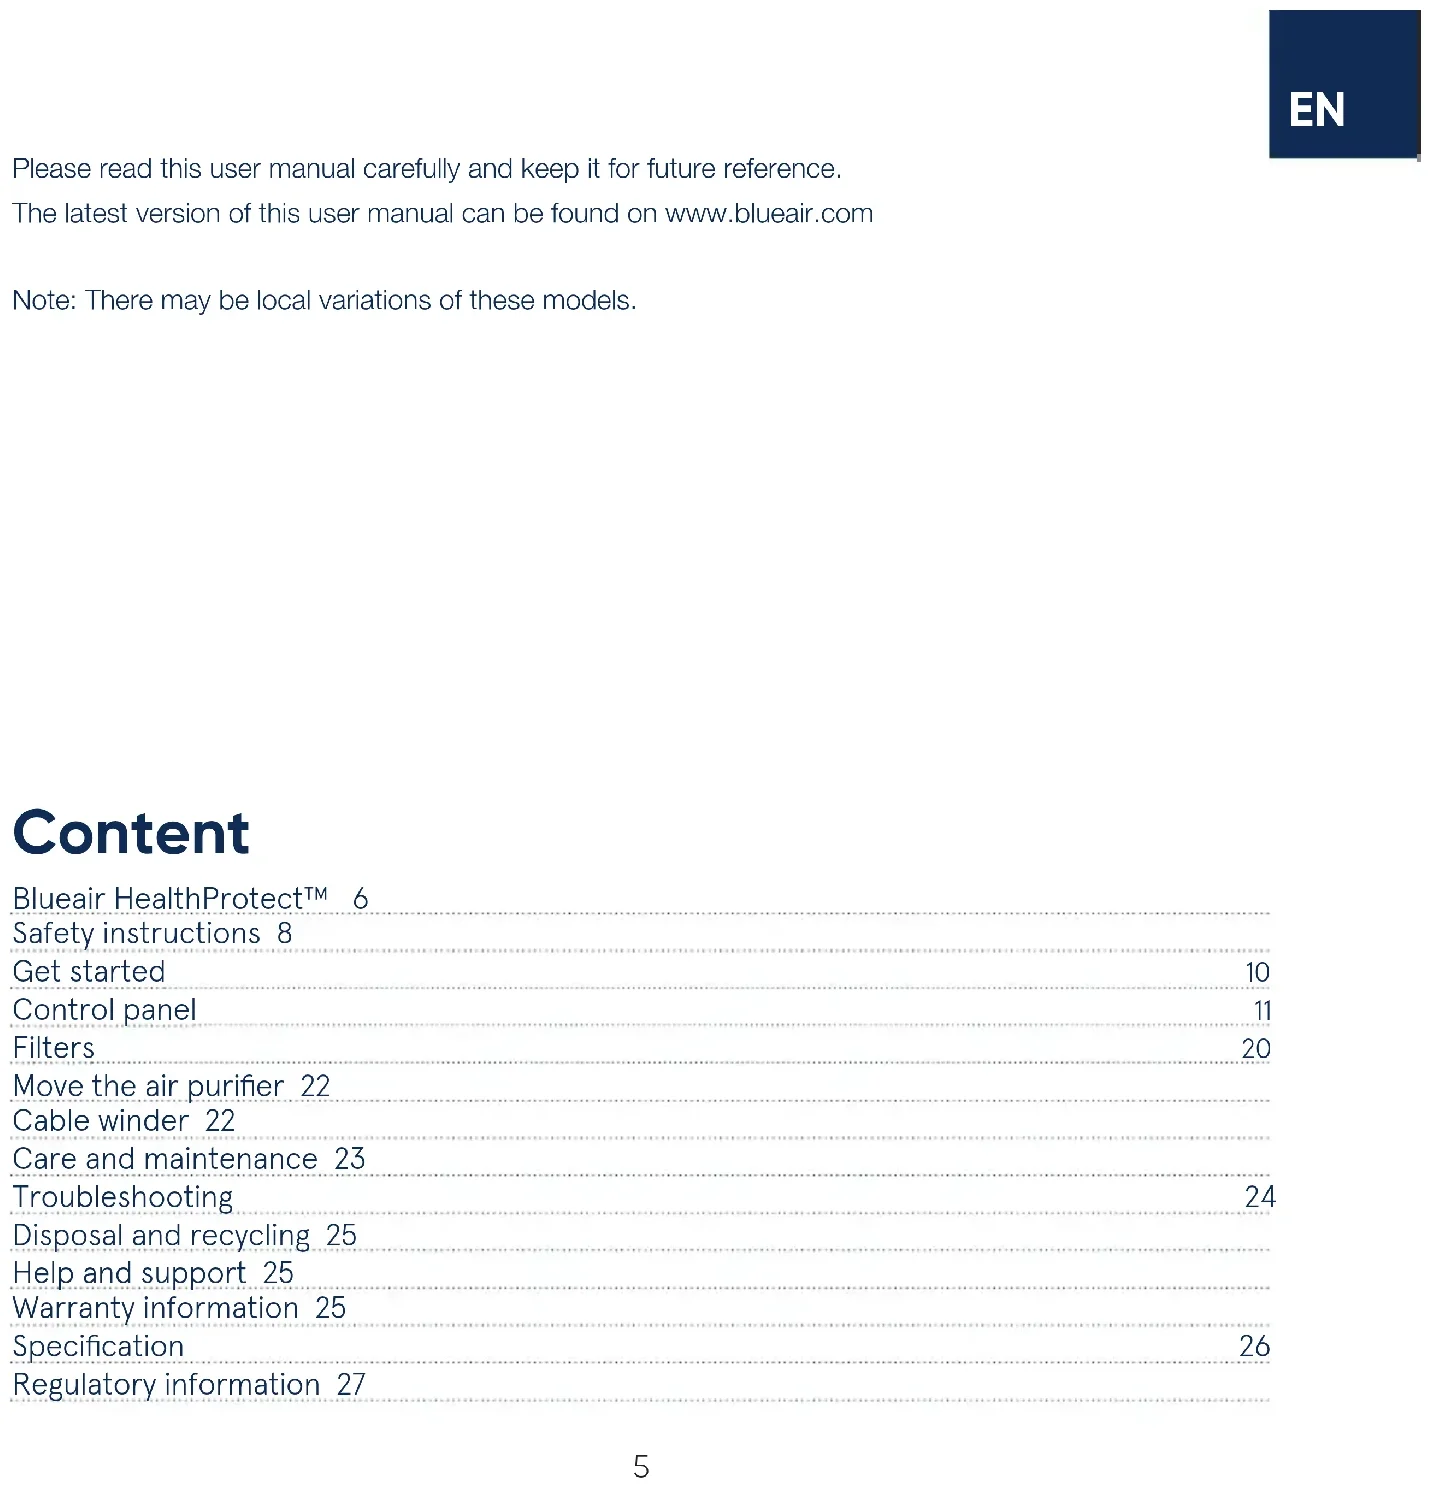
Please read this user manual carefully and keep it for future reference. The latest version of this user manual can be found on www.blueair.com
Note: There may be local variations of these models.
Content
Blueair HealthProtect™ 6
Safety instructions 8
Get started 10
Control panel 11
Filters 20
Move the air purifier 22
Cable winder 22
Care and maintenance 23
Troubleshooting 24
Disposal and recycling 25
Help and support 25
Warranty information 25
Specification 26
Regulatory information 27
Blueair HealthProtect™
Blueair HealthProtect™ air purifiers are available in three models, the 10-models, the 40-models and the 70-models. All models are Wi-Fi enabled, have a GermShield™ function to prevent bacterial growth, pre-filters and a main filter to purify air.
All HealthProtect™ models have control functions and built in sensors. The 40-models and the 70-models have additional indications for air quality data. The 40-models have a display for particulate matter data. The 70-models have a dynamic screen control, with additional functions for particles, gases (tVOC), temperature, relative humidity and filter lifetime.
You can change the air purifier settings at any time, using the control panel on the air purifier or remotely using the Blueair app. Additional functions are available for all models through the Blueair app.
Recommendations for best performance
- Use the air purifier in a room that does not exceed the room size recommendation.
- Place the air purifier in a location where air can circulate freely in, out and around the air purifier.
- Do not place the air purifier closer than 10cm/4" to another object.
- During operation, keep doors and windows in the room with the air purifier closed.
- Run the air purifier 24 hours per day with the GermShield ^TM function on.
- Only use original Blueair filters.
- Change the main filter when the filter replacement indicator appears on the control panel.
- Follow the maintenance instructions in this user manual.
Blueair air purifiers are mainly composed of a motor, a fan and a filter. The air purifier removes contaminants from the air in a room to improve indoor air quality.
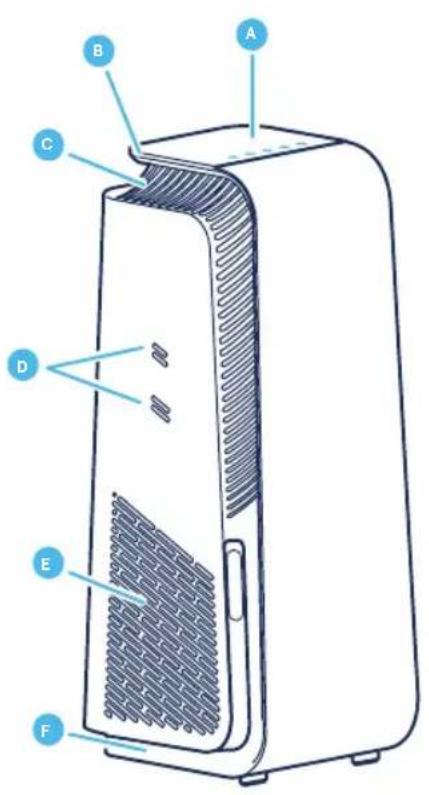
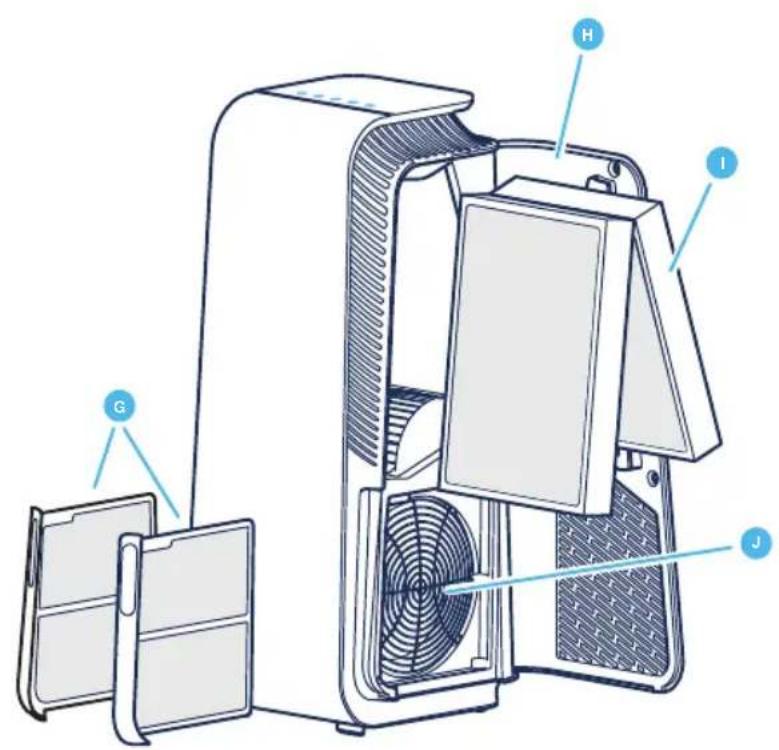
A Control panel G Pre-filters
C Air outlet I Main filter
D Air quality sensor inlets
E Air inlet K Power cable (not in picture)
F Feet and wheels
J Fan and motor
L User Manual (not in picture)
Safety instructions Safety instructions
Blueair HealthProtect™ air purifiers are electrical appliances for indoor use only, take the necessary precautions to reduce the risk of fire, electric shock or injury.
- This appliance is not intended for use by persons (including children) with reduced physical, sensory or mental capabilities, or lack of experience and knowledge, unless they have been given supervision or instruction concerning use of the appliance by a person responsible for their safety.
- Children should be supervised to ensure that they do not play with the appliance.
- Always disconnect the appliance from the power supply before maintenance.
- Do not alter the power plug in any way and do not attempt to open or service the appliance yourself. Service must be done by the manufacturer, service agent or similarly qualified person using only original Blueair spare parts.
- Ensure that the power cable and the power plug are not at risk of getting damaged. To avoid hazard, a damaged power cable must always be replaced by the manufacturer, service agent or similarly qualified person.
- If the appliance is damaged or malfunctions, turn it off, disconnect it from the power supply and contact Blueair.
- The power plug must be firmly inserted in the power socket.
- When disconnecting the unit from the power supply, do not pull on the power cord, pull on the power plug.
-
Use the grounded power cable provided with your Blueair air purifier to plug directly and firmly into an appropriate, grounded electrical outlet. Refer to the rating label on your appliance.
-
Do not use an extension cord or a power strip. Refer to the rating label on your appliance.
- Do not alter the power plug in any way. If the plug does not fit into the outlet, contact qualified personnel to install the proper outlet.
- Do not use the included power cord for anything else but the appliance.
- Do not allow objects to enter or block the air inlets and air outlets as this can cause electric shock or damage the appliance.
- Do not place any objects on top of or directly against the appliance.
- Do not sit on, stand, climb onto or hang from the appliance.
- Keep the appliance, including the power cable, at a safe distance from heated surfaces and open fire.
- Keep the appliance and power plug away from water and other liquids.
- Keep the appliance and power plug away from chemicals such as pesticides and deodorants.
- Place the appliance on the floor. The appliance must be placed on a stable surface.
- Do not use the appliance outdoors or in wet environments such as bathrooms, laundry rooms or pool areas.
- Cleaning and user maintenance shall not be made by children without supervision.
Get started
Step 1
Open the filter door, pull out the main filter and remove the protective wrapping.
Step 2
Put the main filter back into the air purifier and close the filter door.
See section Filters for more information regarding filter handling.
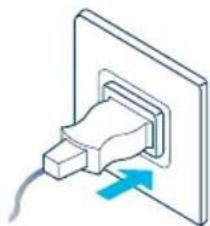
Plug into the power supply
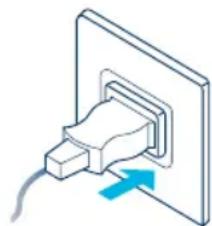
Step 1
If your air purifier has a removable power cable, plug the cable firmly into the power cable socket on the air purifier.
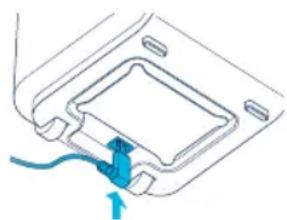
natural_image
Diagram of a device's internal structure with a blue arrow pointing to a component (no text or symbols)Step 2
Plug the power cable into a grounded wall outlet.
Step 3
Press the On/Off button to turn the air purifier on.
natural_image
Isometric illustration of a plug inserted into a wall socket with a blue arrow indicating direction (no text or symbols)Note! For some markets, the air purifier is equipped with a fixed power cable due to regulatory requirements.
Tip! Store any excess cable length in the cable winder under the air purifier.
Connect to the Blueair app
Connecting the air purifier to the Blueair app allows you to control the air purifier remotely and change the settings. The app adds additional functions to the air purifier.
Step 1
Download the Blueair app from the App store or Google play.
Step 2
Open the Blueair app and follow the instructions to connect it to the air purifier.
Control panel
All HealthProtect™ models have controls, a filter indicator and air quality information. The 40-models and the 70-models have additional indications for air quality data. The 40-models have a display for particulate matter data. The 70-models have a dynamic screen control, with additional functions for particles, gases (tVOC), temperature, relative humidity and filter lifetime.
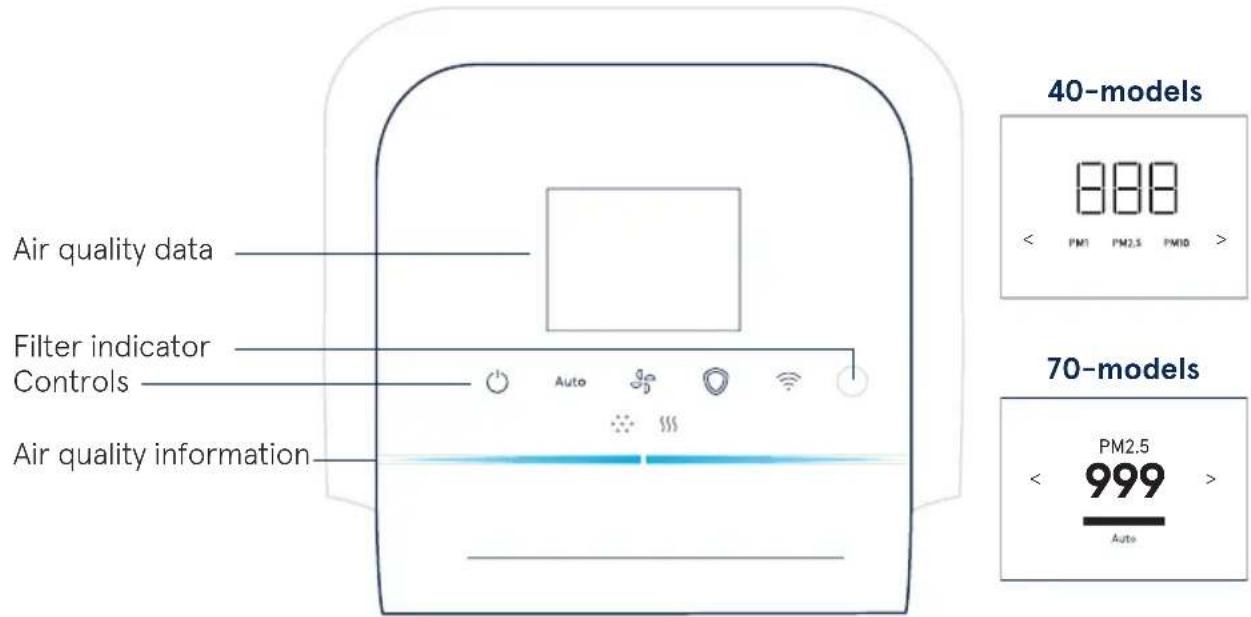
Controls
Control the air purifier using the buttons on the control panel or using the Blue air app.

On/Off
Auto
Auto mode

Airflow speed

GermShield™

Wi-Fi
On/Off

Press to turn On or Off.
Note! Wi-Fi, sensors and the GermShield™ function continue to be in operation when the air purifier is turned off.
Auto mode
In auto mode the air purifier automatically controls the airflow based on air quality information from the sensor.
Auto Press to Activate or Deactivate.
Indicators 10-models/40-models

Status White light On.

Status No light Off.
Indicators 70-models

Status checkmark On.

Status cross Off.
Airflow speed
Available airflow speed options are: 1, 2, 3 and 0.

Press to switch between the different airflow speeds.
Indicators 10-models/40-models Indicators 70-models
Speed: 0 1 2 3 0
GermShield™
The air purifier has a GermShield™ function that activates when a germ-prone environment is detected. The 70-models have an additional indicator on the screen for showing when the GermShield™ function is in operation.

Press to Activate or Deactivate.
Indicators 10-models/40-models

Status White light On.

Status No light Off.
Indicators 70-models

Status checkmark On.

Status cross Off.
Note! When GermShield™ is activated, a light draft can come from the air purifier when detecting a germ prone environment.
Wi-Fi Connection
A Wi-Fi function is available on all models and allows the air purifier to connect to the Blueair app and to receive functional updates. If you do not wish to be connected to Wi-Fi, press the Wi-Fi button to disable the Wi-Fi function.
Button

Press for >15s to turn Wi-Fi on or off.
Indicators (10-models and 40-models)

Status White light
Connected to Wi-Fi network.

Status White fast "blinking" light
Failed to connect.

Status White "pulsating" light
Wi-Fi On, ready for onboarding.

Status No light
Wi-Fi functionality Off.
Indicators LCD screen (70-models) Indicators Buttons (70-models)

Status Green checkmark On.

Status White light
Connected to Wi-Fi network.

Status Red cross
Off.

Status White "pulsating" light
Wi-Fi On, ready for onboarding.

Status Red exclamation
Connection error.

Status dimmed light
Wi-Fi functionality Off.

Status White fast "blinking" light
Connection error.
See the Blueair app for further information regarding Wi-Fi connection. For support, visit www.blueair.com/customer-support
Filter indicator
The air purifier calculates the remaining lifetime of the filter based on usage and sensor readings, and indicates when it is time to replace the filter.
Indicators (10-models and 40-models) Indicators (70-models)

Status Filter replacement No lifetime left of the filter.

Status Filter replacement No lifetime left of the filter.

Status Filter replacement "blinking" Cannot recognize a Blueair filter /No filter detected.

Status New filter Filter change completed.

Status Filter warning Cannot detect a Blueair filter.
Status No filter No filter detected.
See Troubleshooting for more information on filter indicators.
Category indicators (40-models and 70-models)
The categories of the different functions are indicated on the top of the screen- press the buttons on the control panel or on the left and right arrow to view the data for the chosen category.
PM1
Particle data
§§§
Gas data

Temperature

Filter lifetime

Relative humidity
Air quality information
The air quality levels for particulate matter (PM) and gases (tVOC) are indicated using a color scale on the control panel.
PM1 Particulate matter, particles with diameter of size 1 micrometer or less.
PM2.5 Particulate matter, particles with diameter of size 2.5 micrometers or less.
PM10 Particulate matter, particles with diameter of size 10 micrometers or less.
VOC Volatile organic compounds, gases found in both outdoor and indoor air.
Indicators

Particulate matter indicator

Gases (tVOC) indicator
Air quality level
The air quality indicator bar for particles will show the highest pollution level out of PM1, PM2.5 and PM10.
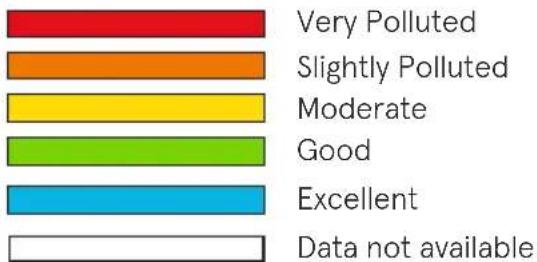
bar
| Category | Value | |---|---| | Very Polluted | 100 | | Slightly Polluted | 80 | | Moderate | 70 | | Good | 60 | | Excellent | 50 | | Data not available | 40 |See the Blueair app for further information regarding air quality.
Air quality data 40-models and 70-models
The 40-models have an additional display that shows measured values for PM1, PM2.5 and PM10. Press the left or right arrow to switch between the different particulate matter sizes.

Indicators
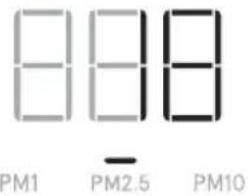
Status Air quality Value of 18 g/m^3 for PM2.5.
The 70-models have a dynamic screen control that shows additional values and statuses for different categories, and have additional indications to show active functions. Press the left or right arrow to switch between the different categories.
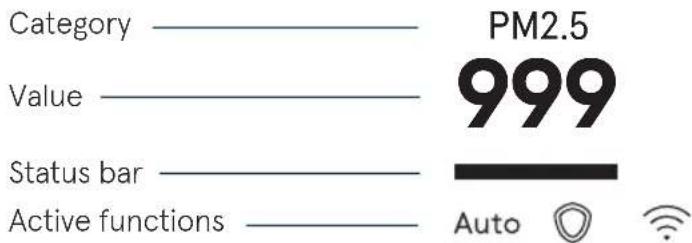
Particle data indicator
The air quality data for particles are indicated on the screen. Press the left or right arrow to switch to the Particle data category page. The screen shows measured values for PM1, PM2.5 and PM10, with its related air quality information indicated in the status bar.
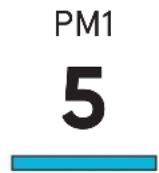
Category PM1 Value of 5 g/m^3 . Status Excellent air quality.
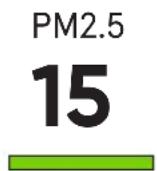
Category PM2.5 Value of 15 g/m^3 . Status Good air quality.

Category PM10 Value of 55 g/m^3 . Status Moderate air quality.

Loading data /No data available.
See the Blueair app for more information.
Temperature indicator
The room temperature is indicated on the screen. Press the left or right arrow to switch to the Temperature category page.

Category Temperature Value of 17 degrees Celsius/63 degrees Fahrenheit in the room.
Relative humidity indicator
The relative humidity of the room is indicated on the screen. Press the left or right arrow to switch to the Relative humidity category page.

Category Relative humidity Value of 36% in the room.
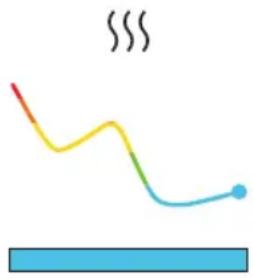
Gas data indicator
The air quality data for gases (tVOC) is indicated on the screen. Press the left or right arrow to switch to the Gas data category page. The screen shows the different sensor readings of gases over time.
natural_image
Simple line drawing of a wavy yellow-orange line with a blue dot at the end, above a horizontal blue bar (no text or symbols)Category Gas data
Value of air quality levels for gases (tVOC) in the room over time.
Status Excellent air quality.
Filter lifetime indicator
The remaining lifetime of the filter is indicated on the screen. Press the left or right arrow to switch to the Filter lifetime category page. The air purifier will count down from 100% with a new filter, and indicate when it is time to change filter.
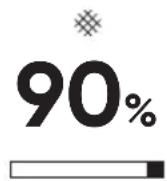
Category Filter lifetime
Value of 90% left of the filter.
Status bar counting down.
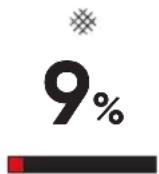
Category Filter lifetime
Value of 9% left of the filter.
Status bar counting down.
Filters
The air purifier is delivered with two pre-filters and one main SmartFilter filter installed. The filters purify the air from both particles and gases. For best performance, clean the pre-filters regularly and change the main filter when the air purifier indicates filter change. To find the correct main filter for your air purifier, use the Blueair app or visit www.blueair.com. The model number of your air purifier can be found on the rating label on the air purifier.
Blueair filter subscription program
Use the Blueair app or visit www.blueair.com to sign up for the Blueair filter subscription program. (Not available in all markets)
Important! Always turn off and disconnect the appliance from the power supply before changing filters, cleaning or carrying out maintenance procedures.
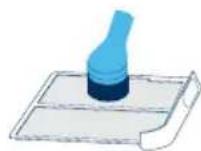
Clean the pre-filters
For best performance, clean the pre-filters regularly.
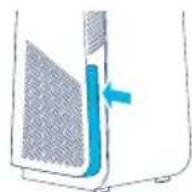
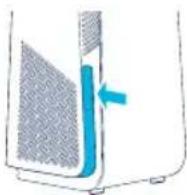
Step 1
Push the left or right side frame indent of the air purifier to release the pre-filter.
Step 3
Clean the pre-filter, by wiping with a dust cloth or vacuuming with a soft brush attachment.
Step 5
Push the pre-filter to lock it in position.

Step 2
Pull out the pre-filter from the slot.
Step 4
Place the pre-filter back into the slot.

natural_image
Diagram of a device with a blue panel and mesh pattern, no visible text or symbolsChange the main filter
The air purifier calculates the remaining lifetime of the filter based on usage and sensor readings, and indicates when it is time to change filter. The recommended time for filter change is between 6–12 months depending on the indoor conditions.
A filter replacement indicator appears on the control panel when it is time to change filter.

Filter replacement indicator (10-models and 40-models)

Filter replacement indicator (70-models)
Important! Use only original Blueair filters suitable for the model to ensure proper function and performance of the air purifier, and to qualify for full warranty coverage.
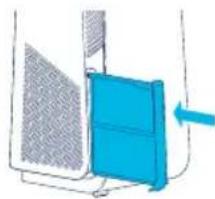
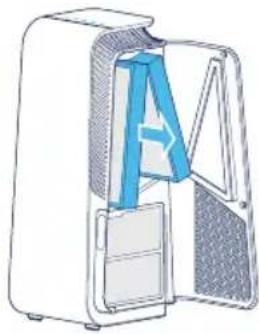
Step 1
Open the filter door.
Note! The air purifier will turn off when the filter door is opened.
natural_image
Illustration of a white rectangular device with a blue interior panel and a blue arrow indicating airflow or movement (no text or symbols)Step 2
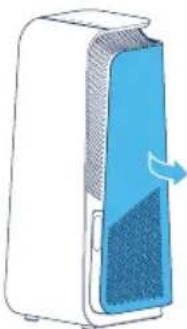
Remove the old main filter by pulling gently on to the two tabs.
Close the main filter to seal the pollutants inside.

natural_image
Diagram of a closed refrigerator with a blue internal structure, showing no text or symbolsStep 3
Note! Remember to remove the protective plastic from the new main filter before use.
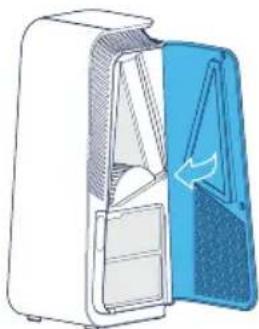
Insert the new main filter.

natural_image
Diagram of a computer case with a blue cover and ventilation slots, showing internal components without any text or symbols.Step 4
Close the filter door.
Note! The filter door needs to be closed for the air purifier to start again.
natural_image
Illustration of a closed refrigerator with open door and side compartments (no text or symbols)Move the air purifier
The air purifier has feet and wheels to enable moving.
Important!
- Unplug the air purifier before moving it.
- Make sure that the filter door on the air purifier is securely closed.
- Move the air purifier by holding onto the handle at the top of the air purifier with two hands.
- Move the air purifier by tilting it backwards and rolling it on its wheels.
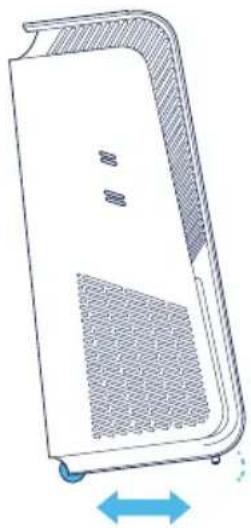
natural_image
Line drawing of a white electronic device casing with ventilation grilles and a blue double-headed arrow indicating rotation (no text or symbols)Cable winder
The air purifier has a manual cable winder to store away any excess cable length. The cable winder is at the bottom of the air purifier. Store any excess cable by wrapping it around the cable winder.
Care and maintenance
General
- Disconnect the air purifier from the power supply before maintenance.
- Do not allow foreign objects to enter the air inlets or air outlets. This may cause electric shock or damage the air purifier.
- Never clean with gasoline, chemical solvents or corrosive materials as these agents may damage the air purifier.
- Make sure the air purifier is completely dry before connecting it to power.
- Do not wash the main filter. The main filter is not washable or reusable.
Cleaning
- Clean the pre-filters by wiping with a dust cloth or vacuuming with a soft brush attachment.
- Wipe the exterior of the air purifier with a soft, clean, damp cloth.
- Open the door, clean the inside of the door with a soft, clean cloth.
• Vacuum the small air inlets with a soft brush attachment.
• Vacuum the inside of the air purifier with a soft brush attachment. - Clean and check the power cable and power plug for wear or damages.
- Clean the sensor when changing the main filter.
Air quality sensor
The inlet for the air quality sensor is located on the side of the air purifier. Vacuum the inlet with a soft brush attachment.
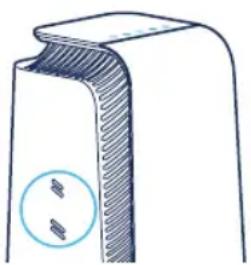
natural_image
Diagram of a mechanical component with two circular features, no text or symbols presentTroubleshooting
Trouble Possible cause Action
| The air purifier does not work. The power cable is not connected to the power supply. | Connect the power cable to the power supply. |
| The filter door is not closed on the air purifier. | Gently close the filter door completely. |
| The connection is not working. The Wi-Fi does not meet the requirements of the device. | Contact Blueair customer service. |
| The Blueair app does not have an updated version or have a temporary bug. | Check for updates. |
| The Blueair app has user account issues. | Contact Blueair customer service. |
| The air purifier is indicating that no data is available. | The sensor values are updating. Wait 30 seconds for update. |
| Disconnect the power cable from the wall outlet and wait approximately five seconds before reconnecting the power cable. | |
| The filter indicator is blinking on the control panel and/or the air purifier has reduced airflow speed /or a filter warning is indicated on the screen. | Insert a main filter and/or check it is inserted properly in the air purifier. |
| Change to an original Blueair filter. | |
| The buttons on the control panel are blinking when pressed or the display indicates Child lock (not on all models). | The Child lock function is activated. Turn off Child lock in the Blueair app. |
| The air purifier have lost Wi-Fi connection and Child lock is activated in the app. | - Disconnect the power cable from the wall outlet and wait approximately five seconds before reconnecting the power cable. |
For further support, please visit www.blueair.com/customer-support
Disposal and recycling
This air purifier should be disposed or recycled as electrical waste and the filter may be recycled as plastic. If you have questions regarding the disposal and recycling of this air purifier, please contact your local recycling facility for availability or Blueair dealer and ask for the correct method of recycling.
Help and support
If you have questions about your product, please visit www.blueair.com or contact your local Blueair retailer.
To contact Blueair for personalized support, please visit www.blueair.com/customer-support
Warranty information
The Blueair Limited Warranty applies only if the air purifier is installed, used and maintained according to the instructions in this manual.
For warranty conditions visit www.blueair.com/warranty
Warranty and returns
If you purchased the air purifier at one of our authorized retailers, please contact the same store to request assistance.
Specification
7400-series 7700-series
| Input voltage, Frequency 120VAC, 60Hz 120VAC, 60Hz | ||
| Power consumption ^1 | 48W 76W | |
| Sound level (min-max) ^2 | 25dB(A)-45dB(A) 27dB(A)-55dB(A) | |
| Recommended room size ^3 | 38 m ^2 /418 ft ^2 | 62 m ^2 /674 ft ^2 |
| CADR Smoke ^3 | 270 cfm/455 m ^3 /h 435 cfm/735 m | ^3 /h |
| CADR Dust ^6 | 275 cfm/465 m ^3 /h >400 cfm/>675 m | ^3 /h |
| CADR Pollen ^2 | 280 cfm/475 m ^3 /h 435 cfm/735 m | ^3 /h |
^1 According to UL867:2011
^2 Sound pressure according to GB4214.1-2017
According to ANSI/AHAM AC-1-2019
Regulatory information
WARNING: Changes or modifications to this unit not expressly approved by the party responsible for compliance could void the user's authority to operate the equipment.
NOTE: This equipment has been tested and found to comply with the limits for a Class B digital device, pursuant to Part 15 of the FCC Rules. These limits are designed to provide reasonable protection against harmful interference in a residential installation. This equipment generates, uses and can radiate radio frequency energy and, if not installed and used in accordance with the instructions, may cause harmful interference to radio communications.
However, there is no guarantee that interference will not occur in a particular installation. If this equipment does cause harmful interference to radio or television reception, which can be determined by turning the equipment off and on, the user is encouraged to try to correct the interference by one or more of the following measures:
- Reorient or relocate the receiving antenna.
Increase the separation between the equipment and receiver. - Connect the equipment into an outlet on a circuit different from that to which the receiver is connected.
- Consult the dealer or an experienced radio/TV technician for help.
This device complies with Part 15 of the FCC Rules. Operation is subject to the following two conditions:
- this device may not cause harmful interference, and
- this device must accept any interference received, including interference that may cause undesired operation.
This device contains licence-exempt transmitter(s)/receiver(s) that comply with Innovation, Science and Economic Development Canada's licence-exempt RSS(s). Operation is subject to the following two conditions: (1) This device may not cause interference, and (2) This device must accept any interference, including interference that may cause undesired operation of the device.
This Class B digital apparatus complies with Canadian ICES-003.
FCC/ISED RF Exposure Information: This equipment should be installed and operated with a minimum distance of 20 centimeters between the radiator and your body.
Blueair HealthProtect™, séries 7400/7700

natural_image
Diagram of a device component with a blue cable inserted into a housing (no text or symbols)Étape 2
natural_image
Isometric illustration of a plug inserted into a wall socket with a blue arrow indicating direction (no text or symbols)natural_image
Simple line drawing of a wavy yellow-orange line with a blue horizontal bar below, no text or symbols present.natural_image
Diagram of a blue mechanical component with a directional arrow, no visible text or symbolsÉtape 5
natural_image
Diagram of a white server unit with a blue ventilation cover and airflow arrow (no text or symbols)Étape 2
natural_image
Diagram of a refrigerator interior showing front and side views (no text or labels)Étape 3
natural_image
Diagram of a computer case with a blue cover and arrow indicating direction (no text or symbols)Étape 4
natural_image
Diagram of a refrigerator with open door and side panel, showing internal compartments (no text or symbols)natural_image
Diagram of a computer monitor with ventilation slots and a blue double-headed arrow indicating leftward motion (no text or symbols)Enrouleur de câble
natural_image
Diagram of a mechanical component with a circular inset showing two small components (no text or symbols)Dépannage
A Panel de control G Prefiltros
B Asa H Puerta del filtro
C Salida de aire I Filtro principal
natural_image
Diagram of a device component with a blue cable inserted into a housing (no text or symbols)Paso 2
natural_image
Isometric illustration of a plug inserted into a wall socket with a blue arrow indicating direction (no text or symbols)natural_image
Five horizontal color bars in red, orange, yellow, green, cyan, and white (no text or symbols)Muy contaminado
Ligeramente contaminado
Regular
Bueno
Excelente
natural_image
Simple line drawing of a wavy yellow-orange path with a blue endpoint, above a horizontal blue bar (no text or symbols)natural_image
Diagram of a blue tool pressing down on a white container (no text or symbols visible)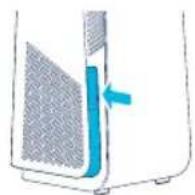
Paso 2
natural_image
Diagram of a blue mechanical component with a blue arrow indicating direction (no text or symbols)natural_image
Diagram of a white server unit with a blue ventilation cover and airflow arrow (no text or symbols)Paso 2
natural_image
Diagram of a refrigerator interior showing front and side views (no text or symbols)Paso 3
natural_image
Diagram of a computer case with an open door and internal panel, showing no text or symbolsPaso 4
natural_image
Illustration of a refrigerator with open door and side compartments (no text or symbols)natural_image
Diagram of a computer monitor with ventilation slots and a blue double-headed arrow indicating left side (no text or symbols)Enrollador de cable
natural_image
Diagram of a mechanical component with a circular inset showing two small components (no text or symbols)natural_image
Diagram of a device component with a blue cable inserted into a housing (no text or symbols)2단계
natural_image
Isometric illustration of a plug inserted into a wall socket with a blue arrow indicating direction (no text or symbols)natural_image
Simple line drawing of a wavy yellow-orange line with a blue horizontal bar below (no text or symbols)카테고리 가스 데이터
natural_image
Diagram of a blue mechanical component with a blue arrow indicating direction (no text or symbols)5단계
natural_image
Illustration of a white rectangular device with a blue cover and arrow indicating airflow or movement (no text or symbols)2단계
natural_image
Diagram of a refrigerator interior showing front and side views (no text or symbols)3단계
natural_image
Cross-sectional diagram of a computer or electronic device showing internal components (no text or symbols)4단계
필터 도어를 닫으십시오.
natural_image
Diagram of a refrigerator with open door and blue door, showing internal compartments (no text or symbols)공기청정기를 이동시키십시오
natural_image
Diagram of a device casing with ventilation grilles and a blue double-headed arrow indicating rotation (no text or symbols)케이블 와인더
natural_image
Diagram of a mechanical component with a circular inset showing two small features (no text or symbols)문제 해결
G前置濾網
natural_image
Diagram of a mechanical component with a blue arrow indicating a specific part (no text or symbols present)步驟 2
將電源線插入接地牆壁插座
步驟 3
壓下開/關按鈕,讓空氣清淨機開始運作。
natural_image
Illustration of a plug inserted into a wall socket with a blue arrow indicating direction (no text or symbols)如需支援,請造訪 www.blueair.com/customer-support
濾網汰換指示燈
顯示空氣品質
natural_image
Simple line drawing of a wavy yellow-orange line with a blue dot at the end, above a horizontal blue bar (no text or symbols)類別氣體資料
natural_image
Diagram of a blue mechanical component with a blue arrow indicating direction (no text or symbols)步驟 5
將前置濾網推入定位。
更換主濾網
natural_image
Illustration of a white rectangular device with a blue interior and a blue arrow indicating rotation (no text or symbols)步驟 2
輕輕拉住二個突起標籤,拆下舊的主濾網。
闔上主濾網,將污染物封在內側。
natural_image
Diagram of a computer case with a blue plastic bag attached, showing internal components (no text or symbols)步驟 3
natural_image
Diagram of a refrigerator interior showing internal compartments and doorways (no text or labels)步驟 4
關上濾網門。
natural_image
Diagram of a refrigerator with open door and blue vent, showing interior compartments (no text or symbols)移動空氣清淨機
空氣清淨機底部有支架和輪子,方便移動。
重要提示!
natural_image
Line drawing of a white electronic device casing with ventilation slots and a blue double-headed arrow indicating rotation (no text or symbols)電源線纏繞器
natural_image
Diagram of a mechanical component with a circular inset showing two small components (no text or symbols)疑難排解
問題 可能成因 動作
如需更多支援,請造訪 www.blueair.com/customer-support
廢棄物處置和回收
Unit 8C, 8/F, MG Tower,
133 Hoi Bun Road,
Kwun Tong, Kowloon,
Hong Kong
Tel: +852 2345 8988
blueairasia@blueair.se
Blueair Inc.
125 S Clark
Suite 2000
Chicago, IL. 60603
USA
Tel: +1 888 258 3247
info@blueair.com
Blueair AB Middle East
Jafza One, Office No. AB1503
Jebel Ali Free Zone
P.O. Box No. 263947
Dubai, United Arab Emirates
Tel:+971(4)8821244
salesme@blueair.se
Blueair (Shanghai) Trading Co. Ltd.
Room 1001, City Gateway
No. 398 North Caoxi Road
Xuhui Distr, Shanghai,
China
Tel: 400 006 9693
info@unilever-le.com