
TX185 - Dashcam TECHNAXX - Free user manual and instructions
Find the device manual for free TX185 TECHNAXX in PDF.

| Product Type | Dashcam dual camera (front and interior) |
| Brand and Model | Technaxx TX185 |
| Dimensions (L x W x H) | 10.5 x 7.0 x 4.5 cm |
| Weight | 80 g |
| Screen | LCD 2.0 inches (5 cm), resolution 320x240 |
| Front Video Resolution | 1080p (1920x1080 interpolated) or 720p |
| Interior Video Resolution | VGA (640x480) |
| Viewing Angle (front / interior) | 120° diagonal / 80° diagonal |
| Night Vision | 3 infrared LEDs (940 nm) for interior camera |
| Storage | MicroSD card up to 32 GB (class 10 recommended) |
| Loop Recording | 1 / 3 / 5 minutes |
| G-Sensor (Collision Detection) | Yes, with sensitivity adjustment |
| Motion Detection | Yes (front camera only) |
| Parking Surveillance | Yes, with internal battery |
| Power Supply | 5 V / 1 A via cigarette lighter (input 12-24 V) |
| Internal Battery | Rechargeable Li-ion 3.7 V / 200 mAh |
| Power Cable Length | 3.5 m |
| Operating Temperature | -20 °C to 60 °C |
| Material | ABS |
| Available Languages | FR, EN, DE, ES, IT, PL, CZ, NL, PT |
| Package Contents | Dashcam TX185, suction cup mount, mounting plate, 12-24 V power cable, user manual |
Frequently Asked Questions - TX185 TECHNAXX
User questions about TX185 TECHNAXX
0 question about this device. Answer the ones you know or ask your own.
Ask a new question about this device
Download the instructions for your Dashcam in PDF format for free! Find your manual TX185 - TECHNAXX and take your electronic device back in hand. On this page are published all the documents necessary for the use of your device. TX185 by TECHNAXX.
USER MANUAL TX185 TECHNAXX
natural_image
Black remote camera with display screen showing a desert road scene, no visible text or symbols on device bodyInnenkamera: 10s = ca. 31MB; 3min = ca. 231MB
Before using the appliance for the first time, please read the instructions for use and safety information carefully.
natural_image
Black and white photo of a digital road-mounted device with a camera lens, showing a scenic desert road scene (no text or symbols visible)This appliance is not intended for use by persons (including children) with reduced physical, sensory or mental capacities, or by persons lacking in experience or knowledge, unless they are supervised or instructed on the use of this device by a person responsible for their safety. Children should be supervised to ensure they do not play with this device.
Keep this user manual for future reference or product sharing carefully. Do the same with the original accessories for this product. In case of warranty, please contact the dealer or the store where you bought this product.
Enjoy your product. * Share your experience and opinion on one of the well-known internet portals.
Table of Contents
Hints 2
Safety instructions.... 3
Warnings 3
Disclaimer.... 4
Features 4
Product overview...... 5
Button functions...... 6
Display symbols 6
Prepare for use.... 7
MicroSD card 7
Mounting instructions 8
First start 9
Menu overview 10
Functions.... 11
Indicator light.... 11
Date & Time 11
Video mode / Record ■.... 11
Automatic video recording..... 11
Manual video recording ..... 12
Photo mode 📁.... 12
Collision sensing (G-Sensor) 12
One button video lock ...... 12
One button mute 13
Motion detection.... 13
Park monitoring 13
Playback mode ▶...... 13
Troubleshooting.... 14
Technical specifications ..... 15
Support.... 16
Care and maintenance ...... 16
Declaration of Conformity ..... 16
Disposal.... 16
Hints
- Set correct time in the system menu before use. ● Make sure you lay the cable in a way that the danger of stumbling is avoided. ● Never hold or carry the device by the power cable. ● Do not clamp or damage the power cable. ● Ensure that the power adapter does not come into contact with water, steam or other liquids. ● You have to check the complete construction at regular intervals for functionality, tightness and damage to prevent the defect of the device. ● Only use the product for purposes due to its intended function ● Do not damage the product. Following cases may damage the product: Incorrect voltage, accidents (including liquid or moisture), misuse or abuse of the product, faulty or improper installation, mains supply problems including power spikes or lightning damage, infestation by insects, tampering or modification of the product by persons other than authorized service personnel, exposure to abnormally corrosive materials, insertion of foreign objects into the unit, used with accessories
not preapproved. ● Refer to and heed all warnings and precautions in the user manual.
Safety instructions
- Never touch the device with wet or damp hands.
● The device can only be operated with the voltage described on the interior panel and on the power supply unit. - Do not position this device near moisture or water.
- Do not place the device on an unstable surface. The unit could be damaged or persons could be injured. Any attachments should be made only in accordance with the manufacturer's instructions or obtained from the manufacturer.
- The cable is sheathed and insulates the current. Do not place any objects on the cable, as this could cause the protective function to be lost. Avoid placing excessive stress on the cable, especially at sockets and plugs.
- If you want to pull the plug out of the socket, always pull on the plug and not on the cable. The cable could otherwise break.
- Do not overload wall outlets, extension cords, or other wiring as this may result in fire or electric shock.
- Do not insert any objects into the openings of the unit, as current flows in some places and contact may cause fire or electric shock.
● Unplug the power cord from the cigarette outlet for cleaning.
- Do not use liquid cleaners or cleaning sprays. The device may only be cleaned with a damp cloth.
- Do not connect any additional devices that are not recommended by the manufacturer.
● The openings of the housing are used for ventilation so that the device does not overheat. These must always be kept free.
- Do not use the device in direct sunlight or places where the temperature may exceed 70°C for a long time.
Warnings
- Do not disassemble the device, it may result in short-circuit or damage.
- Battery life-span will decrease with usage. Charge the battery at least once every month to preserve battery in the event the device is not used for long time. ● Battery warning: Improper use of the battery may cause fire or chemical burns. The battery may explode in case of damage. ● Do not modify, repair or remove without professional guidance. ● Do not use corrosive or volatile liquid for cleaning. ● Do not drop or shake the device, it may break internal circuit boards or mechanics. ● Keep the device in dry and ventilated environment. Avoid high humidity and high temperature. ●
This device is not water-resistant; keep it away from moisture. ● Keep the device away from little children.
Disclaimer
- In no event shall Technaxx Deutschland be liable for any direct, indirect punitive, incidental, special consequential danger, to property or life, improper storage, whatsoever arising out of or connected with the use or misuse of their products. ● This device is NOT intended to be used for illegal surveillance purposes and shall not be used in any form as evidence for claim purpose. ● Some countries prohibit drivers from mounting anything on the windshield, or restrict mounting of dashcams to specific areas of the windshield. It is the owner's responsibility to mount the dashcam in compliance with local laws. ● Error messages may appear depending on the environment it is used in. ● Technaxx Deutschland is not liable/responsible for non- recording of events, missing files, etc.
Features
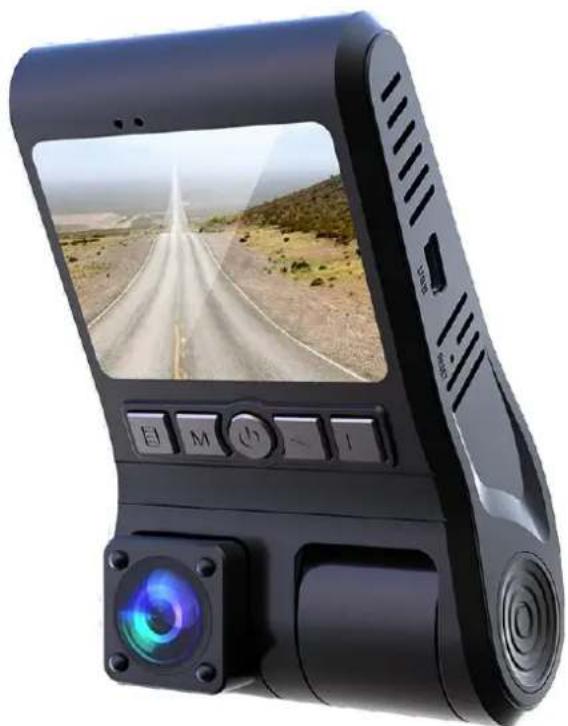
- Dual Dashcam with front (1080p, interpolated) and interior (480p) camera
- Front camera with 120^ viewing angle; wide angle lens
- Recording of front and interior camera at the same time
- Front and interior camera can be rotated independently of each other
- Interior camera has 3 additional Infrared LEDs for night vision
- MicroSD card support, up to 32GB (not included)
• G-Sensor for file protection - Loop recording
• 2.0" (5cm) LCD display - Media playback
- Motion detection
- Park monitoring
• Sound captures with microphone
• Window shield suction cup holder
• Power supply with extra long cable
Product overview
| Left | Front | Right | ||
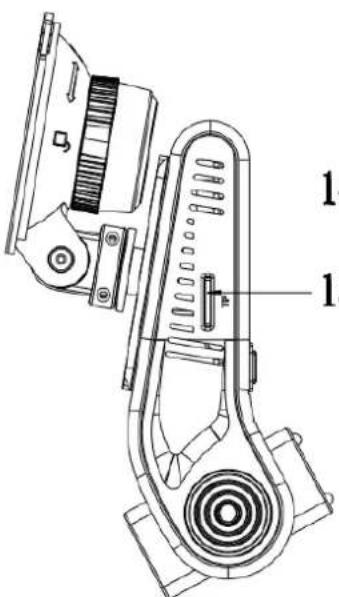 | 4—5 | 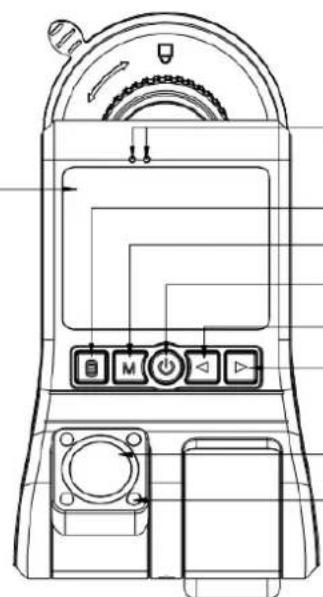 | -13-12-11-10-9-8-7-6 | 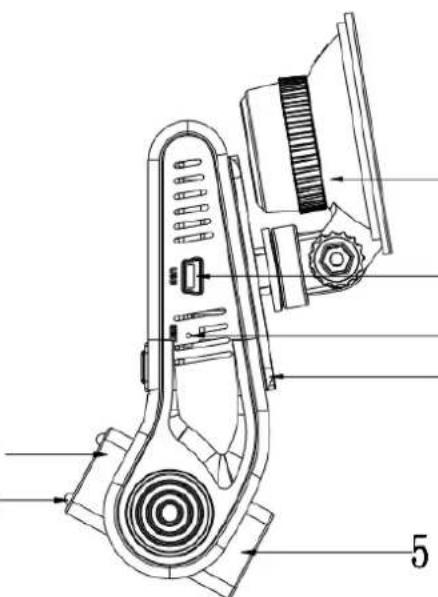 1.2.3.4 1.2.3.4 |
| 1 | Suction cup mount | 9 | Left button (up) | |
| 2 | Power supply port (MiniUSB) | 10 | Power button / Confirm button | |
| 3 | Reset | 11 | Menu button | |
| 4 | Bracket plate | 12 | Mode button | |
| 5 | Front camera | 13 | Indicator light | |
| 6 | Infrared LED / LUX sensor | 14 | Display screen | |
| 7 | Interior camera | 15 | MicroSD card slot | |
| 8 | Right button (down) | |||
Button functions
| 3 | Reset | If the dashcam does not work, try resetting the device. Press the reset button with a fine pen or paperclip. |
| 8 | Right button | - Short press in record mode to switch camera view (Front & interior camera) - Short press in settings to choose - Short press in playback mode, switch to next file |
| 9 | Left button | - Short press in record mode to enable/disable microphone - Short press in settings to choose - Short press in playback mode, switch to previous file |
| 10 | Power button / Confirm button | - Long press for 3 seconds to power off. - Short press to power on/ confirm/ start recording |
| 11 | Menu button | - Short press: - in recording state for manual locking the file - in power on state to open the settings - in playback mode to open delete interface |
| 12 | Mode button | - press short to change mode - press short for return - when entering the menu to set the date, it is used to switch the year/month/day/hour/minute/second |
Display symbols
 | Video mode |  | Photo mode |  | Playback |
 | Motion detection enabled |  | Park monitoring enabled |  | G-Sensor triggered (video recording locked) |
 | MicroSD inserted |  | Audio recording enabled |  | Normal operation, via USB cable |
 | No MicroSD recognized or inserted |  | Audio recording disabled |  | Shown when park monitoring is triggered |
Prepare for use
Turn off the vehicle engine.
MicroSD card
Note: Before inserting or removing the MicroSD card, make sure that the dashcam is turned off.
- Insert the MicroSD card into the dashcam card slot (15).
Pay attention to the orientation of the MicroSD card, the golden contacts should show to you when you are looking at the display. Once inserted, the MicroSD card should be gently clicked in.
- To remove the MicroSD card, press down the MicroSD card lightly and it should pop out of the slot.
Info: Saving file size:
Front camera: 10s = about 104MB; 3min = about 770MB
Interior camera: 10s = about 31MB; 3min = about 231MB
32GB can save up to 90min front and 90min interior camera video footage.
Note:
● Pay attention to the direction of the MicroSD card when inserting it.
- If dashcam and MicroSD card are not compatible, insert a different MicroSD card and try again.
- Use a high-speed MicroSD card (select 8GB, Class 10 or above MicroSD card.)
- Select the FAT32 format for the memory card.
- In order to prevent the MicroSD card from being too slow and affecting the normal recording of the product, it is recommended to format the MicroSD card regularly every month.
- In order to avoid the aging of the MicroSD card and affect the normal recording of the product, it is recommended to replace the new MicroSD card regularly within 6\~12 months according to the frequency of use.
(Memory cards are consumables and need to be checked regularly.)
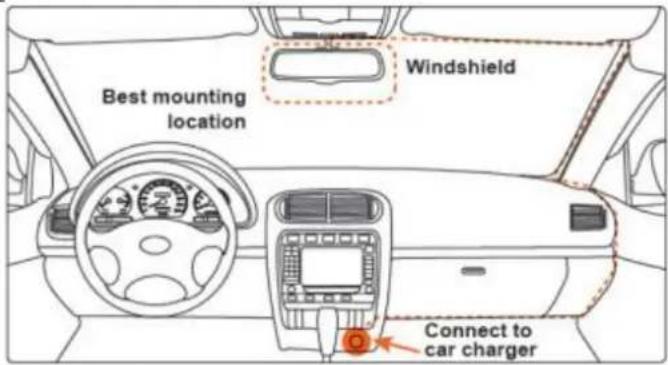
Mounting instructions
| Outside view | Inside view |
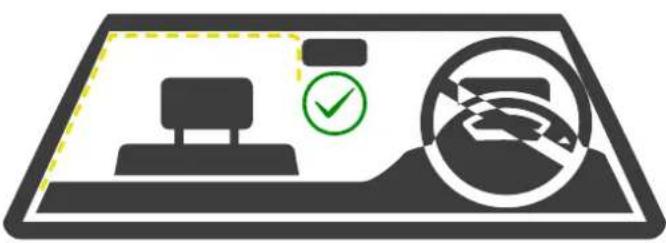 |  Caution: We are not responsible for any damage caused to, or caused by, the air bag due to incorrectly placing the device within the range of the safety bag area. Caution: We are not responsible for any damage caused to, or caused by, the air bag due to incorrectly placing the device within the range of the safety bag area. |
| Best mounting location | |
| Windshield | |
| Connect to car charger | |
| Caution: We are not responsible for any damage caused to, or caused by, the air bag due incorrectly placing the device within the range of the safety bag area. | |
- Choose a mounting location that perfectly captures the entire field of view at the front of the vehicle without obstructing the driver's view.
● The suction cup is connected to the dashcam and its bracket and the host are fixed together. - When finding the best mounting position on the windshield. Place it firmly on the windshield and lock into place.
Connect and arrange your power cable
- Connect the power cable to the MiniUSB port (2) of the dashcam and the power socket of the vehicle.
- For wiring, the extension cable of the power supply can be laid along the edge of the windshield of the vehicle. See picture above, dotted line.
- Start the engine and check whether the machine is installed correctly.
Note: When the machine is installed correctly, the system indicator lights up and the dashcam starts up.
First start
You already should have inserted a MicroSD card, mounted, connected and arranged the cable management of the dashcam. But if not, check the previous points “Prepare for Use” and “Mounting instructions”.
- Start ignition of the vehicle to power the cigarette lighter socket. The dashcam turns on automatically and directly opens the language setting.
-
Choose your language by using the right/left button (8/9) to go down/up and confirm your selection by pressing the confirm button (10). After choosing the language you get automatically into video mode / power on state.
-
Now set current Date&Time. Press the menu button (11). Once press the left button (9) to go up to get to the Date setting. Press confirm button (10). Change the Year(Y) / Month(M) / Day(D) / Hour(H) / Minute(M) / Second(S) by using the right/left button (8/9). To get to the next entry press the mode button (12). When you are finished confirm your settings by pressing the confirm button (10).
-
Either go further through the menu by using right/left button (8/9) to get the dashcam personalized or press the mode button (12) to close the menu.
-
Now you are in Video mode 📋. To start a Manual video recording press the confirm button (10). To stop the recording press the confirm button (10) again. The device is always in automatic recording mode. Means if you start the vehicle the dashcam powers on and starts Automatic video recording. Until you power off your vehicle. Than the video file is saved automatically.
Note: Videos and photos can only be saved to an inserted MicroSD card!
-
To get into Photo mode press mode button (12). By pressing the confirm button (10) you can take a photo. Font and interior camera photos are taken at the same time.
-
To get into Playback mode ▶ press the mode button (12) once more when you were in photo mode before. Playback the videos by pressing the confirm button (10) or switch to the video/photo files by using the right/left button (8/9).
Menu overview
Stop the recording beforehand. In power on state, press menu button (11) to enter the menu. Press right/left button (8/9) to select the appropriate setting. Press the confirm button (10) to enter or set.
| Icon | Setting | Option |
 | Video Quality | Resolution: FHD (1080p), HD (720p) |
 | Photo Quality | 1MP, 2MP, 5MP, 8MP |
 | Button sound | On, Off; On: Pressing buttons gives an audio feedback. |
 | Loop recording | 1minute, 3minutes, 5minutes |
 | Motion Detection | On, Off; On: Dashcam starts recording when motion is detected on the front camera. |
 | White Balance | Auto, Sunny, Cloudy, Incandescent, Fluorescent |
 | Exposure | -3, -2, -1, 0, 1, 2, 3 |
 | Screen auto off | Screen saver: Off, 1minute, 3minutes, 5minutes |
 | Record Audio | On, Off; On: Audio is recorded with the video. |
| Park Monitoring | On, Off; On: When the G-Sensor is triggered while the vehicle is parked, Dashcam start recording for 10 seconds. | |
 | G-Sensor | Off, High, Medium, Low |
 | Date | Year(Y) / Month(M) / Day(D) / Hour(H) / Minute(M) / Second(S) |
 | Language | Polski, English, Nederlands, Francais, Deutsch, Cesky, Italiano, Português, український, Español |
 | Time stamp | On, Off; On: Shows the date & time on the recording. |
 | Format | The MicroSD card will be formatted. All files are deleted. Locked files are deleted, too! |
 | Factory Reset | Restore system parameters to factory settings. Dashcam powers off. |
 | Version | Firmware version |
Functions
Indicator light
Blue light on: power on
Blue light off: power off
Date & Time
In the power on state, short press menu button (11) to enter the system setting menu. Short press right/left button (8/9) to move to the setting date option. Short press confirm button (10) to enter. Short press mode button (12) to switch between Year(Y) / Month(M) / Day(D) / Hour(H) / Minute(M) / Second(S). Short press right/left button (8/9) to add or subtract the corresponding time. After everything is set, short press confirm button (10) to exit and save.
Note: In order to effectively record evidence for driving safety accidents, set the correct date and time before using this machine.
Video mode / Record
When connected to a vehicle power socket, the device automatically enters recording mode and starts recording. The recording time appears on the screen and indicates that the device is recording. To stop recording, press the confirm button (10), the recording time disappears, indicating that the recording has stopped.
If you want to protect the current recording, then press the menu button (11) and the lock icon appears on the screen, which indicates that this recording has been locked and will not be overwritten by new video files.
Automatic video recording
Prerequisite: The cigarette lighter socket is switched on and off with the ignition.
Start the vehicle engine, the dashcam automatically powers on and starts the recording function, the indicator light is on. Turn off the vehicle engine, the dashcam automatically saves the recorded video file and shuts down. The recorded video files are saved in sections on the MicroSD card. When the MicroSD card is full, the dashcam will overwrite the oldest recorded video file. The loop recording time can be set in the menu by itself as 1 minute/3 minutes/5 minutes steps.
Note: ● If you select any of the three settings of 1/3/5 minutes, the dashcam will overwrite the oldest recorded video file when the MicroSD card is full.
- The video files and photo files of the front and interior camera are respectively saved in the DCIMA folder (front) and DCIMB folder (interior) under the DCIM directory in the MicroSD card.
Manual video recording
In power on state, short press the power button (10), the dashcam will start recording. To stop the recording press the power button (10) again. If you need to shut down the dashcam, press and hold the power button (10) for 3 seconds. The dashcam will automatically save the recording and shut down.
Photo mode
Stop the recording beforehand. In the power on state, short press the mode button (12) to enter the photo mode. The icon in the upper left corner of the display has been converted from a camera to a photo. Short press the confirm button (10) to take a photo. If you need to switch back to the video mode short press the mode button (12) twice.
Note: Taking a photo means getting a photo of the front and the interior camera at the same time.
Collision sensing (G-Sensor)
The dashcam has a built-in collision sensor (G-sensor). In the event of a serious vehicle collision, the dashcam locks the video at the time of the accident and saves it as a special video. The lock icon is displayed on the top of the screen. The locked video will not be overwritten by the loop function.
Note: ● The name of the locked video file starts with LOC. The normal video file starts with MOV.
- The collision sensor (G-sensor) supports sensitivity adjustment. You can change the settings in the setting menu according to actual needs.
One button video lock
This dashcam has a one-key lock function, which can lock the video file that need to be retained without being overwritten by loop recording. In recording mode, short press the menu button (11), the dashcam will lock the video file.
One button mute
In the video or recording mode, short press the left button (9). The microphone at the top of the screen will turn into a prohibited icon, indicating that the audio recording has been turned off. At this time, the dashcam only records video files but no audio. Short press the left button (9) again when the microphone prohibition icon at the top of the screen disappears, indicating that the recording function with audio is restored.
Note: The settings will be automatically saved and there is no need to set the mute function after turning on the dashcam again.
Motion detection
When the motion detection function is turned on, a man icon is shown in the top of the display. As soon as a picture change is detected on the front camera, the dashcam records automatically for at least 10 seconds. If further motion is detected the dashcam records as long as motion is detected. However, the maximum is the set loop recording time.
Note: The motion detection function is only available for the front camera. The interior camera does not support motion detection but is recorded as well!
Park monitoring
Prerequisite: The cigarette lighter socket is switched off with the ignition. The park monitoring function is for monitoring while the vehicle is parked. When the park monitoring function is turned on, a car icon is shown in the top of the display. In power off state, the dashcam detects vibrations and automatically starts to record and lock the file. The recording lasts 10 seconds. After that, the dashcam turns off again.
All videos created in Park monitoring mode without external power supply are locked video files and cannot be overwritten with loop recording files.
Note: ● With one charge this function max. last for about 15 recordings using the internal battery and last for about 4 days, depending on how often the dashcam is triggered. ● The internal battery needs to be charged. This is done while normal use.
Playback mode ▶
Stop the recording beforehand. Short press mode button (12) twice in the power-on state to switch to playback mode. Short press right/left button (8/9) to find the file to be played back. Short press confirm button (10) to play. Playback is paused by pressing the confirmation key (10). To exit a
paused file press the mode button (12). To exit the playback mode short press the mode button (12).
Press the menu button (11) to delete a chosen file. If it is not possible to delete the file check if a lock is displayed in the screen. This file cannot be deleted because it is locked.
Troubleshooting
Under normal operating conditions, if there is an problem with the product, refer to the following methods to solve it:
| Problem | Solution |
| Device does not switch on | - Check if the power supply is properly connected to the dashcam or cigarette lighter socket.- Unplug it, wait 1 minute and then plug it back in.- If it is due to software problems, it can be restored to the factory settings by pressing the reset button. |
| Automatically stop recording during recording, or do not cycle recording | - Due to the huge amount of high-definition video data, it is possible that the read and write speed of the memory card cannot keep up.- Use high-speed MicroSD card such as Class10 high-speed card.- It may also be caused by the fact that the G-Sensor function is turned on and all the files in the memory card are locked. Turn off the G-Sensor and format the memory card. |
| Each period of the loop recording is different from the setting | - Check whether the motion detection function is turned on, because the recording time in the motion detection state depends on whether motion is detected in front of the dashcam or not. |
| The resulting video is not clear | - Check the lens for dirt and/or fingerprints.- Clean the lens surface before shooting to keep the lens clean and tidy. |
| The resulting video is sometimes good and sometimes bad | - The shooting light environment, such as backlight, smooth light and the intensity of light, etc., which will cause different effects on the recording. |
| Crash | - After the machine crashes, short press the reset button to power off the device. Press the power button (10) to start the dashcam again. |
Technical specifications
| Working modes | Video / Picture / Playback |
| Image sensor front camera | 1MP, 1/4" CMOS |
| Image sensor interior camera | 0.3MP, 1/6" VGA |
| Viewing angle front camera | Horizontal 100°, Diagonal 120° |
| Viewing angle interior camera | Horizontal 60°, Diagonal 80° |
| Display | 2.0" (5cm) LCD |
| Display resolution | 320x240 pixel |
| Video resolution front | 1080P (FHD1920x1080, interpolated), 720P (HD1280x720) |
| Video resolution interior | VGA (640x480) |
| Video frame rate | 30fps |
| Video encoding format | MJPEG |
| Video saving format | AVI |
| Picture resolution front / interior camera | 1MP (1280x960), 2MP (1920x1080, interpolated), 5MP (2592x1944, interpolated), 8MP (3264x2448 interpolated) / 0.3MP (640x480) |
| Picture saving format | JPG |
| Loop recording | 1min / 3min / 5min |
| Microphone / Speaker | Built-in |
| Speaker | 0.5W / 8Ohm; oval |
| Infrared LED | 3x each 940nm |
| Supported MicroSD-card | 8-32GB; class10 (not included) |
| Working voltage | DC5V / 1A |
| Working current | 520mA |
| Battery | Built in rechargeable Li-lon battery 3.7V 200mAh |
| Power adapter | Input: DC12-24VOutput: DC5V / 1A |
| Power cord length | 3.5m |
| Working temperature | -20°C – 60°C |
| Storage temperature | -20°C – 70°C |
| Working humidity | 15-85%RH |
| Material | ABS |
| Product size / weight | 10.5 (L) x 7.0 (W) x 4.5cm (H) / 80g |
| Language | EN, FR, DE, ES, IT, PL, CZ, NL, PO |
| Package content | FullHD Dual Dashcam TX-185, window suction cup holder, bracket plate, 12-24V power cable, user manual |
Support
Service phone No. for technical support: 01805 012643 (14 cent/minute from German fixed-line and 42 cent/minute from mobile networks). Free
Email: support@technaxx.de
The support hotline is available Mon-Fri from 9am to 1pm & 2pm to 5pm
Care and maintenance
Clean the device only with a dry or slightly damp, lint-free cloth.
Do not use abrasive cleaners to clean the device.
This device is a high-precision optical instrument, so in order to avoid damage, please avoid the following practice:
- Use the device in ultra-high or ultra-low temperature.
- Keep it or use it in moist environment for long.
- Use it in rainfalls or in water.
- Deliver or use it in strongly shocking environment.
Declaration of Conformity

The EU Declaration of Conformity can be requested at the following address: www.technaxx.de/ (in the lower bar "Declaration of Conformity").
Disposal

Disposal of the packaging. Sort packaging materials by type upon disposal.
Dispose of cardboard and paperboard in the waste paper. Foils should be submitted for recyclables collection.

Disposing of old equipment (Applies in the European Union and other European countries with separate collection (collection of recyclable materials) Old equipment must not be disposed of with household waste! Every consumer is required by law to dispose of old devices that can no longer be used separately from household waste, e.g. at a collection point in his or her municipality or district. This ensures that the old devices are properly recycled and that negative effects on the environment are avoided. For this reason, electrical devices are marked with the symbol shown here.

Batteries and rechargeable batteries must not be disposed of in household waste! As a consumer, you are required by law to dispose of all batteries and rechargeable batteries, whether they contain harmful substances* or not, at a collection point in your community/city or with a retailer, to ensure that the batteries can be disposed of in an environmentally friendly manner. * marked with: Cd = cadmium, Hg = mercury, Pb = lead. Return your product to your collection point with the fully discharged battery installed inside!
Made in China
Distributed by: Technaxx Deutschland GmbH & Co. KG Konrad-Zuse-Ring 16-18, 61137 Schöneck, Germany
FullHD Dual Dashcam TX-185