
DOS194 - Epilator LIVOO - Free user manual and instructions
Find the device manual for free DOS194 LIVOO in PDF.
| Product type | Multi-function epilator |
| Brand | Livoo |
| Model | DOS194 |
| Power supply | 5V / 1000mA via USB cable (adapter not included) |
| Battery type | Rechargeable lithium-ion 3.7V, 600mAh |
| Battery life | 90 minutes |
| Charging time | Approximately 2 hours with 5V/1A adapter |
| Main functions | Epilation, shaving, foot care (exfoliation), facial cleansing, massage |
| Heads included | Epilation head, shaving head, foot care head, facial cleansing brush, massage head |
| Recommended use | Body (legs, arms, underarms, bikini line), feet, face |
| Recommended frequency of use | Underarm epilation: 1x/week; legs/arms: 1x/2 weeks; foot care: 1x/2 weeks |
| Cleaning | Cleaning brush included; rinse heads with warm water; wipe with a dry cloth |
| Head replacement | Shaving head and foot care head: replace every year |
| Safety | Do not use near water; do not immerse; keep dry; unplug before cleaning |
| Target audience | Adults; children aged 8 and above under supervision |
| Usage | Household use only |
| Included accessories | USB cable, cleaning brush, 5 interchangeable heads |
Frequently Asked Questions - DOS194 LIVOO
User questions about DOS194 LIVOO
0 question about this device. Answer the ones you know or ask your own.
Ask a new question about this device
Download the instructions for your Epilator in PDF format for free! Find your manual DOS194 - LIVOO and take your electronic device back in hand. On this page are published all the documents necessary for the use of your device. DOS194 by LIVOO.
USER MANUAL DOS194 LIVOO
natural_image
White LVOO facial recognition device with a circular head and orange handle, mounted on a base (no visible text or symbols)Livoo
VüÄÊ-ãÈô:ôë.â.2ôôôôô
Figure 1
natural_image
Three-step diagram showing a coffee maker's processing process, with no text or symbols present.Figure 2
Figure 3
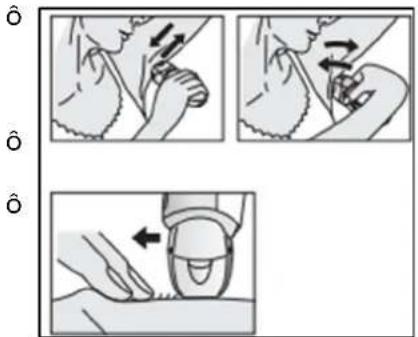
Figure 4
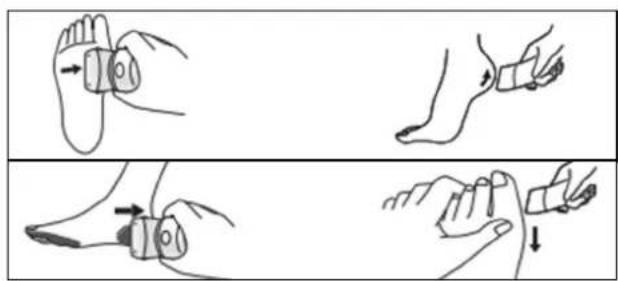
Figure 5
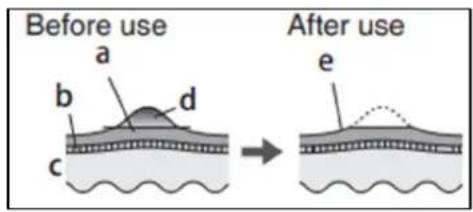
Figure 6
natural_image
Two line drawings showing hands using a tool to adjust or install a mechanical component (no text or symbols present)Figure 7
natural_image
Technical line drawing of a mechanical component with a handle and internal structure (no text or symbols)Figure 8
natural_image
Symbol of a trash bin with crossed lines indicating no waste or restriction, and a solid black rectangle below (no text or labels)Thank you for choosing a Livoo product!
E» Ô
"ãuÃõöüEduÃ,ôyãuÃöö•Ãöüäuuü,ô•ÉdôyãuÃôhü•đôhãÈüÊô•ÃüôÈatô„uÊtôãö„üätÊ,ôthüyô•ÃüôüxtüÊÊ-âÊÊôâßôyãu•òòãw-ÊgôôyãuôûtâôôgütôôãöâêÜÃôîtâôôyãuÃôßÃ-üÊdÊôô•Édôôß•m-òy,ôótâôôõÃ-ÊgôôthümôôtägüthüÃ,ûxõüÃ-üÊäüÊ.ôL-êãâ'Êô•-mô-Êótâôhüôôôyãuòo-ëüôyãuÃòø-ßüótâôthüôßuòòüÊt,ôwh•tüëüÃów-ÊhüÊoyáuòh•yü•Ã.ÔW-ÊtüÃôÕäòüttü,ôÊummüÃöö•Ãöüäuuü.ôÉÂõthüôâthüÃów•yô•ÃäuÈd.õlt'Êouõtâôyãu.ôû•Üüö•dé•Èt•güðâßÃüüdâmôßÃõßüüòôgãädômämuÎètÊöüëüÂyôd•y.ô
ûh•t'Êôwhyôwü'ÃûôããÈÎt•Ètòyô-ÊÈäë•t-Êgô•ÈdôãÃü•t-ÊgôãòüëüÃôõÃáduatÊôßuòòõâßözüÎt,õoutômãÊtaôÎsô•òâF-ÊdôãuÃôüÎt-Ãûôããòùïät-âÊôãÈôãuÃôwüöÊ-tüôwww.õ-ëãâ.üÊ.õô
Livoo, your daily companion till social networks

@L-ëäåô

@ò-ëãã¡ãßß-1
ê
ê

@L-ëäîô
Safety!Instructionsêê
°òù•Êü,ôt•Üüôt-müôtãôÃü•dôwüòôôthüô-ÊÎtÃuät-ãÊôÊhüütôöüßãÃüôthüôß-ÃÎtõuÊüô•ÉdôÜüüöôthümôßãÃô•ê
Aôm-ÊuÊüôãßôthüô·õõò--Èäüôä·Êôd·m·güô-tôãÃôhuÂtôthüôuÊüÃ.ôAÊÉuÃûôth·tôyãuôuÊüôthüô·õõò--ÈäüôßâßãÃôwh-âhô-tô-ÊôdüÊ-gÊüd.ôWüôÃÜßuÊüô·ÈyôÃüÊõâÊÊ-ö-ò-t-üÊô·ÊôßãÃôthüôd·m·güÊööyô·Êô-ÊäãÃÄüäté m·Ê-õuò·t-âÈ.ô
â. Küüõôthüöö•äÜ•g-Ègôm•tüÃ-•òô•w•yôßÃãmôäh-òdÃüÈ.ôô
2. ûhüô•õõò--•EäüômuÊtôãÈòyôöüôÉuõõò-üdô•tôÊ•ßütyôüxtÕôòâwõëåòt•güôäãÃÛÊõåÈd-Ithüô m•ÄÜ-Ègô âÈô thüô •õõò--•Eäü.ô ûh-Êô •õõò--•Eäüô ääÈt•-ÈÊô ö•ttüÃ-üÊô th•táÄüõò•äü•öòü.ô
ê. DāōÊātôōÃÜÊÊôthüôöuttãÊÊôtããôh•Âdô•Êô-tôäauòdôd•m•güôthüôôÃäduät.ôô
4. DāoÈātōuÊüôähüm-ä•òÊôãÈôthüöõÃäduät.õõ
5. WhüÈôthüûuÈ-tô-ÊôÈâtô-ÊôuÊü,ôm•ÜüôÊuÃüô-tô-ÊôäãÃÄüätòyôtuÃÈüdôãßßô•ÈdôÊtãÃüdÃyôõò•äü.ôô
è. »üëüÃô-mmüÃÊüôthüô•õõò--•Èäüô-Êôw•tüÃôãÃô-Êô•ÈyôãthüÃôò-Çu-dÊ.õô

-
W•ÃÊ-Êg!ô Dãô Êãtô uÊüô th-Êô •õõò--•Ëäüô Èü•Ãô ö•thtuöÊ,ô ÊhãwüÃÊ,ô ö•Ê-ÊÊô ãÃô cêüÊÊüòÊôäãÈt•-Ê-Êgôw•tüÃ.ô
-
ûãôõÃüëüÈtô•ôò-ßü-thÃü•tüÈ-ÈgôüòüätÃ-ä•òôÊhãäÜ!ô»üëüÂótâuähôthüô•õõò-•Èäüów-h•ÈdÊôwhüÈôuÊ-Ègô-t!ôô
- Küüõôthüô•õõò-•ÈäüôdÃy.ô
â0. WAî»I»G:ôDüt•ähôthüôh•Èd-hüòdôõ•ÂtôßÃæmôthüôuÊdôãÃô•d•õtãÃô(ôÈâtôÊuõõõ-üd)Êu äãÃđôöüßãÃûôäòü•È-Égô-tô-Êw•tüÃ.ô
ââ. ùh•ëüÃ,ôwütôÊh•ëüÃ,ô•È-m•òôäò-õõüÃ,ôh•-Ãôäò-õõüÃô•Èdô•õõò--ÈäüÊôßãÃôm•È-äuÕüd-äuÃüôä•ÈôöüûEüdôöyôäh-òdÃüÊô•güdôßÃâmô8ôyü•ÃÊô•Èdô•öäëüô•ÈdôõüÃÊaÊÊáÄüduäüdôôhyÊ-ä•ò,ôÊüÊÊãÃyôãÃômüÈt•òôä•õ•õ-ò-t-üÊôãÃôò•äÜôãßôuxõüÃ-üÈäüô•ÉdÜÊãwòüdgü,ô-ßôthüyôh•ëüôöüüÊög-ëüÊôÊuõüÃë-Ê-ãÊôãÃô-ÊÊtÂuät-ãÊôããÊäüÃÈ-Êgõi•õõò--Èäüô-Êô•ôÊ•ßüów•yô•ÈdôuÈdüÃÊt•Èdôthüôh•z•ÃdÊô-Êëãòëüd.ôô
â2.Ch-òdÃüÊôÊh•òòôÊâtôõò•yôw-thôthüô•õõò-•Éäü.ô
âê. Còü•È-Ègô •Èdô m•-ÈtüÈ•Èäüô öyô thüô uÊüÃô Êh•òòô Èâtô öüô m•düô öyô äh-òdÃî ÊuõüÃë-Ê-ãÈ.ôô
a4. IßôthüôUùBôä•öòüô-Êôd•m•güd,ô-tômuÊtôöüôÃüõo•äüdôöyôthüôm•Èuß•ätuÃüÃ,ô-tÊôÊ•güÊtôãÃôÊ-m-ô•ÂòyôÇu•ò-Îз-üdôõüÃÊâÊÊô-ÊôãÃdüÃôtãô•ëã-dôh•z•Ãd.ô
â5. DãôÈātôõuòòôthüôäh•Ãg-Ègôä•öòü.ô
âè. WAî»I»G:ôôFãÃôthüôõuÃõãÊüÊôãßôäh•Âg-Èg,ôãÈøyôuÊüôthüôdüt•äh•öòûûUùBôä•öòûõõ.
â7. »üëüÃôtÃyôtãôÃüö•-Ãô•ôdüßüät-ëüö•õõö•-ÈäüöyäuÃÊüòß.êô
â8. DâôÊâtôòü•ëüôthüôuÈ-tôuÈ•ttüÈdüdôwhüÊôÊâtô-ÊôuÊü.ô
â9. ûh-Êôô•õõò-•Èäüôô-ÊôôÃÜÊüÄëüdôôßãÃôô•ôôdâmüÊt-äôôuÊü.ôôAÈyôôãthüÃôôuÊüôô(äãmmüÃä-•ò,ôütä.)ô-Êôuxäòudüd.ô
20. Ißôyăuôw•ÈtôtăôuÊüôyăuÃôõÃäduätôw-thô•Èô•d•õtãÃ(ÈâtôÊuõõò-üd)ô-ÊÊtü•đôãßôUùEâÈòyôuÊüdô•d•õtãÃôw-thôõãwüÃôÊuõõöyô5VçâA.ôAd•õtãÃÊôw-thôô-ÊÊôßãÃô-ÊÊÜÂt-êÃäÜït-âutòütÊôÊh•òòôõüô•tôòü•Êtôl°"4.ô
2â. F•Êtôäh•ÂgüÃô•ÂüôÈâtôäämô•t-öòü.ô
22. ûh-Êô•õõò--•Éäüô-Êô-ÈtüÈdüdôtãõöüûuÊüdô-ÊôhãuÊühãòdô•ÈdôÊ-m-ò•Ãô•õõò-ä•t-ãÈ
• Êt•ßßöÜ-tähüÈô•Äü•Êô-ÈôÊhãõÊ,ôâßß-äüÊô•ÈdoâthüÃôwãÃÜ-ÉgôüÈë-ÃãÈmüÈtÊô
• β·ÄmôhãuÊüÊô
• öyôäò-üÈtÊô-ÉôhâtüòÊ,ômātüòÊô•ÈdôãthüÃôÃÜÊ-düÈt--•òôtyõüôüÈë-ÃãÈmüÈtÊô
- öüdô•ÈdôöÄü•Üß•ÊtôtyõüôüÈë–ÄãÈmüÈtÊô
TechnicalêSpecificationsê
IÈout:ô5Vôâ000mA.ôB•ttüÃy:ôâôxôê.7V,ôè00mAh.ôAutãÈãmyô:ô90ôm-Ê.ôôô
Ô
Órawingêofêtheêdeviceê
äigureêlê
| aêê | Eõ-ò·t-ãÈôhü·dôô | êêfôôEõ-ò·t-ãÈôCãëüÃô |
| bê | ùh·ë-Ègôhü·cô | ê |
| cê | Fããtôä·Äüôhü·dôô | ê |
| dê | Exßãò-·t-ãÈôhü·dô | ê |
| eê | «•ÊÊ·güôhü·d ĉ | ê |
| gô | Còü•È-ÈgôöÄulô |
| hô F•à--•òôöÄuhôôäëüÂô | |
| iô ÉÈçãßßõouttãÊô | |
| Äô | Ch•Äg-Ègôö•Éiê |
ê
äigureê6ê
| aê | H·ÃdüÊüdôò·yüô | ĉ |
| bê | Eõ-düÃmô | ĉ |
| cê | DüÃm•ô | ĉ |
| d | °āĀt-āĖōtāōöūôÃùmāô |
| e | Lü·ëüôÊămüôãßôthüôh·ÂdüÊüdôc |
íleaningêandêmaintenanceê
íleaningê
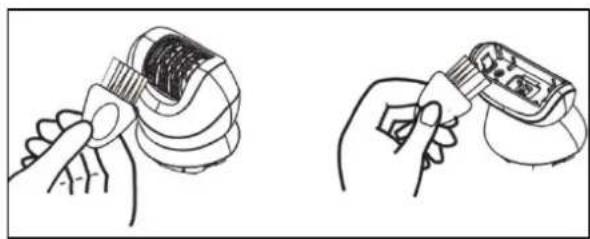
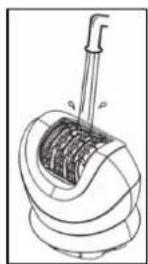
â. ûuÃÈôãßßõthüôdüë-äüô•ÉdôuÉõòugõthüô•õõò--•Éäü.õõ
2. W-thôthüôdòü•È-ÈgôõÄuÊh,ôÂümäëüô•ÈyôÃÜÊ-duüÊô(F-guÃüô7),ôÊuähô•Êôh•-ÃôãÃôdü•đôÊÜ-È,ôwh-âhô uÊü.ô
ê. "äuôä·Êôäòü·Êôthüôd-ßßüÄüÈtôhü·dÊõuÈdüÃôt·õôw·tüÃô(F-guÃüô8).ÔW-õüôthüôdüë-äüôw-thô·ôdÃyôä"
- »üëüÄûuÊüô•Èyô•öÕÊ-ëüô•güÈtÊôãÃôÊãòëüÈt.ô
We recommend using the product within 30 minutes •fter b•thing or showering. With the feet cle•n, wipe off •ny w•ter on the skin. (E•ch use should be •pproxim•tely 10 minutes (5 minutes on e•ch foot, 10 minutes tot•l for both feet)
- Att·ch the foot c·re he·d (Figure 1-c), push down firmly until you he·r · "click".
- Press the power switch once.
- Bring the foot c•re he•d into cont•ct with the skin, •nd begin filing (figure 5)
Tips
Filing • single loc•tion for • long time c•n c•use it to become hot with friction. Filing should be performed •bout once every two weeks.
Do not use the product for filing •nything other th•n c•lluses •nd h•rdened skin on the feet. (Figure 6) Filing too l•rge •n •re• c•n result in even l•rger c•lluses forming. Therefore, be sure to le•ve some of the h•rdened l•yer.
Facial cleaning and massage
Place the massage head or the exfoliation head (figure 1-d or figure 1-e) and push it until the clicks. Add a small amount of your regular face wash to the brush and wet your face with lukewarm water. Turn on the device and make a circular motion to clean your face, nose, etc.
Procedure to observe for battery's end of life
The •ppli•nce b•tteries must be removed before disc•rding the equipment. Please follow the procedure below: Ensure that your •ppli•nce is disconnected so •s to reduce •ny risk of electric•I shock. Disch•rge the b•tteries fully. Remove the protection cover situated in •loc•tion where you connect the m•ins volt•ge •d•pter •nd it is removed so •s to •ccess the b•tteries comp•rtment. C•rry • screwdriver to remove the screw.
Remove the b·tteries from the equipment. Cut the c·bles ·nd t·b connecting the b·tteries in the printed circuit ·nd remove them.
ATTENTION: THESE lithium CELLS MUST BE RECYCLED OR ELIMINATED IN ACCORDANCE WITH THE EQUIPMENT SCRAPPING.
Do not burn, dism•ntle, crush or bre•k out the b•tteries bec•use they c•n rele•se toxic subst•nces. Do not expose them to extreme temper•tures.
Drop them in the b·tteries recycling bins designed for this purpose or return them to your ret·iler.
natural_image
Symbol of a trash bin crossed with no visible text or labelsCorrect disposal of the unit (Electrical and Electronic Equipment).
(Applicable in the European Union and the rest of Europe that have adopted separate collection systems countries). The European Directive 2012/19/EU on Waste Electrical and Electronic Equipment (WEEE), requires that old household electrical appliances must not be disposed of in the normal household waste stream. Old appliances must be collected separately in order to optimize the recovery and recycling of the materials they contain and reduce the impact on human health and the environment. The symbol of the crossed out dustbin is marked on all products to remind the obligations of separate collection. Consumers should contact their local authority or retailer for information concerning the correct disposal of their product.
• Non contr•ctu•l illustr•tion
- Product information is subject to change without prior notice.
natural_image
Symbol of a trash bin crossed with no text or labels, accompanied by a black rectangular block below (no readable text or symbols)


- Thank you for choosing a Livoo product!
- Livoo, your daily companion till social networks
- Safety!Instructionsêê
- TechnicalêSpecificationsê
- Órawingêofêtheêdeviceê
- íleaningêandêmaintenanceê
- íleaningê
- Tips
- Facial cleaning and massage
- Procedure to observe for battery's end of life
- ATTENTION: THESE lithium CELLS MUST BE RECYCLED OR ELIMINATED IN ACCORDANCE WITH THE EQUIPMENT SCRAPPING.
- Correct disposal of the unit (Electrical and Electronic Equipment).
Brand : LIVOO
Model : DOS194
Category : Epilator