KD-X210 - Car stereo JVC - Free user manual and instructions
Find the device manual for free KD-X210 JVC in PDF.
Download the instructions for your Car stereo in PDF format for free! Find your manual KD-X210 - JVC and take your electronic device back in hand. On this page are published all the documents necessary for the use of your device. KD-X210 by JVC.
USER MANUAL KD-X210 JVC
For customer Use: Enter below the Model No. and Serial No. which are located on the top or bottom of the cabinet. Retain this i information for future reference. Model No. Serial No.
How to read this manual • Operations are e~plained mainly using buttons on the faceplate. • [XX] indicates the selected items. • (• XX) indicates references are available on the stated page.
· Do not operate any function that takes your attention away from safe driving.
·Volume setting: • Adjust the volume so that you can hear sounds outside the car to prevent accidents. • Lower the volume before playing digital sources to avoid damaging the speakers by the sudden increase of the output level. General: • Avoid using the USB device or iPod/iPhone if it might hinder saf~ driving. • Make sure all important data has been backed up. We shall bear no responsibility for any loss of recorded data. ' • Never put or leave any metallic objects (such as coins or metal tools) inside the unit, to prevent a short circuit. Remote control (RM-RK52): • Do not leave the remote control in hot places such as on the dashboard. • The Lithium battery is in danger of explosion if replaced incorrectly. Replace it only wjth the same or equivalent 'type. . • The battery pack or batteries shall not be exposed to excessive heat such as sunshine, fire or the like. • Keep the battery out of reach of children and in its original packaging when not in used. Dispose of used batteries promptly. If swallowe~, c~ntact a physician immediately.
Maintenance Cleaning the unit: Wipe off dirt on the faceplate with a dry silicone or soft cloth. · · Cleaning the connector: Detach the faceplate and clean the connector gently with a cotton swab, being careful not to damage the connector.
Connector (on the reverse side of the faceplate)
BASICS Remote control (RM-RK52)
. Pull out the insul~tion sheet when using for the first time.
How to replace the battery
Your preset adjustments will also be erased.
Press 0 /SOURCE. • Press and hold to turn off the power.
Press t( to mute the sound or pau~e playback. . • Press again to cancel.
• Press 0/SOURCE repeatedly. • Press 0/SOURCE, then turn the volume knob within 2 seconds.
. Press SOURCE repeatedly.
Change the display information
Press DISP repeatedly. (+13) • Press and hold to scroll the current display information.
GETTING STARTED Default: XX AUTO: The clock time is automatically set using the Clock Time (CT) data in FM Radio Broadcast Data System signal.; OFF: Cancels. ON: The clock time is shown on the display even when the unit is turned off. ; OFF: Cancels.
F/W.UPOATE SYSTEM F/Wxxxx
YES: Starts upgrading the firmware.; N.Q: Cancels (upgrading is not activated). For details on how to update the firmware, see: <http://www.jvc.net/cs/car/>.
* Not displayed when the corresponding source is selected. 1 Press and hold MENU. · 2 Turn the volume knob to make a selection (see the following table), then press the knob. _ 3 Press MENU to exit. To return to the previous setting item or hierarchy, press~ PTY.
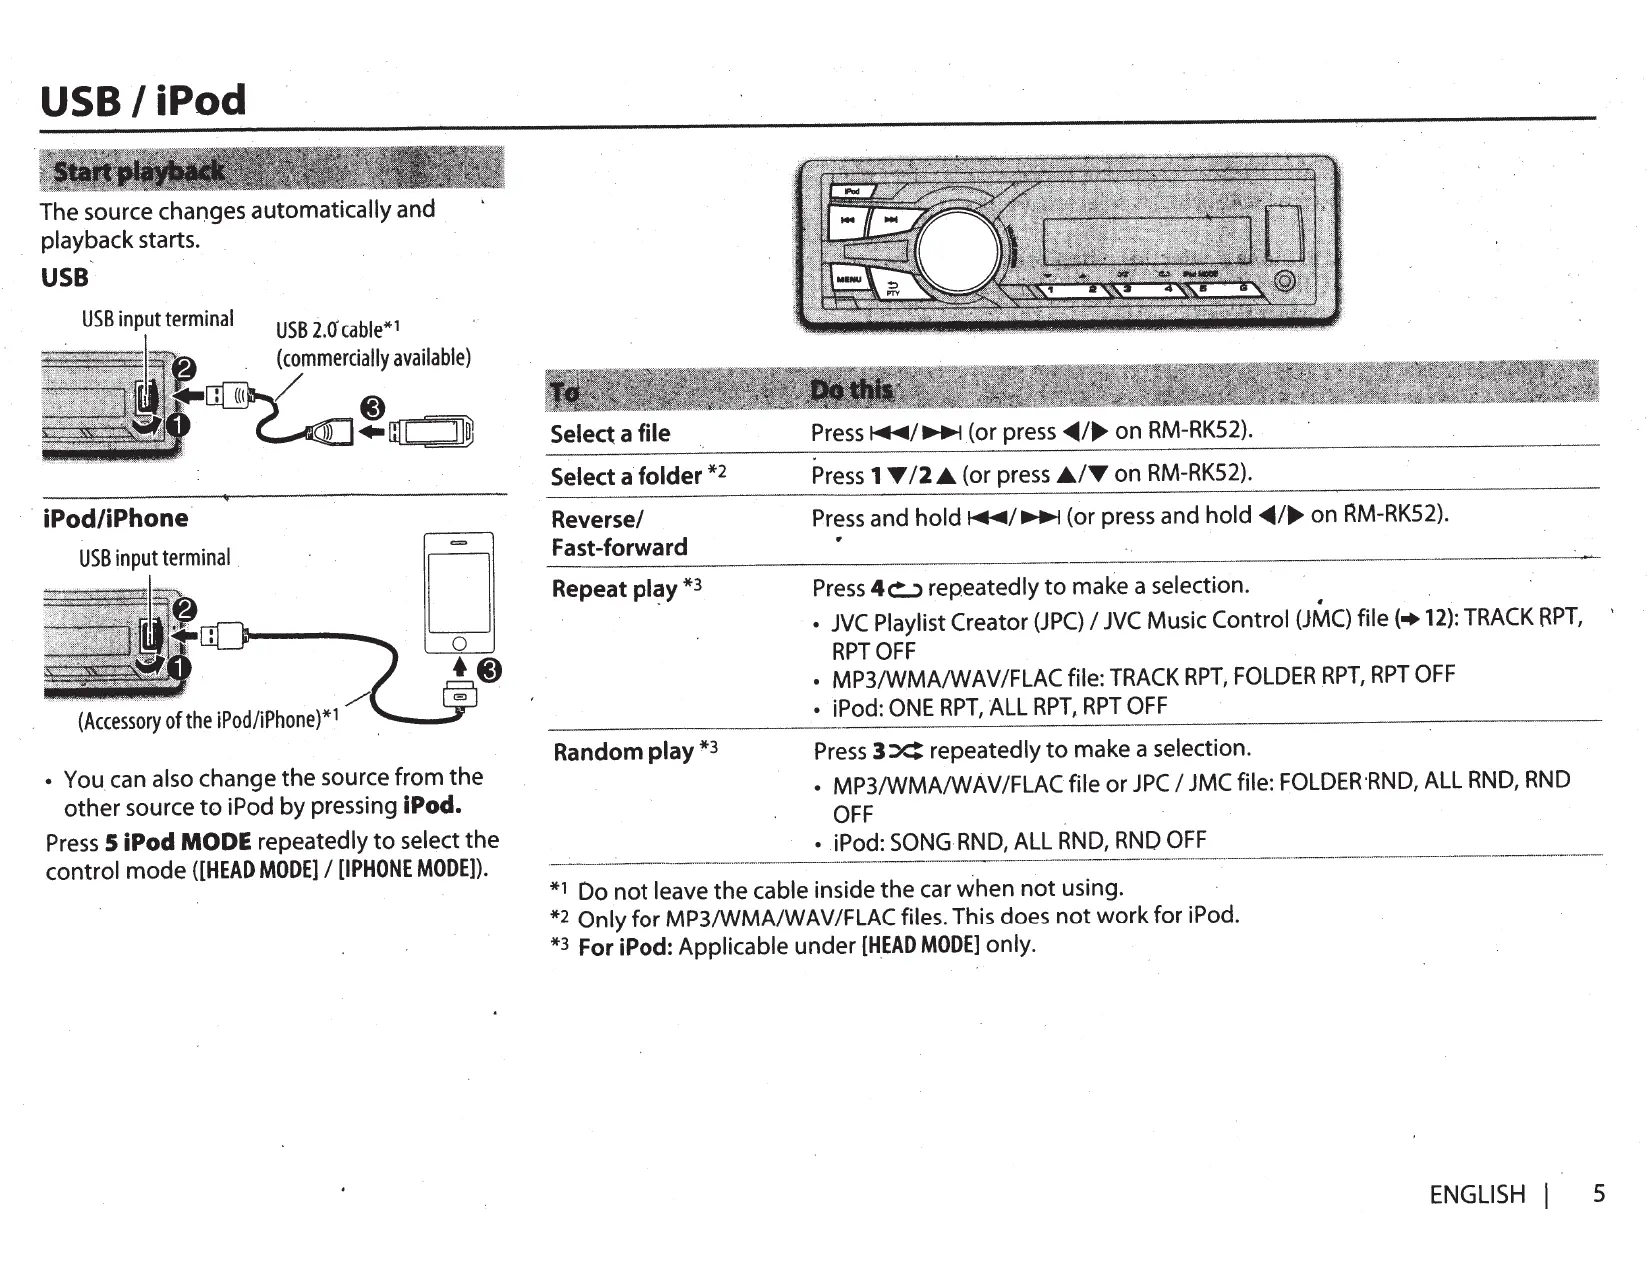
USB I iPod The source changes automatically and playback starts.
co (Accessory 0f the iPod/iPhone )*1
Press 1 Y 12 .A (or press .AIY on RM-RK52}.
Reverse/ Fast-forward
(or press~~ ... on RM-RK52}.
• You can also change the source from the other source to iPod by pressing iPod. Press 5 iPod MODE repeatedly to select the control mode ([HEAD MODE] I [IPHONE MODE]). *1 *2 *3
Press 3 X: repeatedly to make a selection. • MP3/WMA/WAVIFLACfile or JPC I JMC file: FOLDER·RND, ALL RND, RND OFF
• iPod: SONG RND, ALL RND, RND OFF Do not leave the cable inside the car when not using. Only for MP3/WMAIWAVIFLAC files. This does not work for iPod. For iPod: Applicable under [HEAD MODE] only.
USB I iPod For iPod: Applicable onfy when [HEAD MODE] is selected.(+ 5) 1 Press MENU 2 Turn the volume knob to make a sele.ction, then press the knob. • MP31W,MA/WAVIFLAC file: Select the desired folder, then a file. • iPod or JPC I JMC file: Select the desired file from the list (PLAYLISTS, ARTISTS, ALBUMS, SONGS, PODCASTS*, GENRES, COMPOSERS*, AUDIOBOOKS*). * Only for iPod. _ I f you have many files .... You can search through them quickly (on step 2 above) by turning the volume knob quickly. • Not applicable for iPod.
While listening to the iPod and [HEAD MODE] is selected (+ 5) .... If you have many folders or files, you can search through them quickly according to the first character (A to Z, 0 to 9 and OTHERS). • //OTHERS" appear if the first character is other than A to Z, 0 to 9. 1 2
Press MENU. Turn the volume knob to select the desired list, then press the knob. Press 1 T 12 .A. or turn the volume knob quickly to select the desired character. Turn the volume knob to select the desired folder or file, then press the knob.
When a smartphone (Mass Storage Class) is connected to the USB input terminal, you can select its internal memory or external memory (such as an SO card) to playback the stored s'ongs. You can also select the desired drive to playback when a multiple drives device is connected. Press number button 5 repeatedly to select the desired drive. (or) Press and hold MENU. Turn the volume knob to select [USB/I POD], then press the knob. 3 Turn the volume knob to select [USB], then press the knob. 4 Press the volume knob to select [DRIVECHANGE]. The next drive is selected automatically. Repeat steps 1 to 4 to select the following drives. Selectable items: [DRIVE 1] to [DRIVE 5] 1 2
While listening to the iPod and [HEAD MODE] is selected (+ 5) .... 1 Press and hold MENU. · 2 Turn the volume knob to select [USB/I POD], then press the knob. 3 Turn the volume knob to select [IPOD], then press the knob. 4 Turn the volume knob to make a selection, then press the knob. BOOK NORMAL I BOOK FASTER I BOOK SLOWER: Select the desired playback speed of the Audiobooks sound file in your iPodliPhone. (Default: Depends on your iPodliPhone setting.) • To return to the previous setting item or hierarchy, press!::> PTY. • To cancel, press MENU.
RADIO Available only for FM source. 1 Press and hold!::> PTY. 2 Turn the volume knob to select a PTY code, then press the knob to start searching. If there is a station broadcasting a program of the same PTY code as you have selected, that station is tuned in. J.
"ST" lights up when receiving an FM stereo broadcast with sufficient signal strength.
1 Press Q)/SOURCE to select FM or AM. 2 Press~~~ (or press~~ .... on RM-RK52) to search for a station automatically. (or) Press and hold,.,....;~ (or press and hold~/..,. on RM-RK52) until · ''M" flashes, then press repeatedly to search for a station manually.
PTY code: NEWS, INFORM (information), SPORTS, TALK, ROCK, CLS ROCK (classicrock), ADLT HIT (adult hits), SOFT RCK (softrock), TOP 40, COUNTRY, OLDIES, SOFT, NOSTALGA (nostalgia), JAZZ, CLASSICL (classical), R&B (rhythm and blues), SOFT R&B (soft rhythm and blues), LANGUAGE, REL MUSC (religious music), REL TALK (religious talk), PERSNLTY (personality), PUBLIC, COLLEGE, HABL ESP (Spanish talk), MUSC ESP (Spanish music), HIP HOP, WEATHER
1 Press and hold MENU. 2 3 4
You can store up to 18 stations for FM and 6 stations for AM. While listening to a station .... Press and hold one of the nt~mber buttons (1 to 6) to store. (or) 1 Press and hold the volume knob untii"PRESET MODE" flashes. 2 Turn the volume knob to select a preset number; then press the knob. The preset nur'!'ber flashes and "MEMORY" appears.
Turn the volume knob to select [TUNER], then press the knob. Turn the volume knob to make a selection (+ 8), then press the knob. Press MENU to exit.
To return to the previous setting item or hierarchy, press!::> PTY.
• To select a stored station: Press one of the number buttons (1 to 6). I (or) Press MENU, then turn the volume knob to select a preset ~umber and press the knob to confirm.
RADIO AUX Default: XX . ················-········ .. ·······
RADIO TIMER SSM Turns on the radio at a specific time regardless of the current source. 1 ONCE/ DAILYI WEEKLYI OFF: Select how often the timer will be turned on. 2 FM/ AM: Sel~ct the FM or AM band. 3 01 to 18 (for FM)/ 01 to 06 (for AM): Select the preset station. 4 Set the activation day and time. · "0" lights up when complete. Radio Timer will not activate for the following cases. • The unit is turned off. • [OFF] is selected for [AM] in [SRC SELECT] after Radio Timer for AM is · selected. (+ 4)
SSM 01 - 06 I SSM 07 - 12 I SSM 13 - 18: Automatically presets up to 18 stations for FM. "SSM" stops flashing when the first 6 stations are stored. Select SSM 07-12 I SSM 13-18 to store the following 12 stations.
IF BAND AUTO: Increases the tuner selectivity to reduce interference noises fr.om adjacent FM stations. (Stereo effect may be lost.) ; WIDE: Subjects to
Connect a portable audio player (commercially available.). 3.5 mm (1/8") stereo mini plug with "L" shaped connector (commercially available)
Portable audio player
Select [ON] for [AUX] in [SRC SELECT]. (+ 4) Press C) /SOURCE to select AUX. Turn on the portable audio player and start playback.
Use a 3-core plug head stereo mini plug for optimum audio
interference noises from adjacent FM stations, but sound quality will not be degraded and the stereo effect will remain.
MONO Displayed only when the source is FM.
ON: Improves the FM reception, but the stereo effecfwill be lost.; OFF: Cancels. AREA
Connect the Bluetooth adapter, KS-BTA 100 (separately purchased).
r------ ------- -----------1
l Wiring harness of the unit i (+17)
some South American countries, AM/FM intervals: 10 kHz/50 kHz.
2 Register (pair) the Bluetooth device with KS-BTA 100. 3 Select [BT ADAPTER] for [AUX] in [SRC SELECT].(+ 4). 4 Press C)/SOURCE to select BT AUDIO. 5 Start using the Bluetooth device. For details, refer to the instruction manual of KS-BTA 100.
Pandora® Preparation: Install the latest version of the Pandora application onto your device (iPhone/ iPod touch), then create an account and log in to Pa.ndora. • Select [ON] for [PANDORA] in [SRC SELECT],.(+ 4)
1 Press MENU. 2 Turn the volume knob to select [NEW STATION], then press the knob.· 3 Turn the volume knob to select [FROM TRACK] or [FROM ARTIST], then press the knob. A new station is created based on the current song or artist.
Open the Pandora application on your device. Connect your device to the USB input terminal.
of the iPod/iPhone)* / (
The source changes to PANDORA and broadcast starts.
* Do not leave the cable inside the car when not using.
Pause or resume playback Thumbs up or thumbs down Skip a track
1 Press MENU. 2 Turn the volume knob to make a selection, then press the knob. [BY DATE]: According to the registered date. [A-Z]: Alphabetical order. 3 Turn the volume knob to the desired station, then press the knob.
Press the volume knob (or press~ on RM-RK52).
1 Press and hold the volume knob. 2 Turn the volume knob to select [THIS TRACK] or {THIS ARTIST], then press the knob. "BOOKMARKED" appears and the information is stored. to your device. The bookmark is available on your Pandora account but not on this unit.
Press 2-' I 1 ., (or press .11../T on RM-RK52). • If thumbs down is selected, the current track is skipped. Press~
(or press llJll> on RM-RK52).
iHeartRadio® Preparation: lnstaiLthe latest version of iHeart Link for JVC application onto your device (iPhone/ iPod touch), then create an account and log in to iHeartHadio. • Select [ON] for [IHEARTRADIO] in [SRC SELEa]. {+ 4)
Open the iHeart Link application on your device. Connect your device to the USB input terminal.
Q[) (Accessory of the iPod/iPhone)*
Thumbs up or thumbs down for custom station
Press the volume knob {or press t( on RM-RK52). Press 2 4r I 1 ., (or press Jt../T on RM-RK52). • If thumbs down is selected, the current track is skipped.
··············· ····························
································--··-········· ················-···············
Skip a track for custom station
Create a new/custom station
Press and hold the volume knob.
Add to favorite stations for live station
Scan for live station
* Do not leave the cable inside the car when not using. 3
Press C)/SOURCE to select IHEARTRADIO. Broadcast starts automatically
Press MENU. Turn the volume knob to select a category, then press the knob. Turn the volume knob to the desired station, then press the knob. When a city list appears, you can skip cities in alphabetical order. Press MENU to exit.
While a city list appears during search ... 1 Turn the volume knob quickly to enter character search. You can search through the list quickly according to the first character (A to Z). 2 Turn the volume knob or press 2 4r I 1 ., to select the character to be search for. · · 3 Press the volume knob to start searching.
AUDIO SETTINGS 1 Press and hold MENU. Turn the volume knob to make a selection (see the following table), then press the knob. Repeat step 2-until the desired item is selected. 3 Press MENU to exit. To return to the previous setting item or hierarchy, press!:::> PTY. 2
-08- +08 (00): Adjusts the subwoofer output level.
ON I OFF: Turns on or off the subwoofer output.
THROUGH: All signals are sent to the subwoofer.; lOW 55Hz I MID 85Hz I HIGH 120Hz: Audio signals with frequencies lower than 55 Hz/ 85 Hz/ 120 Hz are sent to the subwoofer. R06- F06 (00): Adjusts the front and rear speaker output balance.
+01 I +02: Selects your preferred bass boost level.; QEE: Cancels~
01 I 02: Boosts low or high frequencies to produce a well-balanced sound at low volume. ; OFF: Cancels.
l06- R06 (00): Adjusts the left and right speaker output balance.
-05 - +05 (00): Presets the volume adjustment level of each source (compared to the FM volume level). Before adjustment, select the source you want to adjust. ("VOL ADJ FIX" appears if FM is selected.)
lOW POWER: Limits the maximum volume level to 30 ..(Select if the maximum power of each speaker is less than 50 Wto prevent damaging the speakers.) ; HIGH POWER: The maximum volume level is 50.
D.T.EXP (Digital Track Expander)
ON: Creates realistic sound by compensating the high-frequenc~ components and restoring the rise-time of the ~aveform that are lost in audio data compression.; OFF: Cancels.
ON: Mutes the sounds while using the cellular phone (not connected through KS-BTAlOO).; OFF: Cancels.
l/0 MODE SUB.W I REAR: Selects whether rear speakers or a subwoofer are connected to the REAR/SW line out terminals on the rear panel (through an external amplifier).
* 1 Displayed only when [l/0 MODE] is set to [SUB.W] and [SUB.W] is set to [ON]. *2 This adjustment will not affect the subwoofer output. *3 Displayed only when [SUB.W] is set to [ON]. *4 Displayed only when [l/0 MODE] is set to [SUB.W]. * 5 If you ·are using a two-speaker system, set the fader level to [00] * 6 Does not work if [BT ADAPTER] is selected for [AUX] in [SRC SElECT].
• Playable audio file: MP3 (..mp3), WMA (.wma), WAV (.wav), FLAC (.flac) • Playable USB device file system: FAT12, FAT16, FAT32 . Even when audio files comply with the standards listed above, playback may be impossible depending on the types or conditions of media or device.
Press and hold MENU. Turn the yolume knob to make a selection (see the following table), then press the knob. Repeat step 2 until the desired item is selected. 3 Press MENU to exit. To return to the previous setting item or hierarchy, press ~PTY.
Default: XX DIMMER Selects the display and button illumination adjusted in the [BRIGHTNESS] setting. AUTO: Changes between the day and night adjustments when you turn off or on the car headlights. *1 ; ON: S.elects the night adjustments. ; OFF: Selects the day adjustments. BRIGHTNESS Sets the button, display and USB input terminal brightness for day and night separately. · 1 DAY I NIGHT: Select day or night, 2 , Select azone for setting. (+Illustration above) 3 Setthe brightness level (00 to 31). (Default: DAY: 31; NIGHT: 15)
ONCE: Scrolls the display information once.; AUTO: Repeats scrolling at 5-second intervals. ; OFF: Cancels.
The illumination control wire connection is required. (+17) *2 Some characters or symbols will not be shown correctly (or w,ill be blanked). *1
About USB devices • This unit can play MP3/WMA/WAV/FLAC files . stored on a USB mass storage class device. • You cannot connect a USB device via a USB hub. • Connecting a cable whose total length is longer than 5 m may result in abnormal playback. • The maximum number of characters for: - Folder names: 64 characters - File names: 64 characters - MP3 Tag: 64 characters ~ WMA Tag: 64 characters - WAV Tag: 64 characters • This unit can recognize a total of 20 480 files, 999 folders (999 files per folder including folder without unsupported files), and of 8 hierarchies. • This unit cannot recognize a USB device whose rating is other than 5 Vand exceeds 1 A.
About iPod/iPhone • Made for - iPod touch (1st, 2nd, 3rd, 4th, and 5th generation) - iPod classic - iPod nano (3rd, 4th, 5th, 6th and 7th generation) ·- iPhone, iPhone 3G, 3GS, 4, 4S, 5
• It is not possible to browse video files on the "Videos" menu in [HEAD MODE]. • The song order displayed on the selection menu of this unit may differ from that of the iPod/iPhone. · • If some operations are not performed correctly or as intended, visit: <http://www.jvc.net/cs/car/>.
About JVC Playlist Creator and JVC Music Control • This unit supports the PC application JVC Playlist Creator and Android™ application JVC Music Control. • When you play audio file with song data added using the JVC Playlist Creator or JVC Music Control, you can search for audio file by Genres, Artists, Albums, Playlists, and Songs. · • JVC Playlist Creator and JVC Music Control are available from the following web site: <http://www .jvc.net/cs/car/>.
About Pandora • Pandora is available only in the U.S., Australia and New Zealand. • Because Pandora is a third-party service, the sp-ecifications are subject to change without prior notice. Accordingly, compatibility may be impaired, or some or all of the services may become unavailable. • Some functions of Pandora cannot be operated from this unit. • For issues using the application, please contact Pandora at pandora-support@pandora.com.
MQRE INFORMATION TROUBLESHOOTING About iHeartRadio • iHeartRadio® is a third-party service, therefore the spedfications are subject to change without prior notice. Accordingly, compatibility may be impaired or some or all of the services may become unavailable. • . _. Some iHeartRadio® functionality cannot be operated from this unit.
Sound cannot be heard.
"MISWIRING CHK WIRING - Check to be sure the terminals of the speaker wires are THEN RESET UNIT" I insulated properly, then reset the unit. If this does not solve "WARNING CHK WIRING THEN . the.problem, consult your nearest service center. RESET UNIT" appears and no operations can be. done.
Change the display information Press DISP repeatedly.
FMorAM Station name (PS)*l • Frequency • Program type (PTY)*l *2 • Title*l *2 • Day/Clock • (back to the beginning} * 1 For FM Radio Broadcast Data System stations only. *2 If unavailable, NO PTY" I "NO TEXT" appears.
Source cannot be selected.
Playing time • Day/Clock • Album title/ Artist*3 • Track titJe*3 • Folder/file name .. (back to the beginning}
Correct characters are not displayed.
This unit can only display uppercase letters, numbers, and a limited number of symbols. '
Playing time • Day/Clock • Album title/Artisti! 4• Track title*4 • (back to the beginning} *4 If not recorded, "NO NAME" appears.
Playback order is not as intended.
The playback order is determined by the file name (USB).
Elapsed playing time is not correct.
This depends on the recording pro~ess earlier.
"NOT SUPPORT" appears and track skips.
Check whether the track is a playable format. (•12) •·
························-··································~·····················-···--······------·-------- ---------------···············-···-···-··································
PANDORA Station name • Album title/Artist• Track title• Playing time • Day/Clock• (back to the beginning}
IHEART Stat1on name • Track title*S • Track Artist*S • Day/Clock • (back to the beginning} *S If unavailable, station name appears.
·---------- -----·----- ..····-··-·- ...
*3 If not recorded, "NO NAME" appears.
-·········-···········-··················· ··············-··········•································-··········
------ ··-·--------··---
Check the [SRC SELECT] setting.
Radio reception is poor./ • Connect the antenna firmly. Static noise while listening to • Pull the antenna out all the w~y. the radio.
• Adjust the volume to the optimum level. • Check the cords and connections.
CANNOT PLAY" flashes and/ or connected device cannot . be detected. I/
·····--·-···----------·---···-···-··-··-~·---------------·-·-·-----·-····---·-···-···-····-···-·--·····--------··-·········
• Check whether the connected device is compatible with this unit and ensure the files are in supported formats. 12) • Reattach the device.
BT AUDIO...,... Day/Clock
1/READING" keeps flashing.
• Do not use too many hierarchical levels and folders. • Reattach the USB device.
The iPod/iPhone does not turn on or does not work.
• Check the connection between this unit and iPod/iPhone. • Detach and reset the iPod/iPhone using hard reset.
·····-····--·-···-·--·-..·------·--·-···-· .. ········- ·······-·--·······-·············-·····-·····--·······--·-·····-········-----·-····--·-······ ···-·············--···········-··-······--·-··--··············- ····-······-·····
"ADD ERROR" "SEARCH ERR"
New station creation is unsuccessful.
"CH ~-·~·~Y..~.~-~~~---·-~·-·-··-·····-· . . . .~.~-~~,~--~-~-~--~·~·~-~.?~~-~P.P.!.~-~~~!.?.~. .?.n your device. . "NO SKIPS'; The skip limit has been reached.
Make sure you have installed the latest version of the jHeart Link for JVC application on your device.
You haven't log in. Log in again.
•·················-----·-··-··-······
"STATION NOT Broadcast from the-station is over.
No staHons are found.
The number of registered stations has reached its limit. Retry after de~-~~ing ~nn~ces~-~~~!~~~~-~~~?.~~~-evice. Make sure you have installed the latest version of the Pandora application on your device.
~ I"STATION NOT No station is selected.
::E SELECTED". ················-·-·····-············-··
Broadcast data is interrupted.
Registration of Thumbs Up/Down has failed.
Communication is unstable.
The request has resulted in time-out.
····-··-··-··--·-···--····-···---~-------------···-····~-·-···---~--~----···
Registration of thumbs up/thumbs down has failed.
You try to access from a country which Pandora is not deliverable. ··································································-··············
Station cannot be selected.
Custom station name creation is unsuccessful.
Addition to the favorite category failed.
Check the connection to the device.
·-·---------·-··-····-·-····
The skip limit has been reached. Retry later.
No stations are found.
Link to the application is impossible.
-- SPECIFICATIONS 87.9 MHz to 107.9 MHz (200kHz step) 87.5 MHz to 108.0 MHz (50 kHz step)
Full Bandwidth Power (at less than 1 %THO)
2 500mV/10 kO FM Frequency Range
· 17.2 dBf (2.0 ~V/75 0)
Quieting Sensitivity (DIN SIN = 46 dB)
Channel Space Selection
Usable Sensitivity _ (S/N = 20 dB)
. Mass storage class
Maximum Supply Current
DC 5 V:-:-:: 1 A D/AConverter ._ ·
Frequency Response (± 1 dB)
Signal-to-Noise Ratio (1 kHz)
105 dB Maximum Current Consumption
lOA Operating Temperature Range
oocto +40°C Installation Size (W x Hx D)
Compliant with MPEG-1/2 Audio Layer-:3
Compliant with Windows Media Au.dio
Subject to chang~ without notice.
USB 1.1, USB 2.0 (Full speed)
. RIFF waveform Audio Format (Linear PCM only)
Warning The unit can only be used with a 12 VDC power supply, negative'ground. Disconnect the battery's negative terminal before wiring' and mounting. Do not connect Battery wire (yellow) and Ignition wire (red) to the car chassis or Ground wire (black) to prevent a short circuit Insulate unconnected wires with vinyl tape to prevent a short circuit. Be sure to ground this unit to the car's chassis again after i~stallation.
Caution For safety's sake, leave wiring and mounting to professionals. Consult the car audio dealer. Install this unit in the console of your vehicle. Do not touch the metal parts .of this unit during and shortly after use of the unit. Metal parts such as the heat sink and enclosure become hot. Do not connect the 8 wires of speakers to the car chassis or Ground wire (black), or connect them in parallel. Connect speakers with a maximum power of more than 50 W.lf the maxim_um power of the speakers is lower than 50 W, change the [AMP GAIN]' setting to avoid damaging the speakers. (+11) Mount the unit at an angle of less than 30°. If your vehicle wiring harness does not have the ignition terminal, connect Ignition wire (red) to the terminal on the vehicle's fuse box which provides 12 VDC power supply and is turned on and off by the ignition key. After the unit is installed, check whether the brake lamps, blinkers, wipers, etc. on the car are working properly. If the fuse blows, first make sure the wires are not touching car's chassis, then replace the old fuse with one that hasthe same rating.
Do the requi.red wiring. . (+17)
Installing the unit (in-dash mounting)
Remove the key from the ignition switch, then disconnect the 8 terminal of the car battery. Connect the wire$ properly. See Wiring connection. (+17) .. ·Install the unit to your car. See Installing the unit (in-dash mounting). Connect the 8 terminal ofthe car battery. · Reset the unit.(+ 3)
~ t;, : ~f~ ~;~l~.··.··.,,.·.·.-·.'.·':.1f~~~/~ ~!d:~ (D)
Orientate the trim plate as /~~~;~ . . \ illustrated before fitting. \ , , ) ' ' . . . -, r"
""~ ,,'~~.)."..,...""''\\
When installing without the mounting sleeve A Use only the specifi.ed screws; Using wrong screws might damage the unit. 8 mm (3/8") 8 mm (3/8")
'Flat or round head screws (not suppHed) M5 X 8 mm (M5 X 3/8")
~ B:cket (not supplied)
Dashboard of your car
Bend the appropriate tabs to hold the sleeve firmly in place.
II How to remove the unit
Signal cord (not supplied)
Part list for installation ·
Remote wire (not supplied)
(C) Mounting sleeve ..
---------- - -----1---- -4 ---~--
Join the same color wires together.
I I I I I I I I I I I I I I I I I I I I I I I I I Red: Ignition 12: V
I I I White: Frontsoeaker (left)
Make this connection if your vehicle factory wiring harness does not have "12 Vignttion switch" wire.
: ' - - - - ---,..-- - - -- -- - - ' ~
White/black Grav: Front speaker (riqht) Gray/black Green: Rears
FCC W.ARNING This equipment may generate or use radio frequency energy. Changes or modifications to this equipment may cause harmful interference unless the modifications are expressly approved in the instruction manual. The user could lose the authority to operate this equipment if an unauthorized change or modification is made.
FCC NOlJ This equipment has been tested and found to comply with the limits for a Class Bdigital device, pursuant to Part 15 of the FCC Rules. These limits are designed to provide reasonable protection against harmful interference in a resi~ential installation. This equipment may cause harmful interference to radio communications, if it is not installed and used in accordance with the instructions. ·However, there is no guarantee that interference Will not O(CUr in a particular installation.lf this equipment does cause harmful interference to radio or television reception, which can be determined by turning the equipment off and on,·the user is encouraged to try to correct the interference by one or more of the following measures: • Reorient or relocate the receiving antenna. • Increase the separation between the equipment and receiver. • Connect the equipment into an outlet on a circuit different from that to which the ·receiver is connected. • Consult the dealer or an experienced radio/TV technician for help.
libFLAC Copyright (C) 2000,2001,2002,2003,2004,2005,2006,2007,2008,2009 Josh Coalson Redistribution and use in source and binary forms, with or without modification, are permitted provided that the following conditions are met: - Redistributions of source code must retain the above <op.yright notice, this list of conditions and the following disclaimer. - Redistributions in binary form must reproduce the above copyright notice, this list of <Onditions and the following disclaimer in the documentation and/or other materials provided wUh the distribution. - Neither the name of the Xiph.org Foundation nor the names of its contributors may be used to endorse or promote products derived from this software without specific prior written permission. THIS SOFTWARE IS PROVIDED BY THE COPYRIGHT HOLDERS AND ONTRIBUT<)RS "AS IS" AND ANY EXPRESS OR IMPLIED WARRANTIES, INCLUDING, BUT NOT LIMITED TO, THE IMPLIED WARRANTIES OF MERCHANTABILITY AND FITNESS FOR APARTICULAR PURPOSE ARE DISCLAIMED. IN NO EVENT SHALL THE FOUNDATION OR CONTRIBUTORS BE LIABLE FOR ANY DIRECT, INDIRECT, INCIDENTAL, SPECIAL, EXEMPLARY, OR CONSEQUENTIAL DAMAGES (INCLUDING, BUT NOT LIMITED TO, PROCUREMENT OF SUBSTITUTE GOODS OR SERVICES; LOSS OF USE, DATA, OR PROFITS; OR BUSINESS INTERRUPTION) HOWEVER CAUSED AND ON ANY THEORY OF LIABILITY, WHETHER IN CONTRACT, STRICT LIABILITY, OR TORT (INCLUDING NEGLIGENCE OR OTHERWISE) ARISING IN ANY WAY OUT OF THE USE OF THIS SOFTWARE,-EVEN IF ADVISED OF THE POSSIBILITY OF SUCH DAMAGE. © 2013 JVC KENWOOD Corporation
• Microsoft and Windows Media_are either registered trademarks or trademarks of Microsoft Corporation in the United States and/or other countries. • ·"Made for iPod," and "Made for iPhone" mean that an electronic accessory ~as been designed to connect specifically to iPod, or iPhone, respectively, and has been certified by the developer to meet Apple performance standards. Apple is not responsible for the operation of this device or its compfjance with safety and regulatory standards. Please note that the use of this accessory with iPod or iPhone may affect wireless performance. • iPhone, iPod, iPod classic, iPod nano, and iPod touch are trademarks of Apple Inc., registe(ed in the U.S. and other countries. • Lightning is atrademark of Apple Inc. • Pandora, the Pandora logo, and the Pandora trade dress,are trademarks or registered trademarks of Pandora Media, Inc., used with permission. • iHeartRadio® is aregistered mark of Clear Channel Broadcasting, Inc. in the United States and other countries. Such.marks are used under llcense. • Android is trademark of Google Inc.
Informacion acerca de Ia eliminacion de equipos electricos y electronicos al final de Ia vida util (aplicable a los paises que hayan adoptado sistemas independientes de recogida de residuos}
C:NECT~NT~NNA T~MINA~
JVC Americas Corp. (JVC) warrants this product and all parts thereof, except as set forth below ON LY TO THE ORIGINAL RETAIL PURCHASER to be FREE FROM DEFECTIVE MATER IALS AND WOR KMANSHI P from the date of original purchase for the period shown below. ("Th e Warranty Period")
Remember to retain your Bill of Sale for Warranty Service.
Do not attempt to service the product yourself Caution To prevent electrical shock, do not open the cabinet. There are no user serviceable parts inside. Please refer to qualified service personnel for repairs.
THIS LIMITED WARRANTY IS VALID ONLY IN THE FIFTY (50) UNITED STATES, THE DISTRICT OF COLUMBIA AND IN THE COMMONWEALTH OF PUERTO RICO. WHAT WE Will DO: If th1s product is found to be defective within the warranty period, JVC will repair or replacedefectiveparis with new or rebuilt eq uivalents at no chargeto the origrnal owner. Such repair and replacement services shall be rendered by JVC during normal business hoursat JVC authorized serv1 ce centers. Paris used for replacement arewarranted only for the remainder of the Warranty Period. All products may be brought to aJVC authorized service center on a carry-in basis. Color televisions with ascreen size ol 37"class or greater qualify lor in-homeservice. In such cases, atechnician will come to your home and either repair theTVthere or remove and return it if 11cannot be repaired in your home. WHAT YOU MUST DO FOR WARRANTY SERVICE: Please do not return your product to the retailer. Instead, return your product to the JVC authori zed service center neare st you. If shipping the product tothe service center, please be sure to package it carefully, preferably in the ori ginal packaging, and include a brief description of the problem(s) and a copy of the proof of purchase to verify purchase date. Please call 1-800-252-5722 to locate the nearest JVC authorized service center. Servi ce locations can also be obtained fromour website http://www.jvc com. If your product qualifies for in-home service, the service representative will require clear access to the product. If you haveany questions concerning your JVCProducl, please contact our Customer Care Center at 800-252-5722 WHAT IS NOT COVERED: This limited warranty provided by JVC does not cover: 1. Products which have been subject to abuse, accident, alteration, modification, tampering, negligence, misuse, faulty installation. lack of reasonable care, or it repaired or serviced by anyone other than a service facility authorized by JVC to render such service, or if affixed to any attachment not provided with the products. or if the model or serial number has been altered. tampered with, defaced or removed; 2. Initial installation, installation and removal fromcabinets or mounting systems. 3. Operational adjustments covered in the Owner's Manual, normal maintenance, video and aud io head cleaning: 4. Damage that occurs in shipment, dueto act of God, and cosmetic damage; 5 Signal reception problems and failures due to line power surge; 6. User Removal Memory Devices/Video Pick-up Tubes/CCD Image Sensors are covered for 90 days from the date of purchase: 7 Accessories; 8. Batteries (except that Rechargeable Batteri es arecovered for 90 days fromthe date of purchase): 9. Products used for commercial purposes, including, but not limited to rental. 10. Loss of data resultant from malfunction of hard drive or other data storage device: There areno express warranties except as listed above. THEDURATION OF ANY IMPLIEDWARRANTIES, INCLUDINGTHE IMPLIED WARRANTY OFMERCHANTABILITY, IS LIMITED TO THEDURATION OF THE EXPRESS WARRANTY HEREIN. JVCSHALL NOT BELIABLEFOR AN Y LOSS OF USEOFTHEPR ODUCT. INCONVEN IENCE. OR AN YOTHERDAMAGES. WHETHERDIRECT, INCIDENTAL OR CON SEQUENTIAL (INCLUDING, WITHOUT LI MITATION , DAMAGETOTAPES, RECORDS OR DISCS) RESULTINGFROM THEUSEOF THIS PR ODUCT, OR ARISING OUT OFANY BREACH OFTHISWARR ANTY. ALL EXPRESS AND IMPLIED WARRANTIES. INCLUDING THEWARRANTIES OF MERCHANTABILITY AND FITNESS FOR PARTICULAR PURPOSE, ARELIMITED TO THEWARRANTY PERIOD SET FORTHABOVE Some states do not allow the exclusion of incidental or consequential damages or limitations on how long an implied warranty lasts, so these limitations or exclusions may not apply to you. This warranty gives you specific legal rights and you may also have other rights which vary fromslate to stale.
JVC AMERICAS CORP. 1700 Valley Road, Wayne, NewJersey 07470 http://ww w.jvc.com
PRODUCT REGISTRATION We suggest that you register your product since it will enable us to contact you directly if it is ever necessary to correct a safety related condition in your product. You can register at www.register.jvc.com Please note that failure to register does not diminish any of your rights during the warranty period. BT-50004-1
REFURBISHED PRODUCTSCARRYASEPARATEWARRANTY, THISWARRANTY DOES NOT APPLY. FOR DETAIL OFREFURBISHED PRODUCT WARRANTY, PLEASEREFER TOTHE REFURBISHED PRODUCTWARRANTYINFORMATI ON PACKAGED WITH EACH REFURBISHED PRODUCT.
For customer use: Enter below the Model No. and Serial No. which is located either on the rear. bottom or side of thecabinet. Retain th is information for future reference Model No ..
Nameof dealer rinted in Indonesia
.JVC WARRANTY GARANTIE Warranty applies only to PRODUCT distributed in Canada by JVC Canada Inc.
Lagarantls" appliqueseulement aux PRODUITSdistrlbues au Canada par JVCCanada Inc.
JVC CANADA INC. (hereafter called "JVC") gives the following express warranty for each new JVC product distributed in Canada by JVC and sold by an authorized JVC dealer. JVC warrants that this JVC product is free, under normal use and maintenance, from any defects in material and workmanship subject to the following terms and conditions: 1. To Obtain Warranty Service: 3. Standards: (a) JVC product requiring service must be presented together If any defects should be found in a JVC product within the with proof of purchase. applicable terms, necessary repairs shall be made at no cost to (b) The JVC product must be brought in for service to an thepurchaser for parts or labour when JVC acknowledges that authorized JVC Service Centre. such defects are due to faulty material or workmanship. 2. Limitation: 4. Exclusion of All Other Express Warranties: This Warranty shall not apply to: This warranty constitutes the entire express warranty given by (a) Repair or replacement of any cabinets, batteries, plates, JVCfor JVC products and no dealer or service centre personnel connection cords, antennas, dust covers. knobs, speaker or his, its or their agent or employee is, or are authorized to grills. speaker cones. projection screens, projection screen extend or enlarge this warranty on behalf of JVC. savers. and all accessories. 5. Disclaimer of Consequential Damage: (b) Any defects caused or repairs required as a resull of To theextent the law permits JVC disclaims any responsibil ity misuse. abusive operation, negligence, improper use and/or for loss of timeor use of its product. transportation costs, insufficient care. or any other indirect. incidental or consequential damage or (c) Any defect caused or repairs required as aresult of not inconvenience. following the instructions in theoperation manual. WARRANTY TERM (VALID FROM THE DATE OF PURCHASE) (d) Any JVC product tampered with, adjusted or repaired by any party other than JVC or authorized JVCService Centre Labour Parts Product personnel (Years) (Years) (e) Any JVC products on which the serial number has been defaced, modified or removed. Projection TV In-Home Service (f) Maintenance. cleaning or periodic check-up Colour TV In-Home (25" and above) 1 1 (g) Conversion to foreign or domestic voltage or frequency. O-IL A Rear Projection In-Home Service (h) Any JVC product without the Canadian Electrical Safety LCD TV In-Home Service (25" and above) Regulations ID. * In-Home service to be provided where available. (i) Any JVC products used for commercial or institutional, Where it is not available, the purchaser must assume the rental, or display purposes. responsibility and expense lor the proper packing, shipment Parts 1 year (except video head- 90 days) and all costs associated with the delivery of the equipment to Labour ... 90 days and from the closest JVC Authorized Service Centre (j) Any JVC product which has been resold and no longer owned Receivers and Home Speakers purchased by the original purchaser. separately. Front Projection and Car (k) Product purchased from "outside Canada", "bankruptcy" or 2 2 Audio "ARSENAL" Series "liquidator" (I) Any defects caused by fire. flood, lightning. power surge, or AC Adapte rs. Remote controls, other events beyond the control of JVC. Headphones, Microphones and Projector 90 days 90 days (m)FOR AUTO PRODUCTS lamps Warranty does not cover elimination of car static or electrical Wood Cone Speakers 5 5 interferences, cleaning of head, adjustments. or labour cost for theremoval or reinstallation of the unit for repair. All Other Categories 1 1
JVC CANADA INC. ( ci-apres appele "JVC") enonce Ia garantie expresse su ivante pour tout nouveau produ it JVC distribue au Canada par JVC et vendu par un detaillant JVC autorise. JVC vous garantit que ce produit est degage, sous utilisation et entretien normal, de tout del aut materiel et de fabrication so us reserve des modalites et conditions suivantes: 1. Pour obten ir un service de garantie: (a) Les produits JVC necessitant un service doit etre presentee avec Ia prevue d'achat. (b) Leproduit JVC doil etreapports pour service chez un centre de se rvice JVC autorise. 2. Restrictions: Cette garantie ne s'applique pas aux: (a) Reparation au remplacement de tout cabinet. batteries. panneau avant, cordons de raccord. antennes, housses de protection, boutons. couverts de hautparleur, cones de hautparleur, ecrans de projection, protecteurs d'ecran de projection et tous les accessoires. (b) Taus defauts occasionnes au reparations requises suite aune utilisation abusive. mauvaise, negligente et/ou une utilization incor recte. (c) Taus defauts occasionnes au reparations requises suite a!'omission de suivreles recommandations du manuel d'instruction. (d) Tout produit JVC altere. ajusteau repare par tout autre entreprise que JVC au un centre de serviced'entretien au de service auto rise JVC. (e) Tout produit JVC doni le numero de seriea etealtere, modifi8 au enleve. (f) l'entretien, les verifications periodiques et nettoyage. (g) La conversion aune fnlquenceou unetension etrangere au domestique. (h) Tout produit JVC n'ayant pas le signe d'idenlification qui con forme aux norms electriques Canadiennes (GSA). (i) Pour tout produit utilise ades fins commerciales, institutionnelles, de locationau utilise ades fins d'etalage Pieces .... .... 1 An (Excepte les tetes video- 90 jours) Main d'oeuvre .. 90 Jours (i) Tout produit JVC ayant ete revendu et qui n'est plus Ia propriete de l'acheteur original. (k) Produit achetea"l'exterieur du Canada", provenant d'une "faillite" au d'un "liquidateur" (I) Tout dammage cause par le feu, une inondation, un eclair, unesurtension au tout autre evenement hors du controle de JVC.
JVC CANADA INC. 6070 kestrel Road, Missisauga, Ontario, L5T 1 S8 Canada TEL (905) 670-3381 FAX (905)670-7244 Service toll free# 1-800-964-2650 http://www.fVC ca E-mail service©tvc ca Product Registration We suggest that you register your product since it will enable us to contact you directly if it is ever necessary to correct a safety related condition in your product. You can register at http//www.Jvc.ca/www/Suppori/Warranty.aspx For customer use: Enter below the Model No. and Serial No. which is located either on the rear. bottom or side of the cab inet. Retain this information for future reference.