
Aster - Loudspeaker Sonus Faber - Free user manual and instructions
Find the device manual for free Aster Sonus Faber in PDF.
| Product type | Bookshelf speaker |
| Brand | Sonus Faber |
| Model | Aster |
| Approximate dimensions (H x W x D) | 25 x 15 x 20 cm |
| Approximate weight | 5.5 kg per speaker |
| Power handling | 50 – 100 W |
| Nominal impedance | 8 Ω |
| Frequency response | 50 Hz – 25 kHz |
| Recommended use | Stereo or home theater audio system |
| Wall mounting | Wall bracket included, adjustable tilt in 6 positions (15° increments) |
| Connection | Spring-loaded terminals (clips) for bare wires |
| Package contents | 1 speaker, 1 wall bracket, 1 user manual |
| Care and cleaning | Wipe with a soft, dry cloth; do not use solvents or abrasive products |
| Safety precautions | Maintain safety distances (≥50 cm from children); do not connect in parallel or constant voltage line; keep audio cables away from power cables |
| Warranty | Manufacturer's warranty according to the legislation of the country of purchase; covers manufacturing defects |
| After-sales service | Contact your retailer, official distributor, or customerservice@bonusfaber.com |
Frequently Asked Questions - Aster Sonus Faber
User questions about Aster Sonus Faber
0 question about this device. Answer the ones you know or ask your own.
Ask a new question about this device
Download the instructions for your Loudspeaker in PDF format for free! Find your manual Aster - Sonus Faber and take your electronic device back in hand. On this page are published all the documents necessary for the use of your device. Aster by Sonus Faber.
USER MANUAL Aster Sonus Faber
| Speaker type | 2 way |
| Low frequency transducer | 5.81 in |
| Mid/High frequency transducer | 1.07 in |
| Nominal power | 100 W |
| Low-frequency cut-off (-6dB) | 70 Hz |
| Low-frequency cut-off (-3dB) 61 Hz | |
| Frequency cut-off (-3dB on-axis) 70 Hz - 20 kHz | |
| Frequency cut-off (-6dB on-axis) 61 Hz - 22 kHz | |
| Sensitivity 2.83 Vrms@1m 88 dB | |
| Nominal impedance 8 Ω | |
| Minimal impedance 6 Ω | |
| Weight 4.16 kg - 9.17 lb | |
| Depth 20.50 cm - 8.07 in | |
| Width 19 cm - 7.47 in | |
| Height 29.34 cm - 11.55 in |

CONTENTS
1 General information 11
1.1 User information 11
1.2 Warranty and after-sales assistance 11
2 Safety information 11
3 Installation 12
3.1 Content of the packaging 12
3.2 Assembly 12
3.3 Positioning the speaker 15
4 Technical specifications 17
1 GENERAL INFORMATION
1.1 USER INFORMATION
Dear Customer,
We would like to thank and congratulate you on choosing Aster loudspeakers for your audio/audio-video system.
Since we want you to obtain the best possible listening result in full safety, please read this instruction manual carefully before installation.
Should you have any doubts or enquiries, please contact your sales point's technical staff, the official Bonus
Faber distributor in your country, or Sonus Faber directly by writing to customerservice@sonusfaber.com.
Finally, we highly suggest registering online at www.sonusfaber.com in order to keep up to date on all the latest news, initiatives and promotions offered by Sonus Faber.
Enjoy your
1.2 WARRANTY AND AFTER-SALES ASSISTANCE
The Aster loudspeakers have been designed and manufactured according to the highest quality standards.
Should, however, a fault or a malfunction occur, the loudspeakers are covered by warranty, in compliance with the regulations in force in the country where the loudspeakers were purchased.
In such cases, please contact the dealer from whom you purchased your loudspeakers, or the official Sonus Faber distributor for your country; the contact information for all the distributors can be found on our website:
https://www.sonusfaber.com/en/distributors-stores/
The following should also be kept in mind for your convenience:
- The warranty on the loudspeakers covers any manufacturing defects;
- Keep the receipt as proof of purchase to show to the retailer if necessary;
- Keep the loudspeakers' original packaging so that they can be transported without suffering damage if they need to be shipped to an authorised service centre;
The loudspeakers must be accompanied by a description of the malfunction or defect encountered.
The product's warranty will be void under the following conditions:
If the product has been disassembled or modified by persons other than a Bonus Faber authorised service centre;
If the product has been used in a manner that is not consistent with the indications contained within this manual.
2 SAFETY INFORMATION
This instruction manual must be read carefully and kept in an accessible location for any needs that may arise.
- Make sure that in-wall/in-ceiling fixing is suitably stable.
- Previously check that the capacity of the mounting surface is sufficient to support the weight of the loudspeaker/s.
-
Avoid staying in close proximity to the loudspeakers while the audio system is operating at high volume. This can cause permanent damage to your hearing. Children must be kept at a safety distance of least 50 cm from the loudspeaker.
The speakers generate an electromagnetic field that is harmless to humans and pets, but can compromise the proper functionality of electronic equipment, such as CRT monitors or TVs, when placed in close proximity. If this occurs, increase the equipment's distance from the loudspeakers.
The technology underlying the speakers' functionality is based on the principles of electromagnetism, and the user should therefore avoid operating equipment that generates strong electromagnetic fields, as these could affect the loudspeaker's proper functionality. -
Do not connect the loudspeakers parallel to each other or directly to a constant voltage sound distribution system (100 V, 70.7 V or similar). This could result in a serious system overload, with possible damage to the loudspeaker and/or the amplifier.
- Do not place audio cables and electrical power cables in close proximity to one another. An electromagnetic field is present in the vicinity of the power cables, which can cause an unpleasant humming noise. If this should occur, move the audio cables and electrical power cables away from each other.
The connections must be made with the equipment turned off. Pay attention to the polarities of the terminals during connection.
3 INSTALLATION
3.1 PACKAGE CONTENT
- Speakers
- Wall-mounting bracket
- User manual
3.2 INSTALLATION PROCEDURE
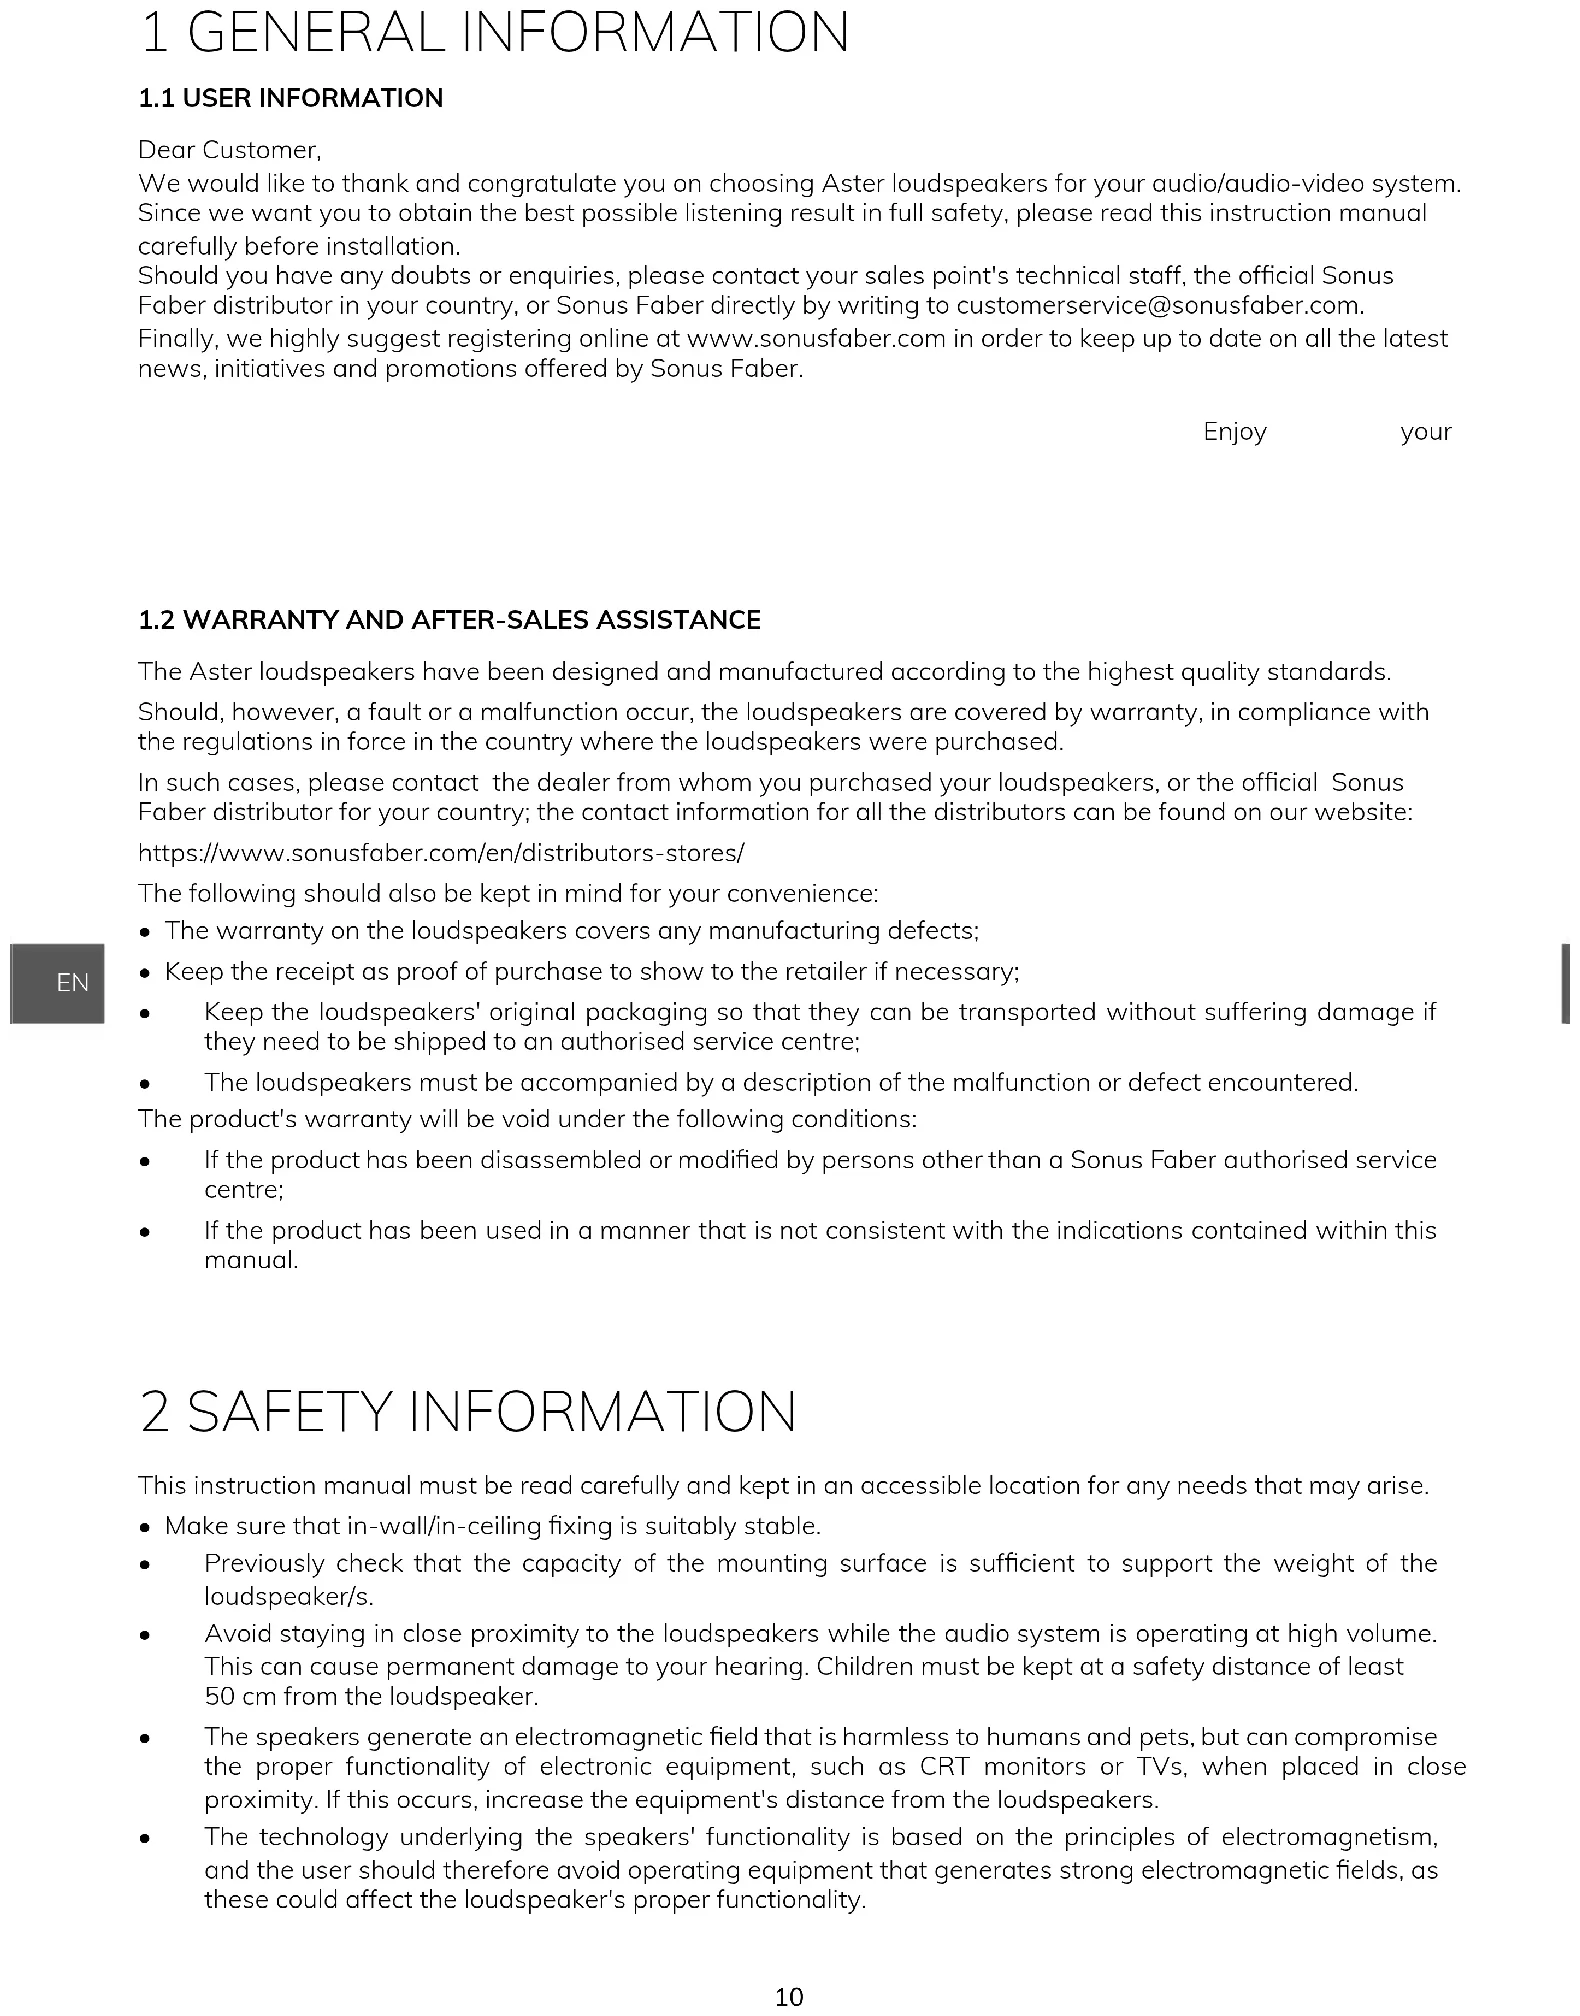
3.2.1 Extract the cables from the wall, after having first positioned them in the desired place.
EN
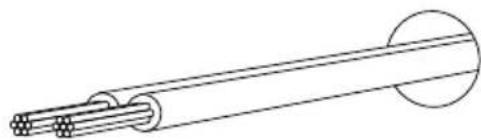
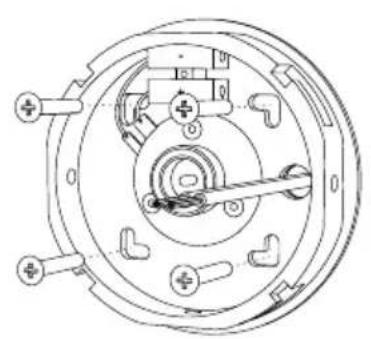
3.2.2 Pass the cables through the circular hole present in the wall-mounting bracket. Now, tighten the bracket to the wall. Use any one of the four planar surfaces of the wall-mounting bracket to position and fasten it correctly. The use of a spirit level or similar tool is advised.
3.2.3 Connect the cables to the free end of the spring clamp. Insert the clamp into the relevant pin in the mounting bracket.

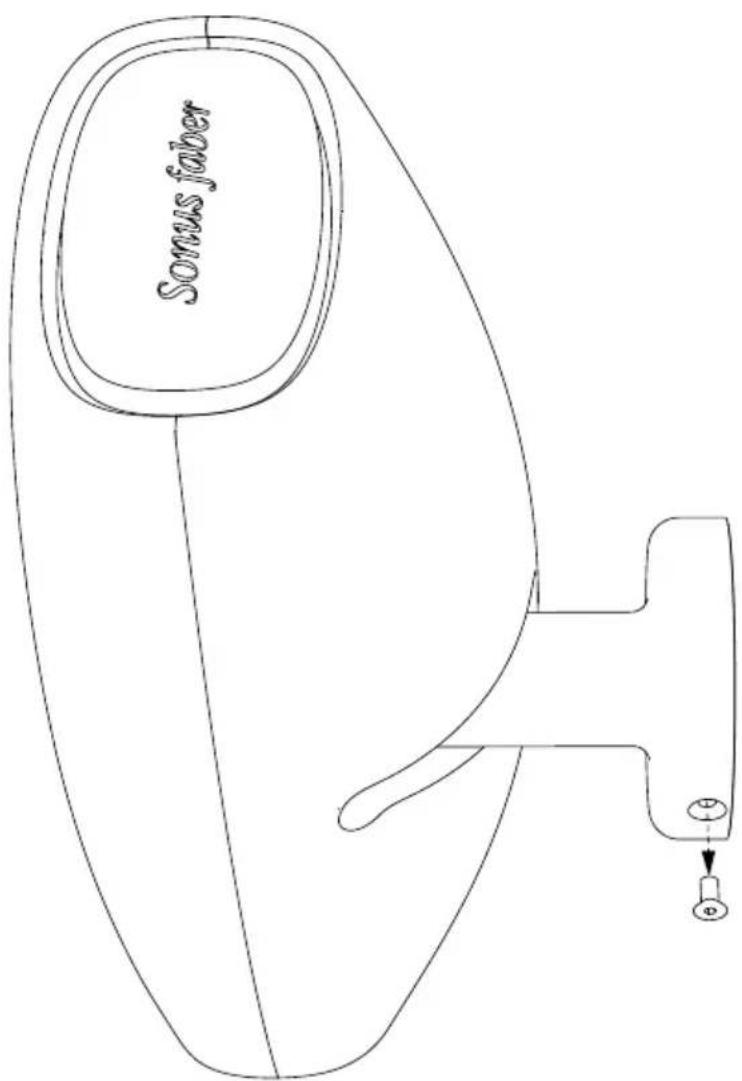
3.2.4 Remove the fixing screw from the speaker bracket.

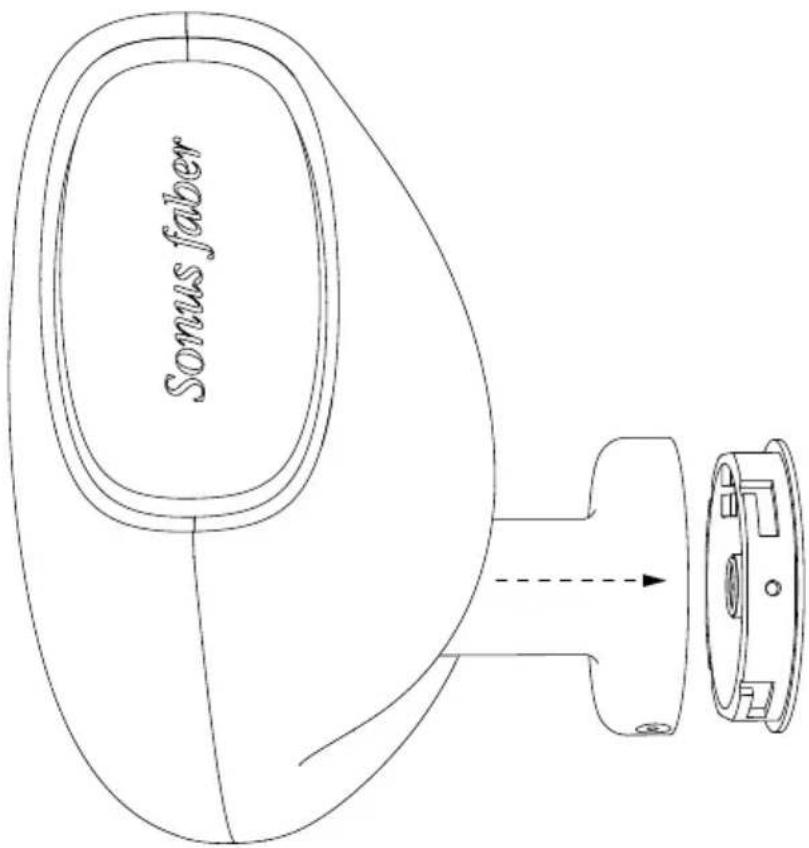
3.2.5 Insert the speaker into the wall-mounting bracket, holding it slightly rotated in an anti-clockwise direction with respect to the desired position, after which, rotate it clockwise until fully home.

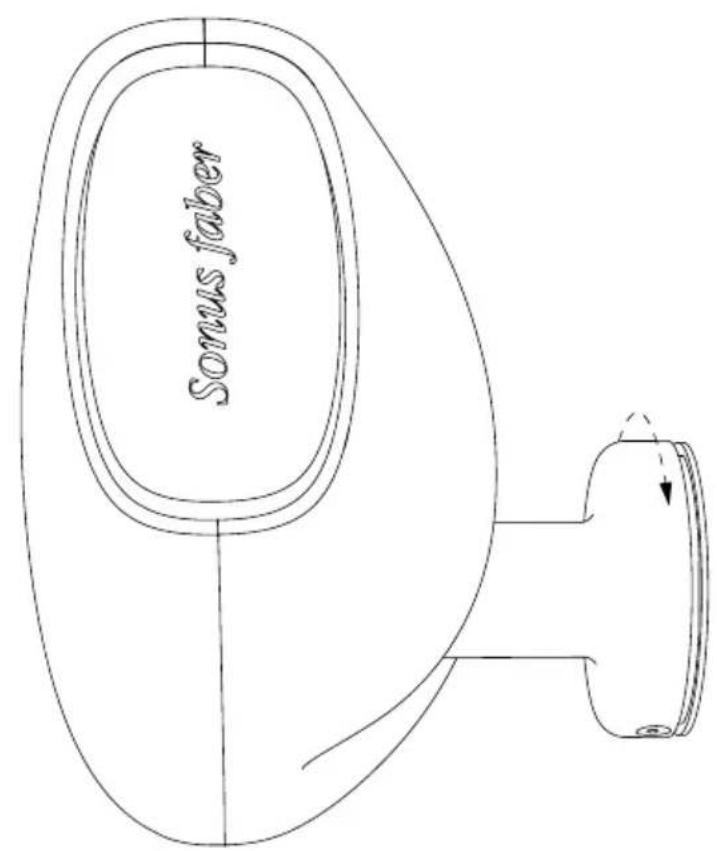
3.2.6 Insert and fasten the fixing screw to fix the two halves of the wall-mounting bracket

EN
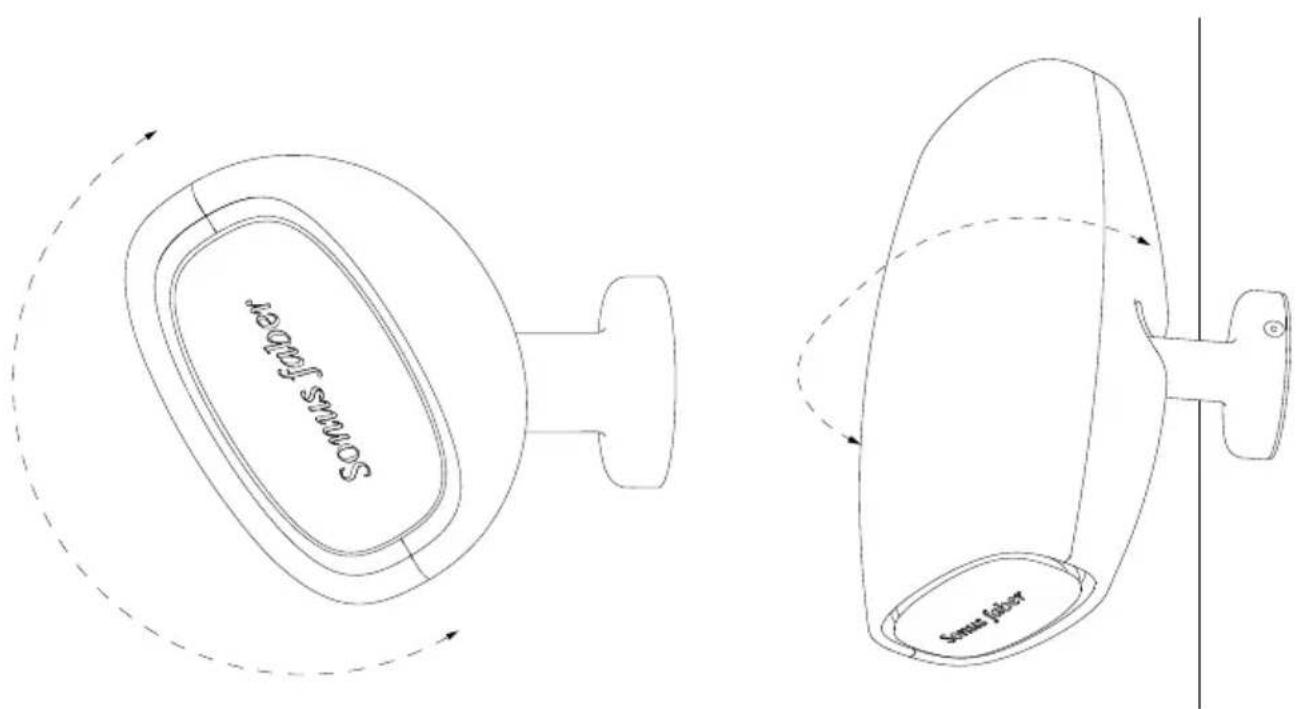
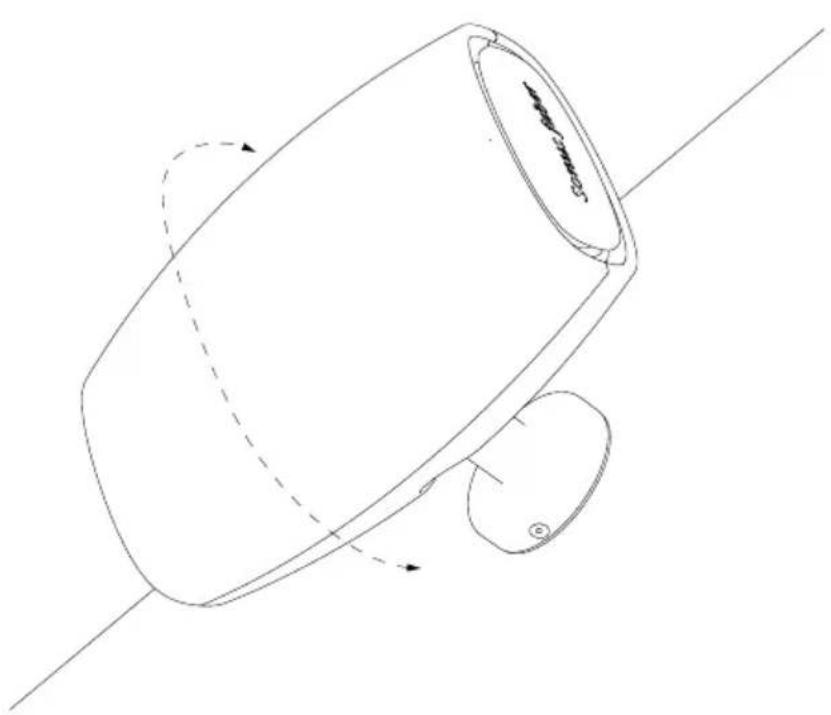
3.3 POSITIONING THE SPEAKER
3.3.1 Horizontal or vertical positioning
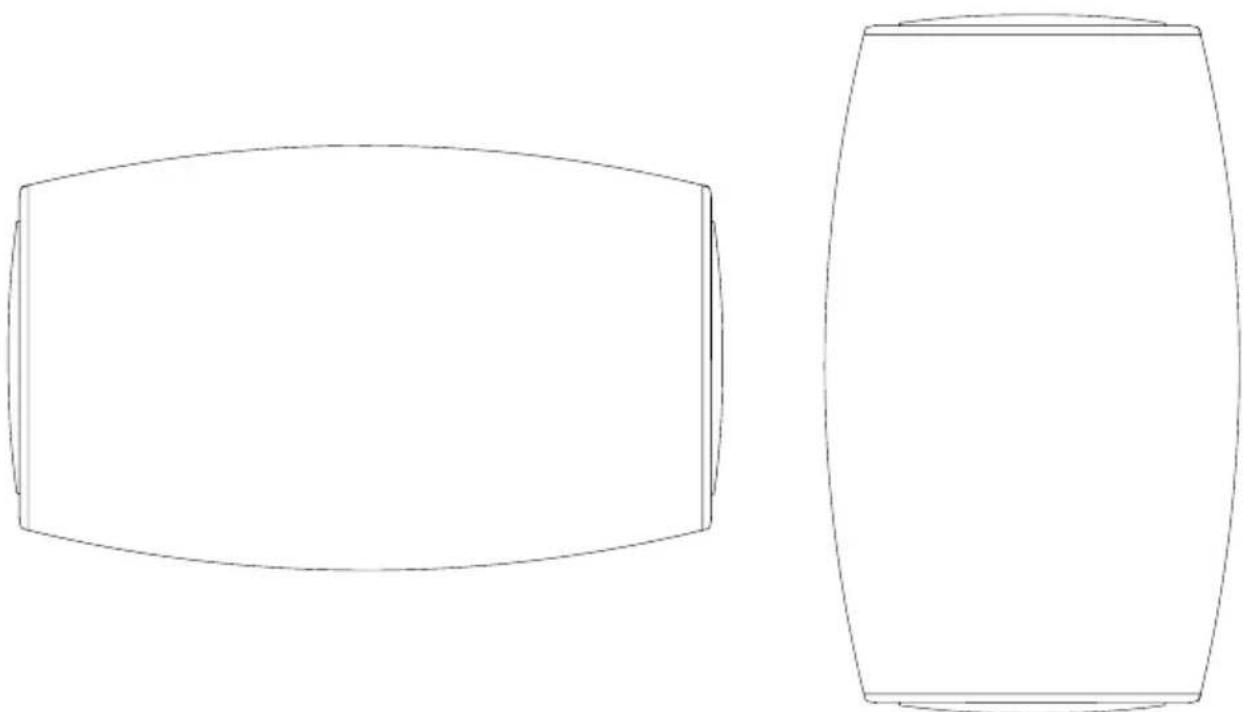
3.3.2 Delicately push or pull the speaker to incline it. There are 6 possible inclinations available, equally distanced by 15 degrees.
EN
4 TECHNICAL SPECIFICATIONS
ASTER
| Speaker type | 2 way |
| Low frequency transducer | 5.81 in |
| Mid/High frequency transducer | 1.07 in |
| Nominal power | 100 W |
| Low-frequency cut-off (-6dB) | 70 Hz |
| Low-frequency cut-off (-3dB) 61 Hz | |
| Frequency cut-off (-3dB on-axis) 70 Hz - 20 kHz | |
| Frequency cut-off (-6dB on-axis) 61 Hz - 22 kHz | |
| Sensitivity 2.83 Vrms@1m 88 dB | |
| Nominal impedance 8 Ω | |
| Minimal impedance 6 Ω | |
| Weight 4.16 kg - 9.17 lb | |
| Depth 20.50 cm - 8.07 in | |
| Width 19 cm - 7.47 in | |
| Height 29.34 cm - 11.55 in |
SOMMAIRE
4 Specifications techniques 25
1 INFORMATIONSGENÉRALES
1.1 INFORMATIONS POUR L'UTILISATION
Cher Client,
| Speaker type | 2 way |
| Low frequency transducer | 5.81 in |
| Mid/High frequency transducer | 1.07 in |
| Nominal power | 100 W |
| Low-frequency cut-off (-6dB) | 70 Hz |
| Low-frequency cut-off (-3dB) 61 Hz | |
| Frequency cut-off (-3dB on-axis) 70 Hz - 20 kHz | |
| Frequency cut-off (-6dB on-axis) 61 Hz - 22 kHz | |
| Sensitivity 2.83 Vrms@1m 88 dB | |
| Nominal impedance 8 Ω | |
| Minimal impedance 6 Ω | |
| Weight 4.16 kg - 9.17 lb | |
| Depth 20.50 cm - 8.07 in | |
| Width 19 cm - 7.47 in | |
| Height 29.34 cm - 11.55 in |
INHALTSVERZEICHNIS
| Speaker type | 2 way |
| Low frequency transducer | 5.81 in |
| Mid/High frequency transducer | 1.07 in |
| Nominal power | 100 W |
| Low-frequency cut-off (-6dB) | 70 Hz |
| Low-frequency cut-off (-3dB) 61 Hz | |
| Frequency cut-off (-3dB on-axis) 70 Hz - 20 kHz | |
| Frequency cut-off (-6dB on-axis) 61 Hz - 22 kHz | |
| Sensitivity 2.83 Vrms@1m 88 dB | |
| Nominal impedance 8 Ω | |
| Minimal impedance 6 Ω | |
| Weight 4.16 kg - 9.17 lb | |
| Depth 20.50 cm - 8.07 in | |
| Width 19 cm - 7.47 in | |
| Height 29.34 cm - 11.55 in |
SUMÁRIO
1 Informacoes gereis 35
1.1 Informacoes para o'utilizar 35
1.2 Garantia e assistencia pos-venda 35
| Speaker type | 2 way |
| Low frequency transducer | 5.81 in |
| Mid/High frequency transducer | 1.07 in |
| Nominal power | 100 W |
| Low-frequency cut-off (-6dB) | 70 Hz |
| Low-frequency cut-off (-3dB) 61 Hz | |
| Frequency cut-off (-3dB on-axis) 70 Hz - 20 kHz | |
| Frequency cut-off (-6dB on-axis) 61 Hz - 22 kHz | |
| Sensitivity 2.83 Vrms@1m 88 dB | |
| Nominal impedance 8 Ω | |
| Minimal impedance 6 Ω | |
| Weight 4.16 kg - 9.17 lb | |
| Depth 20.50 cm - 8.07 in | |
| Width 19 cm - 7.47 in | |
| Height 29.34 cm - 11.55 in |
ÍNDICE
| Speaker type | 2 way |
| Low frequency transducer | 5.81 in |
| Mid/High frequency transducer | 1.07 in |
| Nominal power | 100 W |
| Low-frequency cut-off (-6dB) | 70 Hz |
| Low-frequency cut-off (-3dB) 61 Hz | |
| Frequency cut-off (-3dB on-axis) 70 Hz - 20 kHz | |
| Frequency cut-off (-6dB on-axis) 61 Hz - 22 kHz | |
| Sensitivity 2.83 Vrms@1m 88 dB | |
| Nominal impedance 8 Ω | |
| Minimal impedance 6 Ω | |
| Weight 4.16 kg - 9.17 lb | |
| Depth 20.50 cm - 8.07 in | |
| Width 19 cm - 7.47 in | |
| Height 29.34 cm - 11.55 in |
NOTE
Sonus faber S.p.A.
Via Meucci, 10 - 36057 Arcugnano (VI) - Italy
Tel. +39 0444 288788 - fax +39 0444 288722
info@sonusfaber.com
© COPYRIGHT 2023
World copyright
reserved

Sonus faber reserves the right to change any technical and/or aesthetical feature of its products at any time without any previous notice
Sonus faber S.p.A.
Via Meucci, 10 - 36057 Arcugnano (VI) - Italy
Tel. 0444/288788 - fax 0444/288722 - info@sonusfaber.com


- CONTENTS
- GENERAL INFORMATION
- USER INFORMATION
- WARRANTY AND AFTER-SALES ASSISTANCE
- SAFETY INFORMATION
- INSTALLATION
- PACKAGE CONTENT
- INSTALLATION PROCEDURE
- POSITIONING THE SPEAKER
- TECHNICAL SPECIFICATIONS
- SOMMAIRE
- INFORMATIONSGENÉRALES
- INFORMATIONS POUR L'UTILISATION
- INHALTSVERZEICHNIS
- SUMÁRIO
- ÍNDICE
- NOTE
Brand : Sonus Faber
Model : Aster
Category : Loudspeaker