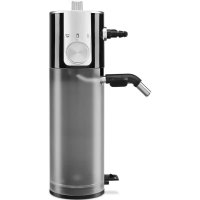
KESMK5OB - Coffee machine KITCHENAID - Free user manual and instructions
Find the device manual for free KESMK5OB KITCHENAID in PDF.



| Product type | Milk frother for espresso machine |
| Brand | KitchenAid |
| Model | KESMK5OB |
| Milk reservoir capacity | Max 17 oz (approx 500 ml) |
| Functions | Milk frothing, hot milk, hot water |
| Frothing adjustment | Rotary knob with variable level |
| Power source | Via the espresso machine (steam) |
| Materials | Plastic, rubber, stainless steel (distribution tube) |
| Care and cleaning | Clean after each use; can be disassembled for deep cleaning with soap |
| Safety | Do not touch hot surfaces; unplug before cleaning; do not use outdoors |
| Included spare parts | Distribution tube, connector, cleaning brush, tube clamp |
| Repairability | 1-year warranty; easy replacement by KitchenAid in case of failure |
| Dimensions (approx.) | Height: 20 cm, Width: 10 cm, Depth: 15 cm (estimated) |
| Weight (approx.) | 0.5 kg (estimated) |
Frequently Asked Questions - KESMK5OB KITCHENAID
User questions about KESMK5OB KITCHENAID
0 question about this device. Answer the ones you know or ask your own.
Ask a new question about this device
Download the instructions for your Coffee machine in PDF format for free! Find your manual KESMK5OB - KITCHENAID and take your electronic device back in hand. On this page are published all the documents necessary for the use of your device. KESMK5OB by KITCHENAID.
USER MANUAL KESMK5OB KITCHENAID
Milk Frother Attachment KESMK4, KESMK5
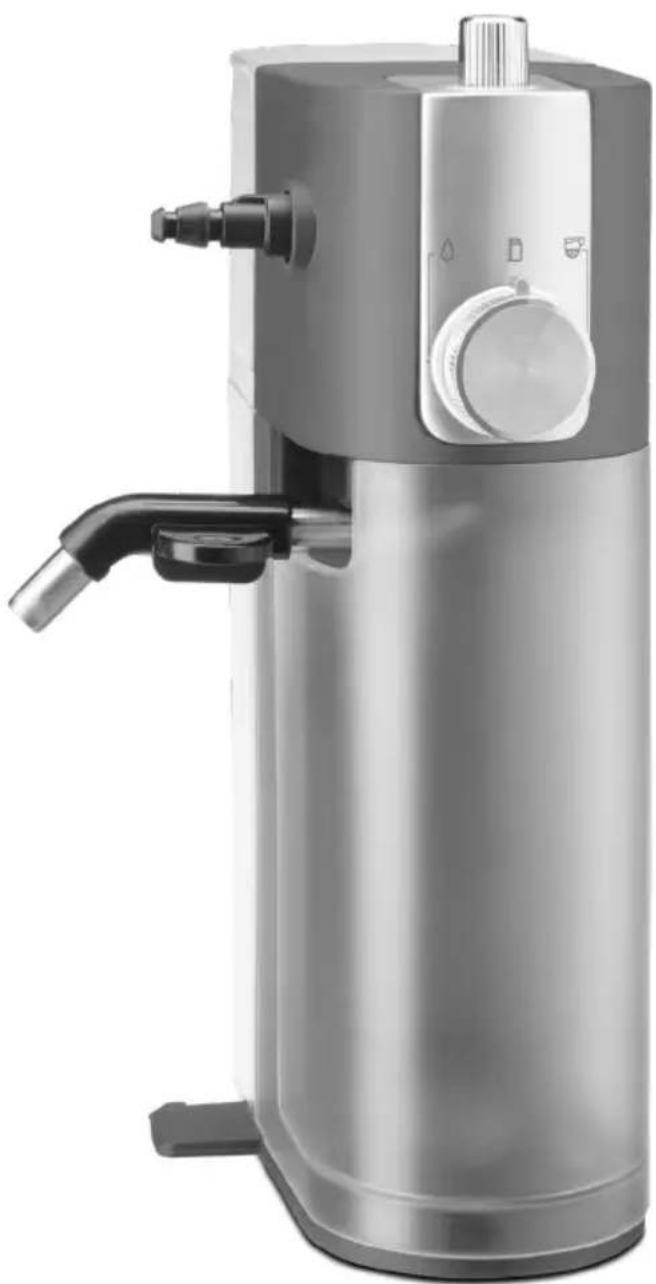
natural_image
Modern stainless steel industrial water heater with control knob and handle (no visible text or symbols)PARTS AND FEATURES
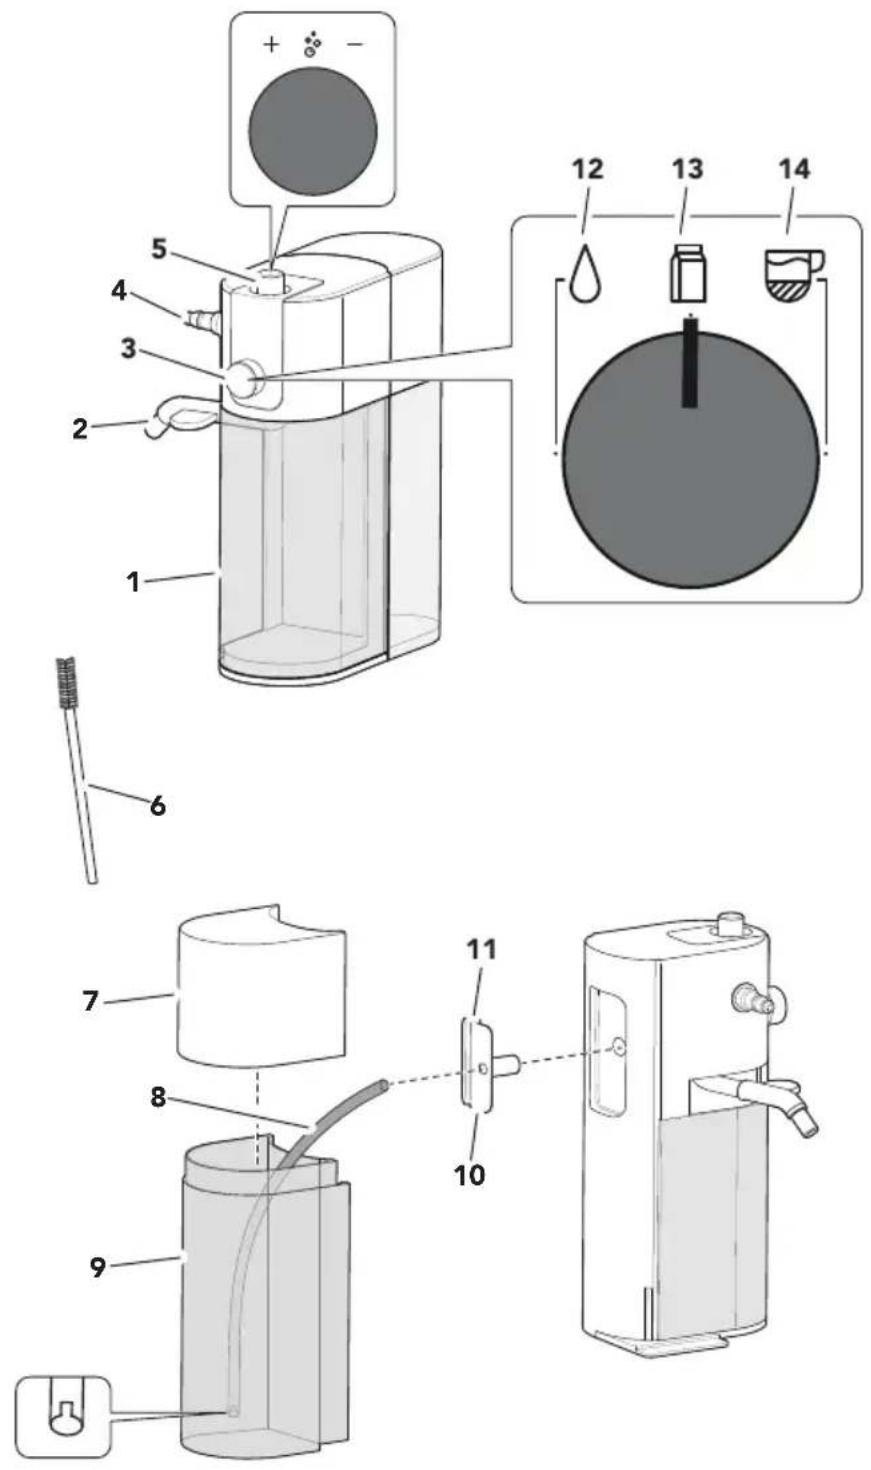
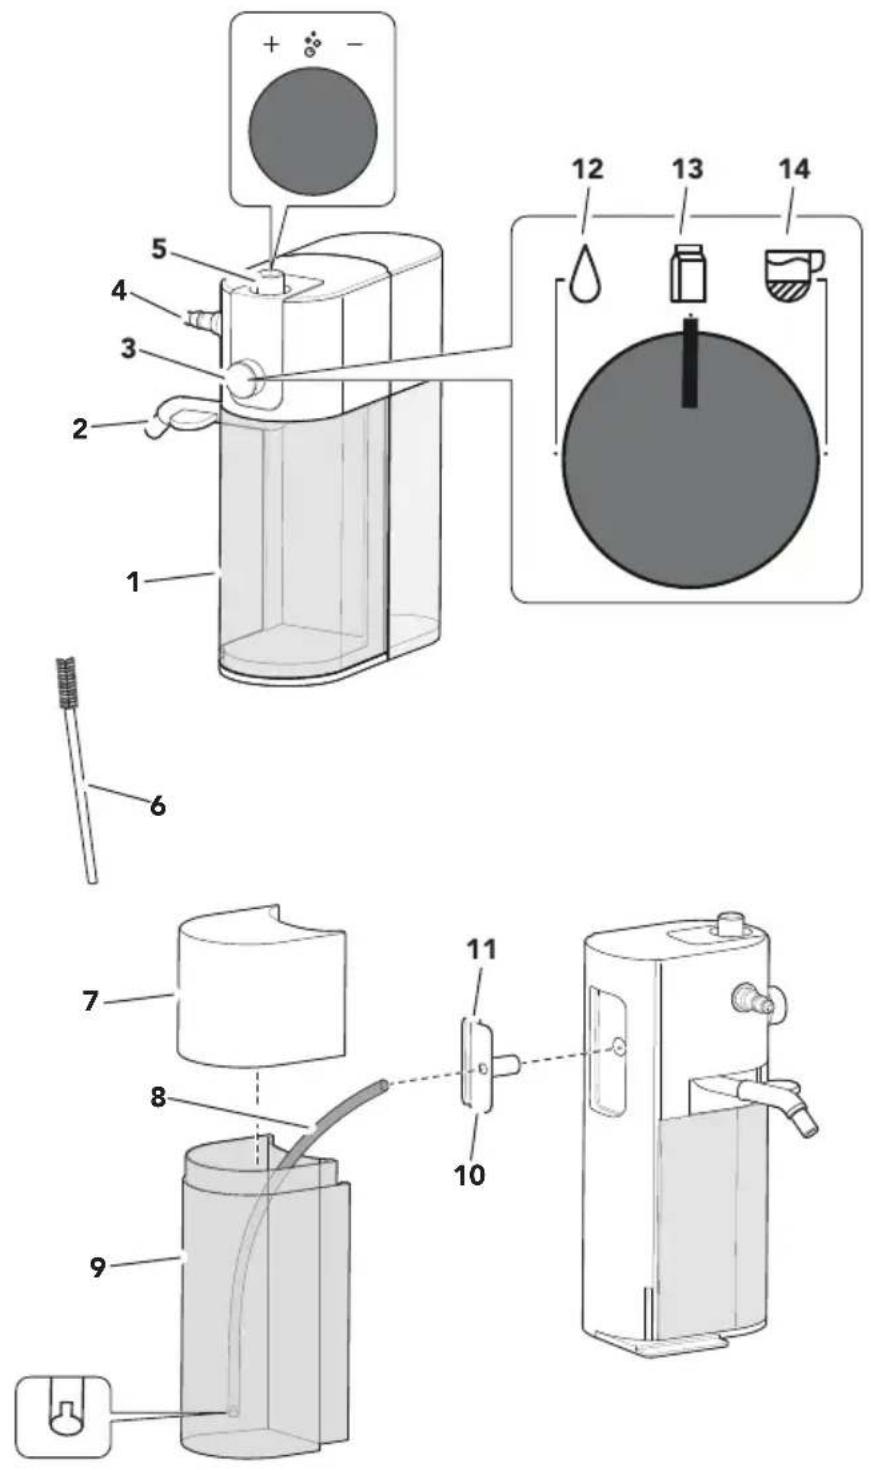
1 Storage container
2 Milk dispenser tube
3 Function knob
4 Steam port
5 Froth level adjustment knob
6 Brush
7 Milk tank lid
8 Milk hose
9 Milk tank
10 Milk hose connector
11 Milk hose clip
12 Hot water function
13 Hot milk function
14 Froth milk function
Your safety and the safety of others are very important.
We have provided many important safety messages in this manual and on your appliance. Always read and obey all safety messages.

This is the safety alert symbol.
This symbol alerts you to potential hazards that can kill or hurt you and others.
All safety messages will follow the safety alert symbol and either the word "DANGER" or "WARNING." These words mean:
! DANGER
You can be killed or seriously injured if you don't immediately follow instructions.
WARNING
You can be killed or seriously injured if you don't follow instructions.
All safety messages will tell you what the potential hazard is, tell you how to reduce the chance of injury, and tell you what can happen if the instructions are not followed.
IMPORTANT SAFEGUARDS
When using electrical appliances, basic safety precautions should always be followed, including the following:
- Read all instructions.
- Do not touch hot surfaces. Use handles or knobs.
- Turn the Espresso Machine OFF (and detach the Milk Frother Attachment from the Espresso Machine) before cleaning. Make sure the steam/water flow stops completely before disassembling.
- This appliance is not intended for use by persons (including children) with reduced physical, sensory, or mental capabilities, or lack of experience or knowledge, unless they are closely supervised and instructed concerning use of the appliance by a person responsible for their safety. Close supervision is necessary when any appliance is used by or near children. Children should be supervised to ensure that they do not play with the appliance.
- Close supervision is necessary when any appliance is used by or near children.
- Allow to cool before putting on or taking off parts, and before cleaning.
- The use of accessory attachments not recommended by the appliance manufacturer may result in fire, electric shock, or personal injury.
- Do not use outdoors.
- Do not clean the Milk Frother Attachment with abrasive cleaners, steel wool, or other abrasive materials.
- Use extreme caution when using hot steam.
- Do not use appliance for other than intended use.
- Also see the Important Safeguards section included in the Espresso Machine Use and Care guide.
SAVE THESE INSTRUCTIONS
This product is designed for household use only.
PRODUCT ASSEMBLY
Before first use, clean all parts and accessories. (See "Care and Cleaning" section).
1
natural_image
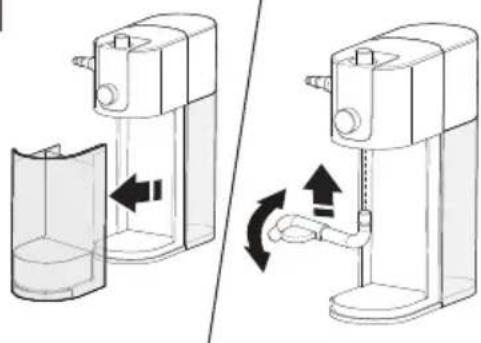
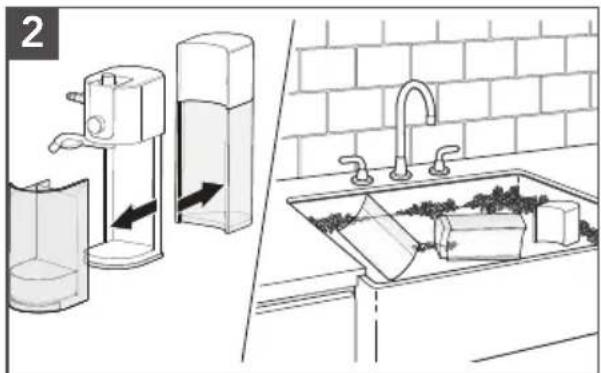
Diagram showing two mechanical devices with directional arrows indicating movement or force (no text or symbols present)Assembling Milk dispenser: Remove the Storage container and insert the Milk dispenser tube. Then, replace the Storage container.
Tip: Wet end of the Milk dispenser tube with fresh water to aid in assembly.
2
natural_image
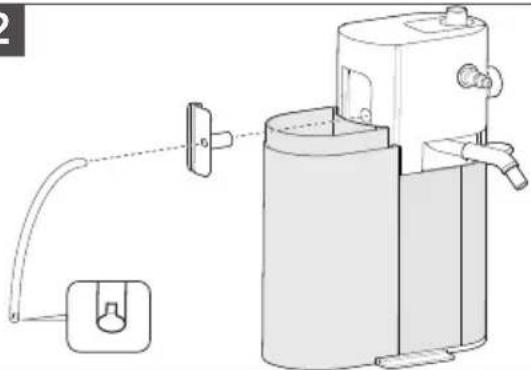
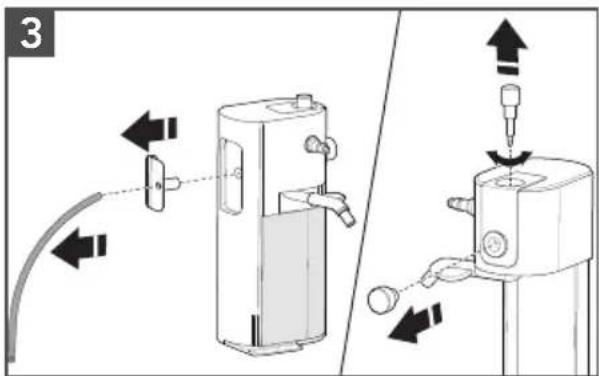
Diagram of a water purifier system with connected tubing and a plug (no text or labels)Remove the Milk tank lid. Insert the Milk hose connector in the Milk inlet hole. Firmly insert the Milk hose in the Milk hose connector. Immerse the Milk hose into the Milk tank.
3
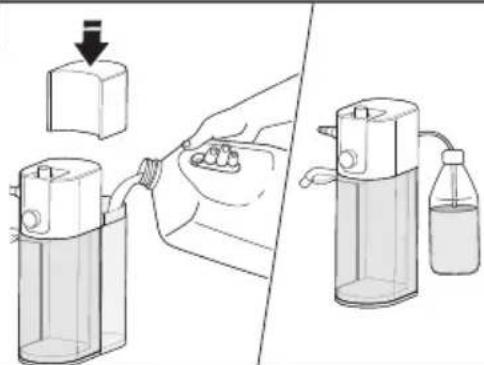
As desired, fill the Milk Tank (max. 17 oz) with the cold milk and replace the Milk tank lid.
Also, you can directly immerse the Milk hose in any milk container or milk bottle.
4
natural_image
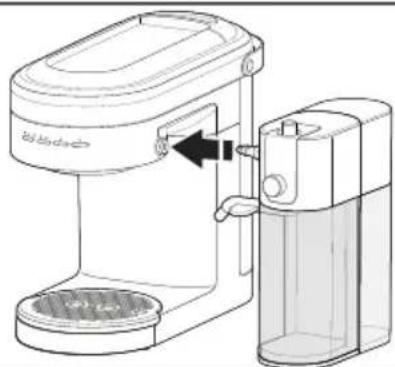
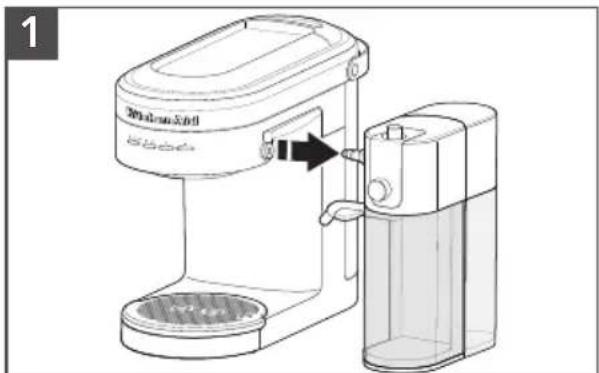
Line drawing of a coffee maker with a side arm and base, showing no text or symbolsOn the Espresso Machine, press the Steam wand release button to remove the Steam wand.
Align Steam port to the machine, press together until you hear a click. Direct the Milk dispenser tube towards the cup.
5
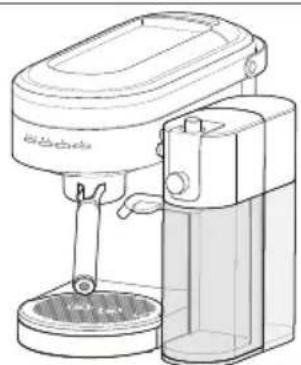
natural_image
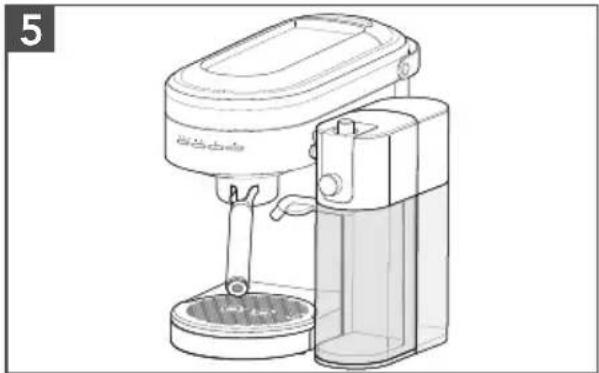
Line drawing of a coffee maker with lid and stand (no text or symbols)Your Espresso Machine with the Milk Frother Attachment is now ready to use.
PRODUCT USAGE
FOR FROTH MILK
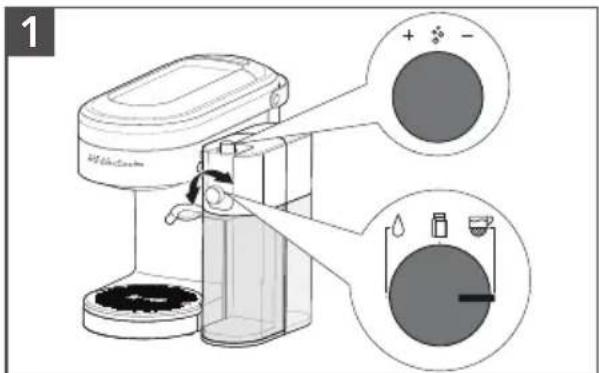
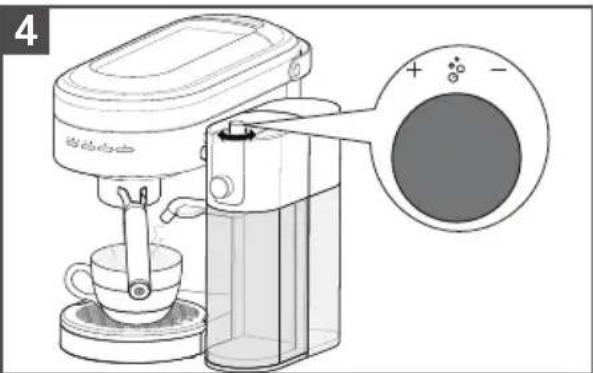
Align the Function knob to Froth milk function. Rotate the Froth level adjustment knob to desired level.
NOTE: For the Froth level adjustment knob, it is suggested to start with 90 Degrees rotation from the screwed down location.
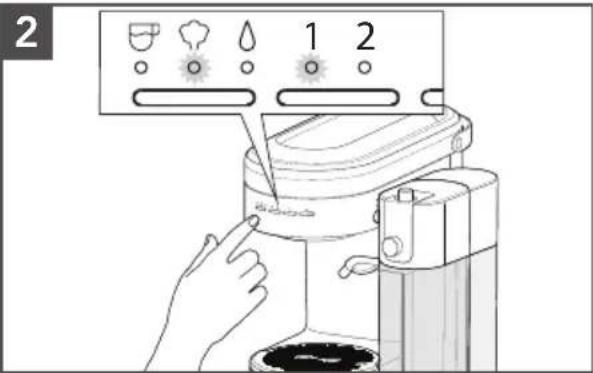
Turn On the Espresso Machine and toggle the Mode button to select Steam.
Toggle the Dose button to 1 or 2 (1 for less milk and 2 for more milk).
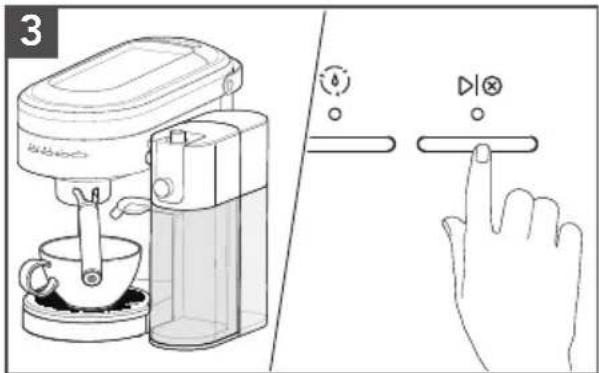
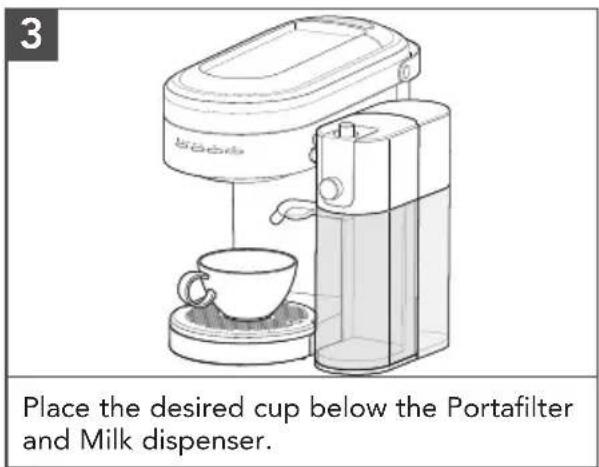
Place the desired cup below the Portafilter and Milk dispenser.
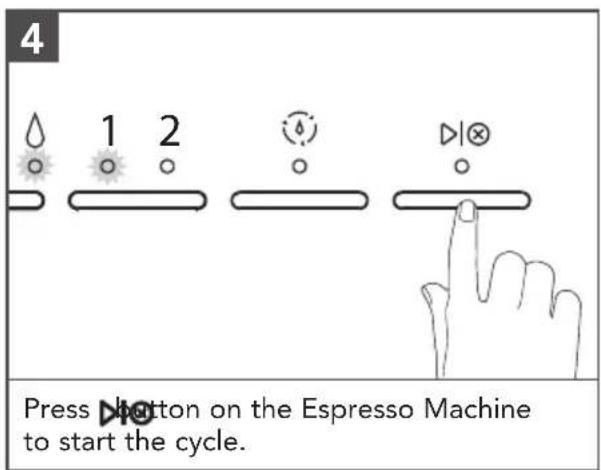
Press ▶ button on the Espresso Machine to start the cycle.
natural_image
Line drawing of a coffee maker with a cup and side arm, no text or symbols presentFroth level can be adjusted throughout the automatic frothing cycle by rotating the Froth level adjustment knob.
FOR HOT MILK
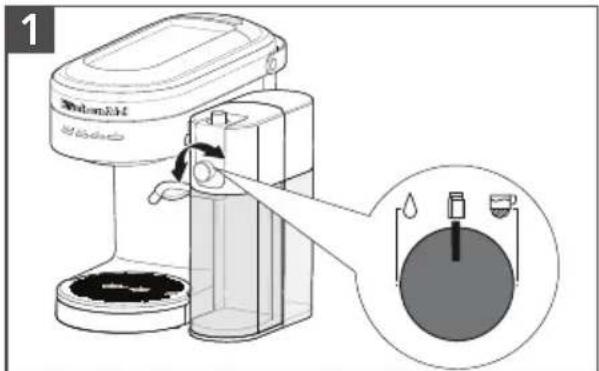
Align Function knob on Milk Frother Attachment to the Hot milk function.
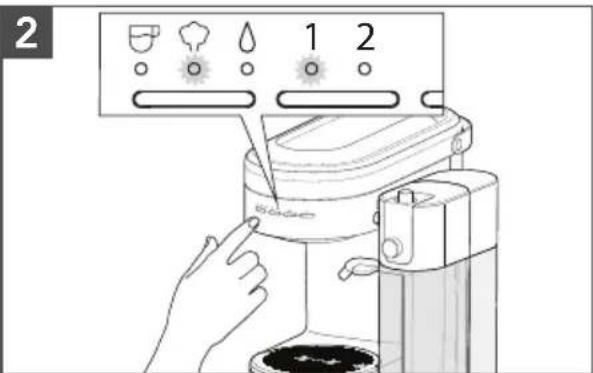
Turn On the Espresso Machine and toggle the Mode button to Steam. Toggle the Dose button mode to 1 or 2 (1 for less milk and 2 for more milk).
PRODUCT USAGE
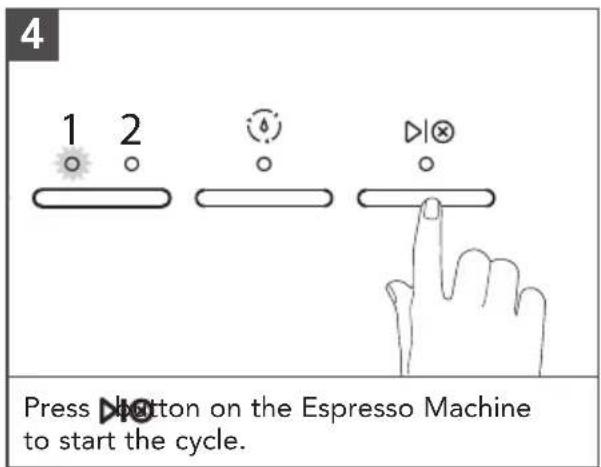
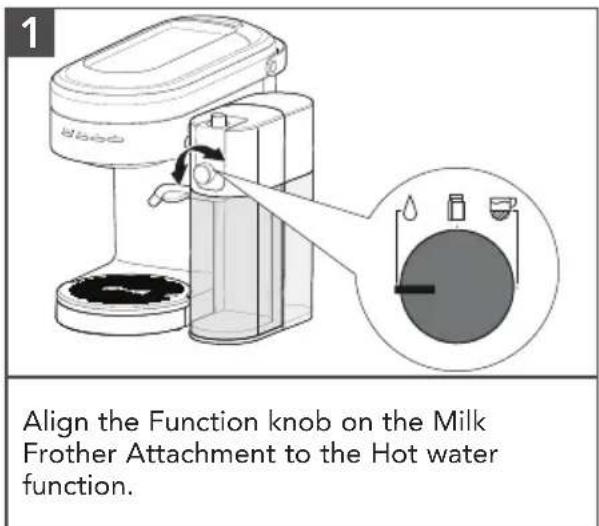
FOR HOT WATER
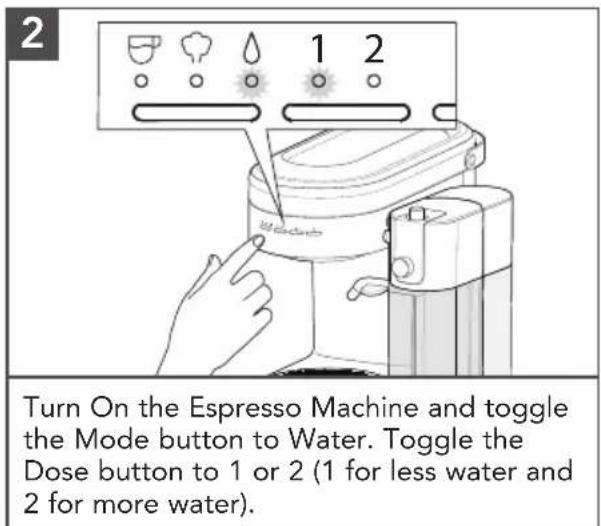
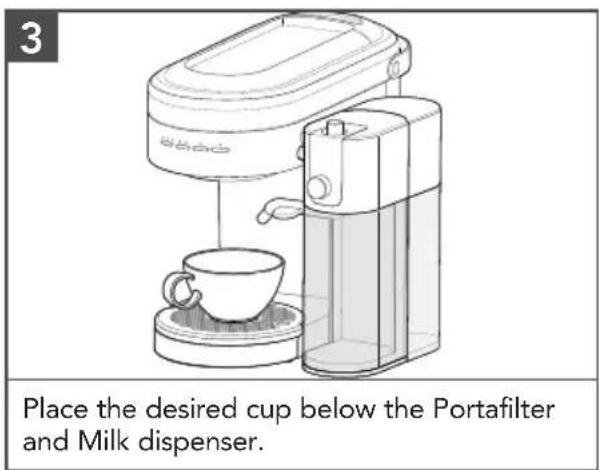
PRODUCT USAGE
PROGRAMMING FUNCTION
The Espresso Machine is equipped with programming functionality for customized milk and water doses (1 and 2).
NOTE: Milk Frother Attachment must be assembled to the Espresso Machine for any customized settings to be saved.
| Beverage Select Function Select Dose Preparation | |||
| Foam or Milk | Steam (∅) | 1 or 2 | Press and hold ▶ button on the Espresso Machine until desired volume is dispensed into your cup. |
| Hot Water | Water (∅) | 1 or 2 | |
CARE AND CLEANING
CLEANING AFTER EVERY USE
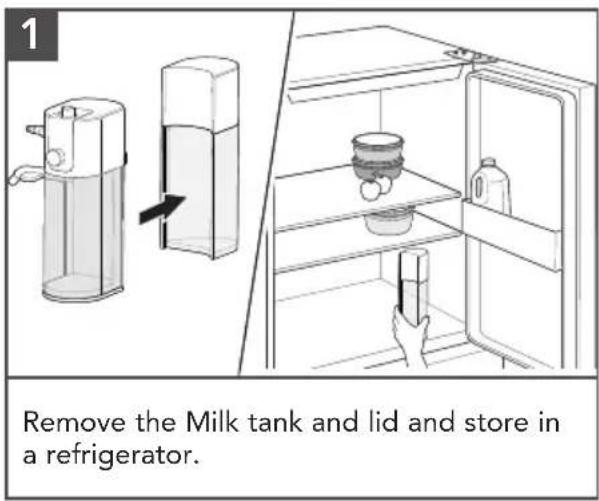
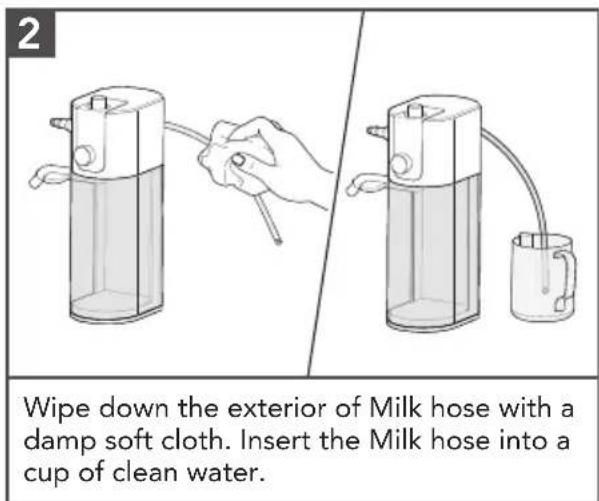
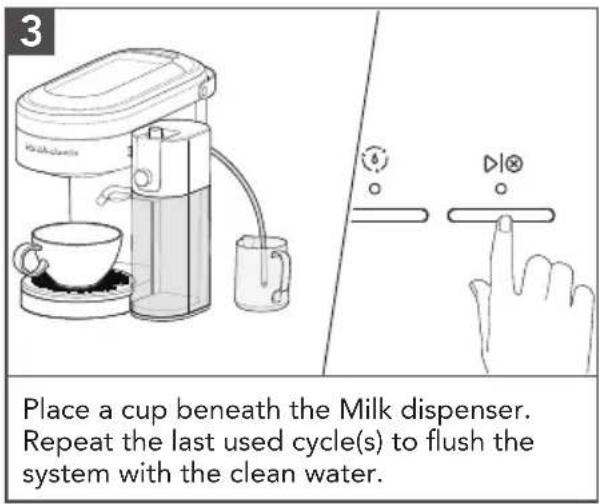
CARE AND CLEANING
DEEP CLEANING THE MILK FROTHER ATTACHMENT
Press the Steam wand release button on Espresso Machine to release Milk Frother Attachment.
Remove the Milk tank and clean it with warm soapy water. Remove the Storage container.
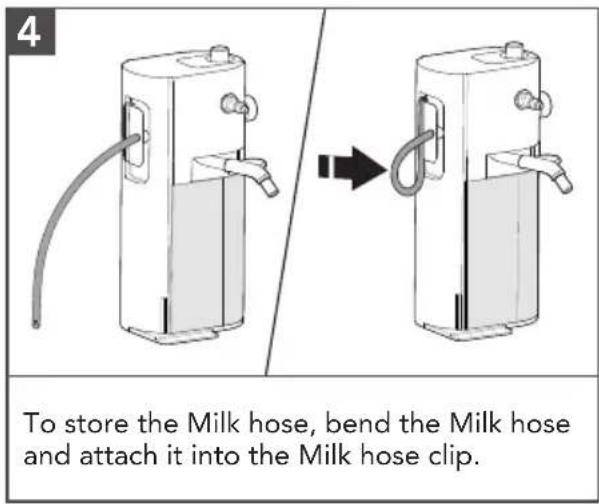
Remove the Milk hose and Hose connector.
Remove the Froth level adjustment knob by unscrewing it counterclockwise. Pull out the Function knob.
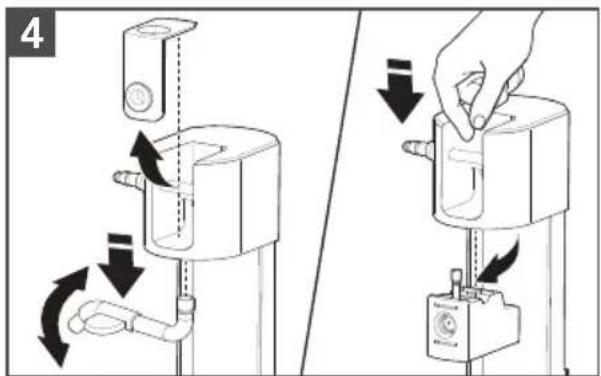
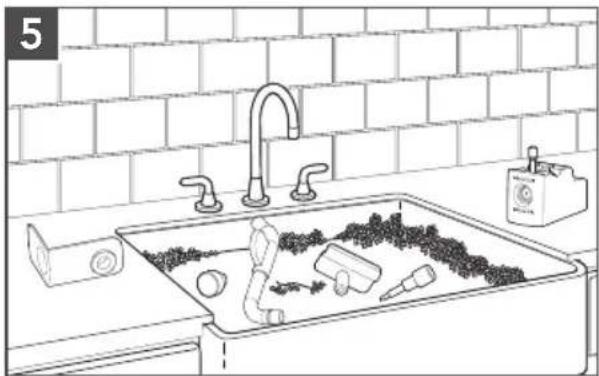
Remove the Decorative plate. Remove the Milk dispenser by pulling and twisting in a downward direction.
Remove the Black rubber frother component by pushing down from the top and pulling from the bottom.
natural_image
Line drawing of a kitchen sink with water spray and a small container, against a brick wall background (no text or symbols)Wash the Froth level adjustment knob, Function knob, Milk hose connector, Milk hose, Milk dispenser, and the Black rubber frother component in warm, soapy water or cleaning solution designed for Milk Frothers. Thoroughly rinse with clean water and dry with a soft cloth.
NOTE: Use the provided cleaning brush to reach any small areas for thorough cleaning.
REASSEMBLING THE PRODUCT
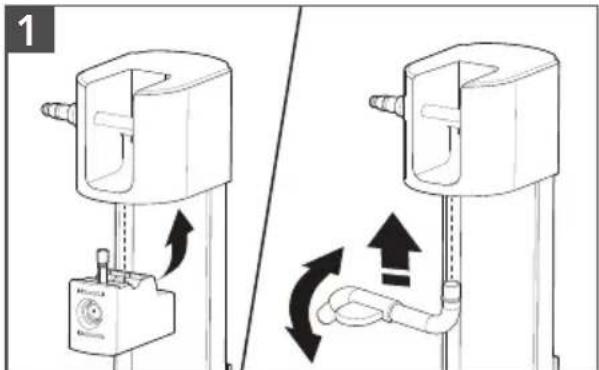
Follow the steps of disassembly to assemble again. Press the Black rubber frother component into the main housing. Insert the Milk dispenser tube in place and push upward and rotate until it clicks.
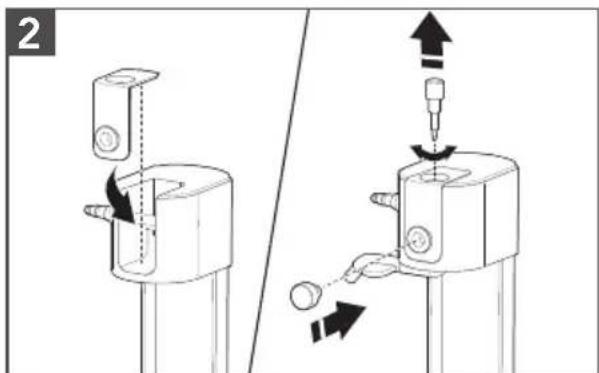
Replace the Decorative plate.
Insert and rotate the Froth level adjustment knob in its place.
Replace the Function knob in its place.
TROUBLESHOOTING GUIDE
| Problem Solution | |
| If Steam and Hot water is not getting selected: | The Milk Frother Attachment may not be correctly attached in place. Please refer to the “Product Assembly” section. |
| If the problem is not due to one of the above items: | See the “Arranging for Service” chapter in the “Warranty and Service” section. Do not return the Espresso Machine to the retailer as they do not provide service. |
| If milk is not being dispensed: | The Milk hose and Milk hose connector may not be properly assembled. Please refer to the “Product Assembly” section. |
WARRANTY AND SERVICE
KITCHENAID® MILK FROTHER ATTACHMENT WARRANTY FOR THE 50 UNITED STATES, THE DISTRICT OF COLUMBIA, PUERTO RICO, AND CANADA
This warranty extends to the purchaser and any succeeding owner for Milk Frother Attachment operated in the 50 United States, the District of Columbia, Puerto Rico, and Canada.
| Length of Warranty: One Year Full Warranty from date of purchase. | |
KitchenAid Will Pay for Your Choice of: | Hassle-Free Replacement of your Milk Frother Attachment. See the next page for details on how to arrange for service, or call the Customer eXperience Center toll-free at 1-800-541-6390.ORThe replacement parts and repair labor costs to correct defects in materials and workmanship.Service must be provided by an Authorized KitchenAid Service Center. |
| KitchenAid Will Not Pay for: | A. Repairs when your Milk Frother Attachment is used in other than normal single family home use.B. Damage resulting from accident, alteration, misuse or abuse.C. Any shipping or handling costs to deliver your Milk Frother Attachment to an Authorized Service Center.D. Replacement parts or repair labor costs for Milk Frother Attachment operated outside the 50 United States, District of Columbia, Puerto Rico, and Canada. |
| DISCLAIMER OF IMPLIED WARRANTIES; LIMITATION OF REMEDIESIMPLIED WARRANTIES, INCLUDING TO THE EXTENT APPLICABLE WARRANTIES OF MERCHANTABILITY OR FITNESS FOR A PARTICULAR PURPOSE, ARE EXCLUDED TO THE EXTENT LEGALLY PERMISSIBLE. ANY IMPLIED WARRANTIES THAT MAY BE IMPOSED BY LAW ARE LIMITED TO ONE YEAR, OR THE SHORTEST PERIOD ALLOWED BY LAW. SOME STATES AND PROVINCES DO NOT ALLOW LIMITATIONS OR EXCLUSIONS ON HOW LONG AN IMPLIED WARRANTY OF MERCHANTABILITY OR FITNESS LASTS, SO THE ABOVE LIMITATIONS OR EXCLUSIONS MAY NOT APPLY TO YOU.IF THIS PRODUCT FAILS TO WORK AS WARRANTED, CUSTOMER'S SOLE AND EXCLUSIVE REMEDY SHALL BE REPAIR OR REPLACEMENT ACCORDING TO THE TERMS OF THIS LIMITED WARRANTY. KITCHENAID AND KITCHENAID CANADA DO NOT ASSUME ANY RESPONSIBILITY FOR INCIDENTAL OR CONSEQUENTIAL DAMAGES. This warranty gives you specific legal rights and you may also have other rights which vary from state to state or province to province. | |
WARRANTY AND SERVICE
HASSLE-FREE REPLACEMENT WARRANTY – 50 UNITED STATES, DISTRICT OF COLUMBIA, AND PUERTO RICO
We're so confident the quality of our products meets the exacting standards of KitchenAid that, if your Milk Frother Attachment should fail within the first year of ownership, KitchenAid will arrange to deliver an identical or comparable replacement to your door free of charge and arrange to have your original Milk Frother Attachment returned to us. Your replacement unit will also be covered by our one year limited warranty.
If your Milk Frother Attachment should fail within the first year of ownership, simply call our toll-free Customer eXperience
Center at 1-800-541-6390 Monday through Friday. Please have your original sales receipt available when you call. Proof of purchase will be required to initiate the claim. Give the consultant your complete shipping address. (No P.O. Box numbers, please.)
When you receive your replacement Milk Frother Attachment, use the carton, packing materials, and prepaid shipping label to pack up your original Milk Frother Attachment and send it back to KitchenAid.
HASSLE-FREE REPLACEMENT WARRANTY – CANADA
We're so confident the quality of our products meets the exacting standards of the KitchenAid brand that, if your Milk Frother Attachment should fail within the first year of ownership, we will replace your Milk Frother Attachment with an identical or comparable replacement. Your replacement unit will also be covered by our one year limited warranty.
If your Milk Frother Attachment should fail within the first year of ownership, simply call our toll-free Customer eXperience
Center at 1-800-807-6777 Monday through Friday. Please have your original sales receipt available when you call. Proof of purchase will be required to initiate the claim. Give the consultant your complete shipping address.
When you receive your replacement Milk Frother Attachment, use the carton, packing materials, and prepaid shipping label to pack up your original Milk Frother Attachment and send it back to KitchenAid.
ARRANGING FOR SERVICE AFTER THE WARRANTY EXPIRES, OR ORDERING ACCESSORIES AND REPLACEMENT PARTS
In the United States and Puerto Rico:
For service information, or to order accessories or replacement parts, call toll-free at 1-800-541-6390 or write to:
Customer eXperience Center, KitchenAid Small Appliances, P.O. Box 218, St. Joseph, MI 49085-0218
Outside the United States and Puerto Rico:
Consult your local KitchenAid dealer or the store where you purchased the Milk Frother Attachment for information on how to obtain service.
For service information in Canada:
Call toll-free 1-800-807-6777.
For service information in Mexico:
Call toll-free 01-800-0022-767.
PIÈCES ET CARACTÉRISTIQUES
ASSEMBLAGE DU PRODUIT
natural_image
Diagram showing two steps of a handwashing device, one with left-hand rule and arrow indicating clockwise motion (no text or symbols)natural_image
Diagram of a water purifier system with pipe connection and outlet (no text or labels)natural_image
Line drawing of a coffee maker with a side panel and handle, showing mechanical components without any text or symbols.ASSEMBLAGE DU PRODUIT
natural_image
Line drawing of a coffee maker with a stand mixer and baseplate (no text or symbols)natural_image
Line drawing of a coffee maker with a cup and saucer (no text or symbols)natural_image
Diagram showing a device being connected via tubing, with no visible text or symbolsnatural_image
Line drawing of a kitchen sink with water spray and a water dispenser, against a brick wall background (no text or symbols)natural_image
Diagram showing two mechanical device configurations with directional arrows indicating motion (no text or symbols)Customer eXperience Center, KitchenAid Small Appliances, P.O. Box 218, St. Joseph, MI 49085-0218
natural_image
Diagram showing two mechanical devices with directional arrows indicating movement or force (no text or symbols present)natural_image
Diagram of a water purifier system with pipe connection and outlet (no text or labels)natural_image
Line drawing of a coffee maker with a side arm and base, showing no text or symbolsnatural_image
Line drawing of a modern water dispenser with a base and handle (no text or symbols)natural_image
Line drawing of a coffee maker with a cup and side arm, no text or symbols presentnatural_image
Line drawing of a coffee maker with a cup and saucer (no text or symbols)natural_image
Line drawing of a coffee maker with a cup and saucer (no text or symbols)natural_image
Line drawing of a kitchen sink with cleaning tools and a water dispenser, against a brick wall background (no text or symbols)Customer eXperience Center, KitchenAid Small Appliances, P.O. Box 218, St. Joseph, MI 49085-0218
natural_image
White silhouette of a telephone handset on black background (no text or symbols)PRODUCT QUESTIONS OR RETURNS
QUESTIONS SUR LE PRODUIT OU LES RETOURS
MEXICO: KitchenAid.com.mx
LATIN AMERICA: KitchenAid-Latam.com
KitchenAid®
®/TM ©2020 KitchenAid. All rights reserved. Used under license in Canada.

- PARTS AND FEATURES
- Your safety and the safety of others are very important.
- ! DANGER
- WARNING
- IMPORTANT SAFEGUARDS
- SAVE THESE INSTRUCTIONS
- PRODUCT ASSEMBLY
- PRODUCT USAGE
- FOR HOT MILK
- FOR HOT WATER
- PROGRAMMING FUNCTION
- CARE AND CLEANING
- CLEANING AFTER EVERY USE
- REASSEMBLING THE PRODUCT
- TROUBLESHOOTING GUIDE
- WARRANTY AND SERVICE
- HASSLE-FREE REPLACEMENT WARRANTY – CANADA
- ARRANGING FOR SERVICE AFTER THE WARRANTY EXPIRES, OR ORDERING ACCESSORIES AND REPLACEMENT PARTS
- In the United States and Puerto Rico:
- Outside the United States and Puerto Rico:
- For service information in Canada:
- For service information in Mexico:
- PIÈCES ET CARACTÉRISTIQUES
- ASSEMBLAGE DU PRODUIT
- KitchenAid®
Brand : KITCHENAID
Model : KESMK5OB
Category : Coffee machine