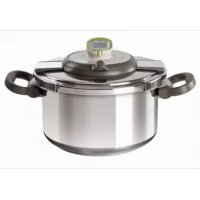
Acticook P43015 - Saucepan TEFAL - Free user manual and instructions
Find the device manual for free Acticook P43015 TEFAL in PDF.




| Product type | Pressure cooker (stovetop pressure cooker) |
| Brand | Tefal |
| Model | Acticook P43015 |
| Capacity | 10 liters |
| Pot diameter | 25 cm |
| Bottom diameter | 20 cm |
| Approximate height | 30 cm |
| Approximate weight | 5 kg |
| Material of pot and lid | Stainless steel |
| Operating pressure | 85 kPa |
| Maximum safety pressure | 120 kPa |
| Compatible heat sources | All types, including induction |
| Main functions | Steaming, braising, searing, soups |
| Included accessories | Steaming basket, trivet, eco-measure (250 ml), timer |
| Timer | Independent, countdown timer with sound alarm |
| Maintenance and cleaning | Pot and lid are dishwasher safe (remove module and gasket); module and valves hand wash only; gasket clean by hand |
| Safety | Pressure indicator, operating valve, safety valve, safety gasket, pressure lock |
| Spare parts and repairability | Gasket, steaming basket, trivet, timer, eco-measure available; repair by Tefal authorized centers |
| Pot warranty | 10 years against metal structure defects |
| Other parts warranty | 1 year (parts and labor) |
Frequently Asked Questions - Acticook P43015 TEFAL
User questions about Acticook P43015 TEFAL
0 question about this device. Answer the ones you know or ask your own.
Ask a new question about this device
Download the instructions for your Saucepan in PDF format for free! Find your manual Acticook P43015 - TEFAL and take your electronic device back in hand. On this page are published all the documents necessary for the use of your device. Acticook P43015 by TEFAL.
USER MANUAL Acticook P43015 TEFAL
natural_image
Exterior view of a stainless steel cooking pot with lid and side handles (no text or symbols visible)Important safety information
For your safety, this appliance complies with applicable standards and regulations:
- Pressure vessel directive
- Materials in contact with food
- Environment
- This product has been designed for domestic use only. Any commercial use, inappropriate use or failure to comply with the instructions, the manufacturer accepts no responsibility and the guarantee will not apply.
Take time to read all of the instructions and always refer back to the "User's Guide". This appliance is not intended for use by persons (including children) with reduced physical, sensory or mental capabilities, or lack of experience and knowledge, unless they have been given supervision of instruction concerning use of the appliance by a person responsible for their safety. Children should be supervised to ensure that they do not play with the appliance.
- Never place your pressure cooker in a hot oven.
- Always be very careful when moving your pressure cooker under pressure. Never touch not surfaces (in particular metal part)ise the handles and knobs. Use gloves where necessary. Check regularly that the bowl's handles are correctly attached. Tighten them if necessary.
- Never use your pressure cooker for any purpose other than the one it was designed for. - Your pressure cooker cooks under pressure. Scolding injuries may result from unsuitable use. Always make sure that the pressure cooker is properly closed before starting to use it. Refer to the "Closing" heading.
- Always Make sure that the selector is in the decompression position before opening ACTICOOK® and that the pressure indicator has fallen.
- Never force your pressure cooker open. Always make sure that the pressure inside it has dropped. Refer to the "Safety" heading.
- Never use your pressure cooker without any liquid in it for this will seriously damage it.
Always make sure that there is enough liquid in it during cooking.
- Use heat source(s) that are compatible with your pressure cooker, in line with the
instructions for use.
- Never make a recipe with milk (BAR) table. - Do not use rock salt in your pressure cooker, but rather add table salt when the cooking is nearly finished.
- Never fill your pressure cooker more than two-thirds full (the maximum mark).
- For food that expands during cooking, like rice or dried vegetables or stewed fruit, ... never fill your pressure cooker more than half full. For certain soups like pumpkin or cougette ... give your pressure cooker a few minutes to cool down, then cool it down fully by placing it under cold running water.
- For meat with an outer layer of skin (e.g. ox tongue.), which could swell due to the effects of pressure, pierce the meat before cooking. At the end of cooking, if the skin looks swollen, wall before taking it out the cooker and never stab the meat as hot juices and steam may scold you.
- When cooking food with a thick texture (e.g. split peas, mubard, stewed fruit, etc) the pressure cooker should be shaken slightly before opening to ensure that the food does not spurt out.
- Always make sure that the operating and safety valves are not blocked before use. Refer to the "Before cooking" heading.
- Never use your pressure cooker to deep fry using oil under pressure.
- Never take any action on the safety systems other than that which is described in the
instructions for cleaning and maintenance.
- Only use TELAL genuine spares designed for your model of appliance. This especially means only using a model cooker body and JELCTUCOOK®
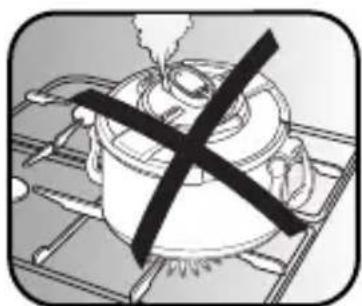
- Never place your pressure cooker on a heat source with the handles folded*
Keep these instructions
* depending on model
Description
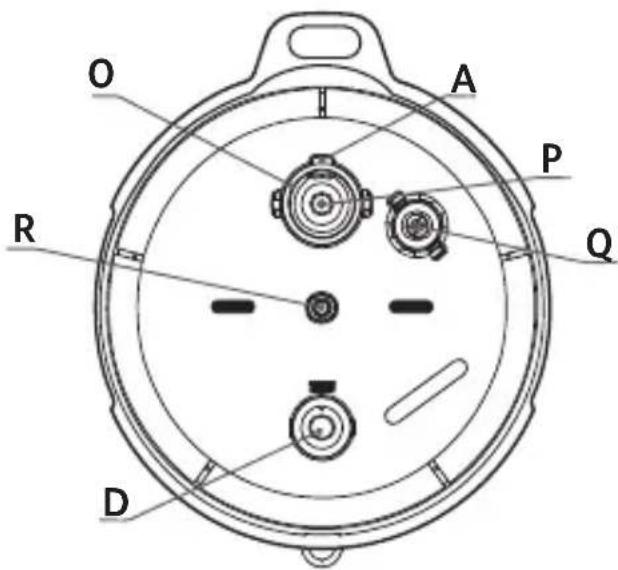
A. Steam release outlet
B. Automatic air evacuation system
C. Timer
D. Pressure indicator
E. Position selector
F. Eco-dose
G. Seal
H. Vitamin basket
I. tripod
J. Handle unlocking button*
K. Folding pan handles*
L. Fixed pan handles*
M. Maximum fill line
N. Pan
O. Steam release outlet seal
P. Operating valve
Q. Safety valve
R. Control module attachment point
Tefal® ACTICOOK®
A single utensil for a whole world of recipes:
...healthy cooking with the steam basket, for soups and stews, as well as browned and sauted recipes.
A wide selection of delicious dishes prepared in minimum time but with maximum energy-saving:
- The system, which expels the air, provides faster cooking while at the same time preserving the nutrients and colour of the food.
- The Eco-dose (1 Eco-dose = 250ml) allows you to add the right quantity of water for each type of cooking.
- The timer issues an audible and visual signal to tell you to reduce the heat source. It also alerts you at the end of cooking.
A book containing 60 recipes is supplied with ActiCook ^® , to help you to prepare classic, creative and above all varied recipes every day.
Diameter of the base of the pressure cooker - references
| Capacity | Total Capacity* | ∅ Pan | ∅ Base | ActiCook® fixed handles | ActiCook® folding handles | Material body and lid |
| 4,5 L 5,3 | L 22 cm | 18 cm P4 | 2906 | - | Stainless steel | |
| 4,5 L 5,3 | L 25 cm | 20 cm P4 | 2912 | - | ||
| 6 L 6,8 | L 22 cm | 18 cm P4 | 2907 P4 | 3007 | ||
| 8 L 9,4 | L 25 cm | 20 cm P4 | 2914 P4 | 3014 | ||
| 10 L 11,4 | L 25 cm | 20 cm P4 | 2915 P4 | 3015 |
* : Product capacity with the lid in position.
Technical information:
Maximum operating pressure: 85 kPa.
Maximum safety pressure: from 120 kPa.
Compatible heat sources
GASSOLID

HOTPLATE

CERAMIC
or HALOGEN

INDUCTION

ELECTRIC
HOTPLATE

Never heat your pan when empty, as you risk damaging your product.
- Your pressure cooker can be used on all heat sources including induction.
- On an electric hotplate, use a plate with a diameter equal to or less than that of the pressure cooker base.
- On ceramic hobs, make sure that the base of the pan is clean and dry.
- On gas, the flame should not extend beyond the diameter of the pan.
For all heat sources, make sure that your pressure cooker is well centred.
- Commercially available ActiCook® accessories are:
| Accessories Reference | ||
| Seal | 4,5/6L X1010004 | |
| 8/10L X1010003 | ||
| Vitamin basket | 4,5/6L X1030001 | |
| 8/10L X1030002 | ||
| Tripod X1030007 | ||
| Timer | X1060004 | |
| Eco-dose | X1100001 | |
- To replace other parts or for repairs, contact an TEFAL Approved Service Centre.
- Only use the correct TEFAL original parts for your model.
Opening
- Make sure that the position selector (E) is in position and that the pressure indicator (D) has fallen.
- Set the position selector (E) on the icon - Fig 1.
- Then lift the lid - Fig 2.
Closing
The jaws must be flat on the edge of the lid.
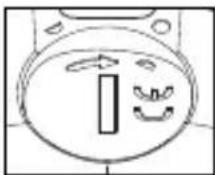
- Make sure that the position selector (E) is aligned with the icon.
- Place the lid vertically on the pan, making sure it is correctly positioned - Fig 3.
- Set the position selector (E) on the desired cooking icon - Fig 4.
If you are unable to close the lid:
- Check the correct positioning of the seal.
-
In the case of opening/closing during cooking, apply light pressure to the centre of the lid to close ActiCook®.
-
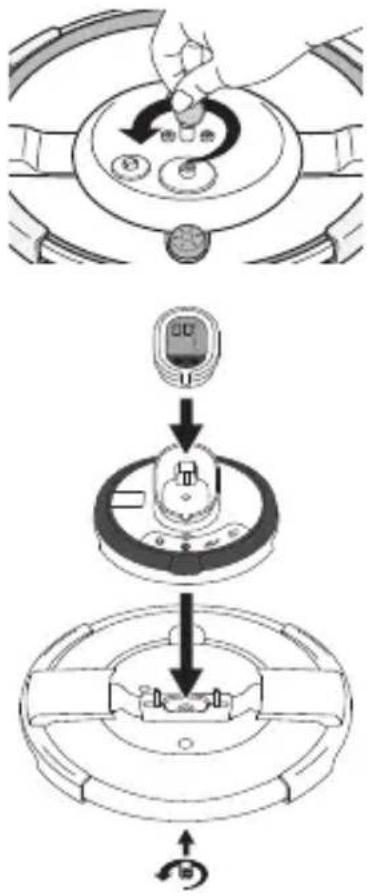
The control module contains all of the elements that allow your pressure cooker to operate. As soon as it is fixed to the lid, ActiCook® may be used normally.
- Once the timer, the control module and the seal have been removed, the lid and pan may be washed in a dishwasher.
- The control module has been designed to facilitate cleaning of your pressure cooker.
To remove the module from the lid:
- Turn the lid over.
- Unscrew the module's fixing nut using a coin, while holding the module with your other hand.
- Turn the lid over and remove the module.
To attach the control module to the lid:

- Make sure that the position selector (E) is aligned with the icon - Fig 10 and that the jaws are flat on the edge of the lid.
- Position the module on the lid.
- Turn the entire assembly over while holding the module on the lid, and screw in the fixing nut using a coin.
The control module can only be fitted in one way.
flowchart
graph TD
    A["Start: Bicycle Switch"] --> B["Step 1: Battery Switch to Control"]
    B --> C["Step 2: Motor Shift to Control"]
    C --> D["Step 3: Control with Battery Switch"]
Steam cooking
The food in the steam basket must not touch the lid of the pressure cooker.
- During steam cooking the food is not in contact with the cooking water.
- Clip the tripod (I) beneath the Vitamin basket (H) - fig 7 et 8
- Place the assembly in the base of the pan - fig 9
Using the steam basket
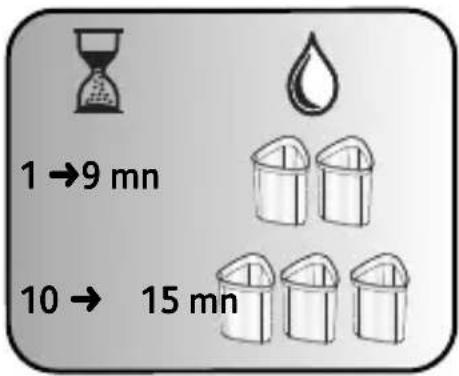
One Eco-dose corresponds to 25 cl (250 ml).
Using the Eco-dose
The Eco-dose helps you to add the right quantity of water for your cooking.
- For steam cooking between 1 and 9 min. add 2 Eco-doses to the pan.
- For steam cooking between 10 and 15 min. add 3 Eco-doses to the pan.
- It is not possible to carry out steam cooking of more than 15 minutes with 3 Eco-doses as you risk damaging your product.
Cooking in water (simmering)
Maximum fill level
- Never fill ActiCool® beyond 2/3 of the depth of the pan (water + food). Maximum fill line: M - fig 6
For certain foodstuffs
- For foodstuffs that expand during cooking, such as rice, dehydrated vegetables or compotes, do not fill ActiCook® above half of the depth of the pan (water + food).
Browned cooking
- For browned cooking, directly in the pan (without the steam basket), always add a minimal quantity of liquid at least equal to 25 cl (250 ml) or one Eco-dose - fig 5
Never use ActiCook® to fry under pressure using oil.
If ActiCook® has been heated without liquid inside:
- Have your ActiCook® checked by an TEFAL Approved Service Centre.
Using the position selector
EN
The position selector allows you:
- To open and/or close ActiCook®. See the paragraphs "Opening" and "Closing".
- To release the steam at the end of cooking, by aligning the position selector (E) with the icon - fig 10
• To select your cooking position - fig 4
• To cook delicate foodstuffs and vegetables:
Set the position selector to icon 1 or 📄
• To cook meat, fish and frozen food:
Set the position selector to icon 2 or 🔒
Timer
ActiCook ^® is fitted with a timer that automatically counts down the cooking time after reaching the temperature level for the selected cooking position:
1/2 or 📄/ ©.
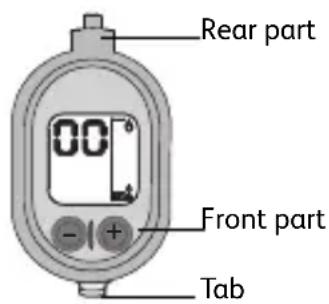
Fitting and removing the timer
- To fit the timer (C) in place Fig. 11, first insert the rear part into the control module and then press to clip the front part.
- To remove the timer (C), lift it using the tab and remove it.
Using the timer
The timer has been designed to help you guarantee the cooking result by allowing you to optimise energy consumption.
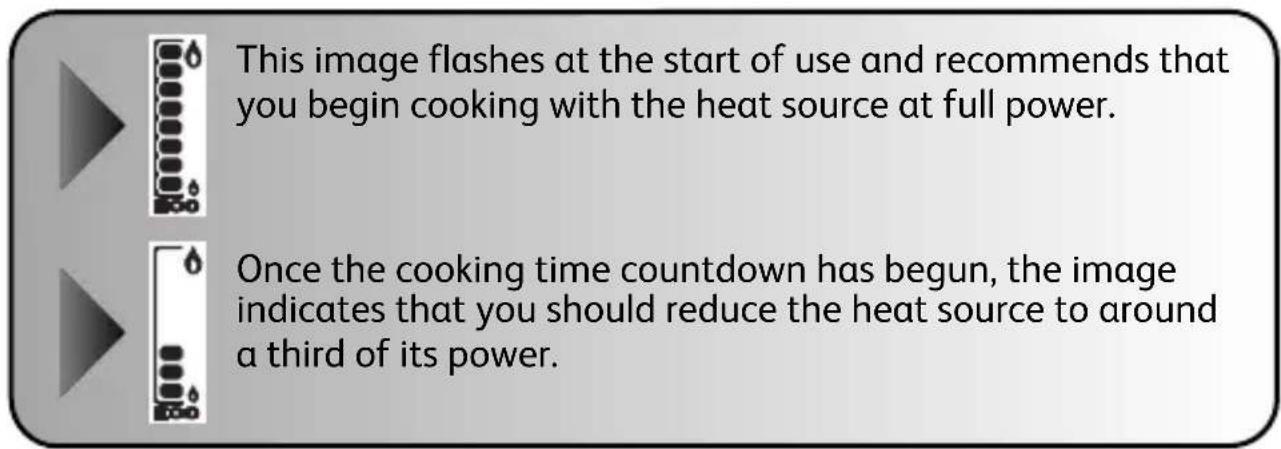
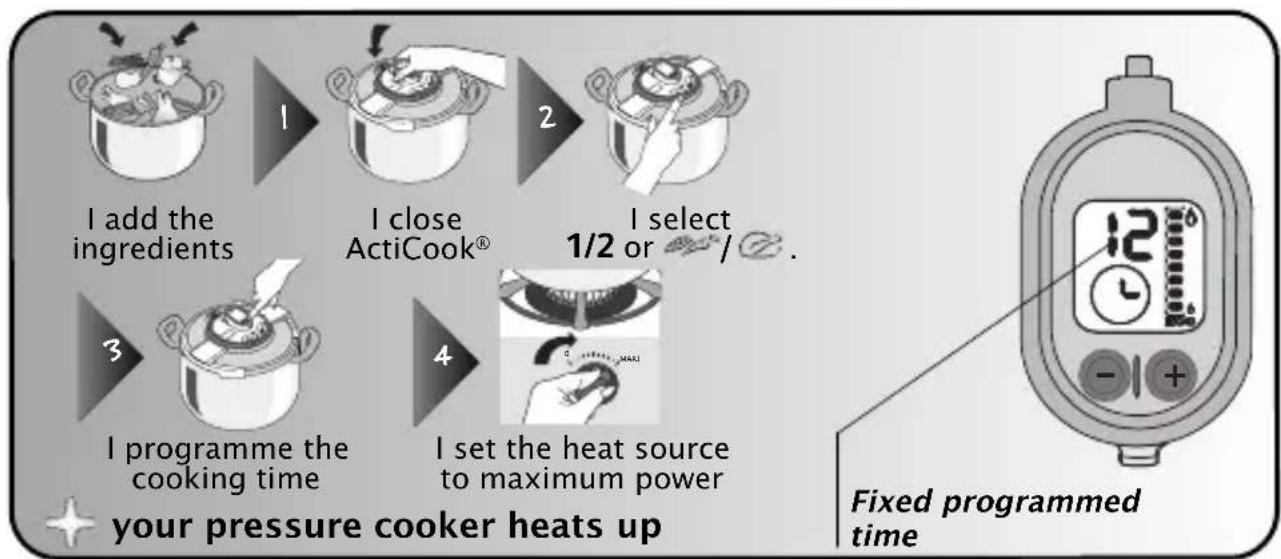
• To start the timer: press the touches + or • .
• Programme the cooking time. Fig. 12
- Start with the heat source at maximum power.
- You can change the cooking time at any point by pressing the + or - buttons.
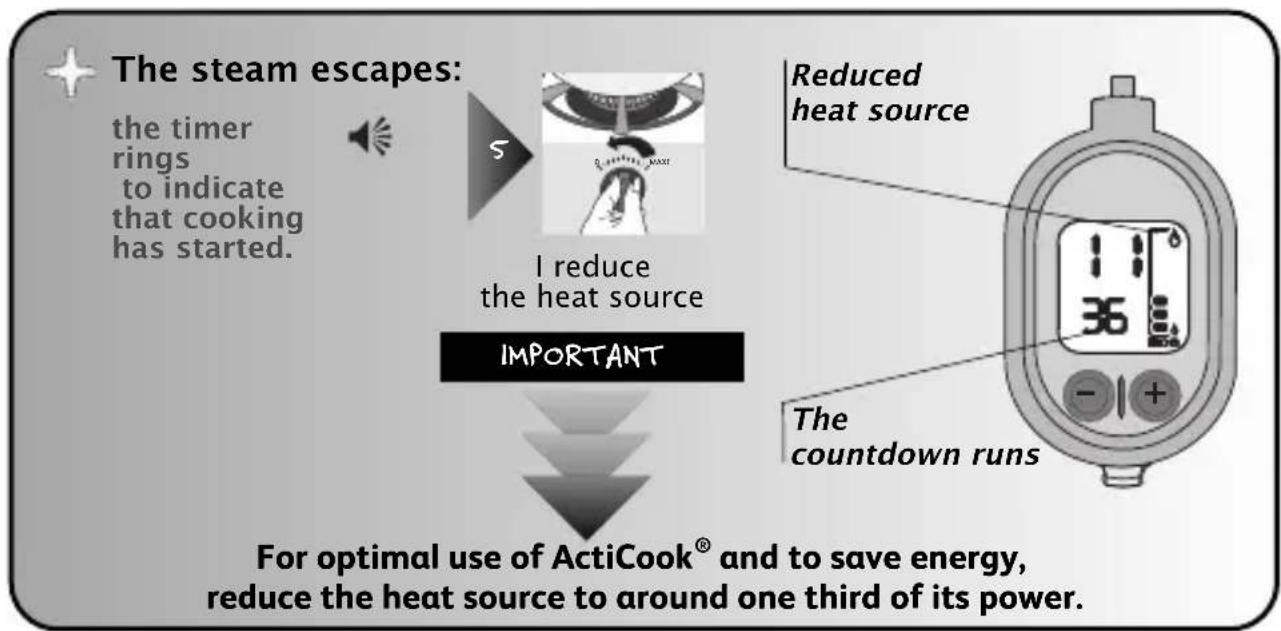
- As soon as ActiCook® has reached the cooking temperature, the timer rings and the countdown begins.
- Reduce the power of the heat source to around one third.
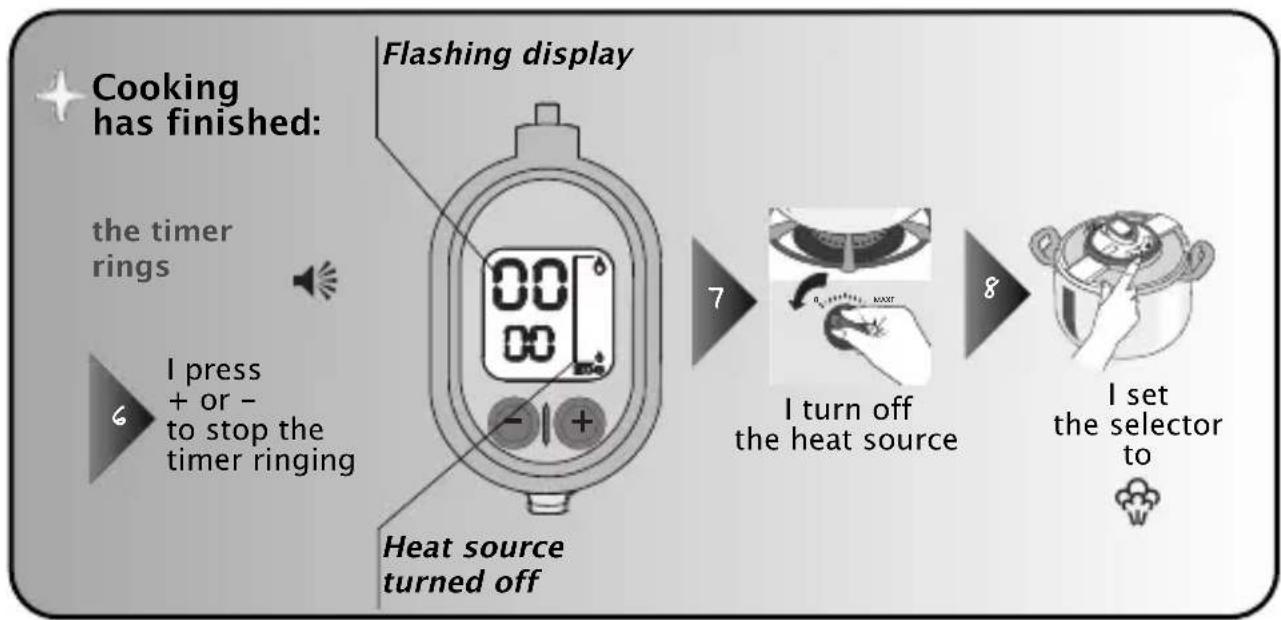
- At the end of the cooking time, the timer rings.
- To stop the timer ringing, press the + or - buttons.
- Turn off the heat source.
The timer must be clipped to the pressure cooker in order to work.
During cooking, check that the valve murmurs regularly. If there is not enough steam, increase the heat source slightly; if there is too much steam, reduce the heat source.
flowchart
graph TD
    A["I add the ingredients"] --> B["I close ActiCook®"]
    B --> C["I select 1/2 or ℃°/°."]
    C --> D["I programme the cooking time"]
    D --> E["I set the heat source to maximum power"]
    E --> F["Your pressure cooker heats up"]
flowchart
graph TD
    A["The steam escapes:"] --> B["I reduce the heat source"]
    B --> C["IMPORTANT"]
    C --> D["For optimal use of ActiCook® and to save energy, reduce the heat source to around one third of its power."]
    E["Reduced heat source"] --> F["The countdown runs"]

flowchart
graph LR
    A["Cooking has finished:"] --> B["the timer rings"]
    B --> C["I press + or - to stop the timer ringing"]
    C --> D["Flashing display"]
    D --> E["Heat source turned off"]
    E --> F["I turn off the heat source"]
    F --> G["I set the selector to"]
Changing the batteries
- The battery life depends on how often the timer is used. However, if you notice a total or partial loss of the display you should change the battery.
Never place the timer in water, or in the dishwasher.
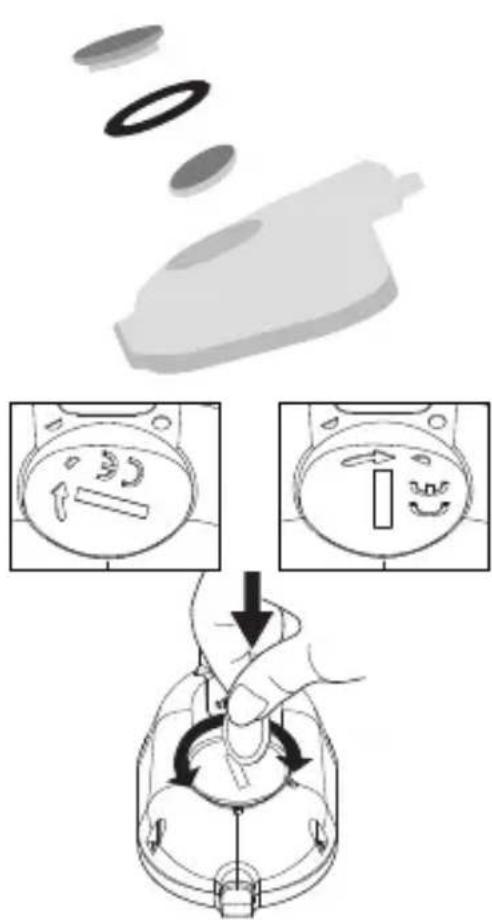
- To help to protect the environment, remove the used battery. Do not throw it out with your household waste, instead dispose of it in a specialised collection centre. The timer battery is a Lithium Manganese battery of type CR2032. It complies with European regulations.
- To remove the battery from your timer, open the battery cap.
- Replace the battery.
- Put the washer back in its holder (if the washer is misshapen, you can reshape it by rolling it between your figures).
- Position the 12 circle of the battery cap so that it is opposite the 12 circle of the timer.
- Gently close the battery cap and whilst pressing lightly align the 12 circle of the battery cap with the circle of the timer.
- This should be done on a flat work surface so that the cap is correctly horizontally positioned.
- Do not force the battery cap when you close it. Do not turn beyond the stops.
- In the case of loss, you can purchase another timer from all of our TEFAL Approved Service Centres.
Folding handles\*
Before use, remove the labels on each handle.
Do not attempt to fold the handles without depressing the unlocking buttons.
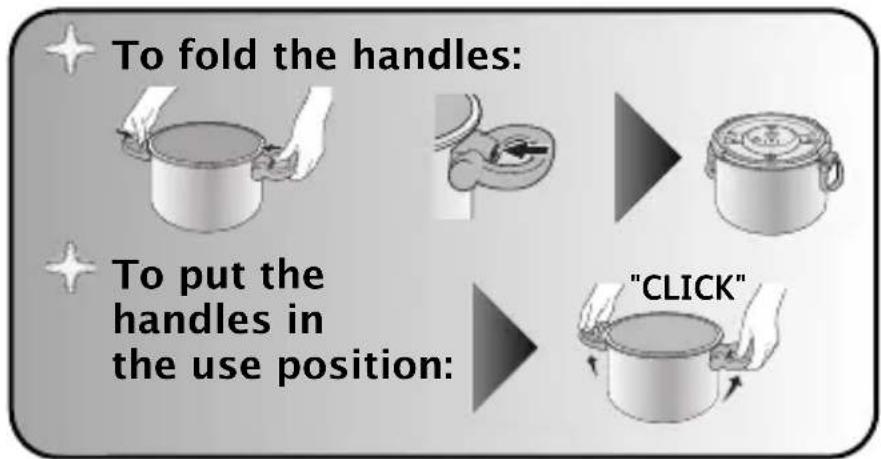
flowchart
graph LR
    A["To fold the handles:"] --> B["To put the handles in the use position:"]
    B --> C["CLICK"]
Never place ActiCook® on a heat source with the handles folded.
natural_image
Simple line drawing of a pot on an induction cooker with a black X mark indicating resistance (no text or symbols)Turn ActiCook® so that the position selector is facing you.
natural_image
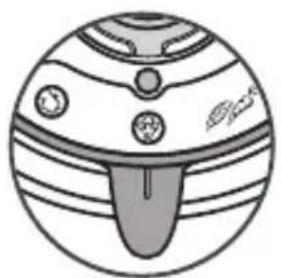
Illustration of a stylized globe with concentric rings and a central tongue, no text or symbols present.Do not try to force opening. Ensure that the pressure indicator (D) is in the lowered position.
- Clip the tripod (I) beneath the Vitamin basket (H) - Figs. 7 and 8.
- Place the Vitamin basket (H) in the bottom of the pan - Fig. 9.
- Fill with water up to 2/3 of the pan (M).
- Close ActiCook®.
- Set the position selector to 2 or .
- Set the timer for 20 min. Place ActiCoo® on a heat source set to maximum power.
- When the steam begins to escape through the valve, the timer rings. Reduce the heat source.
• After 20 minutes have elapsed, turn off your heat source. - Set the selector to fig 10.
- When the pressure indicator (D) falls again: ActiCook® is no longer under pressure.
- Open ActiCook® by setting the selector to - fig 1.
Using your appliance
Before cooking
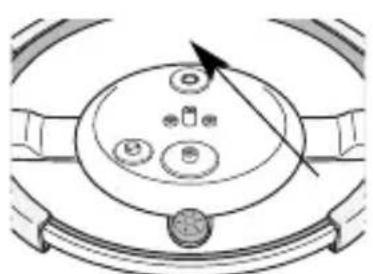
- Before using the appliance, always make sure that the control module is correctly attached (use a coin to help you with this) and check that the operating valve (P) located on the inside of the lid can move freely, by moving the position selector to 1 or and pressing with your finger. and pressing the valve with your finger.
- Check visually and in plain daylight that the steam release outlet (A) is not blocked.- Fig. 14.
- Also check that the safety valve (Q) can be moved: see Fig. 16 and the paragraph "Cleaning and maintenance".
- Determine the quantity of water required for your cooking. See the paragraphs "Cooking".
- Close ActiCook®.
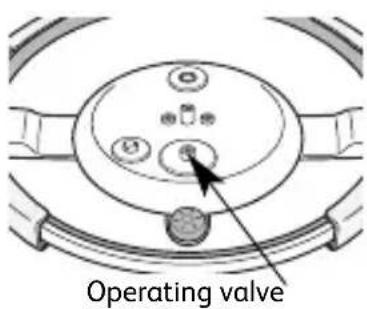
- Set the selector to the chosen cooking position; 1/2 or 📞/ Ⓗ - Fig. 4.
- Set the timer to the desired cooking time. Fig. 12.
- Make sure that ActiCook ^® is properly closed before using it.
- Place ActiCook® on a heat source set to maximum power.
Turn ActiCook® so that the position selector is facing you.
During cooking
As with any cooking utensil, ensure close supervision if you are using ActiCook® near children.
The steam is very hot when it comes out of the escape outlet.
- When steam escapes from the steam release outlet continuously, while emitting a regular noise (pschhht), the cooking time countdown begins automatically, with an audible signal.
- During cooking, check that the valve murmurs regularly. If there is not enough steam, increase the heat source slightly; if there is too much steam, reduce the heat source.
End of cooking
- At the end of cooking, the timer rings to indicate that cooking is finished.
- Release the steam, by aligning the position selector (E) with the 🎨 icon - fig 10
- Check that the pressure indicator (D) has fallen.
- Set the position selector (E) on the icon - Fig 1.
- Then open ActiCook® by lifting the lid - Fig 2.
Watch out for the jet of steam.
If, during decompression, you notice an abnormal release of pressure: return the selector to its initial cooking position: 1/2 or / , wait for a few minutes, then decompress again slowly, making sure that there are no more abnormal pressure releases.
To move ActiCook ^® , use the pan handles.
Cleaning and maintenance
EN
To ensure the correct operation of your pressure cooker, follow these cleaning and maintenance recommendations after each use:
- Wash ActiCook® after each use using water with a little washing-up liquid added. Follow the same procedure for the basket.
- Never use bleach or products containing chlorine, as these will alter the quality of the steel.
- Do not overheat your pan when empty.
Never leave food in ActiCook®.
The browning and marks which may appear following long use do not affect the operation of the pressure cooker.
To clean the inside of the pan
- Wash with a scouring pad and washing-up liquid.
- If the interior of the steel pan has an iridescent sheen, clean it using white vinegar.
- You can wash the pan in the dishwasher.
You can wash the pan and the basket in the dishwasher.
To clean the outside of the pan
- Wash using a sponge and washing-up liquid.
To clean the lid
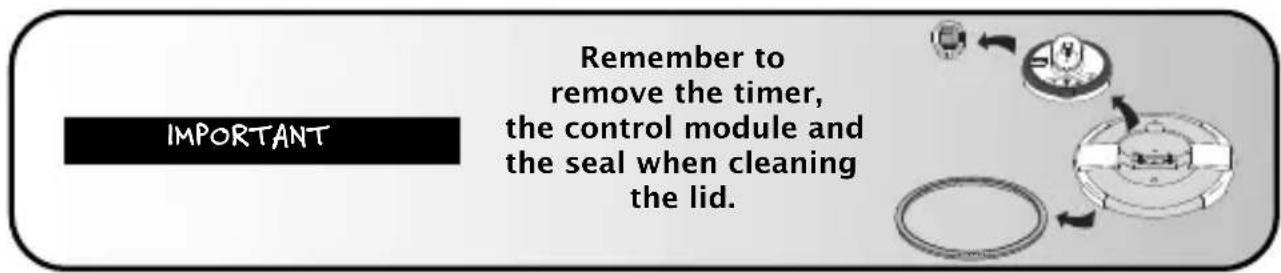
- Remove the timer.
- After each use, remove the module and wash it using a sponge and washing-up liquid.
- You can put the cover in the dishwasher after having removed the timer, the control module and the seal.
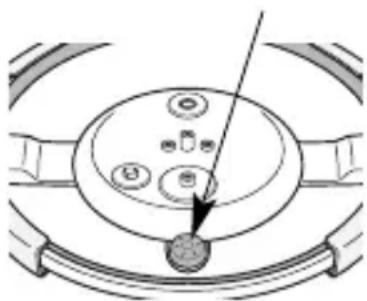
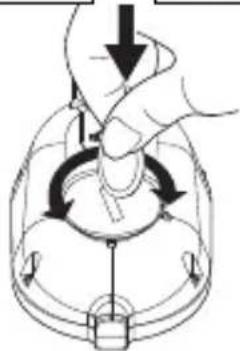
- If you inadvertently remove the base of the automatic air evacuation system, replace it by pushing and turning simultaneously.
Never place the timer in water, or in the dishwasher.
Automatic air release system base
natural_image
Diagram of a mechanical component with a central circular component and surrounding circular elements (no text or symbols)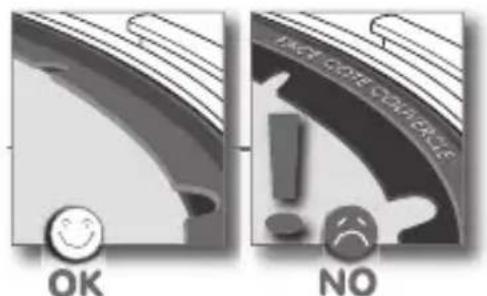
Never wash the seal in the dishwasher.
• After each use, clean the seal (G) and its housing.
- Wash the seal using a sponge and washing-up liquid.
- To put the seal back in place, see Fig. 13 and make sure that the inscription « face côté couvercle » is against the lid.
To clean the control module and the valves
- Remove the control module from the lid: see the paragraph "Control module".
- Wash the module using washing-up liquid and then rinse under running water.
- Check visually and in plain daylight that the steam release outlet (A) is not blocked, see Fig.14. If it is, run it under water.
- Check that the operating valve (P) located inside the lid can be moved, by setting the position selector to 1 or and depressing it with your finger: - Fig. 15.
- You can clean this valve under running water.
- Also check the correct operation of the safety valve (Q) by pressing hard, using a cotton bud (for example), on the central part of the duct, which should move: see Fig. 16. You can clean this valve under running water.
- Check that the module seal is correctly positioned (O). If this seal is missing or damaged, leaks may appear below the module when you use your pressure cooker. The shape of the seal allows its easy removal and refitting. If necessary, you can obtain this part from TEFAL Approved Service Centres.
- Check the cleanliness of the pressure indicator (D); you can clean it under running water.
Never open the control module.
Don't forget to remove the timer.
Never put the control module in the dishwasher.
Do not use a sharp or pointed object to carry out this operation.
Never wash the timer in the dishwasher
- Use a clean dry cloth.
- Do not use any solvents.
- Do not wash the timer in water.
To store your pressure cooker
- Turn the lid over on the pan. Fig. 17
If your ActiCook® has folding handles*: - Depress the handle unlocking buttons (J). See the paragraph "Folding handles".
Do not attempt to fold the handles* without depressing the unlocking buttons.
To change the ActiCook® seal
It is essential to have your ActiCook® checked in an TEFAL Approved Service Centre after 10 years of use.
- Change the ActiCook® seal every year.
- Change the ActiCook® seal if it has any cuts.
- Always use an original TEFAL seal corresponding to your model.
Safety
ActiCook ^® is fitted with several safety devices:
Closing safety:
- The jaws must be in contact with the edge of the lid. Otherwise, there is a steam leak in the pressure indicator and ActiCook ^® cannot be put under pressure.
- If ActiCook ^ is under pressure, the position selector cannot be set to the opening icom as the mechanism is locked by the pressure indicator (D) (in raised position).
- In this case, do not try to force opening, but set the position selector to and wait for the pressure indicator (D) to fall before opening ActiCook®.
- Never force ActiCook® open.
- Above all do not touch the pressure indicator.
- Make sure that the interior pressure has fallen (pressure indicator (D) in lowered position).
Two safety measures against overpressure: \_\_\_\_
- First measure: the safety valve (Q) releases the pressure and steam escapes from beneath the control module: - fig 18
- Second measure: the seal allows steam to escape from between the lid and the pan - fig 19
If one of the overpressure safety systems is triggered:
- Turn off the heat source.
- Let ActiCook® completely cool down.
- Open.
- Check and clean the operating valve (P), the steam release outlet (A), the safety valve (Q) and the seal (G).
- If, after these checks and cleaning, your product leaks or no longer works, take it to an TEFAL Approved Service Centre.
1 - Steam is very hot when it leaves the operating valve.
2 - Do not try to force opening. Ensure that the pressure indicator (D) is in the lowered position.
3 - As with any cooking utensil, ensure close supervision if you are using the pressure cooker near children.
4 - Watch out for the jet of steam.
5 - To move the pressure cooker, use the two pan handles.
6 - Never leave food in your pressure cooker.
7 - Never use bleach or products containing chlorine, as these will alter the quality of the steel.
8 - Do not leave the lid soaking in water.
9 - Change the seal every year.
10 - You must only clean your pressure cooker when it is cold and empty.
11 - It is essential to have your pressure cooker checked in an TEFAL Approved Service Centre after 10 years of use.
Warranty
- Your new TEFAL pressure cooker comes with a ten-year guarantee for use under the conditions set out in these instructions. This guarantee covers:
- Any defects relating to the metal structure of the pressure cookebody,
- Any premature deterioration of the metal base.
- For other parts, a one year parts and labour guarantee is provided (except where applicable law in your own country states otherwise). This guarantee covers any defects or manufacturing faults.
- The contractual guarantee cover is provided only on presentation of a valid proof of purchase which shows the date of purchase.
- The guarantee cover excludes:
- The normal life of the seal, pressure control valve or locking indicator seal is limited. These parts are excluded from the guarantee and will require periodic renewal.
- Any damage consecutive to a failure to follow the major recommendations made or due to negligent use, especially:
- Dropping, falls, bangs or knocks, placing in an oven...
- Washing the lid in the dishwasher.
- Only TEFAL Approved Service Centres are authorised to provide service under guarantee.
- Please call the Helpline number below for the address of your nearest TEFAL Approved Service Center.
Regulatory markings
| Marking Location | |
| Identification of manufacturer or commercial brand | On the control module |
| Production year and batchModel referenceMaximum safety pressure (PS)Maximum operating pressure (PF) | On the upper edge of the lid, visible when this is in "open" position. |
| Capacity On the exterior base of the | pan. |
TEFAL answers your questions
| Problems Recommendations | |
| If you are unable to close the lid: | Make sure that the position selector (E) is aligned with the icon.Check the correct positioning of the seal. See the paragraph "Cleaning and maintenance".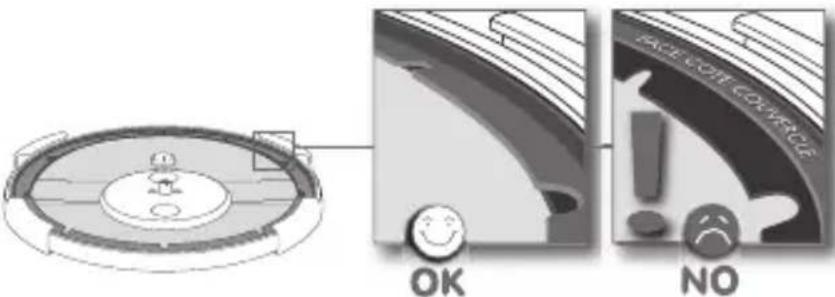 In the case of opening/closing during cooking, apply light pressure to the centre of the lid to close ActiCook®. In the case of opening/closing during cooking, apply light pressure to the centre of the lid to close ActiCook®. |
| If the pressure indicator has not risen. | Set the position selector (E) on one of the cooking icons 1/2 or 📄/ Ⓗ.If the problem persists, have your pressure cooker checked by an TEFAL Approved Service Centre |
| If the pressure indicator has risen and nothing is escaping through the vent during cooking | This is normal during the first few minutes. If the phenomenon persists, check that:The heat source is sufficiently strong; if not, increase it.The quantity of liquid in the pan is sufficient.The operating valve is on either 1/2 or 📄/ Ⓗ.ActiCook® is properly closed.There is no deterioration at the seal or edge of the pan.The seal is correctly positioned in the lid, see the paragraph "Cleaning and maintenance".If the phenomenon persists:Turn off the heat source.Set the position selector to 📄Wait for the pressure indicator to fall.Open ActiCook®.Clean the operating valve and the steam release outlet. |
| Problems | Recommendations |
| If steam is escaping around the lid accompanied by a shrill noise | Check that the seal is not pinched between the pan and the lid. |
| If steam leaks from around the lid, check: | The correct closure of the lid.The position of the lid seal.The condition of the seal; replace it if necessary.The cleanliness of the lid, the seal and its housing in the lid.The condition of the edge of the pan. |
| If one of the over-pressure safety systems is triggered: | Turn off the heat source.Let ActiCook®cool down without moving it.Wait for the pressure indicator to fall and open the pressure cooker.Check and clean the operating valve, the steam discharge stem, the safety valve and the seal.If the problem persists, have your pressure cooker checked by an TEFAL Approved Service Centre. |
| If you are unable to open the lid: | Check that the position selector is onCheck that the pressure indicator is in the lowered position.If not: decompress.Never interfere with the pressure indicator. |
| If the food is not cooked or is burned, check: | The cooking time.The power of the heat source.The correct position of the operating valve.The quantity of liquid. |
| If ActiCook®has been heated under pressure without liquid inside: | Have your ActiCook®checked by an TEFAL Approved Service Centre. |
| Problems Recommendations | |
| If you are unable to put the folding handles* in the use position: | Check that:The unlocking button* can be moved.If the problem persists, have your pressure cooker checked by an TEFAL Approved Service Centre. |
| If you are unable to fold the folding handles*: | Do not force them.Make sure that you are fully depressing the handle unlocking buttons*. |
| If the timer has a partial or total loss of display | Change the battery. |
| If the timer displays « [☐]» | You must replace the timer (accessory reference X1060004). |

Australian – NZ warranty
COOKWARE, BAKEWARE AND PRESSURE COOKERS
Limited Replacement Guarantee
Our goods come with guarantees that cannot be excluded under the Australian Consumer Law. You are entitled to a replacement or refund for a major failure and compensation for any other reasonably foreseeable loss or damage. You are also entitled to have the goods repaired or replaced if the goods fail to be of acceptable quality and the failure does not amount to a major failure. In addition to these statutory rights and any other rights and remedies you may have under the law, Groupe SEB Australia Pty Ltd (we or us) guarantees this Jamie Oliver by Tefal/Tefal/All-Clad/Moulinex product will be free of defects in material and craftsmanship including handles, body, knobs, lids and fixings for 12 months from the date of purchase. We also guarantee the non-stick coating of this Jamie Oliver by Tefal/Tefal/All-Clad/Moulinex product will be free of blistering or peeling for the life of the Jamie Oliver by Tefal/Tefal/All-Clad/Moulinex product. Should your Jamie Oliver by Tefal/Tefal/All-Clad/Moulinex product develop a defect during the guarantee period or the non-stick coating peel during the life of your Jamie Oliver by Tefal/Tefal/All-Clad/Moulinex product, you should return it, at your cost, to the retailer from which you purchased it from, together with your receipt as proof of purchase. The retailer will then forward your claim directly to us for processing. Alternatively, if the retailer is unable to help you, you may contact us directly at:
Groupe SEB Australia Pty Ltd, Customer Service Department, Unit 1, No 10 Hill Rd, Homebush NSW 2127 T: +61 2 9748 7944
If on receipt your Jamie Oliver by Tefal/Tefal/All-Clad/Moulinex product is found to be defective or the non-stick coating has peeled, we will, at our cost, replace or repair the product in our discretion. Only the defective part or accessory will be repaired or replaced. Packaging, instructions etc. will not be replaced unless faulty. This guarantee excludes defects caused by the Jamie Oliver by Tefal/Tefal/All-Clad/Moulinex product not being used in accordance
with instructions, accidental damage (including overheating), misuse or being tampered with by unauthorised persons. It also does not apply if the Jamie Oliver by Tefal/Tefal/All-Clad/Moulinex product is used commercially and excludes consumable items (including accessories such as pressure regulators and safety devices), dishwasher effects and damages, stains, dents, discolouration, scratches or scuffs due to normal wear and tear, and your costs of claiming under the warranty.

Précautions importantes
Vue dessous
FR
Description

flowchart
graph TD
    A["Top knob"] --> B["Rotating wheel"]
    B --> C["Ring"]
    C --> D["Bottom ring"]
natural_image
Simple line drawing of a cooking pot with a crossed-out black X mark on a stove (no text or symbols)natural_image
Illustration of a stylized spherical object with concentric rings and a central tongue, no text or symbols present.
Açıklama
Kapalı ısı kaynağı

flowchart
graph TD
    A["Top knob"] --> B["Rotating wheel"]
    B --> C["Ring"]
    C --> D["Bottom ring"]
Pilleri değiştirme
natural_image
Simple line drawing of a pot on a stove with a crossed black X mark (no text or symbols)natural_image
Illustration of a stylized spherical object with concentric rings and a central tongue (no text or symbols)natural_image
Diagram of a mechanical component with a central circular component and directional arrow (no text or symbols)natural_image
Diagram of a hand turning a circular component with arrows indicating rotation (no text or symbols)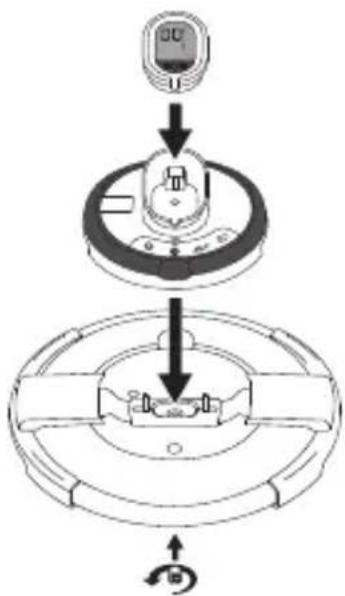
Μαγείρεμα στον ατμό

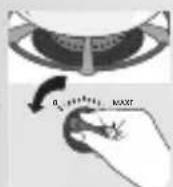

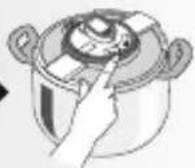
natural_image
Simple line drawing of a pot on a stove with a black X mark indicating resistance (no text or symbols)natural_image
Illustration of a stylized spherical object with concentric rings and a central tongue (no text or symbols)natural_image
Top-down diagram of a circular device with three labeled buttons and an arrow pointing to the center (no text or symbols)Βαλβίδα λειτουργίας
natural_image
Top-down view of a circular mechanical component with multiple holes and a pointer indicating direction (no text or symbols)natural_image
Close-up of a curved metallic object with a smiley face, no visible text or symbolsOK
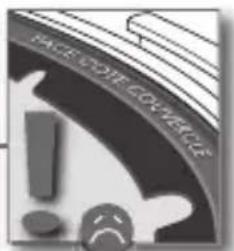
NO
natural_image
Diagram of a mechanical component with a central circular feature and a pointer indicating direction (no text or symbols)natural_image
Illustration of a stylized globe with a tongue and decorative elements (no text or symbols)natural_image
Top-down view of a circular mechanical component with three circular features and an arrow pointing to one (no text or symbols)عامل سوياب
natural_image
Illustration of a kitchen utensil with floating kitchen rings (no text or symbols)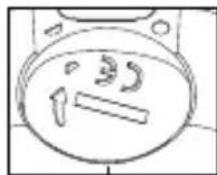
natural_image
Diagram of a hand holding a circular object with directional arrows indicating motion or force (no text or symbols)natural_image
Simple line drawing of a pot on a stove with a crossed black X mark (no text or symbols)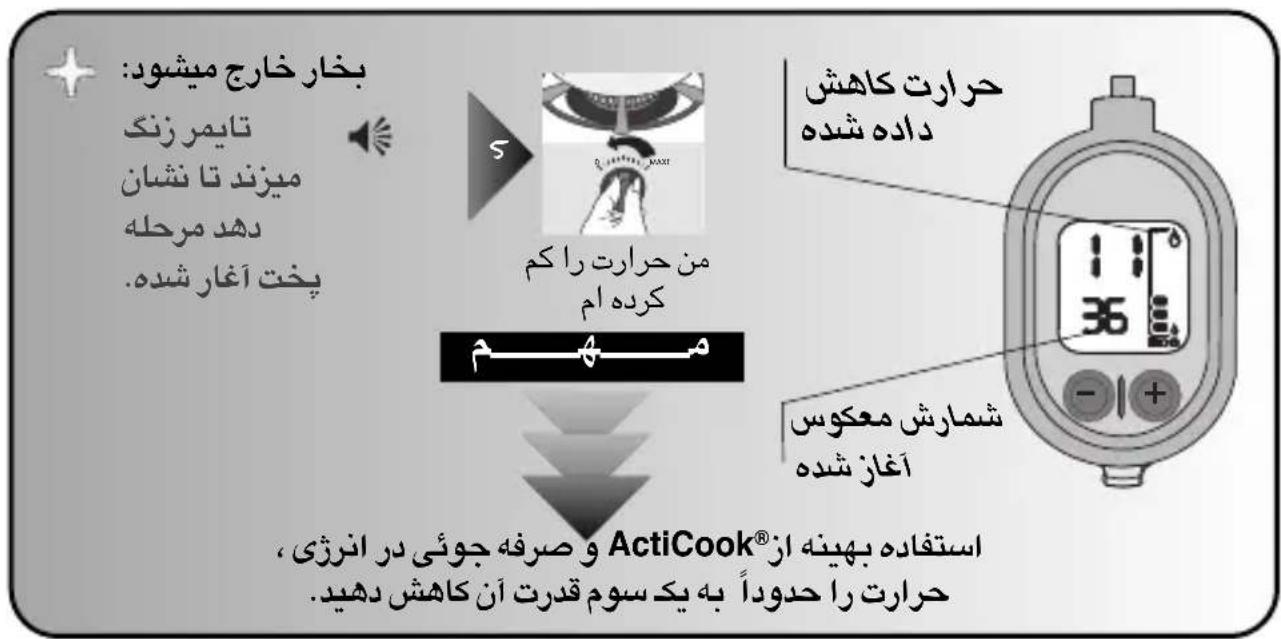
natural_image
Two identical icons: one with droplet symbols and another with a triangle, both without any text or labels.flowchart
graph TD
    A["Top: Left side of steering wheel with rotary dial and battery status"] --> B["Downward adjustment: 100% battery status"]
    B --> C["Bottom: Downward adjustment: 100% battery status"]
    C --> D["Left side of rear-mounted device with rear-mounted device"]
شرح دستكاه
natural_image
Illustration of a stylized globe with concentric rings and a central tongue, no text or symbols present.لا تحاول الفتح
بالقوة. تأكد بأن
(D) مؤشر الضغط
في الموقع السفلي.
استعمال المنتج
قبل الطهي
natural_image
Top-down diagram of a circular device with internal components and an arrow indicating direction (no text or symbols)صَمَّام التشغيل



- Important safety information
- Keep these instructions
- Description
- Tefal® ACTICOOK®
- A single utensil for a whole world of recipes:
- Technical information:
- Compatible heat sources
- Opening
- Closing
- If you are unable to close the lid:
- To remove the module from the lid:
- To attach the control module to the lid:
- Steam cooking
- Using the steam basket
- Using the Eco-dose
- Cooking in water (simmering)
- Maximum fill level
- For certain foodstuffs
- Browned cooking
- Using the position selector
- The position selector allows you:
- Timer
- Fitting and removing the timer
- Using the timer
- Changing the batteries
- Folding handles\*
- Using your appliance
- Before cooking
- During cooking
- End of cooking
- Cleaning and maintenance
- To clean the inside of the pan
- To clean the outside of the pan
- To clean the lid
- To clean the control module and the valves
- To store your pressure cooker
- To change the ActiCook® seal
- Safety
- Closing safety:
- Two safety measures against overpressure: \_\_\_\_
- If one of the overpressure safety systems is triggered:
- Warranty
- TEFAL answers your questions
- Australian – NZ warranty
- COOKWARE, BAKEWARE AND PRESSURE COOKERS
- Limited Replacement Guarantee
- Précautions importantes
- Açıklama
- Pilleri değiştirme
- Μαγείρεμα στον ατμό
- استعمال المنتج
Brand : TEFAL
Model : Acticook P43015
Category : Saucepan