
CKZ39 - Coffee machine ZANUSSI - Free user manual and instructions
Find the device manual for free CKZ39 ZANUSSI in PDF.

| Product type | Multi-system coffee maker |
| Brand | Zanussi |
| Model | CKZ39 |
| Power supply | 220-240 V~ 50/60 Hz |
| Power | 1450 W |
| Pump pressure | 19 bar |
| Water tank capacity | 600 ml |
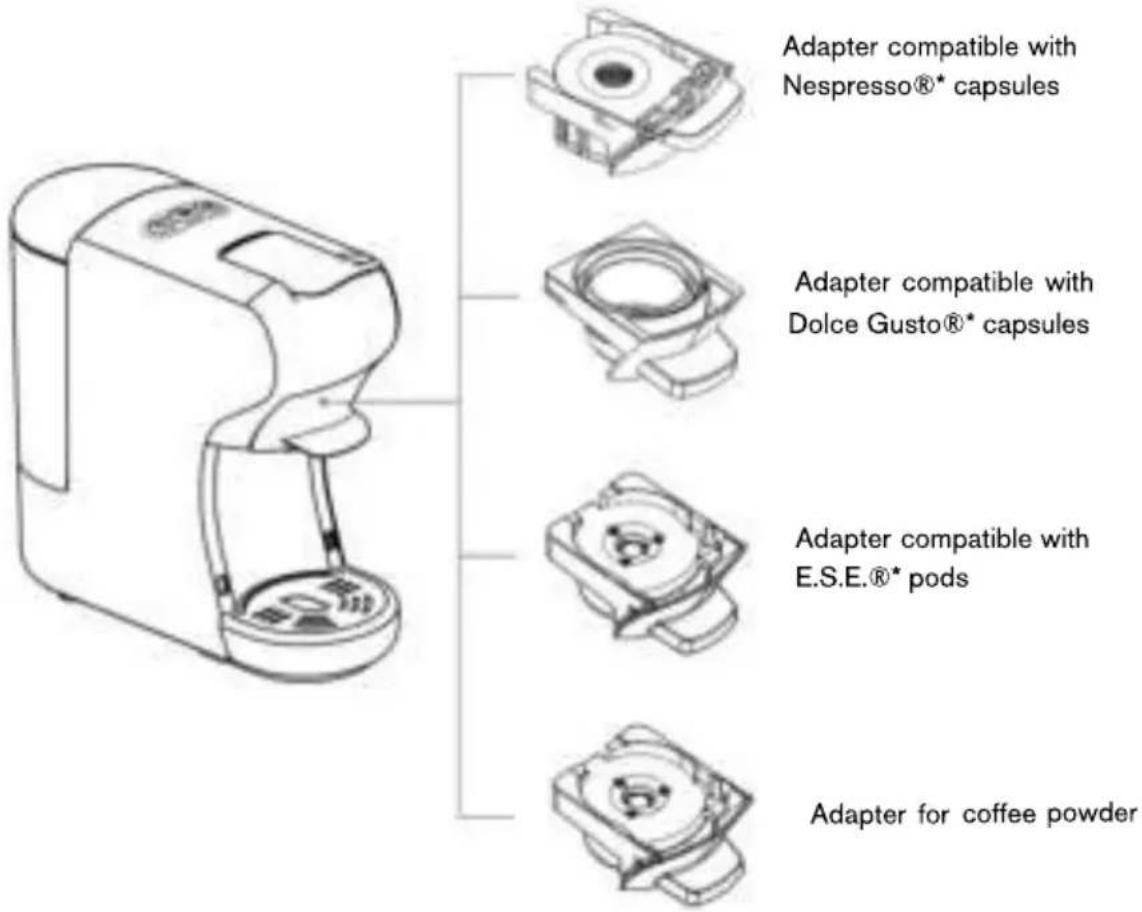
| Capsule compatibility | Nespresso®, Dolce Gusto®, E.S.E.® pods, ground coffee |
| Functions | Small cup, large cup, volume adjustment, rinse, descaling |
| Preheat time | Approximately 45 seconds |
| Standby mode | Automatic after 15 minutes (adjustable) |
| Coffee volume adjustment | Programmable from 10 to 90 seconds |
| Materials | Plastic and stainless steel |
| Dimensions (approx.) | 20 × 30 × 35 cm |
| Weight (approx.) | 4 kg |
| Cleaning | Wash adapters and tank with soapy water; body with damp cloth |
| Descaling | Every 300-400 cycles or if reduced flow |
| Safety | Automatic shut-off, lever lock, burn protection |
| Included accessories | 4 adapters (Nespresso, Dolce Gusto, E.S.E., ground coffee), drip tray, drip grid |
| Warranty | 2 years (subject to conditions) |
| Certifications | CE (2014/35/UE, 2014/30/UE, 2011/65/UE) |
Frequently Asked Questions - CKZ39 ZANUSSI
User questions about CKZ39 ZANUSSI
0 question about this device. Answer the ones you know or ask your own.
Ask a new question about this device
Download the instructions for your Coffee machine in PDF format for free! Find your manual CKZ39 - ZANUSSI and take your electronic device back in hand. On this page are published all the documents necessary for the use of your device. CKZ39 by ZANUSSI.
USER MANUAL CKZ39 ZANUSSI
Instruction booklet 23
Handleiding 44
natural_image
Black and white photo of a coffee maker with a glass of coffee inside (no visible text or symbols)
natural_image
White and black milk tea maker with glass inside, no visible text or symbolsCKZ39-BL
CKZ39-WH
ZANUSSI
SOMMAIRE
INSTRUCTIONS DE SÉCURITÉ .... 3
PROTECTION DE L'ENVIRONNEMENT 7
CONFORMITÉ NORMATIVE 7
DESCRIPTION DE L'APPAREIL 8
AVANT LA PREMIÈRE UTILISATION 9
MISE EN SERVICE DE L'APPAREIL 9
text_image
Warning symbol with steam inside a triangle, indicating heat or smoke hazardnatural_image
Simple line drawing of a triangular warning symbol with a cross inside (no text or labels)CONFORMITÉ NORMATIVE
text_image
A B C D E F G H I J K L Mtext_image
Diagram of a kitchen appliance with labeled parts showing liquid being poured into a containertext_image
Diagram showing a water dispenser pouring liquid into a glass, with numbered labels indicating components.natural_image
Illustration of a plug connecting to a wall-mounted panel with an eye symbol (no text or labels)text_image
Diagram of a coffee maker with numbered parts indicating parts of the device and process flownatural_image
Hand pressing a button on a circular interface element (no text or symbols visible)natural_image
Three circular icons with coffee cup, power button, and mug symbols (no text or numbers)text_image
Diagram showing three labeled buttons (Y, O, P) with fingers interacting over a device interfacenatural_image
Illustration of a small electric mixer with two cups and a tray, no text or symbols presenttext_image
>15 minutestext_image
Diagram illustrating a hand inserting sensors into a device, with numbered instructions and control buttons.text_image
Icon set showing three circular buttons with icons: a coffee cup, a power button, and a mug, connected by a finger.text_image
Icon showing three circular buttons with coffee cup, power symbol, and megaphone, connected by a finger to indicate a process or function.text_image
Diagram showing a device with three buttons labeled ①, ②, and ③ connected to a power outlet, with an electrical outlet nearby.PRÉPARATION DE CAFÉ ET DE BOISSONS CHAUDES
natural_image
Line drawing of a hand mixer with a bowl (no text or symbols)
natural_image
Illustration of a coffee maker with a hand operating it, showing a crossed-out circular diagram with arrows indicating rotation (no text or symbols present)
natural_image
Illustration of a portable water purifier with a hand holding a hand, accompanied by a warning sign (no text or symbols on the device itself)
natural_image
Line drawing of a manual coffee maker with handle and spout (no text or symbols)
text_image
Diagram showing a hand holding a 'no' icon next to a machine, with a glass of clear liquid and a checkmark indicating it is checked.
natural_image
Illustration of a hand using a pen to press hot air from a steaming stove (no text or symbols present)Pour capsules de type Nespresso®.
1. Préparation
natural_image
Illustration of a portable water dispenser with a side view showing its internal components (no text or symbols)text_image
Technical diagram of a mechanical device with numbered components and directional arrows indicating motion or assembly.text_image
Diagram of a portable water dispenser with numbered parts indicating internal components and directional arrowsnatural_image
Hand pressing a button on a circular interface (no text or symbols visible)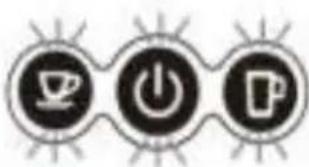
natural_image
Three circular icons with coffee cup, power button, and beer mug symbols (no text or numbers)text_image
Diagram showing a coffee maker with three coffee cups and a hand interacting with it, illustrating coffee cup usage or consumption process.6. Fin de procédure
text_image
Diagram of a water dispenser with labeled parts and Chinese annotationsConseils
natural_image
Illustration of a white portable water dispenser with two cups and a tray, no text or symbols presentnatural_image
Diagram showing a container with a downward arrow and a separate mechanical device (no text or symbols)natural_image
Illustration of a hand pressing a button with three circular icons below (no text or symbols)text_image
Diagram showing a coffee maker with three labeled icons (SP, UP, DP) and a speech bubble containing the SP logo.text_image
Diagram of a water dispenser with numbered parts indicating process stepstext_image
Diagram of a water dispenser with labeled parts and numbered calloutstext_image
Diagram of a water purifier with labeled parts and a magnified view showing internal componentstext_image
Diagram showing two steps of cooking or cooking process with labeled parts and numbered indicatorstext_image
Diagram of a water purifier with numbered parts indicating process stepsnatural_image
Illustration showing a hand pressing a button next to three circular icons with coffee, power, and beer symbols (no text or labels)text_image
Diagram showing a coffee maker with three labeled icons (P, U, F) and a speech bubble containing three circular icons above it.text_image
Diagram of a water dispenser with numbered parts indicating parts of the device and packagingnatural_image
Illustration of a portable water dispenser with two cups and a tray, no text or symbols presentnatural_image
Technical illustration of a mechanical device with two views (labeled 1 and 2), showing internal components without any text or symbols.text_image
Diagram of a water purifier with numbered parts and labeled componentsnatural_image
Illustration showing a hand pressing a button next to three circular icons with coffee cups, power symbols, and a coffee cup (no text or labels)text_image
Diagram showing a coffee maker with three coffee cups and a hand pointing to it, illustrating the process of adding coffee into a cup.text_image
Diagram of a water dispenser with labeled parts and directional arrows indicating flow or movementNETTOYAGE ET ENTRETIEN

text_image
Warning symbol image with exclamation mark inside a trianglenatural_image
Two-step diagram showing a kitchen sink with a bag pouring liquid into it, and a faucet with a bucket (no text or symbols)text_image
Diagram illustrating a hand inserting sensors into a device, with labeled steps and icons for function call, power button, and electrical outlet.SAFETY WARNING....24
ENVIRONMENT & RECYCLING 28
COMPLIANCE....28
PARTS GUIDE 29
BEFORE FIRST USE....30
APPLIANCE SET UP 30
Filling the water tank 30
Internal cleaning: procedure....31
Standby mode (Energy saving) 32
Setting the coffee volume....32
Restoring the factory setting.... 33
PREPARING COFFEE & HOT DRINKS 33
For Nespresso® capsules 35
For Dolce Gusto® capsules.... 36
For E.S.E.® pods 37
For coffee powder.... 38
CLEANING AND MAINTENANCE 39
Cleaning the appliance and its accessories 39
Descaling procedure....40
TROUBLESHOOTING 42
OTHERS INFORMATIONS....42
WARRANTY 43
- Please read the instructions carefully before installing and using this appliance. If you resell this appliance, please make sure you give this instruction booklet to your buyer.
-
This appliance is intended for household use and similar applications, such as:
-
staff kitchen areas in shops, offices and other working environments;
○ farm houses; - by clients in hotels, motels and other residential type of environments;
- bed and breakfast type environments.
- It should not be used for any other purpose or in any other application, such as non-domestic use or in a commercial environment. The manufacturer accepts no responsibility in case of any commercial use, inappropriate use or failure to comply with the instructions, and the guarantee will not apply.
- After unpacking the appliance, make sure it is not damaged. The appliance must not be used if it has been dropped, if there is any visible damage, if it leaks or if it functions abnormally in any way. In case of doubt, do not use the appliance and contact your supplier or a qualified technician.
- Remove all packaging and do not leave the packaging material, such as plastic bags, polystyrene and elastic bands within easy reach of children as they may cause serious injuries.
-
Never use accessories or parts from another manufacturer. The use of this type of accessories or parts will void the warranty. The appliance must be used only with the base and accessories supplied.
-
The appliance shall be used and kept on a flat and stable surface. Leave at least 10 cm of space between the appliance and any rear or side walls, and 15 cm clearance above the espresso machine. Do not put your appliance and its power cord on or near a heat source, such as a hotplate, oven, heater, etc.
- The appliance should not be placed inside a cabinet when in use.
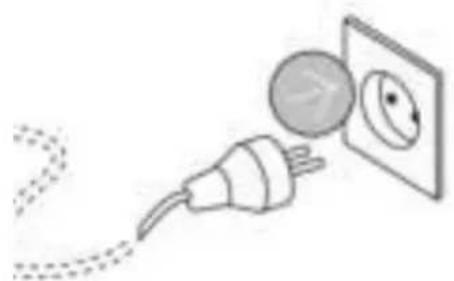
- Before plugging in your appliance, ensure that the electrical voltage in your home corresponds to that of the appliance's rating label.
- Connect your appliance to an earthed wall socket, correctly installed and connected to the electrical supply in accordance with applicable standards.
- Do not use this appliance outdoors and do not store it below 0°C. Water left in the appliance can freeze and cause damage.
- This appliance should not be used with an external timer or separate remote-control system.
- Warning: potential injury from misuse.
- Warning: avoid spillage on the connector.
- Warning: the filling aperture shall not be opened during use.
- This appliance can be used by children aged 8 years and above if they have been given supervision or instruction concerning use of the appliance in a safe way and understand the hazards involved.
- Cleaning and user maintenance shall not be performed by children unless they are over the age of 8 years and are supervised.
• Children shall not play with the appliance. -
Keep the appliance and its power cord out of reach of children aged less than 8 years old.
-
This appliance can be used by persons with reduced physical, sensory or mental capabilities or lack of experience and knowledge if they have been given supervision or instruction concerning use of the appliance in a safe way and understand the hazards involved.
- The appliance must not be immersed. Never immerse its power cord and plug in water or any liquids.
- Never drip water on the control panel buttons.
- If the supply cord is damaged, it must be replaced by the manufacturer, its service agent or similarly qualified persons in order to avoid a hazard.
- The appliance must not be left unattended while it is connected to the power outlet.

text_image
Warning symbol image showing a triangle with steam and a cross symbol indicating hazard or hazard.Warning: hot surface! Surfaces are liable to get hot during use. The temperature of accessible surfaces may be high when the appliance is operating. The heating element surface is subject to residual heat after use.
Warning: danger of scalding by hot liquid. The appliance produces hot water and hot steam may form. There is a risk of hot water splashing or hot steam.
- The appliance must not be left unattended while it is connected to the power outlet.
- To avoid the risk of burns during use:
○ do not remove the drip tray and the grid,
○ do not move the appliance,
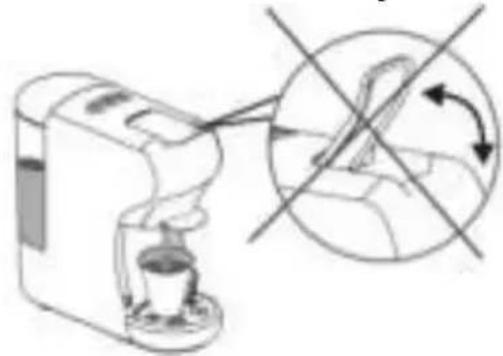
- do not put your fingers under the coffee output,
- do not touch the adapter compartment.
- The appliance uses high pressure; do not force the locking/unlocking mechanism of the lever during operation, the appliance would be damaged and could cause injuries.
- Do not use the appliance without water in the water tank or without its water tank. Respect the maximum and minimum filling capacities as indicated on the appliance.
- Regarding the information on operating the machine, please refer to the following section of the booklet: "Appliance set up".
- For cleaning surfaces that have come into contact with food, please refer to the following section of the booklet: "Cleaning and maintenance".
- Unplug and let the appliance cool down completely:
○ after each use,
- in case of malfunction,
- before cleaning the appliance.
- The power cord should be inspected regularly for any signs of deterioration.
- Do not plug/unplug or touch the control panel buttons with wet hands.
- Never unplug the appliance by pulling the power cord or the appliance from the power outlet. Unplug by pulling the plug out of the power outlet.
- Do not use this appliance near a tap, sink, bathtub, shower or swimming pool.
- Do not use the appliance:
○ if the plug or the power cord are damaged,
○ in case of malfunction,
- if the appliance has been damaged in any way,
- if the appliance or its power cord are immersed in water,
○ if you drop the appliance.
Take the appliance to the after-sales services where it will be inspected and repaired. No repairs can be carried out by the end user.
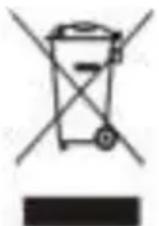
The European Directive on Waste Electrical and Electronic Equipment (WEEE) states that old household electrical appliances should not be disposed of in the normal unsorted municipal waste stream. Old appliances must be collected separately in order to optimise the recovery and recycling of the materials they contain, and reduce the impact on human health and the environment.
The crossed out “wheelie bin” symbol on the product reminds you of the obligation, of separate collection when you dispose of the appliance.
Consumers should contact their local authority or retailer for information concerning the correct disposal of their old appliance.
COMPLIANCE
The appliance meets the main requirements of European Directives: 2014/35/UE (Low Voltage), 2014/30/UE (Electromagnetic Compatibility), 2011/65/UE (Limitation of use of certain substances in electronic equipment).
This instruction booklet is also available on the following website:
www.zanussismallappliances.fr www.zanussismallappliances.be www.zanussismallappliances.nl
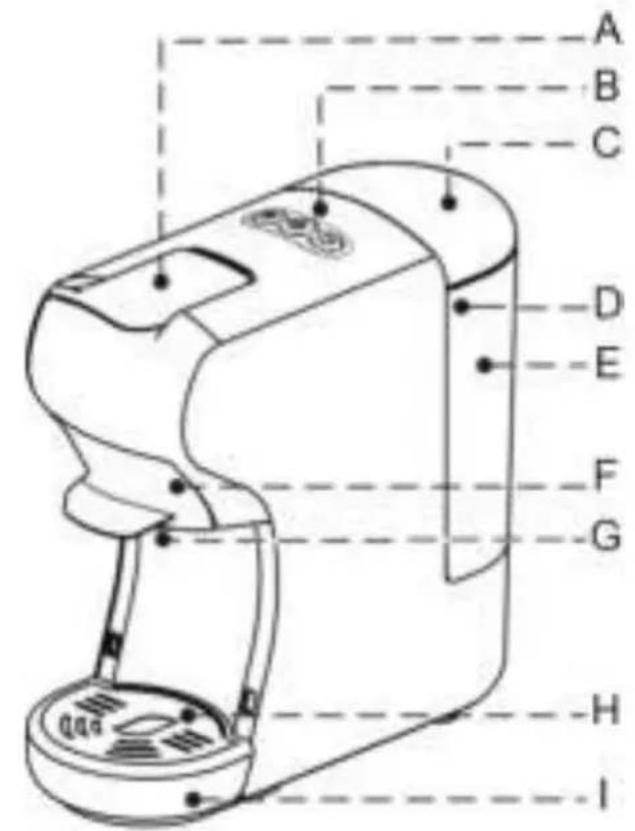
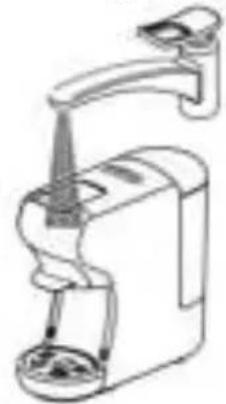
A. Locking/Unlocking lever
B. Control panel buttons
 | Small cup |
 | ON/OFF button |
 | Large cup |
C. Water tank lid
D. Water outlet tube
E. Water tank
F. Adapter compartment
G. Coffee output
H. Removable grid
I. Removable drip tray
J. Adapter compatible with Nespresso®* capsules
K. Adapter compatible with Dolce Gusto®* capsules
L. Adapter for coffee powder
M. Adapter compatible with E.S.E.®* pods
text_image
A B C D E F G H I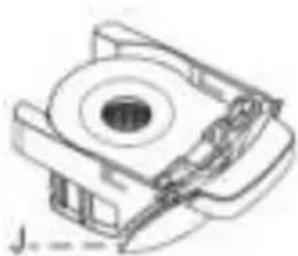
natural_image
Technical line drawing of a mechanical component with no visible text or symbols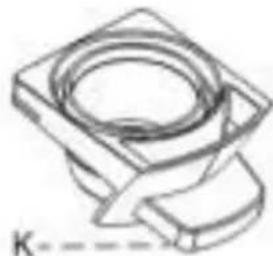
natural_image
Technical line drawing of a mechanical component with a circular top and rectangular base (no text or symbols)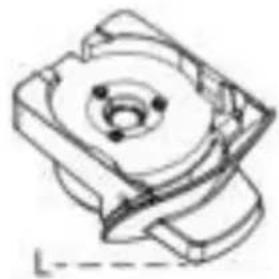
natural_image
Technical line drawing of a mechanical component with no visible text or symbols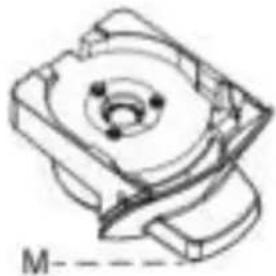
natural_image
Technical line drawing of a mechanical component with no visible text or symbols* Third party brands not related to the appliance and not owned by Zanussi®.
* Nespresso® and Dolce Gusto® are registered trademarks of the Nestlé SA group.
- Remove all packaging and check that the appliance is in good condition.
- Remove any labels and adhesives from the appliance.
- Wipe the appliance with a slightly damp cloth. Dry it completely.
- Wash the adapters, the drip tray, the drip grid, the water tank and its cover with hot soapy water and dry them completely.
- Place the appliance on a flat and stable surface.
- Clean the inside of the machine by running 2 internal rinsing cycles with cold water only in order to remove any dust or residue contained in the appliance.
APPLIANCE SET UP
Filling the water tank
Filling without removing the water tank

text_image
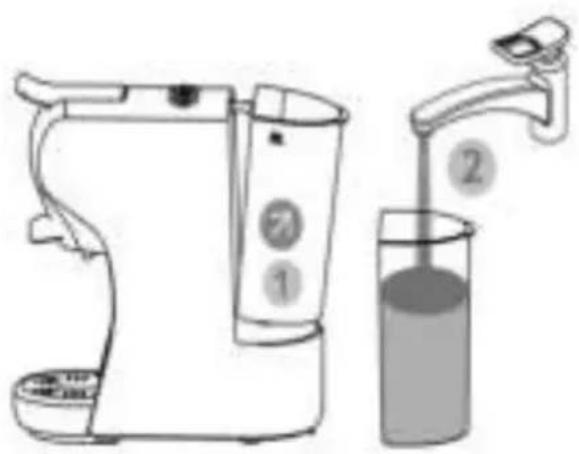
Diagram showing a kitchen appliance with liquid being poured into it, labeled with parts ① and ②.Use a carafe, fill it with cold tap water.
Remove the lid of the water tank and pour the water into the water tank (600ml) up to the MAX line indicated on the tank.
Close the lid on the tank.
Filling by removing the water tank
text_image
Diagram showing a hand mixer and a glass of liquid, labeled with numbered components.Remove the water tank from the appliance by tilting it slightly; fill the water tank with cold, still water to its MAX level (600 ml). Put the water tank back in place by sliding it slowly onto the base making sure that the water outlet pipe is inside the water tank. Then press firmly on the tank to ensure it locks in place. Place the lid on the water tank.
Important
The amount of water in the water tank must be between the minimum "MIN" and the maximum "MAX" levels indicated on the tank. Add water as soon as the water level reaches the "MIN" line of the water tank.
➢ Never operate the appliance without water in the tank or without the tank in place. This can damage the pump and shorten the life of the machine.
▶ Only use still and cold water.
Internal cleaning: procedure
Before using the appliance for the first time, clean the inside of the machine by running 2 internal rinsing cycles with cold water only in order to remove any dust or residue contained in the device.
Internal rinsing of the device is also recommended after a long period of non-use.
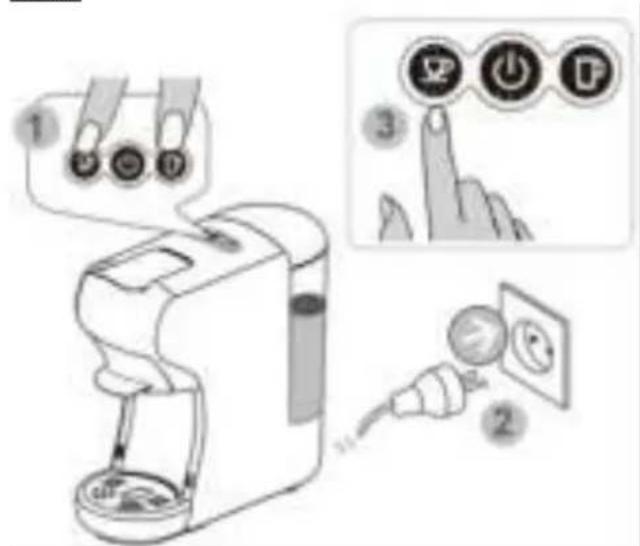
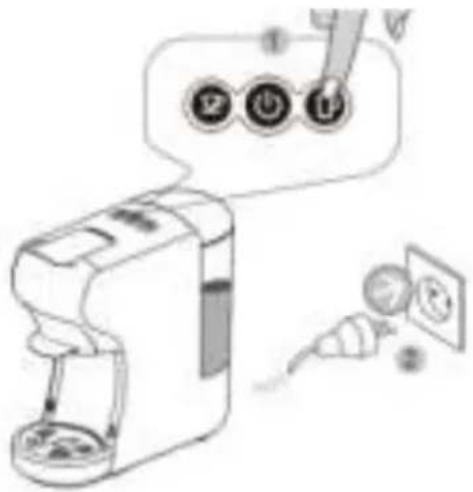
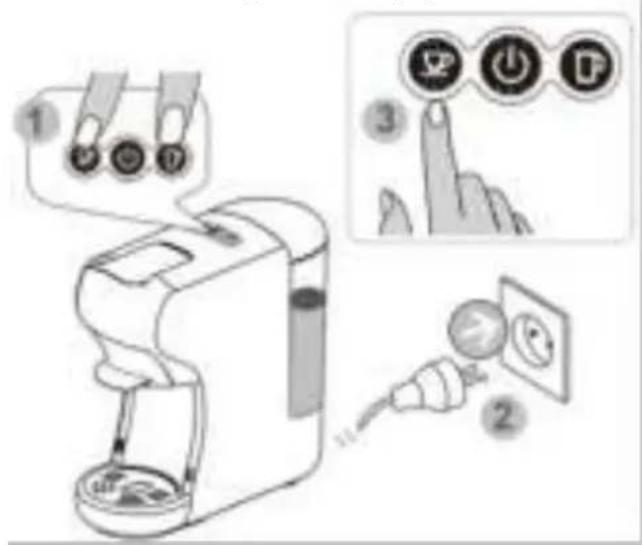
Plugging in the appliance
natural_image
Illustration of a plug connecting a wall to an electrical outlet (no text or symbols)Unwind the appliance's power cord and plug the plug into a power outlet.
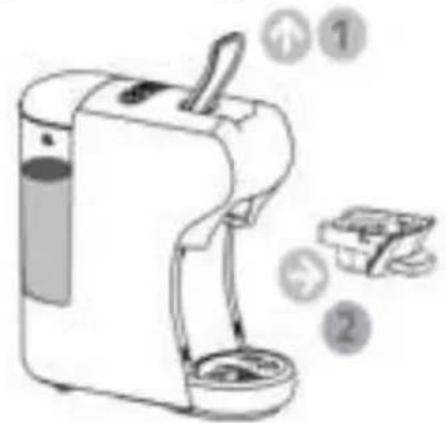
Preparation
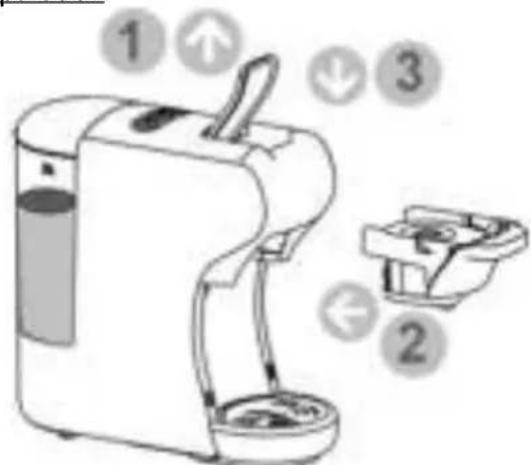
text_image
Diagram of a coffee maker with numbered parts indicating parts of the device and their functions.Lift the lever and insert an empty adapter (without capsules or coffee). Lower the lever to close. Place a large cup (min. 250 ml) on the removable grid.
Switching on the appliance

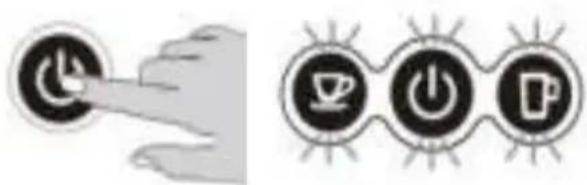
natural_image
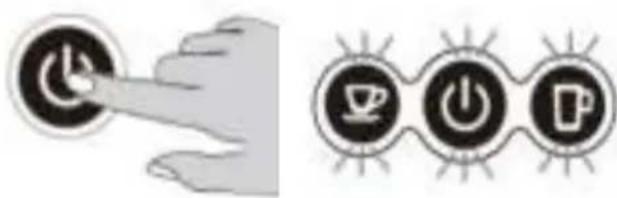
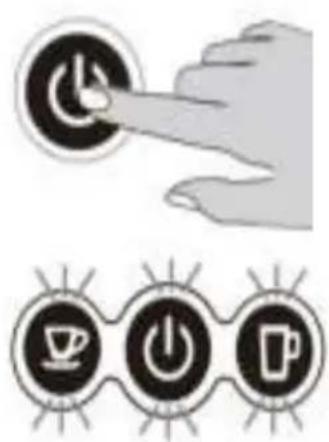
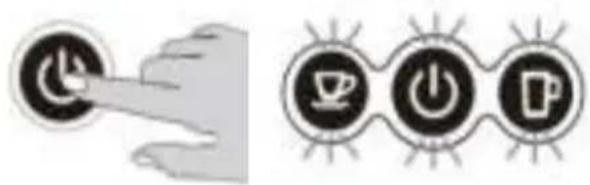
Hand pressing a button on a circular interface element (no text or symbols visible)Press the ON/OFF button to switch on the appliance.
Preheating phase
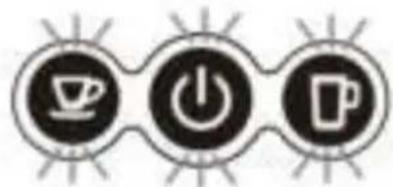
natural_image
Three circular icons with coffee cup, power button, and mug symbols (no text or numbers)The 3 control buttons light up to indicate that the appliance is in preheating mode. The warm-up time is approximately 45 seconds.
Starting the internal rinsing cycle
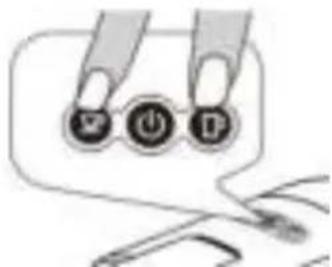
natural_image
Illustration of a hand holding three circular buttons labeled with icons (no text or symbols present)Press the small and large cup buttons simultaneously to start the internal rinsing cycle.
End of procedure

text_image
Diagram of a coffee maker with labeled parts showing liquid, brush, and container componentsLift the lever and remove the empty adapter (without capsules or coffee). Lower the lever to close.
Important
Do not interrupt the internal cleaning procedure if it is started.
➢ Check that water the tank is filled to the "MAX" level and correctly set to avoid any risk of water leakage.
Make sure to close the lever before pressing the buttons.
Always make sure to put a cup with a minimum capacity of 250ml on the drip grid before starting the internal rinsing procedure.
Standby mode (Energy saving)
This appliance is equipped with an energy saving function. It goes into standby automatically after 15 minutes (factory default) if it is not in use.
Exiting stand-by mode
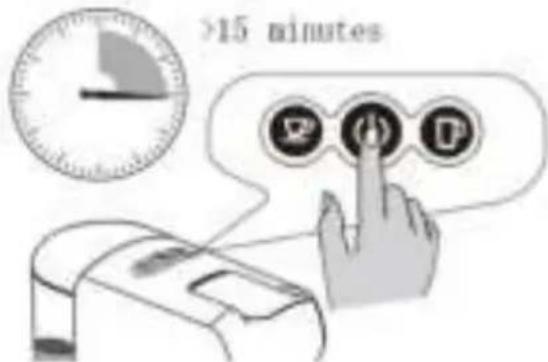
text_image
>15 minutes P A DThe appliance is set by default to enter standby mode after 15 minutes of non-use. Press the ON/OFF button to exit the standby mode.
Cancelling and reactivating the default stand-by mode
text_image
Diagram illustrating a device's electrical switch operation with numbered instructions and control buttonsTo cancel the default standby, unplug the power cord from the power outlet.
Press the small cup and large cup buttons simultaneously, then plug the power cord into the power outlet.
The ON/OFF button lights up, release your fingers. Press the small cup button, the indicator light on the small cup button switches off; the default standby mode is cancelled.
To reactivate the default standby mode, repeat the same procedure.
Setting the coffee volume
Setting the volume of the small cup

natural_image
Three circular icons with icons: coffee cup, power button, and mug, connected by a finger (no text or symbols)The coffee volume of the small cup is set by default for a flow of approximately 25 seconds. Follow the steps below to change the factory setting.
Place a cup on the drip grid, insert the capsule adapter. Press and hold the small cup button. Release once the desired volume is reached. The new level of coffee volume is stored.
Programmable flow time: 10 to 90 seconds.
Setting the volume of the large cup
text_image
Icon showing three circular buttons with icons: coffee cup, power button, and megaphone, connected by a finger to indicate a step.The coffee volume of the large cup is set by default for a flow of approximately 47 seconds. Follow the steps below to change the factory setting.
Place a cup on the drip grid, insert the capsule adapter. Press and hold the large cup button. Release once the desired volume is reached. The new level of coffee volume is stored.
Programmable flow time: 10 to 90 seconds.
Restoring the factory settings
Procedure for restoring default settings
To return to the factory settings, unplug the power cord from the power outlet.
Press and hold the large cup button, then plug the power cord into the power outlet.
After the ON/OFF button has blinked twice, release the button. The factory settings have been restored.
text_image
Diagram showing a device with three buttons labeled ①, ②, ③ connected to a screen, with a pencil inserted.PREPARING COFFEE & HOT DRINKS
This appliance is equipped with 4 adapters compatible with different capsule systems for the preparation of coffee and hot drinks.
text_image
Adapter compatible with Nespresso®* capsules Adapter compatible with Dolce Gusto®* capsules Adapter compatible with E.S.E.®* pods Adapter for coffee powder* Third party brands not related to the appliance and not owned by Zanussi®.
* Nespresso® and Dolce Gusto® are registered trademarks of the Nestlé SA group.
Important
Before preparing your hot drink:
➢ Check that the tank is filled to the "MAX" level and in the correct position to avoid any risk of water leakage.
▶ Check that the appliance is connected to the socket.
➢ Lower the lever before pressing the buttons.
➢ Always put a cup on the drip grid.
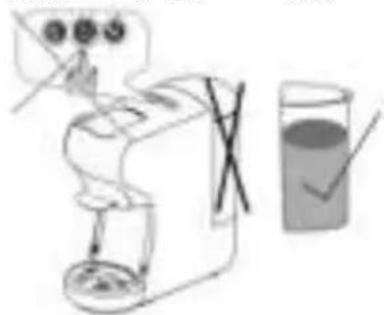
When using your appliance, please follow the instructions given below to avoid any risk of injury and damage to the device.

Never spray water on the appliance.
natural_image
Line drawing of a hand mixer with a bowl (no text or symbols)
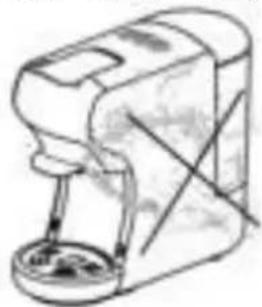
Never lift the lever during use.
natural_image
Illustration of a coffee machine with a crosshair overlay showing a rotating object (no text or symbols)
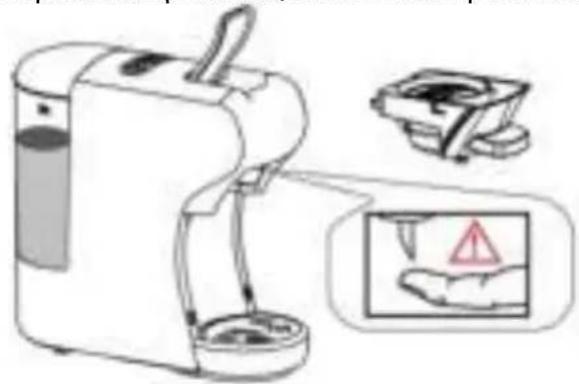
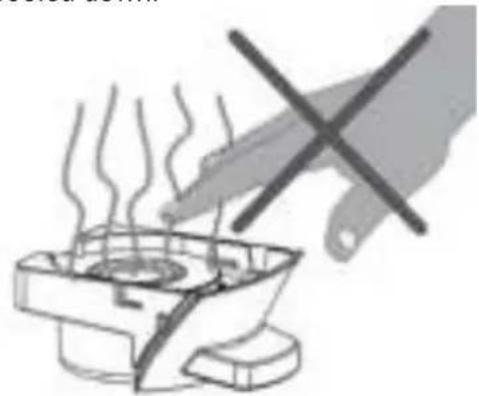
Risk of injury! Do not touch the top of the capsule compartment, there is a sharp needle.
natural_image
Illustration of a water purifier with a hand holding a small container, accompanied by a warning sign (no text or symbols on the diagram itself)
Never immerse the appliance in water.
natural_image
Line drawing of a manual coffee maker with a spool of contents (no text or symbols)
Do not use the appliance if the water tank is empty. Make sure the water tank is filled at least to the "MIN" marking.
natural_image
Illustration of a washing machine with a glass of clear liquid and a hand holding a tray (no text or symbols)
Risk of burns! Do not touch the adapter after making coffee, wait until the adapter has cooled down.
natural_image
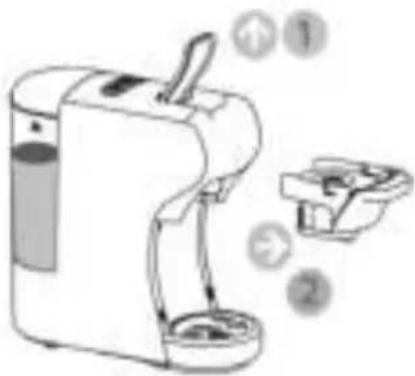
Illustration of a hand using a pen to press hot air in a cooking pot (no text or symbols)For Nespresso® capsules
1. Preparation
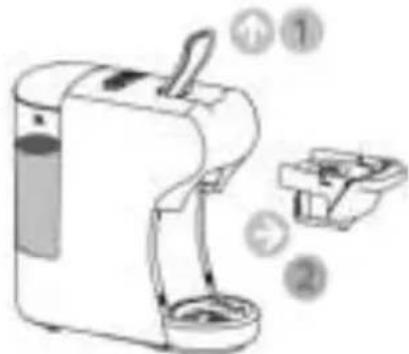
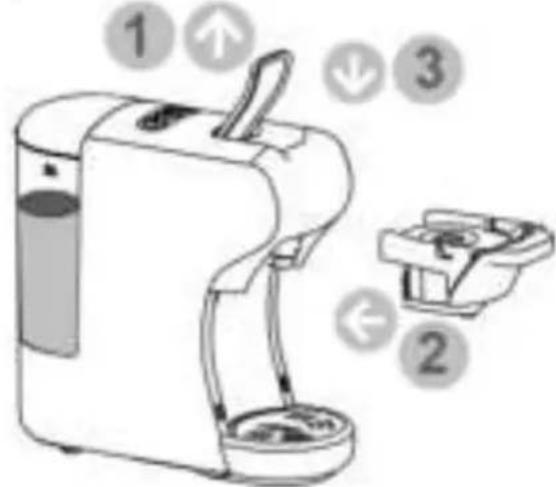
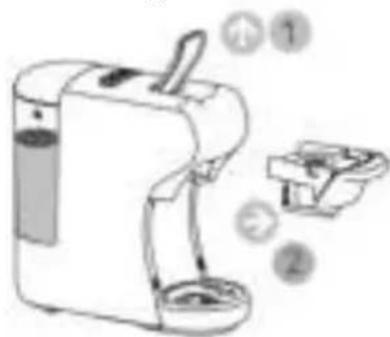
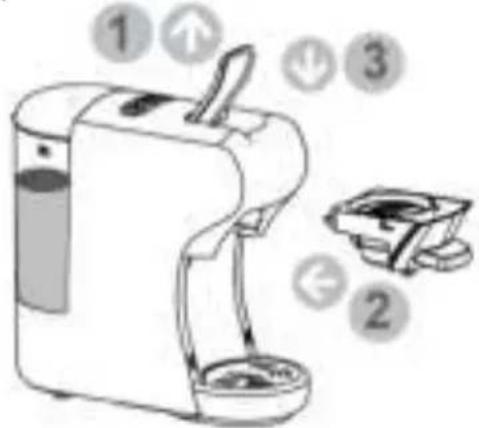
Lift the lever and remove any adapter from the appliance.
natural_image
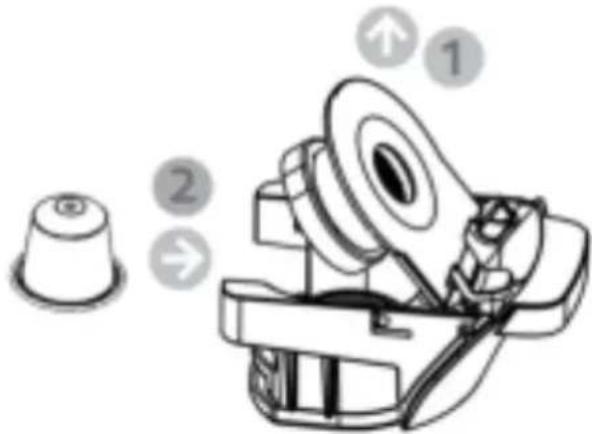
Illustration of a portable water dispenser with labeled parts (no text or symbols on the device itself)- Inserting the capsule into the adapter
Lift the adapter cover and insert the capsule. Lower the cover to close it.
text_image
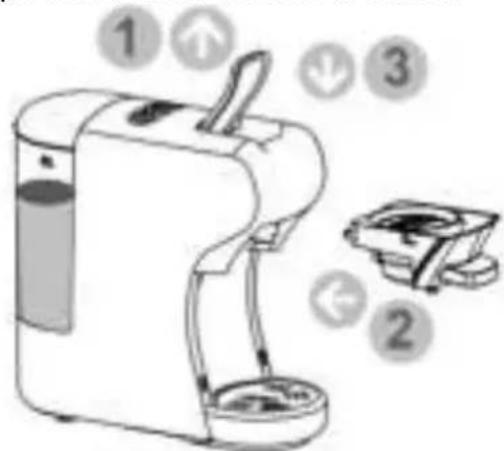
Technical diagram of a mechanical device with numbered components and directional arrows indicating motion or assembly.- Inserting the adapter into the machine
Lift the lever and insert the adapter into its compartment. Lower the lever to close.
text_image
Diagram of a portable water dispenser with numbered parts indicating internal components and directional arrows- Switching on the appliance & preheating
Press the ON/OFF button to turn on the appliance. The 3 control buttons light up and flash to indicate that the appliance is in preheating mode. The warm-up time is approximately 45 seconds.
natural_image
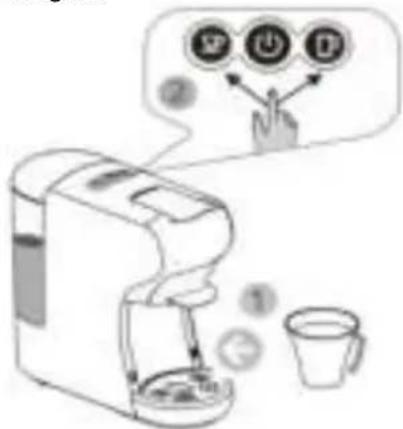
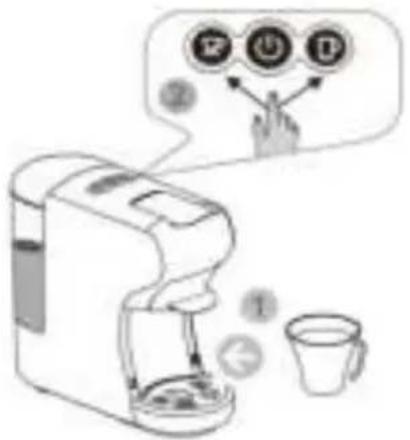
Illustration showing a hand pressing a button next to three circular icons with coffee cups and beer glasses (no text or symbols)- Selecting your coffee volume
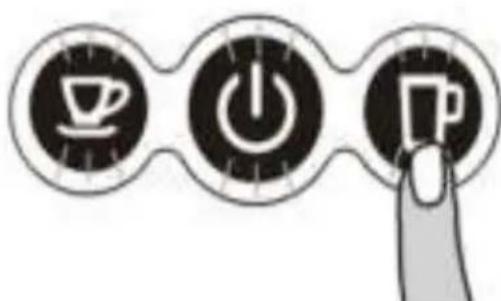
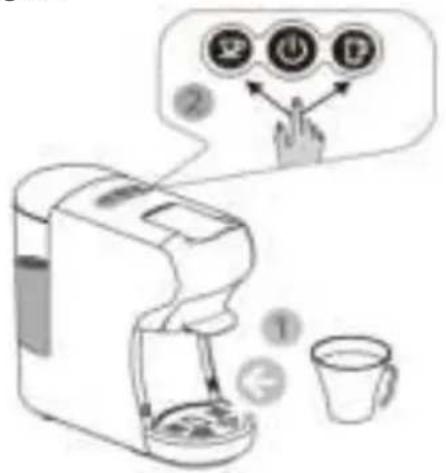
Place a cup on the removable grid. As soon as the lights on the control buttons stop flashing, press the small cup or large cup button to start making coffee. To stop the coffee flow, press the selected cup button again.
text_image
Diagram illustrating a coffee machine with icons for coffee, coffee cup, and coffee cup, showing a hand interacting with the coffee machine.- End of procedure
Lift the lever and remove the adapter. Lower the lever to close.
Wait until the adapter has cooled down before opening its cover to discard the used capsule. If you are no longer using the device, please wash the adapter with hot soapy water for future use.
text_image
Diagram of a water dispenser with labeled parts including inlet, outlet, and baseTips
To have a hot coffee, you should first make a cup with the adapter but without placing a capsule inside.
We recommend using a preheated cup.
The coffee volume of the large cup is set by default for a flow of approximately 47 seconds and that of the small cup is approximately 25 seconds. To set the flow time, refer to the instructions "Setting the coffee volume".
Make sure you lower the lever before pressing the buttons.
▶ Always put a cup on the drip grid.
If you are no longer using the appliance after preparation, please wash the adapter with hot soapy water for future use.
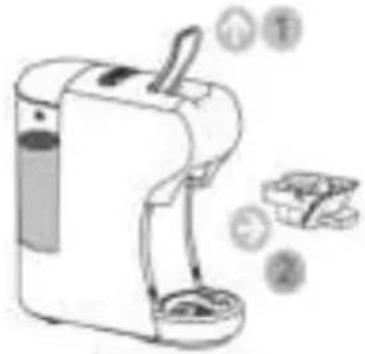
For Dolce Gusto® capsules
1. Preparation
Lift the lever and remove any adapter from the appliance.

text_image
Diagram of a coffee maker with labeled parts and directional arrows indicating flow or positioning.- Inserting the capsule into the adapter Lift the adapter cover and insert the capsule. Lower the cover to close.
natural_image
Diagram showing a container with a downward arrow and a separate motor device (no text or symbols)3. Inserting adapter into the machine
Lift the lever and insert the adapter into its compartment. Lower the lever to close.

text_image
Diagram of a coffee maker with numbered parts indicating process steps: 1, 2, 3, and directional arrows.4. Switching on the appliance & preheating
Press the ON/OFF button to turn on the appliance. The 3 control buttons light up and flash to indicate that the appliance is in preheating mode. The warm-up time is approximately 45 seconds.
text_image
Icon showing a hand pressing a button to three circular icons with coffee, power, and beer symbols, suggesting a process or service icon.5. Selecting your coffee volume
Place a cup on the removable grid. As soon as the lights on the control buttons stop flashing, press the small cup or large cup button to start making coffee. To stop the coffee flow, press the selected cup button again.
text_image
Diagram illustrating a coffee maker with three labeled icons (①, ②) pointing to the speaker and coffee cup, suggesting a coffee machine operation.For E.S.E.® pods
1. Preparation
Lift the lever and remove any adapter from the appliance.

text_image
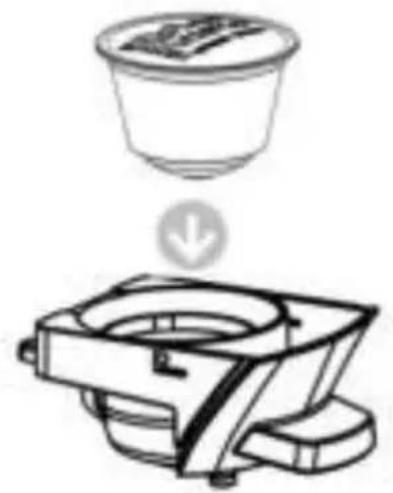
Diagram of a coffee maker with numbered parts indicating parts of the device and parts.2. Inserting the pod into the adapter
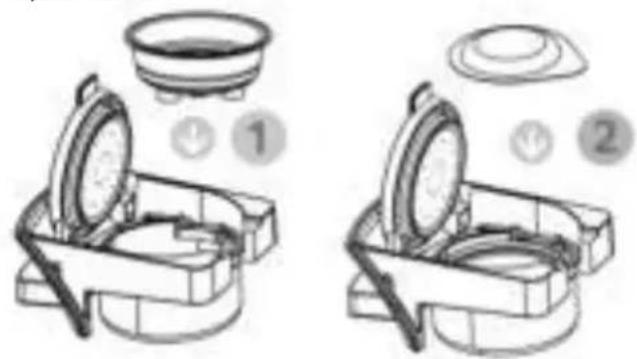
Insert the stainless steel filter holder into the adapter then place the E.S.E. in the filter holder. Close the adapter cover.
text_image
Diagram illustrating two steps of cooking or cooking process with labeled icons and numbered instructions6. End of procedure
Lift the lever and remove the adapter. Lower the lever to close.
Wait until the adapter has cooled down before opening its cover discarding the used capsule. If you are no longer using the device, please wash the adapter with hot soapy water for future use.

text_image
Diagram of a coffee maker with labeled parts including a brush, container, and fan3. Inserting adapter into the machine
Lift the lever and insert the adapter into its compartment. Lower the lever to close it.
text_image
Diagram of a water purifier with numbered parts indicating components and flow direction4. Switching on the appliance & preheating
Press the ON/OFF button to turn on the appliance. The 3 control buttons light up and flash to indicate that the appliance is in preheating mode. The warm-up time is approximately 45 seconds.
natural_image
Two icons: a hand pressing a button labeled 'Power' and three circular icons with icons of a coffee cup, power button, and coffee cup (no text or symbols)5. Selecting your coffee volume
Place a cup on the removable grid. As soon as the lights on the control buttons stop flashing, press the small cup or large cup button to start making coffee. To stop the coffee flow, press the selected cup button again.
text_image
Diagram illustrating a coffee maker with three labeled icons (P, U, P) and a speech bubble containing '②' and '①', plus a cup.6. End of procedure
Lift the lever and remove the adapter. Lower the lever to close.
Wait until the adapter has cooled down before opening its cover to discard the used capsule. If you are no longer using the device, please wash the adapter with hot soapy water for future use.
natural_image
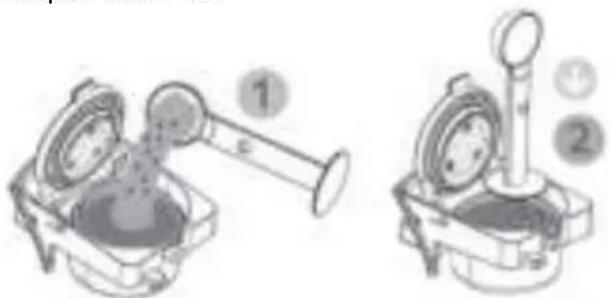
Illustration of a portable water dispenser with a brush and two smaller bags, no text or symbols presentFor coffee powder
1. Preparation
Lift the lever and remove any adapter from the appliance.
text_image
Diagram of a water purifier with labeled parts including inlet, outlet, and filter unit2. Placing coffee in the adapter
Insert the stainless steel filter holder (if it is not already in place) into the adapter then place the coffee with a spoon in the filter holder. Compress the coffee with the bottom of the spoon. Close the adapter cover lid.
natural_image
Two technical illustrations of a mechanical device with labeled parts (1 and 2), no readable text or symbols present.3. Inserting the adapter into the machine
Lift the lever and insert the adapter into its compartment. Lower the lever to close it.
text_image
Diagram of a water purifier with numbered parts indicating components like inlet, outlet, and control panel4. Switching on the appliance & preheating
Press the ON/OFF button to turn on the appliance. The 3 control buttons light up and flash to indicate that the appliance is in preheating mode. The warm-up time is approximately 45 seconds.
natural_image
Two icons: a hand pressing a button labeled 'Power' and three circular icons with icons of a cup, power symbol, and coffee cup (no text or symbols present)- Selecting your coffee volume Place a cup on the removable grid. As soon as the lights on the control buttons stop flashing, press the small cup or large cup button to start making coffee. To stop the coffee flow, press the selected cup button again.

text_image
Diagram illustrating a coffee maker with three labeled icons (Coffee, Soda, Cup) and a speech bubble showing finger interaction.- End of procedure Lift the lever and remove the adapter. Lower the lever to close.
Wait until the adapter has cooled down before opening its cover to discard the used capsule. If you are no longer using the device, ensure to wash the adapter with hot soapy water for future use.
text_image
Diagram of a water dispenser with labeled parts and icons indicating steps 1, 2, and 3.CLEANING AND MAINTENANCE

text_image
Warning symbol with exclamation mark inside a triangleAlways unplug the appliance before cleaning. The appliance must not be immersed.
Never immerse its power cord and plug in water or any other liquid.
Do not use sharp, toxic and aggressive products, such as methylated spirits, industrial strippers or solvents to clean your device because they may damage it.
Cleaning the appliance and its accessories
Before cleaning your appliance, switch off your machine by pressing the ON/OFF button.
Unplug the power cord from the power outlet.
Wait until the appliance and adapter have cooled down before starting the cleaning operation.
Cleaning the adapter

natural_image
Illustration showing a kitchen sink with a water drop and a faucet, both without any text or symbols.Wait until the adapter has cooled down before opening its cover to dispose of the used coffee. Wash the adapter in hot soapy water and rinse it before allowing it to air dry. Note: the Dolce Gusto capsule adapter has no cover.
Cleaning the appliance
text_image
Diagram illustrating a device's electrical connection with labeled buttons and a power outlet, showing step-by-step instructions.Use a soft cloth or sponge dampened with a neutral pH product to clean the surfaces of the machine.
Remove the water tank, wash it in soapy water and rinse it thoroughly before drying it with a clean cloth.
Descaling procedure
It is normal for limescale to form in the appliance. Limescale particles can form in the water deposit and in the machine and can block the pipes and cause malfunctioning or damage. To avoid this, please descale the appliance after 300 to 400 uses or if there is a noticeable slowdown in the flow rate.
To descale your appliance, please follow the instructions below:
▶ Buy a commercial descaling product especially for descaling espresso machines.
- Dilute the descaling solution with water according to the manufacturer's instructions. Wait until the descaling solution is completely dissolved in the mixture.
Pour this solution into the water tank, filling it to the "MAX" mark.
Connect the appliance to a power outlet.
Place a large bowl on the drip grid. Insert an empty adapter (without capsule and without coffee) into the appliance.
▶ Press the ON/OFF button.
Press the large cup button to circulate the descaling mixture through the appliance's internal circuits. At the end of the large cup programme flow cycle, repeat several large cup programme cycles until the mixture in the water tank runs out.
▶ Repeat another descaling cycle by filling the water tank with the mixture for a second time.
- Carry out two internal rinsing cycles of the device with clean water.
| ISSUES | CAUSES | SOLUTIONS |
| NO COFFEE COMES OUT OF THE APPLIANCE. | 1. The water tank is not positioned correctly.2. There is no capsule in the machine.3. The lever is not properly locked. | 1. Please check if the water tank is installed correctly.2. Insert a capsule into the adapter.3. Raise the lever and lower it until it locks. |
| THE DEVICE DOES NOT WORK, NO BUTTONS LIGHT UP. | 1. The appliance is not plugged in.2. The appliance is in standby mode. | 1. Check whether the device is connected to power supply.2. Press the ON/OFF button to exit standby mode. |
| THE COFFEE IS NOT HOT ENOUGH. | 1. The machine is cold.2. The cup is cold.3. Build-up of limescale in the device. | 1. Start a large cup cycle with an empty adapter to warm the internal circuits of the appliance.2. Preheat the cup.3. Descale the appliance. |
| THE VOLUME OF DRINK IS NOT GOOD. | 1. Accumulation of limescale in the device.2. Not enough water in the tank. | 1. Descale the appliance.2. Fill the water tank and press the small or large cup button to continue the flow. |
| WATER ON THE TABLE. | 1. The water tank is leaking.2. The drip tray is full. | 1. Stop the appliance, remove the water tank and replace it, checking that the valve is not blocked.2. Empty the drip tray. |
| THE LEVER DOES NOT CLOSE. | 1. The adapter is not placed correctly. | 1. Raise the lever, remove the adapter and put it back in the correct position. |
OTHERS INFORMATIONS
Technical information
| SPECIFICATIONS | |
| REFERENCE DEPENDING ON COLOURS (MODEL) | CKZ39-WH CKZ39-BL |
| POWER SUPPLY | 220-240V~ 50/60Hz |
| POWER 1450W | |
| PUMP PRESSURE 19 bars | |
| WATER TANK CAPACITY 600ml | |
The warranty of the product does not cover any use that breaches the product instructions for use:
- an installation that does not comply with legal and regulatory provisions (not having an earth connection, moving the appliance during use leading to a cut in the power cord or the supply and drainage pipe, or subsequent to external phenomena, such as lightning, flooding, and more generally non-observance by the end user, the installer or the reseller of the assembly and set up conditions listed in the user booklets of the products of the brand);
- abnormal use in the event of commercial, professional and industrial use;
- use that does not meet the conditions listed in the instructions for use;
- exposure of the product to external conditions affecting the product (rain, excessive humidity, abnormal variation in electrical voltage);
- deterioration of the product due to shocks, falls, negligence, user maintenance defects;
- transformation of the product and its unauthorised technical specifications;
- a product transportation problem;
- cracks on enamelled products that are the consequence of differences in sheet-enamel or cast-enamel expansion and do not modify the adhesion of the enamel;
- breakage of glass, plastic accessories, rubber parts, aesthetic and wearing parts;
- an intervention carried out directly by a user or an unauthorised company;
- use of spare parts other than original spare parts referenced by the brand.
Finally, the following are also excluded from the guarantee:
- a breakdown during unpacking which only concerns appearance defects that may arise from a transport or handling incident;
- aesthetic pieces;
- the accessories;
- breakdowns relating to accessories;
- no detectable defects;
- interventions that do not require changing any parts;
- so-called "second hand" or "refurbished" products;
- repetitive failures due to a wrong diagnosis.

The warranty will be void if the product nameplate and / or serial number are removed.
VEILIGHEIDSINSTRUCTIES 45
MILIEU & RECYCLING....49
COMPLIANCE....49
BESCHRIJVING 50
VÓÓR DE INGEBRUIKNAME 51
HET APPARAAT INSTELLEN 51
ANDEREN INFORMATIE....63
GARANTIE 64
text_image
Warning symbol with steam inside a triangle, indicating heat or smoke hazardnatural_image
Simple line drawing of a triangular warning symbol with a cloud inside (no text or labels)F. Adaptercompartiment
G. Koffie-uitloop
H. Afneembaar rooster
I. Afneembare lekbak
text_image
A B C D E F G H I J K L Mtext_image
Diagram showing a kitchen sink with liquid being poured into a container, labeled with steps ① and ②.text_image
Diagram showing a hand mixer and a glass of liquid, labeled with numbered components.natural_image
Illustration of a plug connecting a wall to an electrical outlet (no text or symbols)text_image
Diagram of a coffee maker with numbered parts indicating parts of the device and their corresponding icons.natural_image
Hand pressing a button on a circular interface element (no text or symbols visible)natural_image
Three circular icons with coffee cup, power button, and mug symbols (no text or numbers)text_image
Diagram showing three labeled buttons with icons, likely representing a software interface or control paneltext_image
Diagram of a coffee maker with labeled parts and parts, showing a tray and cup (①, ②)text_image
>15 minutes P A Dtext_image
Diagram illustrating a device's electrical connection with labeled buttons and a power plug, showing step-by-step instructions.text_image
Icon set showing three circular buttons with icons: a coffee cup, a power button, and a mug, connected by a finger to the first icon.text_image
Icon showing three circular buttons with coffee cup, power button, and megaphone symbols, connected by a finger to indicate a step.text_image
Diagram showing a device with three buttons labeled 'P', 'O', and 'I' connected to a power outlet, with a plug inserted.KOFFIE EN WARME DRANKEN BEREIDEN
text_image
Technical diagram of a coffee maker with labeled parts and exploded viewnatural_image
Line drawing of a hand mixer with a bowl (no text or symbols)
natural_image
Illustration of a coffee maker with a hand operating it, showing a crosshair symbol indicating rotation or movement (no text or labels present)
natural_image
Illustration of a hand washing machine with a hand holding a glove, accompanied by a warning sign (no text or symbols present)
natural_image
Line drawing of a manual coffee maker with handle and spout (no text or symbols)
natural_image
Simple line drawing of a washing machine with a glass of liquid and a hand holding a pointer (no text or symbols)
natural_image
Illustration of a hand using a pen to press hot air from a stove burner, with no visible text or symbols.natural_image
Illustration of a white portable water dispenser with two cups and a small inset showing a tray (no text or symbols)text_image
Technical diagram of a mechanical assembly with numbered components and directional arrows indicating motion or flow.text_image
Diagram of a portable water heater with numbered parts and directional arrows indicating process stepsnatural_image
Hand pressing a button on a circular interface element (no text or symbols visible)
natural_image
Three circular icons with coffee cup, power button, and beer mug symbols (no text or numbers)text_image
Diagram showing a coffee maker with three icons (save, upload, delete) and a speech bubble containing three circular icons labeled ①, ②, ③.text_image
Diagram of a water purifier with labeled parts and Chinese annotationsTips
text_image
Diagram of a water purifier with labeled parts and directional arrows indicating flow or movementnatural_image
Diagram showing a container with a downward arrow and a mechanical device (no text or symbols)text_image
Diagram of a water dispenser with numbered parts indicating process stepstext_image
Icon showing a hand pressing a button to interact with three circular icons representing coffee, power, and beer.text_image
Diagram showing a coffee maker with three labeled icons (安全, 休息, 餐) and a speech bubble containing three circular buttons (安全, 休息, 餐).natural_image
Line drawing of a portable water dispenser with two cups and a handle, emitting coins (no text or symbols)text_image
Diagram of a water purifier with labeled parts and directional arrows indicating flow or movementtext_image
Diagram showing two steps of a kitchen appliance with labeled parts, including a bowl and lid.text_image
Diagram of a water dispenser with numbered parts indicating components: inlet, outlet, and recycling steps.natural_image
Two icons: a hand pressing a button labeled 'Power' and three circular icons with icons of coffee cup, power button, and mug (no text or symbols)text_image
Illustration of a coffee maker with icons and speech bubbles showing menu options like 'OK', 'Cancel', 'Take'.natural_image
Line drawing of a portable water dispenser with two accessories and a small container (no text or symbols)Voor gemalen koffie
1. Voorbereiding
text_image
Diagram of a water dispenser with labeled parts including inlet, outlet, and base components2. Doe de koffie in de adapter
natural_image
Technical illustration of a mechanical device with two views (labeled 1 and 2), showing internal components without any text or symbols.text_image
Diagram of a water purifier with numbered parts indicating components and usage instructionsnatural_image
Illustration showing a hand pressing a button next to three circular icons with icons (coffee cup, power cord, beer mug), no text or symbols present.text_image
Diagram of a coffee maker with three labeled icons (F, U, F) and a speech bubble containing icons pointing to the speaker.text_image
Diagram of a water dispenser with labeled parts and icons indicating steps 1, 2, and 3.REINIGING EN ONDERHOUD

text_image
Warning symbol with exclamation mark inside a trianglenatural_image
Two-step diagram showing a mechanical device with a valve and a magnified view of its tip (no text or symbols)text_image
Diagram illustrating a hand inserting a power switch into a device, with labeled steps and icons for function call and display.ANDERE INFORMATIONEN....85
GARANTIE 86
text_image
Warning symbol with steam inside a triangle, indicating heat or smoke hazardnatural_image
Simple triangular warning symbol with a cross inside, no text or numbers presenttext_image
A B C D E F G H I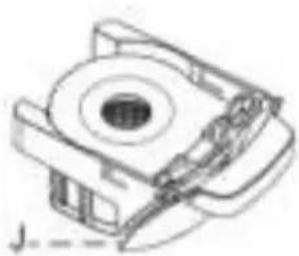
natural_image
Technical line drawing of a mechanical component with no visible text or symbols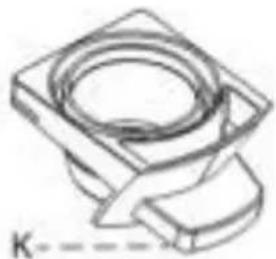
natural_image
Technical line drawing of a mechanical component with no visible text or symbols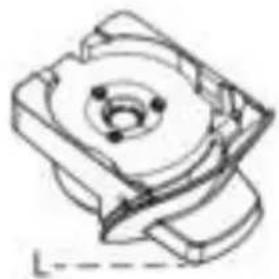
natural_image
Technical line drawing of a mechanical component with no visible text or symbols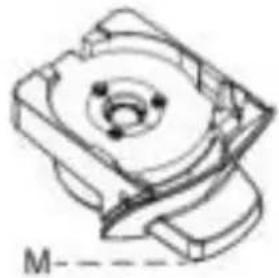
natural_image
Technical line drawing of a mechanical component with no visible text or symbolstext_image
Diagram showing a kitchen appliance with liquid being poured into it, labeled with steps ① and ②.natural_image
Line drawing of a blender and a glass with liquid, no text or symbols presentnatural_image
Illustration of a plug connecting a wall to an electrical outlet (no text or symbols)text_image
Diagram of a coffee maker with numbered parts indicating parts of the device and their corresponding icons.natural_image
Hand pressing a button with an 'Power' icon (no text or symbols visible)natural_image
Three circular icons with coffee cup, power button, and beer mug symbols (no text or numbers)text_image
Diagram showing hands holding three labeled buttons with icons, likely illustrating a device or control interface.text_image
Diagram of a coffee maker with labeled parts showing liquid, spoon, and cuptext_image
>15 minutestext_image
Diagram illustrating a coffee machine operation with labeled steps and icons for menu, function, and power.text_image
Icon set with three circular buttons: a megaphone, a power symbol, and a mug, connected by a finger to the left.text_image
Icon showing three circular buttons with icons: coffee cup, power button, and megaphone, connected by a finger to indicate a step.text_image
Diagram showing a device with three buttons labeled 'P', 'U', and 'V' connected to a wall-mounted display, illustrating a process or operation.natural_image
Line drawing of a hand mixer with a bowl (no text or symbols)
natural_image
Illustration of a coffee machine with a coffee cup and a circular diagram showing a coffee machine with arrows indicating rotation (no text or symbols)
Verletzungsgefahr!
natural_image
Illustration of a portable water dispenser with a hand holding a hand, accompanied by a warning sign (no text or symbols on the device itself)
natural_image
Line drawing of a manual coffee maker with handle and spout (no text or symbols)
natural_image
Illustration of a washing machine with a glass of liquid and a hand holding a small object, no text or symbols present.
natural_image
Illustration of a hand using a crossed-out X-shaped tool to smoke or steam from a steaming stove (no text or symbols)text_image
Diagram of a water purifier with labeled parts and components, showing liquid level, fan, and tray.text_image
Technical diagram of a mechanical device with numbered components and directional arrows indicating motion or assembly.text_image
Diagram of a water purifier with numbered parts and directional arrows indicating process stepsnatural_image
Two icons: a hand pressing a button with a clock symbol and three circular icons (cup, coffee cup, beer mug) connected by lines, no text or labels present.text_image
Diagram illustrating coffee maker setup with icons for menu, keyboard, and coffee cup, showing a hand gesture pointing to the menu icon.text_image
Diagram of a water purifier with labeled parts including inlet, outlet, and base componentsTipps
text_image
Diagram of a water dispenser with numbered instructions for adding or removing it, showing steps 1 and 2.text_image
Technical diagram of a mechanical assembly with numbered components and directional arrows indicating motion or flow.text_image
Diagram of a coffee maker with numbered parts indicating parts of the device and its internal components.natural_image
Illustration of a hand pressing a button on a circular icon with three coffee cup icons below (no text or symbols)text_image
Diagram showing a coffee maker with icons for making a coffee machine, plus a hand pointing to the coffee cup.natural_image
Illustration of a water dispenser with two cups and a brush, emitting powder from a tray (no text or symbols)Für E.S.E.® PADS
text_image
Diagram of a coffee maker with labeled parts and numbered callouts indicating parts 1, 2, and 3.text_image
Diagram showing two steps of cooking or cooking process with labeled icons and componentstext_image
Diagram of a coffee maker with numbered parts indicating parts of the device and packagingnatural_image
Illustration showing a hand pressing a button next to three circular icons with icons (no text or symbols)text_image
Diagram illustrating a coffee machine with icons for menu, keyboard, and coffee cup, showing a finger pressing the button.natural_image
Illustration of a small electric water purifier with two cups and a handle, emitting food from a tray (no text or symbols)Für Kaffeepulver
text_image
Diagram of a water purifier with labeled parts and numbered calloutsnatural_image
Technical illustration of two mechanical devices with numbered components (no text or symbols)text_image
Diagram of a coffee maker with numbered parts indicating parts of the device and packagingnatural_image
Hand pressing a button on a circular interface element (no text or symbols visible)natural_image
Three circular icons with coffee cup, power button, and beer mug symbols (no text or numbers)text_image
Diagram showing a coffee maker with three digital buttons labeled 'P', 'O', 'T' interacting with the phone, and a mug nearby.- Ende des Verfahrens
natural_image
Illustration of a portable water dispenser with two cups and a spoon, accompanied by icons indicating steps 1 and 2 (no text or symbols on the device itself)natural_image
Two-step diagram showing a top-down view of a mechanical component being lifted by a tool, and a lower view of a water tap with a submerged object (no text or symbols)text_image
Diagram illustrating a device's electrical switch operation with labeled steps and iconsANDERE INFORMATIONEN
Technische angaben
| SPEZIFIKATIONEN | |
| MODELL CKZ39-WH CKZ39-BL | |
| STROMVERSORGUNG | 220-240 V ~ 50/60 Hz |
| LEISTUNG 1450 W | |
| PUMPDRUCK 19 bars | |
| FASSUNGSVERMÖGEN DES WASSERTANKS | 600 ml |
ZANUSSI is a registered trademark used under license from AB Electrolux (publ).
Importer :
CLD Distribution SA