S5TiB - Treadmills BH FITNESS - Free user manual and instructions
Find the device manual for free S5TiB BH FITNESS in PDF.


User questions about S5TiB BH FITNESS
0 question about this device. Answer the ones you know or ask your own.
Ask a new question about this device
Download the instructions for your Treadmills in PDF format for free! Find your manual S5TiB - BH FITNESS and take your electronic device back in hand. On this page are published all the documents necessary for the use of your device. S5TiB by BH FITNESS.
USER MANUAL S5TiB BH FITNESS
Important: Read all instructions carefully before using this product. Retain this owner's manual for future reference. BH North America | 20155 Ellipse, Foothill Ranch, California 92610 | p.949.206.0330 | f.949.206.0350 | www.BHFitnessUSA.com
BH
TABLE OF CONTENTS
Title
Introduction 03
Warning Labels 04
Safety Information 05
Exercise Instruction 08
Training Guidelines 09
Workout and Stretching 13
Overview 15
Assembly Instructions 16
Belt Adjustments 20
Console Operations 21
Downloading Apps and Pairing Your Device 28
Maintenance and Cleaning 31
Information and Recommendations 31
Exploded View Drawing 32
Parts List 33
Warranty 35
French / Francais 36
CONGRATULATIONS
Congratulations on your purchase of BH Fitness equipment. We hope you appreciate the style, quality, and value that exercisers across North America have come to expect from BH Fitness.
If you have any questions, concerns or product issues, please call our Customer Service at 1-866-325-2339 or email us at CustomerSupport@BHNorthAmerica.com.
Carefully read through the instructions contained in this manual. They provide you with important information about assembly, safety, fitness and use of the machine. Please read ALL the safety information contained on the following page.
WARNING LABELS
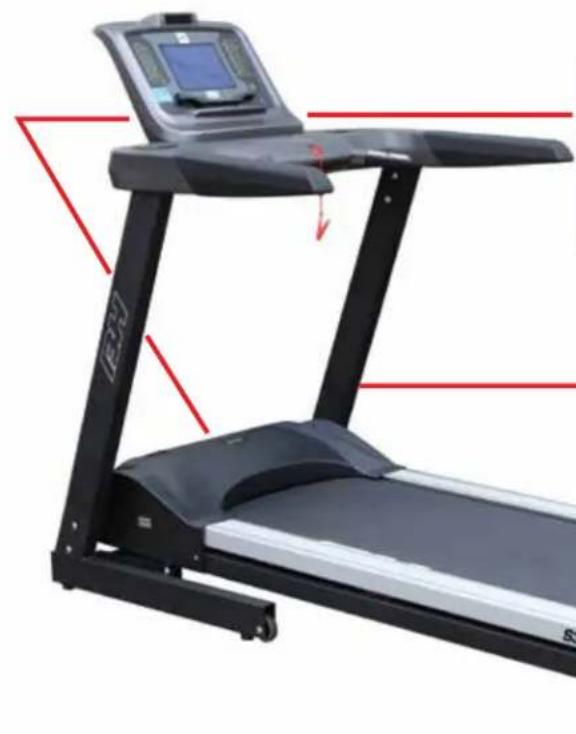

CAUTION Risk of injury to persons: To avoid injury, use extreme caution when sleeping in an office or all of a meeting room. Read instruction manual before using.
CAUTION - To ensure the risk of injury from moving parts - unplait before swarmingWARNING - To ensure risk of electric shock - unplait before cleaning or servicing
Keep hands and fingers clear of this area.
WARNING
- Misuse of this machine may result in serious injury.
- Read User's Manual prior to use and follow all warnings and Instructions.
- Do not allow children on or around the machines.
- Reduce belt speed in a controlled manner;
The user weight must not exceed 350 kJ/158.2 kg
This product should always be used on a level surface. - Replace label if damaged, Hoggle or removed.
Do not use this machine outdoors. - This treadmill fills. Please stand S feel away when treadmill is unflicking.
- Keep children away from treadmill when unfolding.
- Let treadmill unfold on its own.
SAFETY INFORMATION
PRECAUTIONS
The machine has been designed and constructed to provide maximum safety. Nevertheless, certain precautions should be taken when using exercise equipment. Read the whole manual before assembling and using the machine. Please observe the following safety precautions:
- Keep children and pets away from this equipment at all times. DO NOT leave them unsupervised in the room where the machine is kept.
- If you experience dizziness, nausea, chest pains or any other symptom while using this machine STOP exercising. SEEK IMMEDIATE MEDICAL ATTENTION!
- Use the machine on a level and solid surface. Adjust the feet for stability.
- Keep your hands away from any of the joints and moving parts.
- Wear clothing suitable for doing exercise. Do not wear baggy clothing that might get caught in the machine. Always wear athletic shoes when using the machine and tie the laces securely.
- This machine must only be used for the purposes described in this manual. DO NOT use accessories that are not recommended by BH Fitness.
- Do not place sharp objects near the machine.
- Any person with physical or coordination limitations should not use the machine without the assistance of a qualified person or doctor.
- Do warm-up stretching exercises before using the equipment.
- Do not use the machine if it is not working correctly.
- Before using the machine, thoroughly inspect the equipment for proper assembly.
- Maintain a minimum safety clearance of 12^ in the front, 24^ on the sides and 79^ to the rear of the treadmill.
- Use only authorized and trained technicians if a repair is needed.
- Please follow the advice for correct training, as detailed in the Training Guidelines.
- Use only the tools provided to assemble this machine.
- This machine was designed for a maximum user weight of 400 lbs (181 kg)
- The machine can only be used by one person at a time.
- Auto Stop Safety Feature: If the treadmill detects that there is no user on the treadmill for 5 minutes, the treadmill will come to a stop automatically.
Caution: Consult your doctor before beginning to use the machine or any exercise program. Read all of the instructions before using any exercise equipment.
KEEP THESE INSTRUCTIONS SAFE FOR FUTURE USE.
IMPORTANT SAFETY INSTRUCTIONS
When using an electrical appliance, basic precautions should always be followed, including the following:
Read all instructions before using this machine:
DANGER - To reduce the risk of electric shock:
Always shut off and unplug this machine from the electrical outlet immediately after using and before cleaning.
WARNING - To reduce the risk of burns, fire, electric shock, or injury to persons:
- The machine should never be left unattended when plugged in. Unplug from outlet when not in use and before maintenance or repair of the machine.
- Close supervision is necessary when this appliance is used by, on, or near children, invalids, or disabled persons. Keep children away from the treadmill belt.
- Use this appliance only for its intended use as described in this manual. Do not use attachments not recommended by the manufacturer.
- Never operate this appliance if it has a damaged cord or plug, if it is not working properly, or has been damaged. For repair, use only authorized and trained technicians.
- Keep the cord away from heated surfaces.
- Never drop or insert any object into any opening.
- Do not use outdoors.
- Do not operate where aerosol (spray) products are being used or where oxygen is being administered.
- To disconnect, turn all controls to the off position, then remove plug from outlet.
- Connect this appliance to a properly grounded outlet only. See Grounding Instructions.
- Care has been taken to assure that your equipment has been properly adjusted and lubricated at the factory. It is not recommended that the user attempt service on the internal components. Instead, seek service from an authorized service center. However, you may clean the outer surface. Use a soft cloth, dampened with warm water. Do not use aerosol sprays or pump bottles as they may deposit sediments upon the console surface. The use of harsh chemicals will destroy the protective coating and cause a static build-up that may damage some of the components.
- This product has a circuit breaker that will shut the machine down completely when it reaches a set Amperage. The button on the breaker will pop out when the breaker is engaged. The breaker needs to be reset for the machine to function. Resetting the breaker can be done by pushing in the beaker button next to the power cord on the machine.
GROUNDING INSTRUCTION
This product must be grounded. If it should malfunction or breakdown, grounding provides a path of least resistance for electric current to reduce the risk of electric shock. This product is equipped with a cord having an equipment-grounding conductor and a grounding plug. The plug must be plugged into an appropriate outlet that is properly installed and grounded in accordance with all local codes and ordinances.
DANGER - Improper connection of the equipment-grounding conductor can result in a risk of electric shock. Check with a qualified electrician or serviceman if you are in doubt as to whether the product is properly grounded. Do not modify the plug provided with the product - if it will not fit the outlet, have a proper outlet installed by a qualified electrician.
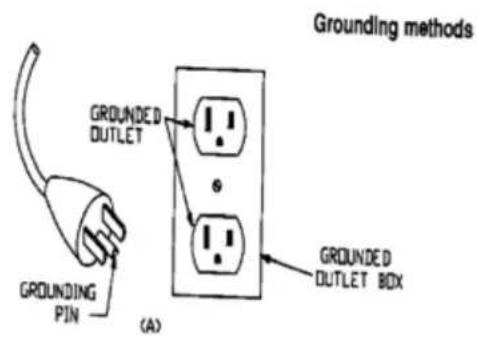
This product is for use on a nominal 120-volt circuit and has a grounding plug that looks like the plug illustrated in sketch A in following figure. Make sure that the product is connected to an outlet having the same configuration as the plug. No adapter should be used with this product. Grounding method
EXERCISE INSTRUCTION
Use of the machine offers various benefits; it will improve fitness, muscle tone and when used in conjunction with a calorie controlled diet, it will help you lose weight.
- Consult your doctor before starting any exercise program. It is advisable to undergo a complete physical examination.
- Work at the recommended exercise level. Do not over exert yourself.
- If you feel any pain or discomfort, stop exercising immediately and consult your doctor.
- Wear appropriate clothing and footwear for the exercise; do not wear loose clothing; do not wear leather soled shoes or footwear with high heels.
- It is advised that you do warm-up stretches before working out.
- Step on to the equipment slowly and securely.
- Select the program or workout option that is most closely aligned with your workout interests.
- Start slowly and work your way up to a comfortable pace.
- Be sure to cool down after your workout.
TRAINING GUIDELINES
Exercise is one of the most important factors in the overall health of an individual. Listed among its benefits are:
- Increased capacity for physical work (strength endurance)
- Increased cardiovascular (heart and arteries/veins) and respiratory efficiency
- Decreased risk of coronary heart disease
Changes in body metabolism, e.g. losing weight - Delaying the physiological effects of age
- Reduction in stress, increase in self-confidence, etc.
There are several components of physical fitness and each is defined below.
STRENGTH
The capacity of a muscle to exert a force against resistance. Strength contributes to power and speed.
MUSCULAR ENDURANCE
The capacity to exert a force repeatedly over a period of time, e.g. it is the muscular endurance of your legs to carry you 10km without stopping.
FLEXIBILITY
The range of motion of your joints. Improving flexibility involves the stretching of muscles and tendons to maintain or increase suppleness, and it provides increased resistance to muscle injury or soreness.
CARDIO-RESPIRATORY ENDURANCE
The most essential component of physical fitness. It is the efficient functioning of the heart and lungs.
AEROBIC FITNESS
Is an exercise of relatively low intensity and long duration, which depends primarily on the aerobic energy system. Aerobic means "with oxygen", and refers to the use of oxygen in the body's metabolic or energy-generating process. Many types of exercise are aerobic, and by definition are performed at moderate levels of intensity for extended periods of time.
ANAEROBIC TRAINING
Is an exercise intense enough to trigger anaerobic metabolism. This means "without oxygen" and is the output of energy when the oxygen supply is insufficient to meet the body's long term energy demands. (For example, a 100 meter sprint.)
OXYGEN UPTAKE
The effort that you can exert over a prolonged period of time is limited by your ability to deliver oxygen to the working muscles. Regular vigorous exercise produces a training effect that can increase your aerobic capacity by as much as 20 to 30% . An increased VO2 Max indicates an increased ability of the heart to pump blood, of the lungs to ventilate oxygen, and of the muscles to take up oxygen.
THE TRAINING THRESHOLD
This is the minimum level of exercise which is required to produce significant improvements in any physical fitness parameter.
OVERLOAD
This is where you exercise above your comfort level. The intensity, duration and frequency of exercise should be above the training threshold and should be gradually increased as the body adapts to the increasing demands. As your fitness level improves, the training threshold should rise. Working through your program and gradually increasing the overload factor is important.
PROGRESSION
As you become more fit, a higher intensity of exercise is required to create an overload and therefore provide continued improvement.
SPECIFICS
Different forms of exercise produce different results. The type of exercise that is carried out is specific to the muscle groups being used and to the energy source involved. There is little transfer of the effects of exercise, i.e. from strength training to cardiovascular fitness. That is why it is important to have an exercise program tailored to your specific needs.
REVERSIBILITY
If you stop exercising or do not do your program often enough, you will lose the benefits you have gained. Regular workouts are the key to success.
WARM-UP
Every exercise program should start with a warm-up where the body is prepared for the effort to come. It should be gentle and preferably use the muscles group to be involved later. Stretching should be included in both your warm-up and cool down, and should be performed after 3-5 minutes of low intensity aerobic activity or callisthenic type exercise.
This involves a gradual decrease in the intensity of the exercise session. Following exercise, a large supply of blood remains in the working muscles. If it is not returned promptly to the central circulation, pooling of blood may occur in the muscles.
HEART RATE
As you exercise, your heart beat increases. This is often used as a measure of the required intensity of an exercise. You need to exercise hard enough to condition your circulatory system, and increase your pulse rate, but not enough to strain your heart.
Your initial level of fitness is important when developing an exercise program for you. When starting, you can get a good training effect with a heart rate of 110-120 beats per minute (BPM). If you are more fit, you will need a higher threshold of stimulation.
To begin with, you should exercise at a level that elevates your heart rate to about 65 to 70% of your maximum. If you find this is too easy, you may want to increase it, but it is better to lean on the conservative side.
As a rule of thumb, the maximum heart rate is 220 minus your age. As you increase in age, your heart, like other muscles, loses some of its efficiency. Some of its natural loss is won back as fitness improves. The following table is a guide to those who are "starting fitness."
| Age | Target | Heart | Rate | 25 | 30 | 35 | 40 | 45 | 50 | 55 | 60 | ||
| 10 | Second | Count | 23 | 22 | 22 | 21 | 20 | 19 | 19 | 18 | 18 | ||
| Beats per Minute | 138 | 132 | 132 | 126 | 120 | 114 | 114 | 108 | 108 | ||||
PULSE COUNT
The pulse count (on your wrist or carotid artery in the neck, taken with two index fingers) is done for ten seconds, taken a few seconds after you stop exercising. This is for two reasons: (a) 10 seconds is long enough for accuracy, (b) the pulse count is to approximate your BPM rate at the time you are exercising. Since heart rate slows as you recover, a longer count isn't as accurate.
The target is not a magic number, but a general guide. If you're above average with your fitness, you may work comfortably a little above that suggested for your age group. The following table is a guide.
| Age | Target | Heart | Rate | 25 | 30 | 35 | 40 | 45 | 50 | 55 | 60 | 65 | |
| 10 | Second | Count | 26 | 26 | 25 | 24 | 23 | 22 | 22 | 21 | 20 | ||
| Beats | per | Minute | 156 | 156 | 150 | 144 | 138 | 132 | 132 | 126 | 120 | ||
Don't push yourself too hard to reach the figures on this table. It can be very uncomfortable if you over exercise. Let it happen naturally as you work through your program. Remember, the target is a guide, not a rule, a little above or below is just fine.
Two final comments: (1) don't be concerned with day to day variations in your pulse rate, being under pressure or not enough sleep can affect it; (2) your pulse rate is a guide, don't become a slave to it.
MUSCLE SORENESS
For the first week or so, muscle soreness may be the only indication you have that you are on an exercise program. This, of course, does depend on your overall fitness level. A confirmation that you are on the correct program is a very slight soreness in most major muscle groups. This is quite normal and will disappear in a matter of days.
If you experience major discomfort, you may be on a program that is too advanced, or you have increased your program too rapidly.
If you experience PAIN during or after exercise, your body is telling you something. Stop exercising and consult your doctor.
WHAT TO WEAR
Wear clothing that will not restrict your movement in any way while exercising. Clothes should be light enough to allow the body to cool. Excessive clothing that causes you to perspire more than you normally would give you no advantage. The extra weight you lose is body fluid and will be replaced with the next glass of water you drink. It is advisable to wear a pair athletic shoes.
BREATHING DURING EXERCISE
Do not hold your breath while exercising. Breathe normally as much as possible. Remember, breathing involves the intake and distribution of oxygen, which feeds the working muscles.
REST PERIODS
Once you start your exercise program, you should continue through to the end. Do not break off halfway through and then restart at the same place later on without going through the warm-up stage again. The rest period required between exercises may vary from person to person.
SUGGESTED STRETCHES
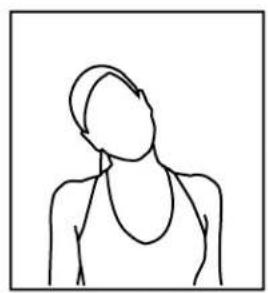
Head Rolls
Rotate your head to the right for one count while feeling the stretch up the left side of your neck. Next, rotate your head back for one count, stretching your chin to the ceiling. Rotate your head to the left for one count, and finally, drop your head to your chest for one count.
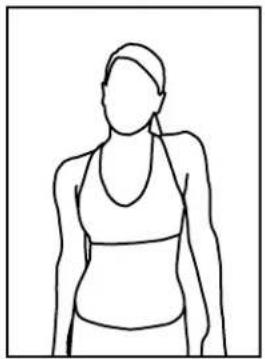
Shoulder Lifts
Lift your left shoulder up toward your ear for one count. Then lift your right shoulder up for one count as you lower your left shoulder.
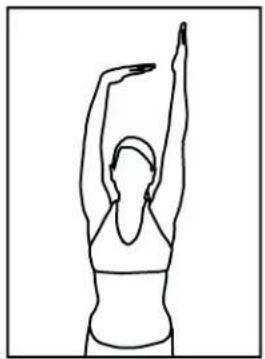
Side Stretches
Open your arms to the side and continue lifting them until they are over your head. Reach your left arm as far upward as you can for one count. Feel the stretch up your left side. Repeat this action with your right arm.
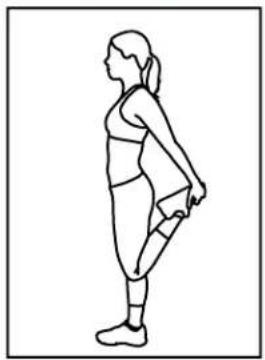
Quadriceps Stretch
With one hand against a wall for balance, reach behind you and pull your left foot up. Bring your heel as close to your buttocks as possible. Hold for 15 counts and repeat with right foot up.
SUGGESTED STRETCHES
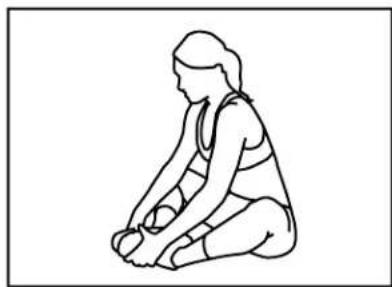
Inner Thigh Stretch
Sit with the soles of your feet together with your knees pointing outward. Pull your feet as close into your groin as possible. Gently push your knees towards the floor. Hold for 15 counts.
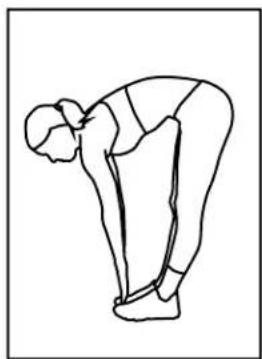
Toe Touches
Slowly bend forward from your waist, letting your back and shoulders relax as you stretch toward your toes. Reach down as far as you can and hold for 15 counts.
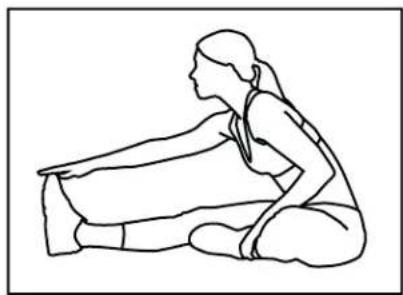
Hamstring Stretches
Sit with your right leg extended. Rest the soles of your left foot against your right inner thigh. Stretch toward your toes as far as possible. Hold for 15 counts. Relax and then repeat with left leg extended.
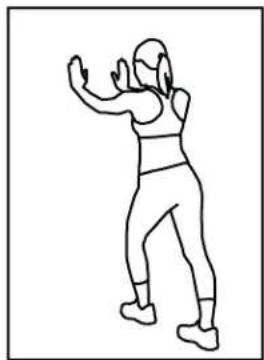
CalfAchilles Stretches
Lean against a wall with your right leg in front of the left and your arms forward. Keep your left leg straight and the right foot on the floor; then bend the right leg and lean forward by moving your hip toward the wall. Hold, then repeat on the other side for 15 counts.
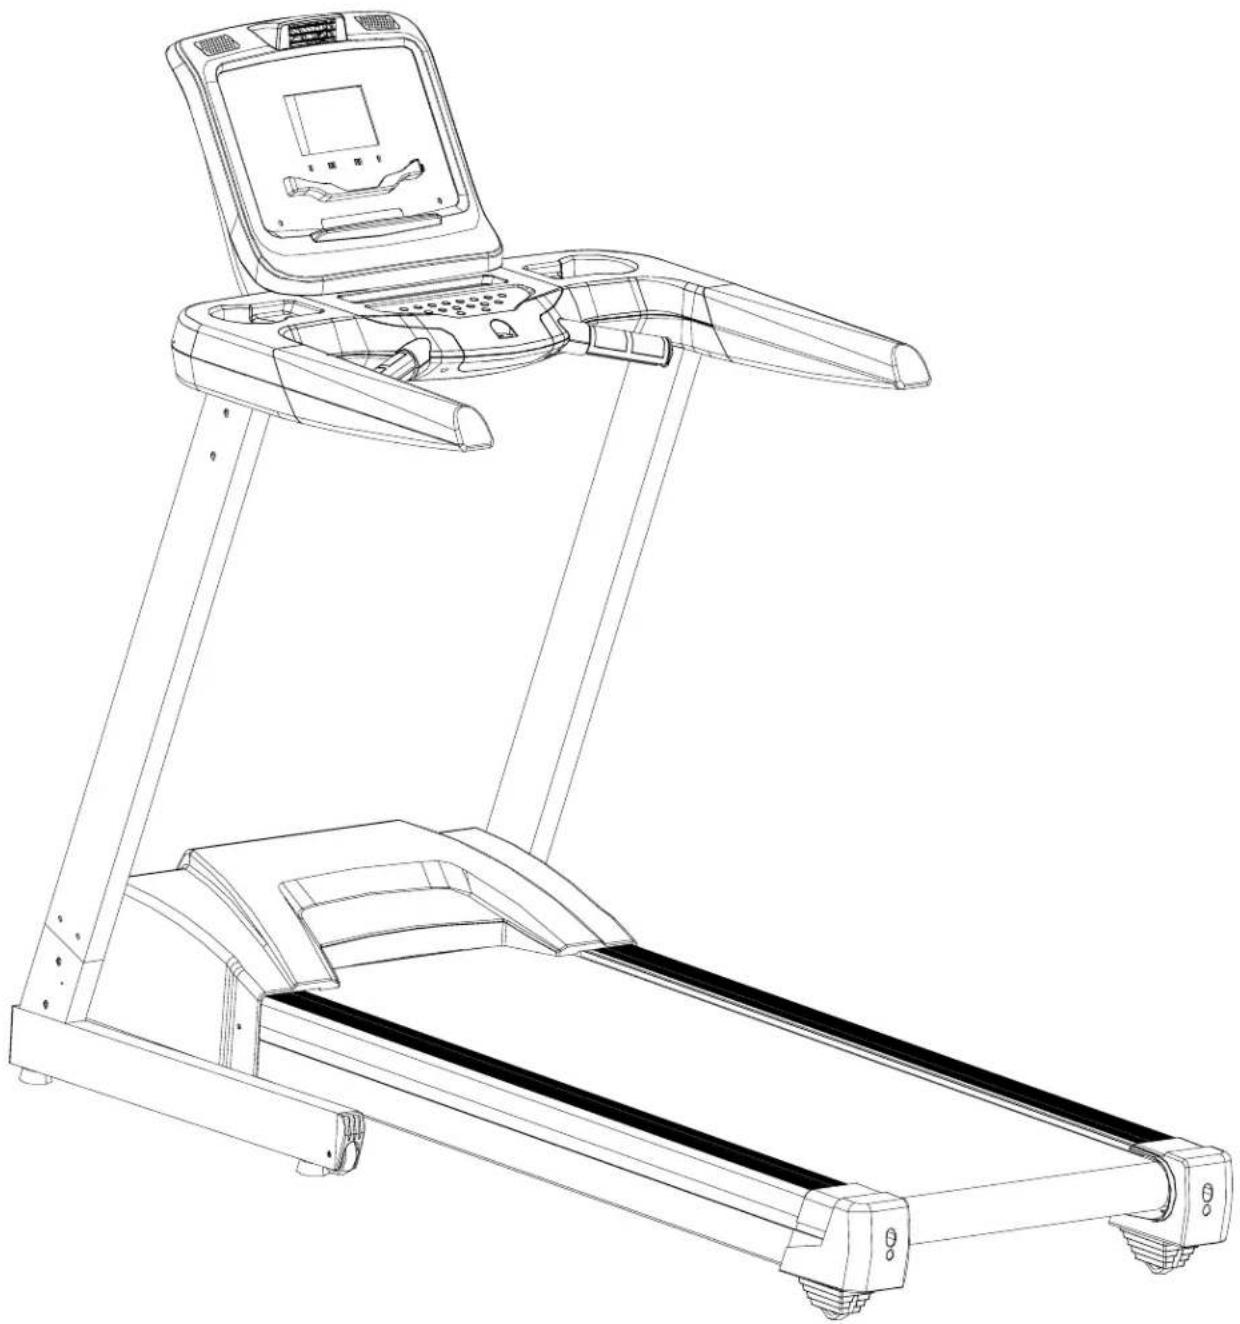
OVERVIEW
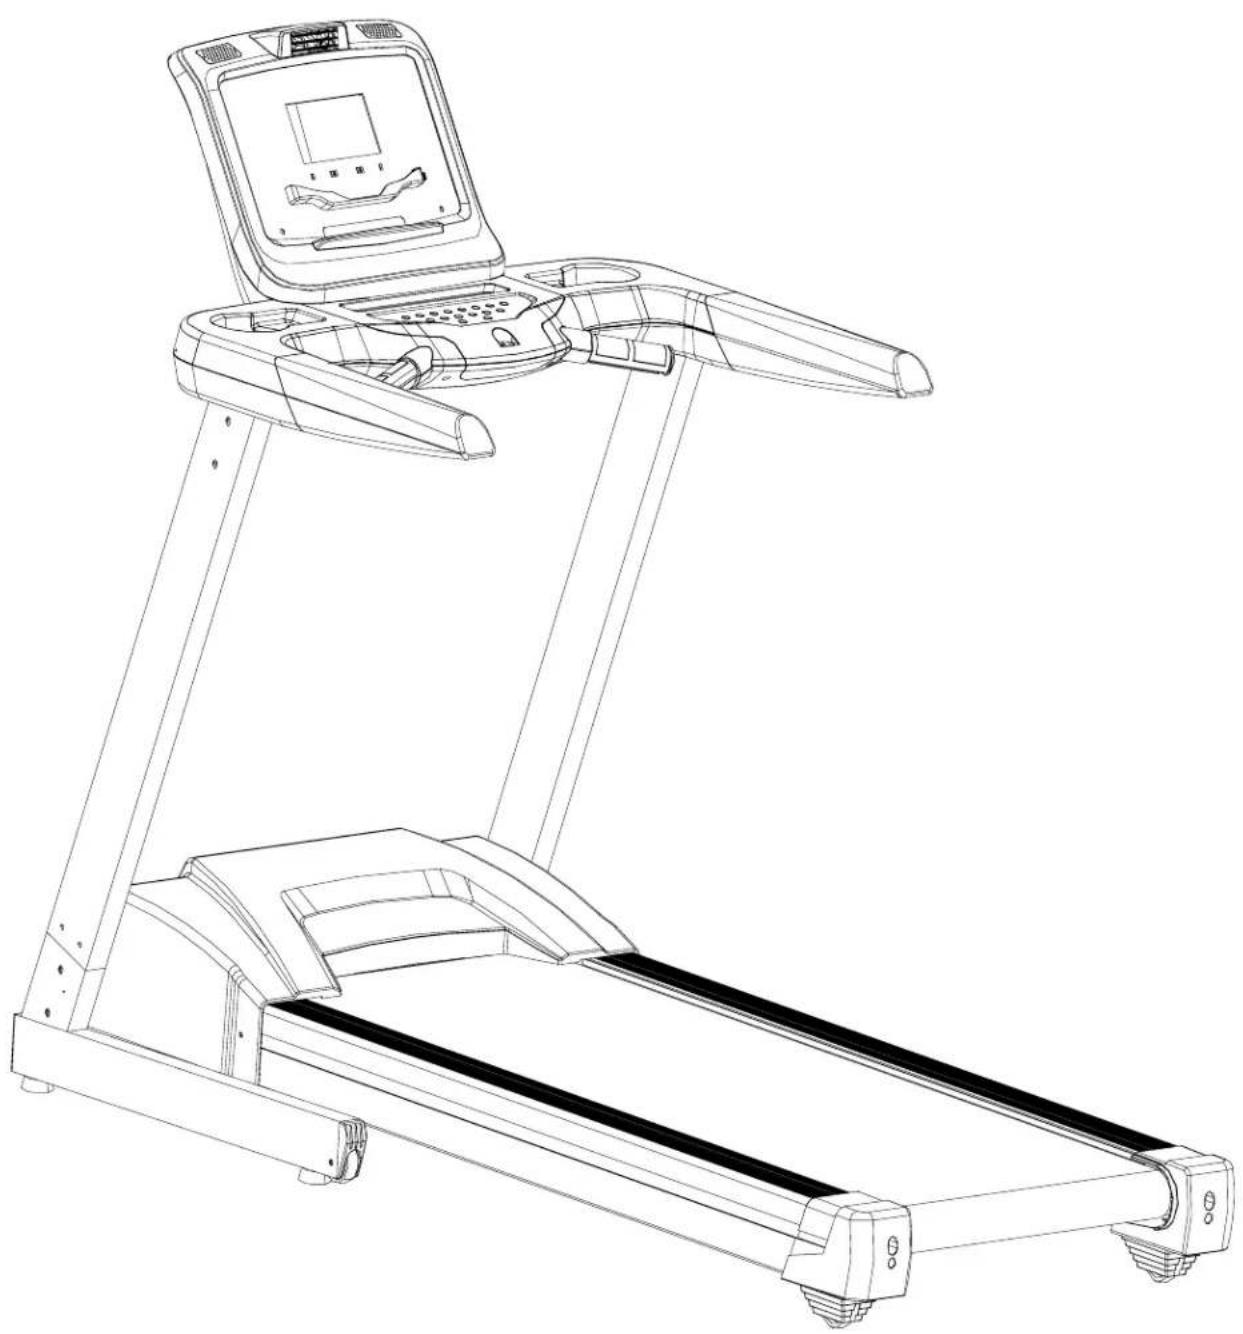
The assembly of this product requires two or more people. When assembling the uprights, one person should hold the uprights to prevent them from falling.
ASSEMBLY INSTRUCTIONS
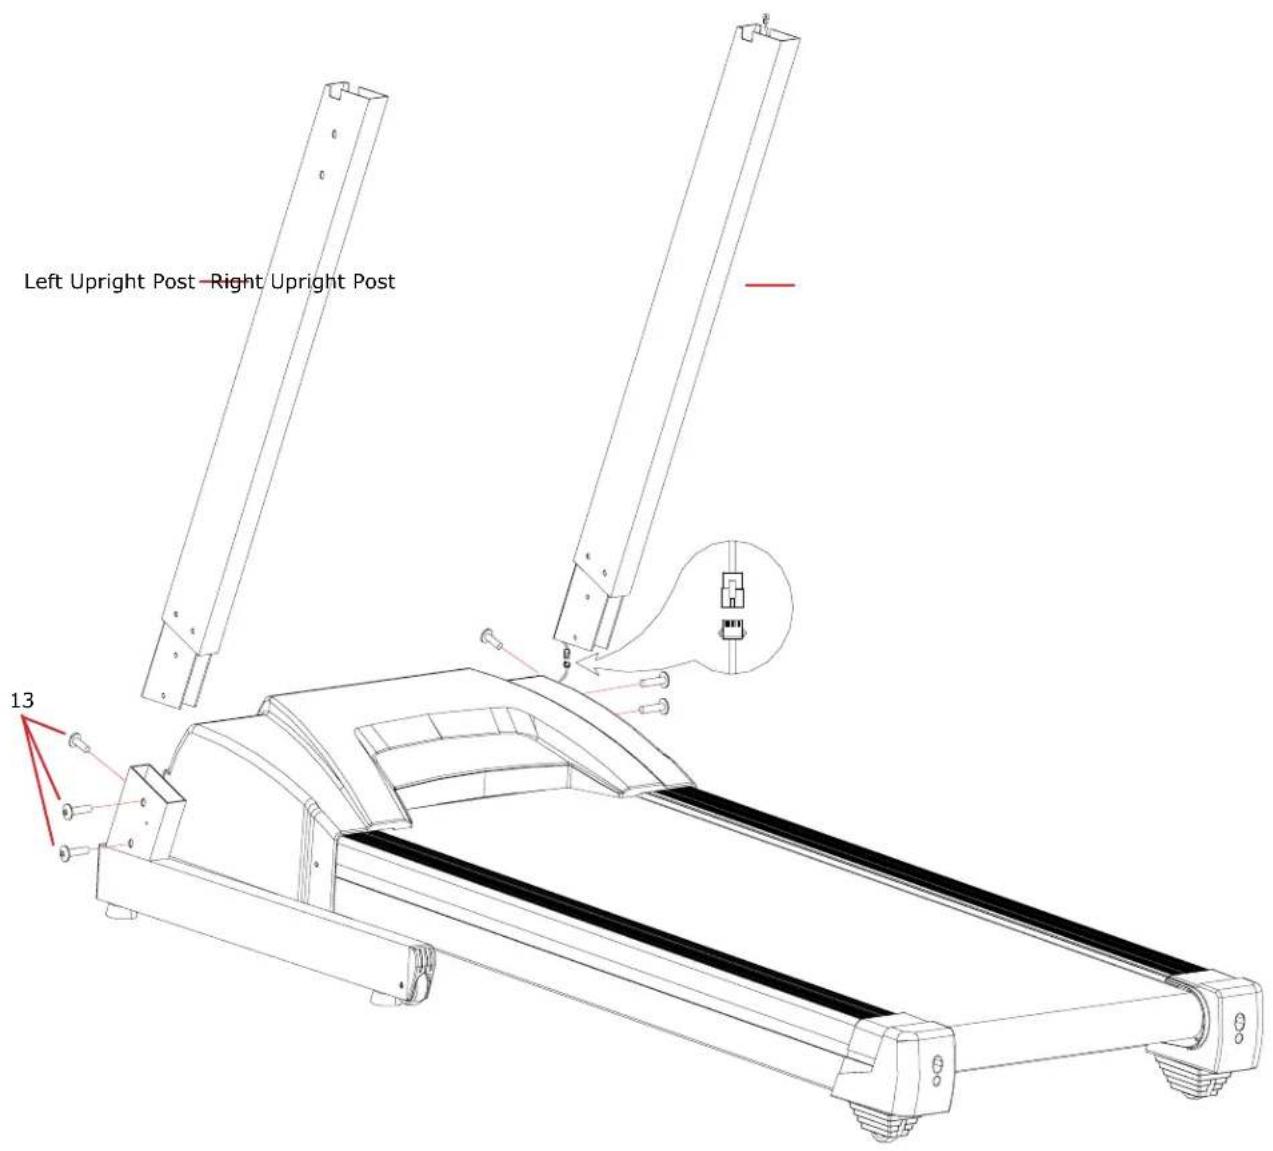
STEP 1 (this step will require two people)
Take the treadmill and the parts from the carton. Take the right upright post and connect the wire on the bottom of the post with the wire in the bracket at the front right of the machine. After connecting the wires, slide the right upright post into the right bracket. Make sure not to pinch the wires. Take the left upright post and place it in the left bracket. Secure the posts with 6 pcs of Screws (13). Leave them hand tight.
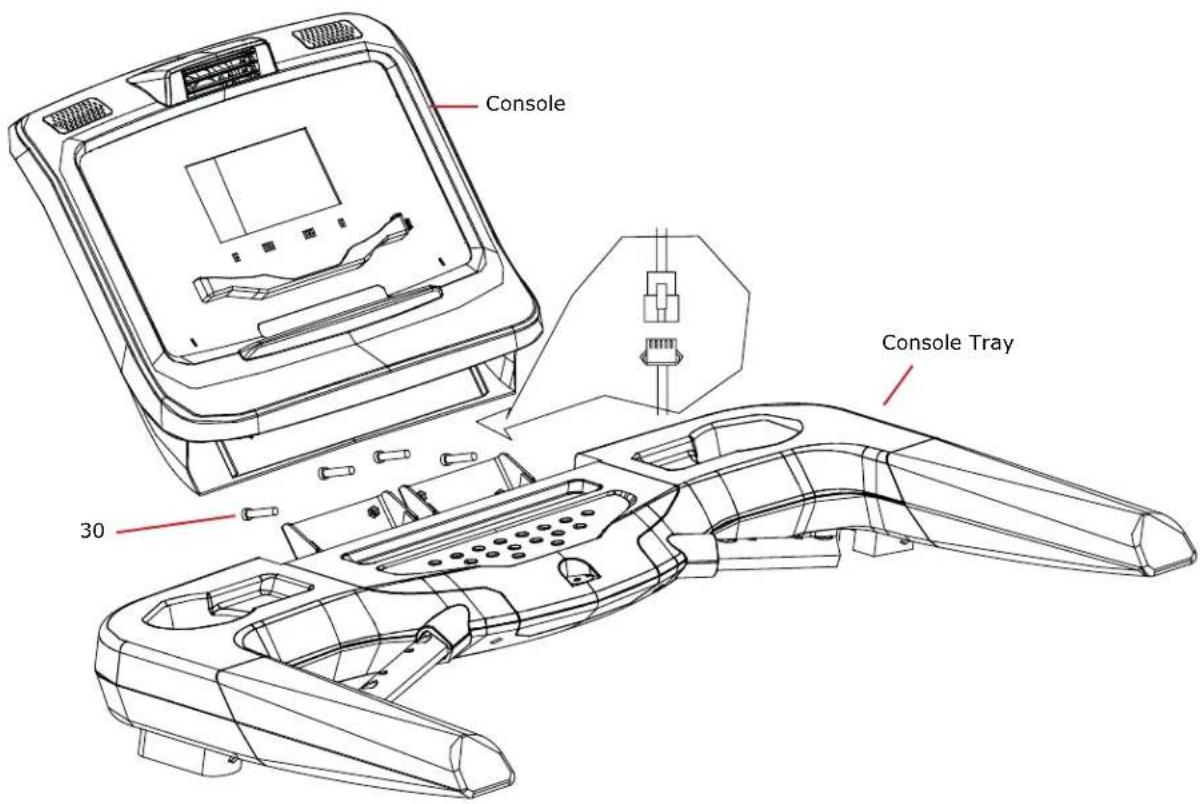
STEP 2
Connect wires from the console to the wires from the console tray. After connecting the wires, tuck them into the console. Secure the console housing with 4pcs of Screws (30). Make sure not to pinch the wires when tightening down the console.
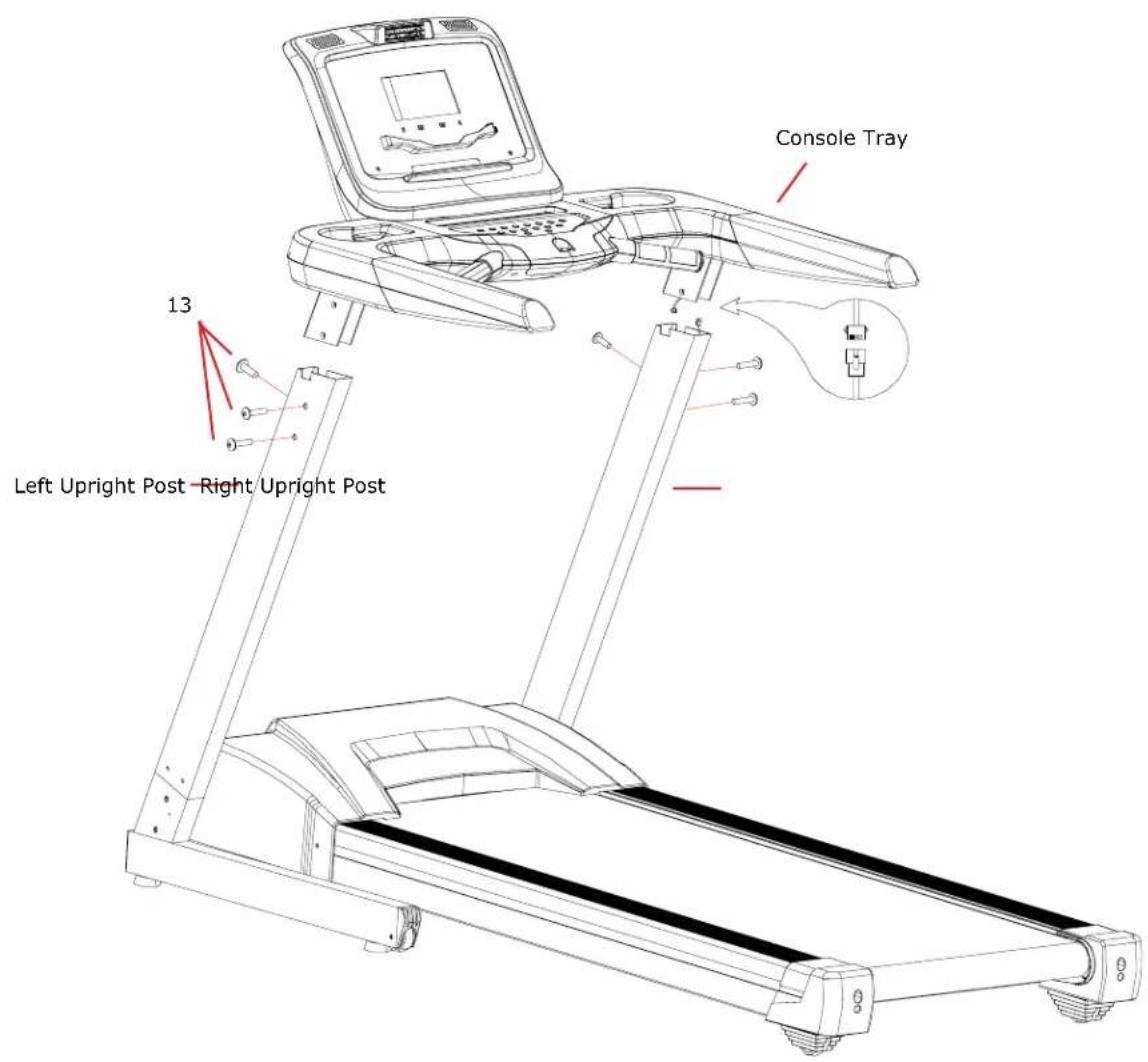
STEP 3 (this step will require two people)
Connect the wire in the right upper end of the upright post with the wire from the bottom right console tray bracket. Slide the left and right console tray brackets into the upright posts. Align the holes in the console tray brackets with the upright post holes and secure them with 6pcs of Screws (13).
TIP: If you are having trouble getting the console tray into the upright posts, make sure that the screws at the bottom of the upright posts are loose. This gives some play in the upright posts and you can seat the console tray more easily.
STEP 4
Tighten the screws on the upright posts where they connect to the frame and console tray. There should be 12 total screws. Once you have done that, installation is complete.
BELT ADJUSTMENTS
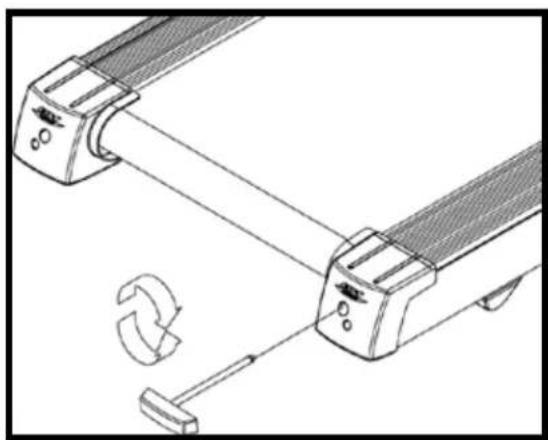
To adjust the running belt, stop the treadmill, then use the Hex Wrench and adjust the Hex Screw located in the Rear End Cap. If the running belt is moving towards the left side, tighten the left Hex Screw about 1/4 turn (clockwise); if the running belt is moving towards the right side, tighten the right Hex Screw about 1/4 turn (clockwise); Turn the treadmill on after it has been adjusted. If you find that the belt has not moved to the proper position, please repeat the steps above. Don't use the treadmill until the running belt returns to the center position.
The position of running belt might not stay precisely in the center, it can and will shift slightly towards the left and right sides, however, you do not need to adjust the belt if it is not rubbing against the side rails.
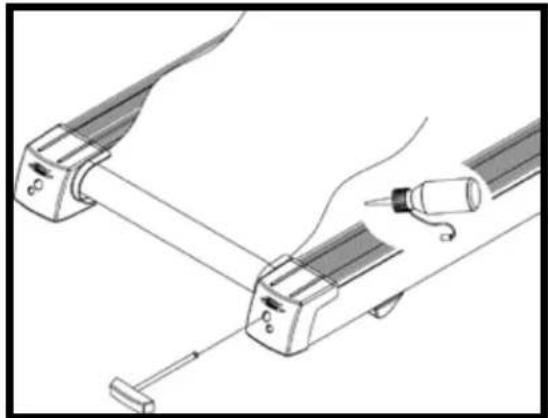
Depending on the usage of the product, please apply silicon according to the chart to the right. Use the Hex Wrench to unscrew the bolt inside the Rear Roller. Then pull the belt up and put some silicon to the center of the board. After that, adjust the belt to the center of the deck, followed by tightening the screw to the original set.
When the belt is sliding, please follow the above method to lubricate the running board.
Silicon Chart
| KGS/LBS Speed Interval | ||
| KGS | 6KM/hr Below | 1 year |
| 6~12KM/hr 6 | months | |
| 12KM/hr Above | 3 months | |
| LBS | 4mile/hr Below | 1 year |
| 4~8mile/hr 6 | months | |
| 8mile/hr Above | 3 months | |
| Note: This maintenance is intended for household use. If used for business, it is suggested to examine the product every other month. | ||
CONSOLE OPERATIONS
GETTING STARTED: SWITCHING FROM MPH TO KM AND VICE VERSA
- When taking out the safety key, E-07 will appear on the screen. Press the PROGRAM and MODE button at the same time.
- MPH (M) and KM (KM) will appear on the screen. Choose according to preferences.
- Release the PROGRAM and MODE buttons. The screen will light up and the E07 will once again, appear on screen.
- Place the safety key back in the treadmill to start the machine operation.
QUICK START
- The LCD will display the following:
Distance, Time, Speed, Calories, Heartbeat, Incline. - To QUICK START: Stop > Program > Press any of these buttons: Speed+, Speed-,
Incline+, Incline-, Fan, ECO, Instant speed keys button: 2/6/10M/H, and
Instant incline keys: 4,8,12%.
BUTTON DESCRIPTIONS
A. P01-P02-P03-P04-P05-P06-P07-P08-P09-P10-P11-P12-HRC-Program: When treadmill stops, press 'Program' to choose 'Manual-P01-P02-P03-P04-P05-P06-P07-P08-P09-P10-P11-P12-HRC-Body fat' programs in a circle.
B. Mode: please refer to below 'body fat function' description.
C. Stop: Stop the treadmill.
D. Speed+: While setting a program, this button will increase a setting value and when the motor is running, it is used to increase the running speed.
E. Speed-: While setting a program, this button will decrease a setting value and when the motor is running, it is used to decrease the running speed.
G. Incline+: Increases the incline angle
H. Incline-: Decreases the incline angle
I. Instant SPEED keys: provides an instant and easy speed change to 2/6/10M/H
J. Instant INCLINE keys: provides an instant and easy incline change to 4,8,12%.
K. Fan: turns fan off/on
L: Start: on/off ECO function.
CHOOSING AND STARTING A PROGRAM
- Program description:
A. One Manual program: Normal, time count-down, calories count-down, distance count-down.
B. P01, P02, P03, P04, P05, P06, P07, P08, P09, P10, P11, P12:12 pre-set programs.
C. One body fat program.
D. One HRC program.
- How to start:
A. Place the safety key in place. The LCD screen will light up for 2 seconds, the beeper will then make a sound. You can now enter into the Manual Program mode.
B. Press 'START'. To start without any settings, press "QUICK START", and the time window will display: 3-2-1, then the treadmill starts.
MANUAL PROGRAM MODE
- Entering into the manual mode:
A. Press the ON switch. Manual mode is the default mode setting, so it will be the first screen you will encounter.
- Time, Distance, and Calorie Setting:
A. When entering into the manual program, the time window will display 0:00
B. Under the Manual program, press 'Mode' to enter into Time count-down mode. The time window flashes and the initial value is 30:00. Press 'Speed+/ Speed-' to set the desired exercise time. The range is 5:00-99:00 minutes.
C. Under the TIME count-down mode, press 'Mode'. This takes you to the CALORIES count-down mode. The initial calorie value is 50kal. Press the 'Speed+/Speed-' to set the calories range: 5-999 calories.
D. Under the CALORIES count down mode, Press 'Mode'. This takes you to the DISTANCE count-down mode, and the initial value is 1 mile. Press 'Speed+/Speed-' to set the desired distance. The range is 1-99 miles.
- Operating the Manual Mode:
A. Press start, after 3 seconds, the machine will start at an initial speed of 0.6MPH
B. Press Speed + / - to adjust the speed.
C. Press Incline + / - to adjust incline.
D. Press the "STOP" button to stop the treadmill.
E. Press INSTANT SPEED keys to set speed.
F. Press INSTANT INCLINE keys to set incline.
G. For an emergency stop or to stop immediately, pull off the safety key. The screen
will display: E07 while the beeper will make a sound. This machine will come to a complete stop within 3 seconds.
H. When the count down hits zero for time, speed, calories, and distance all halt and the display will read "END". This means that the countdown is complete.
PROGRAM
- Initial time is 30:00, time range: 5:00-99:00 minutes. Press speed +/- button to adjust time.
- Press 'start', and the treadmill starts at the preset speed.
- Press speed + / - to adjust speed.
- Press incline + / - to adjust incline.
- Press the instant speed keys to set speed instantly.
- Press the instant incline keys to set incline instantly.
- Each program is divided into 10 segments, every segment lasts 1 / 10 of total time.
- The machine will make a sound when entering into the next segment.
- Press the stop key to stop the treadmill.
- When the time counts down to zero, the speed will slow down to zero, and the console will display 'End'.
BODY FAT PROGRAM
- When on the main screen, press the 'PROGRAM' key to navigate to the BODY FAT function.
- The distance window will display the setting value, and the calories window will display the parameter.
- SETTING GENDER: After entering into body fat function, calories window will display: 01 (gender: male), and can be changed into 02 (gender: female) by pressing the UP/DOWN Speed buttons.
- SETTING AGE & CALORIES: Press Mode to set age, calories window will display:02, distance window will display 25(years old), These can all be adjusted by pressing the UP/ DOWN Speed buttons.
- SETTING HEIGHT: Press Mode to set height, calories window will display: 03, distance window will show: 68(inches), press the UP/DOWN Speed buttons to adjust height (40-80inches).
- SETTING WEIGHT: Press Mode to set weight, calories window will display: 04, distance window will show 154 pounds, press the UP/DOWN Speed buttons to adjust the weight (44-330 pounds)
- BODY FAT RATE: Press Mode to enter into body fat function, calories window will
display: 05, distance window will show 00 (body fat rate). To display the body fat rate: place two hands on the handle pulse sensor for about 8 seconds, distance window will then show the user's body fat rate.
- To start the fan, press the on/off fan button. It can also be turned off when the safety key is removed and placed back again, as well as pressing the STOP button.
PARAMETERS
| Time (minute:second) | Initial value Set initial value | Setting range Display range | |
| Time 0:00 30:00 5:00-99:00 | 0:00-99:59 |
PROGRAM PARAMETERS: M/H
| Speed MH 0.0 N/A | N/A | 0.6-12 | ||
| Incline (%) | 00 | N/A | N/A | 00-15 |
| Distance(KM) | 0.0 1.00 | 1-99 | 0.0-99.9 | |
| Calories(Cal.) | 0 | 50 | 50-999 | 0-999 |
| P1 | P2 | P3 | P4 | P5 | P6 | |||||||
| Golf Course Walk | Interval (Beginner) | Interval (Intermediate) | Interval (Advanced) | Interval (Professional) | Calorie Burner | |||||||
| No. | Speed | Incline | Speed | Incline | Speed | Incline | Speed | Incline | Speed | Incline | Speed | Incline |
| 1 | 1.8 | 0 | 1.2 | 0 | 1.2 | 0 | 2 | 0 | 2.5 | 0 | 2.5 | 3 |
| 2 | 2.2 | 0 | 1.2 | 0 | 3.1 | 0 | 4.3 | 0 | 6.5 | 0 | 3 | 4 |
| 3 | 2.5 | 1 | 3.1 | 2 | 5.6 | 4 | 7.2 | 5 | 9.5 | 6 | 3.5 | 5 |
| 4 | 2.5 | 4 | 1.2 | 0 | 3.1 | 0 | 4.3 | 0 | 6.5 | 0 | 4 | 6 |
| 5 | 2.5 | 3 | 3.1 | 2 | 5.6 | 4 | 7.2 | 5 | 10 | 6 | 4.5 | 7 |
| 6 | 2.5 | 3 | 1.2 | 0 | 3.1 | 0 | 4.3 | 0 | 6 | 0 | 4.5 | 8 |
| 7 | 2.5 | 4 | 3.1 | 2 | 5.6 | 4 | 7.5 | 5 | 10.5 | 6 | 4.5 | 9 |
| 8 | 2 | 2 | 1.2 | 0 | 3.1 | 0 | 4.3 | 0 | 6 | 0 | 4.5 | 10 |
| 9 | 1.8 | 1 | 3.1 | 2 | 5.6 | 4 | 7.5 | 5 | 10.5 | 1 | 4.5 | 11 |
| 10 | 1.2 | 0 | 1.2 | 0 | 2 | 0 | 2 | 0 | 2 | 0 | 1.8 | 0 |
| P7 P8 P9 P10 P11 P12 | ||||||||||||
| Weight Loss(Beginner) | Weight Loss(Intermediate) | Hill Run Hill | Climb Rolling Hills Speed Run | |||||||||
| No. Speed | Speed Incline | Speed Incline | Speed | Incline Speed | Speed Incline | Speed Incline | Speed | Incline | ||||
| 1 2 0 | 3 1 3.2 0 1 | 2 0 1.2 0 | 3 0 | |||||||||
| 2 2.5 | 1 3.5 2 3.7 | 1 1.7 1 3.1 | 1 1 4 0 | |||||||||
| 3 3 1 | 4 2 4.2 2 2 | 2 2 4.3 2 | 5 0 | |||||||||
| 4 3.5 | 2 4.5 3 4.7 | 3 2.7 3 5.6 | 6 3 6 0 | |||||||||
| 5 4.5 | 3 5.5 4 5.2 | 4 3.2 4 6.8 | 8 4 7 0 | |||||||||
| 6 5.5 | 4 6.5 5 5.7 | 5 3.7 5 3.1 | 1 3 8 0 | |||||||||
| 7 4.5 | 3 5.5 4 6.2 | 6 4.2 6 4.3 | 3 2 9 0 | |||||||||
| 8 4 2 | 4.5 3 6.7 7 | 4.7 7 5.6 | 2 10 0 | |||||||||
| 9 3.5 | 1 3.5 2 7.2 | 8 5.2 8 3.1 | 1 1 1 0 | |||||||||
| 10 3 0 | 1.8 1 1.8 | 0 1.2 0 1.8 | 0 1.5 0 | |||||||||
SETTING INFORMATION
- Age setting: 15-80 years old.
- (220-AGE) X 0.9. Target heart rate setting: 80: (220-AGE) X 0.9
- Maximum heart rate can not exceed the limit:220-AGE.
- Heart rate minus=target heart rate-user's heart rate
- HRC program only acknowledges a wireless heart rate. When a user uses hand pulse the HRC program will not recognize.
- The incline will not change when running, it can be user-defined.
SETTING THE HRC PROGRAM
- Press program to choose HRC program while the treadmill is not running. The program window will show HR. It has entered into the HRC program when window shows 13. Press the speed +/- button to set the time, when the time value flashes in the HRC program it will show "30:00" Minutes. The time range is 5-99 minutes.
- Under the time setting, press Mode to set age, the time value will then flash to show age 25. Press the speed +/- button to set the age of the user. The age range is 15-80 years old.
- Press Mode to set target heart rate, the time value will flash to show a sport target heart rate. Press the speed +/- button to set the sport target. The range is 80-(220-AGE) X0.9.
- Press Mode to set time.
- Press START to operate.
OPERATING THE HRC PROGRAM
- Press the START key to run. The initial speed will be 0.6 MPH, while the initial incline is 0.
- Treadmill will run for 1 minute within a speed of 0.6MPH
- After 1 minute, calculate the heart rate minus (target heart rate-user's heart rate), comparing with 30:
A: (target heart rate-user's heart rate) >30 , speed will increase 1.2 MPH.
B: (target heart rate-user's heart rate) < 30 , speed will increase 0.6 MPH.
C: (user's heart rate-target heart rate) >30 , speed will reduce 1.2 MPH.
D: (user's heart rate-target heart rate) < 30 , speed will reduce 0.6 MPH.
- The machine will do this evaluation every 30 seconds.
- If the user's heart rate exceeds (220-AGE), the speed will slow down to 0.6 MPH immediately and run for 15 seconds. An alarm will sound every second, then the treadmill will stop.
- If the pulse handle is not in use, the speed will not change. If after two 30 second evaluations and there is no heart rate signal detected, the speed will slow down to 0.6MPH and run for 15 seconds with an alarm every second until stopped.
COMMON ERRORS AND SOLUTIONS
| PROBLEM POSSIBLE CAUSE SOLUTION | ||
| Treadmill does not work | a . No connected to power supply | Plug into socket |
| b. Safety key not inserted Insert safety key | ||
| c. Signal not being received Check connections to lower control board | ||
| d. Treadmill is not on Switch on | ||
| e. Fuse is broken Change the fuse | ||
| Belt does not run properly | a. Running belt needs lubrication | Lubricate board with silicon |
| b. Running belt is too tight Adjust running belt | ||
| Belt is slipping | a. Running belt is too loose Adjust running belt | |
| b. Motor belt is too loose Adjust the motor belt | ||
1. ELECTRONIC ERROR: E01
A: E01: The lower control board is having difficulty communicating with the console.
B: Solution: Check the 4 lines that connect the console and see if they are connected properly.
Check for pinched, damaged, or loose cables. Secure the cable connections if they are loose, replace the cables if damaged.
2. ELECTRONIC ERROR: E02
A: E02: The lower control board does not detect motor voltage.
B: Solution: Check the + and - connection wires. Make sure they are connected to the + and - terminals and that the wires are not damaged.
3. ELECTRONIC ERROR: E03
A: E03: No speed signal is detected
B: Solution: Check to see if the speed sensor is connected securely. Check to see if the sensor is in line with the magnet on the motor and the gap between them is 3 - 5mm . If the problem persists, change the speed sensor.
4. ELECTRONIC ERROR: E05
A: E05: Motor current is over limited.
B: Solution: Visually inspect the motor to see if it turns freely. Make sure that there is nothing obstructing the movement of the running belt on rollers. If the problem persists, change the motor.
5. ELECTRONIC ERROR: E06
A. E06: Incline Motor Problem
B. Solution: Recalibrate incline motor
6. ELECTRONIC ERROR: E07
A: E07: Safety key is not detected.
B: Solution: Make sure that the safety key is installed. If problem persists, replace the safety key.
DOWNLOADING APPS AND PAIRING YOUR DEVICE WITH YOUR EQUIPMENT
DOWNSLOADING THE SOFTWARE
Connect the Apple device with the App Store (iTunes) or your Android Device with Google Play, search for "Pafers", then read the APP introductions and Download the APPs with bicycle/elliptical machine functions to your device. Note: if you download an APP for a treadmill and pair it with an Elliptical it will not work.
- The App uses bluetooth mode, so please make sure the machine and device you are using has the optional DualKIT installed. See BH DualKit installation on this page.
- The App contains the following functions, the user must open a 3G network or wi-fi network:
(a) Managing Data - After completing the registration in the "Pafers" App, log on to your personal account. Now that you have registered you can record all of your workout data and save it to your device.
(b) Some APPs need connection to Google maps in order to function correctly.
BH DUALKIT INSTALLATION
- To Access iConcept compatible apps, an optional (purchased separately) BH DualKit Module is required.
INSTALLATION:
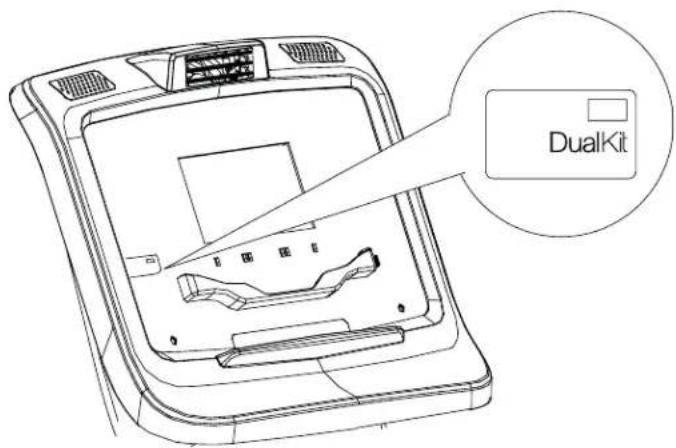
1.) There should be a blue square on the front of the console that says "DualKit". This is where the DualKit Module plugs in.
2.) Select the appropriate BH DualKit Module. On the front of the module, it will say the machine type and on the back of the module it will say if it is a SMART or CLASSIC type. There are 3 types of modules:
a.) Bike & Elliptical - Classic
b.) Treadmill - Classic
c.) BH DualKit - Works for all machine types
3.) Make sure the USB part is extended from the module.
- Push up on the sides of the DualKit Module (Fig. 1)
- The USB Port should extend out of the bottom of the module (Fig. 2)
4.) Push the module in the USB slot on the front of the console (Fig. 3)
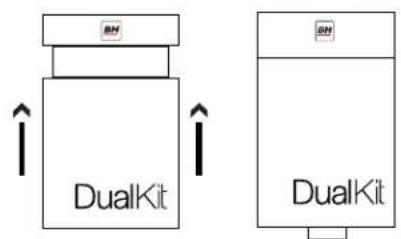
Fig.1 Fig.2 Fig.3
PAIRING THE BLUETOOTH DEVICE WITH AN APPLE DEVICE
- Place the Apple Device on the area in front of the LCD screen.
- Enter into settings and turn Bluetooth on.
- Your Apple Device will detect all Bluetooth devices within range (following on screen instructions), click on the appropriate bluetooth device name and confirm your connection.
- After pairing successfully, please start the APP within 2 minutes, if you do not, Bluetooth will automatically cancel the pairing. Please keep the Apple Device within a range of 2 meters for best quality connection. If you see "not connected," please perform the above steps again.
- Press the Apple Device home button, the screen will return to the desktop.
- Start the APP you downloaded. When the APP connects with the equipment successfully, the APP screen buttons will unlock. Start from APP interface using a variety of modes to control the exercise equipment. Pay attention to the APP instructions and function introduction. If you need help with the APP, please browse the APPs download page description or contact Pafers for instructions.
- When you are done using the APP, please press the HOME button on the Apple Device twice and close the APP.
PAIRING THE BLUETOOTH DEVICE WITH AN ANDROID DEVICE
- Place the Android Device on the area in front of the LCD screen.
- Enter into settings and turn Bluetooth on.
- Your Android Device will detect all Bluetooth devices within range (following on screen instructions), click on the appropriate bluetooth device name and confirm your connection.
- After pairing successfully, please start the APP within 2 minutes, if you do not, Bluetooth will automatically cancel the pairing. Please keep the Android Device within a range of 2 meters for best quality connection. If you see "not connected," please perform the above steps again.
- Press the home button, the screen will return to the desktop.
- Start the APP you downloaded. When the APP connects with the equipment successfully, the APP screen buttons will unlock. Start from APP interface using a variety of modes to control the exercise equipment. Pay attention to the APP instructions and function introduction. If you need help with the APP, please browse the APPs download page description or contact the third party for instructions.
- When you are done using the APP, please press main screen button on the Android Device twice and close the APP.
COMPATIBLE DEVICES
Android
Bluetooth & App Enabled Android Device
Apple Products
iPod touch (4th generation) iPod touch (3rd generation)
| iPhone | 5 | iPhone | 4S |
| iPhone | 4 | Mini | iPad |
| iPad | iPad | 2 |
BH Fitness i.Concept Bluetooth products are compatible with Apple devices with iOS 5.1 or later. It is recommended to update iOS to the latest version to obtain the best user experience.
iPad, iPhone, iPod classic, iPod nano, iPod shuffle, and iPod touch, is a registered trademark of Apple, Inc., in the United States and other countries.
"Made for iPod," "Made for iPhone," and "Made for iPad" mean that an electronic accessory
MAINTENANCE AND CLEANING
Care has been taken to assure that your equipment has been properly adjusted and lubricated at the factory. It is not recommended that the user attempt service on the internal components. Instead, seek service from an authorized service center. However, you may clean the outer surface. Use a soft cloth, dampened with warm water. Do not use aerosol sprays or pump bottles as they may deposit sediments upon the console surface. The use of harsh chemicals will destroy the protective coating and cause a static build-up that may damage the some of the components.
MACHINE INFORMATION AND RECOMMENDATION
- It is recommended that the machine run on a 15-20 A, 110 - 120V dedicated circuit.
- Equipment must be connected to electrical circuits with an earth/ground connection. If not, the user risks receiving an electric shock.
- Treadmills are not compatible with GFCI (Ground Fault Circuit Interrupt) plugs.
Each machine has a breaker that will engage at 15 Amps. - Power cord length is 72 inches (6ft)
SPECIFICATIONS
- Blue Backlit LCD Display
- Bluetooth Enabled i.Concept Technology
- Polar® Heart Rate Strap Compatible (Non Coded)
- Contact Heart Rate Grips
Cooling Fan
15 Built-in Programs - 22" x 57" Running Surface
0-12 MPH
0-12% Incline
3.5 HP Motor
2.5" Rollers
Ortho Cushion Belt
Active-Flex II Suspension
- Removable Water Bottle Holders
Max User Weight: 400 lbs.
- Treadmill Weight: 254 lbs.
- Step Up Height: 7"
Length (76in.) Width (37in.) Height (57in.)
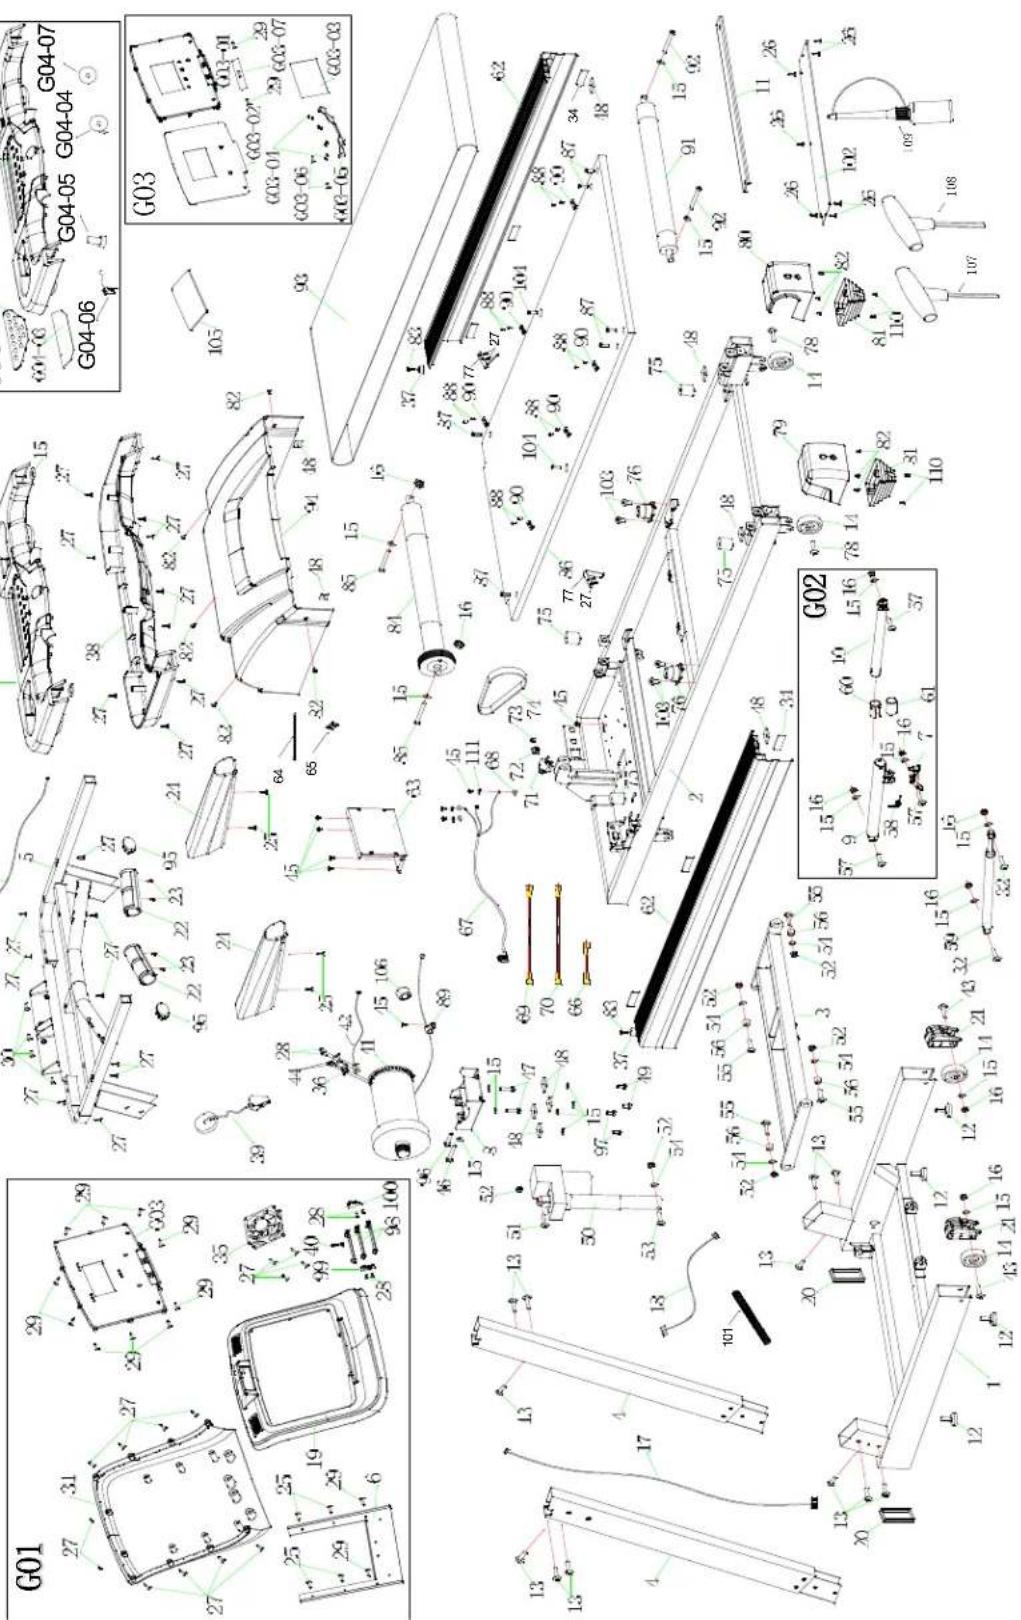
EXPLODED VIEW DRAWING
PARTS LIST
To order replacement parts: provide your customer service representative with the product model number and the part number located on the Parts List below, along with the quantity you require.
| No.DescriptionQtyNo.DescriptionQty | |||||
| S5TiB-1 Base frame 1 S5TiB-53 Allen C.K.S. half thread screw M10*65 1 | |||||
| S5TiB-2 Main frame 1 S5TiB-54 Flat washer Φ10 5 | |||||
| S5TiB-3 Incline frame 1 S5TiB-55 Aler C.K.S. half thread screw M10*55 4 | |||||
| S5TiB-4 Upright post ( L & R ) 2 S5TiB-56 Metal spacer 4 | |||||
| S5TiB-5 Computer frame 1 55 TiB-57 Allen C.K.S. half thread screw M8*40 3 | |||||
| S5TiB-6 Console bracket 1 S5TiB-58 Spring 1 | |||||
| S5TiB-7 Foot pedal release 1 S5TiB-59 Hydraulic 1 | |||||
| S5TiB-8 Motor base frame 1 S5TiB-60 Plastic bushing 1 | |||||
| S5TiB-9 External extension tube frame 1 S5TiB-61 Plastic bushing 1 | |||||
| S5TiB-10 Internal extension tube frame 1 55 TiB-62 Side rail 2 | |||||
| S5TiB-12 Adjustable foot 4 55 TiB-63 Lower control board 1 | |||||
| S5TiB-13 Allen C.K.S. full thread screw M8*15 12 55 TiB-64 Binder 12 | |||||
| S5TiB-14 Transportation wheel 4 55 TiB-65 Cable guide 4 | |||||
| S5TiB-15 Flat washer (Φ8) 22 55 TiB-66 Wire (red) 1 | |||||
| S5TiB-16 Self-fixing bolt M8 9 55 TiB-67 Power cord 1 | |||||
| S5TiB-17 Main cable L-1200 1 55 TiB-68 Washer Φ5 1 | |||||
| S5TiB-18 Controller cable L-800 1 55 TiB-69 Wire (red) 1 | |||||
| S5TiB-19 Console housing (front) 1 55 TiB-70 Wire (black) 1 | |||||
| S5TiB-20 End cap (front) 2 55 TiB-71 Breaker switch 1 | |||||
| S5TiB-21 End cap (rear) 2 55 TiB-72 Power switch 1 | |||||
| S5TiB-22 Handle pulse grip 2 55 TiB-73 Cable ring 1 | |||||
| S5TiB-23 Phillips C.K.S. self-tapping screw ST3*25 4 55 TiB-74 Motor belt 1 | |||||
| S5TiB-24 Foam grip (left, right) 2 55 TiB-75 Shock absorber Φ30×M6 4 | |||||
| S5TiB-25 Phillips C.K.S. self-tapping screw ST4*20 8 55 TiB-76 Cushion with holder 2 | |||||
| S5TiB-27 Phillips C.K.S. self-tapping screw ST4*16 46 55 TiB-77 Hex bolt 4 | |||||
| S5TiB-28 Phillips self-tapping screw ST3*10 6 55 TiB-78 Allen C.K.S. half thread screw M8*35*20 2 | |||||
| S5TiB-29 Phillips C.K.S. steel self-tapping screw ST4*12 12 55 TiB-79 End cap (Left) 1 | |||||
| S5TiB-30 Allen socket full thread screw M6*25 4 55 TiB-80 End cap (Right) 1 | |||||
| S5TiB-31 Console housing (rear) 1 55 TiB-81 Foot pad 2 | |||||
| S5TiB-32 Allen C.K.S. half thread screw M8*30 2 55 TiB-82 Phillips C.K.S. full thread screw M5*10 11 | |||||
| S5TiB-33 Cable L-700 1 55 TiB-83 Phillips C.K.S. full thread screw M5*15 2 | |||||
| S5TiB-34 Rail pad 6 55 TiB-84 Front roller 1 | |||||
| S5TiB-35 Fan 1 55 TiB-85 Allen socket head half thread screw M8*65 2 | |||||
| S5TiB-36 Sensor bracket 1 55 TiB-86 Running deck 1 | |||||
| S5TiB-37 Spacer 2 55 TiB-87 Allen countersunk full thread screw M6×30 6 | |||||
| S5TiB-38 Console tray (lower) 1 55 TiB-88 Phillips countersunk self tapping screw 2 | |||||
| S5TiB-39 Safety key 1 55 TiB-89 Cable guide 2 | |||||
| S5TiB-40 Clinker 1 55 TiB-90 Side rail guide 6 | |||||
| S5TiB-41 Motor 1 55 TiB-91 Rear roller 1 | |||||
| S5TiB-42 Speed sensor 1 55 TiB-92 Allen screw M8*75 2 | |||||
| S5TiB-43 Allen C.K.S. half thread bolt M8*50 2 55 TiB-93 Running belt 1 | |||||
| S5TiB-44 Phillips C.K.S. self-tapping screw 2 55 TiB-94 Motor cover 1 | |||||
| S5TiB-45 Phillips C.K.S. full thread screw M4*10 11 55 TiB-95 End cap Φ32 2 | |||||
| S5TiB-46 Allen socket full thread screw M8*50 1 55 TiB-96 Allen socket head full thread screw M8*40 1 | |||||
| S5TiB-47 Allen socket full thread screw M8*35 2 55 TiB-97 Allen C.K.S. full thread screw M8*20 2 | |||||
| S5TiB-48 Square cushion 9 55 TiB-98 Fan plate 3 | |||||
| S5TiB-49 Hex full thread bolt M8*20 2 55 TiB-99 Bracket (Left) 1 | |||||
| S5TiB-50 Incline motor 1 55 TiB-100 Bracket (Right) 1 | |||||
| S5TiB-51 Allen C.K.S. half thread bolt M10*45 1 55 TiB-101 Wire protector 1 | |||||
| S5TiB-52 Hex self-locking nut M10 6 55 TiB-102 Back cover 1 | |||||
PARTS LIST CONTINUED
| No.DescriptionQtyNo.DescriptionQty | |||||
| S5TiB-103 Phillips self tapping screw 12 S5TiB-G03-04 Clinker 8 | |||||
| S5TiB-104 Belt guide 2 S5TiB-G03-05 Ipad tray 1 | |||||
| S5TiB-106 | Choke Φ35×Φ22×t15.0 | 1 | S5TiB-G03-06 | Phillips C.K.S. full thread screw M5*15 2 | |
| S5TiB-107 T shape wrench 6mm 1 S5TiB-G03-07 MP3 socket cover | 1 | ||||
| S5TiB-108 | T shape wrench 5mm | 1 | S5TiB-G04 | Console tray assembly 1 | |
| S5TiB-109 Lubricant 1 S5TiB-G04-01 Console tray (upper) 1 | |||||
| S5TiB-110 Phillips screw 4 S5TiB-G04-02 Console overlay 1 | |||||
| S5TiB-G01 | Console Assembly | 1 | S5TiB-G04-03 | Console PCB 1 | |
| S5TiB-G03 | Console Board (PCB) | 1 | S5TiB-G04-04 | Safety key plate 1 | |
| S5TiB-G03-01 | Console Board | 1 | S5TiB-G04-05 | Safety key needle 1 | |
| S5TiB-G03-02 | Console board overlay | 1 | S5TiB-G04-06 | Safety key yellow sticker 1 | |
| S5TiB-G03-03 | Screen PCB board | 1 | S5TiB-G04-07 | Micro switch 1 | |
WARRANTY
LIMITED RESIDENTIAL WARRANTY
BH Fitness will repair or replace, free of charge, at its option, parts that are defective as a result of material or workmanship. Lifetime replacement warranty coverage on frame and motor. Ten (10) year on other parts. Labor warranty coverage is one (1) year. Warranty covers the original consumer purchaser only.
*Residential Disclaimer: Please note: The equipment that you are purchasing is intended for single-family home use only. Use of this equipment in a commercial environment shall void the warranty.
COSMETICS PARTS DISCLAIMER
For all products and all level of warranty, cosmetic parts shall be warranted for 1 year from date of purchase against manufactures defect. "Cosmetics" includes: External plastics, overlays/decals and covers.
THIS WARRANTY DOES NOT COVER
- Pre-delivery set-up.
- Components that require replacement due to dirt or lack of regular maintenance.
- Repairs necessary because of operator abuse or negligence or the failure to operate and maintain the equipment according to the instructions contained in the Owner's Manual.
For more detailed warranty information or to register your product warranty easily online, visit our website at: http://www.BHFitnessUSA.com
FOR WARRANTY REPAIRS, PLEASE DO NOT TAKE YOUR MACHINE BACK TO THE RETAIL STORE. CONTACT BH FITNESS FIRST.
BH North America Corporation
20155 Ellipse
Foothill Ranch, CA 92610
Phone: 949.206.0330; Toll Free: 866.325.2339; Fax: 949.206.0350
Web: www.BHFitnessUSA.com | Email: customersupport@bhnorthamerica.com
Mon - Fri 8am - 5pm PST
S5TiB
GUIDE D'UTILISATION
TOUTES NOS FÉLICITATIONS!
Keep hands and fingers clear of this area.
WARNING
- Misuse of this machine may result in serious injury.
- Read User's Manual prior to use and follow all warnings and instructions.
- Do not allow children on or around the machine.
- Reduce belt speed in a controlled manner.
The user weight.mwt. not exceed 350 lb./158.kg. - This product should always be used on a level surface.
- Replace labelf damaged, legible or removed.
Do not use this machine outdoors. - This treadmill folds. Please stand 5 feet away when treadmill is unfolding.
- Keep children away from treadmill when unfolding.
Let treadmill unfold on its own.
RENSEIGNEMENTS RELATIFS À LA SECURITE
PRECAUTIONS
CONSOMMATION D'OXYGENE
MODE DE PROGRAMME MANUEL
BH North America Corporation
20155 Ellipse
Web: www.BHFitnessUSA.com | Courriel: customersupport@bhnorthamerica.com