
TR36P - Swimming Pool POLARIS - Free user manual and instructions
Find the device manual for free TR36P POLARIS in PDF.
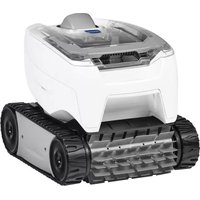
| Brand | Polaris |
| Model | TR36P |
| Product Type | 3-wheel hydraulic pool cleaner |
| Use | In-ground or above-ground pools with dedicated wall fitting |
| Power Source | Hydraulic via pool's filter pump |
| Main Functions | Vacuums, sweeps and scrubs surfaces (floor, walls, waterline) |
| Recommended Wheel Speed | 28 to 32 revolutions per minute (rpm) |
| Filter Bag | Zippered all-purpose bag, recommended to empty when half full |
| Included Parts | Body, bag, head float, sweep hose, Tail Sweep PRO, feed hose, floats, reverse valve, quick disconnect fitting, universal wall fitting, strainer, clamp, pressure tester |
| Routine Maintenance | Empty bag, clean strainer, backwash pool filter, check rpm |
| Safety | Do not swim or use pool while operating; remove before chemical treatment |
| Surface Compatibility | All surfaces, PosiTrax strips available for tile/fiberglass |
| Warranty | Limited warranty (details in manual) |
| Customer Service | 1-800-822-7933 (USA/Canada); www.polarispool.com |
Frequently Asked Questions - TR36P POLARIS
User questions about TR36P POLARIS
0 question about this device. Answer the ones you know or ask your own.
Ask a new question about this device
Download the instructions for your Swimming Pool in PDF format for free! Find your manual TR36P - POLARIS and take your electronic device back in hand. On this page are published all the documents necessary for the use of your device. TR36P by POLARIS.
USER MANUAL TR36P POLARIS
- Before installing the Polaris ^ cleaner,make sure the pool filter is clean.
- New plumbing lines should be flushed out before installing the Polaris cleaner.
- The Polaris cleaner should not be used to remove plaster dust in new pools.
- Always disconnect the cleaner before cleaning or backwashing the pool filter.
- After cleaning or backwashing, let the filtration system run for at least five (5) minutes before reconnecting the cleaner.
- Always remove the cleaner from the pool before chemical shock treatments, such as super oxidation or chlorination.
- Solar heating systems, ozone generators, and other air inducing equipment may cause air flow through the cleaner, adversely affecting cleaner balance and performance. Plumb the dedicated cleaner line upstream of these components.
- Highly chlorinated water can cause maintenance problems. Avoid running the Polaris cleaner while chlorinating.
For customer service or support:
- Please mail warranty card immediately.
For on-line support: www.polarispool.com
To contact Polaris: US and Canada
Customer Service
2620 Commerce Way
Vista, CA 92081-8438
1-800-822-7933

WARNING
To avoid risk of potentially serious injury:
- Do not handle the Polaris cleaner while it is operating, except when checking the wheel RPM.
- Always remove the Polaris cleaner before swimmers enter the pool.
CAUTION
USE OF THE POLARIS CLEANER IN A VINYL LINER POOL
Certain vinyl liner patterns are particularly susceptible to rapid surface wear or pattern removal caused by objects coming into contact with the vinyl surface, including pool brushes, pool toys, floats, fountains, chlorine dispensers, and automatic pool cleaners. Some vinyl liner patterns can be seriously scratched or abraded simply by rubbing the surface with a pool brush. Ink from the pattern can also rub off during the installation process or when it comes into contact with objects in the pool. Zodiac Pool Systems, Inc. is not responsible for, and the Limited Warranty does not cover, pattern removal, abrasion or markings on vinyl liners.
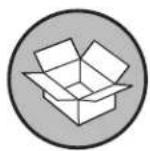
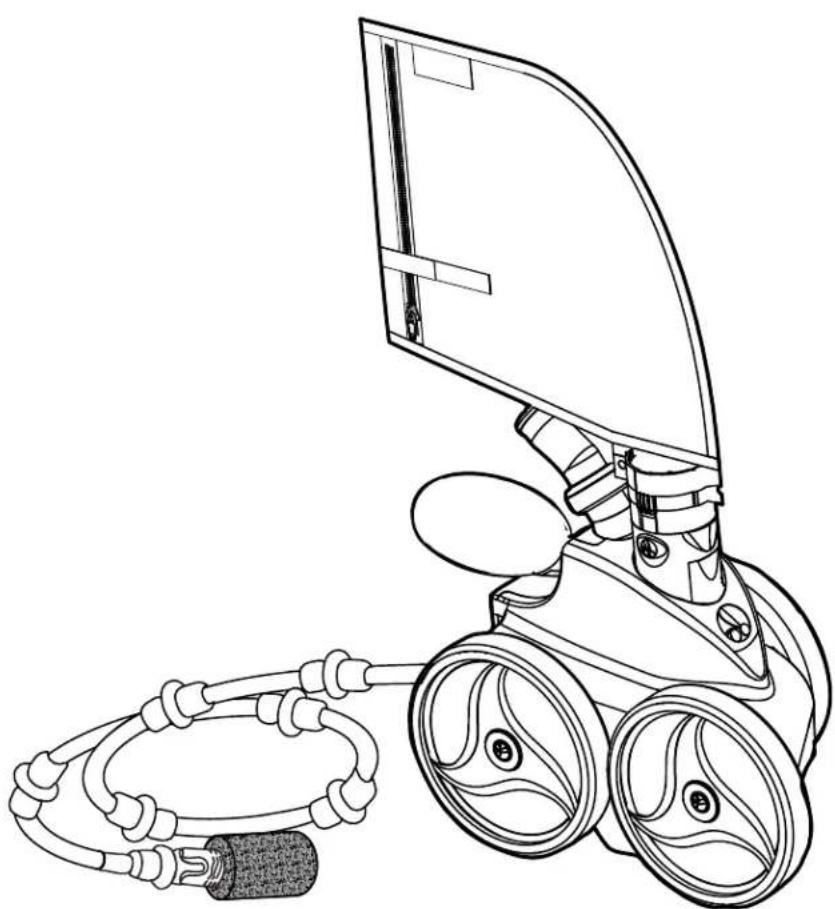
Included in the Box
a. Cleaner Body
b. All-Purpose Zipper Bag
c. Head Float
d. Sweep Hose
e. Tail Sweep PRO (with Sweep Hose Scrubber)
f. Feed Hose
g. Hose Float(s)
h. Back-up Valve
i. Quick Disconnect and Pressure Relief Valve
j. Universal Wall Fitting (UWF®)
k. Filter Screen, UWF/QD
I. Bag Collar
m. Pressure Tester
n. Bonus All-Purpose Zipper Bag
Tools Needed for Installation
- Scissors or garden shears
- Pliers
-
Tape measure
-
Piece of tape
UWF tool (optional part # 10-102-00)
Installing the Cleaner

Read the complete owner's manual before you begin installation.
1 Prepare the Pool
- Turn on the filtration pump for 2-3 minutes to flush out the plumbing lines.
- Turn off the filtration pump.
- Lay hose (f) out on the pool deck in sunlight to relax coils. This will reduce the risk of tangling during cleaning.
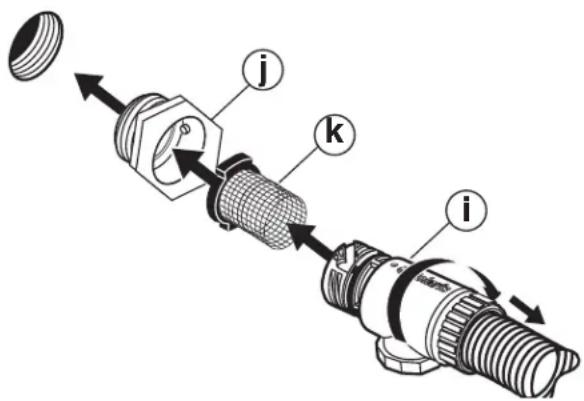
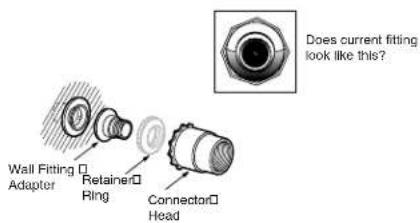
2 Install the Universal Wall Fitting
Purpose of installing the UWF: Once the UWF is properly installed, the Quick Disconnect can be removed each time without removing the UWF.
- Remove the Universal Wall Fitting (UWF) (j) from the end of the hose (f) and thread (by hand) into the dedicated return line opening in the pool.
- Make sure the filter screen (k) is firmly seated in the Quick Disconnect (i).
- Install Quick Disconnect into the UWF by turning clockwise (do not over-tighten), then pull to secure in place.
Multiple Return Lines? Polaris
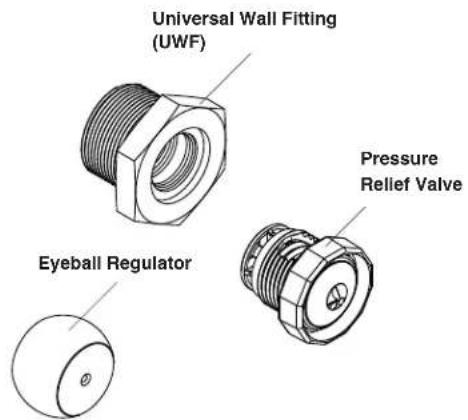
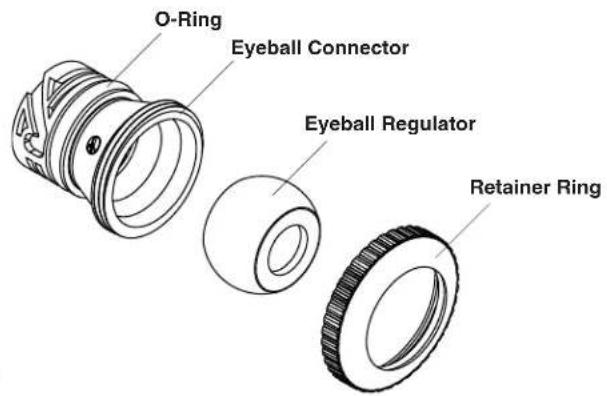
If your pool has two or three return lines, use the Eyeball Fitting Connection Kit (part #9-100-8001). This kit provides a Universal Wall Fitting (UWF) and pressure relief valve to be installed into the 2nd return line. Also included is an eyeball regulator, which will replace the existing eyeball if a 3rd return line is present.
Cleaner Removed from Pool?
Use the UWF Eyeball Fitting Kit (part #6-511-00) to restore proper water circulation when the cleaner is removed from the pool.
Installing Other Pool Connections
If the pool does not have a dedicated return line, the Polaris TR36P cleaner connects to most common return lines using special adapter kits available for purchase at a participating Polaris dealer.
For pools with plastic-pipe return lines (without pipe threads) that are cut off flush with the pool wall:
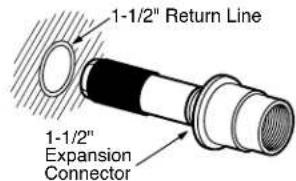
If pipe is 1" in diameter, use 1" Stub Pipe Connection Kit (part #9-100-8002)
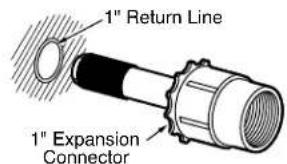
If pipe is 1-1/2" in diameter, use 1-1/2" Stub Pipe Connection Kit (part #9-100-8003)
For directional eyeball fittings that do not have a 1-1/2" threaded socket, request the Eyeball Adapter Connection Kit (part #9-100-8005)
If the UWF and Eyeball Regulators still cannot be installed on the pool, contact your dealer or Customer Service to determine which parts may be necessary.
Pool/Spa Connections Requiring Special Fittings
If a spa is connected to the pool filtration equipment, obtain expansion regulators in addition to one of the kits listed above. Contact your dealer or Customer Service to determine which parts may be necessary.
3
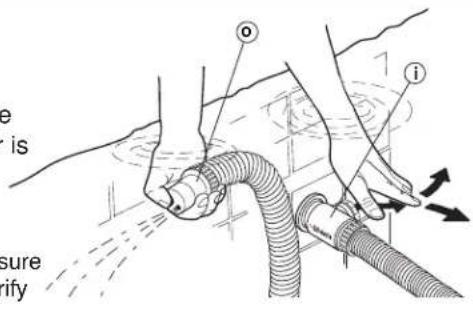
Test Water Pressure
- Turn on the filtration pump.
- With the hose connected to the UWF, hold the pressure tester (o) under water. Cover the large hole with your thumb and confirm water is releasing from the pressure relief valve (i).
NOTE: There are two holes in the end of the pressure tester. It is important to block the larger hole to verify pressure.
No water flow from pressure relief valve?
- If your Polaris ^ cleaner is connected to a dedicated cleaner line,adjust the diverter valve to increase the water flow to the cleaner.
- Make sure filter screen (k) is correctly positioned in Quick Disconnect.
- Check skimmer, pump basket, and main filter for debris restricting flow.
- If the Polaris cleaner is connected to one of multiple return lines, verify you have the correct Polaris return line connection kits installed (see page 5 of this manual).
4
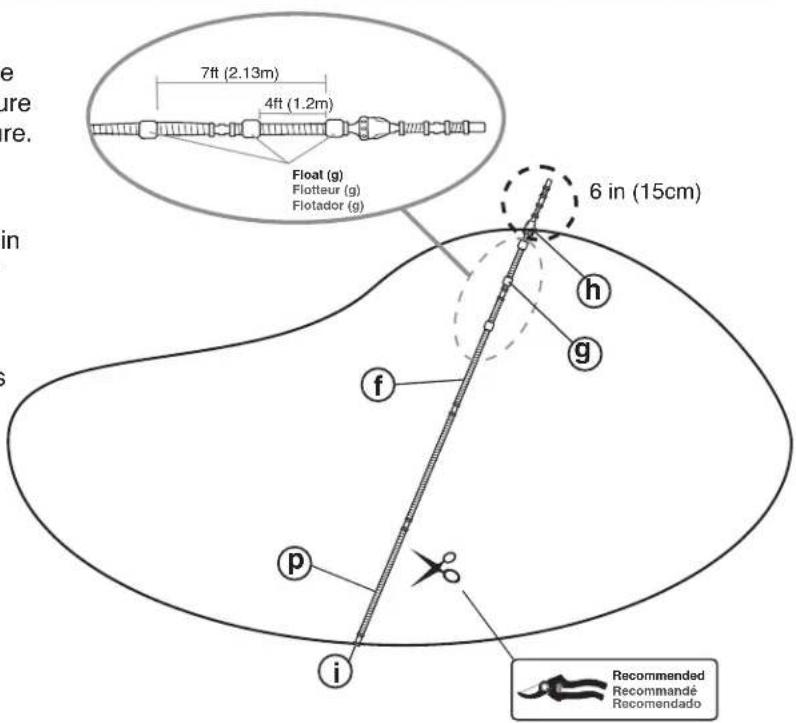
Adjust Hose Length
- Turn the pump on. Hold hose under water until the pressure relief valve releases pressure.
- Extend the hose to the farthest point of the pool. The hose end must be within 6 inches (15 cm), longer or shorter.
- Measure the hose with the pressure on and cut excess length from the first hose section (p). (This is the section connected to the Quick Disconnect (i).)
- Reconnect hose sections.
- After adjusting the hose length, position the three hose floats as shown.
Hose too short?
- Contact your local Polaris dealer. Buy a new hose section. Add to the first hose section (p) and cut until within 6 inches (15 cm).
5
Assemble the Cleaner
- Remove the pressure tester (o) by unscrewing the hose nut (q). NOTE: The hose nut has reversed threads.
- Use the same hose nut (q) and secure the hose to the cleaner body at the feed pipe.
- Pull the bag up and attach to the hose using the bag clip (n).
- Push the head float (c) all the way forward, up against the cleaner body.

Operating the Cleaner
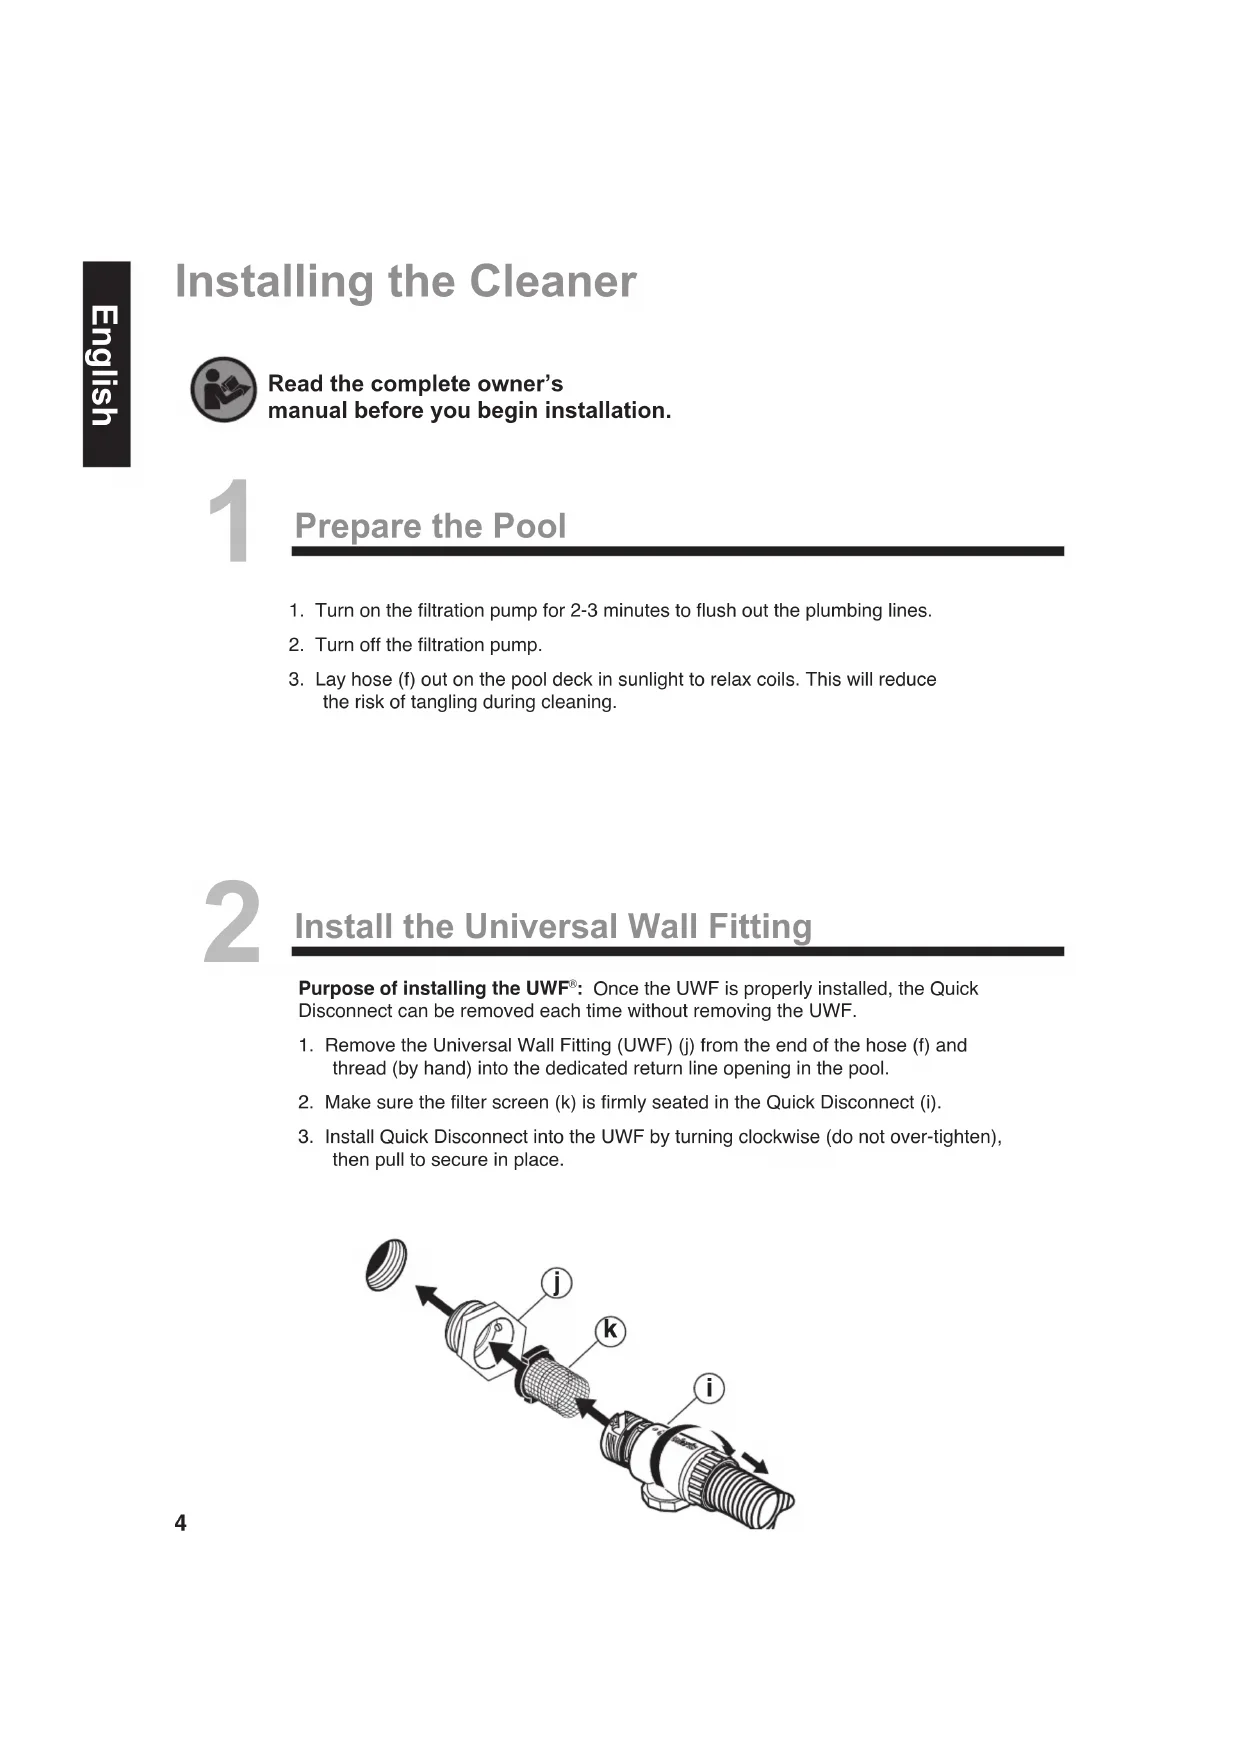
WARNING
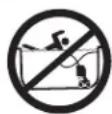
To avoid risk of potentially serious injury, do not swim or use the pool when the cleaner is submerged or operating.
1 Start the Cleaner
- Connect hose in the pool at the UWF
- Submerge the cleaner in the pool, allowing it to sink to the bottom.
- Turn on the filtration pump and allow it to prime. Cleaner will begin to move.
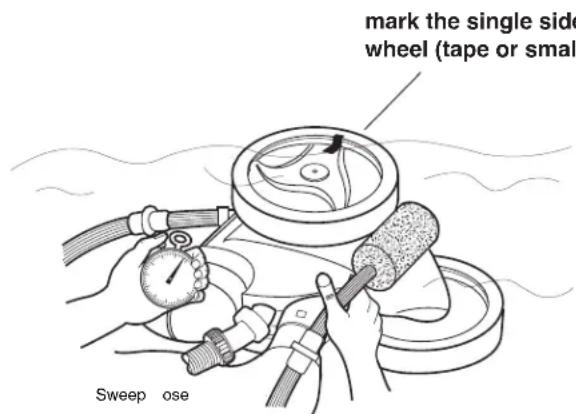
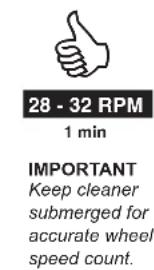
2 Check for Proper Wheel RPM
Before operating the Polaris cleaner, check for proper wheel revolutions per minute (RPM). For maximum efficiency, the Polaris should operate between 28 and 32 RPM.
- Mark the single side wheel using using a piece of tape (or a small leaf tucked into the tire).
- Turn the pump on, hold the cleaner below the water level and count wheel revolutions for one minute.
- Optimum wheel speed should be between 28 and 32 RPM.
3
Adjust the Wheel Speed
Wheel Speed less than 28 RPM?
- Check the filter screen in the Quick Disconnect for debris.
- Clean the skimmer, filter and pump basket.
- Check the hoses, connections, and swivel for leaks.
- If the cleaner is connected to a dedicated return line, adjust the diverter valve to increase water flow.
Wheel Speed more than 32 RPM?
- If the cleaner is connected to a dedicated cleaner line, adjust the diverter valve to reduce the water flow to the cleaner.
- Unscrew the pressure relief valve until proper RPM is reached. NOTE: For easier removal, use the Polaris® UWF® removal tool (Contact your local Polaris dealer, Part # 10-102-00).
Fine Tuning the Cleaner
When operating correctly, the Polaris® cleaner vacuums, sweeps and scrubs all surfaces randomly throughout the pool. The climbing ability depends on the pool's shape and water pressure or flow. The Polaris cleaner climbs best in pools without sharp angles or curves in the transition from the pool floor to the pool wall. Approximately every 3-1/2 minutes the Polaris cleaner goes into back-up mode. This action pulls the Polaris cleaner away from pool obstacles.
Fine tune your cleaner by adjusting the sweep hose or the thrust jet as necessary, for optimal operation.
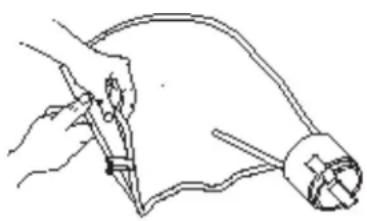
1 Adjust the Sweep Hose
The sweep hose should move in a gentle sweeping motion. To increase or decrease sweeping motion:
- Turn the filtration pump OFF.
- Turn the adjustment screw on the feed pipe (r) counterclockwise to increase sweep hose motion. Turn the adjustment screw clockwise to decrease motion.

Decrease motion

Increase motion
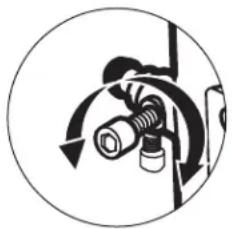
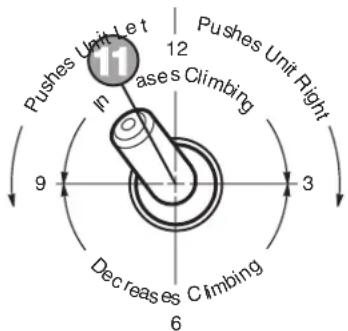
2 Adjust the Thrust Jet
If the cleaner is veering left or right instead of tracking straight, adjust the thrust jet (on the back of the cleaner body) for climbing walls or turning.
NOTE: Factory default setting is eleven o'clock. Only adjust thrust jet to accommodate unique pools shapes.
Routine Maintenance
Perform routine maintenance to prolong the life of your cleaner.
1 Empty the Bag
Empty the bag when it is half full, especially if the dirt load is mostly sand.
NOTE: It is easier to empty a dry bag. Remove the bag and let dry before emptying. Alternate between two bags while drying, so the cleaning cycle is not interrupted.
- Detatch the bag by releasing the prongs.
- Remove the bag tie collar from the feed hose.
- Open the closure and dump out the debris.
Backwash the Pool Filter
Backwash your pool filter periodically. Always disconnect the Polaris® cleaner from the pool wall before cleaning or backwashing the pool filter. After cleaning or backwashing, let the filtration system run for at least five minutes to flush out the return lines before re-connecting the Polaris cleaner.
3 Storage and Winterizing
NOTE: Never store the cleaner in direct sunlight.
To store the cleaner for the winter:
- Remove cleaner from the pool and drain all water to avoid freezing water damage (freeze damage is not covered under the warranty).
- Remove the UWF from the pool wall using the Quick Disconnect. Use a pulling pressure as you unscrew. If necessary, use the UWF Removal Tool (part #10-102-00) available from your local Polaris dealer.
Troubleshooting
| Problem Solution | |
| Hangs up on steps or other obstacles for longer than 3 1/2 minutes. | 1. Check the wheel RPM. 2. Verify the back-up valve is cycling. 3. Adjust the thrust jet. 4. Remove unnecessary pool hardware or install a Ladder Guard Kit (Part # G21) from a Polaris® dealer. 5. Check the bag and empty if needed. |
| Cleaner is sluggish, running with less power than normal. | 1. Check the filter screen in the Quick Disconnect and clean, if necessary. 2. Clean the skimmer basket, pump basket, and pool filter. 3. Check hoses, connections, and swivels for leaks that could cause loss of water pressure. 4. Check the wheel RPM (between 28 - 32). |
| Cleaner flies around the pool and/or does not make contact with the bottom. | 1. Check the wheel RPM. - If cleaner is connected to a dedicated return line with a diverter valve, adjust the valve to decrease water flow to cleaner. - If more than 32 RPM, unscrew the pressure relief valve to decrease water flow to the cleaner. 2. Verify the back-up valve is cycling. Hold the valve out of the water and watch the jet. It should come on and go off every 3 1/2 minutes. |
| Cleaner does not back up. | 1. Verify the back-up valve is cycling every 3 1/2 minutes. 2. Check the wheel RPM (between 28 - 32). 3. If the bag is full, empty it. 4. If the head float has water in it, replace it. 5. Make sure feed hose is floating. |
| Cleaner only turns in one direction. | Adjust the thrust jet. 2. Verify the feed hose assembly is floating properly. Waterlogged hose floats can cause the feed hose to sink. Older hoses may lose buoyancy, replace if needed. 3. If the end of the hose connecting to the cleaner has a curve, align it with the curve in the feed pipe. 4. Make sure that the swivel on the feed pipe turns freely. |
| Feed hose becomes tangled. 1. Remeasure the hose to verify that it is adjusted to the proper length for the pool shape. 2. With the Polaris cleaner operating, check that the swivels in the hose and the hose connections turn freely. 3. Make sure feed hose is floating. 4. With the Polaris® cleaner turned off, spin each of the wheels. All wheels should turn together. | |
| Sweep hose is sucked into the vacuum tube. | 1. Make sure the orifice at the end of the sweep hose is not blocked by the sweep hose scrubber. 2. Adjust the sweep hose to a gentle sweeping motion. |
| Sweep hose sprays too much water out of the pool. | 1. Verify the Tail Sweep Pro® is installed correctly. 2. Adjust the speed of the sweep hose by tightening the adjustment screw. |
| The cleaner does not clean the entire pool. | 1. Check the hose length reaches within 6" of the farthest point of the pool. If not, order a new hose section from your Polaris dealer. 2. Check thrust jet for 11 o' clock position that optimizes random turning. 3. With the pump running, turn the cleaner head upside down. Verify the three vacuum jets have consistent unobstructed flow. If not, contact Customer Service or a Polaris authorized Service Center for assistance. |
| The cleaner is running in circles on its side. | 1. Check filter bag, if full it can weigh the cleaner down on one side. 2. Remove the head float and shake it. If there is water in the float, order a new one. 3. The feed hose float should float evenly on the surface of the pool. |
| Cleaner does not climb walls. | Verify the wheel speed is 28 - 32 RPM. 2. Verify the thrust jet is in the 11 o'clock position. 3. Verify the head float is positioned all the way forward. 4. Verify the hoses have been cut correctly, following the instructions. 5. With the pump running, turn the cleaner head upside down. Verify the three vacuum jets have consistent unobstructed flow. If not, contact customer service or a Polaris® authorized service center for assistance. |
| Cleaner tires are slipping on tile or fiberglass pool surface. | 1. Verify your cleaner has Polaris PosiTrax® tires installed on all three wheels. Polaris PosiTrax tires are only for use on tile and fiberglass pool surfaces. 2. Verify the wheel speed is 28 - 32 RPM. |
| Wheels rotate less than 28 times per minute | 1. Verify the filter screen, pump baskets, and main filter are clean. 2. Verify there are no leaks in the cleaner hoses, swivels, or connectors. 3. If cleaner is installed on a dedicated cleaner line, adjust the diverter valve to increase flow to the cleaner. |
| Wheels rotate more than 32 times per minute | 1. If cleaner is connected to a dedicated cleaner line, adjust the diverter valve to reduce the water flow to the cleaner. 2. Unscrew the pressure relief valve on the UWF® connector assembly until RPM is between 28 and 32. |
Questions?
For replacement parts or additional troubleshooting questions, call or go online.
1.800.822.7933

www.polarispool.com
Zodiac Pool Systems, Inc.
2620 Commerce Way, Vista, CA 92081
1.800.822.7933 | www.polarispool.com
Polaris and the 3-wheeled cleaner design are registered trademarks of Zodiac Pool Systems, Inc. All other trademarks referenced herein are the property of their respective owners.
©2016 Zodiac Pool Systems, Inc. H0570700_REVC

Polaris®
TR36P
MANUEL DU PROPRIÉTAIRE
Avant de commencer: Informations importantes
Zodiac Pool Systems, Inc.
2620 Commerce Way, Vista, CA 92081
1.800.822.7933 | www.polarispool.com
Zodiac Pool Systems, Inc.
2620 Commerce Way, Vista, CA 92081
1.800.822.7933 | www.polarispool.com
Polaris® and the 3-wheeled cleaner design are registered trademarks of Zodiac Pool Systems, Inc.
All other trademarks referenced herein are the property of their respective owners.

- For customer service or support:
- WARNING
- CAUTION
- Included in the Box
- Tools Needed for Installation
- Installing the Cleaner
- Prepare the Pool
- Install the Universal Wall Fitting
- Multiple Return Lines? Polaris
- Installing Other Pool Connections
- Pool/Spa Connections Requiring Special Fittings
- 3
- Test Water Pressure
- No water flow from pressure relief valve?
- 4
- Adjust Hose Length
- Hose too short?
- 5
- Assemble the Cleaner
- Operating the Cleaner
- Start the Cleaner
- Check for Proper Wheel RPM
- Adjust the Wheel Speed
- Wheel Speed less than 28 RPM?
- Wheel Speed more than 32 RPM?
- Fine Tuning the Cleaner
- Adjust the Sweep Hose
- Adjust the Thrust Jet
- Routine Maintenance
- Empty the Bag
- Backwash the Pool Filter
- Storage and Winterizing
- Troubleshooting
- Questions?
- Polaris®
- TR36P
- MANUEL DU PROPRIÉTAIRE
- Avant de commencer: Informations importantes
Brand : POLARIS
Model : TR36P
Category : Swimming Pool