
PacVac 93012B - Vacuum Cleaner TORNADO - Free user manual and instructions
Find the device manual for free PacVac 93012B TORNADO in PDF.

| Product Type | Professional Backpack Vacuum |
| Brand | Tornado |
| Model | PacVac 93012B |
| Usage | Commercial, indoor only |
| Power Supply | 120 V ~ 60 Hz |
| Power Cord | 3-wire, 16/3 SJT, 127 cm (50 in.) |
| Filtration Type | HEPA filter + motor exhaust filter |
| Dust Bag | Reusable cloth bag + disposable paper bag (recommended) |
| Carrying Mode | Backpack, with adjustable shoulder straps and waist belt |
| Switch | On/Off on belt-mounted housing |
| Safety | Thermal circuit breaker, mandatory grounding, obstruction protection |
| Maintenance | Regular bag emptying, HEPA filter replacement every 6 months, exhaust filter every 4 bag changes |
| Included Accessories | Hose, extension wand, crevice tool, carpet tool, furniture brush, dusting tool, hard floor tool, gliding carpet tool |
| Motor Type | Powerful suction motor with thermal circuit breaker |
| Special Instructions | Do not use without bag or filter; do not pick up burning objects |
| Replacement Parts Reference | See manual: C352-2500 (paper bag), B352-2401 (HEPA filter), etc. |
Frequently Asked Questions - PacVac 93012B TORNADO
User questions about PacVac 93012B TORNADO
0 question about this device. Answer the ones you know or ask your own.
Ask a new question about this device
Download the instructions for your Vacuum Cleaner in PDF format for free! Find your manual PacVac 93012B - TORNADO and take your electronic device back in hand. On this page are published all the documents necessary for the use of your device. PacVac 93012B by TORNADO.
USER MANUAL PacVac 93012B TORNADO
Operations & Maintenance Manual
For Commercial Use Only
natural_image
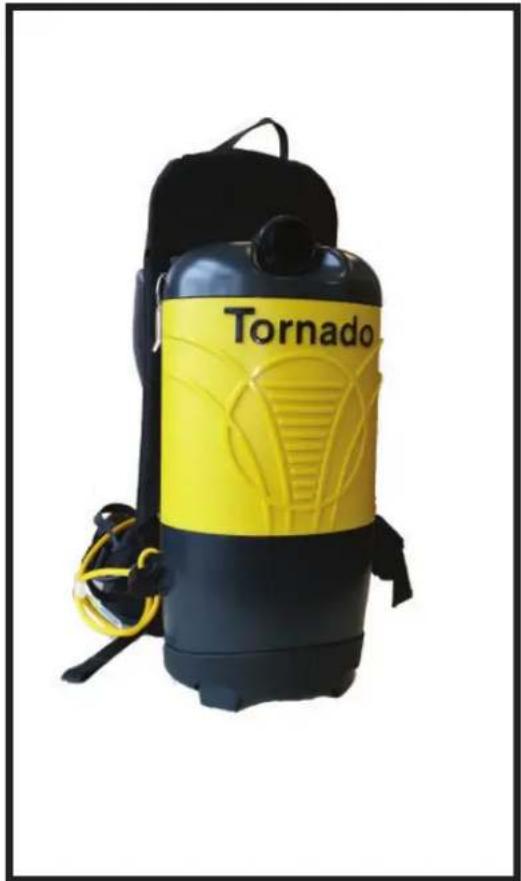
Tornado dust purifier with yellow and black casing, attached to a black bag (no visible text or symbols)Pac-Vac™ 6 Aircomfort/Pac-Vac™ 10 Aircomfort
MODEL NO: 93012B/93014B
NOTES
For warranty information go to www.tornadovac.com
IMPORTANT SAFETY INSTRUCTIONS
FOR COMMERCIAL USE
WHEN USING AN ELECTRICAL APPLIANCE, BASIC PRECAUTIONS SHOULD
ALWAYS BE FOLLOWED INCLUDING THE FOLLOWING:
READ ALL INSTRUCTIONS BEFORE USING THIS MACHINE
WARNING: TO REDUCE THE RISK OF FIRE, ELECTRIC SHOCK, OR INJURY:
- Do not leave machine unattended when plugged in. Unplug from outlet when not in use and before changing pads or attempting any maintenance or adjustment. If handle switch lever is activated accidentally, high starting torque will cause machine to move and may cause damage or injury.
- To avoid electrical shock, Use indoors only. Do not use outdoors and do not expose to rain.
- Do not allow to be used as a toy. Close attention is necessary when used by or near children.
- Use only as described in this manual. Use only manufacturer's recommended attachments.
- Do not use with damaged cord or plug. If machine is not working properly, if it was dropped, damaged, left outdoors, or dropped into water, return it to a service center.
- Do not pull or carry by cord, use cord as a handle, close a door on cord, or pull cord around sharp edges or corners. Do not run machine over cord. Keep cord away from heated surfaces. Do not unplug by pulling on cord. To unplug, grasp the plug not the cord.
- Do not handle plug or machine with wet hands.
- Keep hair, loose clothing, fingers, and all parts of body away from openings and moving parts.
- Turn off all controls before unplugging.
- Connect to a properly grounded outlet only. See Grounding Instructions.
- Do not put hands under base - rotating parts could cause injury.
• Always keep hands feet and loose fitting clothing away from moving parts to prevent possible injuries. - Use care to keep electrical supply cable from contacting moving parts, such as floor brushes or pads.
- Risk of explosion: Floor sanding can result in explosive mixture of fine dust and air. Use this machine only in a well-ventilated area, free from any flame or match.
- Do not use machine in areas where flammable and/or explosive vapors or dusts are present.
- To avoid fires do not use with a flammable or combustible liquid to clean a floor.
- Make sure voltage and frequency at the wall receptacle correspond with that indicated on nameplate before plugging in machine.
- Use only a 12 Ga. three-wire extension cable, which have 3-prong grounding type plugs and 3-prong receptacles that accept the plug of the machine.
- Use extra care when cleaning on stairs.
- Do not pick up anything that is burning or smoking such as cigarettes, matches, or hot ashes.
- Do not use without dust bag and/or filters in place.
SAVE THESE INSTRUCTIONS
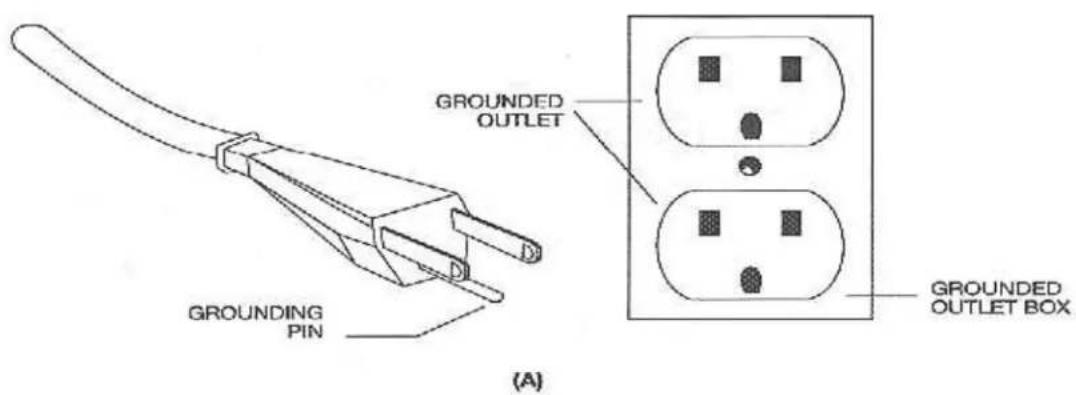
GROUNDING INSTRUCTIONS
This appliance must be grounded. If it should malfunction or breakdown, grounding provides a path of least resistance for electric current to reduce the risk electric shock. This machine is equipped with a cord having an equipment -grounding conductor and grounding plug. The plug must be inserted into an appropriate outlet that is properly installed and grounded in accordance with all local codes and ordinances.
WARNING: Improper connection of the equipment-grounding conductor can result in a risk of electric shock. Check with a qualified electrician or service person if you are in doubt as to whether the outlet is properly grounded. Do not modify the plug provided with the appliance - if it will not fit the outlet, have a proper outlet installed by a qualified electrician.
This appliance is for use on a nominal 120-volt circuit, and has a grounding plug that looks like the plug illustrated in sketch A.
Sketch A
SAFETY PRECAUTIONS
Do not operate the vacuum while it is standing on high pile carpet/ It is essential that the exhaust airflow not be restricted
Do not wash or launder the cloth bag as this will destroy the filtration capacity of the fabric.
WHEN THE MACHINE IS DELIVERED
Check the carton carefully for signs of rough handling. Remove the machine from the carton and look for concealed damage. If the machine is damaged, notify the carrier immediately and request an inspection. Be sure to keep the carton, packing inserts, packing lists, and carrier's receipt until the inspector has verified your claim.
Read the manual carefully and completely before attempting to operate the unit. This manual has important information for the use and safe operation of the machine. FAILURE TO ADHERE TO THESE INSTRUCTIONS COULD RESULT IN SERIOUS BODILY INJURY OF PROPERTY DAMAGE. Keep this manual on file and handy. This machine will assure years of satisfactory service if operated and maintained according to recommendations in the manual. If additional information is needed, please contact your local distributor or write to:
TORNADO INDUSTRIES
3101 Wichita Ct.
Fort Worth, TX 76140
1-800-VACUUMS
All information and specifications printed in the manual and parts list are current at the time of printing. However, because of Tornado's policy of continual product improvement, we reserve the right to make changes at any time without notice.
WARRANTY
To protect your investment, promptly fill out the
required information on the warranty card that
comes with the unit and mail it back to
Tornado Industries
Note: Service repair and warranty work
is not normally handled at the factory.
WARNING
The machine was designed for use on floors as per instructions
and recommendations written in this manual. Any deviation from its proper use or purpose and the consequential damage that may occur is the sole responsibility of the end user.
GENERAL PRECAUTIONS
- You must be trained in the operation of this machine before use. Please read this manual carefully and obtain operation instructions from your safety director or your authorized Tornado distributor.
• Always operate this machine with all of the cable removed from the handle. Failure to do so will upset the precision balance of the machine. - Do not use the Floor Machine for scarifying or sanding.
- Care should be taken to keep cable away from rotating brush.
- Do not attempt to repair warranted machines. All repairs must be done by a qualified and authorized repair center. Non warranted repairs will be billed back to the owner of the unit.
- Do not use any replacement parts except those specified in the parts list. Unauthorized parts could cause the unit to malfunction and will void the warranty.
FAILURE TO COMPLY WITH THE ABOVE WARNING INSTRUCTIONS WILL VOID THE WARRANTY
OPERATION INSTRUCTIONS
Please read the following operating instructions carefully. They will help you to get the best performance from this professional quality vacuum cleaner and to maintain it in optimum condition.
Follow these simple steps for easy and effective operation of the Backpack vacuum.
Open the lid and ensure that the cloth bag is correctly located and the flexible ring provides a proper seal when the lid is closed. For optimum performance, filtration and maximum hygiene, it is advisable to use a paper vacuum bag in addition to the standard cloth bag.
If a paper vacuum bag is used, simply insert it into the cloth bag, making sure that the cardboard disk is centered on the flexible sealing ring. When you replace the lid, the short nozzle in the center of the lid will be forced into the central hole of the cardboard disk of the paper vacuum bag thus providing a tight seal. Make sure the paper vacuum bag is tightly secured over the short nozzle before vacuuming.
Lock the lid down with the two latches. Always ensure that the cloth vacuum bag is empty and the paper bag is no more than 12 full before vacuuming. The Backpack vacuum has been fitted with a thermal overload switch to protect the motor against damage should the airflow be blocked for extended periods. This may occur if the vacuum bag is overfull, the cloth filter bag is clogged or if the vacuum hose or exhaust is blocked. The vacuum motor will stop before it can get too hot. If this happens, empty and thoroughly clean the vacuum bag and HEPA filter or free any blockage and ensure that adequate airflow is restored. After the motor has cooled to a safe operating temperature, locate the thermal reset switch on the bottom of the unit and push it back in. There will be a slight audible click. Now the motor will restart.
- The vacuum hose is fitted into the cuff in the lid. It should not be necessary to remove the hose in normal operation.
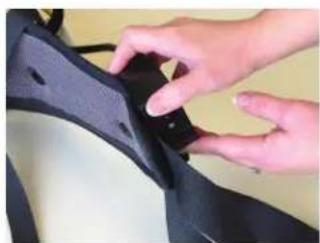
- Place the Backpack vacuum on your back, adjust the shoulder straps until you feel comfortable and then tighten the waist belt. The Backpack vacuum is designed to ride higher on your back for maximum comfort.
- Plug the cord into a 110 volt, grounded outlet. Always unwind the cord completely before vacuuming. It is important to maintain the power cord in good condition. This unit ships with a 50' 16/3 SJT power cord. Use care when pulling the cord around sharp edges and through doorways.
Never operate the Backpack vacuum if the power cord is damaged in any way.
- Attach the extension wand to the hose and fit the floor tool or any of the other vacuuming accessories on the wand.
- Turn the vacuum on. The toggle switch is located on the switch box. The switch box is affixed to the waist belt.
- After you finish cleaning, turn off the main power switch and unplug the cord from the wall outlet. Then starting from the Backpack vacuum, wrap up the cord to store. Be careful not to pull or yank on the vacuum cleaner's power cord.
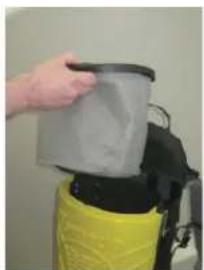
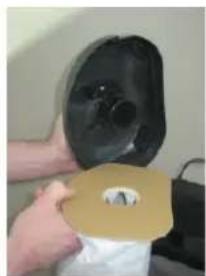
TO CHANGE THE FILTER COLLECTION BAGS
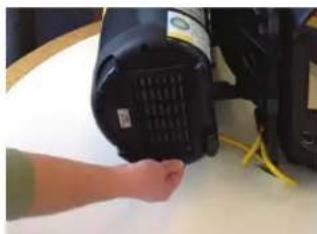
- Turn off the main power switch and unplug unit from wall outlet (Fig. 1).
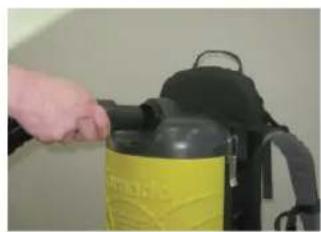
- Remove vacuum hose from top of unit (Fig 2).
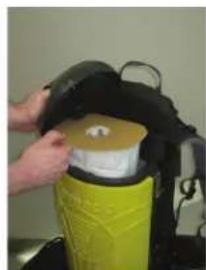
- Release the two latches and lift off lid (Fig. 3).
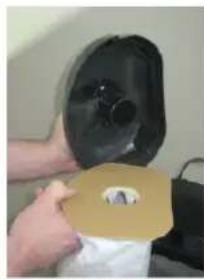
- Separate lid from paper bag insert and dispose of paper bag (Fig. 4)
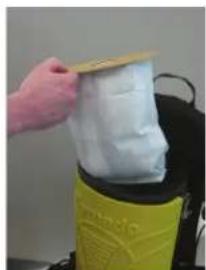
- Remove cloth filter bag, clean, dust and replace (Fig. 5).
- Insert new paper bag making sure to align lid nozzle with bag hole and replace latches (Fig. 6)
natural_image
Close-up of hands adjusting a black plastic component (no visible text or symbols)Fig. 1 Fig. 2

natural_image
Hand holding a black backpack with a yellow bag, next to a white wall (no visible text or symbols)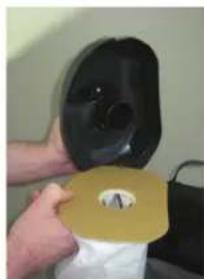
natural_image
Close-up of hands holding a black plastic object with a yellow base, no visible text or symbolsFig. 6
natural_image
Person inserting a yellow object into a black container with a white lid (no visible text or symbols)Fig. 3 Fig. 4
natural_image
Hand placing a yellow paper over a white plastic bag into a green industrial machine (no visible text or symbols)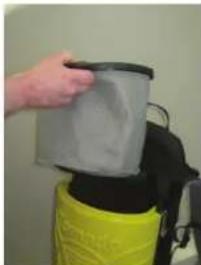
natural_image
Person applying a white cloth to a black device with yellow fabric (no visible text or symbols)Fig. 5
CHANGING EXHAUST FILTER ASSEMBLY
The Pac-Vac vacuum cleaner is equipped with a HEPA filter and an exhaust filter. These filters capture fine dust particles and protect the motor from dirt. It is important to replace the HEPA filter approximately every six months. Replace the exhaust filter every fourth time the paper vacuum bags changed.
To change or clean the exhaust filter
- Turn off the main power switch and unplug unit from wall outlet (Fig. 1).
- Detach the exhaust filter holder from the bottom of the unit (Fig. 7)
- Remove the exhaust filter from the holder (Fig. 8)
- DO NOT THROW AWAY THE FILTER HOLDER.
- Remove the exhaust filter from the plastic holder and shake or brush dirt from the filter.
- Replace the exhaust filter in the plastic holder and place into vacuum.
natural_image
Close-up of a hand inserting a black plastic component into a device, with yellow cables visible (no text or symbols)Fig. 7
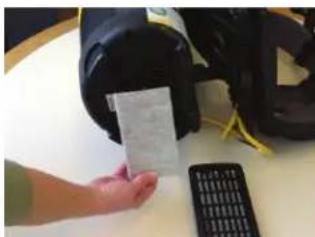
Fig. 8
CHANGING HEPA FILTER ASSEMBLY
To change the HEPA filter:
- Unplug the unit. Remove the lid, paper bag and cloth bag to expose the HEPA filter.
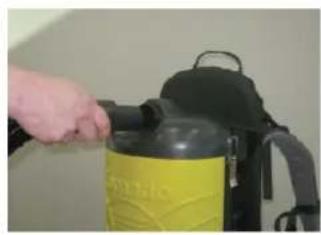
- Remove the filter cap on the top of the HEPA filter (Fig. 9)
- Remove the HEPA filter from the dust compartment
- Insert a new HEPA filter and replace the filter cap (Fig. 10). Refit the cloth bag, paper bag, and replace lid.
Note: The HEPA filter can NOT be washed and reused.

natural_image
Close-up of a hand pressing down on a yellow plastic container with a black plastic component (no visible text or symbols)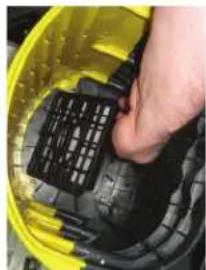
natural_image
Close-up of a hand pressing down on a yellow plastic component with a grid-patterned internal structure (no visible text or symbols)Fig. 9 Fig. 10
MAINTENANCE
Clean the cloth vacuum bag regularly. After emptying the vacuum bag, turn it inside out and shake as much dust out of the fabric as possible. Optimum performance is achieved by using a paper filter bag with the cloth bag.
Clean the vacuum bag and HEPA filter or free any blockage and ensure that adequate airflow is restored.
Use only approved Tornado paper filter bags.
Check the power cord for damage and replace if damaged.
Always unwind the cord completely.
Ensure the vacuum hose, the extension wand and the vacuuming accessories are not blocked.
Ensure that the electrical outlet and the plug are securely connected. Incorrect connections may cause sparking and damage to the cable socket.
Have your unit serviced by an authorized repair service center if you suspect any potential problems.
Ensure that the flexible vacuum bag ring provides a proper seal before vacuuming.
Recommended replacement parts:
| Pac-VacTM Aircomfort Vacuum Cleaner | |
| C352-2500 Paper Bag (10 pack) 90312 | |
| B352-7800 Paper Bag (10 pack) 90314 | |
| B352-2400 Motor Exhaust Micro Filter | |
| B352-2401 HEPA Filter | |
| C352-1400 Shake Out Bag 90312 | |
| C352-1500 Shake Out Bag 90314 | |
| C352-2800 Switch Harness | |
| B352-6800 Strain Relief Complete | |
| B352-3200 Power Harness | |
| D113-3400 Motor | |
| X9714 Power Cord | |
natural_image
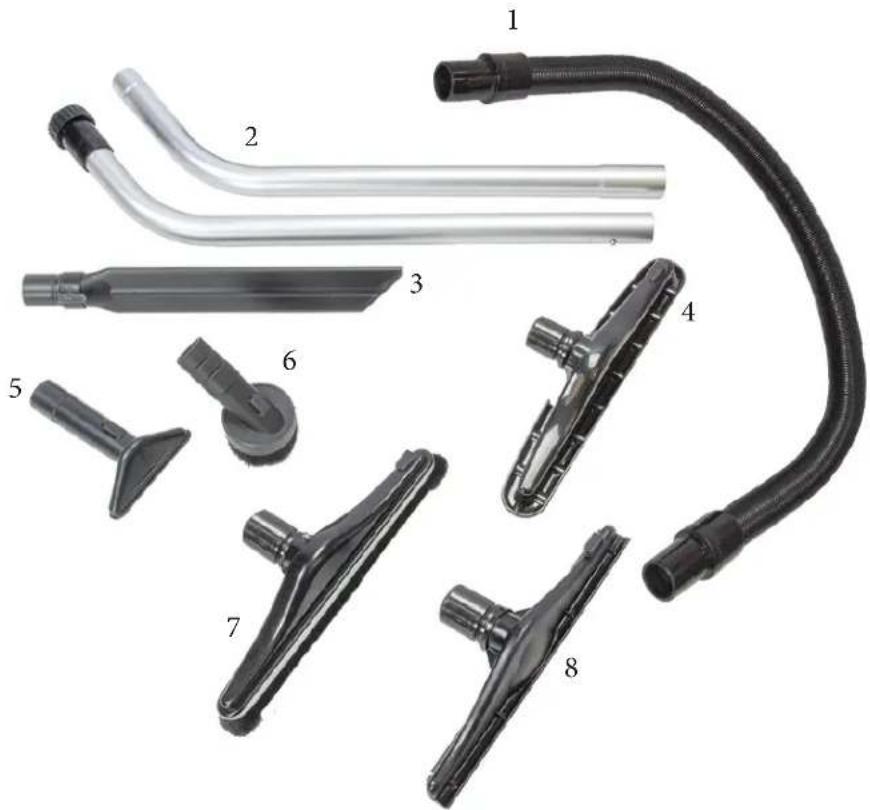
Collection of eight different types of hair blisters and clips, including tubing, clips, and connectors (no text or labels visible)| No. Part No. Description | ||
| 1 | A352-6900 | Hose |
| 2 CT171 Wand | ||
| 3 CT176 Crevice Tool | ||
| 4 B352-PF10 Carpet Tool | ||
| 5 CT188 Upholstery Tool | ||
| 6 CT184 Dusting Tool | ||
| 7 C352-PF20 | Hard Floor Tool | |
| 8 | CT190 Easy Glide Carpet Tool | |
REMARQUES
natural_image
Close-up of hands adjusting a black fabric or mesh component (no visible text or symbols)Fig. 1 Fig. 2
natural_image
Hand placing a yellow and black plastic bag labeled 'Spare' on a black backpack (no visible text or symbols)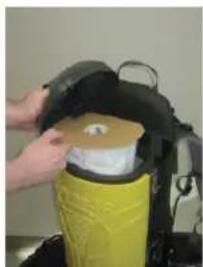
natural_image
Person pouring liquid into a yellow bottle with a white lid, no visible text or symbols
natural_image
Person applying a yellow adhesive to a white plastic bag on a yellow industrial machine (no text or symbols visible)Fig. 3 Fig. 4
natural_image
Person handling a large cylindrical object with a black lid, next to a yellow and black device (no visible text or symbols)Fig. 5
natural_image
Close-up of hands holding a black circular object with a small circular mark on its surface (no visible text or symbols)Fig. 6
CHANGER LE FILTRE D'ÉVACUATION
natural_image
Hand inserting a black plastic component into a white surface, with yellow cables visible (no text or symbols)Fig. 7
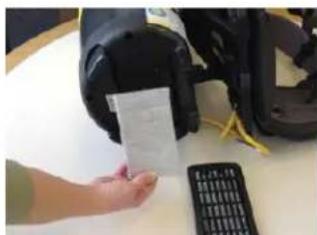
Fig. 8
REEMPLACER L'UNITÉ DE FLITRE HEPA
natural_image
Close-up of a hand placing a black plastic component into a yellow safety helmet (no visible text or symbols)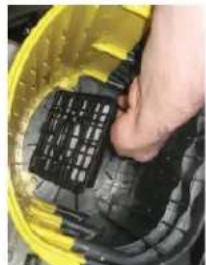
natural_image
Close-up of a hand holding a black plastic component inside a yellow container (no visible text or symbols)Fig. 9 Fig. 10
ENTRETIEN
natural_image
Collection of eight different types of hair cleaning or spray tools, including tubing, clips, and plastic components (no text or labels visible)natural_image
Close-up of hands adjusting a black plastic component (no visible text or symbols)Fig. 1 Fig. 2
natural_image
Person holding a yellow backpack with a green bag, no visible text or symbols
natural_image
Person pouring liquid into a yellow container with a white lid (no visible text or symbols)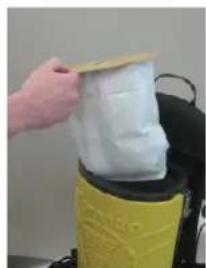
natural_image
Person applying a yellow adhesive to a white plastic bag on a black industrial device (no text or symbols visible)Fig. 3 Fig. 4

natural_image
Person applying a white filter to a yellow bag, no visible text or symbolsFig. 5
natural_image
Person applying a black plastic pad to a black circular object (no visible text or symbols)Fig. 6
natural_image
Close-up of a hand holding a black industrial fan or motor component with yellow wires attached (no visible text or symbols)Fig. 7
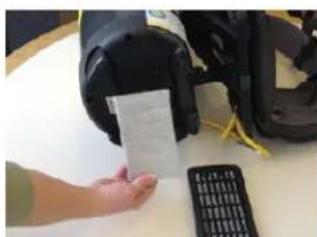
Fig. 8
DEL CAMBIO DEL MONTAJE DEL FILTRO HEPA
natural_image
Close-up of a hand inserting a black plastic component into a yellow plastic housing (no text or symbols visible)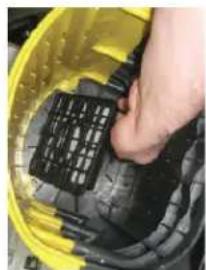
natural_image
Close-up of a hand placing a black plastic component into a yellow safety helmet (no visible text or symbols)Fig. 9 Fig. 10
MANTENIMIENTO
natural_image
Collection of eight different types of hair cleaning or spray tools, including tubes, clips, and tubing (no text or labels visible)
- IMPORTANT SAFETY INSTRUCTIONS
- WARNING: TO REDUCE THE RISK OF FIRE, ELECTRIC SHOCK, OR INJURY:
- SAVE THESE INSTRUCTIONS
- GROUNDING INSTRUCTIONS
- SAFETY PRECAUTIONS
- WHEN THE MACHINE IS DELIVERED
- TORNADO INDUSTRIES
- WARRANTY
- WARNING
- GENERAL PRECAUTIONS
- FAILURE TO COMPLY WITH THE ABOVE WARNING INSTRUCTIONS WILL VOID THE WARRANTY
- OPERATION INSTRUCTIONS
- Follow these simple steps for easy and effective operation of the Backpack vacuum.
- Never operate the Backpack vacuum if the power cord is damaged in any way.
- TO CHANGE THE FILTER COLLECTION BAGS
- CHANGING EXHAUST FILTER ASSEMBLY
- CHANGING HEPA FILTER ASSEMBLY
- MAINTENANCE
- CHANGER LE FILTRE D'ÉVACUATION
- REEMPLACER L'UNITÉ DE FLITRE HEPA
- ENTRETIEN
- DEL CAMBIO DEL MONTAJE DEL FILTRO HEPA
- MANTENIMIENTO
Brand : TORNADO
Model : PacVac 93012B
Category : Vacuum Cleaner