
93016B1 - Vacuum Cleaner TORNADO - Free user manual and instructions
Find the device manual for free 93016B1 TORNADO in PDF.

| Product Type | Backpack battery vacuum |
| Brand | Tornado |
| Model | 93016B1 |
| Power Supply | Rechargeable battery (X1200) |
| Charger | Tornado X1194 |
| Full charge time | Approximately 2.5 hours |
| Charge indicator | 4 LEDs (1 red, 3 green) |
| Filtration system | HEPA filter and exhaust filter |
| Dust bag | Reusable cloth bag + disposable paper bag (C352-2500) |
| Carrying system | Deuter air harness with Vari-Quick adjustment |
| Usage | Indoors only, commercial use |
| Accessories included | Hose, extension tube, carpet nozzle (B352-PF10), crevice nozzle (CT176), upholstery nozzle (CT188), dust brush (CT184), hard floor nozzle (C352-PF20), Easy Glide carpet nozzle (CT190) |
| Filter maintenance | Clean the cloth bag regularly; replace the HEPA filter every 6 months; replace the exhaust filter at the 4th paper bag change |
| Recommended spare parts | Paper bag (C352-2500), HEPA filter (B352-2401), exhaust filter (B352-2400), battery (X1200), charger (X1194), motor (X1208) |
| Warranty | Subject to original receipt/invoice |
Frequently Asked Questions - 93016B1 TORNADO
User questions about 93016B1 TORNADO
0 question about this device. Answer the ones you know or ask your own.
Ask a new question about this device
Download the instructions for your Vacuum Cleaner in PDF format for free! Find your manual 93016B1 - TORNADO and take your electronic device back in hand. On this page are published all the documents necessary for the use of your device. 93016B1 by TORNADO.
USER MANUAL 93016B1 TORNADO
Operations & Maintenance Manual
For Commercial Use Only
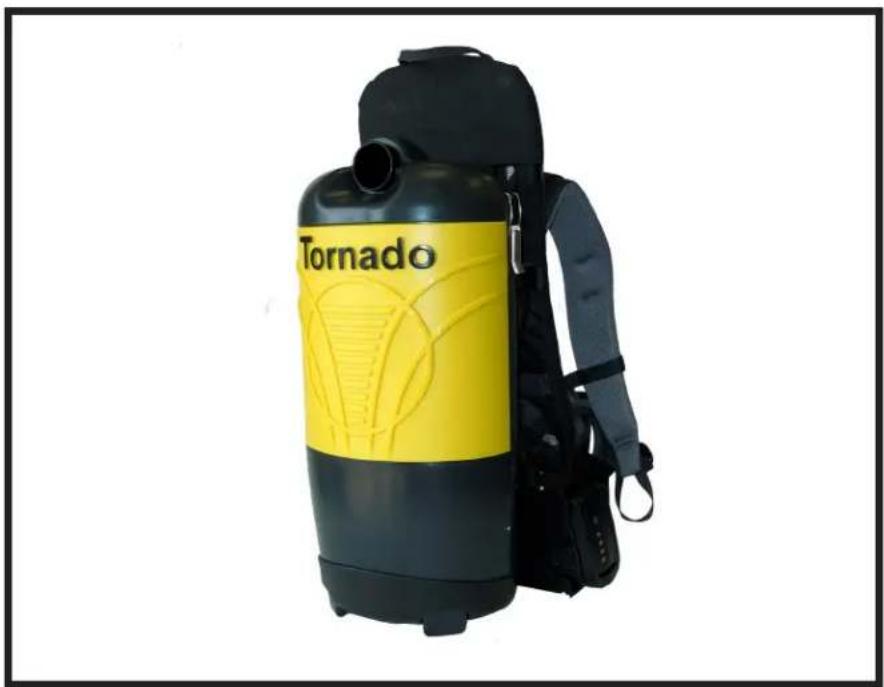
Pac-VacTM 6 Roam
MODEL NO: 93016
Form No. L3016M DE 12/21 ©Tornado Industries, LLC. All rights reserved
Within 30 days, to activate the warranty, go to; https://tornadovac.com/services/warranty-registration-form.aspx For warranty information go to www.tornadovac.com
Your new Tornado unit is a high quality, precision-made product. All parts used in the manufacturing of this unit have passed rigid quality control standards prior to assembly. Please safeguard the original receipt / invoice. If you experience any problems with your unit during the warranty period, the original receipt / invoice will act as proof of purchase. Contact Tornado for any warranty inquiries.
Check the carton for shipping damage. Carefully unpack and inspect your new Tornado vacuum for shipping damage.
Each unit is tested and thoroughly inspected prior to shipping. If damage is discovered, immediately notify the transportation company that delivered your machine and request an inspection. As a manufacturer, we are unable to act upon any claim for concealed damage; you must originate the claim. Be sure to keep the carton, packing inserts, packing lists, and carrier's receipt until the inspector has verified your claim.
IMPORTANT SAFETY INSTRUCTIONS
READ AND UNDERSTAND ALL INSTRUCTIONS BEFORE USING THIS UNIT
Read and understand this owner's manual and all labels on the unit before operating. Safety is a combination of common sense, staying alert and knowing how your unit works. Use this unit only as described in this manual. Use only manufacturer's recommended attachments. To reduce the risk of personal injury or damage to your unit use only Tornado recommended accessories.
SAFETY PRECAUTIONS
Do not operate the vacuum while it is standing on high pile carpet/ It is essential that the exhaust airflow not be restricted
Do not wash or launder the cloth bag as this will destroy the filtration capacity of the fabric.
GENERAL PRECAUTIONS
- You must be trained in the operation of this machine before use. Please read this manual carefully and obtain operation instructions from your safety director or your authorized Tornado distributor.
- Do not attempt to repair warranted machines. All repairs must be done by a qualified and authorized repair center. Non warranted repairs will be billed back to the owner of the unit.
- Do not use any replacement parts except those specified in the parts list. Unauthorized parts could cause the unit to malfunction and will void the warranty.
FAILURE TO COMPLY WITH THE ABOVE WARNING INSTRUCTIONS
WILL VOID THE WARRANTY
Disconnect the battery pack from the appliance before making any adjustments, changing accessories, or storing appliance. Such preventive safety measures reduce the risk of starting the appliance accidentally.
CAUTION
Under abusive conditions, liquid may be ejected from the battery; avoid contact. If contact accidentally occurs, flush with water. If liquid contacts eyes, additionally seek medical help. Liquid ejected from the battery may cause irritation or burns.

RECYCLING BATTERIES
Proper disposal and recycling batteries is mandatory under the Mercury Containing Rechargeable Battery management Act, 42 U.S.S. 14301-14336 ("Battery Act").
The 'Charge Up to Recycle!' program offers various recycling plans for communities, retailers, businesses, and public agencies. For more information about the "Charge Up to Recycle!" program, or for more information about a local collection site visit www.rbrc.com or call RBRC's toll free number 1-800-8-BATTERY.
PROTECTTHEENVIRONMENT
Please dispose of packaging materials in an environmentally safe way according to local waste disposal regulations.

Always remember to recycle
IMPORTANT SAFETY INSTRUCTIONS
FOR COMMERCIAL USE
WHEN USING AN ELECTRICAL APPLIANCE, BASIC PRECAUTIONS SHOULD
ALWAYS BE FOLLOWED INCLUDING THE FOLLOWING:
READ ALL INSTRUCTIONS BEFORE USING THIS MACHINE
WARNING: TO REDUCE THE RISK OF FIRE, ELECTRIC SHOCK, OR INJURY:
- Do not leave machine unattended when plugged in. Unplug from outlet when not in use and before changing pads or attempting any maintenance or adjustment. If handle switch lever is activated accidentally, high starting torque will cause machine to move and may cause damage or injury.
- To avoid electrical shock, Use indoors only. Do not use outdoors and do not expose to rain.
- Do not allow to be used as a toy. Close attention is necessary when used by or near children.
- Use only as described in this manual. Use only manufacturer's recommended attachments.
- Do not use with damaged cord or plug. If machine is not working properly, if it was dropped, damaged, left outdoors, or dropped into water, return it to a service center.
- Do not pull or carry by cord, use cord as a handle, close a door on cord, or pull cord around sharp edges or corners. Do not run machine over cord. Keep cord away from heated surfaces. Do not unplug by pulling on cord. To unplug, grasp the plug not the cord.
- Do not handle plug or machine with wet hands.
- Keep hair, loose clothing, fingers, and all parts of body away from openings and moving parts.
- Turn off all controls before unplugging.
- Connect to a properly grounded outlet only. See Grounding Instructions.
- Do not put hands under base - rotating parts could cause injury.
Always keep hands feet and loose fitting clothing away from moving parts to prevent possible injuries. - Use care to keep electrical supply cable from contacting moving parts, such as floor brushes or pads.
- Risk of explosion: Floor sanding can result in explosive mixture of fine dust and air. Use this machine only in a well-ventilated area, free from any flame or match.
- Do not use machine in areas where flammable and/or explosive vapors or dusts are present.
- To avoid fires do not use with a flammable or combustible liquid to clean a floor.
- Make sure voltage and frequency at the wall receptacle correspond with that indicated on nameplate before plugging in machine.
- Use only a 12 Ga. three-wire extension cable, which have 3-prong grounding type plugs and 3-prong receptacles that accept the plug of the machine.
- Use extra care when cleaning on stairs.
- Do not pick up anything that is burning or smoking such as cigarettes, matches, or hot ashes.
- Do not use without dust bag and/or filters in place.
SAVE THESE INSTRUCTIONS

WARNING!
Battery and Charging Safety:
To reduce the risk of electric shock, fire, battery explosion, or injury:
- Use only Tornado charger X1194 and Tornado battery pack X1200C
- DO NOT expose battery packs to temperatures above 122^ (50^) . Never leave battery packs in automobiles on hot days, where temperatures can be much higher than the outside temperature.
- DO NOT use or store vacuum or batteries in wet or moist conditions, or with flammable or combustible materials.
- DO NOT charge batteries or store battery for extended periods, 1 month or more, in temperatures above 90^ F (32^) or below 40^ (5^) .
- When charging, make sure that the charger has at least 6 inches of clearance on all sides. Adequate airflow is required to cool the charger when in use.
- Connect charging cord to a properly grounded outlet only. See Grounding Instructions.
- DO NOT use a damaged cord or plug for charging.
- DO NOT pull on charger's cord to unplug. Grasp and pull the plug, not the cord.
- DO NOT handle the charger's cord plug with wet hands when inserting into electrical outlet.
- Keep sparks and flames away from batteries.
- DO NOT smoke near batteries or charger.
- DO NOT charge the unit outdoors.
- DO NOT attempt to repair, service, or modify the battery system or charger. Contact Tornado Customer Service with any issues.
- DO NOT short-circuit the battery or charger terminals with conductive items such as paper clips. This can deliver high current, resulting in heat and fire.
- DO NOT crush, drop, incinerate or damage the battery pack.
- DO NOT use a battery pack that has been damaged in any way.
- DO NOT incinerate the battery even if it is severely damaged or nonworking. The battery can explode in a fire.
CAUTION
To avoid damage to the battery contacts, turn off power switch before reconnecting the battery. Battery must be
fully engaged to insure proper electrical connection. INSTALLING BATTERY PACK INTO VACUUM
- Holding battery by the front, carefully slide the battery into the lower housing until it clicks in place (Fig. 1).
- Connector is spring-loaded. Battery will need to be pushed fully into position. BATTERY FUEL GAUGE
The battery fuel gauge indicates the approximate run time remaining on the battery. When the battery button is pressed, one to four indicators will light up, indicating the approximate battery charge remaining as follows:
All 4 lights on: Full Charge
3 lights on: 70% Charge
2 lights on: 45% Charge
1 light on: 25% Charge
1 light on and blinking: Low battery, charge when possible

Fig. 1
Pac-Vac® 6 and 10 Aircomfort
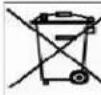
The Patented Aircomfort System Includes:
- Aircomfort harness allows air to escape from three sides, reducing wearer perspiration by up to 25% over a normal closed back system, positively impacting the operator's body temperature.
- Aluminum stays direct weight to the hip belt, enhancing the stability of the integrated Aircomfort back system.
- Anatomically shaped shoulder straps with 3D Air Mesh lining.
- Contoured hip belt with bilaminate foam reinforced with PE provides comfort on the hips.
The Deuter Aircomfort harness system on Tornado's Pac-Vac 6 and 10 Aircomfort Series offers five unique adjustments, ensuring a secure, cool, and individualized fit:
a. Patented Vari-Quick System
b. Shoulder straps
C. Hip belt
d. Sternum straps
Stabilizer straps
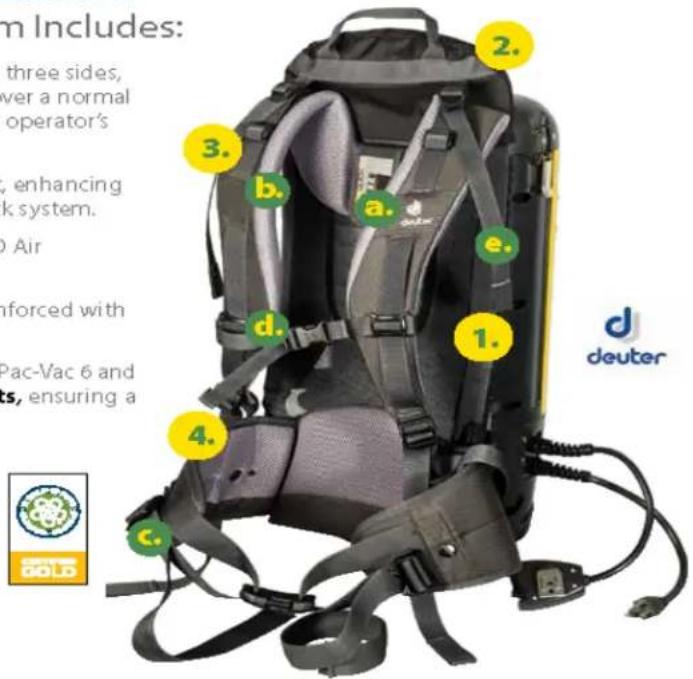
Wearing the Backpack Vacuum
The backpack is designed to balance the weight of the vacuum on the hips, not the shoulders.
- Adjust the Vari-Quick height adjuster to your back length.
- Loosen all of the straps and place the vacuum on your back.
Fig.
2
Fig.

3
Fig.
4
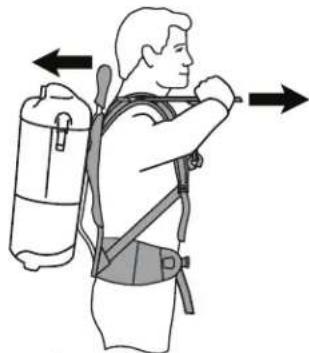
Fig.
5
- Place the hip belt over your hip and connect the buckle. Your hip bones should be centered between the top and bottom of the belt. Pull the straps forward to tighten the hip belt. (Fig. 2)
- Pull down the shoulder straps to tighten the backpack on your shoulders. (Fig. 3) Do not tighten too tight. The main weight of the vacuum should be on the hip belt. The anchor points of the shoulder straps should ideally be between the shoulder blades. Adjust the Vari-Quick height adjuster if necessary to properly place the vacuum to your back length.
- Adjust the sternum strap on a comfortable part of your chest and close the strap. (Fig. 4)
- Loosen or tighten the stabilizer straps as needed, to fit your back. (Fig. 5)
- Do final adjustments on the shoulder and stabilizer straps as needed to balance the weight of the vacuum on the hips
OPERATION INSTRUCTIONS
Please read the following operating instructions carefully. They will help you to get the best performance from this professional quality vacuum cleaner and to maintain it in optimum condition.
Follow these simple steps for easy and effective operation of the Backpack vacuum.
Open the lid and ensure that the cloth bag is correctly located and the flexible ring provides a proper seal when the lid is closed. For optimum performance, filtration and maximum hygiene, it is advisable to use a paper vacuum bag in addition to the standard cloth bag.
If a paper vacuum bag is used, simply insert it into the cloth bag, making sure that the cardboard disk is centered on the flexible sealing ring. When you replace the lid, the short nozzle in the center of the lid will be forced into the central hole of the cardboard disk of the paper vacuum bag thus providing a tight seal. Make sure the paper vacuum bag is tightly secured over the short nozzle before vacuuming.
Lock the lid down with the two latches. Always ensure that the cloth vacuum bag is empty and the paper bag is no more than 12 full before vacuuming. The vacuum hose is fitted into the cuff in the lid. It should not be necessary to remove the hose in normal operation.
- Place the Backpack vacuum on your back, adjust the shoulder straps until you feel comfortable and then tighten the waist belt. The Backpack vacuum is designed to ride higher on your back for maximum comfort.
- Attach the extension wand to the hose and fit the floor tool or any of the other vacuuming accessories on the wand.
- Turn the vacuum on. The toggle switch is located on the lower housing.
- After you finish cleaning, turn off the main power switch.
PREPARING BATTERY PACK FOR CHARGING
- Plug the charger's power cord into the charger (Fig. 6).
- Plug the charger's power cord into 120V wall outlet (Fig. 7).
- The indicator light should turn Red and blink while charging and turn Green when fully charged (Fig. 8). The battery pack may require approximately 2.5 hours to fully charge.
- Verify the charge level of the battery pack by pressing the power level indicator button on the front of the pack. (Fig. 9). Four lights (one red and three green) indicate a fully charged battery. Unplug battery from charger and unplug cord from wall outlet after charging.
*Battery pack may get warm while charging.
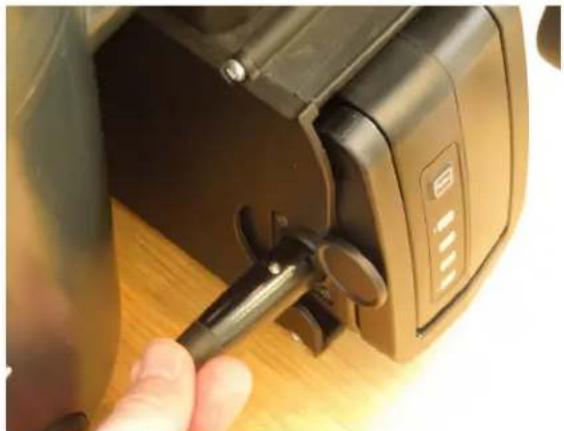
Fig. 6 Fig. 7
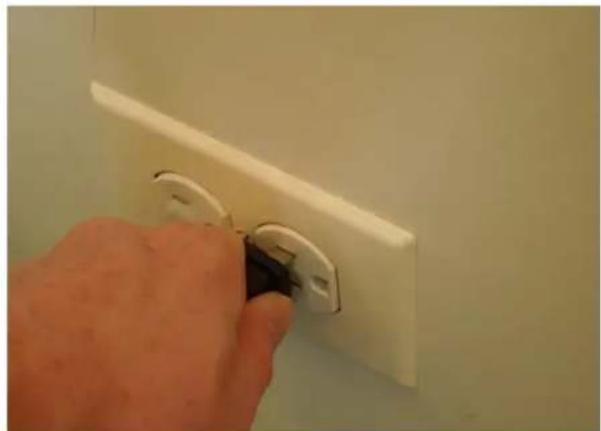
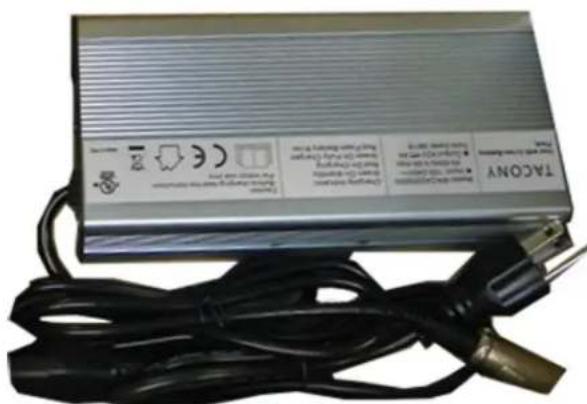
Fig. 8
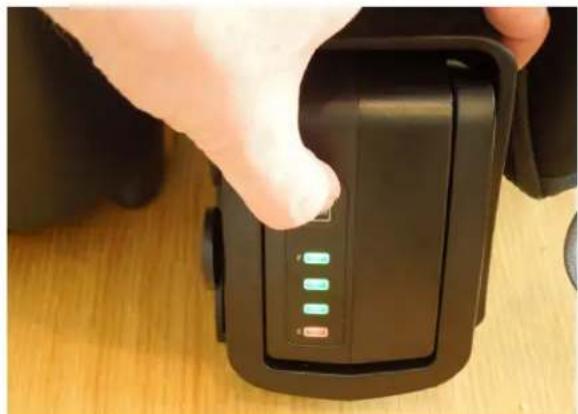
Fig. 9
TO CHANGE THE FILTER COLLECTION BAGS
- Turn off the main power switch (Fig. 10).
- Remove vacuum hose from top of unit (Fig 11).
- Release the two latches and lift off lid (Fig. 12).
- Separate lid from paper bag insert and dispose of paper bag (Fig. 13)
- Remove cloth filter bag, clean, dust and replace (Fig. 14).
- Insert new paper bag making sure to align lid nozzle with bag hole and replace latches (Fig. 15)
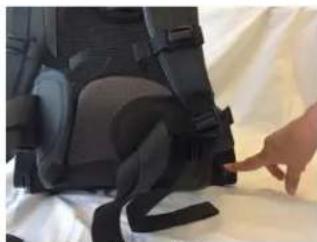
Fig. 10

Fig. 11
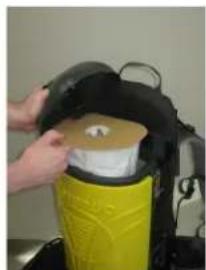
Fig. 12 Fig. 13
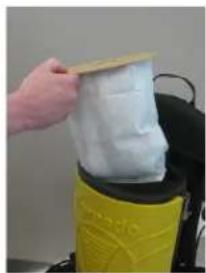
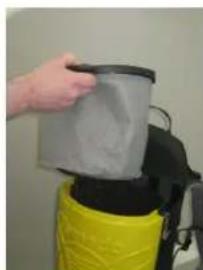
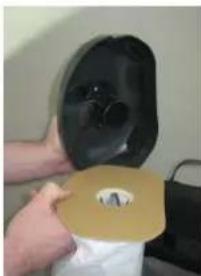
Fig. 14 Fig. 15
CHANGING EXHAUST FILTER ASSEMBLY
The Pac-Vac vacuum cleaner is equipped with a HEPA filter and an exhaust filter. These filters capture fine dust particles and protect the motor from dirt. It is important to replace the HEPA filter approximately every six months. Replace the exhaust filter every fourth time the paper vacuum bags are changed.
To change or clean the exhaust filter
- Turn off the main power switch (Fig. 10).
- Detach the exhaust filter holder from the bottom of the unit (Fig. 16)
- Remove the exhaust filter from the holder (Fig. 17)
- DO NOT THROW AWAY THE FILTER HOLDER.
- Remove the exhaust filter from the plastic holder and shake or brush dirt from the filter.
- Replace the exhaust filter in the plastic holder and place into vacuum.
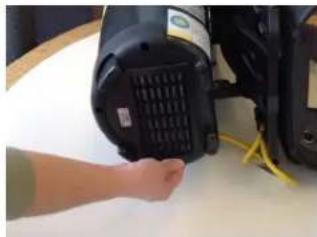
Fig. 16

Fig. 17
CHANGING HEPA FILTER ASSEMBLY
To change the HEPA filter:
- Remove the lid, paper bag and cloth bag to expose the HEPA filter.
- Remove the filter cap on the top of the HEPA filter (Fig. 18)
- Remove the HEPA filter from the dust compartment
- Insert a new HEPA filter and replace the filter cap (Fig. 19). Refit the cloth bag, paper bag, and replace lid.
Note: The HEPA filter can NOT be washed and reused.
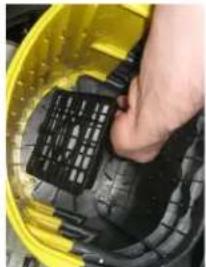
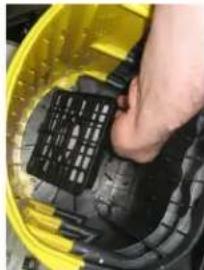
Fig. 18 Fig. 19
MAINTENANCE
Clean the cloth vacuum bag regularly. After emptying the vacuum bag, turn it inside out and shake as much dust out of the fabric as possible. Optimum performance is achieved by using a paper filter bag with the cloth bag.
Clean the vacuum bag and HEPA filter or free any blockage and ensure that adequate airflow is restored.
Use only approved Tornado paper filter bags.
Ensure the vacuum hose, the extension wand and the vacuuming accessories are not blocked.
Have your unit serviced by an authorized repair service center if you suspect any potential problems.
Ensure that the flexible vacuum bag ring provides a proper seal before vacuuming.
Recommended replacement parts:
| C352-2500 Paper Bag (10 pack) | |
| B352-2400 Motor Exhaust Micro Filter | |
| B352-2401 HEPA Filter | |
| C352-1400 Shake Out Bag | |
| X1208 Motor | |
| X1200C Battery | |
| X1194 Battery Charger w/Cord |
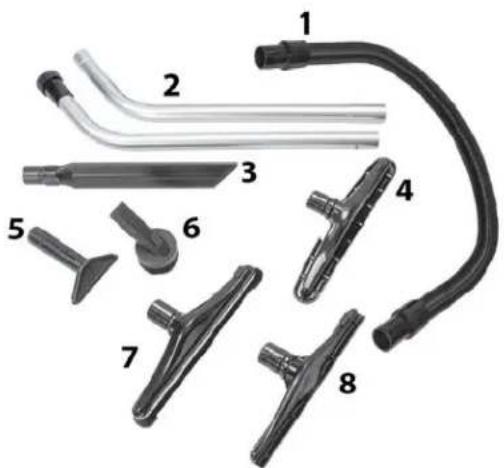
| No. Part No. Qty Description | ||
| 1 A352-6900 1 Hose | ||
| 2 CT171 1 Wand | ||
| 3 CT176 1 Crevice Tool | ||
| 4 B352-PF10 1 Carpet Tool | ||
| 5 CT188 1 Upholstery Tool | ||
| 6 CT184 1 Dusting Tool | ||
| 7 C352-PF20 1 Hard Floor Tool | ||
| 8 CT190 1 Easy Glide Carpet Tool |
ANNULERA LA GARANTIE

- IMPORTANT SAFETY INSTRUCTIONS
- READ AND UNDERSTAND ALL INSTRUCTIONS BEFORE USING THIS UNIT
- SAFETY PRECAUTIONS
- GENERAL PRECAUTIONS
- FAILURE TO COMPLY WITH THE ABOVE WARNING INSTRUCTIONS
- WILL VOID THE WARRANTY
- CAUTION
- RECYCLING BATTERIES
- PROTECTTHEENVIRONMENT
- FOR COMMERCIAL USE
- WHEN USING AN ELECTRICAL APPLIANCE, BASIC PRECAUTIONS SHOULD
- WARNING: TO REDUCE THE RISK OF FIRE, ELECTRIC SHOCK, OR INJURY:
- SAVE THESE INSTRUCTIONS
- WARNING!
- Battery and Charging Safety:
- Pac-Vac® 6 and 10 Aircomfort
- The Patented Aircomfort System Includes:
- Wearing the Backpack Vacuum
- OPERATION INSTRUCTIONS
- Follow these simple steps for easy and effective operation of the Backpack vacuum.
- PREPARING BATTERY PACK FOR CHARGING
- TO CHANGE THE FILTER COLLECTION BAGS
- CHANGING EXHAUST FILTER ASSEMBLY
- CHANGING HEPA FILTER ASSEMBLY
- MAINTENANCE
- ANNULERA LA GARANTIE
Brand : TORNADO
Model : 93016B1
Category : Vacuum Cleaner