
93030 - Vacuum Cleaner TORNADO - Free user manual and instructions
Find the device manual for free 93030 TORNADO in PDF.

| Product Type | Upright vacuum for large areas |
| Brand | Tornado |
| Model | 93030 |
| Voltage / Frequency | 120 V / 60 Hz |
| Suction Motor Power | 1512 W / 12.6 A |
| Brush Motor Power | 1/4 HP / 2 A |
| Total Electrical Consumption | 14 A |
| Bag Capacity | 45.5 qt / 43 L |
| Airflow | 226 cfm / 384 m³/h |
| Vacuum (Water Lift) | 71 in / 1804 mm |
| Filtration | HEPA, 99.97% at 0.3 micron |
| Brush Width | 30 in / 762 mm |
| Power Cord Length | 75 ft / 23 m |
| Weight (including cord) | 74 lb / 33.6 kg |
| Sound Level | 69.9 dB(A) |
| Dimensions (folded) | 33 x 31 x 19 in (83.8 x 78.7 x 48.3 cm) |
| Dimensions (in use) | 33 x 31 x 39 in (83.8 x 78.7 x 99.1 cm) |
| Brush Height Adjustment | 5 levels, by foot pedal |
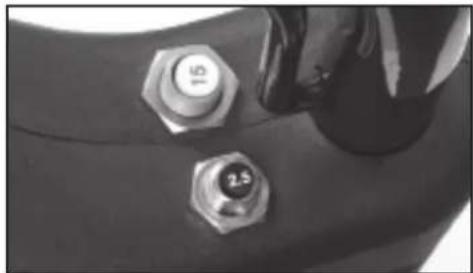
| Circuit Breakers | 2 (15 A for suction, 2.5 A for brush) |
| Bag System | Cloth bag + paper bag (mandatory) |
| Filter Maintenance | Exhaust filter and motor filters to be replaced every 6 months |
| Warranty | 2 years parts, 1 year labor (see conditions) |
Frequently Asked Questions - 93030 TORNADO
User questions about 93030 TORNADO
0 question about this device. Answer the ones you know or ask your own.
Ask a new question about this device
Download the instructions for your Vacuum Cleaner in PDF format for free! Find your manual 93030 - TORNADO and take your electronic device back in hand. On this page are published all the documents necessary for the use of your device. 93030 by TORNADO.
USER MANUAL 93030 TORNADO
natural_image
Yellow and black lawn mower with 'Tornado' branding on the side (no additional text or symbols visible)Wide Area Vacuum Cleaner
CATALOG NO.
93030
93031
Wide Area Vacuum Cleaner
Operator and Parts Manual
EN
Long Term Buyer Protection Limited Warranty
Tornado Industries, LLC. (Tornado) warrants to the end/user customer that the Tornado product(s) will be free from defects in material and workmanship for the duration(s) described below. This limited warranty DOES NOT cover machines and/or components subject to normal wear and tear, damage that occurs in shipping, failures resulting from modification, accident, unsuitable operating environment, misuse, abuse, neglect, or improper maintenance by you. For full details, contact your Authorized Tornado Distributor, Service Center, or the Tornado Technical Service Department. Tornado sales and service representatives are not authorized to waive or alter the terms of this warranty, or to increase the obligations of Tornado under the warranty.
10 Years\*
Plastic water tanks and Rotationally-molded bodies
2 Years\*
Parts on all Tornado cleaning equipment
1 Year\*
Labor on all Tornado cleaning equipment
1 Year\*
Warranty on batteries, one year prorated
All battery warranties are handled directly by the battery manufacturer, on a one year prorated basis
Terms subject to change without notice
- Except all Windshears™ Blowers, Storm, TV 2, Side and Downdraft, Insulation Blowers, CV 30, CV 38, CK14/1 PRO, CK 14/2 PRO, SWM 31/9, CK LW13/1, CV 38/48 Dual, PV6, PV10, and all chargers are warranted for 1 (one) year for both parts and labor.
- All non-wear item parts purchased after warranty expiration are warranted for 90 days.
- Warranty starts from the date of sale to the consumer or, at Tornado's discretion, 6 months after the dealer purchased the unit from Tornado, whichever comes first.
- The EB 30 is warranted for a period of 90 days for both parts and labor.
- The warranty on engines used on propane powered equipment is limited to motor manufacturer's warranty.
- Ride-on Scrubbers are warranted for 24 months, parts, 6 months labor or 1,000 hours, whichever occurs first.
Note: Tornado, The Latest Dirt, Floorkeeper,
Carpetkeeper, Carpetrinser, Carpetrinser/Dryer,
Headmaster, Taskforce, PAC-VAC, T-Lite, Glazer,
Windshear, Max-Vac and Trot-Mop are trademarks of Tornado Industries
Website: www.tornadovac.com
Phone: 1-800-VACUUMS
Fax: (817)-551-6507
Address: 3130 Wichita Ct,
Fort Worth, Tx, 76140
1-800-VACUUMS 80 Years of Cleaning Innovation A Tacony Company
Form F2662.©2014. All rights reserved
TIONY
GENERAL INDEX
This machine is intended for commercial use. This manual is furnished with each new wide area vacuum cleaner. It provides necessary operation, maintenance instructions and parts list.

Read this manual completely and understand the machine before operating or servicing it.
When ordering replacement parts use the Parts Lists section in this manual. Before ordering parts or supplies, be sure to have your machine model number and serial number handy. Parts and supplies may be ordered online, by phone, by fax or by mail or from any Tennant or Nobles Authorized Service Center or Distributor.
UNCRATING MACHINE: Carefully check carton for signs of damage. Report damages at once to carrier.
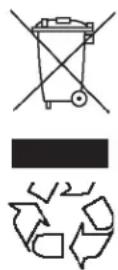
PROTECT THE ENVIRONMENT
Please dispose of packaging materials and old machine components in an environmentally safe way according to local waste disposal regulations.
Always remember to recycle.
Warranty 2
Important Safety Instructions ....4
Grounding Instructions ....5
Safety Label 5
Parts Identification 6
Replacement Bags and Filters 6
Handle Adjustment 7
Bag Installation 7
Brush Height Adjustment 7
Operation of Machine 7
Circuit Breaker....7
Machine Maintenance ....7
For Best Performance ....7
Exhaust Filter Replacement 8
Belt Adjustment and Replacement 8
Vacuum Motor Filters....8
Machine Specifications....8
Electrical Diagram 8
Recommended Spare Parts 23
Specifications and parts are subject to change without notice.
CUSTOMER'S RECORD
The model and serial number of this product may be found on the back side of the unit. You should complete the enclosed warranty card and mail it back to us as soon as possible for your protection. Also, note the model and serial number of your unit in the spaces provided below, and retain this book as a permanent record of your purchase.
Model Number:
Serial Number:
Date Purchased:
Your new wide area vacuum cleaner is a product of high quality materials and superior workmanship. We urge you to read these operating instructions carefully before you use this vacuum cleaner, in order to obtain the full performance and satisfaction it can offer you.
IMPORTANT SAFETY INSTRUCTIONS
When using an electrical appliance, basic precautions should always be followed, including the following:
READ ALL INSTRUCTIONS BEFORE USING THIS APPLIANCE.

WARNING! To reduce the risk of fire, electric shock, or injury:
- The machine is designed exclusively to pick up dirt, dry debris and dust in an indoor environment and is not constructed for any other use. The pick up of any type of fluid or dangerous/toxic materials is prohibited.
- Before you plug in your new vacuum cleaner, make sure the voltage indicated on the rating plate located on the back of the vacuum cleaner is the same as your local supply.
- Do not leave appliance unattended when plugged in. Unplug from outlet when not in use and before servicing.
- Do not use with damaged cord or plug. If appliance is not working as it should, has been dropped, damaged, left outdoors, or dropped into water, return it to a service center for repair.
- Do not pull or carry by cord, use cord as handle, close a door on cord, or pull cord around sharp edges or corners. Do not run appliance over cord. Keep cord away from heated surfaces.
- If the supply cord is damaged, it must be replaced by the manufacturer, its service agent or similarly qualified persons in order to avoid a hazard.
- Do not unplug by pulling on cord. To unplug, grasp the plug, not the cord.
- Do not handle plug or appliance with wet hands.
- Turn off all controls before unplugging.
- Do not attempt to service the unit while appliance is plugged in.
- Connect to a properly grounded outlet only. See Grounding Instructions. Connect only to a dedicated individual branch circuit.
- Do not operate machine with the use of an extension cord.
- Do not use outdoors or on wet surfaces. Do not expose to rain/moisture. Store Indoors.
- Do not put any object into openings. Do not use with any opening blocked, keep free of dust, lint, hair, and anything that may reduce air flow.
- Keep hair, loose clothing, fingers and all parts of body away from openings and moving parts.
- Do not pick up anything that is burning or smoking, such as cigarettes, matches or hot ashes.
- Do not use without vacuum bag and / or filters in place.
- Do not use to pick up flammable or combustible liquids such as gasoline or use in areas where they may be present.
- Do not allow to be used as a toy. Close attention is necessary when used by or near children.
- Use only as described in this manual. Use only manufacturer's recommended attachments.
- Do not operate machine unless mentally and physically capable of following machine instructions.
- Keep children and unauthorized persons away from the machine when in use.
SAVE THESE INSTRUCTIONS
GROUNDING INSTRUCTIONS
This appliance must be grounded. If it should malfunction or break down, grounding provides a path of least resistance for the electric current to reduce the risk of electric shock. This appliance is equipped with a cord having an equipment-grounding conductor and grounding plug. The plug must be plugged into an appropriate outlet that is properly installed and grounded in accordance with all local codes and ordinances.
WARNING – Improper connection of the equipment-grounding conductor can result in a risk of electric shock. Check with a qualified electrician or service person if you are in doubt as to whether the outlet is properly grounded. Do not modify the plug provided with the appliance. If it will not fit the outlet, have a proper outlet installed by a qualified electrician. Connect only to a dedicated individual branch circuit.
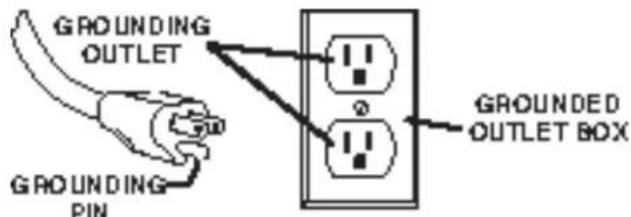
Fig. 1
This appliance is for use on a nominal 120 volt circuit and has a grounding attachment plug that looks like the plug illustrated in (Fig. 1). Make sure that the appliance is connected to an outlet having the same configuration as the plug. No adaptor should be used with this appliance.
WARNING – the replacement or repair of damaged wiring should only be performed by a qualified electrician or by an Authorized Service Center or Distributor.
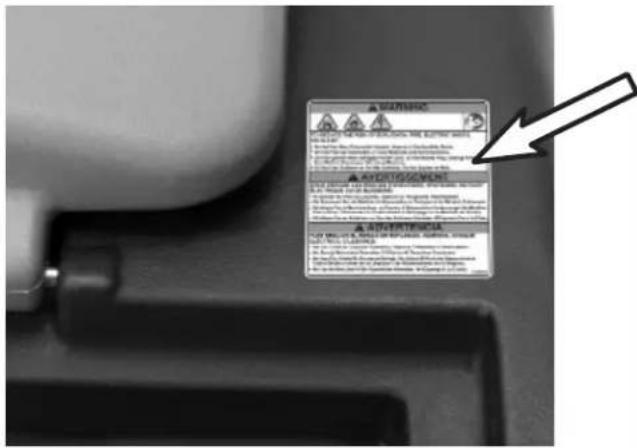
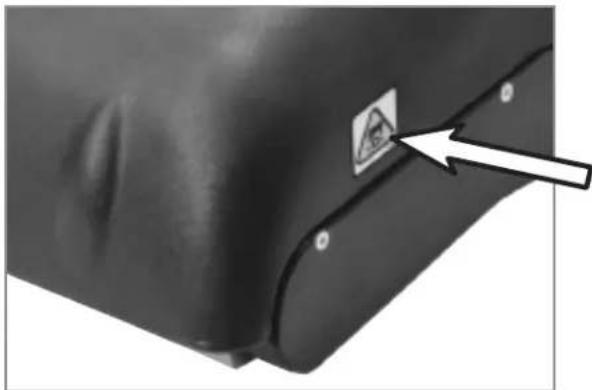
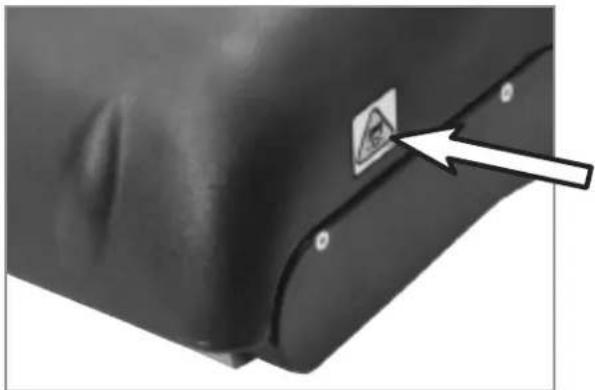
SAFETY LABELS
The safety labels appears on the machine in the locations indicated.
Replace a label if it is missing or becomes damaged or illegible.
natural_image
Close-up of a black metal panel with a warning symbol and arrow pointing to a small object (no text or symbols present)WARNING


TO REDUCE THE RISK OF EXPLOSION, FIRE, ELECTRIC SHOCK, OR INJURY:
- Do Not Use Near Flammable Liquids, Vapors or Combustible Dusts.
- Do Not Pick Up Flammable or Toxic Materials and Burning Debris.
- Do Not Operate With Damaged Power Cord. Do Not Modify Plug. Unplug Power Cord Before Cleaning or Servicing Machine.
- Do Not Use Outdoors or On Wet Surfaces. Do Not Expose to Rain.
AVERTISSEMENT
POUR RÉDUIRE LES RISQUES D'EXPLOSION, D'INCENDIE, DE CHOC ÉLECTRIQUE OU DE BLESSURE:
Warning: Spinning Brush. Keep Hands Away. Turn off and unplug the vacuum cleaner before performing maintenance.
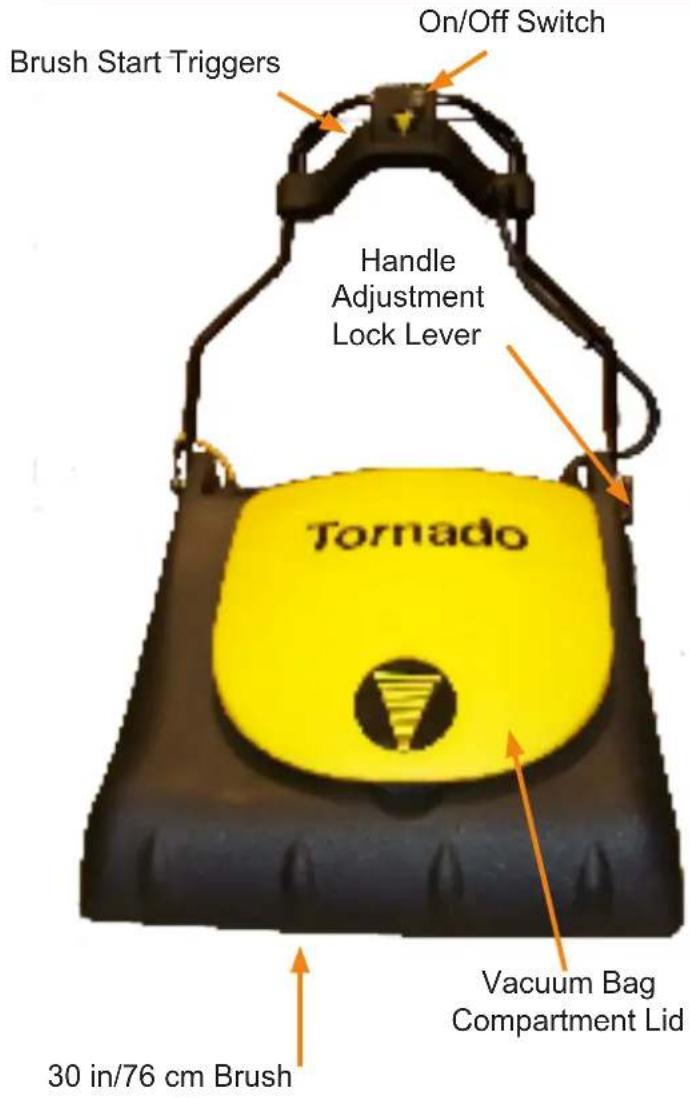
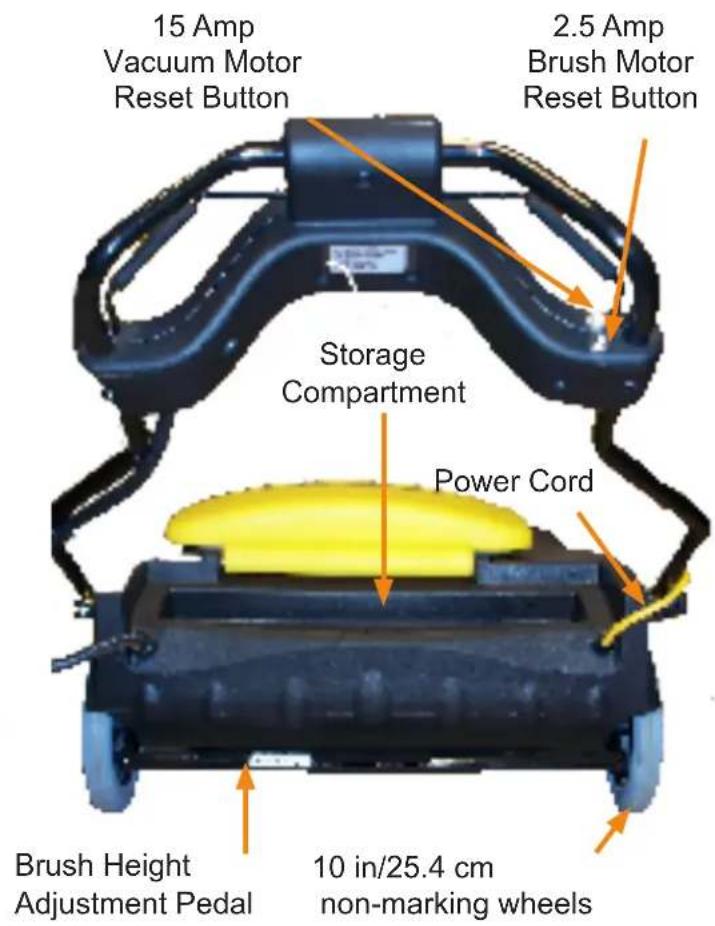
PARTS IDENTIFICATION
REPLACEMENT BAGS AND FILTERS
• Genuine OEM Vacuum Bags
Part # 90701 Vacuum Bag, paper 10 per package
Part # 19816A Cloth Bag 1 per package
Part # 90701A Vacuum Bag, HEPA 10 per package
• Genuine OEM Brush Belt Part # 19802 1 per package
• Genuine OEM Vacuum Filters Part # 19855 1 per package (Exhaust Filters)
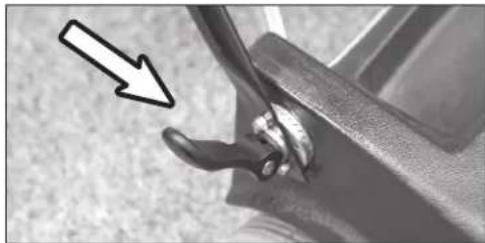
HANDLE ADJUSTMENT
- Loosen handle adjustment lock lever and adjust handle to comfortable operation height
- Tighten lever to lock handle in place.
natural_image
Close-up of a car seatbelt being adjusted with a tool, showing a hand holding the seatbelt and a white arrow pointing to the handle (no text or symbols visible)BAG INSTALLATION
- Position the handle in normal operating position.
- Open bag compartment lid and rest it on the handle.
- Unzip cloth bag and install paper bag inside.
- Attach both bag openings together onto vacuum intake housing.
- Make sure bag is properly positioned inside machine housing.
- Completely close zipper on cloth bag and close lid of machine.
ATTENTION: Always use cloth and paper bags together.
natural_image
Close-up of a mechanical component with internal parts and a circular feature (no visible text or symbols)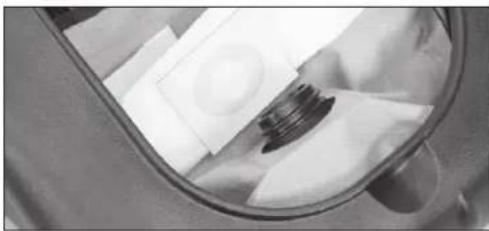
natural_image
Close-up of a mechanical component with a threaded shaft and white components inside a transparent container (no visible text or symbols)BRUSH HEIGHT ADJUSTMENT
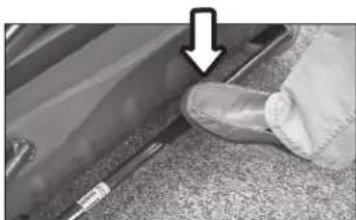
- This machine has 5 brush adjustment levels.
- To raise brush height level: lift up height adjustment pedal until desired brush height is attained.
- To lower brush height level: push down on height adjustment pedal until desired brush height is attained.
natural_image
Close-up of a hand holding a tool near a vehicle's side panel, with an arrow pointing to the component (no visible text or symbols)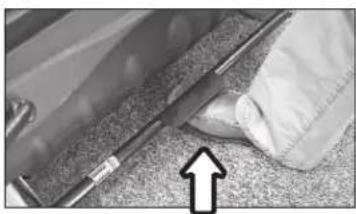
natural_image
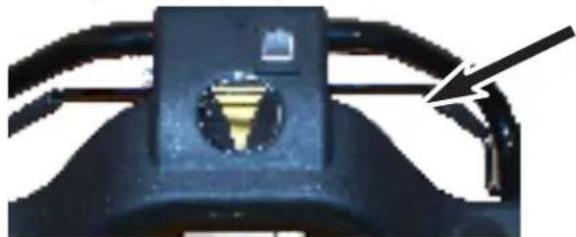
Close-up of a tool interacting with a surface, showing a white arrow pointing upward (no text or symbols visible)- Plug power cord into properly grounded power outlet.
- Push the on/off switch to the ON (I) position.
- To operate brush squeeze the brush start triggers.
- Push machine forward to begin cleaning.
- Adjust brush height for proper pick-up.
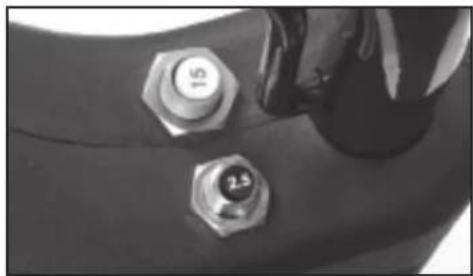
natural_image
Close-up of a black plastic mechanical component with a circular hole and a black arrow pointing to it (no text or symbols visible)CIRCUIT BREAKER PROTECTION
natural_image
Close-up of a hand pressing down on a mechanical component with two hexagonal bolts (no visible text or symbols)Your new wide area vacuum comes equipped with two manual circuit breakers, a 15 amp breaker for the vacuum motor and a 2.5 amp breaker for the brush motor. If the machine does not turn on you will need to check the circuit breakers.
To reset circuit breakers:
- Turn off and unplug the vacuum cleaner.
-
Check machine for the following:
Full bag, obstructions, clogged filters, clogged brush, brush height set too low, etc. -
Press the affected circuit breaker button to reset.
-
Resume operation
If vacuum cleaner fails to turn on, contact a Tornado Authorized Service Center or Distributor.
FOR BEST PERFORMANCE
- Keep machine and all accessories clean and in good operating condition.
- Change vacuum bags and filters as recommended to maintain optimum cleaning efficiency.
- Always use OEM bags, filters and parts, as use of other products may result in poor cleaning of filtration performance. OEM products are designed for maximum performance.
- Have machine checked periodically by a Tornado Authorized Service Center or Distributor.
- Store machine carefully in a dry area.
- For optimum cleaning performance and safety, follow your owner's manual.
- After each use, carefully wrap power cord around handle and check cord for wear or damage. If cord is damaged, have power cord replaced by a Tornado Authorized Service Center or Distributor immediately.
MACHINE MAINTENANCE
CAUTION: Turn off and unplug the vacuum cleaner before performing maintenance.
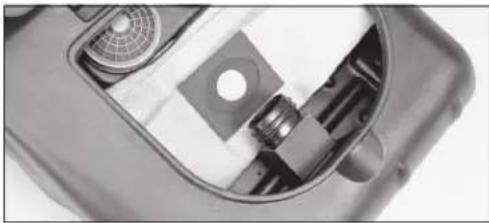
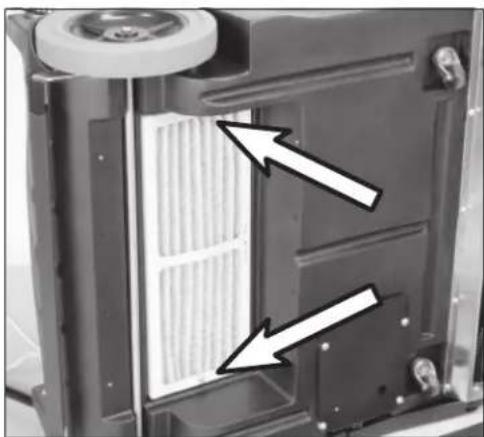
EXHAUST FILTER REPLACEMENT
- Turn off and unplug vacuum cleaner.
- Carefully turn machine on its side and remove exhaust cover from bottom of machine.
- Remove the two nuts holding filter onto machine.
- Replace filter in proper position and tighten nuts.
- Reinstall exhaust cover.
*Replace exhaust filter every 6 months.
natural_image
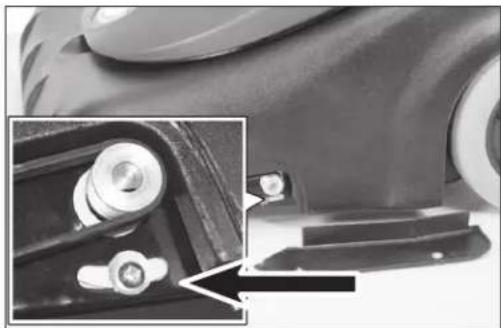
Close-up of a mechanical component with two white arrows pointing to a side panel (no text or symbols visible)BELT ADJUSTMENT AND REPLACEMENT
- Turn off and unplug vacuum cleaner.
- Remove belt cover on left side of machine.
- Loosen the motor belt adjusting screws on motor bracket.
- Remove belt.
- Install new belt and reposition motor to eliminate excess slack.
- Once proper tension is set, tighten motor adjusting screws.
- Replace belt cover on side of machine.
natural_image
Close-up of a mechanical component with a magnified inset showing a bolt detail (no visible text or symbols)VACUUM MOTOR FILTERS
natural_image
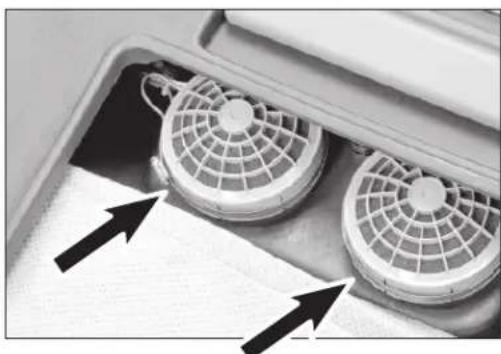
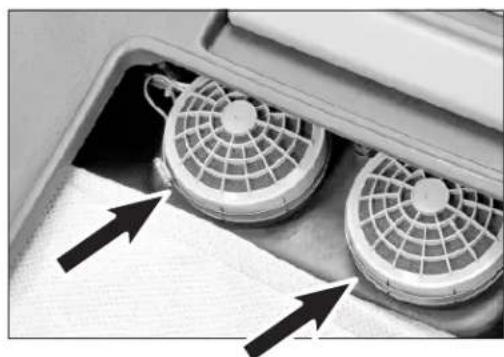
Close-up of a kitchen sink with two circular fans and ventilation grilles, showing three blades with black arrows pointing to the sides (no text or symbols visible)VACUUM MOTOR FILTERS
- Turn off and unplug vacuum cleaner.
- Position the handle in normal operating position.
- Open Wide Area Vacuum lid and rest it on the handle.
- Remove clamp with a screwdriver to gain access to filter
- Remove plastic cap covering the motor
- Remove plastic retainer in cap
- Replace filters in their original positions.
- Reinstall plastic retainer in cap
- Reinstall cap onto motors
- Reinstall clamp.
*Replace the vacuum motor filters every 6 months.
MACHINE SPECIFICATIONS
| Model 93030 | 93031 |
| Voltage / Frequency | 120 V / 60 Hz230V / 60 Hz |
| Vacuum motor rating 15 | 12W / 12.6 A |
| Brush Motor rating 1/4 h | b / 2 A |
| Total power consumption | 14 A |
| Bag capacity - dry 45.5 | qt / 43 L |
| Airflow 226 cfm / 384 m | 3/h |
| Vacuum - water lift at sealed orifice | 71 in / 1804 mm |
| Filtration - HEPA 99.97% | @0.3 micron |
| Vibration at controls < 2.5 m/s | 2 |
| Brush width 30 in / 762 mm | |
| Cable length 75 ft / 23 m | |
| Weight (including cord) | 74 lb / 33.6 kg |
| Noise level 69.9 dB(A) | |
| Construction class | I |
| Protection | IP20 |
| Machine dimensions | Folded: 33" X 31" X 19"Operating Position: 33" X 31" X 39" |
ELECTRICAL DIAGRAM
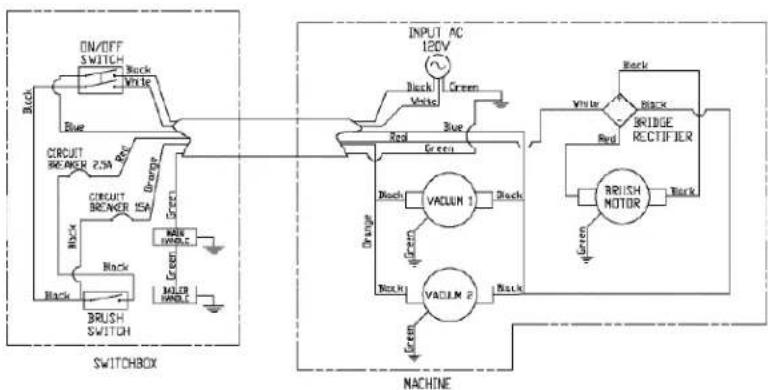
flowchart
graph TD
    subgraph SWITCHBOX
        A["ON/OFF SWITCH"] --> B["Black"]
        B --> C["Blue"]
        C --> D["CIRCUIT BREAKER 2.5A"]
        D --> E["Orange"]
        E --> F["CIRCUIT BREAKER 15A"]
        F --> G["Green"]
        G --> H["Black"]
        H --> I["BRUSH SWITCH"]
    end

    subgraph MACHINE
        J["INPUT AC 12DV"] --> K["Blue"]
        K --> L["Green"]
        L --> M["White"]
        M --> N["BRIDGE RECTIFIER"]
        N --> O["White"]
        O --> P["RRISH MOTOR"]
        P --> Q["Black"]
        Q --> R["Green"]
        R --> S["VACUUM 1"]
        S --> T["VACUUM 2"]
        T --> U["Green"]
        U --> V["Black"]
        V --> W["White"]
        W --> X["BRUSH MOTOR"]
    end

    style SWITCHBOX fill:#f9f,stroke:#333
    style MACHINE fill:#ccf,stroke:#333
Nota: Tornado, The Latest Dirt, Floorkeeper, Carpetkeeper, Carpetrinser, Carpetrinser/Dryer, Headmaster, Taskforce, PAC-VAC, T-Lite, Glazer, Windshear, Max-Vac,y Trot-Mop son marcas registradas de Tornado Industries
Sitio web: www.tornadovac.com
natural_image
Close-up of a black metal panel with a warning sign and arrow pointing to a corner detail (no text or symbols on the panel itself)WARNING


TO REDUCE THE RISK OF EXPLOSION, FIRE, ELECTRIC SHOCK, OR INJURY:
- Do Not Use Near Flammable Liquids, Vapors or Combustible Dusts.
- Do Not Pick Up Flammable or Toxic Materials and Burning Debris.
- Do Not Operate With Damaged Power Cord. Do Not Modify Plug. Unplug Power Cord Before Cleaning or Servicing Machine.
- Do Not Use Outdoors or On Wet Surfaces. Do Not Expose to Rain.
AVERTISSEMENT
POUR RÉDUIRE LES RISQUES D'EXPLOSION, D'INCENDIE, DE CHOC ÉLECTRIQUE OU DE BLESSURE:
natural_image
Close-up of a car's side panel with a tool and arrow pointing to the handle (no text or symbols visible)natural_image
Close-up of a mechanical component with internal components and a circular feature (no visible text or symbols)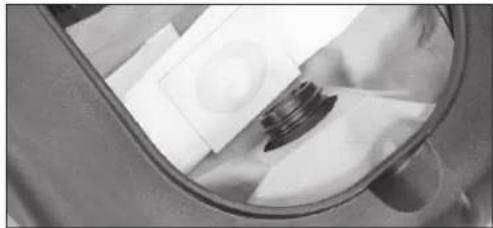
natural_image
Close-up of a mechanical component with a cylindrical part inserted into a glass bowl (no visible text or symbols)AJUSTE DE LA ALTURA DEL CEPILLO
natural_image
Close-up of a hand applying adhesive to a car wheel, with a downward arrow indicating the angle (no text or symbols visible)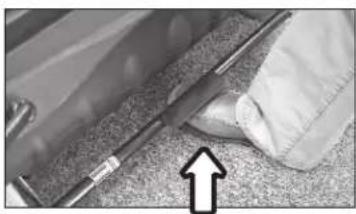
natural_image
Close-up of a tool interacting with a textured surface, no visible text or symbolsnatural_image
Close-up of a black mechanical component with a circular feature and an arrow pointing to it (no visible text or symbols)INTERRUPTOR TÉRMICO
natural_image
Close-up of a hand pressing down on a metal component with two hexagonal bolts (no visible text or symbols)natural_image
Close-up of a mechanical component with two white arrows pointing to internal channels (no text or symbols visible)natural_image
Close-up of a car's front wheel assembly with a magnified inset showing the component detail (no text or symbols visible)FILTROS DEL MOTOR DE LA ASPIRADORA
natural_image
Close-up of two air purifiers with mesh grating inside a container, showing airflow direction arrows (no text or symbols)FILTROS DEL MOTOR DE LA ASPIRADORA
natural_image
Close-up of a black metal panel with a warning sign and arrow pointing to a detail (no text or symbols present)WARNING


TO REDUCE THE RISK OF EXPLOSION, FIRE, ELECTRIC SHOCK, OR INJURY:
- Do Not Use Near Flammable Liquids, Vapors or Combustible Dusts.
- Do Not Pick Up Flammable or Toxic Materials and Burning Debris.
- Do Not Operate With Damaged Power Cord. Do Not Modify Plug. Unplug Power Cord Before Cleaning or Servicing Machine.
- Do Not Use Outdoors or On Wet Surfaces. Do Not Expose to Rain.
AVERTISSEMENT
POUR RÉDUIRE LES RISQUES D'EXPLOSION, D'INCENDIE, DE CHOC ÉLECTRIQUE OU DE BLESSURE:
natural_image
Close-up of a car's handle and lever mechanism with an arrow pointing to the pivot point (no text or symbols visible)INSTALLATION DU SAC
natural_image
Close-up of a mechanical device interior showing internal components and a circular component (no visible text or symbols)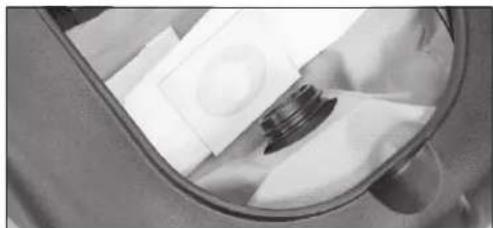
natural_image
Close-up of a mechanical component with a circular housing and a threaded shaft, viewed through a curved mirror (no visible text or symbols)natural_image
Close-up of a person's foot and shoe on a textured surface, with a downward arrow pointing to the shoe (no visible text or symbols)
natural_image
Close-up of a mechanical component with a tool and an arrow pointing upward (no visible text or symbols)FONCTIONNEMENT DE L'APPAREIL
natural_image
Close-up of a black mechanical component with a circular feature and a small arrow pointing to it (no visible text or symbols)PROTECTION DU COUPE-CIRCUIT

natural_image
Close-up of a mechanical component with two hexagonal bolts and a dark circular button (no visible text or symbols)REEMPLACEMENT DU FILTRE D'ÉVACUATION
natural_image
Close-up of a mechanical component with ventilation grilles and mounting holes (no text or symbols visible)RÉGLAGE ET REMPLACEMENT DE LA COURROIE
natural_image
Close-up of a mechanical component with a highlighted section showing a bolt and nut assembly (no text or symbols visible)FILTRES DU MOTEUR D'ASPIRATION

natural_image
Close-up of two circular air purifiers with mesh grids inside a container, no visible text or symbolsFILTRES DU MOTEUR D'ASPIRATION
- Long Term Buyer Protection Limited Warranty
- Years\*
- Years\*
- Year\*
- Terms subject to change without notice
- GENERAL INDEX
- PROTECT THE ENVIRONMENT
- CUSTOMER'S RECORD
- IMPORTANT SAFETY INSTRUCTIONS
- WARNING! To reduce the risk of fire, electric shock, or injury:
- SAVE THESE INSTRUCTIONS
- GROUNDING INSTRUCTIONS
- SAFETY LABELS
- WARNING
- AVERTISSEMENT
- PARTS IDENTIFICATION
- REPLACEMENT BAGS AND FILTERS
- HANDLE ADJUSTMENT
- BAG INSTALLATION
- BRUSH HEIGHT ADJUSTMENT
- CIRCUIT BREAKER PROTECTION
- FOR BEST PERFORMANCE
- MACHINE MAINTENANCE
- EXHAUST FILTER REPLACEMENT
- BELT ADJUSTMENT AND REPLACEMENT
- VACUUM MOTOR FILTERS
- ELECTRICAL DIAGRAM
- AJUSTE DE LA ALTURA DEL CEPILLO
- INTERRUPTOR TÉRMICO
- FILTROS DEL MOTOR DE LA ASPIRADORA
- INSTALLATION DU SAC
- FONCTIONNEMENT DE L'APPAREIL
- PROTECTION DU COUPE-CIRCUIT
- REEMPLACEMENT DU FILTRE D'ÉVACUATION
- RÉGLAGE ET REMPLACEMENT DE LA COURROIE
- FILTRES DU MOTEUR D'ASPIRATION
Brand : TORNADO
Model : 93030
Category : Vacuum Cleaner