
The Quiet One - Food Processor Vitamix - Free user manual and instructions
Find the device manual for free The Quiet One Vitamix in PDF.

| Product Type | Food Processor (High-End Blender) |
| Brand | Vitamix |
| Model | The Quiet One |
| Dimensions (H x W x D) | 45.7 x 21.6 x 27.2 cm (lid closed) 62.2 x 21.6 x 27.2 cm (lid open) |
| Power Supply | 120 V, 50-60 Hz, 15 A, grounded outlet |
| Container Capacity | 48 oz / 1.4 L (Advance container) |
| Blade Material | Tempered stainless steel |
| Preset Programs | 6 buttons with optimized cycles (smoothie, frozen coffee, ice cream, etc.) |
| Additional Functions | Variable speed (1-100%), High/Low Pulse, display screen, timer, customizable programming via chip |
| Container Type | Advance 48 oz container (compatible with sound-dampening lid) |
| Sound Dampening System | Lockable lid with sealing gasket (sound enclosure) |
| Maintenance | Hand wash recommended; do not immerse base; container washable in warm soapy water |
| Safety | Lockable lid, auto shut-off at end of cycle, motor thermal protection |
| Available Spare Parts | Drive socket, blade assembly, lid, cover, positioning pad |
| Warranty | Motor base: 3 years; container, lid, blades: 1 year |
| Recommended Uses | Smoothies, frozen juices, milk drinks, cocktails, soups (hot liquids up to 99 °C) |
| Country of Manufacture | United States (Vita-Mix Corporation) |
Frequently Asked Questions - The Quiet One Vitamix
User questions about The Quiet One Vitamix
0 question about this device. Answer the ones you know or ask your own.
Ask a new question about this device
Download the instructions for your Food Processor in PDF format for free! Find your manual The Quiet One - Vitamix and take your electronic device back in hand. On this page are published all the documents necessary for the use of your device. The Quiet One by Vitamix.
USER MANUAL The Quiet One Vitamix
The Quiet One® Blending Station
SYMBOLS
| ! | Warning Caution | ! | |
| NEVER touch moving parts. Keep hands and utensils out of container | Operate with lid and lid plug in place | ||
| Electrical Shock Hazard Read and understand | ovar's | manual | |
| High temperature when blending hot liquids Do not immerse | |||
| DO NOT insert items into the container while the blender is in use | I/O | On/Off | |
| Unplug while not in use, before cleaning, changing accessories or approaching parts that move while the blender is in use | |||
Dimensions:
18.0 in./45,7 cm high with lid closed
24.5 in./62,2 cm high with lid open
- Depth: 10.7 in. / 27.2 cm with handle
Width: 8.5 in. / 21,6 cm
RECYCLING INFORMATION
This product has been supplied from an environmentally aware manufacturer.
This product may contain substances that could be harmful to the environment if disposed of in places (landfills) that are not appropriate according to legislation.
The 'crossed-out wheelie bin' symbol is placed on this product to encourage you to recycle wherever possible.
Please be environmentally responsible and recycle this product through your recycling facility at the end of its life.

| VM# | Rating | Additional Information |
| VM0145 | 120V, 50-60 Hz, 15 Amps |
WARNING

To Avoid Injury.
Read and understand the instruction manual before using this machine.
Basic safety precautions should be followed, including the following.

WARNING

Electrical Shock Hazard.
ONLY use an earthed outlet.
DO NOT remove the ground.
DO NOT use an adaptor.
DO NOT use an extension cable.
Failure to follow instructions can cause death or electric shock.
READ ALL INSTRUCTIONS, SAFEGUARDS AND WARNINGS BEFORE OPERATING THE BLENDER.
-
Read all instructions.
-
DO NOT IMMERSE. To protect against risk of electrical shock, do not put motor base in water or other liquid.
-
Children should be supervised to ensure that they do not play with the appliance.
-
This appliance is not intended for use by persons (including children) with reduced physical, sensory or mental capabilities, or lack of experience or knowledge, unless they have been given supervision or instruction concerning use of the appliance by a person responsible for their safety.
-
Appliances can be used by persons with reduced physical, sensory or mental capabilities or lack of experience and knowledge if they have been given supervision or instruction concerning use of the appliance in a safe way and if they understand the hazards involved.
-
This appliance shall not be used by children. Keep this appliance and it's cord out of reach of children. Children shall not play with this appliance.
-
Unplug the power cord from the wall outlet when the Vitamix® machine is not in use, before disassembling, when putting on or taking off parts, and before cleaning, other than washing the container.
-
Never come in contact with moving parts, especially the blades.
-
If the supply cord is damaged, it must be replaced by the manufacturer, its service agent or similarly qualified persons in order to avoid a hazard.
-
Do not operate any machine that malfunctions, has a damaged cord or plug, has been dropped or is damaged in any manner. If you purchased your equipment in the U.S.A., call Vitaminix Technical Support, 800-886-5235 for examination, repair, possible replacement, or electrical or mechanical adjustment. If you purchased outside of the U.S.A., please contact your local authorized Vitaminix Distributor, or contact the Vitaminix International Division at +1.440.782.2450 or email: international@vitamix.com for a distributor near you.
-
Do not use attachments not recommended or sold by Vitamix. Doing so will void the warranty. Alteration or modification of this product in any form is not recommended as such may result in bodily injury.
12. Do not use outdoors.
-
Do not let the power cord touch hot surfaces or hang over edge of table or counter.
-
Be careful if hot liquid is poured into the blender as it can be ejected out of the appliance due to a sudden steaming.
-
Do not place the machine on or near a hot gas or electrical burner, in a heated oven, or allow machine to touch hot surfaces. External heat sources can damage the machine.
-
Keep hands and utensils out of container while motor is running to prevent the possibility of severe personal injury and/or damage to the Vitaminix machine. A rubber spatula may be used, but only when the Vitaminix machine is not running.
17. WARNING: Blades are sharp. Handle carefully.
- Never try to remove the blades while container is sitting on the motor base.
-
Do not operate with loose, nicked or damaged blades - replace immediately.
To reduce the risk of personal injury, never place blade assembly on motor base without the Vitamix container properly attached.
Care shall be taken when handling the sharp cutting blades, emptying the bowl and during cleaning -
The maximum capacity is equivalent to the ounces (liters) listed on the container, i.e., 48 oz./1.4 L, and is substantially less with thick mixtures.
- Always operate the Vitaminix machine with the lid in place and securely attached.
- Display window area will scratch when contacted with a scouring pad or sharp object. Use a soft cloth to wipe the control panel area clean.
- The machine cannot be cleaned with a water jet.
- The 20 amp circuit per machine is recommended for 120V installation. One dedicated circuit per machine is recommended for 220-240V and 100V-110V installation. Consult your local electrical codes for proper installation.
- CAUTION: Turn power off or unplug the machine before touching movable parts. Shut off power switch at night or whenever machine will be left unattended.
Save These Safety Instructions
The Vitamix blender's U.S.A. power cord comes equipped with a three-prong (grounding) plug which mates with a standard three-prong wall outlet (Figure A). This cord will vary for countries outside the USA.
- Do not cut or remove the third (ground) prong from the plug or power cord.
- Consult your electrician if you are not sure if the wall outlet is grounded through the building wiring.

WARNING!
Do not leave blender unattended when in use.
Turn power off or unplug the machine before touching movable parts. Shut off power switch at night or whenever machine will be left unattended.
If you detect a change in the sound of the machine or if a hard or foreign object comes into contact with the blades, do not serve the drink. Inspect your blade assembly for loose, nicked or missing parts. If parts are loose, missing, or nicked, replace with new blade assembly.
When processing hot liquids:
- Do NOT expose the container to temperatures over 210^ (99^)
- Do NOT expose the container to hot liquids or ingredients over 210^ (99^) .
Use caution. Escaping steam or splashes may scald. Never start on the highest speed when blending hot ingredients. Three-prong adapters are not to be used in Canada.
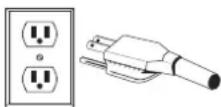
FIGURE A
IMPORTANT NOTES!
THE INSTRUCTIONS APPEARING IN THIS USE AND CARE MANUAL CANNOT COVER EVERY POSSIBLE CONDITION AND SITUATION THAT MAY OCCUR. COMMON SENSE AND CAUTION MUST BE PRACTICED WHEN OPERATING AND MAINTAINING ANY APPLIANCE.
LIMITED WARRANTY
In order to maximize the life and keep your Vitaminx product in good working order, it is important that you follow a few simple maintenance tips:
- Periodically inspect the drive socket for visible wear and tear, cracks, or brakes to the socket. If damage is found, replace the drive socket with the extra drive socket enclosed with your blender. To purchase additional replacement drive sockets contact Vitaminix at 1-800-437-4654 (1-800-4DRINK4) for a dealer near you. For customers outside the U.S.A., contact your authorized Vitaminix Distributor, or call the Vitaminix International Division at +1.440.782.2450 or email international@vitamix.com for a distributor near you.
- Manually rotate the blade bearing assembly to make sure it turns without hesitation or doesn't spin too freely. If the blade hesitates or spins too freely, contact Vitaminix at 1-800-437-4654 (1-800-4DRINK4) for warranty information or a dealer near you. For customers outside the U.S.A., contact your authorized Vitaminix Distributor, or call the Vitaminix International Division at +1.440.782.2450 or email international@vitamix.com for a distributor near you.
- Never run the machine without the centering pad properly placed on the base. Vita-Mix Corporation (hereinafter "Vita-Mix") warrants to the original end-user (proof of purchase required) purchased in the U.S.A., that this Vita-Mix blender (hereinafter the "Equipment") is free from defects in material and workmanship for the warranty periods applicable to the Equipment as described herein and subject to the conditions set forth below.
Motor Base
Vita-Mix warrants to the original end-user that:
If the motor base fails within thirty (30) days from the date of purchase, Vita-Mix will replace the motor base without charge.
If the motor base fails after thirty (30) days but within one year from the date of purchase, due to a defect in materials or workmanship, Vita-Mix will assume the cost of all parts and labor necessary to repair the motor base.
If the motor base fails after one year but within three (3) years from the date of purchase due to a defect in materials or workmanship, Vita-Mix will assume the cost of the parts deemed necessary to repair the base.
Container, Lid, Blade Assembly, Drive Socket and Sound Enclosure (if included)
The container, lid, blade assembly, drive socket and where included a Vita-Mix manufactured sound enclosure, are warranted against defects in material and workmanship for one year from the date of purchase.
Conditions
The warranties contained herein run only to the original end-user and are not transferable. To make a warranty claim, proof of purchase is required.
This warranty is the sole remedy of the purchaser and sets forth the only obligations of Vita-Mix and does not cover normal wear-and-tear, abuse, misuse, negligent use, alteration of the base or container (or the sound enclosure), or exposure to extreme conditions and is only valid if the Equipment is used in accordance with the accompanying instruction booklet (which may also be accessed at www.vitamix.com).
If applicable, improper installation or ventilation in the case of the in-counter model of the Equipment, or placing the Equipment in a sound enclosure not manufactured by Vita-Mix will void this warranty.
This warranty is void in the event that repairs to the Equipment are performed by someone other than Vita-Mix or an authorized Vita-Mix Service Center. Vita-Mix will not be responsible for the cost of any unauthorized repairs.
The sole obligation of Vita-Mix under this warranty is to repair or replace the warranted part or parts as determined exclusively by Vita-Mix.
In no event, whether based on contract, indemnity, warranty, tort (including negligence), strict liability or otherwise, shall Vita-Mix be liable for any special, indirect, incidental or consequential damages whatsoever including, without limitation, loss of profit or revenue. The above limited warranty is your exclusive remedy, and you and Vita-Mix hereby expressly disclaim all other warranties or conditions, express or implied, statutory or otherwise, including any implied warranty of merchantability and any implied warranty of fitness for a particular purpose, and, without limiting the generality of the foregoing, you and Vita-Mix hereby expressly exclude, to the extent permitted by law, the application of any sale of goods legislation and the United Nations Convention on Contracts for the International Sale of Goods, as may be applicable.
Some jurisdictions do not allow a limitation on implied warranties or on special, incidental or consequential damages.
No employee of Vita-Mix or any other person is authorized to make any warranty in addition to or amendment of the warranties made herein. For warranty details for machines purchased outside the U.S.A., contact your authorized Vita-Mix distributor, or call the Vita-Mix International Division at +1.440.782.2450 or email international@vitamix.com for a distributor near you. In the event your Vita-Mix blender needs service or repair covered by the terms of this warranty, please call the Vita-Mix Corporation for warranty assistance. For machines purchased in the U.S.A., call Vita-Mix Technical Support: 800-886-5235. If purchased outside the continental U.S.A., contact your authorized Vita-Mix Distributor, or telephone the Vita-Mix International Division at +1.440.782.2450 or email international@vitamix.com for a distributor near you.
Customer is responsible for in-bound freight costs for warranty service.
How to Obtain Warranty Coverage and Repair
Who to Contact For Warranty Service and Repair. In the event your Vitaminix blender needs service or repair covered by the terms of this warranty, please call the Vita-Mix Corporation, an authorized service center or a local distributor for warranty assistance.
- For Equipment purchased and located in the US and Canada, call Vitaminix Customer Service at: 800-437-4654.
For Equipment purchased outside the continental U.S.A.: Contact your authorized Vitaminix Distributor or the Vitaminix International Division at +1 (440) 782.2450 or email international@vitamix.com for a distributor near you.
You will be asked to provide proof of purchase for the Equipment. If the remote technical support team cannot fix the Equipment remotely, the Equipment will need to be serviced. The team will help you either locate an authorized service center or arrange for the Equipment to be shipped back to Vitamix.
How to Ship the Equipment to Vitamin Mix for Service
A. Obtain a Return Authorization Number Before Shipment. Do not return or send in Equipment without the approval from Vitaminix. Under no circumstances will Vitaminix be responsible for the cost of any unauthorized repairs. All Equipment returns must have the Return Authorization Number ("RA") clearly marked on the outside of the box. Any Equipment that is sent to Vitaminix without prior authorization or approval will be returned to the shipper's address "as is" without repair.
B. Properly Package The Returned Item. Any item sent to Vitaminix must be sent in original or sufficient packaging.
Instructions for using the Pre-Set Program Buttons
The following is the basic settings of the six Pre-Set buttons for The Quiet One. These programs, numbered 1 through 6, are blending cycles designed for the most commonly made drinks. Depending on the viscosity of the drink you are creating, selecting one of the Pre-Set programs will run the machine for a full cycle. The machine will stop by itself when the cycle is complete. A cycle varies in speed and length. Your machine's Pre-Set options may differ due to program revisions or due to the difference of recipes, your results may also vary.
BUTTON 1: General Purpose / Smoothie - blends smoothies and thin drinks consisting of juice and ice to a creamy consistency. (18)
BUTTON 2: Double Smoothle - blends similar drinks to that of button 1 but at larger volumes. (18)
BUTTON 3: Frozen Coffee and Juices - blends light coffee drinks to a creamy consistency. (18)
BUTTON 4: Ice Cream Drinks - blends drinks containing hard ice cream to a thick shake consistency. (28)
BUTTON 5: Double and hard-to-blend ice cream drinks. (20)
BUTTON 6: Thick Hard-toblend Smoothie - blends thick frozen fruit & hard ingredients for a thick but consistent smoothie. (28)
Blending Tips
- Place liquids and soft foods in the container first, solid items and ice last. Although not necessary for processing, you may want to cut or break food into smaller pieces for more precise measuring of ingredients. Thawed or partially thawed fruit is recommended.
- As a general rule, compared to other blenders, you do not need as much ice to make an equally frozen drink in The Quiet One. If your recipe freezes up, try reducing the amount of ice.
- Set the container on the motor base by aligning it over the centering pad anchored to the base. (Motor must be completely stopped before positioning container.) Containers are not to be used for hard, dry materials. Avoid running your machine with the container empty.
- Always use a lid that is securely attached when blending.
- Plug the machine into the nearest outlet (if unplugged). Press the On/Off switch to on. Select desired programmed setting by pressing any of the Pre-Set buttons 1 through 6. The machine will immediately begin to cycle through the selected program and turn off when the program is complete. (NOTE: Each button has a different pre-selected combination of speed and length for blending.)
- Once one of the six Pre-Set program buttons is pushed, the machine will start and stop automatically. By pressing another Pre-Set button, the machine will stop the blending cycle.
- When the cycle is complete, the blender stops. Wait until blades come to a complete stop before removing the lid and/or container from the motor base.
- Remove the container, pour, garnish and serve the drink.
- Press the On/Off power switch to off when not in use.
Maintenance Tips
- Never bang the container against a surface to loosen the ingredients. Remove the container from the base and use a rubber spatula to remove thick mixtures from the bottom of your container.
- Never shake or rattle a container while in use.
- Never remove the container before the machine has come to a complete stop.
- Never start the motor before the container is in place.
IMPORTANT NOTES!
- Check your blades daily for loose, nicked or missing parts. If you find something is loose, nicked or missing, replace the blade assembly before use. Do not tighten hex-headed screw (on top of blade assembly). If loose, replace blade assembly immediately.
The instructions appearing in this Use and Care Manual cannot cover every possible condition and situation that may occur. Common sense and caution must be practiced when operating and maintaining any appliance. - When the thermal protector shuts the motor off, review your processing techniques and your instructions. Your recipes may be too thick or have too much material in them. Consider adding more liquid and consult Vitaminix® Customer Service or your local Vitaminix Distributor for further assistance.
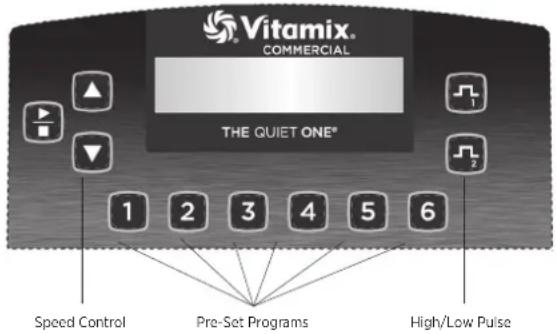
CONTROL PANEL
On/Off Power Switch: Located on the back of the motor base, the On/Off switch controls the power to the machine. While plugged in, switch to on to ready the machine for blending. Shut off the power switch at night or whenever the machine will be left unattended.
Start/Stop Button: Pressing Start(▶)/Stop(■) once starts and runs the machine and turns the blade. Press Start/Stop button again to stop the machine and the blade.
Speed Buttons: Press the button to gradually increase the speed of the blade in increments of 1% , up to 100% . Press the button to gradually decrease the speed of the blade in increments of 1% , down to 7% . Speed is used to set the blending speed of the Pulse buttons and the Start/Stop button.
Pre-Set Program Buttons: These buttons, numbered 1 through 6, are preprogrammed blending cycles designed for the most commonly made drinks. Depending on the viscosity of the drink you are creating, pressing one of the six Pre-Set program buttons will run the machine for a full cycle. The machine will stop by itself when the cycle is complete. A cycle varies in speed and length. Each button can be reprogrammed to any recipe through custom programming or by reprogramming to any of the 34 available recipes. Due to difference of recipes, your results may vary.
Display Window: This area, depending on which button is pressed, displays a variety of operation messages. A "Ready" message appears when there is power to the machine.
IMPORTANT NOTES!
Start/Stop Button: Pressing one of the Pre-Set program buttons, while the motor is running, will stop the machine.
Speed Button: These settings will reset if the power is shut off. Pulse Buttons: The pulse provides a quick increase or decrease in speed of the blade when blending or refreshing a drink. Press to increase the motor to speeds that range from 51% - 100% . Press to decrease the motor speed down to a range of 50% - 7% . The Pulse button will override the running program as long as it is Pressed. Once released, the original program continues its cycle.
- The Pulse High ( ) and Low ( ) speed is set by using the Speed buttons. To set, while pressing and holding a Pulse button, press the Speed button until the desired motor speed is reached. The pulse speed will remain at this setting until changed again with the Speed buttons.
Owner Controls: The control panel is accessible by activating the Power Switch located on the back of the motor base while pressing button 2.
- Once the unit powers up, the display will cycle through three screens. The first indicates the current program version. The second indicates which program is running on the machine. The third will indicate the motor temperature (NORM, WARM, HOT), and the total hours of operation, including production and testing. This time can no reached, button 2 can be released.
- Press button 2 within 12 seconds to scroll through the menu settings.
- The first press will reveal the timer. Total operation is recorded in hours, minutes and seconds; including production and testing. This time cannot be cleared.
- The second press will reveal the name of the program controlling the Pre-Set buttons. If you are using the Advance settings, this will read "VITA-MIX ADVANCE PROGRAM."
- The third press will reveal an option to reset the Pre-Set buttons to the original factory settings.
PROGRAMMING
The Quiet One® is pre-programmed with an Advance® program which is optimized for the Advance® container. The program can be customized by using the control panel, or a programming chip or programmer software kit available from VitaminX. Call your distributor or customer service for more information.
Programming Pre-Set Buttons
- Access the 34 stored programs by activating the power switch located on the back of the motor base while pressing the High Pulse button. The display will say "BUTTON SET UP"
- Press the Speed buttons to scroll through the "Recipe" numbers until you reach the one you want.
-
Press the Pre-Set button that you want to program for the recipe selected. For Example: If you wanted to program button 1 with recipe #17:
-
After accessing the stored programs as described in step 1, the display window will say "BUTTON SETUP."
- Press the Speed button until the screen displays "Recipe 17."
- Press the 1 button to apply Recipe 17.
- Either continue programming the other five buttons or press the High Pulse button to exit and continue blending.
BUTTON SET UP RECIPE1
BUTTON SETUP RECIPE17
BUTTON SET UP
RECIPCE 17-→
READY
| VITA-MIX CORP VERSION #201 | ||
| VITA-MIX ADVANCE PROGRAM #201 | ||
| TEMP | COUNT | TOTAL |
| NORM | 25 | 100 |
| TIMER | HR: | MIN: SS |
| 0: | 10: 33 | |
| 1 TO OVERWRITE CURRENT PROGRAM | ||
PROGRAMMING (CONTINUED)
Programming your Machine with a Custom Chip
- Turn on the machine.
- Remove the container and rotate the machine to the rear so that you can see the programming port.
- With the rear of the machine facing towards you, insert the custom programmed chip (with the words, "THIS SIDE FACING TO THE FRONT OF THE MACHINE" toward the left) into the port located on the right hand side of the machine opposite the On/Off switch. Push gently until chip engages into the port. The display window will read "NEW MODULE."
- Within 10 seconds, the six Pre-Set buttons will be reprogrammed and the display window will read "Saved" then "Ready."
- Remove the programming chip, return it to the original package and store in a safe, easily accessible spot.
- Press one of the six Pre-Set buttons to reveal, in the display window, the name of the program/drink.

Custom Programmed Chip
Resetting the Pre-Set Buttons to the original factory settings
- Access the Owner Controls by activating the power switch located on the back of the motor base while pressing button 2.
- Once the unit powers up, it will cycle through three screens then stop on the motor status screen. Press button 2 again, within 12 seconds, to scroll through the menu settings.
- Scroll using button 2. The screen will display "1 TO OVERWRITE CURRENT PROGRAM". Press button 1 to reset to the original factory settings.
IMPORTANT NOTES!
Programming Chip: If the above programming steps are taken and the custom programming does not appear with the first blend cycle, turn the chip 180^ (side-to-side) and try again.
Recipe Options Arranged by recipe number (#) and drink type:
| DRINK TYPE# | DESCRIPTION | RUN TIME | |
| 1 | General Purpose/ Smoothie | Ramps up to 60% for 18 seconds :18 | |
| 2 | Double Smoothie | Ramps up to MED (45%) for 6 seconds, then (58%) for 8 seconds, then HIGH (85%) for 4 seconds | :18 |
| 3 | Frozen Coffee & Juices | Ramps up to LOW (25%) for 4 seconds then to MED (60%) for 14 seconds | :18 |
| 4 | Ice Cream Drinks | Ramps up to MED (55%) for 5 seconds, then LOW (25%) for 7 seconds, then (12%) for 16 seconds | :28 |
| 5 | Double & Hard to Blend Ice Cream Drinks | Ramps up to MED (51%) for 10 seconds, then ramps up to HIGH (85%) for 10 seconds | :20 |
| 6 | Thick Hard-To-Blenc | Ramps up to LOW (15%) for 7 seconds, then gradually ramps up to HIGH (82%) for 21 seconds | :28 |
| 7 | Medium Smoothie Gradually ramps up to HIGH (100%):20 | ||
| 8 | Hard to Blend Smoothie | Gradually ramps up to HIGH (100%):25 | |
| 9 | Thick Smoothie | Ramps up to MED (50%) for 15 seconds, then ramps up to HIGH (100%) for 20 seconds | :35 |
| # | DRINK TYPE | DESCRIPTION | RUN TIME |
| 10 | Mix, Light Juice Drinks on LOW (10%) | :04 | |
| 11 | Heavy Smoothie | Runs at MED-HIGH (75%), ramps up, back down, then up to HIGH (100%) | :40 |
| 12 | Hard to Blend Smoothie | Runs on LOW (7%) for 25 seconds, quickly ramps up to HIGH (100%), then decreases to LOW (7%), and quickly back to HIGH (100%) | :40 |
| 13 | Regular Iced Coffee | Quickly ramps up to HIGH (100%) | :09 |
| 14 | Double Iced Coffee | Quickly ramps up to HIGH (100%) | :13 |
| 15 | Thick Coffee | Ramps up to MED (55%), gradually decreases to LOW (7%), then quickly up to HIGH (100%) | :30 |
| 16 | Multiple Coffees | Ramps up to LOW (25%), gradually ramps up to MED (50%), then up to HIGH (100%) | :25 |
| 17 | Multiple Coffees 2 | Ramps up to LOW (25%), gradually ramps up to MED (50%), then up to HIGH (100%) | :30 |
| 18 | Small Coffee | Gradually ramps up to MED-HIGH (75%) | :14 |
| 19 | 1-2 Drink Cocktail | Ramps up to HIGH (90%) | :13 |
| 20 | 3-4 Drink Cocktail | Ramps up to MED (45%), then ramps up to HIGH (100%) | :25 |
| 21 | Kids Cup | Starts at MED (55%), then decreases to LOW (7%), then to HIGH (100%) | :30 |
| 22 | Bar Shake | Gradually steps up to HIGH (100%) | :25 |
| 23 | Bar Special | Ramps up to MED (58%), decreases to LOW (22%), then gradually steps up to HIGH (100%) | :35 |
| 24 | Utility Blend | Ramps up to MED (40%), then gradually increases to MED-HIGH (75%) | :25 |
| 25 | 1 Shake | Ramps up to MED (50%), decreases to LOW (25%), then gradually decreases to LOW (15%) | :20 |
| 26 | 2 Shake | Ramps up to MED (50%), decreases to LOW (25%), then gradually decreases to LOW (17%) | :30 |
| 27 | 3 Shake | Ramps to HIGH (100%), decreases to LOW (25%), then decreases to LOW (15%) | :20 |
| 28 | Ice Cream Drink | Ramps up to MED-LOW (35%), then ramps to MED-HIGH (75%) | :15 |
| 29 | Frozen Bowl 1 | Ramps up to LOW (25%), then increases to MED-HIGH (80%) | :60 |
| 30 | Frozen Bowl 2 | Ramps up to MED-HIGH (70%), quickly decreases to LOW (25%), then quickly increases to MED-HIGH (80%) | :50 |
The following programs are designed to be used with the Vitaminix Aerating Container (sold separately). Contact your local Vitaminix Dealer/Distributor to purchase the Aerating Container. Contact Vitaminix Customer Service directly for availability and product information.
| 31 | Delicate Aerating Program 1 | Ramps up to LOW (18%) | :20 |
| 32 | Delicate Aerating Program 2 | Ramps up to low (22%) | :25 |
| 33 | Aggressive Aerating Program 1 | Quickly ramps up to MED-HIGH (80%) | :20 |
| 34 | Aggressive Aerating Program 2 | Slowly ramps up to MED-HIGH (80%) | :30 |
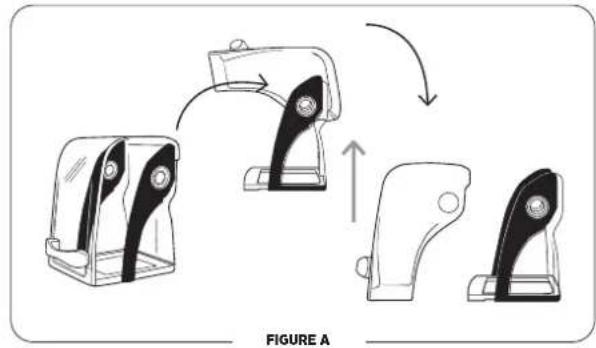
MACHINE ASSEMBLY
Cover Door
- Lift the handle to open the cover. Gently spread the sides of the door over the round hinges and remove.
- To reinstall the cover door, gently spread the sides of the door and place the door hinge cutouts over the round hinges.
IMPORTANT NOTES!
Containers:
- The Quiet One® machines are optimized for use with the Vitaminix® 48 oz., /1,4 L Advance® container (3 sided container). The 64 oz. / 2,0 L standard container will not fit in the compact cover used on the The Quiet One® Contact Vitaminix customer service at 800-886-5235 or contact your distributor for more information.
- Outside the United States and Canada, your machine may come with a different container configuration.
Twist Lock Compact Cover Removal
Note: The twist lock cover is designed to be removed without the use of tools. DO NOT force the cover to rotate with tools or other objects. To avoid damaging the cover, apply pressure to the cover frame, not the clear plastic material. To remove the cover, pressure will be applied at two points to disengage the cover from locking tabs on the motor plate.
To remove the twist lock sound enclosure:
- Remove the compact cover door to prevent it from closing unexpectedly. Lift the handle to open the cover. Gently spread the sides of the door over the round hinges and remove.
- Lift up on the front of the centering pad and peel away from the motor base. Lift it up and over the drive socket to remove. (See Figure A).
- Grasp the bottom frame of the cover with two hands as shown in (See Figure B).
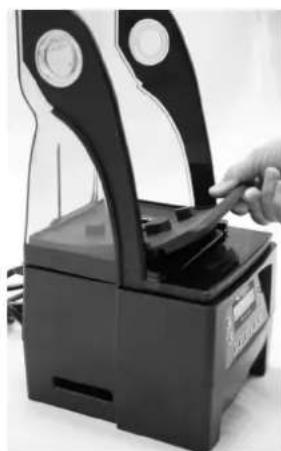
FIGURE A
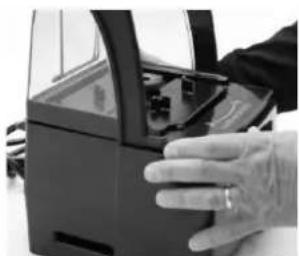
FIGURE B
- With equal pressure and in one motion, use the index finger of your left hand to apply pressure at the back of the cover frame while at the same time apply pressure with your right thumb to unlock and twist the cover away from center in a counter-clockwise direction (See Figure C).
- If necessary, continue applying pressure at these two points until the cover is free and can be separated from the motor base (See Figure D).
- Once disengaged, lift the cover up and away from the blender base (See Figure D).
Note: See Figure E for an example of the motor base with the twist lock compact cover removed.
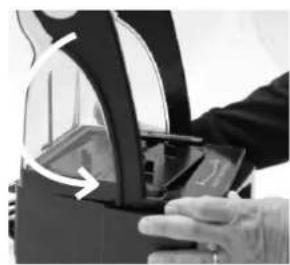
FIGURE C
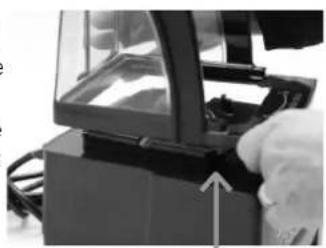
FIGURE D
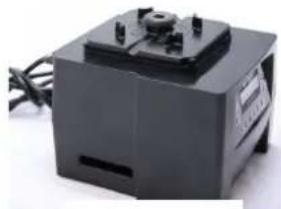
FIGURE E
Twist Lock Compact Cover Installation
- Put the twist lock compact cover on top of the blender base. Align the four locking tabs on the motor adapter plate with the openings on the compact cover. (See Figure A).
- Twist the compact cover clockwise on the motor base to lock it in place. (See Figure B).

FIGURE A
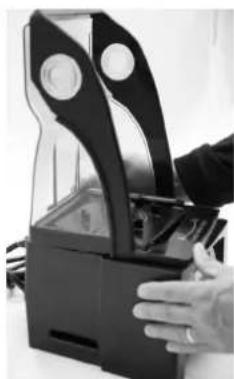
FIGURE B
- Align the rail guides on the centering pad with the slots between the compact cover and the motor adapter on the motor base (See Figure C).
- Put the centering pad in place on the motor base in the proper alignment. (See Figure D).
Note: The centering pad MUST be used on the motor base during use to keep the twist lock compact cover in place. DO NOT use the machine without the centering pad.
- From the back of the motor base working towards the front, apply pressure on the centering pad to push it into position on the motor base, making sure that the centering pad is completely seated under the drive socket. (See Figure E).

FIGURE C
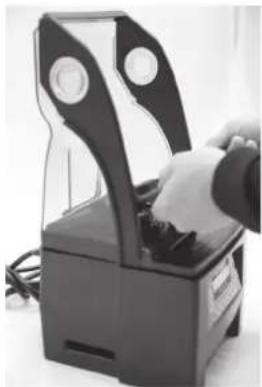
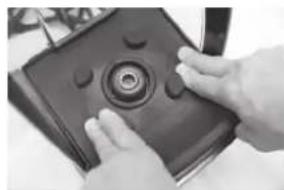
FIGURE D
FIGURE E
- To reinstall the cover door, gently spread the sides of the door and place the door hinge cutouts over the round hinges. (See Figures F and G).
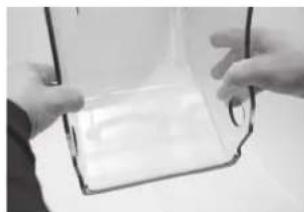
FIGURE F
Twist Lock Compact Cover FAQ's
Q: My blender has a different type of sound cover. Can I use the new twist lock cover?
A: If your blender has the locking tab motor adapter design you can use a twist lock cover. The twist lock cover requires the centering pad shown in Figure E. The centering pad can be ordered using Vitamin X Item Number 067791.
Q: I have a new blender with a twist lock cover, can I use my old magnetic style cover on this machine?
A: No, the older blenders had magnets in the blender base that held the cover in place. The new twist lock motor bases do not include magnets.
Q: My twist lock blender does not have an isolation gasket. Do I need one?
A: No, with the new twist lock cover the isolation gasket is not needed.
Q: I have a blender with a twist lock motor adapter plate, an isolation gasket and a magnetic style cover, can I switch to the new twist lock design?
A: Yes, you can use either type of cover on this design.
Q: I have several older units with magnetic sound covers. I purchased a new blender and it has the twist lock cover. I would like to switch all my blenders to the twist lock design.
A: Vitamix is currently not offering an upgrade package to convert your old motor base to twist lock design.
Q: My blender was repaired and it was returned it has a twist lock motor plate. Can I still use my magnetic cover and isolation gasket?
A: Yes, you can still use your magnetic style sound cover or you can upgrade to the new twist lock sound cover and eliminate the isolation gasket.
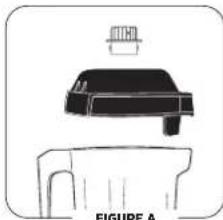
Two-Piece Lid (Figure A)
48 oz./1,4 L Advance Container
The two-piece lid is easy to clean and easy to put on, take off and seal.
To remove a fully latched lid, lift the two tabs and pull upward and off.
- Twist the center lid plug to fasten or remove.
To secure lid plug, rotate it so one tab locks between the notches on top of rubber lid.
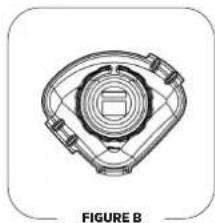
One-Piece Lid (Figure B)
48 oz./1,4 L Advance Container
The one-piece lid is easy to clean and easy to put on, take off and seal.
- There is no lid plug for this lid.
- Ingredients can be added through port on top.
Blade Assembly
Blade Agiltator Assembly: The blade assembly includes a precision-hardened stainless steel blade with enclosed double sealed steel ball bearings for maximum durability. The rugged blade assembly literally explodes molecules of food and ice in the container, helping every batch to homogenize more effectively. The blades do not need to be removed for normal cleaning.
Drive Spline: Inserts into drive socket on the motor base to turn the blade. Note: Removing and replacing your container while the drive socket is still rotating will strip the drive spline "teeth." (This part is NOT removable.)
Retalner Nut: Must be tight.

FIGURE G
IMPORTANT NOTES!
Cleaning Products: Do not use abrasive cleaning agents or concentrated bleach when cleaning. Do not use any of the following cleaning products: automatic dishwashing detergents, oven cleaners, steel wool or other abrasive pads.
Cover: Do not wash cover door, handle or back cover in dishwasher. It is recommended that the handle not be disassembled during cleaning. However, if you choose to disassemble the handle from the cover, make sure to not over-tighten it when reattaching it to the cover. Doing so will cause damage.
Container: Do not let mixtures, liquids or food products dry in the container. Rinse after use. Dry product may lock around the blade and weaken/tear the bearings seal when restarted. Do not place containers in the freezer. Extremely low temperature combined with hot ingredients and/or the immediate rapid action of the blade may crack the container. Microwaving and automatic dishwashing are not recommended.
Blade Assembly: Do not soak the blade agitator assembly.
- Be sure to uplug the blender and wring excess water out of cloth or sponge when cleaning around the controls or any electrical part.
**Recommended sanitizing solution: 1.5 tsp. / 7,4 ml institutional or household bleach in 2 qt. / 1,9 L water.
Motor Base/Control Panel: Unplug the power cord and gently wash the outside surface with a damp soft cotton cloth moistened with a mild solution of warm water* and nonabrasive detergent or nonabrasive liquid spray cleaner. Be careful to not scratch or scrub the display window on the control panel. Never Immerse the motor base in water or other liquid. Dry with a soft cotton cloth.
Lid: Wash in warm, soapy water. Rinse clean under running water and dry.
Cover Door: The cover can be removed and cleaned by placing under running water and washing with a soft cloth. Wipe dry and replace back on the base.
Container Centering Pad: Remove the centering pad. Wash the pad in warm, soapy water. Rinse clean under running water and dry. Reassemble before use. Replace the sound enclosure. The centering pad should be flat on the motor base.
Container: The Advance container has been designed to be chemical resistant. However, for maximum container life, hand washing is recommended.
To Clean: Wash all container parts in warm soapy water. Rinse and drain. Do not soak the blade assembly.**
To Sanitize: After all solid residue is removed, fill container 3 / 2 full with a sanitizing solution mix. *** Return container to motor base and firmly position the two-piece lid. Run machine on a high speed for 30 seconds. Turn machine off and allow mixture to stand in the container for an additional 112 minutes. Pour out contents. Return container to motor base and run machine empty for an additional 5 seconds. Do not rinse after sanitizing. Allow container to air dry.
TROUBLESHOOTING
| Problems: · Loud noise from blender container blade area · Container blades do not spin · Increased vibration · Leaking from bottom of container | Possible Actions: a. Broken or worn drive socket. Replace (Item #891). Instructions are included with part. b. Check blade assembly for loose, damaged or nicked components and replace. c. Tighten retainer nut with the retainer nut wrench moving clockwise until it is tight. |
| · Loud grinding noise from the blender motor Damaged motor bearings, your machine may need to be repaired. | |
| · Machine will not run · Display window does not say "Ready" | a. Double-check to make sure power cord is firmly in power outlet. b. Check to make sure the On/Off power switch is in the on position. c. Turn the On/Off power switch to off, then on, to reboot the electronics. |
| · Display window reads "SHUT DOWN SEE MANUAL" | Let the machine cool for an hour, restart. |
| · Display window reads "MOTOR LOCKED PROGRAM TERMINATED" Let the machine cool for an hour, restart. | |
| · Machine is running irregularly · "NO PROGRAM" is displayed when a button is pushed · Button pressed starts wrong program · Machine starts by itself · A specific program button is defective · Machine does not work when first tried · Machine works but no information displayed on screen · Program buttons run the blender on the same speed | a. Turn the machine off and on again to reset the programming. b. Try plugging the machine into a new outlet. |
| · Display window reads "CORRUPT DATA" Call Vitaminix technical support. | |
| · Machine stops in the middle of its blend cycle and resets; display window reads "VITAMIX GENERAL PROGRAM" then "READY" | a. Plug the machine into its own dedicated outlet. |
Station de mélange The Quiet One
SYMBOLS
REMARQUES IMPORTANTES!
LES INSTRUCTIONS CONTENUES DANS CE GUIDE D'UTILISATION ET D'ENTRETIEN NE COUVRENT PAS TOUTES LES CONDITIONS ET LES SITUATIONS POUVANT SURVENIR. LE BON SENS ET LA PRUDENCE SONT DE MISE LORS DE L'UTILISATION ET DE L'ENTRETIEN DE TOUT APPAREIL.
GARANTIE LIMITÉE
REMARQUES IMPORTANTES!
REMARQUES IMPORTANTES!
| BUTTON SET UP RECIPCE 1 |
| BUTTON SET UP RECIPCE 17 |
| BUTTON SET UP RECIPCE 17------>1 |
| READY |
PROGRAMMATION (SUITE)
REMARQUES IMPORTANTES!
REMARQUES IMPORTANTES!
Recipients:
Installation ducovercle compact Twist Lock
REMARQUES IMPORTANTES!
The Quiet One® Blending Station
SIMBOLOs
BUTTON SET UP RECIPE1
BUTTON SET UP RECIPE 17
BUTTON SET UP RECIPE 17-
READY
PROGRAMACION (CONTINUACION)
- The Quiet One® Blending Station
- Dimensions:
- RECYCLING INFORMATION
- WARNING
- To Avoid Injury.
- Electrical Shock Hazard.
- READ ALL INSTRUCTIONS, SAFEGUARDS AND WARNINGS BEFORE OPERATING THE BLENDER.
- Do not use outdoors.
- WARNING: Blades are sharp. Handle carefully.
- Save These Safety Instructions
- WARNING!
- IMPORTANT NOTES!
- LIMITED WARRANTY
- Motor Base
- Container, Lid, Blade Assembly, Drive Socket and Sound Enclosure (if included)
- Conditions
- How to Obtain Warranty Coverage and Repair
- How to Ship the Equipment to Vitamin Mix for Service
- Instructions for using the Pre-Set Program Buttons
- Blending Tips
- Maintenance Tips
- PROGRAMMING
- Programming Pre-Set Buttons
- PROGRAMMING (CONTINUED)
- Programming your Machine with a Custom Chip
- Resetting the Pre-Set Buttons to the original factory settings
- MACHINE ASSEMBLY
- Cover Door
- Containers:
- Twist Lock Compact Cover Removal
- To remove the twist lock sound enclosure:
- Twist Lock Compact Cover Installation
- Twist Lock Compact Cover FAQ's
- Two-Piece Lid (Figure A)
- oz./1,4 L Advance Container
- One-Piece Lid (Figure B)
- Blade Assembly
- Station de mélange The Quiet One
- REMARQUES IMPORTANTES!
- GARANTIE LIMITÉE
- PROGRAMMATION (SUITE)
- Recipients:
- Installation ducovercle compact Twist Lock
- PROGRAMACION (CONTINUACION)
Brand : Vitamix
Model : The Quiet One
Category : Food Processor