56870 - Coffee machine WestBend - Free user manual and instructions
Find the device manual for free 56870 WestBend in PDF.


| Brand | WestBend |
| Model | 56870 |
| Product Type | Drip coffee maker |
| Capacity | 10 cups (approx. 1.2 L) |
| Power Supply | 120 V~, 60 Hz (polarized plug) |
| Power | Not specified |
| Built-in clock | Yes, with AM/PM display |
| Programmable timer | Yes, up to 24 hours in advance |
| Auto shut-off | Yes, after 2 hours of inactivity |
| Pause 'n Serve function | Yes, allows serving a cup before the cycle ends |
| Filter type | Paper filter #4 or permanent filter (not included) |
| Carafe | Glass carafe with lid |
| Warming plate | Keeps coffee warm after brewing |
| Cleaning | Hand wash or dishwasher (filter basket, carafe and lid on top rack) |
| Descaling | Recommended with undiluted white vinegar |
| Safety | Polarized plug, safety auto shut-off |
| Warranty | 1 year limited (parts and labor) |
| Replacement parts | Available from the manufacturer (Focus Electrics) |
| Intended use | Household use only |
Frequently Asked Questions - 56870 WestBend
User questions about 56870 WestBend
0 question about this device. Answer the ones you know or ask your own.
Ask a new question about this device
Download the instructions for your Coffee machine in PDF format for free! Find your manual 56870 - WestBend and take your electronic device back in hand. On this page are published all the documents necessary for the use of your device. 56870 by WestBend.
USER MANUAL 56870 WestBend
| WEST BEND® |
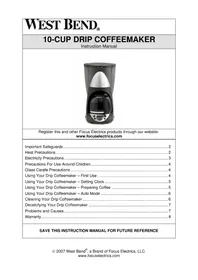
| 10-CUP DRIP COFFEEMAKERInstruction Manual |
 |
| Register this and other Focus Electrics products through our website:www.focuselectrics.com |
| Important Safeguards......2Heat Precautions......2Electricity Precautions......3Precautions For Use Around Children......4Glass Carafe Precautions......4Using Your Drip Coffeemaker – First Use......4Using Your Drip Coffeemaker – Setting Clock......5Using Your Drip Coffeemaker – Preparing Coffee......5Using Your Drip Coffeemaker – Auto Mode......6Cleaning Your Drip Coffeemaker......6Decalcifying Your Drip Coffeemaker......7Problems and Causes......7Warranty......8 |
| SAVE THIS INSTRUCTION MANUAL FOR FUTURE REFERENCE |
IMPORTANT SAFEGUARDS

CAUTION
To prevent personal injury or property damage, read and follow all instructions and warnings.
When using electrical appliances, basic safety precautions should always be followed including the following:
- Read all instructions, including these important safeguards and the care and use instructions in this manual.
- Do not use appliance for other than intended use.
- Do not place on or near a hot gas or electric burner, or a heated oven.
- The use of accessory attachments not recommended by Focus Electrics may result in fire, electric shock, or injury to persons.
- Do not operate when the appliance is not working properly or when it has been damaged in any manner. For service information see warranty page.
• Do not attempt to repair this appliance yourself.
• For household use only.

CAUTION
To prevent burns, personal injury or property damage, read and follow all instructions and warnings.
HEAT PRECAUTIONS
- Do not touch hot surfaces. Use handles or knobs where provided. Use hot pads or oven mitts when handling hot surfaces.
- Do not move an appliance containing hot water, coffee or other hot liquids.
- Do not refill the water reservoir while the appliance is on. Turn the appliance off and allow to cool before refilling with water.
- Make sure glass carafe is in place when brewing coffee. If the glass carafe is not in place, hot water or hot coffee will overflow.
• Scalding may occur if the lid is removed during the brewing cycle. - The lid of the carafe must be in place and properly positioned on the coffee carafe during the brew process or hot water or hot coffee may overflow.
- Always use the proper grind of coffee. Too fine of a grind could clog the filter and cause hot water or hot coffee to overflow.

CAUTION
To prevent electrical shock, personal injury or property damage, read and follow all instructions and warnings.
ELECTRICITY PRECAUTIONS
- To protect against fire, electric shock and injury to persons, do not immerse cord, plugs, or other electric parts in water or other liquids.
• Do not operate any appliance with a damaged cord or plug. - Do not use this appliance outdoors.
- Do not plug cord into wall outlet unless power switch is in OFF position.
• Always position switch to OFF and unplug the appliance from outlet before cleaning. Allow to cool before putting on or taking off parts and before cleaning. - A short power-supply cord is provided to reduce risks resulting from becoming entangled in or tripping over a longer cord.
- Longer detachable power-supply cords or extension cords are available and may be used if care is exercised in their use. While use of an extension cord is not recommended, if you must use one, the marked electrical rating of the detachable power-supply cord or extension cord should be at least as great as the electrical rating of the appliance. If the appliance is of the grounded type, the extension cord should be a grounding-type 3-wire cord. The cord should be arranged so that it will not drape over the counter top or tabletop where it can be pulled by children or tripped over.
- This appliance has a polarized plug (one blade is wider than the other). To reduce the risk of electric shock, this plug is intended to fit into a polarized outlet only one way. If the plug does not fit fully into the outlet, reverse the plug. If it still does not fit, contact a qualified electrician. Do not attempt to modify the plug in any way.
- Do not use an outlet or extension cord if the plug fits loosely or if the outlet or extension cord feels hot.
- Keep the cord away from hot parts of the appliance and hot surfaces during operation.

CAUTION
To prevent burns or other personal injuries to children, read and follow all instructions and warnings.
PRECAUTIONS FOR USE AROUND CHILDREN
- Close supervision is necessary when this appliance is used by or near children.
- Do not allow cord to hang over any edge where a child can reach it. Arrange cord to avoid pulling, tripping or entanglement.

CAUTION
GLASS CARAFE CAUTIONS
- The carafe is designed for use with this appliance only. Do not use the carafe provided with this appliance for any other appliance or application.
- Do not place carafe on hot surface or in a heated oven.
- Do not put a hot carafe on a wet or cold surface.
- Do not use a cracked carafe or a carafe having a loose or weakened handle.
- Do not clean carafe with cleansers, steel wool pads, or other abrasive materials.
SAVE THESE INSTRUCTIONS
USING YOUR DRIP COFFEEMAKER – FIRST USE
Before making coffee, clean the entire unit according to the cleaning instructions. Wash all loose parts in warm, soapy water, rinse thoroughly and dry.
- Place appliance on dry, level, heat-resistant surface, away from any edge.
- Plug cord into a 120 volt AC electric outlet only.
- To remove any manufacturing residuals in the appliance, we recommend making at least one full pot with water only, no coffee grounds.
- A small amount of smoke and/or odor may occur upon heating due to the release of manufacturing oils – this is normal.
- Some minor expansion/contraction sounds may occur during heating and cooling – this is normal.
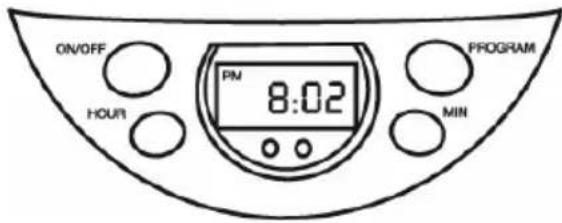
- Press the PROGRAM button once. "CLOCK" should appear in display. If "TIMER" appears in display, press the PROGRAM button once again to have "CLOCK" appear in the display.
- With "CLOCK" in the display, press the HOUR button until the correct hour and AM or PM appears in display. To fast forward numbers, hold HOUR button down.
- With "CLOCK" in the display, press the MINUTE button until correct minutes appear in display. To fast forward number, hold MINUTE button down.
- If you go beyond the desired time, press the respective button down until correct time appears. Clock must be reset whenever appliance is unplugged.
USING YOUR DRIP COFFEEMAKER – PREPARING COFFEE
- Place appliance on dry, level, heat-resistant surface, away from any edge.
- With switch in the OFF position, plug cord into a 120 volt AC electric outlet only.
- Ensure the brew basket is in place. Place #4 paper or permanent coffee filter in brew basket and add desired amount of coffee into the filter. We recommend one measure (measuring spoon provided) of ground coffee for each cup of brewed coffee to start. After using your coffeemaker a few times, you can adjust the amount of coffee to suit your own taste. NOTE: The coffee grind should be appropriate for a “drip” coffeemaker. Do not use coffee that is ground to a powder like consistency. This will prevent water from passing through the coffee and may cause hot water or hot coffee to overflow.
- Open the hinged water reservoir cover. Using the carafe pour in the desired quantity of clean, cool water for the number of cups you are brewing. Close the hinge reservoir cover. Never pour more water into the reservoir than the marked maximum level. Do not use warm or hot water to fill reservoir.
- Place the carafe with lid in position on the warming plate. Make sure carafe sits flat on inside circle of warming plate. The lid of the carafe must be in place and properly positioned on the carafe during the brew process or hot water or hot coffee may overflow.
- Turn the appliance to the ON position. The red indicator light will illuminate indicating that the brewing process has begun. NOTE: As long as the red indicator light is illuminated, the coffee will be kept warm. If the carafe is removed before the end of the brew cycle, it must be returned properly to the warming plate so the coffee may continue to brew and to avoid hot water or hot coffee overflow.
- After coffee has been served, switch unit to OFF position and follow directions in "CLEANING YOUR DRIP COFFEEMAKER" section.
• This coffeemaker features a 2-hour automatic shutoff as a safety feature.
- Pause 'n Serve Feature: The Pause 'n Serve Feature allows you pour a cup of coffee while still in the brewing process. For optimum flavor, allow half the quantity of coffee to finish brewing before removing carafe. Return carafe within 30 seconds so the coffee may continue to brew and to avoid hot water or hot coffee overflow. To prevent scald injury, do not remove any part of appliance, other than carafe, during the brew cycle.
Your West Bend ^® Coffeemaker can be set up to 24-hours in advance to turn on and brew at a pre-programmed time.
- Prepare your coffeemaker as described in the "Preparing Coffee" section of this manual except do not turn the coffeemaker on when ready. Make sure the carafe with cover is in place.
- Ensure the clock has been set to the correct time of day following the instructions in the "Setting Clock" section of this manual.
- Press the PROGRAM button twice or until "TIMER" appears in display. If "CLOCK" appears press the PROGRAM button once again to have "TIMER" appear in display.
- With "TIMER" in the display press the HOUR button until the desired hour and AM or PM appear. To fast forward numbers, hold HOUR button down.
- With "TIMER" in the display press the MINUTE button until the desired minutes appear. To fast forward number, hold MINUTE button down.
- NOTE: If you go beyond the desired time, press the respective button down until correct time appears. Clock and timer must be reset whenever coffeemaker is unplugged.
- Press the ON/OFF button twice or until yellow indicator is illuminated. As long as the yellow indicator light is illuminated, the coffeemaker is in the Auto Mode and will turn on and begin the brewing process at the programmed time. If the carafe is removed before the programmed time or before the end of the brew cycle, it must be returned properly to the warming plate so that the coffee may brew and avoid hot water or hot coffee overflow.
- Switch coffeemaker off and unplug from electrical outlet. Allow the entire unit to cool before cleaning.
- Remove and discard used grounds and disposable filter from the brew basket.
- Clean the brew basket, carafe, and cover in a solution of warm water and mild liquid soap. Rinse thoroughly. These parts may also be cleaned in an automatic dishwasher, top rack only.
-
The exterior of the coffeemaker can be wiped clean with a damp cloth after it has been unplugged and the base is cool.
-
Do not clean the inside of the water reservoir with a cloth or paper towel. This may leave particles in the chambers that may clog small openings in your coffeemaker. Rinse with cold water periodically.
- Decalcify the coffeemaker periodically. See the "Decalcifying Your Drip Coffeemaker" section in this manual.
- The coffeemaker must be decalcified periodically. Over time, mineral deposits build up on internal parts and affect the operation of the coffeemaker. The frequency of decalcification depends on the hardness of your water and how often you use the coffeemaker. Indications that decalcifying is necessary are:
- Increased noise during brewing
- Excessive steaming
- Longer brewing times
- The pumping action stops before all of the water has been pumped from the water reservoir
• If usage is regular, decalcifying should be carried out as follows:
- With soft water, decalcify once per year
- With medium water, decalcify every 3 months
- With hard water, decalcify monthly
- We recommend the use of vinegar for decalcifying.
- Pour 20 ounces (4-cup mark on carafe) of fresh, cool, undiluted white household vinegar into the carafe. Make sure the coffee filter basket and carafe cover are properly positioned. NOTE: Do not use coffee grounds and do not dilute vinegar with water.
- Follow steps 4-7 in "Using Your Drip Coffeemaker – Preparing Coffee" section of this manual.
- Repeat the process above except use clear, cool water in place of vinegar to rinse any remaining traces of the vinegar from the system. Rinse twice using clean, cool water each time.
PROBLEMS AND CAUSES
• Coffee or water leaks from coffee filter basket
- Filter is not properly placed or is folded over
- Filter basket is not properly in place
○ Carafe or carafe cover is not in place - Too much coffee in filter
- Filter basket valve is dirty, broken or missing
• Coffee does not come out or is very slow
- No water in water reservoir
- No coffee in filter holder
- Basket is not properly in place
○ Carafe or carafe cover is not in place - Filter clogged because coffee is ground too fine or packed too tightly
- Coffeemaker needs to be decalcified
PRODUCT WARRANTY
Appliance 1 Year Limited Warranty
Focus Electrics, LLC (“Focus Electrics”) warrants this appliance from failures in the material and workmanship for one (1) year from the date of original purchase with proof of purchase, provided the appliance is operated and maintained in conformity with the provided Instruction Manual. Any failed part of the appliance will be repaired or replaced without charge at Focus Electrics’ discretion. This warranty applies to indoor household use only.
This warranty does not cover any damage, including discoloration, to any non-stick surface of the appliance. This warranty is null and void, as determined solely by Focus Electrics if the appliance is damaged through accident, misuse, abuse, negligence, scratching, or if the appliance is altered in any way.
THIS WARRANTY IS IN LIEU OF ALL IMPLIED WARRANTIES, INCLUDING WARRANTIES OF MERCHANTABILITY, FITNESS FOR A PARTICULAR PURPOSE, PERFORMANCE, OR OTHERWISE, WHICH ARE HERBY EXCLUDED. IN NO EVENT SHALL FOCUS ELECTRICS BE LIABLE FOR ANY DAMAGES, WHETHER DIRECT, INDIRECT, INCIDENTAL, FORSEEABLE, CONSEQUENTIAL, OR SPECIAL, ARISING OUT OF OR IN CONNECTION WITH THIS APPLIANCE.
If you think the appliance has failed or requires service within its warranty period, please contact the Focus Electrics Customer Service Department at (866) 290 –1851 or e-mail us at service@focuselectrics.com. Return shipping fees are non-refundable. A receipt proving original purchase date will be required for all warranty claims. Hand-written receipts are not accepted. Focus Electrics is not responsible for returns lost in transit.
Valid only in USA and Canada
REPLACEMENT PARTS
Replacement parts, if available, may be ordered directly from Focus Electrics online at www.focuselectrics.com, or you may call or e-mail the service department at the number/e-mail address listed above, or by writing to us at:
Focus Electrics, LLC
Attn: Customer Service
P. O. Box 2780
West Bend, WI 53095
Be sure to include the catalog/model number of your appliance (located on the bottom/back of the unit) and a description and quantity of the part you wish to order. Along with this include your name, mailing address, Visa/MasterCard number, expiration date and the name as it appears on the card. Checks can be made payable to Focus Electrics, LLC. Call Customer Service to obtain purchase amount. Your state's sales tax and a shipping/processing fee will be added to your total charge. Please allow two (2) weeks for delivery.
This manual contains important and helpful information regarding the safe use and care of your new Focus Electrics product. For future reference, attach dated sales receipt for warranty proof of purchase and record the following information:
Date purchased or received as gift:
Where purchased and price, if known:
Item number and Date Code (shown bottom/back of product):
MODE D'EMPLOI DE LA CAFETIÈRE – RÉGLAGE DE L'HORLOGE
Focus Electrics, LLC
Attn: Customer Service
P. O. Box 2780
West Bend, WI 53095
natural_image
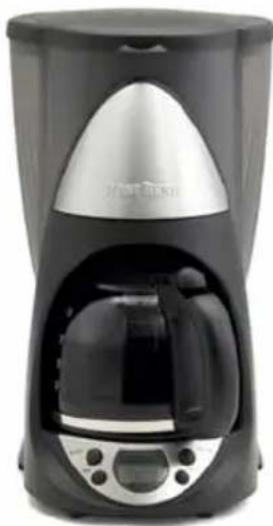
Black and silver coffee maker with digital display (no visible text or symbols)USO DE LA CAFETERA DE GOTEO — AJUSTE DEL RELOJ
Focus Electrics, LLC
Attn: Customer Service
P. O. Box 2780
West Bend, WI 53095



- IMPORTANT SAFEGUARDS
- CAUTION
- HEAT PRECAUTIONS
- ELECTRICITY PRECAUTIONS
- PRECAUTIONS FOR USE AROUND CHILDREN
- GLASS CARAFE CAUTIONS
- SAVE THESE INSTRUCTIONS
- USING YOUR DRIP COFFEEMAKER – FIRST USE
- USING YOUR DRIP COFFEEMAKER – PREPARING COFFEE
- PROBLEMS AND CAUSES
- PRODUCT WARRANTY
- Appliance 1 Year Limited Warranty
- Valid only in USA and Canada
- REPLACEMENT PARTS
- MODE D'EMPLOI DE LA CAFETIÈRE – RÉGLAGE DE L'HORLOGE
- USO DE LA CAFETERA DE GOTEO — AJUSTE DEL RELOJ
Brand : WestBend
Model : 56870
Category : Coffee machine