
KFPW760OB - Food processor KITCHENAID - Free user manual and instructions
Find the device manual for free KFPW760OB KITCHENAID in PDF.

| Product Type | Food Processor |
| Brand | KitchenAid |
| Model | KFPW760 |
| Work Bowl Capacity | 2.8 L (12 cups) |
| Chef's Bowl Capacity | 2.4 L (10 cups) |
| Mini Bowl Capacity | 945 ml (4 cups) |
| Power Supply | 120 V, 60 Hz |
| Plug Type | Polarized (one wider blade) |
| Main Functions | Chop, slice, shred, knead, whip, juice (depending on model) |
| Blades and Discs Included | Multipurpose blade, dough blade, thin slicing disc (2 mm), medium slicing disc (4 mm), medium shredding disc (4 mm) |
| Special Accessories | Egg whip, citrus juicer (except model KFPW763) |
| Food Pusher | 2-piece food pusher |
| Safety System | Interlock system for bowl, cover, and pusher; automatic shut-off in case of overheating |
| Cleaning | Removable parts dishwasher safe (except base) |
| Bowl Material | Clear plastic (polycarbonate) |
| Warranty | 1 year limited |
| Storage Accessories | Chef's accessory case included |
| Control | On, Off, Pulse |
| Spatula/cleaning tool | Included |
| Plug Type | 120 V, 60 Hz, polarized plug |
Frequently Asked Questions - KFPW760OB KITCHENAID
User questions about KFPW760OB KITCHENAID
0 question about this device. Answer the ones you know or ask your own.
Ask a new question about this device
Download the instructions for your Food processor in PDF format for free! Find your manual KFPW760OB - KITCHENAID and take your electronic device back in hand. On this page are published all the documents necessary for the use of your device. KFPW760OB by KITCHENAID.
USER MANUAL KFPW760OB KITCHENAID
natural_image
Exterior view of a kitchen appliance with clear glass casing and control panel (no visible text or symbols)
Proof of Purchase & Product Registration
Always keep a copy of the sales receipt showing the date of purchase of your Food Processor. Proof of purchase will assure you of in-warranty service.
Before you use your Food Processor, please fill out and mail your product registration card packed with the unit. This card will
enable us to contact you in the unlikely event of a product safety notification and assist us in complying with the provisions of the Consumer Product Safety Act. This card does not verify your warranty.
Please complete the following for your personal records:
Model Number
Serial Number
Date Purchased
Store Name and Location ____
Proof of Purchase & Product Registration ....Inside Front Cover
Food Processor Safety 3
Important Safeguards....4
Electrical Requirements 5
FEATURES AND OPERATION
Food Processor Features....6
Preparing the Food Processor for Use Before First Use ....8
Work Bowl Assembly 8
Multipurpose Blade and Dough Blade Assembly 9
Slicing, Shredding, and Cutting Disc Assembly....9
Mini Bowl Assembly....10
Chef's Bowl Assembly 10
Egg Whip Assembly and Use 11
Citrus Press Assembly and Use 11
Using the Food Processor Before Use....13
Food Pusher Interlock ....13
Maximum Liquid Level 13
Turning the Food Processor On and Off 13
Using the Pulse Control ....14
The Food Pusher, 2-Piece and 3-Piece ....14
Disassembling the Food Processor 15
CARE AND CLEANING
Cleaning the Food Processor ....16
Troubleshooting....17
Continued on next page
Table of Contents
FOOD PROCESSING TIPS
Using the Multipurpose Blade ....18
Using a Slicing, Shredding, or Cutting Disc 19
Using the Dough Blade....20
Using the Egg Whip 20
Helpful Hints....21
WARRANTY AND SERVICE INFORMATION
KitchenAid® Food Processor Warranty 23
Hassle-Free Replacement Warranty – 50 United States and District of Columbia ......24
Hassle-Free Replacement Warranty – Canada 24
How to Arrange for Warranty Service in Puerto Rico ....25
How to Arrange for Service after the Warranty Expires – All Locations ....25
How to Arrange for Service Outside these Locations ....25
How to Order Accessories and Replacement Parts 26
Food Processor Safety
Your safety and the safety of others are very important.
We have provided many important safety messages in this manual and on your appliance. Always read and obey all safety messages.

This is the safety alert symbol.
This symbol alerts you to potential hazards that can kill or hurt you and others.
All safety messages will follow the safety alert symbol and either the word “DANGER” or “WARNING.” These words mean:
! DANGER
You can be killed or seriously injured if you don't immediately follow instructions.
WARNING
You can be killed or seriously injured if you don't follow instructions.
All safety messages will tell you what the potential hazard is, tell you how to reduce the chance of injury, and tell you what can happen if the instructions are not followed.
IMPORTANT SAFEGUARDS
When using electrical appliances, basic safety precautions should always be followed, including the following:
- Read all instructions.
- To protect against risk of electrical shock do not put Food Processor in water or other liquid.
- Close supervision is necessary when any appliance is used by or near children.
- Unplug from the outlet when not in use, before putting on or taking off parts, and before cleaning.
- Avoid contacting moving parts.
- Do not operate any appliance with a damaged cord or plug, or after the appliance malfunctions, or is dropped or damaged in any manner. Return appliance to the nearest Authorized Service Facility for examination, repair, or electrical or mechanical adjustment.
- The use of attachments not recommended or sold by KitchenAid may cause fire, electric shock or injury.
- Do not use outdoors.
- Do not let cord hang over edge of table or counter.
- Keep hands and utensils away from moving blades or discs while processing food to reduce the risk of severe injury to persons or damage to the Food Processor. A scraper may be used but must be used only when the Food Processor is not running.
- Blades are sharp. Handle carefully.
- To reduce the risk of injury, never place cutting blade or discs on base without first putting bowl properly in place.
- Be certain cover is securely locked in place before operating appliance.
- Never feed food by hand. Always use the food pusher.
- Do not attempt to defeat the cover interlock mechanism.
- This product is designed for household use only.
SAVE THESE INSTRUCTIONS
Electrical Requirements
WARNING

Electrical Shock Hazard
Plug into a grounded 3 prong outlet.
Do not remove ground prong.
Do not use an adapter.
Do not use an extension cord.
Failure to follow these instructions can result in death, fire, or electrical shock.
Models KFPM770 & KFPM773:
Volts: 120 V.A.C.
Hertz: 60 Hz
NOTE: Models KFPM770 & KFPM773 have a 3 prong grounded plug. To reduce the risk of electrical shock, this plug will fit in an outlet only one way. If the plug does not fit in the outlet, contact a qualified electrician. Do not modify the plug in any way.
Do not use an extension cord. If the power supply cord is too short, have a qualified electrician or serviceman install an outlet near the appliance.
WARNING

natural_image
Silhouette of a flame with sharp edges, resembling a stylized fire or smoke plume (no text or symbols)Fire Hazard
Do not use an extension cord.
Doing so can result in death or fire.
Models KFPW760 & KFPW763:
Volts: 120 V.A.C.
Hertz: 60 Hz
NOTE: Models KFPW760 & KFPW763 have a polarized plug (one blade is wider than the other). To reduce the risk of electrical shock, this plug will fit in a polarized outlet only one way. If the plug does not fit fully in the outlet, reverse the plug. If it still does not fit, contact a qualified electrician. Do not modify the plug in any way.
Do not use an extension cord. If the power supply cord is too short, have a qualified electrician or serviceman install an outlet near the appliance.
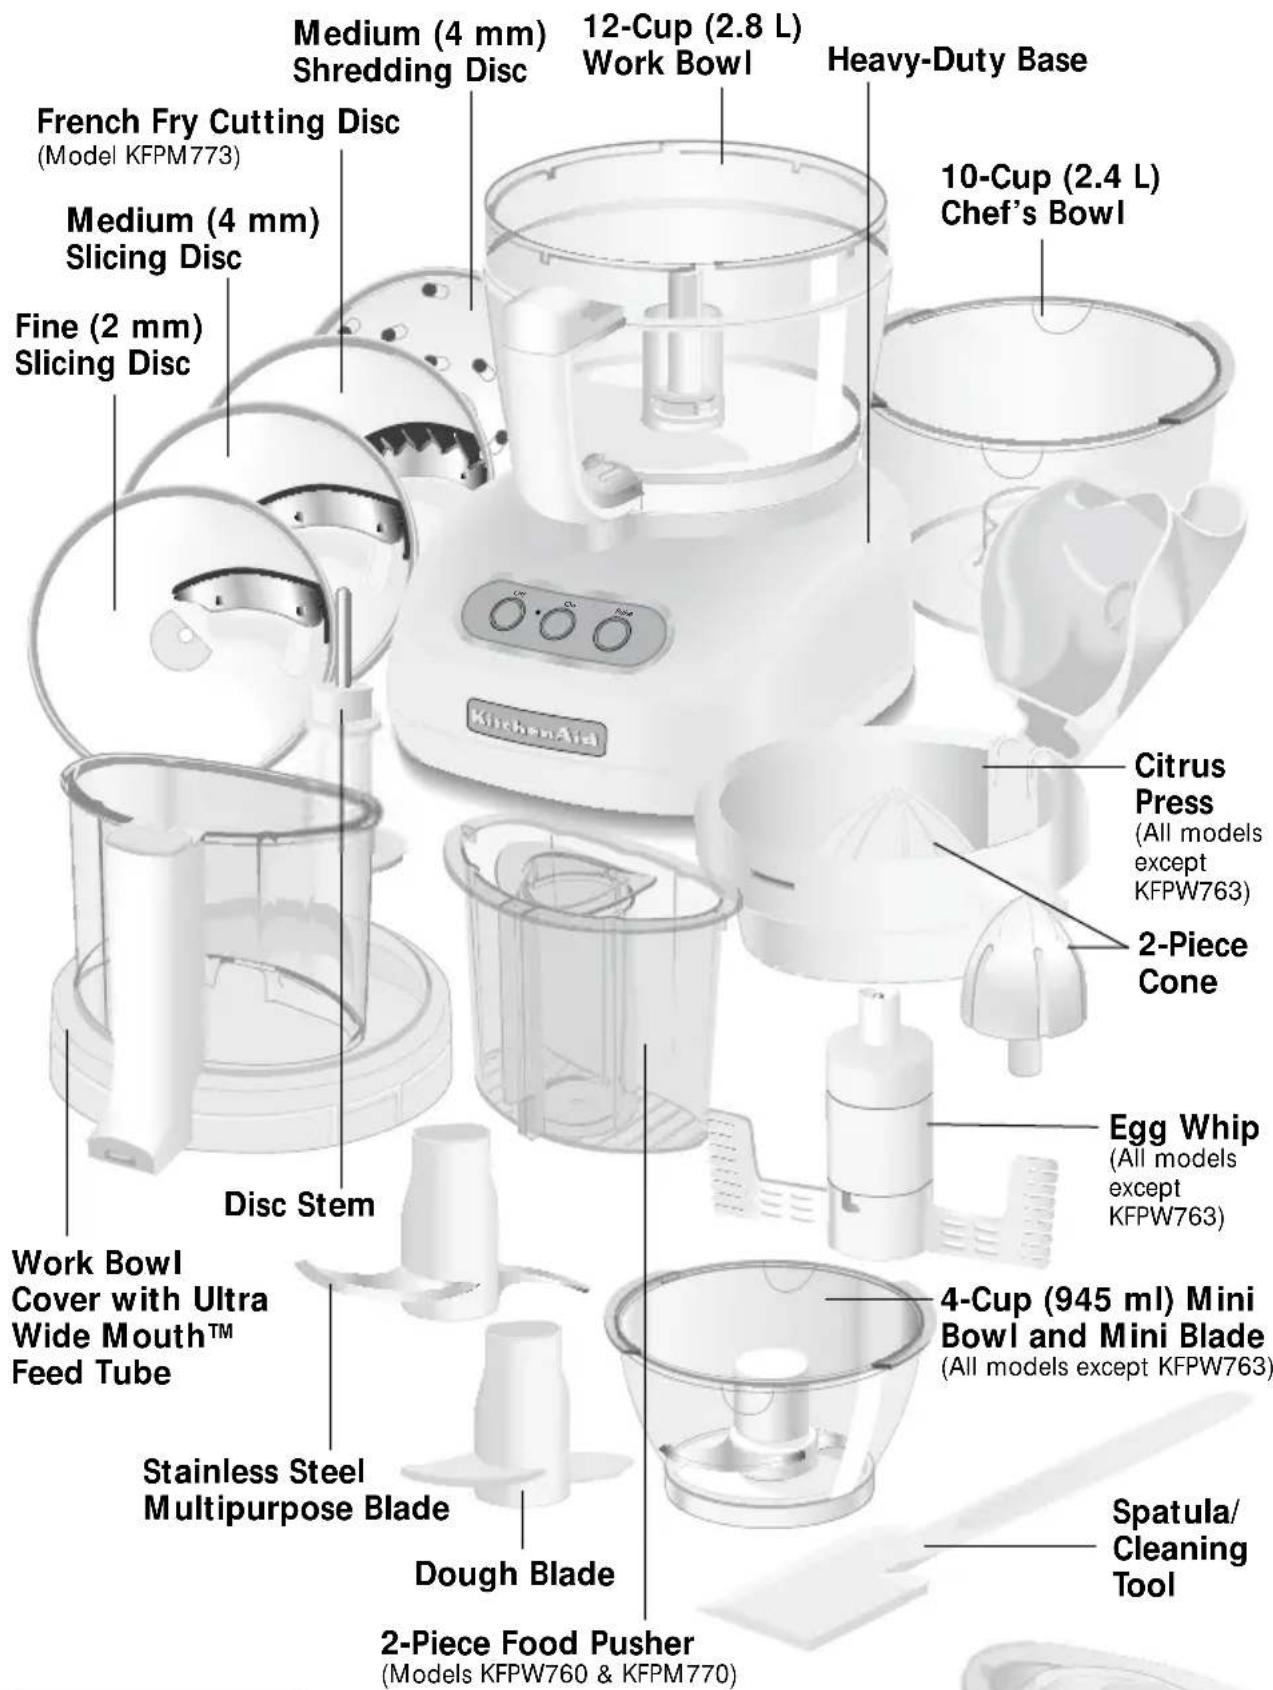
Food Processor Features
ENSOLIDH
natural_image
Transparent plastic container with a circular vent and internal structure (no text or symbols visible)3-Piece Food Pusher —
(Models KFPW763 & KFPM773)
Chef's Accessory Case
Work Bowl Cover with Ultra Wide Mouth™ Feed Tube
One of the industry's largest, the Ultra Wide Mouth™ feed tube accommodates large items – like tomatoes, cucumbers, and potatoes – with a minimum of sectioning or slicing.
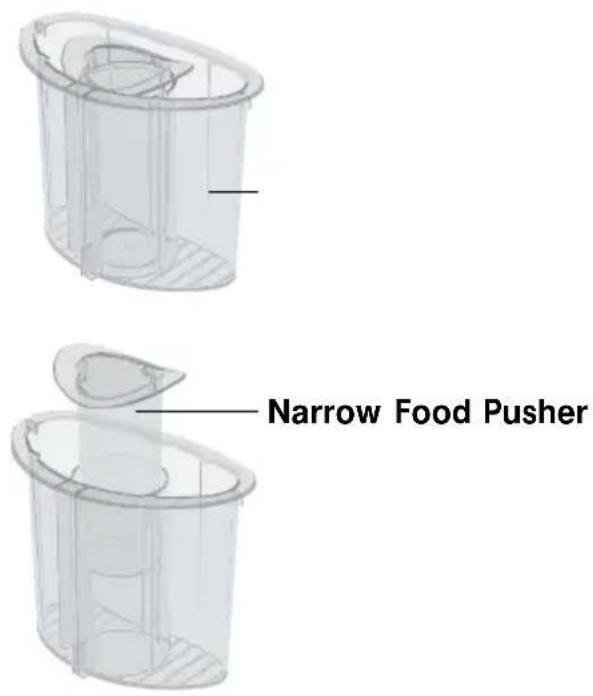
2-Piece Food Pusher (Models KFPW760 & KFPM770)
For smaller items, remove the narrow pusher from the central tube in the large pusher. The narrow pusher and feed tube make it easy to process herbs, nuts, single carrots and celery. The narrow pusher can also be used as a convenient 4-oz (120 ml) measuring cup.
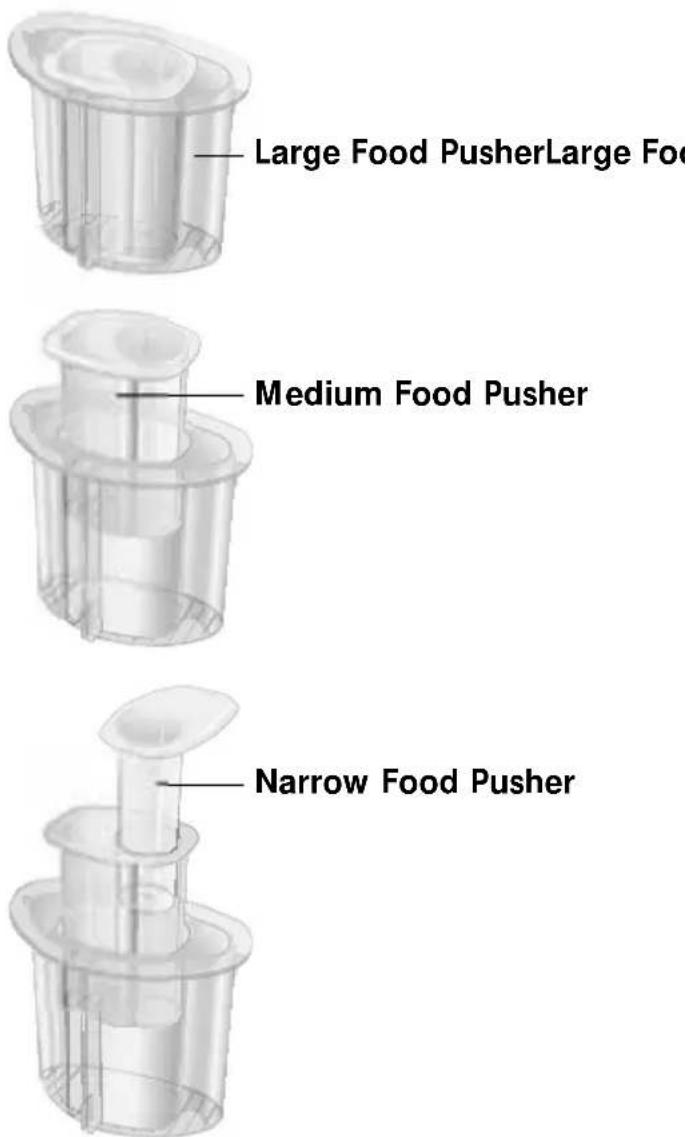
3-Piece Food Pusher (Models KFPW763 & KFPM773)
Three pushers are nested inside of each other to offer increased variety of feed tube choices. Remove the medium pusher from the large pusher to reveal a medium-size feed tube for continuous processing. For continuous processing of smaller items (like herbs, nuts, single carrots and celery) remove the narrow pusher and use the narrow feed tube. The medium pusher, with narrow pusher removed, can be used as a convenient 4-oz (120 ml) measuring cup. A small hole in the bottom of the narrow pusher makes it easy to drizzle oil into ingredients – just fill with the desired amount of oil.
12-Cup (2.8 L) Work Bowl
The durable, large work bowl provides capacity for large jobs.
10-cup (2.4 L) Chef's Bowl
Place the chef's bowl inside the work bowl, and slice or shred a food item while keeping the work bowl clean for another ingredient.
4-cup (945 ml) Mini Bowl and Mini Blade (All models except KFPW763)
Mini bowl and stainless steel blade are perfect for small chopping and mixing jobs.
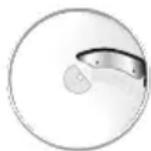
Fine (2 mm) Slicing Disc
Disc produces approximately 116 -inch (2 mm) slices of most foods, from delicate strawberries to partially frozen meats.
Medium (4 mm) Slicing Disc
Disc produces approximately 18 -inch (4 mm) slices of most foods.
Medium (4 mm) Shredding Disc
Disc produces approximately 18 -inch (4 mm) shreds of most firm fruits, vegetables, and cheese.
French Fry Cutting Disc (Model KFPM773)
Disc produces approximately 13 x 14 -inch (8.5 mm x 6.5 mm) thick sticks of potatoes and other firm fruits and vegetables.
Disc Stem
Stem fits over the power shaft on the base and into the bottom of a slicing or shredding disc.
Stainless Steel Multipurpose Blade
Versatile blade chops, minces, blends, mixes, and emulsifies in a matter of seconds.
Dough Blade
The dough blade is specially designed for mixing and kneading yeast dough.
Egg Whip
(All models except KFPW763)
The egg whip will quickly whip cream and egg whites for meringues, mousses, soufflés, and desserts.
Citrus Press
(All models except KFPW763)
Press consists of a strainer basket, 2-piece cone, and lever arm. Use the removable outer cone for larger items, such as grapefruit, and the inner cone for lemons and limes.
Heavy-Duty Base
The base features the OFF, ON, and PULSE buttons along with the power shaft, which rotates the blades and discs.
Spatula/Cleaning Tool
Special shape facilitates food removal from bowls, discs, and blades.
Chef's Accessory Case
Stylish and durable slim-line case organizes and protects blades, discs, and accessories.
Preparing the Food Processor for Use
WARNING
Cut Hazard
Handle blades carefully.
Failure to do so can result in cuts.
Before First Use
Before using your Food Processor for the first time, wash the work bowl, work bowl cover, chef's bowl, mini bowl, feed tube pushers, discs, and blades either by hand or in the dishwasher (see "Cleaning the Food Processor" on page 16).
Work Bowl Assembly
- Place the Food Processor base on a dry, level countertop with the controls facing forward. Do not plug in the unit until it is completely assembled.
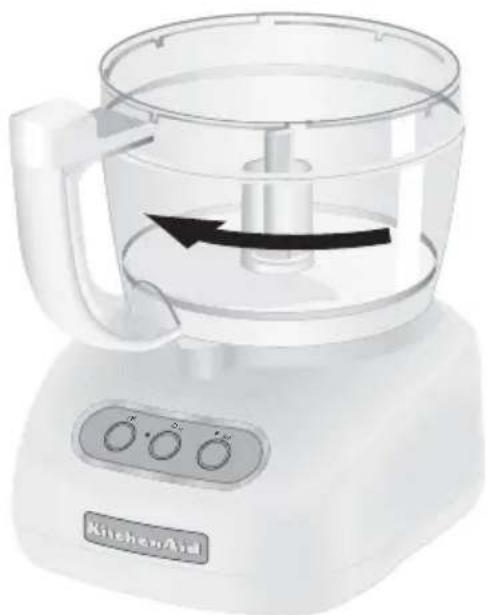
- With the handle just to the left of center, place the work bowl on the base, fitting the center opening over the power shaft.
- Grasp the work bowl handle and turn the bowl to the right until it locks into position.
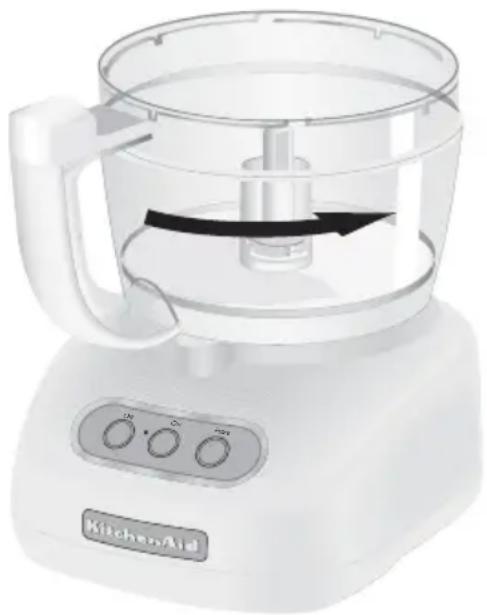
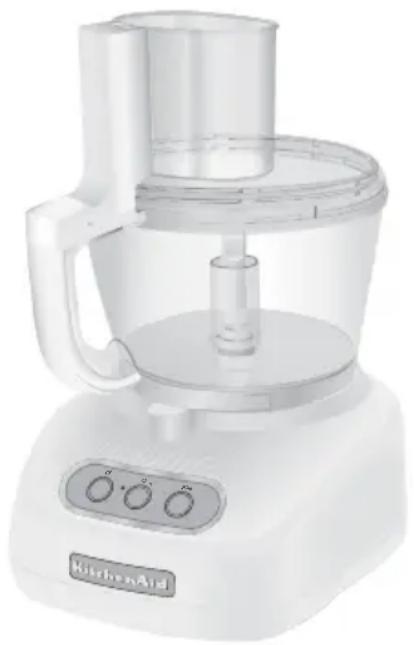
natural_image
White kitchen Aid blender with control panel and directional arrow (no text or symbols on device)- Insert the desired accessory into the work bowl. See pages 9–12 for accessory instructions.
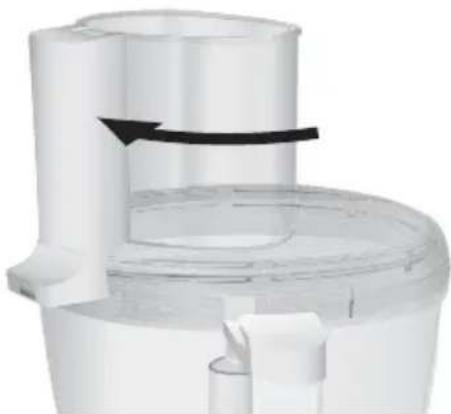
- Place the work bowl cover on the work bowl with the feed tube just to the left of the work bowl handle. Grasp the feed tube and turn the cover to the right until it locks into place.
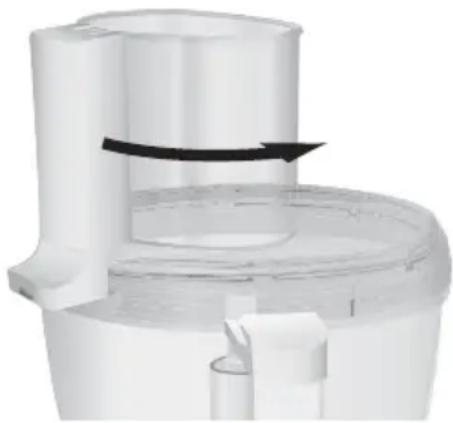
natural_image
Close-up of a white plastic kitchen appliance with a black arrow indicating rotation (no text or symbols visible)NOTE: To avoid damage to the work bowl, do not attach the cover to the work bowl before the work bowl is locked on the base.
Preparing the Food Processor for Use
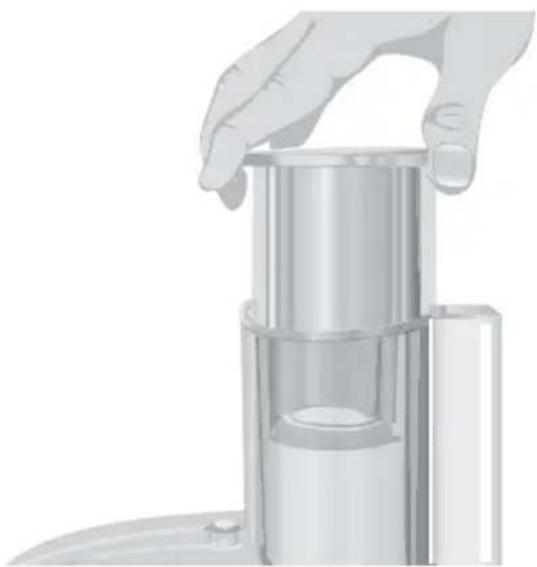
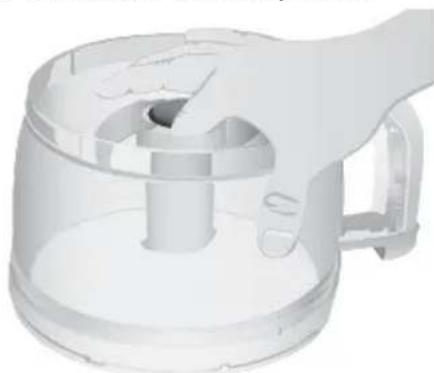
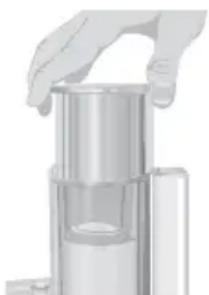
- Fit the 2-piece food pusher (on models KFPW760 & KFPM770) or the 3-piece food pusher (on models KFPW763 & KFPM773) into the Ultra Wide Mouth™ feed tube.
natural_image
Illustration of a hand holding a cylindrical device with a transparent internal structure (no text or symbols visible)NOTE: Your Food Processor will not operate unless the work bowl and work bowl cover are properly locked on the base, and the large pusher is inserted to the maximum fill line on the feed tube (approximately halfway down).
To avoid damage to the work bowl, do not remove the work bowl from the base without first removing the work bowl cover.
Multipurpose Blade and Dough Blade Assembly
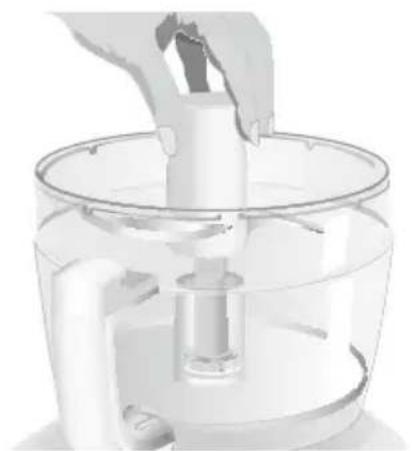
- Place the blade on the power shaft.
- Rotate the blade so it falls into place on the shaft.
natural_image
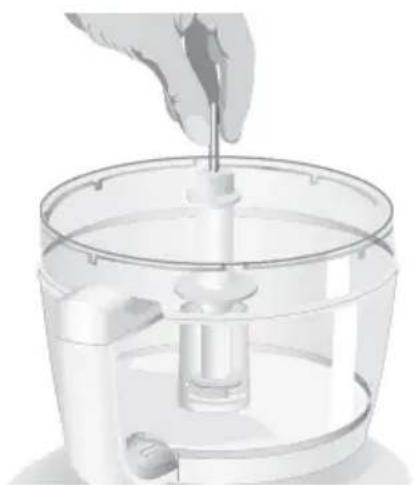
Close-up of a hand pouring liquid into a transparent kitchen mixer (no text or symbols visible)Slicing, Shredding, and Cutting Disc Assembly
- Place the disc stem on the power shaft.
natural_image
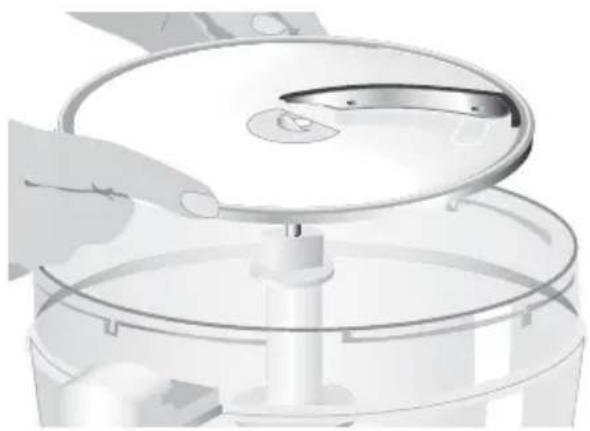
Illustration of a hand using a tool to press or adjust a mechanical component inside a transparent kitchen appliance (no text or symbols visible)Preparing the Food Processor for Use
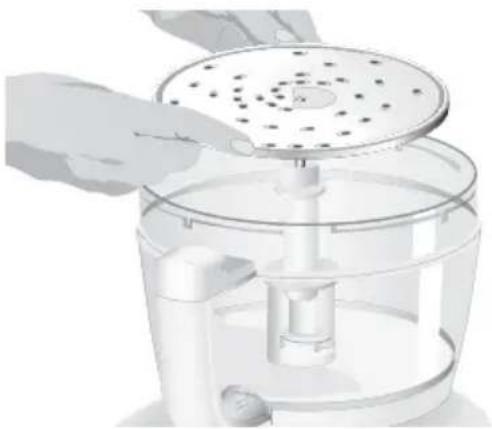
- Fit the disc over the metal pin on the disc stem with the raised-blade side up. The disc has a raised nub on the top and grooves underneath to help align it properly. Rotate the disc until it falls fully onto the stem.
natural_image
Close-up of a hand pressing down on a circular mechanical component (no text or symbols visible)Mini Bowl Assembly
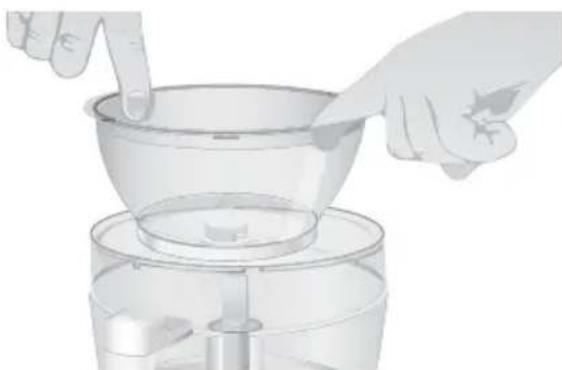
- Place the mini bowl inside the work bowl over the power shaft. Rotate the mini bowl until it falls into place. When properly seated in the work bowl, the mini bowl cannot be rotated.
natural_image
Illustration of hands operating a kitchen grater with a bowl and side sink (no text or symbols)- Fit the mini blade on the power shaft. It may be necessary to rotate the blade until it falls into place. The mini bowl can also be placed in the chef's bowl in a similar manner.
natural_image
Close-up of a kitchen knife pressing into a plastic kitchen appliance (no text or symbols visible)- To remove the mini bowl after processing, lift the bowl using the two finger grips located along the top edge of the bowl.
natural_image
Illustration of hands stirring a bowl over a food processor (no text or symbols visible)Chef's Bowl Assembly
Place the chef's bowl inside the work bowl over the power shaft. Rotate the chef's bowl until it falls into place. When properly seated in the work bowl, the chef's bowl cannot be rotated.
The chef's bowl can only be used with the slicing, shredding, and cutting discs – the multipurpose blade cannot be used. To remove the chef's bowl after processing, lift the bowl using the two finger grips located along the top edge of the bowl.
Preparing the Food Processor for Use
Egg Whip Assembly and Use
The egg whip is designed to whip egg whites or heavy cream to create toppings or soft meringues. For the best results, at least 1 cup (235 ml) of heavy cream or 3 egg whites should be whipped at a time. Whipping smaller quantities may not result in maximum volume.
To assemble:
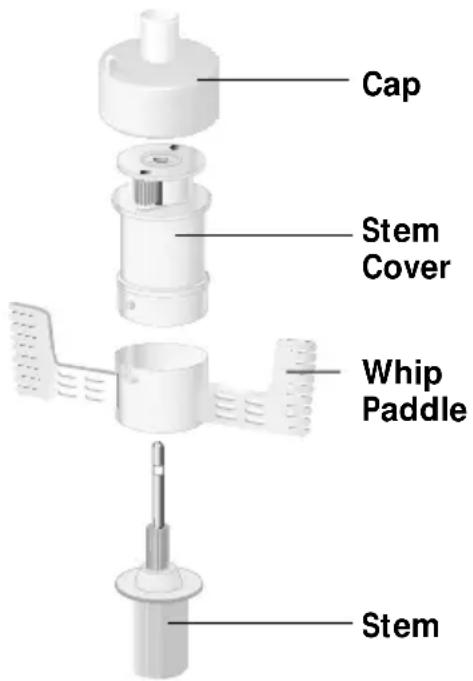
The egg whip consists of 4 pieces – the egg whip stem, stem cover, whip paddle, and cap.
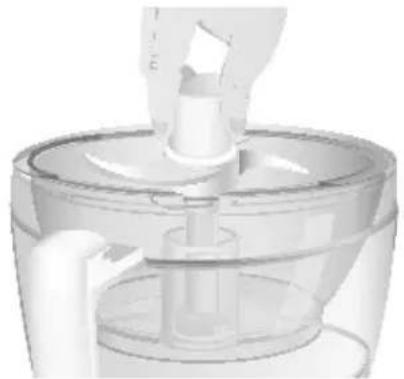
- Place the egg whip stem on the power shaft. Slowly turn the stem until it drops fully onto the shaft.
- Align the L-shaped notch on the whip paddle with the small post on the stem cover, and slide the paddle onto the cover. Turn slightly to lock paddle.
- Fit the stem cover and paddle over the egg whip stem. Push downward to engage the ridges of the stem with the gears of the paddle.
-
Fit the egg whip cap over the egg whip stem. Push downward to lock it into place.
-
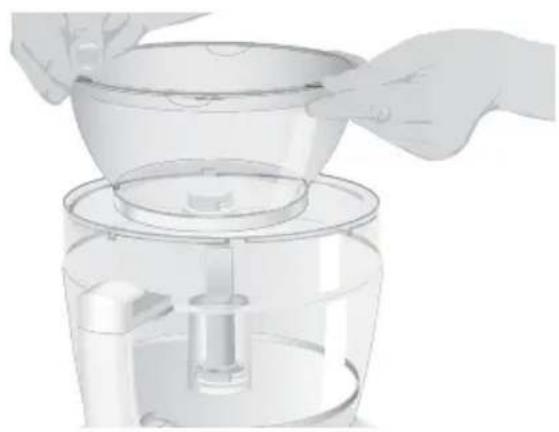
Place the work bowl cover on the work bowl with the feed tube just to the left of the handle. Make sure the center pin of the egg whip fits into the center opening of the cover. Grasp the feed tube and turn the cover to the right to lock it into place. Insert the pusher into the feed tube. The egg whip is now ready to operate.
-
Press the ON Button and whip ingredients to the desired texture and volume. Press the OFF Button when finished.
To disassemble:
- Unplug the food processor.
- Remove the work bowl cover with a clockwise turn.
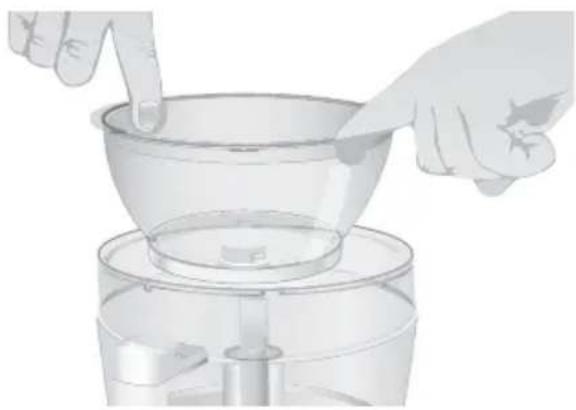
- Lift the egg whip assembly off the power shaft. Remove whipped ingredients from the work bowl.
- Pull the cap from the egg whip assembly. Push downward on the stem pin to remove stem from the stem cover. Turn the egg whip paddle to unlock, and slide the paddle from the stem cover.
Citrus Press Assembly and Use
- Position and lock the work bowl on the base.
- Place the strainer basket in the bowl with the locking clip to the left of the work bowl handle.
- Turn the basket counter-clockwise until the clip locks into the handle.
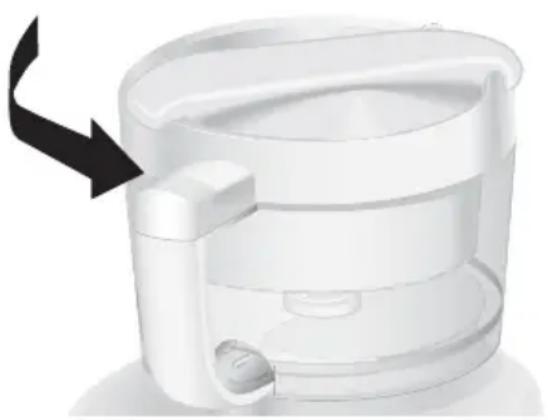
natural_image
White 3D-printed device with a black arrow pointing to its side (no text or symbols visible)Preparing the Food Processor for Use
- The 2-piece cone offers two sizes; choose the right size for the fruit you are juicing. Use the outer cone for grapefruit, oranges and other large fruits. Remove the outer cone to reveal a smaller inner cone that's perfect for lemons and limes.
- Open the lid and place the cone inside the strainer basket over the power shaft. It may be necessary to rotate the cone until it falls into place.
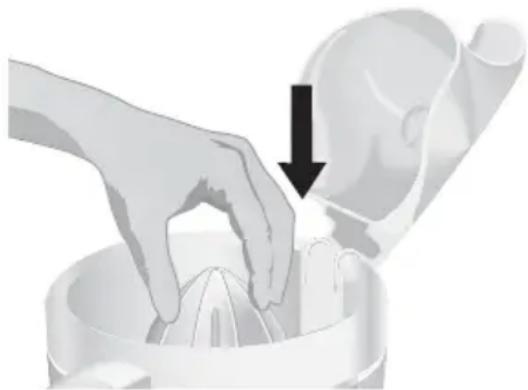
natural_image
Illustration of a hand placing food into a bowl with a downward arrow indicating compression (no text or symbols)- Halve the fruit to be juiced.
- Place fruit half on cone.
- Close the lid of the strainer basket. Hold the lever arm down firmly with an open palm to maintain even pressure. Operate the citrus press only when the lever arm is in the down position, holding the fruit on the cone.
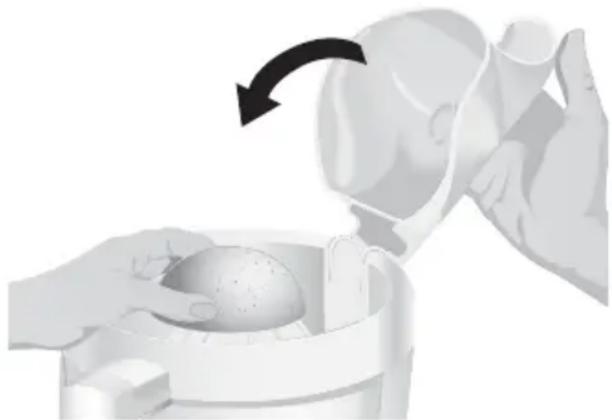
natural_image
Illustration of hands pouring liquid into a container with a rotating arrow (no text or symbols)NOTE: Use of the citrus press without the clip-on lever arm is not recommended. If you do use it without the lever arm, remove the lever arm from the basket (see Step 14).
- Operate the citrus press by pressing the ON Button or the PULSE Button.
- When juice is fully extracted, Press the OFF Button.
NOTE: Do not exceed the maximum liquid level line on the work bowl, or juice will leak from the bowl.
- Unplug the food processor.
- Unlock the strainer basket by turning it clockwise. Remove juiced fruit, cone, and strainer basket from the work bowl.
- Remove the work bowl from Food Processor and pour juice into desired container.
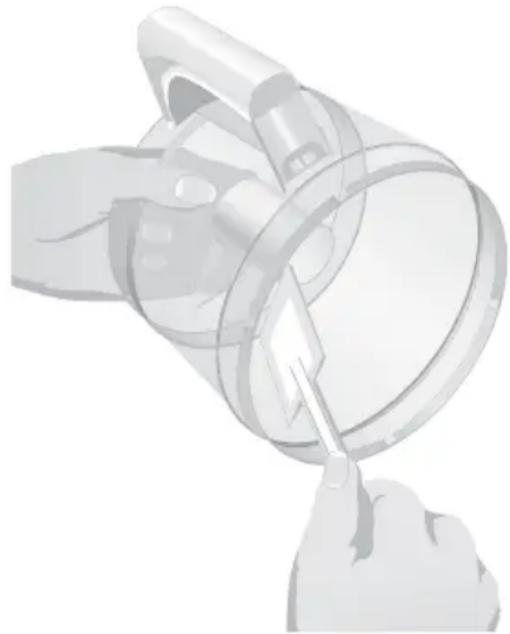
- To detach the clip-on lever arm from the strainer basket for thorough cleaning, pull the clip at the bottom of the basket away from the basket side and remove the lever arm from the basket.
- When reattaching the lever arm to the strainer basket, make sure the tabs on the clip snap securely into a pair of holes in the bottom of the basket.
WARNING

Rotating Blade Hazard
Always use food pusher.
Keep fingers out of openings.
Keep away from children.
Failure to do so can result in amputation or cuts.
Before Use
Before operating the Food Processor, be sure the work bowl, blades, and work bowl cover are properly assembled on the Food Processor base (see “Preparing the Food Processor for Use” starting on page 8).
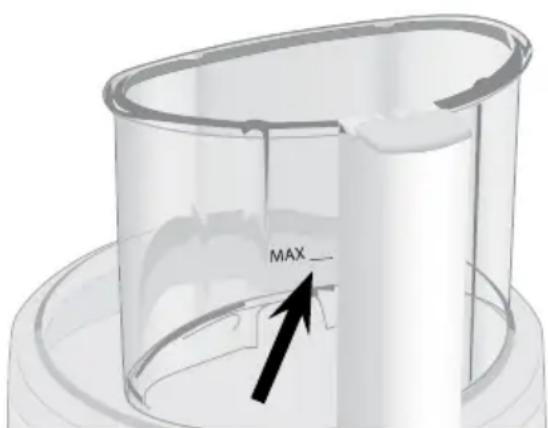
Food Pusher Interlock
The food pusher is part of the safety interlock system. The Food Processor will not run unless the large pusher is inserted to the maximum fill line on the feed tube (approximately halfway down).
natural_image
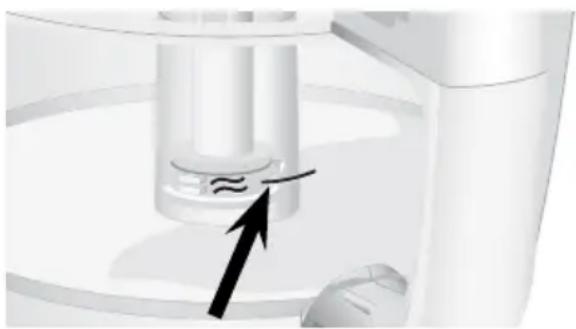
3D diagram of a cylindrical container with an arrow pointing to a labeled 'MAX' point (no other text or symbols)Maximum Liquid Level
This line on the work bowl indicates the maximum level of liquid that can be processed by the Food Processor.
natural_image
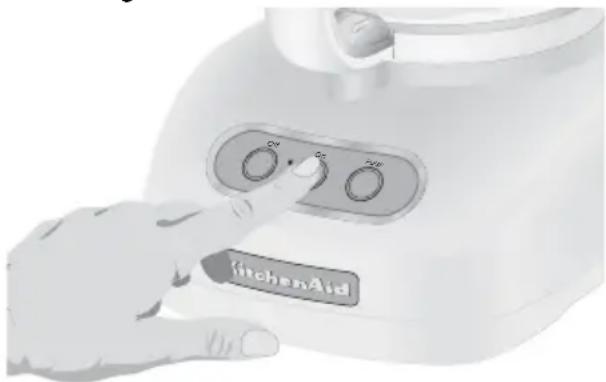
Close-up of a white electronic device with a metallic component and a black arrow pointing to it, no visible text or symbols.Turning the Food Processor On and Off
- To turn on the Food Processor, press the ON Button. The unit will run continuously and the indicator light will glow.
natural_image
Close-up of a hand pressing a kitchen aid device with control buttons (no visible text or symbols)- To stop the Food Processor, press the OFF Button. The indicator light will go out and an automatic brake will stop the action of the blade or disk within seconds.
- Wait until the blade or disk comes to a complete stop before removing the work bowl cover. Be sure to turn off the Food Processor before removing the work bowl cover, or before unplugging the Food Processor.
NOTE: If the Food Processor fails to operate, make sure the work bowl and cover are properly locked on the base, and the large food pusher is inserted to the maximum fill line on the feed tube (see "Preparing the Food Processor for Use" starting on page 8).
Using the Food Processor
Using the Pulse Control
The pulse control allows precise control of the duration and frequency of processing. It's great for jobs which require a light touch. Just press and hold the PULSE Button to start processing, and release it to stop. The indicator light will glow each time the PULSE Button is pressed.
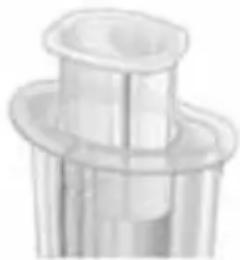
The 2-Piece Food Pusher (Models KFPW760 & KFPM770)
To slice or shred small items, insert the 2-piece food pusher into the Ultra Wide Mouth™ feed tube, then turn the narrow center pusher clockwise to unlock and remove. Use the narrow feed tube and pusher to process small or slender items, or to add liquid while the Food Processor is running. When not using the narrow feed tube, lock the narrow pusher into place by turning it counter-clockwise.
The 3-Piece Food Pusher (Models KFPW763 & KFPM773)
For continuous processing of smaller items, insert the 3-piece food pusher into the Ultra Wide Mouth™ feed tube and turn the top of one of the nested pushers left or right to unlock the appropriate-sized pusher, then lift to remove. Use the narrow feed tube and pusher to process small or slender items, like single carrots or celery stalks. Use the medium feed tube and pusher for continuous slicing or shredding of larger items, like cheese or multiple carrots. Be sure to lock the narrow pusher into place when using the medium-size feed tube. And when using the Ultra Wide Mouth™ feed tube, be sure to lock both the medium and narrow pushers into place. To slowly drizzle oil into ingredients, just fill the narrow pusher with the desired amount of oil. A small hole in the bottom of the pusher will drizzle the oil at a constant rate.
Disassembling the Food Processor
WARNING
Cut Hazard
Handle blades carefully.
Failure to do so can result in cuts.
NOTE: If you have difficulty removing the pusher from the feed tube, it is likely that food particles have become lodged in the interlock system. To free the pusher, soak the work bowl cover in warm water or wash it in a dishwasher.
- Press OFF Button.
- Unplug the Food Processor before disassembling.
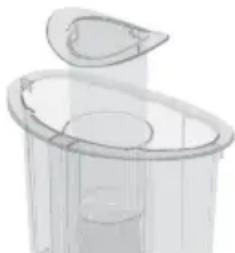
- Turn the work bowl cover to the left and remove.
natural_image
Close-up of a white plastic kitchen appliance with a curved arrow indicating rotation or movement (no text or symbols visible)- If using a disc, remove it before removing the bowl. Place two fingers under each side of the disc and lift it straight up. Remove the disc stem.
natural_image
Illustration of a hand using a cleaning or cleaning tool on a food processor (no text or symbols visible)- If using the mini bowl or chef's bowl, grasp and remove the bowl using the finger grips located along the top edge of the bowl.
natural_image
Illustration of hands using a lathe to process food preparation (no text or symbols visible)- Turn the work bowl to the left to unlock it from the base. Lift to remove.
natural_image
White kitchen air fryer with control panel and directional arrow (no text or symbols on device)- The multipurpose blade can be removed from the work bowl before the contents are emptied. The blade can also be held in place as you remove food: grasp the work bowl from the bottom and place one finger through the center opening to grip the blade shaft. Then remove food from the bowl and blade with a spatula.
natural_image
3D rendering of a white plastic kitchen pot with handle and side panel (no text or symbols)Cleaning the Food Processor
WARNING
Cut Hazard
Handle blades carefully.
Failure to do so can result in cuts.
- Press the OFF Button.
- Unplug the Food Processor before cleaning.
- Wipe the base and cord with a warm, sudsy cloth, and wipe clean with a damp cloth. Dry with a soft cloth. Do not use abrasive cleansers or scouring pads.
-
All the other parts of the Food Processor are dishwasher safe. Be sure to load them away from exposed heating elements in the dishwasher. If washing the Food Processor parts by hand, avoid the use of abrasive cleansers or scouring pads. They may scratch or cloud the work bowl and cover. Thoroughly dry all parts after washing.
-
To prevent damage to the interlock system, always store the work bowl and work bowl cover in the unlocked position when not in use.
natural_image
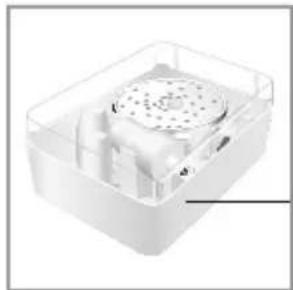
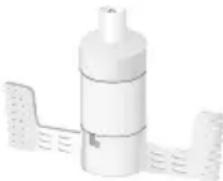
White kitchen aid blender with control panel and digital display (no visible text or symbols on device body)- Wrap the power cord around the work bowl. Secure the plug by clipping it to the cord.
- Disassembled discs, shafts, and blades should be stored in the provided storage case, and in a location out of the reach of children.
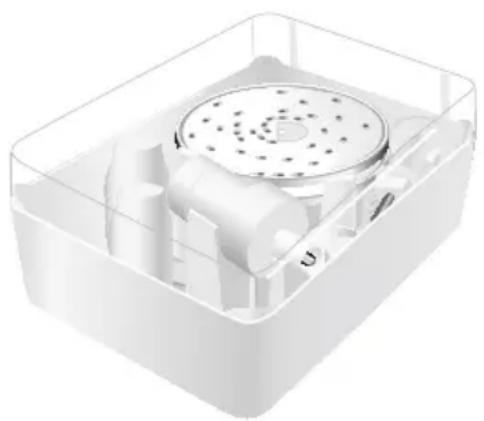
natural_image
3D rendering of a transparent plastic enclosure containing a cylindrical device with internal components (no text or symbols visible)Troubleshooting
- If your Food Processor should fail to operate, check the following:
- Make sure the work bowl and work bowl cover are properly locked on the base, and the large food pusher is inserted to the maximum fill line on the feed tube (approximately halfway down).
- See if the Food Processor is plugged into a proper electrical outlet If it is, unplug the Food Processor, then plug it into the same outlet again.
Models KFPM770 & KFPM773
WARNING

Electrical Shock Hazard
Plug into a grounded 3 prong outlet.
Do not remove ground prong.
Do not use an adapter.
Do not use an extension cord.
Failure to follow these instructions can result in death, fire, or electrical shock.
Models KFPW760 & KFPW763
WARNING

natural_image
Silhouette of a flame with sharp edges, resembling a stylized fire or smoke plume (no text or symbols)Fire Hazard
Do not use an extension cord.
Doing so can result in death or fire.
- If the Food Processor still does not work, check the fuse or circuit breaker on the electrical circuit the Food Processor is connected to and make sure the circuit is closed.
- If your Food Processor should fail to slice, shred, or cut when using the disc:
- Make sure the raised-blade side of the disc is positioned face up on the disc stem. The disc has a raised nub on the top and grooves underneath to help align it properly.
- If your Food Processor lid won't close when using the disc:
- Make sure the disc is installed correctly, with the raised nub on top, and is positioned properly on the disc stem.
- If the Food Processor shuts off while it is running:
- The Food Processor may be overheated. If the motor exceeds a certain temperature, it will automatically shut off to prevent damage. This should be an extremely rare occurrence. If it happens, press the OFF Button and wait 15 minutes for the Food Processor to cool before resuming. If the Food Processor still refuses to run, wait an additional 15 minutes for the Food Processor to cool.
- If you have difficulty removing the food pusher from the feed tube:
- Food particles are probably lodged in the interlock system. To free the pusher, soak the work bowl cover in warm water or wash it in a dishwasher.
If the problem cannot be corrected with the steps in this section, see the KitchenAid Warranty and Service section on pages 23-26. Do not return the Food Processor to the retailer – they do not provide service.
USING THE MULTIPURPOSE BLADE
To chop fresh fruits or vegetables:
Peel, core, and/or remove seeds. Cut food in 1 to 1^1/2 -inch (2.5 to 3.8 cm) pieces. Process food to desired size, using short pulses, 1 to 2 seconds each time. Scrape sides of bowl, if necessary.
To puree cooked fruits and vegetables (except potatoes):
Add 14 cup (60 ml) liquid from recipe per cup (235 ml) of food. Process food, using short pulses, until finely chopped. Then process continuously until reaching desired texture. Scrape sides of bowl, if necessary.
To prepare mashed potatoes:
Insert chef's bowl into the work bowl. Using the shredding disc, shred hot, cooked potatoes. Remove the chef's bowl with potatoes. Place multipurpose blade in work bowl, and add shredded potatoes, softened butter, milk, and seasonings. Pulse 3 to 4 times, 2 to 3 seconds each time, until milk is absorbed and texture is smooth. Do not overprocess.
To chop dried (or sticky) fruits:
The food should be cold. Add 14 cup (60 ml) flour from recipe per 12 cup (120 ml) dried fruit. Process fruit, using short pulses, until reaching desired texture.
To finely chop citrus peel:
With sharp knife, peel colored portion (without white membrane) from citrus. Cut peel in small strips. Process until finely chopped.
To mince garlic or to chop fresh herbs or small quantities of vegetables:
With processor running, add food through the narrow feed tube. Process until chopped. For best results, make sure work bowl and herbs are very dry before chopping.
To chop nuts or make nut butters:
Process up to 3 cups (710 ml) of nuts to desired texture, using short pulses, 1 to 2 seconds each time. For a coarser texture, process smaller batches, pulsing 1 or 2 times, 1 to 2 seconds each time. Pulse more often for finer texture. For nut butters, process continuously until smooth. Store in refrigerator.
To chop cooked or raw meat, poultry or seafood:
The food should be very cold. Cut in 1-inch (2.5 cm) pieces. Process up to 1 pound (455 g) at a time to desired size, using short pulses, 1 to 2 seconds each time. Scrape sides of bowl, if necessary.
To make bread, cookie, or cracker crumbs:
Break food into 1½ to 2-inch (3.8 to 5 cm) pieces. Process until fine. For larger pieces, pulse 2 to 3 times, 1 to 2 seconds each time. Then process until fine.
To melt chocolate in a recipe:
Combine chocolate and sugar from recipe in work bowl. Process until finely chopped. Heat liquid from recipe. With processor running, pour hot liquid through the narrow feed tube. Process until smooth.
Food Processing Tips
To grate hard cheeses, such as Parmesan and Romano:
Never attempt to process cheese that cannot be pierced with the tip of a sharp knife. You can use the multi-purpose blade to grate hard cheeses. Cut cheese in 1-inch (2.5 cm) pieces. Place in work bowl. Process, using short pulses, until coarsely chopped. Process continuously until finely grated. Pieces of cheese can also be added through the narrow feed tube while the processor is running.
USING A SLICING, SHREDDING, OR CUTTING DISC
NOTE: When cutting and packing food items in the Ultra Wide Mouth™ feed tube, do not exceed the maximum fill line. This will permit the pusher to engage the interlock and the unit to operate.
To cut julienne, or match stick, strips of vegetables and fruits:
Cut food to fit feed tube horizontally. Position food horizontally in feed tube. Process, using even pressure to make plank-like slices. Re-stack slices and position vertically or horizontally in feed tube. Process, using even pressure.
natural_image
Illustration of a hand pressing down a cylindrical container (no text or symbols visible)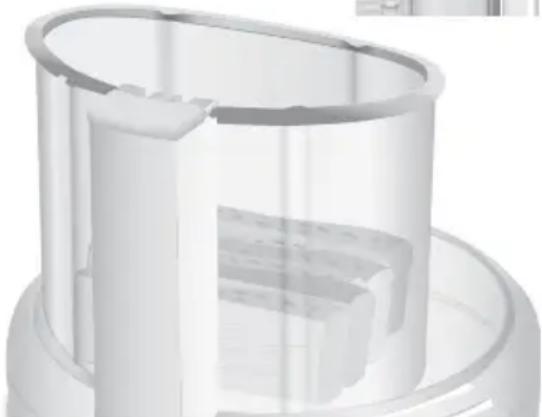
natural_image
3D rendering of a transparent cylindrical mechanical component with internal cutouts (no text or symbols visible)To slice or shred fruits or vegetables that are long and relatively small in diameter, such as celery, carrots and bananas:
Cut food to fit the feed tube vertically or horizontally, and pack feed tube securely to keep food positioned properly. Process using even pressure. Use the medium-size feed tube in the 3-piece food pusher, and process with the medium pusher (KFPW763 & KFPM773). Or use the narrow feed tube in either the two-piece food pusher (KFPW760 & KFPM770) or three-piece pusher. Position food vertically in the tube with the small end going in first and the large end processed last. Use the narrow food pusher to process the food.
natural_image
Close-up of a cylindrical mechanical component with flanged ends and a central bore (no visible text or symbols)To slice or shred fruits and vegetables that are round, such as onions, apples, and green peppers:
Peel, core, and remove seeds. Cut in halves or quarters to fit feed tube. Position in feed tube. Process using even pressure.
To slice or shred fruits and vegetables that are small, such as strawberries, mushrooms and radishes:
Position food vertically or horizontally in layers within the feed tube. Fill feed tube in order to keep food positioned properly, but do not exceed the maximum fill line. Process, using even pressure. Use the medium-size feed tube in the 3-piece food pusher, and process with the medium pusher (KFPW763 & KFPM773). Or use the narrow feed tube in either the two-piece food pusher (KFPW760 & KFPM770) or three-piece pusher. Position food vertically in the tube and use the narrow food pusher to process the food.
To shred spinach and other leaves:
Stack leaves. Roll up and stand up in feed tube. Process, using even pressure.

natural_image
3D rendered diagram of a cylindrical mechanical component with internal cylindrical features (no text or symbols)To slice uncooked meat or poultry, such as stir-fry meats:
Cut or roll food to fit feed tube. Wrap and freeze food until hard to the touch, 30 minutes to 2 hours, depending on thickness of food. Check to be sure you can still pierce food with the tip of a sharp knife. If not, allow to thaw slightly. Process, using even pressure.
To slice cooked meat or poultry, including salami, pepperoni, etc.:
Food should be very cold. Cut in pieces to fit feed tube. Process food using firm, even pressure.
To shred firm and soft cheeses:
Firm cheese should be very cold. For best results with soft cheeses, such as mozzarella, freeze 10 to 15 minutes before processing. Cut to fit feed tube. Process, using even pressure.
To slice or shred items that are "pear-shaped" like sweet potatoes, eggplant and squash:
Position food horizontally so that the bigger/fatter side is to the left of the feed tube when you are facing the unit. Process, using even pressure on the food pusher.

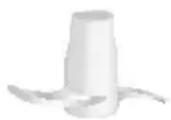
USING THE DOUGH BLADE
The dough blade is specially designed for mixing and kneading yeast dough quickly and thoroughly. For the best results, do not knead recipes which use more than 2-3 cups (475-710 ml) of flour.
natural_image
3D rendering of a cylindrical object with flanged side brackets (no text or symbols visible)USING THE EGG WHIP
To make soft egg white meringue:
Place 3 egg whites and ^1/4 teaspoon (1 ml) cream of tartar in work bowl fitted with egg whip. Process until foamy, about 30 to 45 seconds. With processor running, slowly add ^1/3 cup (80 ml) sugar through the narrow feed tube. Process until stiff peaks form, about 2^1/2 to 3 minutes. Stop processor as necessary to check texture of mixture.
To whip cream:
Place heavy cream in work bowl fitted with egg whip. Process 30 seconds. With processor running, add 2 tablespoons (30 ml) powdered sugar through the narrow feed tube. Process just until soft peaks form, about 30 to 40 seconds. Stop processor as necessary to check texture of mixture. With processor running, add 12 teaspoon (2 ml) vanilla, if desired, through the narrow feed tube. Process just until mixed. Do not overprocess.
WARNING
Cut Hazard
Handle blades carefully.
Failure to do so can result in cuts.
- To avoid damage to the blade or motor, do not process food that is so hard or firmly frozen that it cannot be pierced with the tip of a sharp knife. If a piece of hard food, such as a carrot, becomes wedged or stuck on the blade, stop the processor and remove the blade. Gently remove food from the blade.
- When cutting and packing food items in the Ultra Wide Mouth™ feed tube, do not exceed the maximum fill line. This will permit the large pusher to engage the interlock and the unit to operate.
- Do not overfill work bowl or mini bowl. For thin mixtures, fill work bowl up to 12 to 23 full. For thicker mixtures, fill work bowl up to 34 full. For liquids, fill up to the maximum level as described on page 13. When chopping, the work bowl should be no more than 13 to 12 full. Use the mini bowl for up to 1 cup (235 ml) of liquid or 12 cup (120 ml) solids.
- Position slicing discs so the cutting surface is just to the right of the feed tube. This allows the blade a full rotation before contacting the food.
-
To capitalize on the speed of the processor, drop ingredients to be chopped through the narrow feed tube while the processor is running.
-
Different foods require varying degrees of pressure for best shredding and slicing results. In general, use light pressure for soft, delicate foods (strawberries, tomatoes, etc.), moderate pressure for medium foods (zucchini, potatoes, etc.), and firmer pressure for harder foods (carrots, apples, hard cheeses, partially frozen meats, etc.).
-
Soft and medium-hard cheese may spread out or roll up on the shredding disc. To avoid this, shred only well-chilled cheese.
-
Sometimes slender foods, such as carrots or celery, fall over in the feed tube, resulting in an uneven slice. To minimize this, cut food in several pieces and pack the medium feed tube in the three-piece pusher with the food (models KFPW763 &
KFPM773). For processing small or slender items, the narrow feed tube (all models) will prove especially convenient.
natural_image
3D rendering of a transparent cylindrical container with an open lid (no text or symbols)-
When preparing a cake or cookie batter or quick bread, use the multipurpose blade to cream fat and sugar first. Add dry ingredients last. Place nuts and fruit on top of flour mixture to prevent overchopping. Process nuts and fruits, using short pulses, until blended with other ingredients. Do not overprocess.
-
When shredded or sliced food piles up on one side of the bowl, stop the processor and redistribute the food using a spatula.
-
When food quantity reaches the bottom of a slicing or shredding disc, remove the food.
-
A few larger pieces of food may remain on top of the disc after slicing or shredding. If desired, cut these by hand and add to mixture.
- Organize processing tasks to minimize bowl cleanup. Process dry or firm ingredients before liquid ingredients.
- To clean ingredients from the multipurpose blade easily, just empty the work bowl, replace the lid, and pulse 1 to 2 seconds to spin the blade clean.
- After removing the work bowl cover, place it upside down on the counter. This will help keep the counter clean.
- To remove the contents of the work bowl without removing the multipurpose blade, grasp the work bowl from the bottom and place one finger through the center opening to hold the blade in place. Then remove food from the bowl and blade with a spatula.
natural_image
Illustration of hands using a magnifying glass to examine a device (no text or symbols visible)-
Your Food Processor is not designed to perform the following functions:
-
grind coffee beans, grains, or hard spices
- grind bones or other inedible parts of food
- liquefy raw fruits or vegetables
-
slice hard-cooked eggs or unchilled meats
-
If any plastic parts should discolor due to the types of food processed, clean them with lemon juice.
KitchenAid® Food Processor Warranty
| Length of Warranty: | KitchenAidWill Pay For: | KitchenAidWill Not Pay For: |
| 50 United States, the District of Columbia, Canada, and Puerto Rico:One-year limited warranty from date of purchase. | 50 United States , the District of Columbia and Canada:Hassle-free replacement of your Food Processor. See the following page for details on how to arrange for replacement.ORIn Puerto Rico:The replacement parts and repair labor costs to correct defects in materials and workmanship. Service must be provided by an Authorized KitchenAid Service Center. To arrange for service, follow the instructions on page 25. | A. Repairs when Food Processor is used in other than normal single family home use.B. Damage resulting from accident, alteration, misuse or abuse or use with products not approved by KitchenAid.C. Replacement parts or repair labor costs for Food Processor when operated outside the country of purchase. |
DISCLAIMER OF IMPLIED WARRANTIES; LIMITATION OF REMEDIES IMPLIED WARRANTIES, INCLUDING TO THE EXTENT APPLICABLE WARRANTIES OF MERCHANTABILITY OR FITNESS FOR A PARTICULAR PURPOSE, ARE EXCLUDED TO THE EXTENT LEGALLY PERMISSIBLE. ANY IMPLIED WARRANTIES THAT MAY BE IMPOSED BY LAW ARE LIMITED TO ONE YEAR, OR THE SHORTEST PERIOD ALLOWED BY LAW. SOME STATES AND PROVINCES DO NOT ALLOW LIMITATIONS OR EXCLUSIONS ON HOW LONG AN IMPLIED WARRANTY OF MERCHANTABILITY OR FITNESS LASTS, SO THE ABOVE LIMITATIONS OR EXCLUSIONS MAY NOT APPLY TO YOU.
IF THIS PRODUCT FAILS TO WORK AS WARRANTED, CUSTOMER'S SOLE AND EXCLUSIVE REMEDY SHALL BE REPAIR OR REPLACEMENT ACCORDING TO THE TERMS OF THIS LIMITED WARRANTY. KITCHENAID AND KITCHENAID CANADA DO NOT ASSUME ANY RESPONSIBILITY FOR INCIDENTAL OR CONSEQUENTIAL DAMAGES. This warranty gives you specific legal rights and you may also have other rights which vary from state to state or province to province.
Hassle-Free Replacement Warranty – 50 United States and District of Columbia
We're so confident the quality of our products meets the exacting standards of KitchenAid that, if your Food Processor should fail within the first year of ownership, KitchenAid will arrange to deliver an identical or comparable replacement to your door free of charge and arrange to have your original Food Processor returned to us. Your replacement unit will also be covered by our one year limited warranty. Please follow these instructions to receive this quality service.
If your KitchenAid® Food Processor should fail within the first year of ownership, simply call our toll-free Customer Satisfaction Center at 1-800-541-6390 Monday through Friday, 8 a.m. to 8 p.m. (Eastern Time), or Saturday, 10 a.m. to 5 p.m. Give the consultant your complete shipping address. (No P.O. Box numbers, please.)
When you receive your replacement Food Processor, use the carton and packing materials to pack up your original Food Processor. In the carton, include your name and address on a sheet of paper along with a copy of the proof of purchase (register receipt, credit card slip, etc.).
Hassle-Free Replacement Warranty – Canada
We're so confident the quality of our products meets the exacting standards of the KitchenAid® brand that, if your Food Processor should fail within the first year of ownership, KitchenAid Canada will replace your Food Processor with an identical or comparable replacement. Your replacement unit will also be covered by our one year limited warranty. Please follow these instructions to receive this quality service.
If your KitchenAid® Food Processor should fail within the first year of ownership, take the Food Processor or ship collect to an Authorized KitchenAid Canada Service Centre. In the carton include your name and complete shipping address along with a copy of the proof of purchase (register receipt, credit card slip, etc.). Your replacement Food Processor will be returned prepaid and insured. If you are unable to obtain satisfactory service in this manner call our toll-free Customer eXperience Centre at 1-800-807-6777. Or write to us at:
Customer eXperience Centre KitchenAid Canada 1901 Minnesota Court Mississauga, ON L5N 3A7
How to Arrange for Warranty Service in Puerto Rico
Your KitchenAid® Food Processor is covered by a one-year limited warranty from the date of purchase. KitchenAid will pay for replacement parts and labor costs to correct defects in materials and workmanship. Service must be provided by an Authorized KitchenAid Service Center. Take the Food Processor or ship prepaid and insured to an Authorized KitchenAid Service Center. Your repaired Food Processor will be returned prepaid and insured. If you are unable to obtain satisfactory service in this manner, call toll-free 1-800-541-6390 to learn the location of a Service Center near you.
How to Arrange for Service after the Warranty Expires – All Locations
Before calling for service, please review the Troubleshooting section on page 17.
For service information in the 50 United States, District of Columbia, and Puerto Rico,
call toll-free 1-800-541-6390.
Or write to:
Customer Satisfaction Center
KitchenAid Portable Appliances
P.O. Box 218
St. Joseph, MI 49085-0218
Or contact an Authorized Service Center near you.
For service information in Canada, call toll-free 1-800-807-6777.
Or write to:
Customer eXperience Centre
KitchenAid Canada
1901 Minnesota Court
Mississauga, ON L5N 3A7
How to Arrange for Service Outside these Locations
Consult your local KitchenAid dealer or the store where you purchased the Food Processor for information on how to obtain service.
For service information in Mexico, call toll-free
01-800-024-17-17
(JV Distribuciones)
Or
01-800-902-31-00
(Industrias Birtman)
How to Order Accessories and Replacement Parts
To order accessories or replacement parts for your Food Processor in the 50 United States, District of Columbia, and Puerto Rico, call toll-free 1-800-541-6390 Monday through Friday, 8 a.m. to 8 p.m. (Eastern Time), or Saturday, 10 a.m. to 5 p.m.
Or write to:
Customer Satisfaction Center
KitchenAid Portable Appliances
P.O. Box 218
St. Joseph, MI 49085-0218
To order accessories or replacement parts for your Food Processor in Canada, call toll-free 1-800-807-6777.
Or write to:
Customer eXperience Centre
KitchenAid Canada
1901 Minnesota Court
Mississauga, ON L5N 3A7
To order accessories or replacement parts for your Food Processor in Mexico, call toll-free
01-800-024-17-17
(JV Distribuciones)
Or
01-800-902-31-00
(Industrias Birtman)
Accessories for 12-Cup (2.8 L) Models KFPW760, KFPW763, KFPM770 & KFPM773:
Blades and Discs
Multipurpose Blade KFP72BL
Dough Blade KFP72DB
Mini Blade (for Mini Bowl) KFP7MBL
2 mm (Fine) Slicing Disc KFP7SL2
2 mm (Fine) Shredding Disc KFP7SH2
4 mm (Med) Slicing Disc KFP7SL4
4 mm (Med) Shredding Disc KFP7SH4
6 mm (Thick) Slicing Disc KFP7SL6
6 mm (Thick) Shredding Disc KFP7SH6
Julienne Disc KFP7JU
French Fry Cutting Disc KFP7FF
Parmesan/Ice Grating Disc KFP7PI
5 Disc Set KFP7DS
- 6 mm slicing
- 6 mm shredding
- French fry
- Julienne
- Parmesan/Ice grating
Bowls and Covers
Work Bowl Cover with
Ultra Wide Mouth™
Feed Tube KFP7WWC
Work Bowl (12 cup [2.8 L]) KFP72WB
Mini Bowl (4 cup [945 ml])
with Storage Lid KFP7MB
Chef's Bowl (10 cup [2.4 L]) KFP72CB
Specialty Accessories
Egg Whip KFP72EW
Citrus Press KFP7CP
Other Accessories
2-Piece Food Pusher for
Ultra Wide Mouth™
Feed Tube KFP7WP
3-Piece Food Pusher for
Ultra Wide Mouth™
Feed Tube KFPTPP
Spatula/Cleaning Tool KFP7SP
Chef's Accessory Case KFP7SC
Table des matières
INTRODUCTION
natural_image
Silhouette of a flame with multiple sharp peaks against a white background (no text or symbols)Risque d'incendie
natural_image
White kitchen aid blender with control panel and directional arrow (no text or symbols on device)natural_image
Close-up of a white plastic kitchen appliance with a black arrow indicating rotation or movement (no text or symbols visible)natural_image
Illustration of a hand holding a cylindrical device with a transparent casing and a small circular component inside (no text or symbols visible)natural_image
Close-up of a hand using a tool to lift a cylindrical component in a transparent kitchen bowl (no text or symbols visible)natural_image
Illustration of a hand using a pipette to press or adjust a transparent kitchen appliance (no text or symbols visible)natural_image
Close-up of a hand holding a lid over a transparent kitchen appliance (no text or symbols visible)natural_image
Illustration of hands cleaning a small kitchen appliance with a bowl and side sink (no text or symbols)natural_image
Close-up of a hand pressing down on a transparent cylindrical device (no text or symbols visible)natural_image
Illustration of hands stirring a bowl over a food processor (no text or symbols visible)natural_image
White 3D printer or scanner device with a black arrow pointing to its side (no text or symbols visible)natural_image
Illustration of a hand placing a cup into a container with a downward arrow indicating compression (no text or symbols)natural_image
Illustration of a person pouring liquid into a container with a rotating arrow indicating rotation (no text or symbols)natural_image
3D diagram of a mechanical component with a labeled arrow pointing to a feature, no readable text or symbols present.natural_image
Close-up of a mechanical device with a cylindrical component and an arrow pointing to a small component (no visible text or symbols)natural_image
Close-up of a hand pressing a kitchen aid device with control buttons (no visible text or symbols)natural_image
Close-up of a white plastic kitchen appliance with a black arrow indicating rotation (no text or symbols visible)natural_image
Illustration of a hand operating a cleaning or cleaning device with a circular lid and central shaft (no text or symbols visible)natural_image
Illustration of hands stirring a bowl over a stand (no text or symbols)natural_image
White kitchen appliance with a clear lid and control panel, no visible text or symbols on the device itself.natural_image
White plastic kitchen pot with handle and side panel (no text or symbols visible)natural_image
White kitchen feeder with digital display and control buttons (no visible text or symbols on device)natural_image
3D rendering of a transparent plastic enclosure containing a circular component with internal pipes and a central hub (no text or symbols visible)Dépannage
natural_image
Silhouette of a flame-like shape with multiple sharp peaks (no text or symbols)Risque d'incendie
natural_image
Illustration of a hand pressing a cylindrical container with a transparent lid (no text or symbols visible)
natural_image
3D rendering of a transparent cylindrical container with internal cutouts and a base (no text or symbols visible)natural_image
Close-up of a transparent plastic mechanical component with cylindrical and flanged ends (no visible text or symbols)natural_image
3D rendering of a cylindrical mechanical component with internal cavities (no text or symbols visible)natural_image
3D rendering of a cylindrical object with a side protrusion, mounted on a perforated base (no text or symbols visible)UTILISATION DU FOUET À OEUFS
natural_image
Close-up of a transparent plastic container with a lid and internal compartments (no text or symbols visible)natural_image
Illustration of hands using a magnifying glass to examine a device (no text or symbols visible)Customer Satisfaction Center
KitchenAid Portable Appliances
P.O. Box 218
St. Joseph, MI 49085-0218
1901 Minnesota Court
Mississauga, ON L5N 3A7
Customer Satisfaction Center
KitchenAid Portable Appliances
P.O. Box 218
St. Joseph, MI 49085-0218
1901 Minnesota Court
Mississauga, ON L5N 3A7
natural_image
Silhouette of a flame with sharp edges, resembling a stylized mountain or flame (no text or symbols)Peligro de Incendio
natural_image
White kitchen Aid blender with control panel and directional arrow (no text or symbols on device)natural_image
Close-up of a white plastic kitchen appliance with a black arrow indicating rotation or movement (no text or symbols visible)natural_image
Illustration of a hand holding a cylindrical device with a transparent casing and a small circular component inside (no text or symbols)natural_image
Close-up of a hand using a tool to press or brush inside a transparent container (no text or symbols visible)natural_image
Illustration of a hand using a tool to press or adjust a mechanical component inside a transparent kitchen appliance (no text or symbols visible)natural_image
Illustration of a hand holding a lid above a transparent kitchen appliance (no text or symbols visible)natural_image
Illustration of hands operating a kitchen tool with a bowl and lid (no text or symbols)natural_image
Close-up of a hand pressing down on a transparent cylindrical container (no text or symbols visible)natural_image
Illustration of hands stirring a bowl on a food processor (no text or symbols)natural_image
White plastic kitchen appliance with a black arrow pointing to the side (no text or symbols visible)natural_image
Illustration of a hand pouring liquid into a container with a downward arrow indicating process (no text or symbols)natural_image
Illustration of a hand pouring liquid into a container with a rotating arrow indicating rotation (no text or symbols)natural_image
Close-up of a white electronic device with a black arrow pointing to a component, no visible text or symbols.natural_image
Close-up of a hand pressing a kitchen air conditioner with control buttons (no visible text or symbols)natural_image
Close-up of a white plastic kitchen appliance with a black arrow indicating a component (no visible text or symbols)natural_image
Illustration of a hand operating a kitchen appliance with a circular lid and central valve (no text or symbols visible)natural_image
Illustration of hands stirring a glass bowl on a stand (no text or symbols)natural_image
White kitchen Andal blender with control panel and directional arrow (no text or symbols on device)natural_image
3D rendering of a white plastic kitchen pot with handle and side panel (no text or symbols)natural_image
White kitchen aid blender with control panel and digital display (no visible text or symbols on device)natural_image
3D rendering of a transparent plastic enclosure containing a circular mechanical component with internal components (no text or symbols visible)natural_image
Silhouette of a flame with sharp edges, resembling a stylized mountain or flame (no text or symbols)Peligro de Incendio
natural_image
Illustration of a hand pressing down a cylindrical container with liquid inside (no text or symbols visible)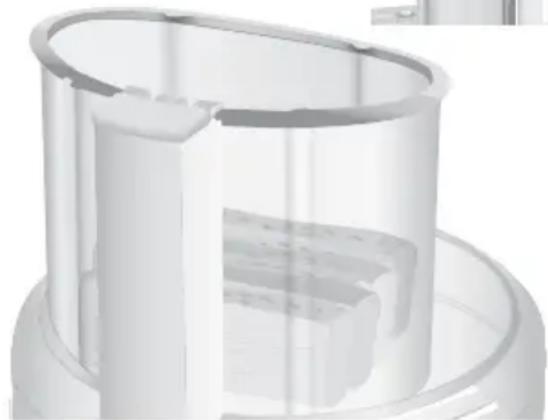
natural_image
3D rendering of a transparent cylindrical device with internal cutouts, no visible text or symbolsnatural_image
Close-up of a cylindrical mechanical component with flanges and a central hub (no visible text or symbols)natural_image
Close-up of a transparent cylindrical container with internal cylindrical components, no visible text or symbols.natural_image
3D rendered diagram of a cylindrical mechanical component with flanged ends (no text or symbols)natural_image
3D rendering of a transparent cylindrical container with an open lid (no text or symbols)natural_image
Illustration of a hand using a magnifying glass to examine a device (no text or symbols visible)Customer eXperience Centre
KitchenAid Canada
1901 Minnesota Court
Mississauga, ON L5N 3A7
Customer Satisfaction Center
KitchenAid Portable Appliances
P.O. Box 218
St. Joseph, MI 49085-0218
Customer eXperience Centre
KitchenAid Canada
1901 Minnesota Court
Mississauga, ON L5N 3A7
® Registered trademark /™ Trademark /the shape of the mixer is a registered Trademark of KitchenAid U.S.A., KitchenAid Canada licensee in Canada. ©2009. All rights reserved.

- Proof of Purchase & Product Registration
- FEATURES AND OPERATION
- CARE AND CLEANING
- Table of Contents
- FOOD PROCESSING TIPS
- WARRANTY AND SERVICE INFORMATION
- Food Processor Safety
- Your safety and the safety of others are very important.
- ! DANGER
- WARNING
- IMPORTANT SAFEGUARDS
- SAVE THESE INSTRUCTIONS
- Electrical Requirements
- Models KFPM770 & KFPM773:
- Models KFPW760 & KFPW763:
- Work Bowl Cover with Ultra Wide Mouth™ Feed Tube
- 2-Piece Food Pusher (Models KFPW760 & KFPM770)
- 3-Piece Food Pusher (Models KFPW763 & KFPM773)
- 12-Cup (2.8 L) Work Bowl
- 10-cup (2.4 L) Chef's Bowl
- 4-cup (945 ml) Mini Bowl and Mini Blade (All models except KFPW763)
- Fine (2 mm) Slicing Disc
- Medium (4 mm) Slicing Disc
- Medium (4 mm) Shredding Disc
- French Fry Cutting Disc (Model KFPM773)
- Disc Stem
- Stainless Steel Multipurpose Blade
- Dough Blade
- Egg Whip
- (All models except KFPW763)
- Citrus Press
- Heavy-Duty Base
- Spatula/Cleaning Tool
- Chef's Accessory Case
- Preparing the Food Processor for Use
- Before First Use
- Work Bowl Assembly
- Multipurpose Blade and Dough Blade Assembly
- Slicing, Shredding, and Cutting Disc Assembly
- Mini Bowl Assembly
- Chef's Bowl Assembly
- Egg Whip Assembly and Use
- To assemble:
- To disassemble:
- Citrus Press Assembly and Use
- Before Use
- Food Pusher Interlock
- Maximum Liquid Level
- Turning the Food Processor On and Off
- Using the Food Processor
- Using the Pulse Control
- The 2-Piece Food Pusher (Models KFPW760 & KFPM770)
- The 3-Piece Food Pusher (Models KFPW763 & KFPM773)
- Disassembling the Food Processor
- Cleaning the Food Processor
- Cut Hazard
- Troubleshooting
- USING THE MULTIPURPOSE BLADE
- To chop fresh fruits or vegetables:
- To puree cooked fruits and vegetables (except potatoes):
- To prepare mashed potatoes:
- To chop dried (or sticky) fruits:
- To finely chop citrus peel:
- To mince garlic or to chop fresh herbs or small quantities of vegetables:
- To chop nuts or make nut butters:
- To chop cooked or raw meat, poultry or seafood:
- To make bread, cookie, or cracker crumbs:
- To melt chocolate in a recipe:
- To grate hard cheeses, such as Parmesan and Romano:
- USING A SLICING, SHREDDING, OR CUTTING DISC
- To cut julienne, or match stick, strips of vegetables and fruits:
- To slice or shred fruits and vegetables that are round, such as onions, apples, and green peppers:
- To slice or shred fruits and vegetables that are small, such as strawberries, mushrooms and radishes:
- To slice uncooked meat or poultry, such as stir-fry meats:
- To slice cooked meat or poultry, including salami, pepperoni, etc.:
- To shred firm and soft cheeses:
- To slice or shred items that are "pear-shaped" like sweet potatoes, eggplant and squash:
- USING THE DOUGH BLADE
- USING THE EGG WHIP
- To make soft egg white meringue:
- To whip cream:
- Handle blades carefully.
- Failure to do so can result in cuts.
- KitchenAid® Food Processor Warranty
- Hassle-Free Replacement Warranty – 50 United States and District of Columbia
- Hassle-Free Replacement Warranty – Canada
- How to Arrange for Warranty Service in Puerto Rico
- How to Arrange for Service after the Warranty Expires – All Locations
- How to Arrange for Service Outside these Locations
- How to Order Accessories and Replacement Parts
- Blades and Discs
- Bowls and Covers
- Specialty Accessories
- Other Accessories
- Table des matières
- INTRODUCTION
- Dépannage
- UTILISATION DU FOUET À OEUFS
- Peligro de Incendio
Brand : KITCHENAID
Model : KFPW760OB
Category : Food processor