86604CF - Rice cooker WestBend - Free user manual and instructions
Find the device manual for free 86604CF WestBend in PDF.


| Product Type | Rice Cooker and Steamer |
| Brand | WestBend |
| Model | 86604CF |
| Power Supply | 120 V AC, 60 Hz |
| Power | Not specified (estimated 600-800 W) |
| Housing Material | Heat-resistant plastic |
| Rice Bowl Capacity | Approximately 1 liter (not exactly specified) |
| Number of Steamer Baskets | 3 stackable baskets with separation rings |
| Main Functions | Steam cooking, keep warm, delayed cooking, automatic shut-off |
| Timer | From 0 to 90 minutes for steam, delay up to 12 hours |
| Keep Warm | Up to 1 hour after cooking |
| Water Level Alarm | Yes, with "ADD WATER" icon and safety shut-off |
| Safety | Polarized plug, overheat protection, automatic shut-off if water runs out |
| Maintenance and Cleaning | Baskets, rice bowl, drip tray and lid dishwasher safe (top rack). Heating base cleaned with a damp cloth. Descaling recommended with vinegar. |
| Spare Parts | Available via Focus Electrics (service@focuselectrics.com or (866) 290-1851) |
| Warranty | 1-year limited (parts and labor) for household use |
| Usage | Household only, indoor |
| Included Accessories | 3 steamer baskets, rice bowl, drip tray, separation rings, lid |
| Dimensions (approx.) | Total height with stacked baskets approx. 40 cm, base diameter approx. 25 cm (not officially specified) |
| Weight (approx.) | Approximately 2.5 kg (estimated) |
Frequently Asked Questions - 86604CF WestBend
User questions about 86604CF WestBend
0 question about this device. Answer the ones you know or ask your own.
Ask a new question about this device
Download the instructions for your Rice cooker in PDF format for free! Find your manual 86604CF - WestBend and take your electronic device back in hand. On this page are published all the documents necessary for the use of your device. 86604CF by WestBend.
USER MANUAL 86604CF WestBend
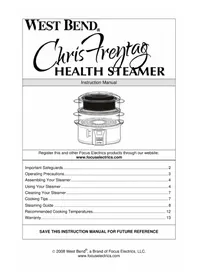
Register this and other Focus Electronics products through our website: www.focuselectrics.com
Important Safeguards. 2
Operating Precautions. 3
Assembling Your Steamer 4
Using Your Steamer 4
Cleaning Your Steamer 7
Cooking Tips 7
Steaming Guide 8
Recommended Cooking Temperatures. 12
Warranty. 13
SAVE THIS INSTRUCTION MANUAL FOR FUTURE REFERENCE
IMPORTANT SAFEGUARDS

CAUTION
To prevent personal injury or property damage, read and follow all instructions and warnings.
When using electrical appliances, basic safety precautions should always be followed including the following:
- Read all instructions, including these important safeguards and the care and use instructions in this manual.
- Do not touch hot surfaces. Use handles or knobs.
- To protect against electric shock, do not immerse cord, plugs, or other electric parts in water or other liquids.
- Close supervision is necessary when this appliance is used by or near children.
- Unplug the appliance from outlet when not in use and before cleaning. Allow to cool before putting on or taking off parts.
- Do not operate any appliance with a damaged cord or plug or after the appliance malfunctions or if the appliance is dropped or damaged in any manner. If you experience any problems with your appliance, unplug it immediately from the electrical outlet. For service information see warranty page.
- The use of accessory attachments not recommended by Focus Electronics, LLC may cause injuries.
- Do not use this appliance outdoors.
- Do not let cord hang over the edge of a table or counter, or touch hot surfaces.
- Do not place on or near a hot gas or electrical burner, or in a heated oven.
- Extreme caution must be used when moving an appliance containing hot oil or other hot liquids.
- To disconnect, turn unit to "OFF", then remove plug from wall outlet.
- Do not use appliance for other than intended use.
- This appliance has a polarized plug (one blade is wider than the other). To reduce the risk of electric shock, this plug is intended to fit into a polarized outlet only one way. If the plug does not fit fully into the outlet, reverse the plug. If it still does not fit, contact a qualified electrician. Do not attempt to modify the plug in any way.
- Do not preheat the heating base.
- For household use only.

CAUTION
To prevent personal injury or property damage, read and follow all instructions and warnings.
OPERATING PRECAUTIONS
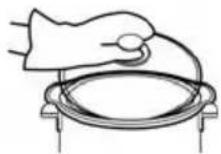
- Use hot pads or oven mitts if you lift or carry the electrical base, baskets or cover when it is hot.
- Be extremely cautious of steam when removing cover. Lift cover slowly, directing steam away from you and let water drip into steamer.
- Do not operate appliance while empty or without water in the reservoir.
- A short power-supply cord is provided to reduce risks resulting from becoming entangled in or tripping over a longer cord.
- Longer detachable power-supply cords or extension cords are available and may be used if care is exercised in their use. While use of an extension cord is not recommended, if you must use one, the marked electrical rating of the detachable power-supply cord or extension cord should be at least as great as the electrical rating of the appliance. If the appliance is of the grounded type, the extension cord should be a grounding-type 3-wire cord. The cord should be arranged so that it will not drape over the counter top or tabletop where it can be pulled by children or tripped over.
- Do not attempt to repair this appliance yourself.
SAVE THESE INSTRUCTIONS
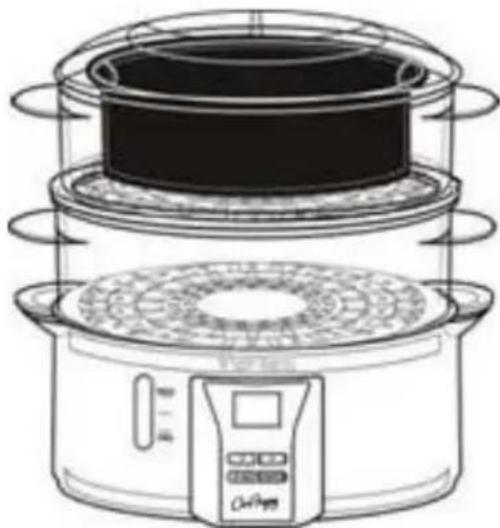
ASSEMBLING YOUR STEAMER
USING YOUR STEAMER
Before using for the first time, wash baskets, rice bowl, drip tray, separator rings and cover using warm, soapy water. Rinse thoroughly and dry. Wipe the surfaces of the heating base with a damp cloth and dry thoroughly. Do not use abrasive cleaning products.
Cook Time - Maximum 90 minutes cooking time and 12 hour delay cycle.
| STEAMER ICONS | |||||
| OFF 10 | START/STOP | 48 STEAM | A | V | 00 WARM |
| “OFF” | “START/STOP” | “STEAM” | “STEAM TIME” | “WARM” | |
| The display when first plugged in. | Starts and stops the steamer. | Indicates the steaming time. | Adjust the steaming time up. | Adjust the steaming time down. | Indicates steamer is in keep warm mode. |
| SET DELAY | SET 6:00 | 8 8:30 | ADD H 20 |
| “SET DELAY” “SET” “HOURGLASS” “ADD WATER” | |||
| Press to set the delayed steaming time. | Indicates the delayed steaming time. | Indicates how long the timer has to count down to 0:00 | Indicates the steamer does not have enough water to complete the steaming cycle. |
STEAMING
-
Place the heating base on a dry, level, heat resistant surface, away from any edge. Note: As food cooks, steam will come out of appliance. To prevent possible damage, do not place steamer directly under cabinets.
-
Add cold water to the desired level or as shown in the cooking chart. Note: Never start the steamer without water or with water below the "MIN" line or above the "MAX" line.
-
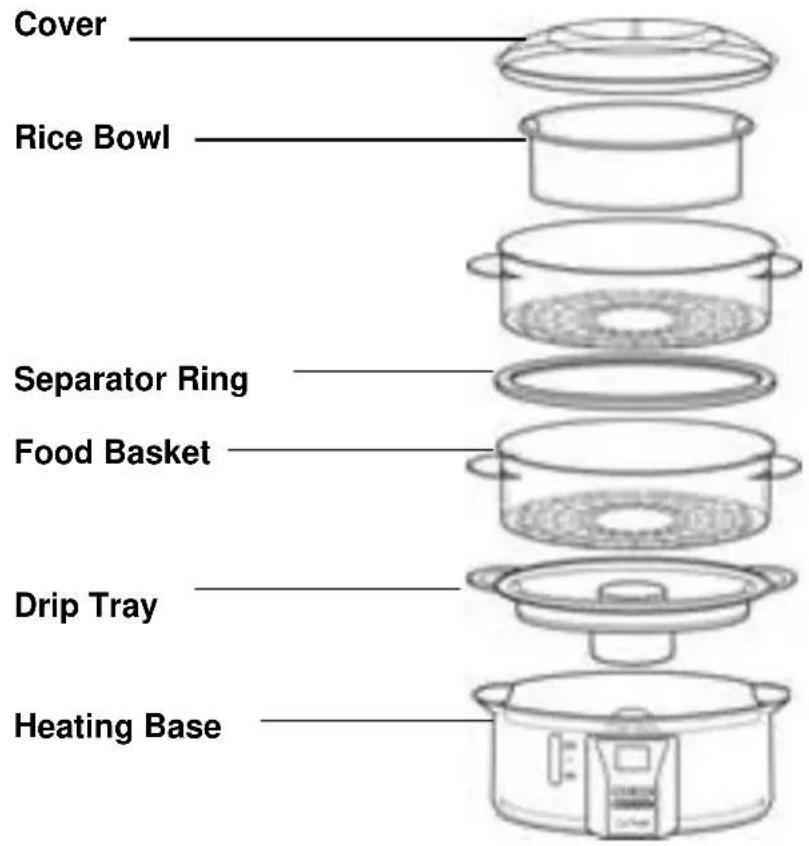
Place the drip tray in the heating base. Note: The drip tray must always be used when steaming foods or cooking rice.
-
Place food items in the food baskets or rice bowl. Place the food basket on top of the drip tray making sure the drip tray and food basket are aligned properly. If you are using multiple food baskets, lay a separator ring on top of the bottom food basket and snap the second food basket in place. Make sure the separator ring is completely snapped on to the upper basket and all baskets line up properly. If using the second and third baskets repeat this procedure. If you are using the rice bowl, place the rice bowl inside any of the food baskets being used. Always place the cover on the top basket being used.
-
Plug the cord into a 120 volt, AC electric outlet only. The appliance will beep and display a cooking time of 10 minutes and the display will read "OFF." Note: If the steamer is left idle for 5 minutes or more, the digital display will turn off. Press any button on the steamer to reactivate the display.
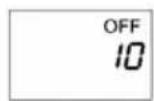
Pressing the "STEAM TIME" buttons will adjust the steaming time up or down between 00 and 90 minutes. Note: Hold either button down to scroll quickly. See the steaming chart for approximate cooking times.
- When the timer is at the desired steaming time, press the "START/STOP" button to begin steaming. The "STEAM" icon will appear in the display to indicate steaming has begun. To cancel steaming, press the "START/STOP" button again.

KEEP WARM - After the steaming time has elapsed, an audible beep will sound 5 times and the "STEAM" icon will disappear. The steamer will enter a 1 hour keep warm mode indicated by a "WARM" icon and "00" in the display. During the keep warm mode,
the steamer will periodically turn off and on to maintain food at serving temperature. When the keep warm mode is finished, the steamer will beep and "OFF" and "10" will appear in the display.
If you want to cancel the "WARM" cycle, press the "START/STOP" button.
DELAY COOKING
- Follow steps 1 - 4 from the "STEAMING" directions. Note: Do not press the "START/STOP" button.
- Press the "SET DELAY" button. The "SET" icon and 6:00 will be displayed.
- Pressing the "STEAM TIME" buttons will adjust the delay time up or down between 00 and 12 hours. Note: Hold either button down to scroll quickly.
- Press the "SET DELAY" button to accept the delay time. Once the button is pressed, the hourglass icon will be displayed which means the timer is counting down to 0:00. When the timer reaches 0:00, the unit will beep once and start the steaming cycle.
SET
6:00
8:30 - If you decide to change the delay time after it has been set, press the "SET DELAY" button and you will be back in "SET" mode. After changing the delay time, be sure to press "SET DELAY" again to start the timer.
- If you decide to change the steam time when in the delay mode, press the "START/STOP" button and you will be back in the steam timer mode. Note: The delay timer will have to be reset after you change the steam time.
ADD WATER ALARM - when the steamer is out of water or the water level is too low to complete the steaming cycle, the steamer has a self-protection feature that will stop the steaming operation. An audible
beep will sound for 50 seconds and the "ADD WATER" icon will appear in the display.
If this happens, push any button to stop the alarm. The steam time and "OFF" will appear in the display. Add cold water through the drip tray handles or remove the drip tray and add cold water directly into the heating base. Allow a few seconds for the heater to cool down. Start the steamer up again by pushing "START/STOP" button; the steamer will resume the cycle. If the steamer goes back into the alarm mode, let the steamer cool down for a longer period of time and push the "START/STOP" button again.
ADD
H20
CLEANING YOUR STEAMER
- Unplug the cord from the electrical outlet. Allow the steamer and all accessories to cool completely before cleaning. Note: Never immerse the heating base, cord or plug in water or in a dishwasher.
- Wash the food baskets, rice bowl, drip tray, separator rings and cover using warm, soapy water. Rinse thoroughly and dry. These parts may also be cleaned in a dishwasher, top rack only. Note: Do not use the heat setting to dry.
- Clean the inside and outside of the heating base with a damp cloth and dry thoroughly. Note: Do not use abrasive cleaning products.
-
Mineral deposits may build up on the steamer heater over time. When you see a white coating on the heater, perform the following steps to descale and extend the life of your steamer.
-
Fill the heating base with two cups of vinegar and one cup of cold water.
- Put the drip tray in place, set the timer for twenty minutes and press "START/STOP" to begin steaming.
- When the steamer turns off, let it cool completely and rinse the water reservoir with cold water being careful not to get water on the outside or bottom of the heating base.
- Dry thoroughly.
STORAGE - Your steamer's food baskets nest for easy storage. Remove the separation rings between the baskets and place baskets inside one another.
COOKING TIPS
- Altitude and water type affect the temperature at which water boils which affects cooking time. As you cook with this appliance, adapt times and measurements to your own personal tastes.
- Cut food into uniform pieces and arrange evenly in food baskets for even cooking.
- Do not thaw frozen vegetables before steaming. Stir halfway through the steaming time for best results.
- Items will continue to cook slightly during the "Warm" mode, so adjust accordingly.
- Do not pack food into the baskets as this limits the flow of steam.
- If steaming items for more than 60 minutes, you may have to add water during the steaming cycle.
These steaming times are for the bottom basket filled to the capacity listed in the chart. Items will cook faster in the bottom basket. If you are cooking with multiple baskets, or putting more food into the baskets than suggested, you may have to add extra steaming time. The water level does not have to be precise. The following levels are suggested to provide enough water for the recommended steaming times.
Note: The drip tray must always be used.
| Fresh Vegetables | Amount | Approximate Time (minutes) | Water Level | Preparation |
| Artichokes, whole | 4 whole. 30-34 MAX | Trim stem; remove loose outer leaves, cut 1 inch off top. | ||
| Asparagus, spears | 1 lb. 13-17 Middle Place evenly in basket. | |||
| Beans, green/wax | 1 lb. 16-20 Middle Place evenly in basket. | |||
| Beets | 1 | lb. | 24-28 | Cut and place evenly in basket. Middle |
| Broccoli, spears | 1 lb. 16-20 Middle Place evenly in basket. | |||
| Brussels Sprouts | 1 lb. 20-24 | Between Middle and MAX | Remove outer leaves and place evenly in basket. | |
| Cabbage | 1 head 23 | Between 27 Middle and MAX | Cut whole head into 8 equal pieces. | |
| Carrots, sliced or whole | 1 lb. 25-29 | Between Middle and MAX | Place evenly in basket. | |
| Cauliflower 1 lb. 16-20 Middle Place evenly in basket. | ||||
| Celery 1 lb. 17-21 Middle Cut into 1/4 inch pieces. | ||||
| Corn on the Cob | Up to 6 ears per basket | 28-32 | MAX | Remove husk. Place evenly in basket. |
| Mushrooms, whole | 1 lb. 11-15 Middle Place evenly in basket. | |||
| Okra 1 lb. | 18-22 Middle | Place evenly in basket. | ||
| Onions, quartered | 1 lb. 12-16 | Middle Place evenly in basket. | ||
| Parsnips 1 lb. | 10-14 Middle | Place evenly in basket. | ||
| Peas in pod 1 | lb. 12-16 | Middle Place evenly in basket. | ||
| Peppers, green or red | 1 lb. 12-16 | Middle Place evenly in basket. | ||
| Potatoes, red, baking or sweet | 1 lb. 38-42 MAX | Cut in half and place cut side down or cut in ¼ inch slices. | ||
| Potatoes, whole | 6 potatoes | 50-54 MAX | Pierce skin with fork several times and place evenly in basket. | |
| Rutabaga | 1 | lb. | Between 28-42 and MAX | Dice and place evenly in basket. |
| Spinach 1 lb. | 10-14 Middle | Place evenly in basket. | ||
| Squash, Summer, Yellow, Zucchini | 1 lb. 14-18 | Middle Cut into ¼ inch pieces. | ||
| Turnips | 1 | lb. | 20-24 | Slice and place evenly in basket. |
| Frozen Vegetables | ||||
| All-Corn, Carrots, Green Beans, Broccoli, Peas, Brussel Sprouts | 1 lb. 16-20 | Middle | Place evenly in basket. Stir halfway through steaming cycle. | |
| Vegetables in sauce | 1 lb. 16-20 | Middle | Put in rice bowl with recommended water stated on package. Mix halfway through steaming cycle. | |
| Rice/Grains/Pasta | Amount | Approximate Time (minutes) | Water Level | Preparation |
| White, 1 cup | cup dry 33-37 MAX | Mix 1 cup rice with 1½ cups water and desired seasoning in rice bowl. | ||
| Brown, 1 cup | cup dry 40-44 MAX | Mix 1 cup rice with 1½ cups water and desired seasoning in rice bowl. | ||
| Barley 1 cup | cup dry 40-44 MAX | Mix 1 cup barley with 1½ cups water in rice bowl. | ||
| Pasta 1 cup | cup dry 38-42 MAX | Mix 1 cup pasta with 1½ cups water in rice bowl. | ||
| Eggs | ||||
| Hard Boiled Up to 12 16-20 Soft Boiled Up to 12 8-10 Middle Place evenly in basket. | ||||
| Seafood and Fish | ||||
| Clams, Fresh in shell | 1 lb. 12-16 Middle | Clean, soak shells. Cook until shells are open. | ||
| Crab legs, claws (cooked) | 1 lb. 15-19 Middle Steam until hot. | |||
| Lobster tails (uncooked) | 1 lb. 18-22 Middle | Remove underside of shell. Place in steam basket shell side down. Steam until flesh is opaque and shell is reddish in color. | ||
| Mussels, in shell | 1 lb. 16-20 Middle | Clean shells. Cook until shells are open and flesh turns tannish in color. | ||
| Oysters, in shell | 1 lb. 13-17 Middle | Clean shell. Cook until shells are opened and juices bubble. | ||
| Scallops, thawed | 1 lb. 13-17 Middle | Rinse scallops. Steam until opaque in color. | ||
| Seafood and Fish | Amount | Approximate Time (minutes) | Water Level | Preparation |
| Shrimp, in shell frozen | 1 lb. 13-17 | Middle | Place evenly in basket. Cook until shrimp is opaque in color. | |
| Shrimp in shell, thawed | 1 lb. 10-14 | Middle | Place evenly in basket. Cook until shrimp is opaque in color. | |
| Fish Fillets 1 | lb. 18-22 | Middle | Season and place evenly in basket - cook until fish flakes easily. | |
| Fish Steaks 3 | lbs. 23-27 | Middle | Season and place evenly in basket - cook until fish flakes easily. | |
| Poached fish in rice bowl | 1 lb. 22-26 | Middle | Place in rice bowl with desired seasoning and butter. Cover rice bowl with foil. | |
| Other Foods | ||||
| Beans | 1 cup dry beans | 60-120 depending on type of bean | Max (you may need to add water during the cooking cycle) | Mix 1 cup beans with 1½ cups water in rice bowl - cook until soft. |
| Oatmeal 1 | cup dry 8-12 | Middle | Mix 1 cup oatmeal with 1¾ cups water in rice bowl. | |
| Dinner Rolls | Up to 6 2-4 | Middle | Place evenly in basket. | |
| Tortillas, soft | Up to 6 2-4 | Middle | Place evenly in basket. | |
| Leftovers | 1-2 | cups 11-15 | Ml | Place in rice bowl andiddlecover with foil until warm. |
| Meat - Amount | Approximate Time (minutes) | Water Level | Preparation | |
| When cooking meats always check the internal temperatures with a meat thermometer. Make sure meat is thoroughly cooked to required temperature before consuming. See recommended cooking temperatures on the following chart. | ||||
| Chicken Breast, boneless | 1 lb. 20-24 | Between | Middle and Max | Steam until juices run clear. |
| Chicken Breast, split with bone | 1 lb. 39-44 | Max Place flesh side | down, steam until juices run clear. | |
| Drumstick and Thighs with bone | 1 lb. 30-34 | Max Steam until juices run | clear. | |
| Hot Dogs Up to 24 8-12 Middle Pierce skin and place | evenly in basket. | |||
| Precooked Sausage | Up to 12 10-14 Middle Pierce skin and place | evenly in basket. | ||
RECOMMENDED COOKING TEMPERATURES
| Food | Type | Minimum Internal Temperature |
| Beef, Veal, Lamb, Pork Ground | 160°F (71°C) | |
| Beef Veal, Lamb | Roasts Legs, Chops – Medium Rare | 145°F (63°C) |
| Beef, Veal, Lamb | Roasts Legs, Chops – Medium | 160°F (71°C) |
| Beef, Veal, Lamb | Roasts Legs, Chops – Well Done | 170°F (77°C) |
| Chicken, Turkey | Ground | 165°F (74°C) |
| Whole Poultry | All Types | 180°F (82°C) |
| Poultry | Breasts, Roasts | 170°F (77°C) |
| Fresh Pork | Medium | 160°F (71°C) |
| Fresh Pork | Well Done | 170°F (77°C) |
| Ham | Cooking Required | 160°F (71°C) |
| Ham | Fully Cooked | 140°F (60°C) |
| Egg Dishes | All Types | 160°F (71°C) |
| Stuffing | In Bird | 165°F (74°C) |
| Leftovers | All Types | 165°F (74°C) |
PRODUCT WARRANTY
Appliance 1 Year Limited Warranty
Focus Electronics, LLC ("Focus Electronics") warrants this appliance from failures in the material and workmanship for one (1) year from the date of original purchase with proof of purchase, provided the appliance is operated and maintained in conformity with the provided Instruction Manual. Any failed part of the appliance will be repaired or replaced without charge at Focus Electronics' discretion. This warranty applies to indoor household use only.
This warranty does not cover any damage, including discoloration, to any non-stick surface of the appliance. This warranty is null and void, as determined solely by Focus Electronics if the appliance is damaged through accident, misuse, abuse, negligence, scratching, or if the appliance is altered in any way.
THIS WARRANTY IS IN LIEU OF ALL IMPLIED WARRANTYES, INCLUDING WARRANTYES OF MERCHANTABILITY, FITNESS FOR A PARTICULAR PURPOSE, PERFORMANCE, OR OTHERWISE, WHICH ARE HEREBY EXCUSED. IN NO EVENT SHALL FOCUS ELECTRICS BE LIABLE FOR ANY DAMAGES, WHETHER DIRECT, INDIRECT, INCIDENTAL, FORSEEABLE, CONSEQUENTIAL, OR SPECIAL, ARISING OUT OF OR IN CONNECTION WITH THIS APPLIANCE.
If you think the appliance has failed or requires service within its warranty period, please contact the Focus Electronics Customer Service Department at (866) 290-1851, or e-mail us at service@focuselectronics.com. A receipt proving the original purchase date will be required for all warranty claims, hand written receipts are not accepted. You may also be required to return the appliance for inspection and evaluation. Return shipping costs are not refundable. Focus Electronics is not responsible for returns lost in transit.
Valid only in USA and Canada
REPLACEMENT PARTS
Replacement parts, if available, may be ordered directly from Focus Electronics, LLC several ways. Order online at www.Focuselectrics.com, e-mail service@focuselectrics.com, over the phone by calling (866)290-1851, or by writing to:
Focus Electrics, LLC
Attn: Customer Service
P.O.Box 2780
West Bend, WI 53095
To order with a check or money order, please first contact Customer Service for an order total. Mail your payment along with a letter stating the model or catalog number of your appliance, which can be found on the bottom or back of the unit, a description of the part or parts you are ordering, and the quantity you would like. Your check should be made payable to Focus Electronics, LLC.
Your state/province's sales tax and a shipping fee will be added to your total charge. Please allow two weeks for processing and delivery.
This manual contains important and helpful information regarding the safe use and care of your new Focus Electronics product. For future reference, attach dated sales receipt for warranty proof of purchase and record the following information:
Date purchased or received as gift:
Where purchased and price, if known:
Item number and Date Code (shown bottom/back of product):
WEST BEND®
Chris Freytag CUISEUR A VAPEUR SANTÉ
Mode d'emploi
Focus Electronics, LLC
Attn: Customer Service
P.O.Box 2780
West Bend, WI 53095
Focus Electrics, LLC
Attn: Customer Service
P.O.Box 2780
West Bend, WI 53095
- IMPORTANT SAFEGUARDS
- CAUTION
- To prevent personal injury or property damage, read and follow all instructions and warnings.
- OPERATING PRECAUTIONS
- SAVE THESE INSTRUCTIONS
- ASSEMBLING YOUR STEAMER
- USING YOUR STEAMER
- STEAMING
- DELAY COOKING
- CLEANING YOUR STEAMER
- COOKING TIPS
- PRODUCT WARRANTY
- Appliance 1 Year Limited Warranty
- REPLACEMENT PARTS
- WEST BEND®
- Chris Freytag CUISEUR A VAPEUR SANTÉ
Brand : WestBend
Model : 86604CF
Category : Rice cooker