
Pogo - High chair Nania - Free user manual and instructions
Find the device manual for free Pogo Nania in PDF.



| Product type | High chair (convertible car seat) |
| Brand | Nania |
| Model | Pogo |
| Age/weight group | Group 0-1-2: 0 to 25 kg (from birth to about 6 years) |
| Rear-facing use | Group 0 (0 to 10 kg) |
| Forward-facing use | Group 1 (9 to 18 kg) and Group 2 (15 to 25 kg) |
| Required belt type | UN/ECE No. 16 approved 3-point safety belt |
| Harness adjustment | 4 height positions, 5-point harness with central buckle |
| Cover | Removable cover, hand washable at 30°C with soapy water (no bleach, no machine, no dryer) |
| Safety | Approved according to UN/ECE Regulation No. 44/04; do not use on a seat with a frontal airbag; correct installation is essential |
| Included accessories | Cover, pillow, sleeves (x2), newborn cushion (depending on model) |
| Maintenance | Clean textile parts with a damp sponge; do not use bleach |
| Storage of instructions | Slide between the cover and the shell |
| Repairability | Spare parts available from the manufacturer; do not modify the seat |
| Product weight | Approximately 5 kg (estimate) |
| Dimensions (L x W x H) | Approximately 70 x 45 x 60 cm (estimate) |
Frequently Asked Questions - Pogo Nania
User questions about Pogo Nania
0 question about this device. Answer the ones you know or ask your own.
Ask a new question about this device
Download the instructions for your High chair in PDF format for free! Find your manual Pogo - Nania and take your electronic device back in hand. On this page are published all the documents necessary for the use of your device. Pogo by Nania.
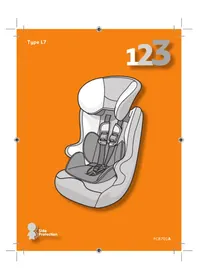
USER MANUAL Pogo Nania
natural_image
Illustration of a car seat with blue and white panels, no text or symbols present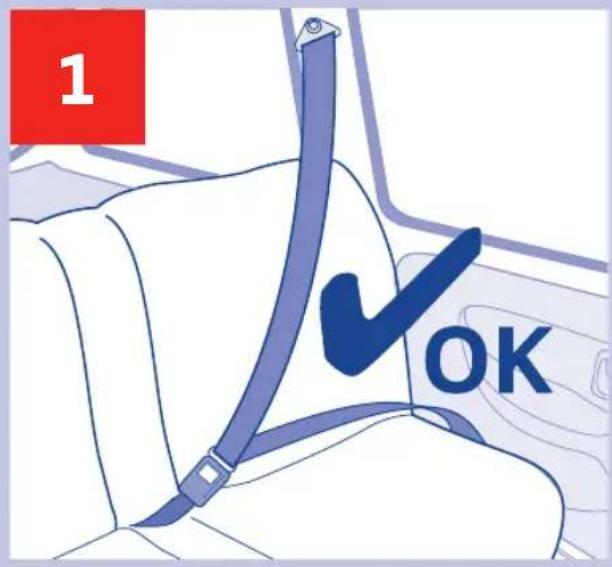
natural_image
Illustration of a person using a car seatbelt to interact with a red asterisk symbol (no text or symbols present)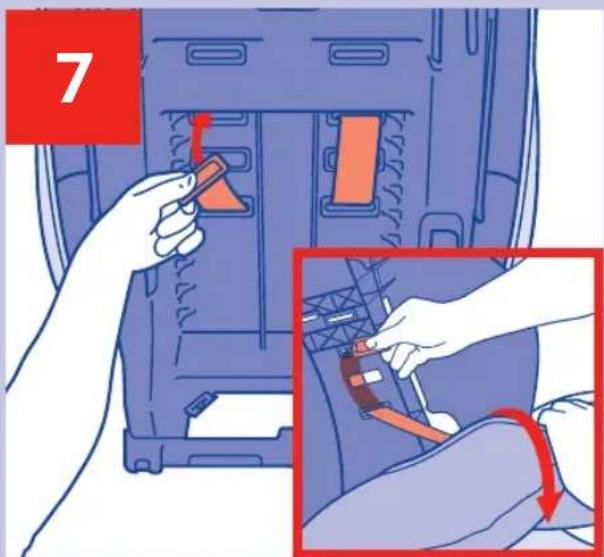
natural_image
Illustration of a car seatbelt with a hand inserting a tool, showing red star patterns on the seat (no text or symbols)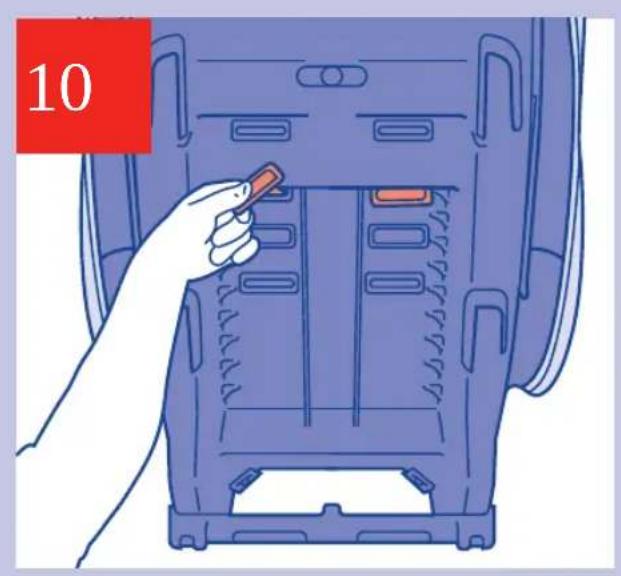
natural_image
Illustration of a hand inserting a component into a blue appliance panel (no text or symbols)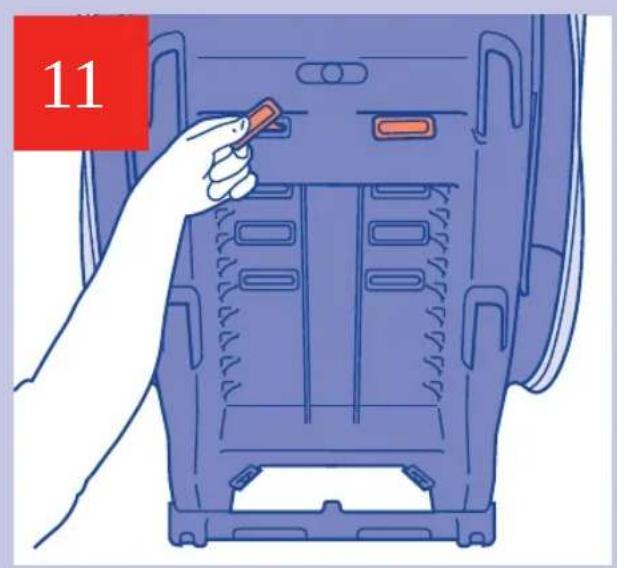
natural_image
Illustration of a hand holding a tool inside a blue industrial container (no text or symbols)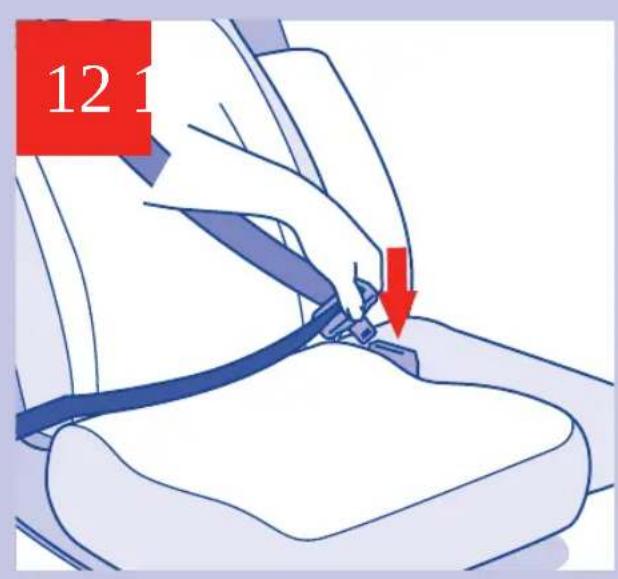
natural_image
Illustration of a car seatbelt device with a red arrow indicating compression or disassembly (no text or symbols present)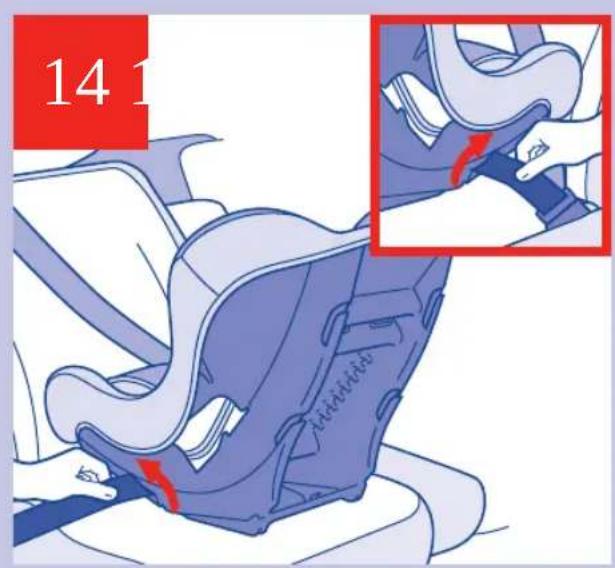
natural_image
Illustration of hands adjusting a car seatbelt with two red circles highlighting the seat area (no text or symbols present)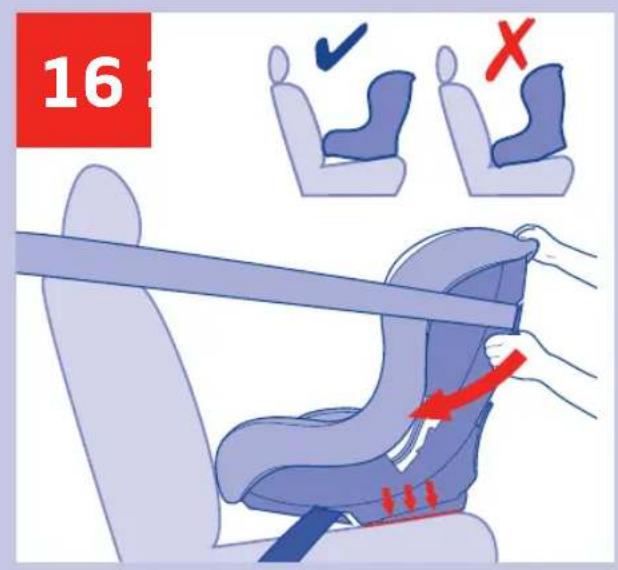
natural_image
Illustration of a car seatbelt buckle with red directional arrows indicating force or movement (no text or symbols)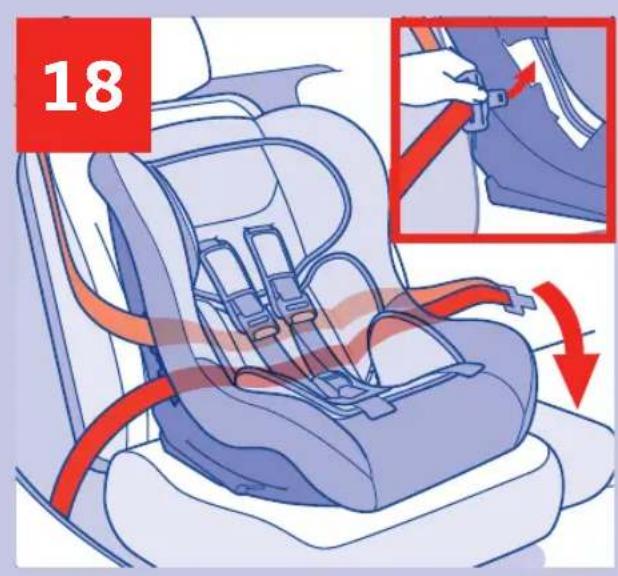
natural_image
Illustration of a person using a belt drive a seatbelt, showing red motion arrows (no text or symbols)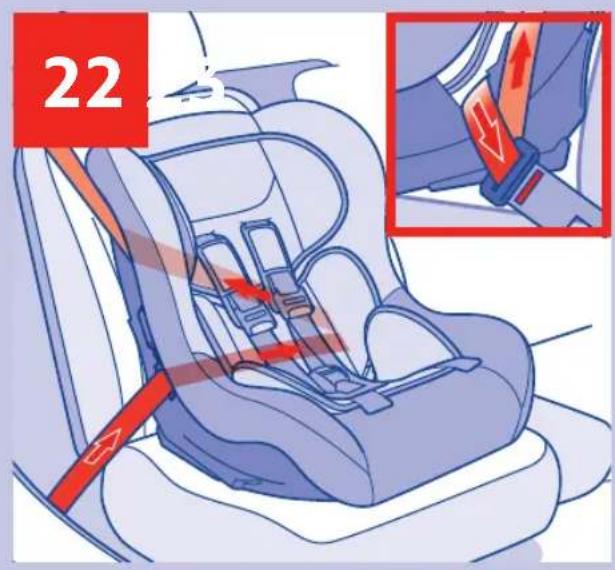
natural_image
Illustration of hands adjusting a car seatbelt with red directional arrows indicating movement (no text or symbols)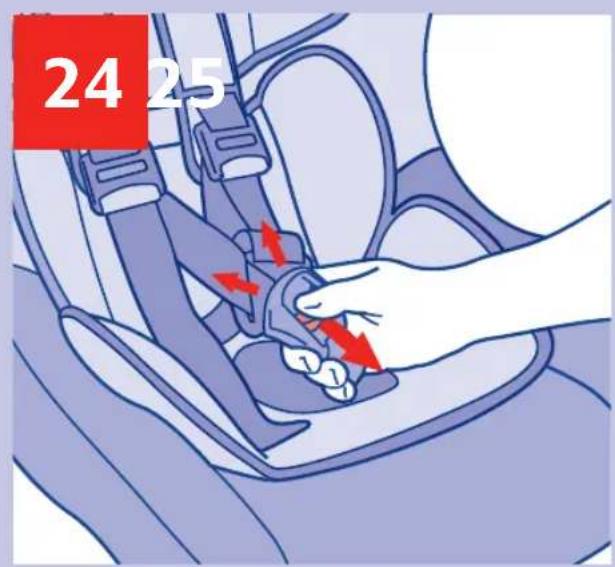
natural_image
Illustration of a person adjusting a seatbelt device, with red arrows indicating direction (no text or symbols)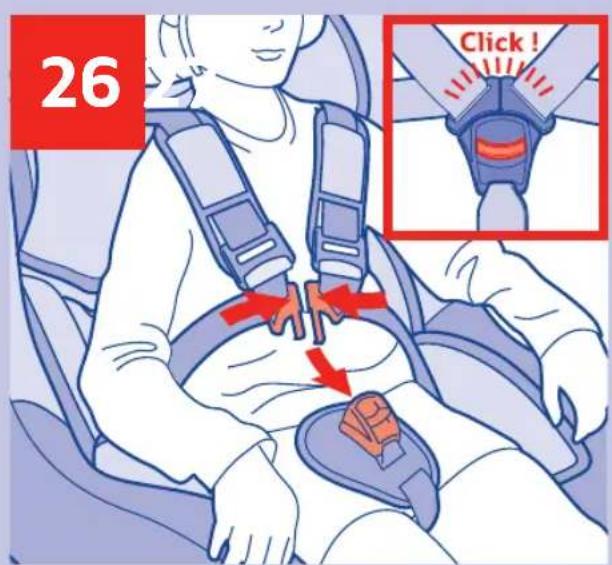
natural_image
Illustration of a person wearing a seatbelt being lifted, with a red arrow indicating the pressure point (no text or symbols present)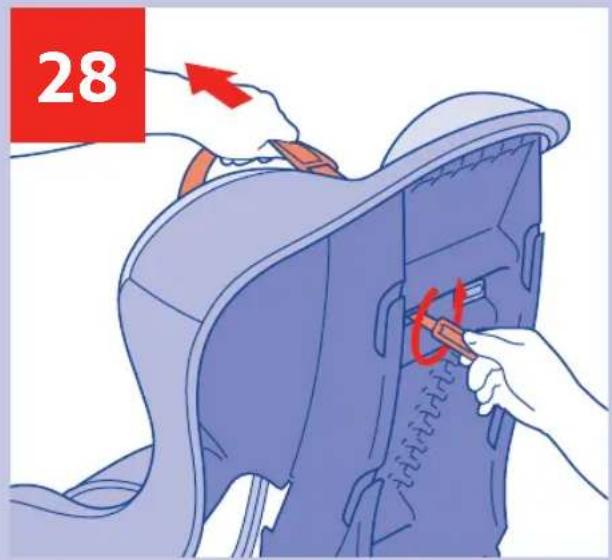

natural_image
Illustration of a person seated in a car seat with a red belt and arrow indicating pressure or movement (no text or symbols)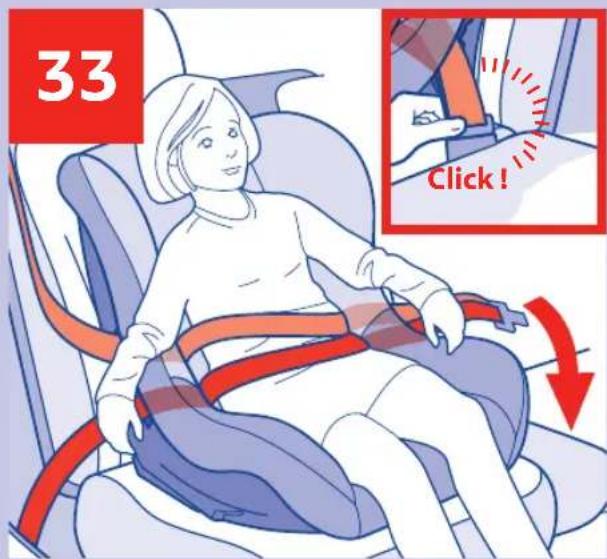

natural_image
Illustration of a person pressing down on a blue cushion with a red arrow indicating motion (no text or symbols)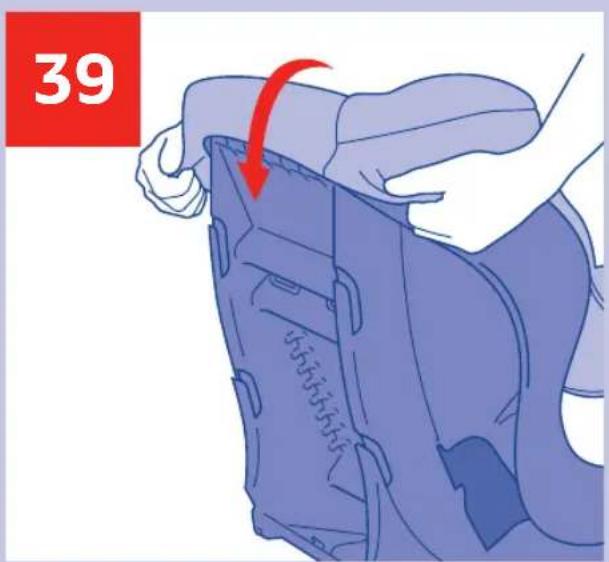

natural_image
Illustration of a person pressing down on a curved mechanical component, with a red arrow indicating the motion direction (no text or symbols present)FR
Thank you for purchasing this Group 0-1-2 car seat. If you require assistance with this product or if you wish to change an accessory, please contact our customer service department (see details on reverse).
SAFETY INSTRUCTIONS
PLEASE READ THESE INSTRUCTIONS CAREFULLY BEFORE BEGINNING THE INSTALLATION. IF THE SEAT IS NOT INSTALLED CORRECTLY, YOUR CHILD'S SAFETY MAY BE AT RISK. DO NOT USE THIS CHILD SEAT ON A PASSENGER SEAT FITTED WITH AN AIR BAG!
The seat may be installed in a front-facing or rear-facing position with a 3-point safety belt to UN/ECE No.16 standard or equivalent. Do not use it on side-facing or rear-facing seats. Always remember to fasten and correctly adjust the child's harness and never start the car without first checking that the seat is properly fixed to the passenger seat as shown in these instructions. It is important to check that the straps of the seat belt are fully tightened and that the harness lap strap is positioned as low as possible to support your child's pelvis. Check that the seat belt and harness straps are not twisted. For maximum protection, there must be no slack between the car seat and the passenger seat. Please refer to the method recommended in these instructions. The seat must not be modified in any way and no elements should be added. It is recommended that you replace this car seat if it has been subjected to a severe impact following an accident or in case of wear. You should regularly check that the harness is not showing signs of wear; check in particular the harness points, the seams and the adjustment devices. Never leave your child unattended in the seat. Check that no part of the seat is trapped in the door or in a fold-down passenger seat. If your car has a fold-down rear seat, check that it is correctly locked in the vertical position. Direct exposure to the sun increases the temperature inside vehicles. For this reason, you are advised to cover the child's car seat when not in use in order to prevent the elements, in particular the fixations, from getting hot and burning the child. Do not use your car seat without its cover and only replace it with a cover that has been recommended by the manufacturer. In an emergency, the child must be able to be freed quickly. The buckle, which can be easily opened, must therefore not be covered. Teach your child not to play with the buckle. Always remember to check that there are no scraps of food or other remains in either the harness buckle or the central adjuster. Luggage and other heavy or sharp objects must be fixed down in the car. Objects that are not attached may injure a child in the event of an accident. In winter, make sure that the child is not wearing over-bulky clothes.
The correct type of safety belt to use with your car seat
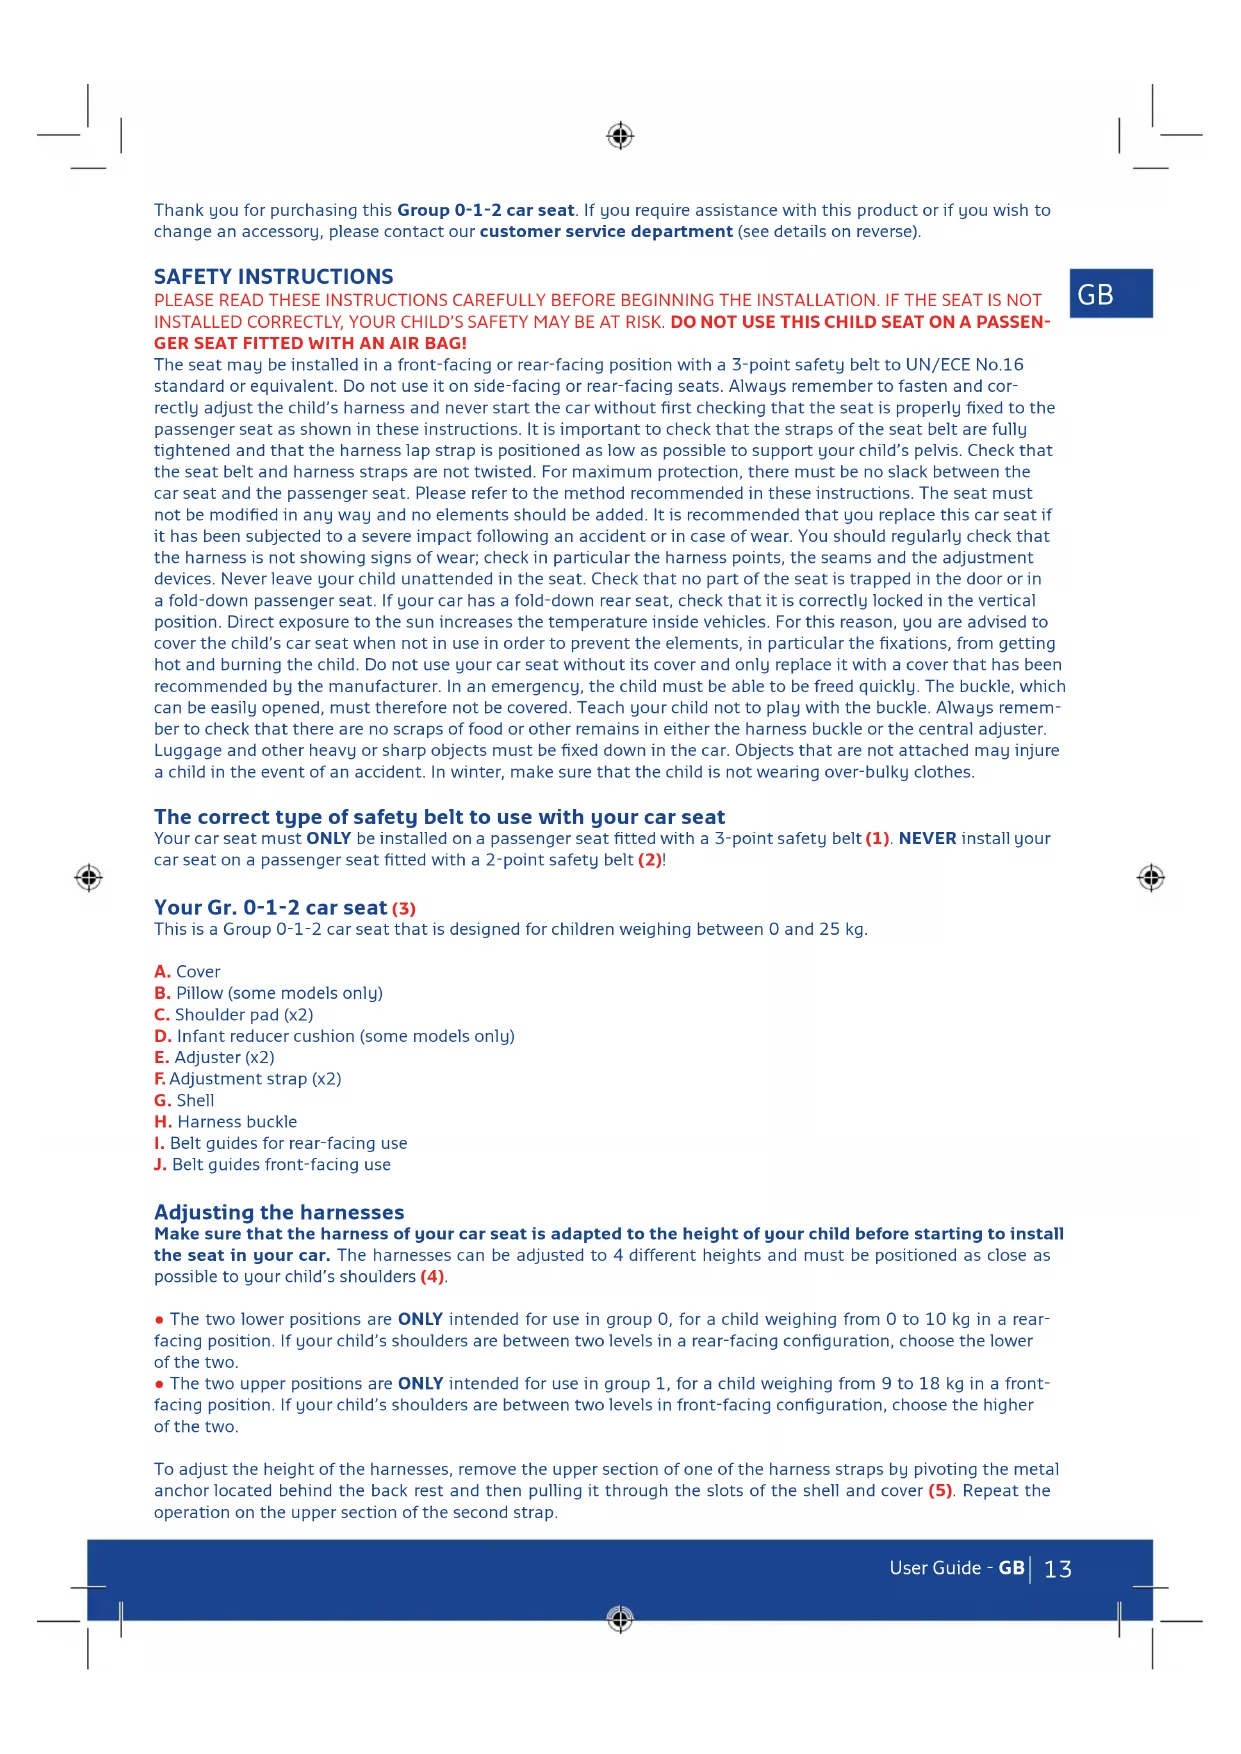
Your car seat must ONLY be installed on a passenger seat fitted with a 3-point safety belt (1). NEVER install your car seat on a passenger seat fitted with a 2-point safety belt (2)!
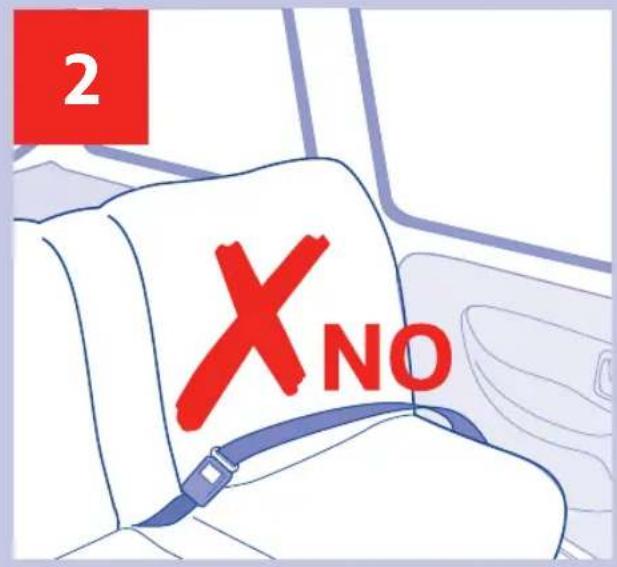
Your Gr. 0-1-2 car seat (3)
This is a Group 0-1-2 car seat that is designed for children weighing between 0 and 25 kg.
A. Cover
B. Pillow (some models only)
C. Shoulder pad (x2)
D. Infant reducer cushion (some models only)
E. Adjuster (x2)
F. Adjustment strap (x2)
G. Shell
H. Harness buckle
I. Belt guides for rear-facing use
J. Belt guides front-facing use
Adjusting the harnesses
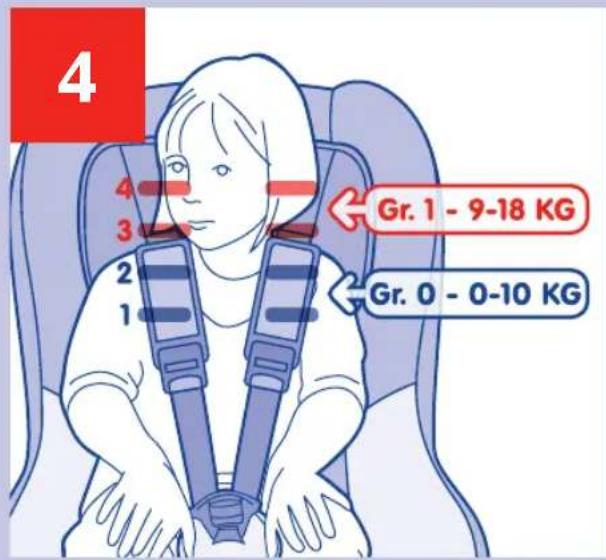
Make sure that the harness of your car seat is adapted to the height of your child before starting to install the seat in your car. The harnesses can be adjusted to 4 different heights and must be positioned as close as possible to your child's shoulders (4).
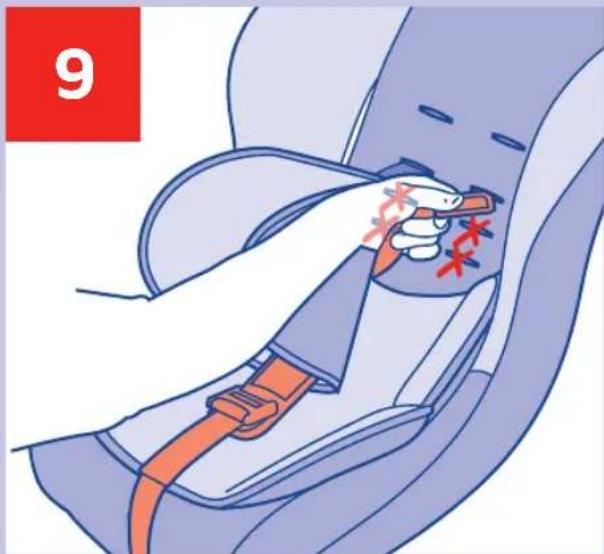
- The two lower positions are ONLY intended for use in group 0, for a child weighing from 0 to 10kg in a rear-facing position. If your child's shoulders are between two levels in a rear-facing configuration, choose the lower of the two.
- The two upper positions are ONLY intended for use in group 1, for a child weighing from 9 to 18kg in a front-facing position. If your child's shoulders are between two levels in front-facing configuration, choose the higher of the two.
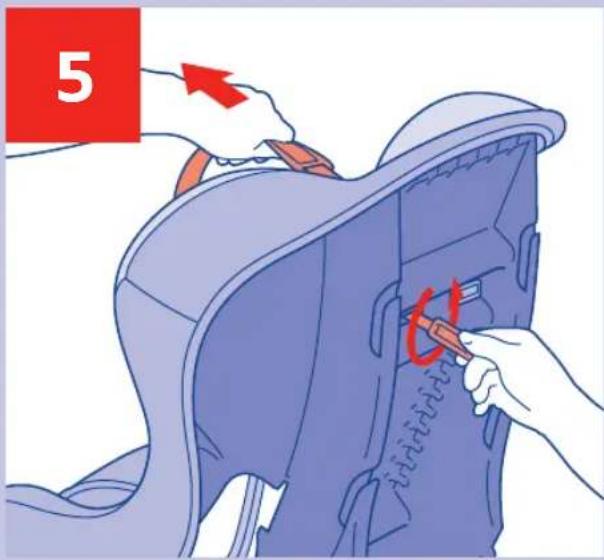
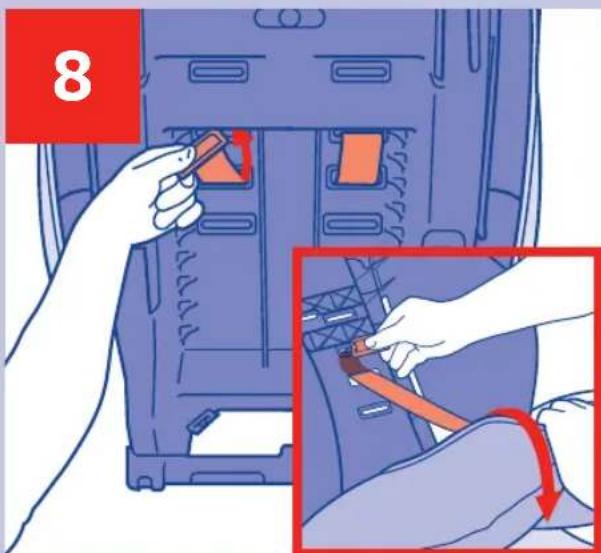
To adjust the height of the harnesses, remove the upper section of one of the harness straps by pivoting the metal anchor located behind the back rest and then pulling it through the slots of the shell and cover (5). Repeat the operation on the upper section of the second strap.
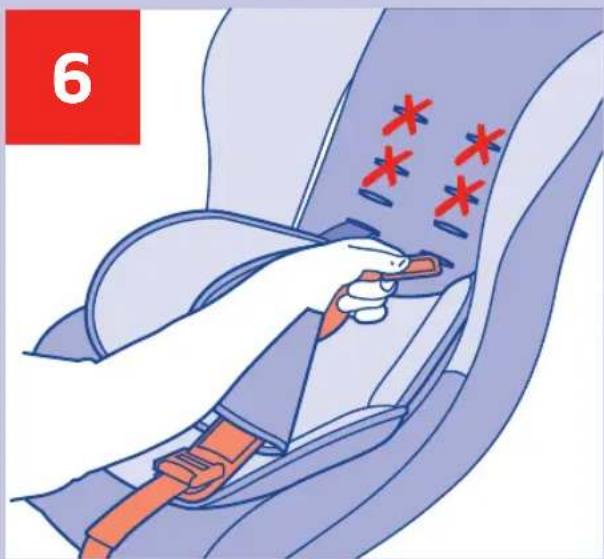
Feed the ends of the harness straps through the slots at identical level in both the cover and the shell, according to the chosen configuration:
- For a rear-facing configuration (Gr. 0, from 0 to 10kg ), the harnesses are fed through one of the two lower positions (6) and then up to the third position to be secured inside the shell (7) (8). Make sure that the metal anchor is correctly positioned and that the ends of the harness straps are not twisted.
IMPORTANT: Whichever of the two lower positions you have chosen, make sure that the metal anchors of the harnesses are well secured through the slots of the third position of the shell.
- For a front-facing position (Gr. 1, from 9 to 18kg ), the harnesses are fed through one of the two upper positions (9) and are secured directly behind the position chosen, at the back of the shell (10) (11). Make sure that the metal anchor is correctly positioned and that the ends of the harness straps are not twisted.
Installing the car seat in a rear-facing position (Gr. 0, from 0 to 10 kg)
DANGER! DO NOT USE THIS CHILD'S CAR SEAT ON A PASSENGER SEAT FITTED WITH AN AIR BAG!
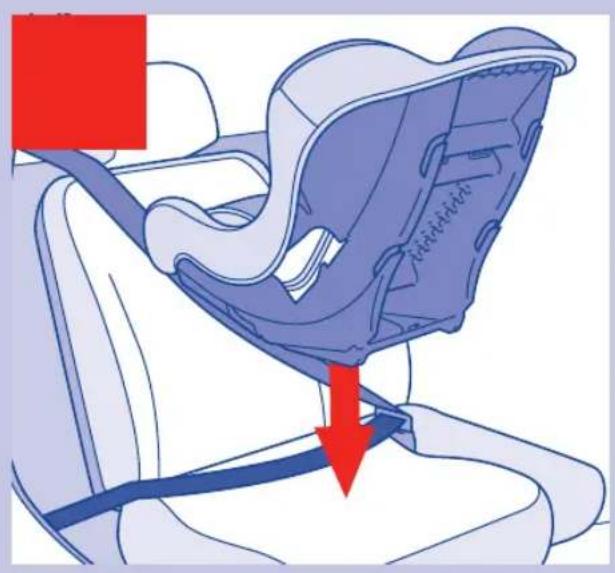
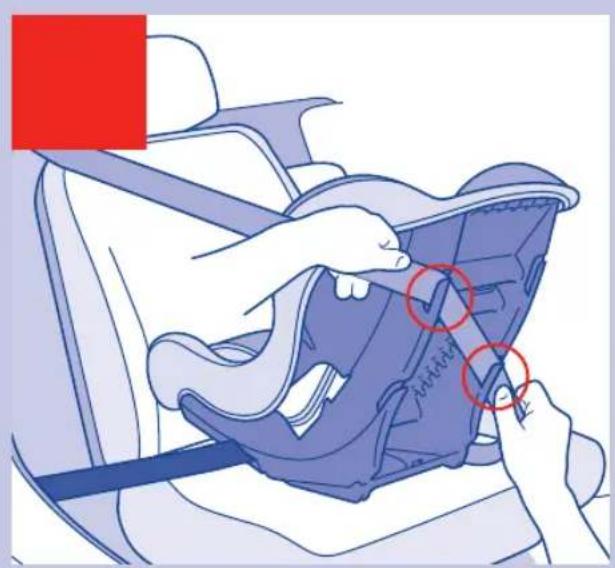
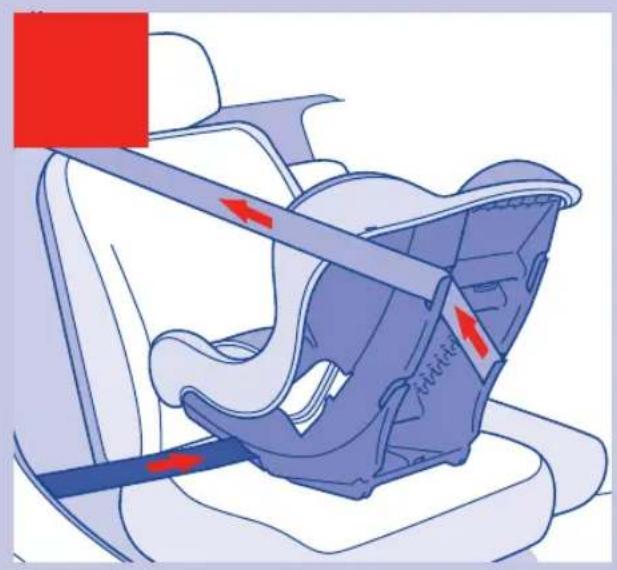
Fasten the vehicle seat belt (12). Place the car seat in a rear-facing position on either the front seat or the rear seats of your vehicle (13). Feed the waist strap of the seat belt through the guides located under the base of the car seat (14). Pull and feed the diagonal part of the seat belt through the guides located behind the back rest of the car seat. The diagonal strap passes through the upper guide on the side nearest the belt winder and through the lower guide on the side nearest the seat belt buckle (15). Place the car seat so that only the back of its base is in contact with the seat of the vehicle (16). Make sure the belt is not twisted and pull it as tightly as possible (17).
IMPORTANT: once the car seat has been installed, the vehicle seat buckle must not be touching the waist strap guide located under the base of the car seat. If it does, choose another place in the vehicle. If in doubt, please contact our customer service department.
Place your child in the car seat, following the instructions in the section entitled 'Installing your child in the car seat with a harness'.
Installing the car seat in a front-facing position (Gr. 1, from 9 to 18 kg)
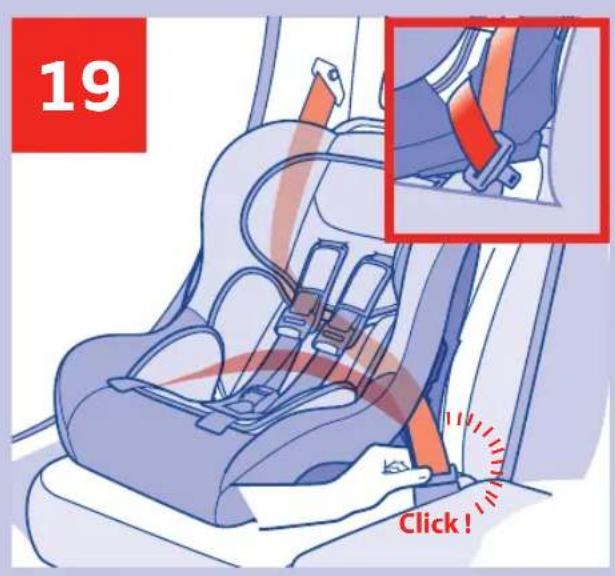
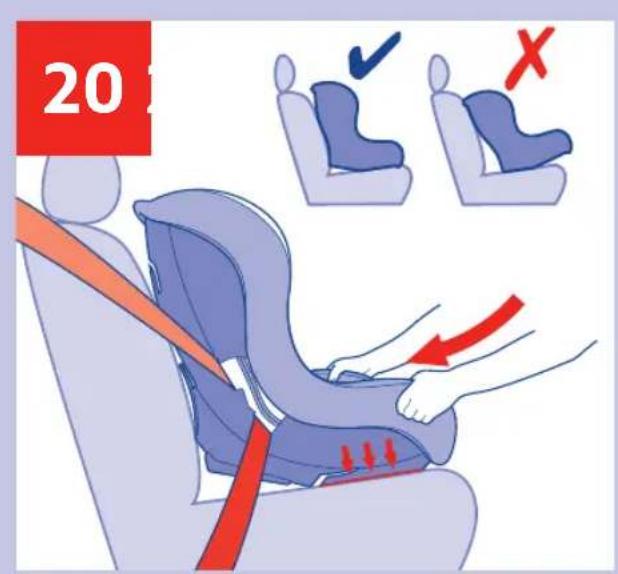
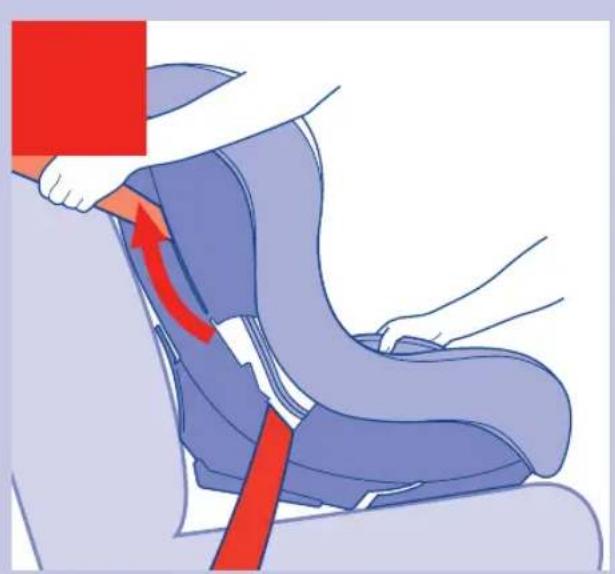
Place the car seat in a front-facing position on the rear seat of the vehicle. Pull on the vehicle seat belt until it is completely loose. Feed the two straps of the belt through the opening in the shell (18), bringing them out through the opposite opening. The belt should pass between the shell and the car seat cover. Fasten the seatbelt (19). Place the car seat so that only the front of its base is in contact with the seat of the vehicle (20). On the side nearest the belt winder, pull up the diagonal belt through the slot located on the side of the shell (21). Make sure the belt is not twisted and pull it as tightly as possible (22).
IMPORTANT: once the car seat has been installed, the vehicle seat buckle must not touch the opening through which the belt passes on the side of the car seat. If it does, choose another place in the vehicle. If in doubt, please contact our customer service department.
Place your child in the car seat, following the instructions in the section entitled 'Installing your child in the car seat with a harness'.
Installing your child in the car seat with a harness (Gr. 0 / Gr. 1)
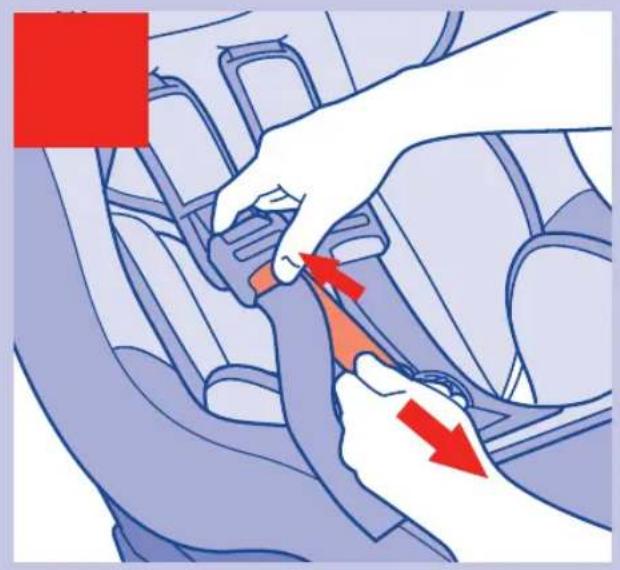
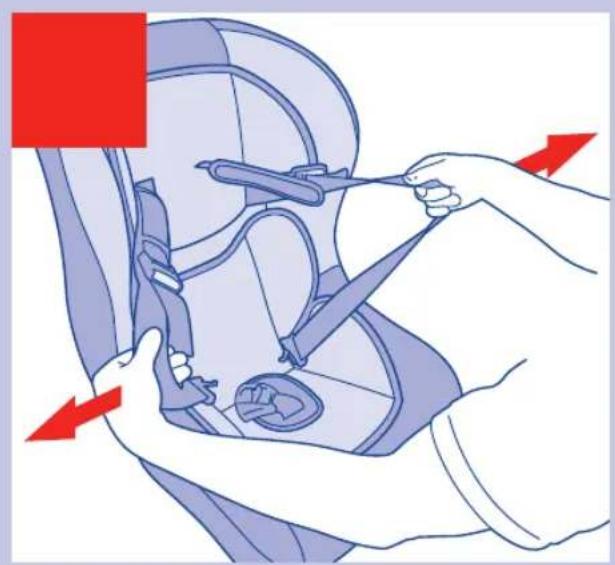
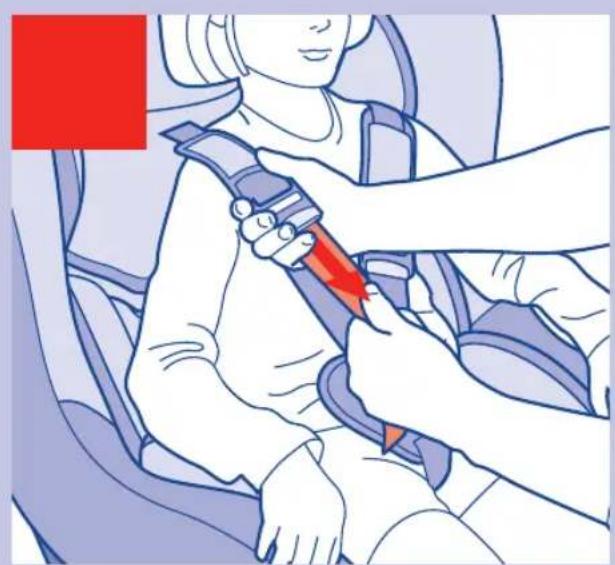
Loosen the harnesses by pressing on the adjuster buttons positioned on the upper section of the harnesses, grasp the lower section and pull simultaneously (23). Press on the red button in the centre to open the harness buckle (24). Open out the harnesses (25) and place your child in the car seat. Put the harness connectors together and insert them into the buckle, making sure you hear a 'click' (26). Pull on the adjusting strap of one of the harnesses until it is properly tightened against your child (27). Repeat the operation with the adjusting strap of the second harness.
IMPORTANT: A correctly adjusted harness is essential for your child's protection. There should not be more than finger's width between the harness and your child.
Removing the harness
Put the harness buckle ends together and close the buckle in order to assemble the various parts of the harness and the crotch strap. This will enable you to store the harness more easily for future use. Remove one of the upper sections of the harness by pivoting the metal anchor located behind the back of the shell and then pulling it through the slots of the back rest and cover (28). Repeat the operation with the second upper strap section.
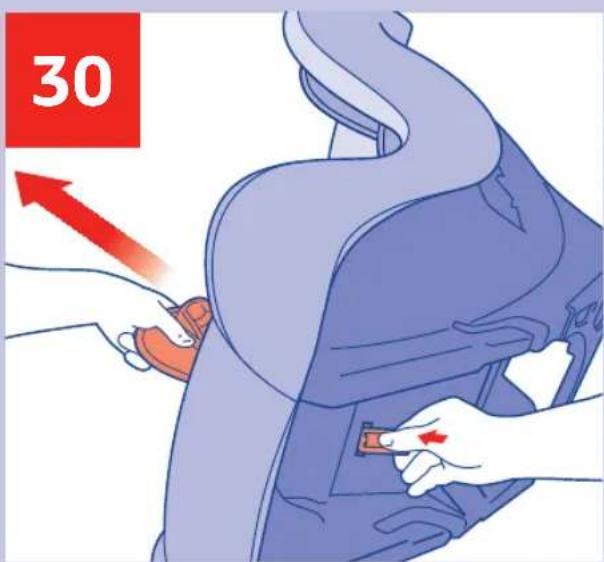
Remove one of the lower sections of the harness by pivoting the metal anchor located under the base of the car seat and then pulling it through the slots of the base and the cover (29). Repeat the operation with the second lower section. Remove the crotch strap by pivoting the metal anchor and then feeding it through the slots of the base and the cover (30).
Simply reverse this procedure when you wish to put back your car seat harness.
Installing the car seat in a front-facing position (Gr. 2, from 15 to 25 kg)
Make sure that you have removed the harness of the car seat before starting the installation. Follow the instructions in the section entitled 'Removing the harness'.
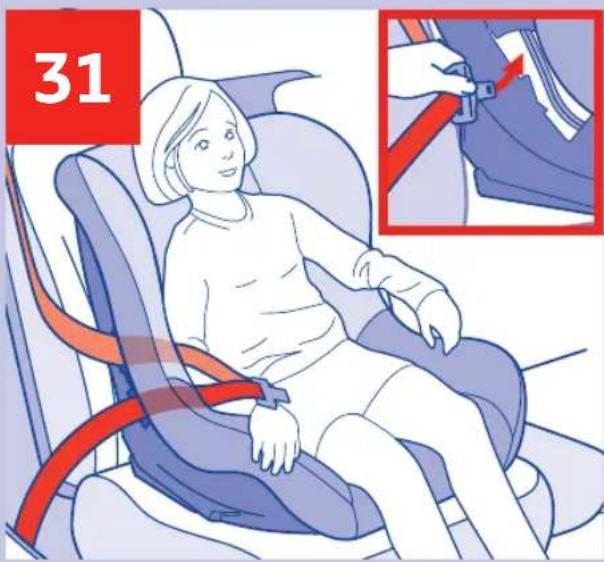
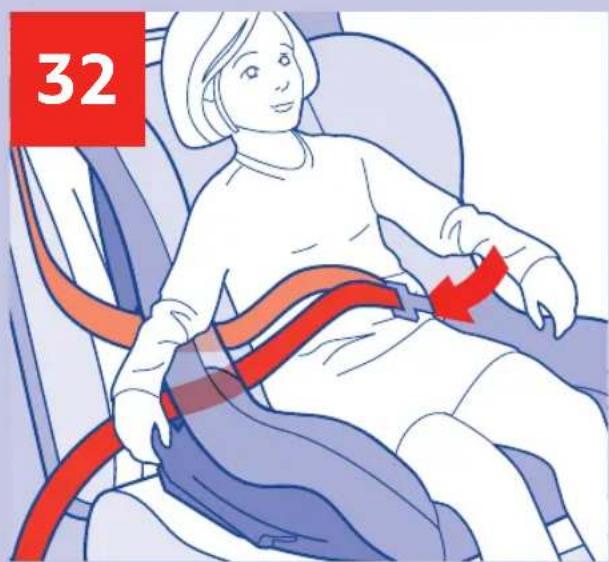
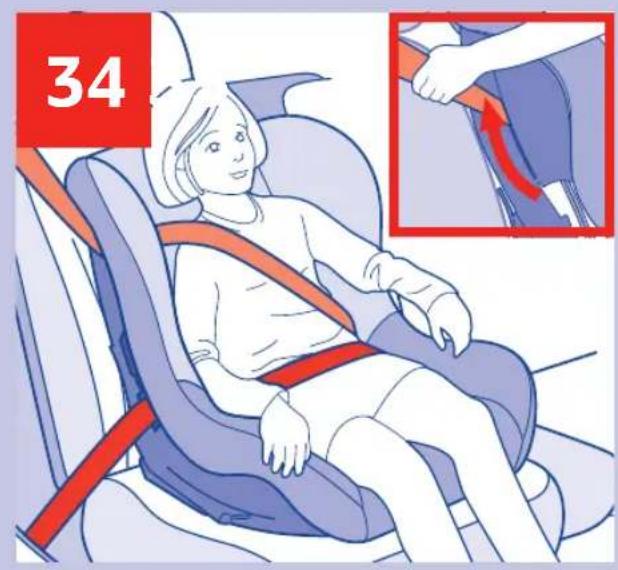
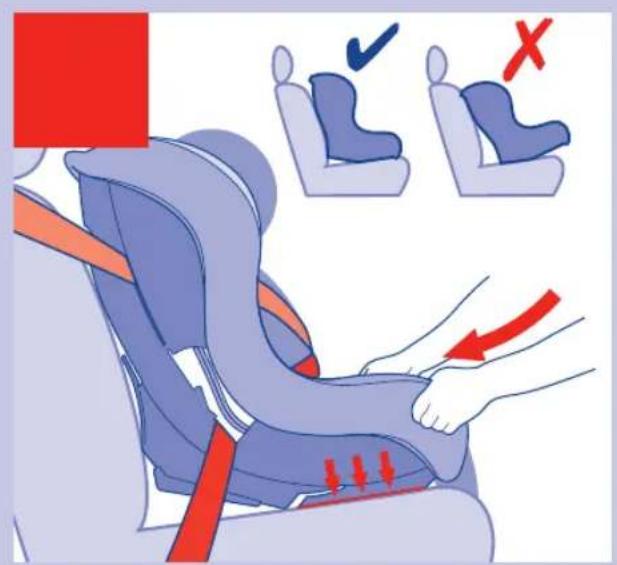
Place the car seat in a front-facing position on the rear passenger seat of your vehicle and sit your child in the car seat. Pull on the seat belt until it is completely loose. Thread the seat belt through the openings on the side of the shell and cover of the car seat (31). Pull on the belt and threaded through the openings on the opposite side of the shell and cover (32). Fasten the seatbelt (33). On the side nearest the belt winder, pull up the diagonal belt through the slot located on the side of the shell (34). Place the car seat so that only the front of its base is in contact with the seat of the vehicle (35). Make sure the belt is not twisted and pull it as tightly as possible (36). Check that the diagonal lies across your child's shoulder, clear of their neck.
IMPORTANT: once the car seat has been installed, the vehicle seat buckle must not touch the opening through which the belt passes on the side of the car seat. If it does, choose another place in the vehicle. If in doubt, please contact our customer service department.
Storing the instructions
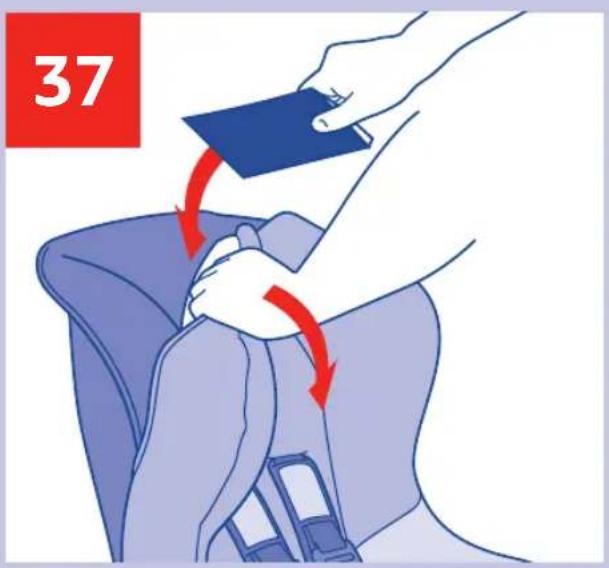
Keep these instructions to hand, by sliding them between the cover and the shell of your car seat (37).
Maintenance information
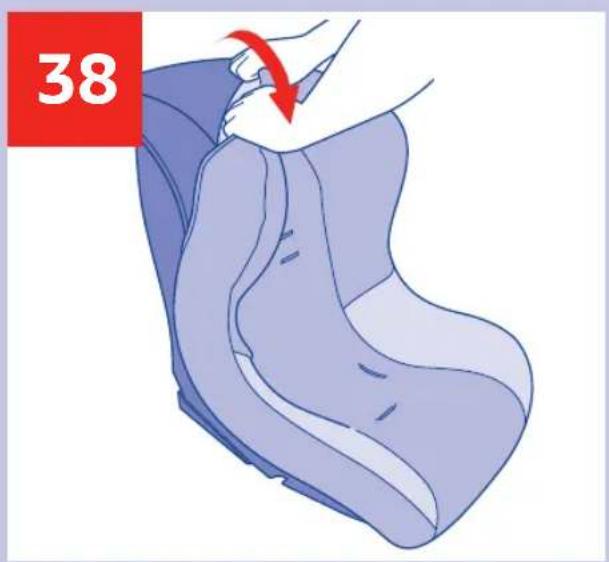
All the fabric parts are removable. To take off the cover, first remove the harness following the instructions in the section entitled 'Removing the harness' (38).
Minor stains can be cleaned using a sponge and soapy water or hand-washed at 30^ in soapy water. Do not use bleach, do not iron, do not machine wash or tumble dry.
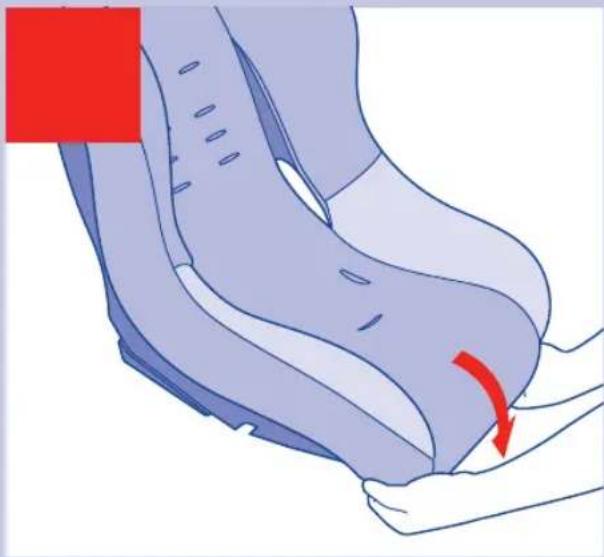
To put the cover back on, start with the top of the shell (39), then the sides (40) and finally the lower part (41).
WARNING
- This car seat is a 'Universal' child restraint system. It has been approved in accordance with regulation No.44/04 and is suitable for general use in vehicles and is compatible with the majority (some exceptions) vehicle seats.
- It is more likely that the seat is perfectly compatible if the vehicle manufacturer states that its vehicles are suitable for 'Universal' child restraint systems.
- This restraint system is classified as 'Universal' in accordance with the strictest approval criteria, whereas earlier models do not correspond to these new provisions.
- It can only be adapted to vehicles with 3-point safety belts that are either fixed or have a roller mechanism and that have been approved to UN/ECE No.16 or other equivalent standards.
- If in doubt, please contact the manufacturer or retailer of the restraint system.



- FR
- SAFETY INSTRUCTIONS
- The correct type of safety belt to use with your car seat
- Your Gr. 0-1-2 car seat (3)
- Adjusting the harnesses
- Installing the car seat in a rear-facing position (Gr. 0, from 0 to 10 kg)
- DANGER! DO NOT USE THIS CHILD'S CAR SEAT ON A PASSENGER SEAT FITTED WITH AN AIR BAG!
- Installing the car seat in a front-facing position (Gr. 1, from 9 to 18 kg)
- Installing your child in the car seat with a harness (Gr. 0 / Gr. 1)
- Removing the harness
- Installing the car seat in a front-facing position (Gr. 2, from 15 to 25 kg)
- Storing the instructions
- Maintenance information
- WARNING
Brand : Nania
Model : Pogo
Category : High chair