USER MANUAL Racer SP Nania
natural_image
Illustration of a car comfort seat with seatbelt covers and seatbelt (no text or symbols)
bar
| Category | Value |
|---|---|
| Bar | 2 |
from 9 to 36 kg (from approximately 9 months to 12 years)
natural_image
Diagram of a car interior showing a valve mechanism with orange arrows indicating motion (no text or symbols)
natural_image
Illustration of a car seatbelt being adjusted using a tool, showing the orange arrow indicating the motion (no text or symbols present)
natural_image
Illustration of a car seatbelt being adjusted using a cable, with no visible text or symbols
natural_image
Interior view of a car dashboard with no visible text or symbols
natural_image
Illustration of a person seated in a car seat with orange arrows indicating movement or pressure points (no text or symbols present)
natural_image
Illustration of a hand holding a wristbelt with an orange arrow indicating force or movement (no text or symbols)
natural_image
Illustration of a car comfort seat with seats and seatbelt (no text or symbols)
natural_image
Illustration of a car seatbelt with orange belt and orange straps, shown from two different angles (no text or symbols)
natural_image
Illustration of a person seated in a car seat with orange arrows indicating motion or pressure points (no text or symbols)
natural_image
Interior view of a car showing the seatbelt and dashboard (no text or symbols visible)
natural_image
Line drawing of a car seat with seatbelt and seat cover, no text or symbols present
natural_image
Illustration of a person using a cable to lift a car seatbelt, no text or symbols present
natural_image
Illustration of hands inserting a cable into a seatbelt, no text or symbols present
natural_image
Illustration of a child wearing a seatbelt and cap, seated in a car (no text or symbols)
natural_image
Illustration of a car seatbelt with orange band and gray body (no text or symbols)
natural_image
Illustration of a person wearing a seatbelt and head covering, seated in a vehicle (no text or symbols)
natural_image
Illustration of a car seatbelt with an orange bandage and orange cable, no text or symbols present
natural_image
Illustration of a hand using a tool to lift a car seatbelt, with an inset showing the interior compartment (no text or symbols present)

natural_image
Diagram of a car interior with no visible text or symbols
FR
We would like to congratulate you on your purchase of a group 1-2-3 car seat. If you would like to obtain any help regarding this product, you can contact our customer service (contact details on the back of this guide).
GB
SAFETY INSTRUCTIONS
WARNING: Please read these instructions carefully before using the seat and keep this guide in a safe place for future reference. If you do not comply with these instructions, the safety of your child could be compromised. Only install your group 1-2-3 booster seat on a forward facing seat that has a 3-point seat belt (1).
- The hard items and the items in plastic of the child restraint system must be located and installed so that when used normally, they do not get trapped under a movable seat or in the vehicle door.
- Make sure the straps to attach the restraint system to the vehicle are kept tight and adjust the straps that hold in the child. The straps must not be twisted.
- Make sure the sub-abdominal straps are run as low as possible, to keep the pelvis in good position.
- Replace the restraint system if it has been subjected to violent shocks in an accident.
- It is dangerous to change or add elements to the restraint system in any way without the authorisation of the competent authority, or not to carefully follow the instructions on installation provided by the manufacturer of the child restraint system.
- Keep the seat out of direct sunlight so that the child does not get burned.
- Do not leave the child unattended in a child restraint system.
- Make sure that luggage and other items that might harm the child in the seat in the event of a shock are correctly stowed away.
- Do not use the child restraint system without the cover.
- Do not replace the seat cover with one that has not been recommended by the manufacturer, because it plays a direct role ensuring that the restraint system works effectively.
- If you have a doubt concerning the installation and correct usage of your seat, please contact the manufacturer of the child restraint system.
- Install your child restraint system on seats categorised as "Universal" in your car manual.
- Do not use weight-bearing contact points other than those described in the instructions and indicated on the restraint system.
- Always use the back seat if possible even if the Highway Code stipulates that using the front seat is allowed.
• Always ensure that the seat belt has been fastened.
• Always check that there are no bits of food or other debris in the buckle of the harness or in the main adjuster.
- Do not clothe the child in garments that are too bulky in winter.
- Do not use the child restraint system on side facing or rear facing vehicle seats.
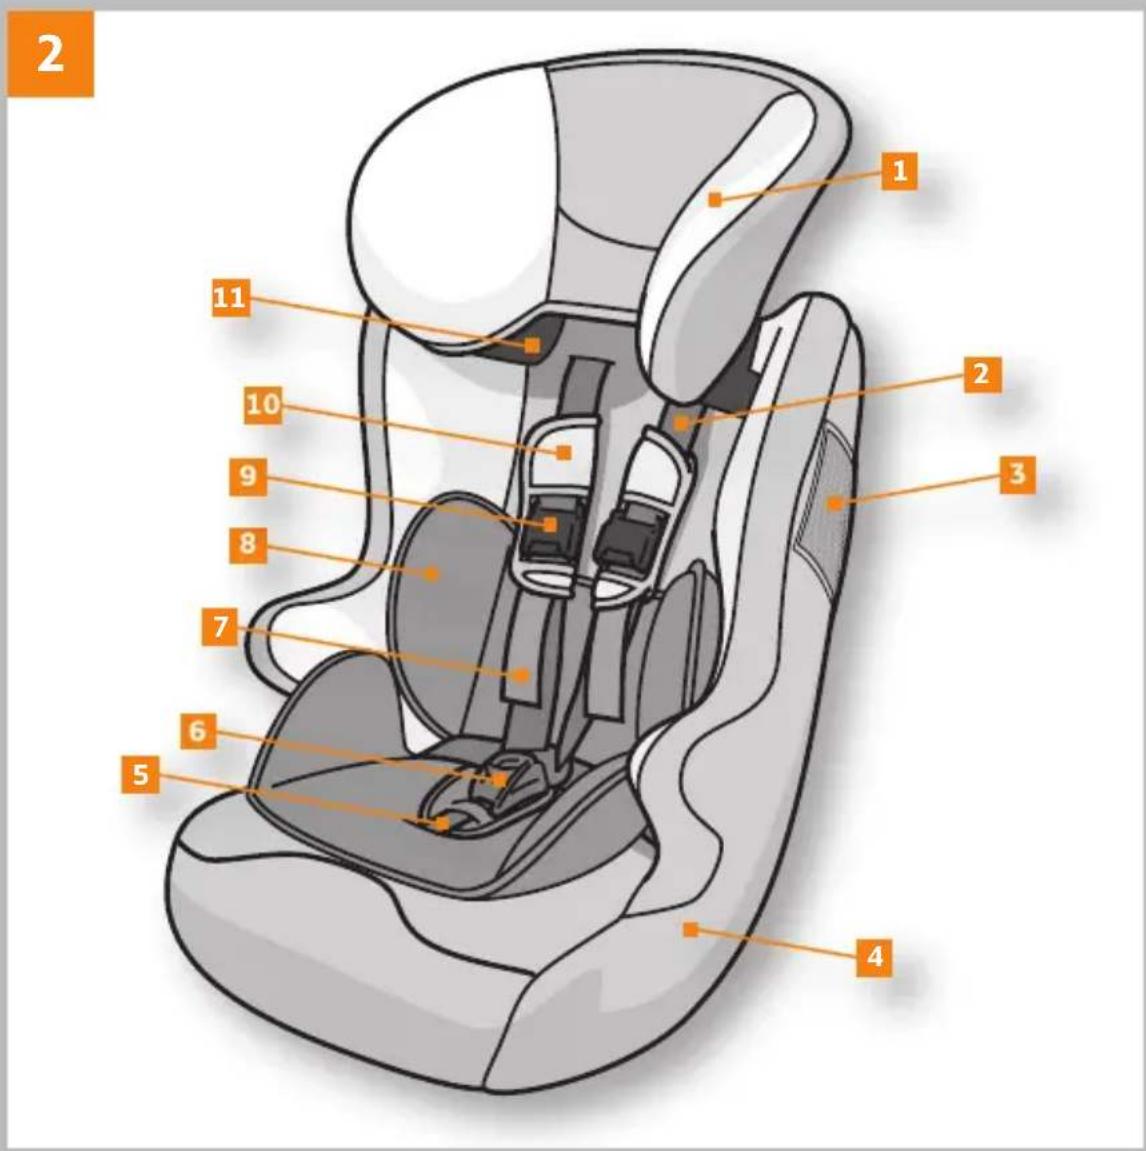
Your Group 1-2-3 booster seat (2)
- Adjustable headrest
- Harness straps (x2)
- User guide pocket (if fitted on this model)
- Shell
- Crotch strap
- Harness buckle
- Adjustment strap (x2)
- Body insert (if fitted on this model)
- Adjustor (x2)
-
Safety cover (x2)
-
Diagonal belt guide (x2 - used without the harness)
Installation with the harness
Gr. 1, from 9 to 18 kg (from approximately 9 months to 4 years)
Make sure that the harness of your car seat is adapted to the height of your child before starting to install the seat in your car.
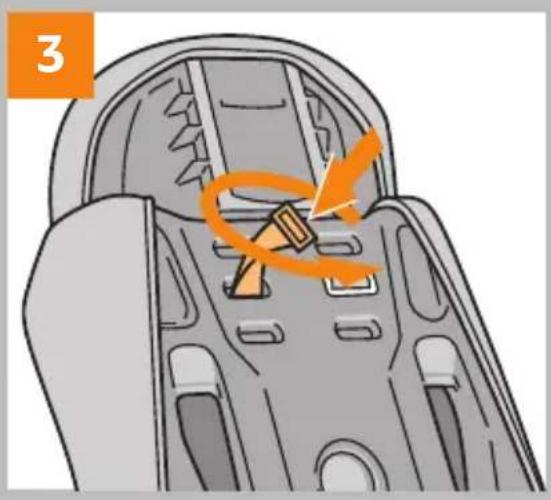
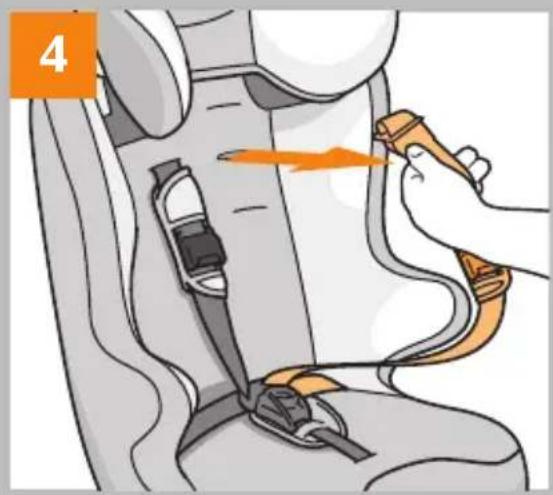
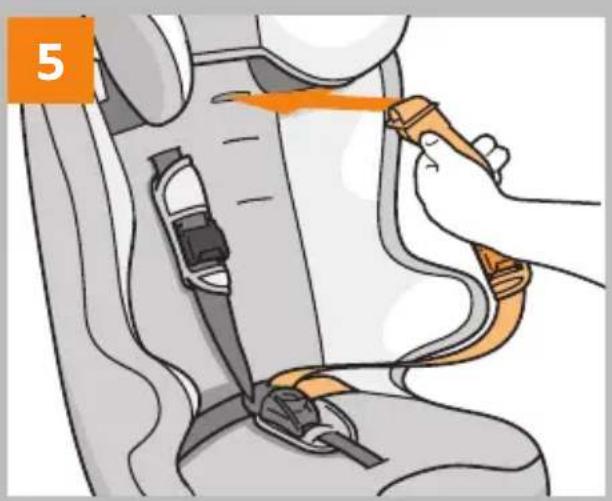
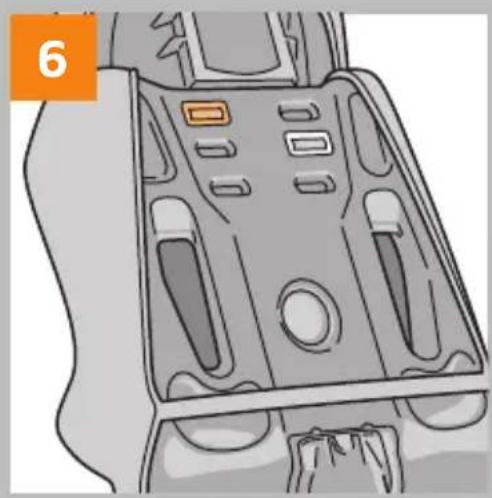
The harness can be adjusted to three different heights. The straps must pass through the holes that are closest to your child's shoulders. If your child's shoulders are between two levels, always use the higher of the two. To adjust the height of the harness, remove the upper section of one of the harness straps by twisting the metal keeper located behind the backrest (3) and then pulling the end of the harness strap through the slots of the shell and the cover (4). Feed the end of the harness strap through the same slots at the desired height, both in the cover and the shell (5) and reattach it behind the backrest (6). Make sure that the metal anchor is correctly positioned and that the end of the harness strap is not twisted. Repeat the operation on the second strap.
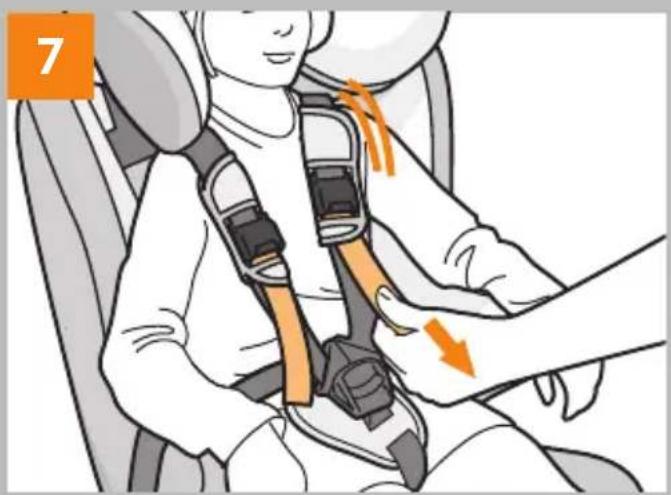
- To tighten the harness: Pull on the adjusting straps positioned on the harness. You do not need to press on the adjuster buttons (7).
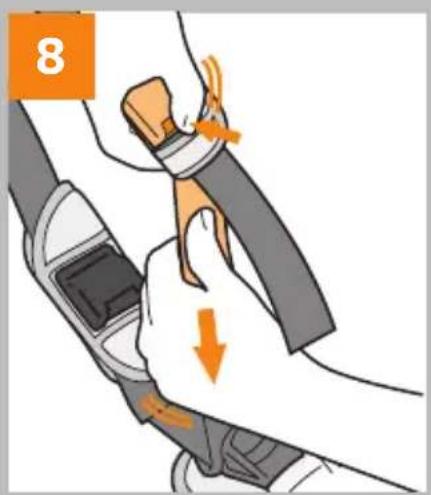
- To loosen the harness: Press on the adjuster buttons positioned on the upper section of the harness, grasp the lower section and pull simultaneously (8). Press on the red harness button on the buckle to free your child completely.
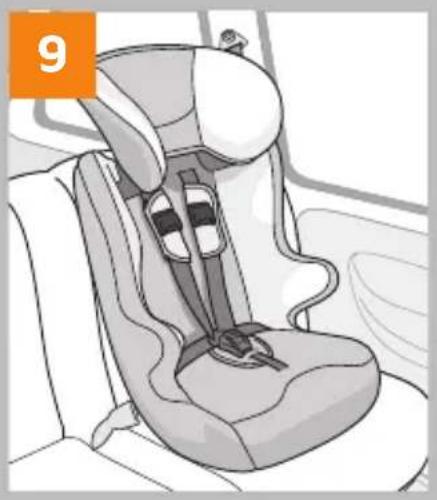
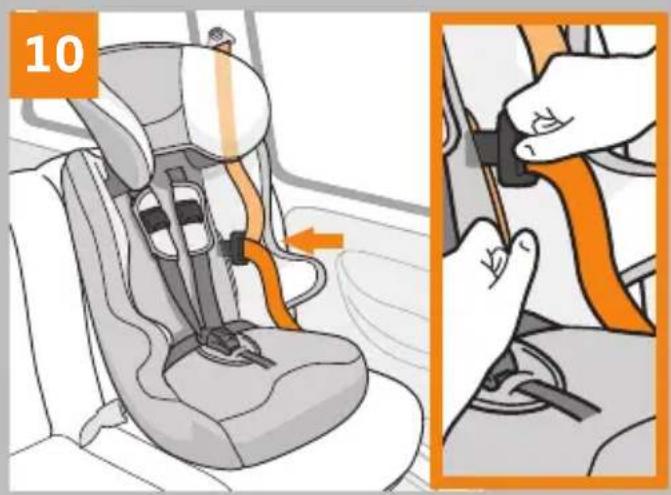
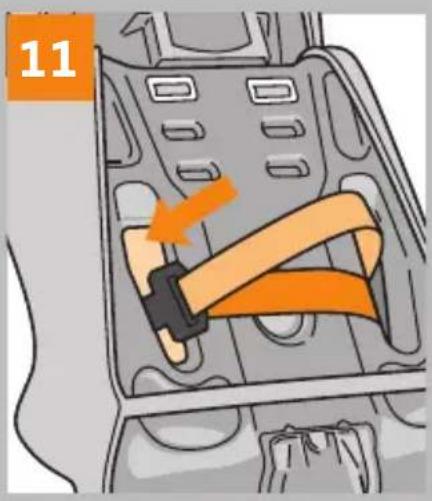
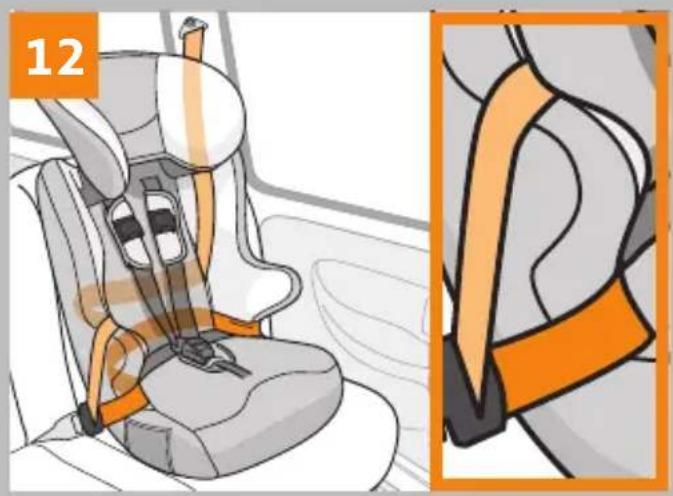
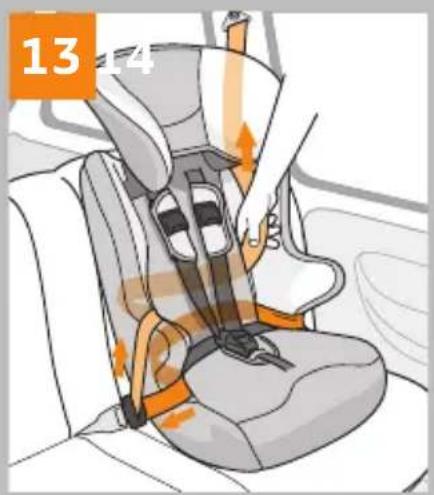
Place the car seat against the back seat of the vehicle (9). Lower the headrest as far as possible. Pull on the vehicle seat belt until it is completely loose. Feed both straps of the belt through the openings in the cover and the backrest shell (10) making sure the waist strap passes under the arm rest of the car seat and that the diagonal strap rises vertically between the backrest and the head support without passing through the belt guide. Bring the vehicle belt out through the opposite openings (11). Make sure that the waist strap of the belt passes under the arm rest and that the diagonal strap passes above the arm rest of the car seat. Fasten the vehicle seat belt, making sure that it is not twisted (12). Push the car seat firmly against the back seat of the vehicle and tighten the belt as much as possible by pulling the waist strap and the diagonal strap towards the winder (13). Open the
GB
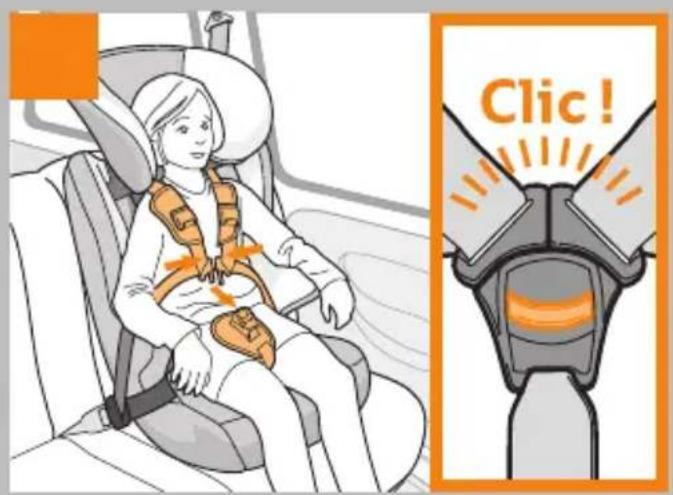
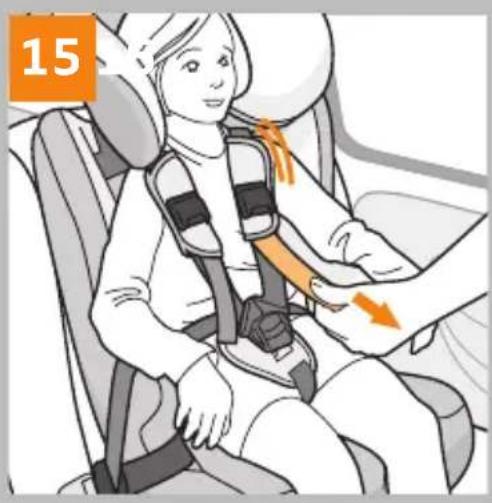
harness buckle by pressing on the red button in the centre of the buckle. Place your child in the car seat. Put the harness buckle ends together and close the buckle, making sure you hear a 'click' (14). Pull on the adjusting strap of one of the upper harness sections until it is properly tightened against your child (15). Repeat the operation with the adjusting strap of the second upper harness section.
CAUTION: A correctly adjusted harness is essential for your child's protection. There should not be more than a finger's width between the harness and your child.
Installation without the harness
Gr. 2-3, from 15 to 36 kg (from approximately 3 to 12 years)
Ensure that the harness of your car seat has been dismantled before starting to install it in the vehicle.
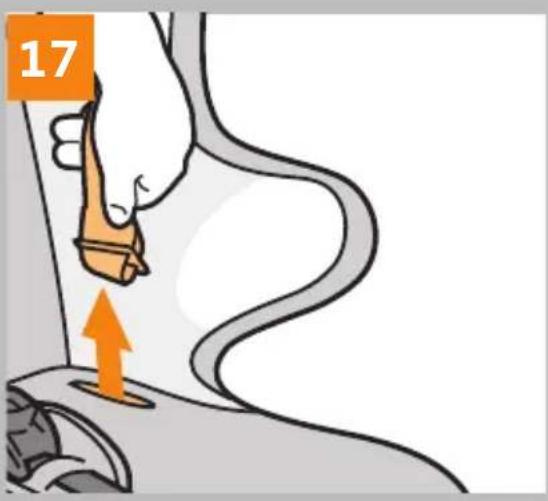
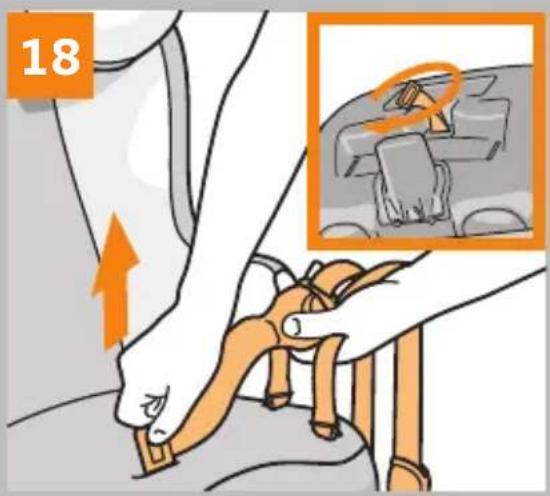
- Dismantling the harness: Put the harness connectors together and close the buckle in order to assemble the various parts of the harness and the crotch strap. This will enable you to store the harness more easily for future use. Repeat operations (3) and (4) on each upper section of the harness. Remove one of the lower section of the harness by twisting the metal keeper located under the base (16) and then pulling the end of the harness strap through the slots of the base and the cover (17). Repeat the operation on the second lower section. Remove the crotch strap by twisting the metal keeper and by passing it through the slots in the base and the cover (18).
Your car seat is fitted with an adjustable headrest that has been designed to support your child throughout growth by providing maximum side protection.
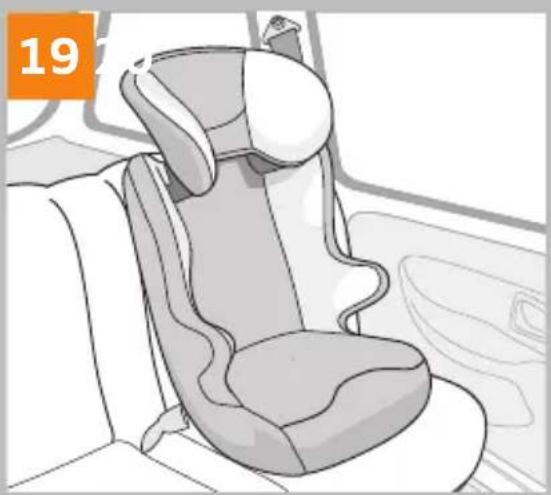
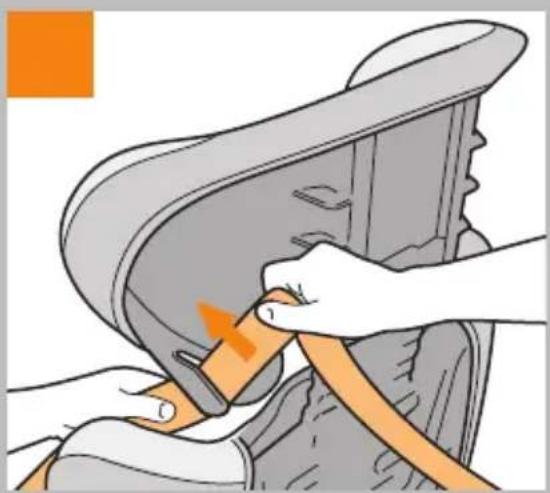
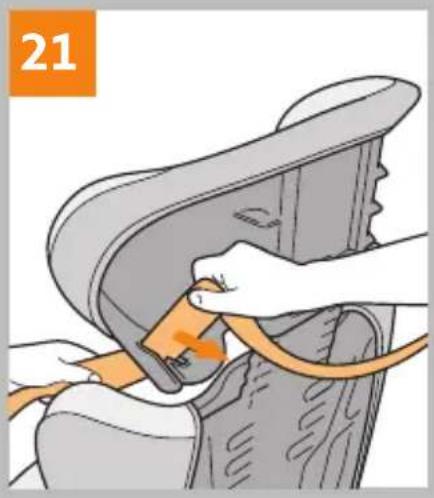
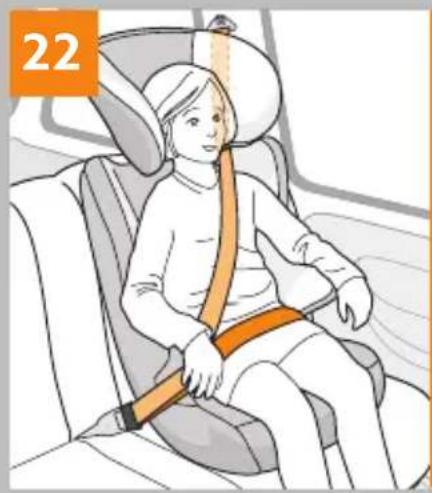
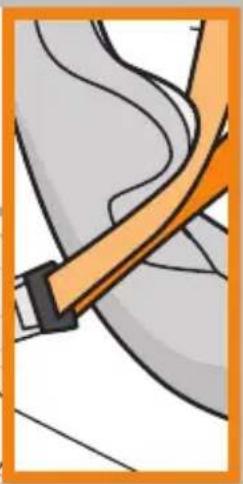
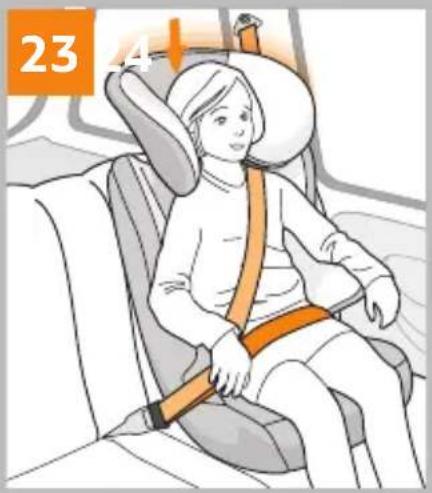
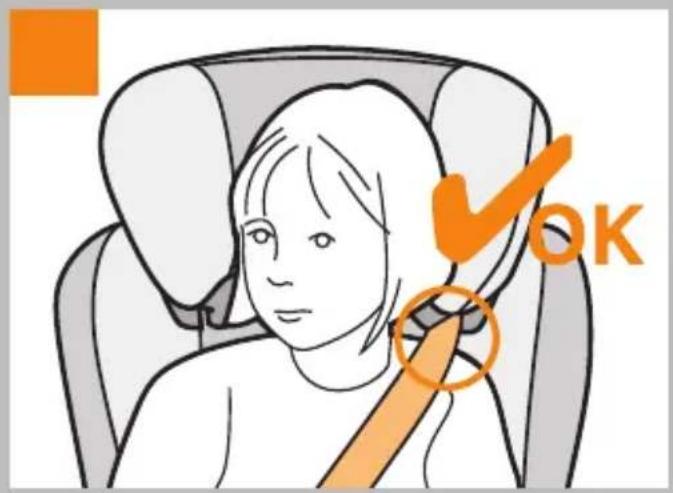
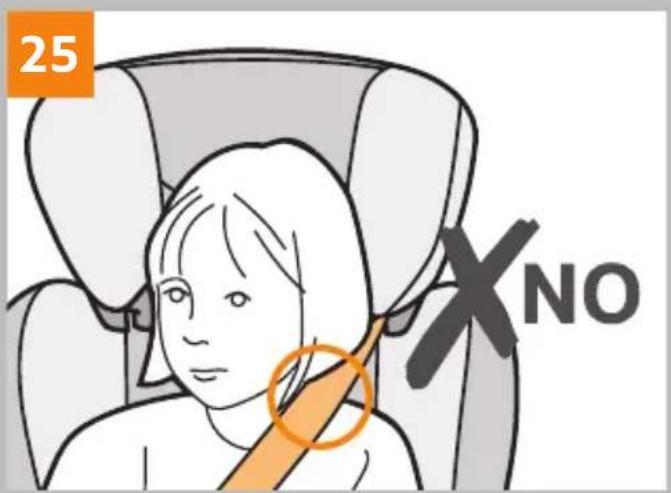
Raise the adjustable headrest to its highest position. Place the car seat against the back seat of the vehicle (19) and feed the diagonal strap of the belt through the headrest guide (20) (21). Sit your child in the car seat. Make sure that the child's back is fully in contact with the back of the car seat. Pull and fasten the vehicle seat belt. Pass the diagonal strap of the belt under the arm rest opposite the belt guide used. The waist strap of the belt passes under both armrests (22). Lower the adjustable headrest and adjust it to the height of your child (23). It should be positioned so that it surrounds your child's head, providing maximum lateral protection, whilst guiding the diagonal belt over the child's shoulder so that it doesn't extend onto the child's neck (24) (25). Tighten the vehicle seat belt.
Make sure that the seat belt is properly tightened, that it is not twisted and that it is not positioned at the level of your child's neck.
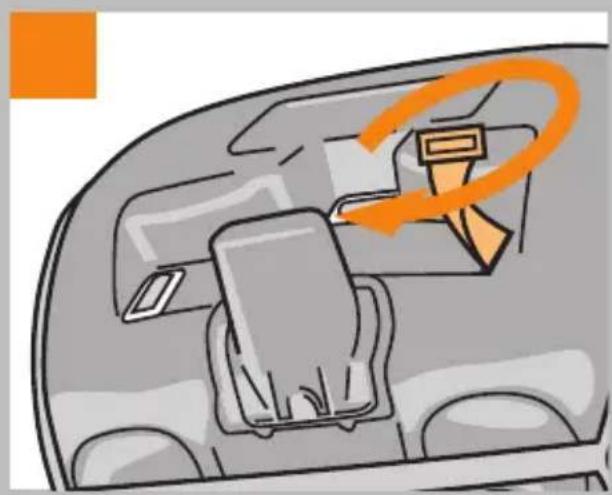
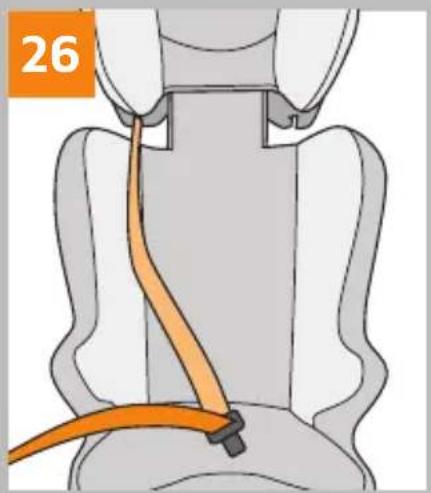
To remove your child from the car seat, simply unbuckle the seat belt and place it at the side of the car seat. The belt will remain suspended from the headrest belt guide (26).
CAUTION: Secure your car seat with the vehicle seat belt at all times, even when your child is not in the car seat. An unsecured car seat can cause injuries in the event of a collision.
Returning to the original configuration of the car seat
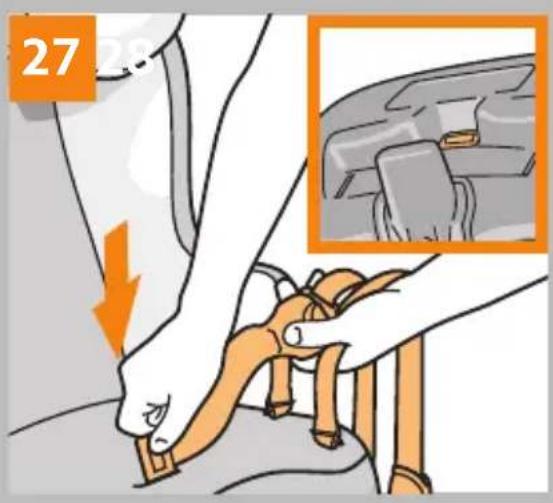
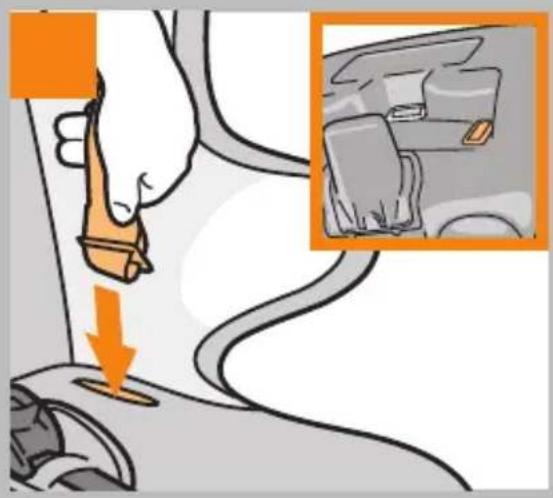
Follow the instructions below if you wish to return to the harness configuration. Re-install the crotch strap, making sure that the metal keeper is correctly in place under the seat (27). Re-install one of the lower sections of the harness, making sure that the metal anchor of the lower section is correctly in place under the seat (28). Repeat the operation with the second lower section.
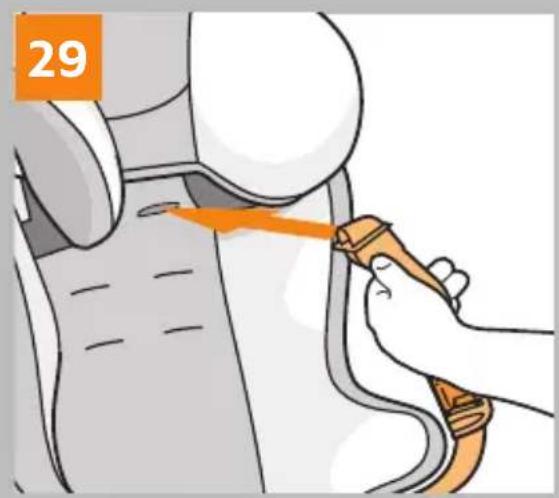
Re-install one of the upper sections of the harness (29). Make sure that the metal anchor of the upper section is correctly in place behind the backrest (30). Repeat the operation with the second upper section. Make sure that neither the upper or the lower sections of the harness are twisted.
Storage of the instruction manual
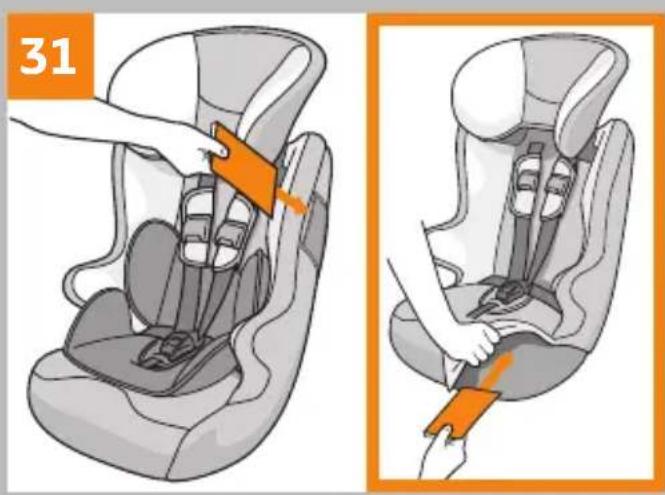
Store this instruction manual, depending on the model of your vehicle, either in the pouch provided, or by slipping it into between the shell and the cover of the seat (31).
Maintenance advice
All the material parts can be removed. Slight stains can be removed using a damp sponge soaked in soapy water or it can be washed by hand at 30^ in soapy water. Do not use bleach, do not iron, do not machine wash, and do not tumble dry.
WARNING
- This car seat is a “Universal” child restraint system. It has been approved in accordance with regulation N°44/04, and is suitable for general use in vehicles and is compatible with the majority (some exceptions) of vehicle seats.
- It is more likely that the seat is perfectly compatible if the vehicle manufacturer states that its vehicles are suitable for taking “Universal” child restraint systems.
- This restraint system is classified as “Universal” in accordance with the strictest approval criteria, whereas earlier models do not correspond to these new provisions.
- It can only be adapted to vehicles with 3-point safety belts that are either fixed or have a roller mechanism and that have been approved compliant with the UN/ECE N° 16 or other equivalent standards.
- If in doubt, contact the manufacturer or retailer of the restraint system.
DE