
1053103 - Fondue, raclette and wok appliance BARTSCHER - Free user manual and instructions
Find the device manual for free 1053103 BARTSCHER in PDF.
| Product type | Professional gas wok range |
| Brand | Bartscher |
| Model | 1053103 (GWH3) |
| Material | Stainless steel CHS 18/10 |
| Number of burners | 3 |
| Power per burner | 11.5 kW |
| Total power | Natural gas: 39 kW / LPG: 34.5 kW |
| Dimensions (W x D x H) | 1500 x 600 x 960 mm |
| Weight | 85.0 kg |
| Gas supply | LPG (G30/G31) or natural gas (G20/G25) |
| Gas connection | R 3/4" |
| Gas pressure | G30/G31: 28-30/37 mbar or 50 mbar; G20: 20 mbar; G25: 25 mbar |
| Ignition | Manual (ignition rod) |
| Safety | Thermocouple on each burner |
| Included accessories | 3 removable wok supports (inner ∅ 290 mm), natural gas injectors |
| Cooking surface | For containers from ∅ 200 mm (without support) |
| Usage | Professional, for sautéing, frying, braising, stewing |
| Maintenance | Regular cleaning with mild soap and water, avoid chlorine products |
| Repairability | Service reserved for a qualified gas installer |
Frequently Asked Questions - 1053103 BARTSCHER
User questions about 1053103 BARTSCHER
0 question about this device. Answer the ones you know or ask your own.
Ask a new question about this device
Download the instructions for your Fondue, raclette and wok appliance in PDF format for free! Find your manual 1053103 - BARTSCHER and take your electronic device back in hand. On this page are published all the documents necessary for the use of your device. 1053103 by BARTSCHER.
USER MANUAL 1053103 BARTSCHER
natural_image
Exterior view of a stainless steel electric stove with two burners and a brand label (no text on main body)GWH2 / 1052103
natural_image
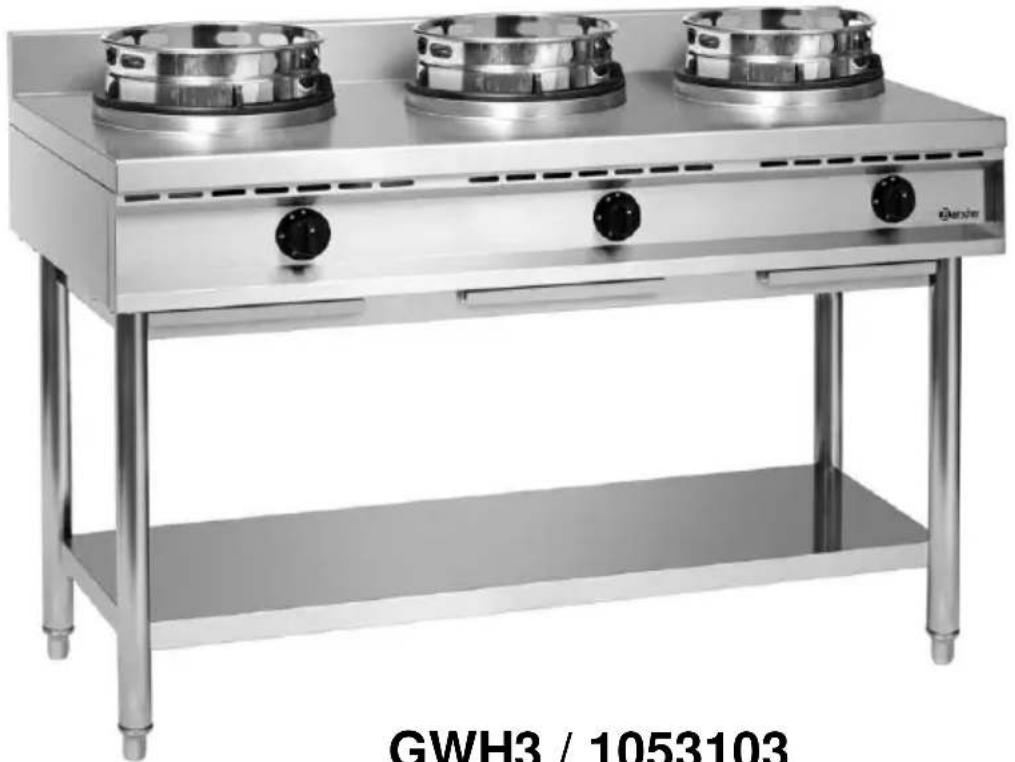
Exterior view of a stainless steel portable stove with three burners and control knobs (no text or symbols on the main body)GWH3 / 1053103
Gebrauchsanleitung
Gas-Wokherd
Seite 1 bis 28
D/A/CH
Instruction manual
Gas wok cooker
from page 29 to 56
GB/UK
Mode d'emploi
Abb. 4
| GB | II2H3+ | G20; 2H; 20 mbarG30/31; 3+; 28-30/37 mbar | ☐☐ |
| This appliance must be installed according to the regulations in force and used only in o well aired place. Consult the instructions before installing and using this appliance. This package must be disposed according to the regulations in force. | |||
| C = Druckeinlass |
| D = Gasleitung |
| E = Schlauch |
| G = Eingangsgasanschluss |
| M = Manometer |
| R = Gashahn |
Abb. 12
natural_image
Close-up of a black circular industrial control knob with mounting holes and star-shaped buttons (no text or symbols visible)Fig. 13
of the original instruction manual
Table of contents
1. Safety 30
1.1 Safety instructions....30
1.2 Key to symbols....31
1.3 Hazard sources 32
1.4 Intended use 33
2. General information 34
2.1 Liability and Warrantees 34
2.2 Copyright protection 34
2.3 Declaration of conformity 34
3. Transport, packaging and storage.... 35
3.1 Delivery check.... 35
3.2 Packaging 35
3.3 Storage.... 35
4. Technical data 36
4.1 Technical specification 36
4.2 Overview of parts 38
4.3 Rating/information plate 40
5. Installation and operation 42
5.1 Instructions for the installer 42
5.1.1 Assembly of the lower section 43
5.1.2 Installation 44
5.1.3 Gas connection 45
5.2 Instructions for the user 52
5.2.1 Safety instructions 52
5.2.2 First start-up 53
6. Cleaning and maintenance 54
7. Possible failures....55
8. Removing of waste material 56
Bartscher GmbH
Read these instructions before using and keep them available at all times!
This instruction manual contains information about the installation, operation and maintenance of the device and should be consulted as an important source of information and reference guide.
Awareness of the safety instructions and instructions for use in this manual will ensure the safe and correct use of the device.
In addition to the information given here, you should comply with any local Health and safety Controls and generally applicable safety regulations.
The instruction manual forms part of the product and should be kept near the device and easily accessible for anyone carrying out the installation, servicing, maintenance or cleaning.
1. Safety
This device is designed in accordance with the presently applicable technological standards. However, the device can pose a danger if handled improperly and inappropriately.
All persons using the device must follow the recommendations and instructions in this instruction manual.
1.1 Safety instructions
- This device may only be operated in technically proper and safe condition.
- The device is not intended for use by individuals (including children) with physical or mental disabilities, insufficient experience, and/or insufficient knowledge unless such persons are under the care of a person responsible for their safety or have received instructions regarding appropriate use of the device.
• Children should be observed to ensure that they are not playing with the device. - Only a qualified technician and using original spare parts and accessories should carry out repairs and maintenance of the device. Do not attempt to repair the device yourself.
- Do not use any accessory or spare parts that have not been recommended by the manufacturer. These can be dangerous for the user or lead to damages of the device or personal injury, and further, the warranty expires.
• To prevent hazards and to ensure optimum efficiency, no modifications or alterations to the device that are not explicitly approved by the manufacturer may be undertaken.
- Before cleaning and maintenance of the device and if not using the device for an extended period of time, disconnect the gas supply (close the main gas valve).
1.2 Key to symbols
In this manual, symbols are used to highlight important safety instructions and any advice relating to the device. The instructions should be followed very carefully to avoid any risk of accident, personal injury or material damage.

DANGER!
This symbol highlights hazards which could lead to injury.
To avoid them please follow the instructions very carefully and proceed with particular attention in these cases.

WARNING!
This symbol highlights dangerous situations which could lead to injury or death.
To avoid them please follow the instructions very carefully and proceed with particular attention in these cases.

CAUTION!
This symbol highlights dangerous situations which could lead to light injuries, or damage, malfunction, and/or destruction of the device.
To avoid them please follow the instructions very carefully and proceed with particular attention in these cases.
NOTE!
This symbol highlights recommendations and information aimed for effective and trouble-free device operation.
1.3 Hazard sources

DANGER!
In order to avoid any danger from gas please follow the safety instructions listed below.
Do not use the device if it is not operating properly, has been damaged or dropped.
➢ Incorrect installation, maintenance, cleaning or any modifications to the device may cause serious injuries or may damage the device.
In order to ensure safe operation of the device, the personnel must undergo regular technical trainings.
NEVER attempt to disassemble or repair the device. Only qualified gas installers may perform this work while following the legal regulations in force.

DANGER! Risk of suffocation!
In order to avoid this risk please follow the instructions listed below.
➢ Prevent kids from accessing the packaging material such as plastic bags and Styrofoam elements.

WARNING! Risk of burning!
In order to avoid this risk please follow the instructions listed below.
DO NOT lean over the cooking stations while igniting the flame. High flame may cause serious injuries.
NEVER touch hot surface of gas burners during their operation and directly afterwards. Allow the device to cool down. Use the cloth for pots or protective gloves.
DO NOT USE FLAT-BOTTOM POTS on the wok ring insert.
Both with the work ring insert and without it, at full burner output the flames go out from the sides or above the insert. This may lead to serious burns.

WARNING! Risk of fire or explosion!
In order to avoid this risk please follow the instructions listed below.
Do not leave the device unattended when heating fats or oils, because they may combust spontaneously.
Do not place any flammable objects near the device.
NEVER put out the flames or fire with water, close the gas shut-off valve and extinguish the flames with a lid or fire-proof blanket
DO NOT use the aluminium foil or similar materials to cover the burners, dripping trays or ventilation holes in the side walls. It may cause insufficient air flow and gas combustion and lead to overheating and fire.
1.4 Intended use

CAUTION!
The device has been designed and built for commercial use and should be operated only by qualified personnel in kitchen facilities.
Safe operation is only guaranteed when using the device for its intended purpose.
Any technical interventions, as well as assembly and maintenance are to be made by a qualified customer service only.
The gas wok cooker has been designed for preparation of Western and Oriental food by frying, baking and cooking, and is designed only for preparation of food.
- DO NOT use the device for heating of non-food products.

CAUTION!
Any use going beyond the intended purpose and/or any different use of the device is forbidden and is not considered as conventional.
Any claims against the manufacturer or his authorized representative as a consequence of experiencing damages resulting from unconventional use are impossible.
The operator is liable for all damages resulting from inappropriate use.
2. General information
2.1 Liability and Warrantees
All the information and instructions in this manual take into account standard safety regulations, current levels of technical engineering as well as the expertise and experience we have developed over the years.
The instruction manual was translated with all due care and attention. However, we do not accept liability for any translation errors. The German version of this instruction manual is definitive.
If the delivery consists of a special model, the actual scope of delivery may differ from the descriptions and illustrations in this manual. This is also the case for special orders or when the device has been modified in line with new technology.

CAUTION!
Read this manual carefully and thoroughly before any operation of the device, and especially before turning it on!
Manufacturer is not liable for any damages or faults caused by:
- violation of advice concerning operation and cleaning;
- use other than designed;
- alterations made by user;
- use of inadequate spare parts.
We reserve the right to make technical changes for purposes of developing and improving the useful properties.
2.2 Copyright protection
The instruction manual including any texts, drawings, images or other illustrations is copyright. No part of this publication may be reproduced, transmitted or used in any form or by any means without permission in writing from the manufacturer. Any person who commits any unauthorized act in relation to this publication shall be liable to claims for damages. All rights reserved.
NOTE!
The contents, texts, drawings, pictures and any other illustrations are copyright and subject to other protection rights. Any person unlawfully using this publication is liable to criminal prosecution.
2.3 Declaration of conformity

The device complies with the current standards and directives of the EU. We certify this in the EC declaration of conformity. If required we will be glad to send you the according declaration of conformity.
3. Transport, packaging and storage
3.1 Delivery check
Please check the delivery upon completeness and transport damage immediately after receipt. In case of visible damage do not accept or accept the delivery with reservation only.
Note the extent of damage on the carrier's bill of delivery. Trigger off the complaint. Hidden damages should be reclaimed immediately after notice, as claims for damages can only be asserted within the effective period for complaints.
3.2 Packaging
Please do not throw away the covering carton of your device as it might be useful for storage purposes, when moving or, in case of damages, when the device must be sent back to a repair center. The outer and inner packing material should be removed completely from the device before installation.
NOTE!
If you liked to dispose the packing, consider the regulations applicable in your country. Supply re-usable packing materials to the recycling.
Please inspect the device upon completeness. In case any part is missing please contact our customer service center immediately.
3.3 Storage
Keep the package closed until installation and under consideration of the outside indicated positioning- and storage markings.
Packages should be stored under consideration of the following:
- Do not store outdoors.
- Keep it dry and dust-free.
- Do not expose it to aggressive media.
- Do not expose it to direct sunlight.
- Avoid mechanical shocks and vibration.
- In case of longer storage (> 3 months) make sure you check the state of the packaging and the parts regularly. If required refresh or renew.
4. Technical data
4.1 Technical specification
| Description | Gas wok cooker GWH2 |
| Code-no.: | 1052103 |
| Material: CHS 18/10 | |
| No. of burners/power 2 of 11.5 kW | |
| Gas connection: R 3/4" | |
| Gas pressure at connection: | G 30/G 31 : 28 – 30/37 mbar G 20 : 20 mbarG 30/G 31 : 50 mbar G 25 : 25 mbar |
| Rated heat load: natural gas: 26 kW, liquid gas: 23 kW | |
| Dimensions: W 900 x D 600 x | H 960 mm |
| Dimensions of cooking station w/o wok ring: | for pots of ∅ 200 mm |
| Weight: 58.0 kg | |
| Equipment: 2 removable wok ring inserts, ∅ 290 mm | |
We reserve the right to make technical changes!
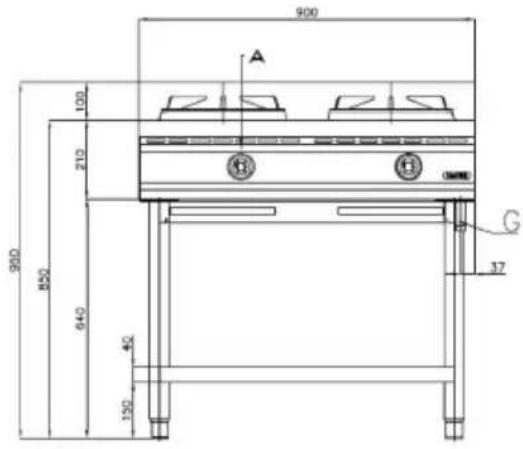
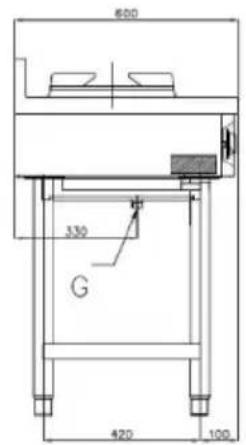
Installation dimensions 1052103 / GWH2

A - cooking adjustment knob
G – gas connection
Fig. 1
| Description | Gas wok cooker GWH3 |
| Code-no.: | 1053103 |
| Material: CHS 18/10 | |
| No. of burners/power 3 of 11.5 kW | |
| Gas connection: R 3/4" | |
| Gas pressure at connection: | G 30/G 31 : 28 – 30/37 mbar G 20 : 20 mbarG 30/G 31 : 50 mbar G 25 : 25 mbar |
| Rated heat load: natural gas: 39 kW, liquid gas: 34.5 kW | |
| Dimensions: W 1500 x D 600 x H 960 mm | |
| Dimensions of cooking station w/o wok ring: | for pots of ∅ 200 mm |
| Weight: 85.0 kg | |
| Equipment: 3 removable wok ring inserts, ∅ 290 mm | |
We reserve the right to make technical changes!
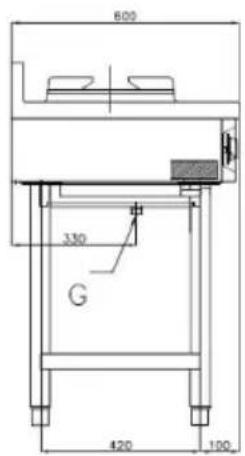
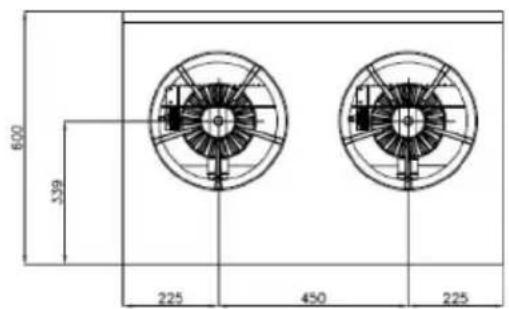
Installation dimensions 1053103 / GWH3

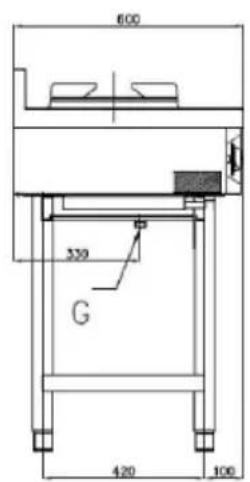

A – cooking adjustment knob
G - gas connection
Fig. 2
4.2 Overview of parts
1052103 / GWH2
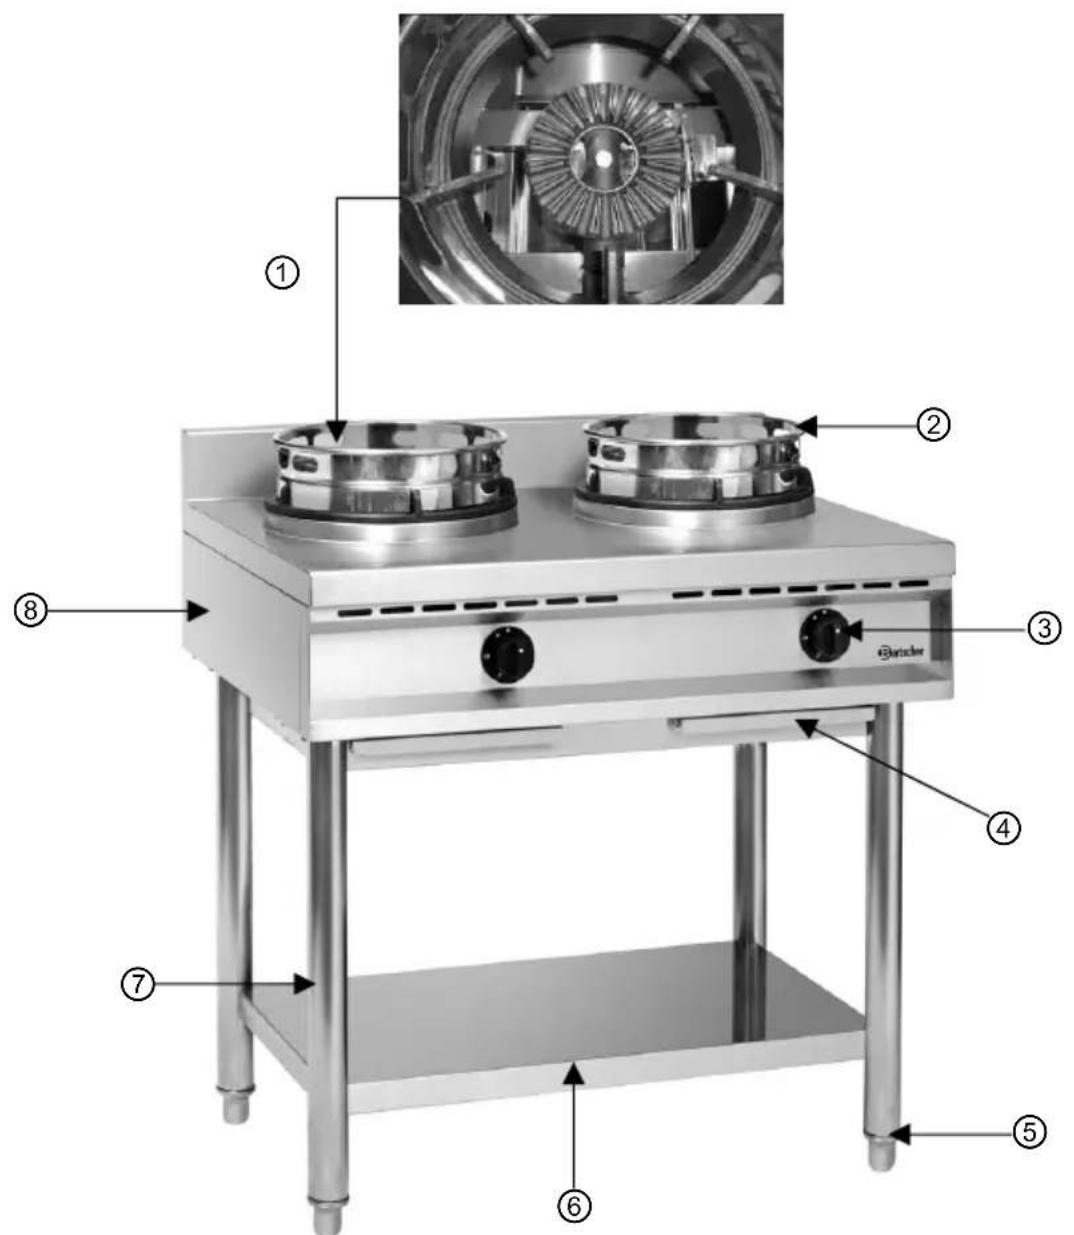
Fig. 3
① Burner
② Round wok insert
③ Cooking station knob
④ Tray for dripping fat
⑤ Feet of adjustable height
⑥ Base with shelf
⑦ Base
⑧ Cooker housing
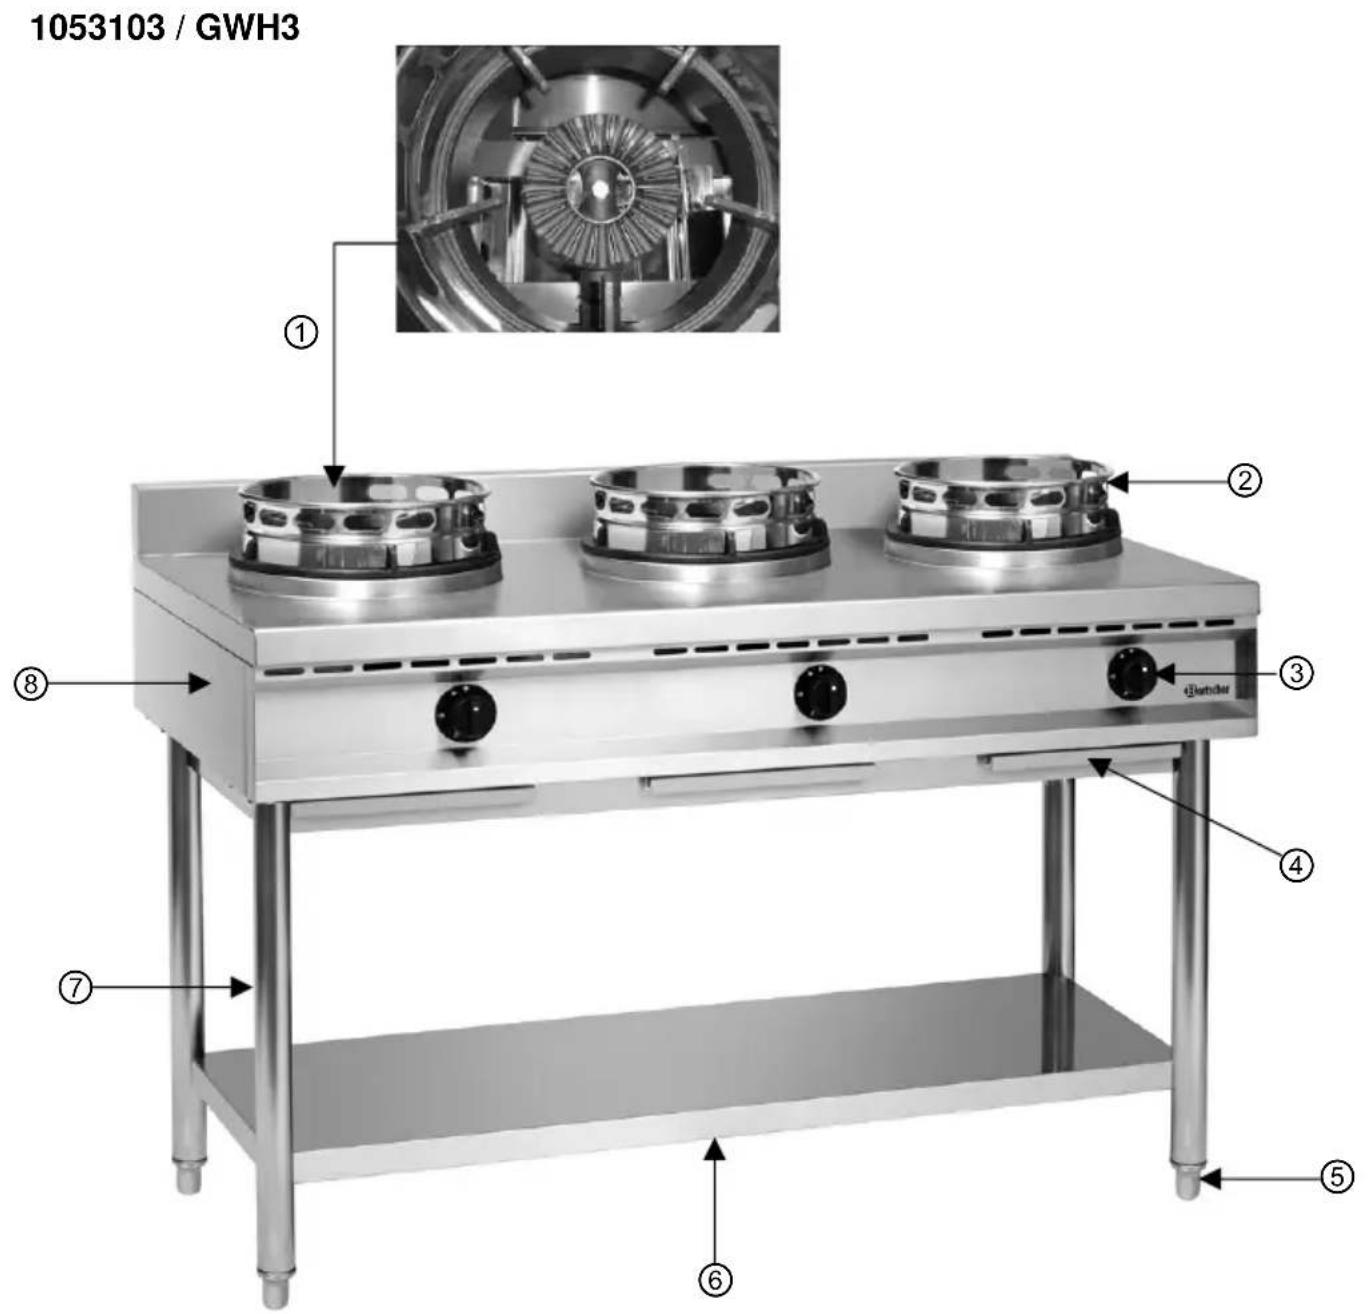
Fig. 4
① Burner
② Round wok insert
③ Cooking station knob
④ Tray for dripping fat
⑤ Feet of adjustable height
⑥ Base with shelf
⑦ Base
⑧ Cooker housing
Features of gas wok cookers
• high-efficient burner of power of 11.5 kW, manual ignition
- burners removed without tools
- burners with thermoelectric protection
• dripping fat collecting tray under the burners
- base with adjustable feet
- preset to liquid gas, natural gas jets are enclosed
4.3 Rating/information plate
Fig. 5
The rating plate shows information about the current settings for gas and rated data for the gas wok cooker.
1052103 / GWH2
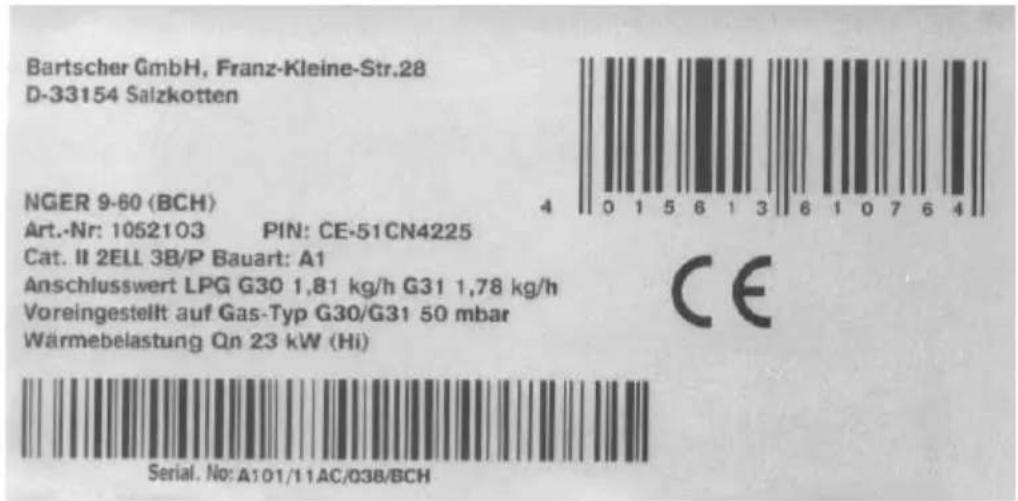
The information plate shows warning information in the languages of target countries.
| DE | Dieses Gerät muss nach geltenden Vorschriften angeschlossen und darf nur in einem gut belüfteten Raum betrieben werden. Bitte beachten Sie vor Inbetriebnahme des Gerätes die Gebrauchs- und Wartungsanleitung. |
| GB | This device must be connected according to the valid regulations, and must be operated in properly ventilated room only. Before starting the device read the operation and maintenance manual. |
| FR | Ce dispositif doit être connecté conformément à la réglementation en vigueur et ne peut être utilisé que dans un endroit bien ventilé. Veuillez lire les instructions d'utilisation et d'entretien avant la mise en service de l'appareil. |
| IT | La presente apparecchiatura dovrà essere collegata in conformità con le norme vigenti e potrà essere utilizzata unicamente in ambienti ben ventilati. Prima dell'avvio, rispettare le istruzioni per l'uso e la manutenzione. |
| ES | El presente dispositivo debe conectarse conforme a la normativa vigente y puede utilizarse solo en una estancia bien ventilada. Antes de poner en marcha el dispositivo, se deben observar las instrucciones de uso y mantenimiento. |
| NL | Het apparaat moet worden aangesloten in overeenstemming met de geldende voorschriften en mag uitsluitend worden gebruikt in een goed geventileerde ruimte. Houdt u aan de gebruiksaanwijzing en de onderhoudsvoorschriften voordat u het apparaat in gebruik neemt. |
| PL | Niniejsze urządzenie musi być podłączone zgodnie z obowiązującymi przepi-sami i może być używane wyłącznie w dobrze wietrzonym pomieszczeniu. Przed uruchomieniem urządzenia należy przestrzegać instrukcji użytkowania i konserwacji. |
Fig. 7
The rating plate on the device packaging includes warnings and information about current settings of the device (see an example below).
| GB | II2H3+ | G20; 2H; 20 mbarG30/31; 3+; 28-30/37 mbar | ☐☐ |
| This appliance must be installed according to the regulations in force and used only in o well aired place. Consult the instructions before installing and using this appliance.This package must be disposed according to the regulations in force. | |||
5. Installation and operation
5.1 Instructions for the installer

CAUTION!
Any installation, connection and maintenance work related to the device must be performed by the qualified gas installer, according to the international, national and local regulations in force in the installation country.
Remove the external packages (wooden crates and/or carton boards) and take them out of the installation area according to the valid regulations.
- The device with the gas-powered equipment should be installed according to the following regulations:
a local requirements and international standards;
b local recommendations, like building standards and recommendations for the combustion devices;
c recommendations and regulations of the gas and electric energy suppliers;
d work safety regulations.
- Make sure that the gas supply for the device is sufficient.
- Install the device with use of appropriate gas filter.
- Before the test start-up place the device in well ventilated room and remove all flammable materials in the vicinity.
- Before starting the device perform the tightness test with the use of a soap solution. Spread the soap solution on screw unions and pipe connections. The leaks become visible by appearance of bubbles on the screw unions and pipe connections. Observing of the gas meter is another test method. No meter movement indicates that there are no gas leaks. Do not use open flame for testing the tightness of the gas installation!
- Before cleaning and maintenance of the device close the gas supply in the safe place.
5.1.1 Assembly of the lower section
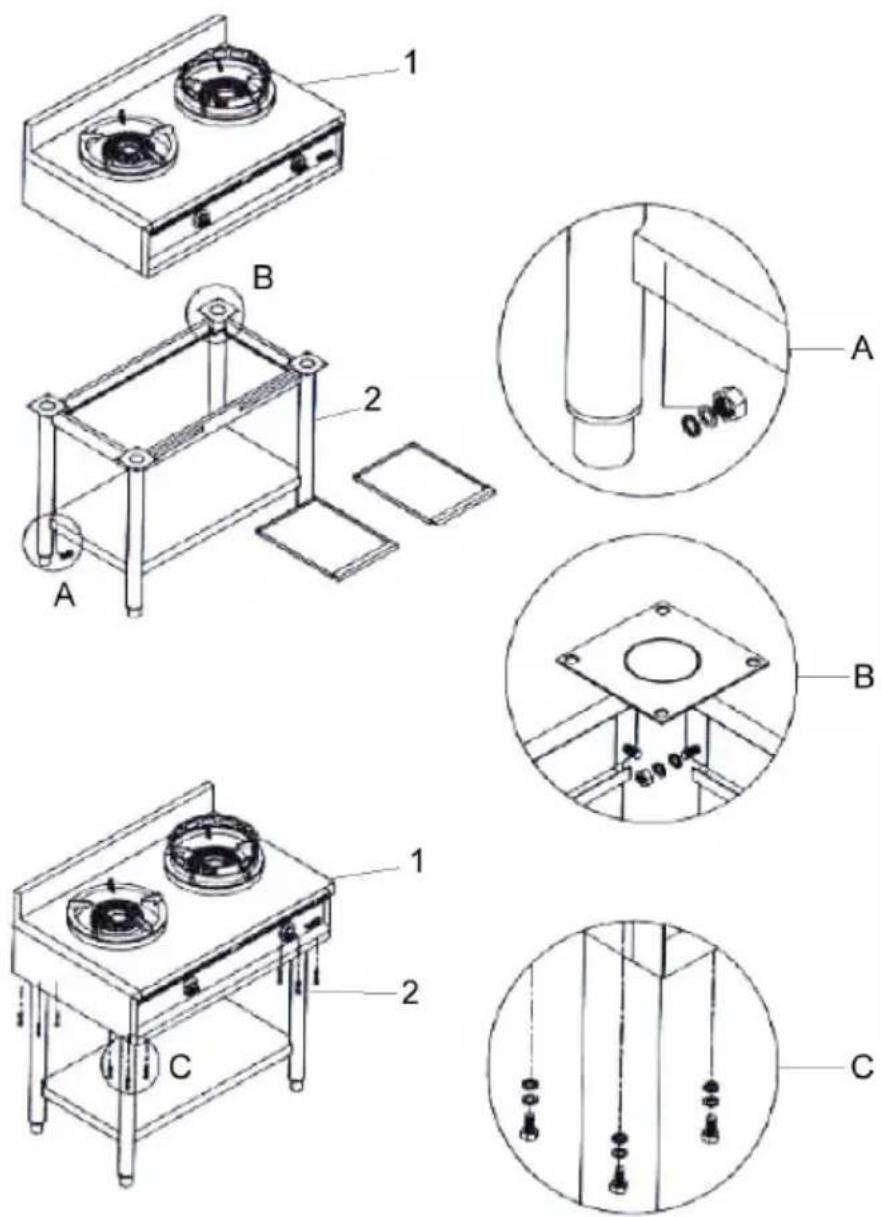
Fig. 8
A. Place 4 pipes on the lower storage surface.
Use external toothed washers, washers and nuts M8.
B. Put the stabilizer strips on the upper tips of pipes (2 strips on the sides, 1 strip in the front and 1 strip in the back).
Use external toothed washers, washers and nuts M6.
C. Install the device (1) on the lower section (2).
Use external toothed washers, washers and hexagonal nuts M6.
5.1.2 Installation
• DO NOT install the device in toxic or explosion-threatened environment.
- DO NOT install the device in the vicinity of flammable materials, like gasoline, glue, liquid gas, paper, etc.
- DO NOT install the device in wet or humid room or conditions, like in the rain or next to the water, etc.
- The installation must be performed by the authorized person. Install the device according to the national safety standards for the gas-powered devices.
- Place the device in well-ventilated room with permanent ventilation ducts in order to assure sufficient air replacement and for safe work station. If the gas cooker is not connected directly with the extraction system, place it under the hood of high efficiency in order to remove the combustion gases and cooking vapours.
- The following is valid for the housing types listed below while following the national regulations:
- A1: The device without air intake or connection with the extraction system or other device for removing the combustion products from the room. The combustion air and gases are mixed in the same room.
- Make sure that no objects next to and under the gas cooker limit the amount of air required for combustion.
- Remove all flammable materials from the cooker vicinity.
- In case of free standing device maintain at least 20 cm of space to the side walls and 10 cm to the back wall. It is especially important when the device is positioned next to the wall and is not protected by the refractory material.
- Position the device separately or next to another device of the same type.
- Position the device on a stable, even and flat surface near the gas connection.
- Remove the protective foil before start-up. Remove all stickers using appropriate solvent.
- Remove the package material according to the national regulations.

CAUTION!
➢ Never remove the rating plate and any warning signs from the device.
5.1.3 Gas connection
Gas supply connection
- Before the installation and connection to the gas supply carefully check the permanent part of the gas device which should conform to the national building regulations.
- Check if the cross section of pipes assures sufficient supply for all gas-powered devices. In order to avoid the excessive pressure losses install the device in the similar conditions.
- The pipelines must be made from steel pipes (with fittings from hardened cast iron or galvanized steel, or pipes connected by gas welding), or from copper pipes (with mechanical connections and connections without seals, putty or soldering).
- Check if the gas cylinder (if applicable) is positioned and protected according to the regulations in dry place.
- Make sure that the gas pipelines are accessible for inspection. In case of pipelines installed in the floor and walls make sure that they are installed professionally and that there are the reference points allowing for finding the pipeline.
- Before the installation of the gas wok cooker make sure that the device is designed for gas and the pressure in the gas installation (see the rating plate on the device and packaging). If the initial settings are inconsistent, the device must be modified for a different type of gas (see section „Modification for a different type of gas / required settings”).
- Connect the gas wok cooker to the gas installation with rigid or flexible steel pipes of cross section appropriate for the rated power and length.
- Make sure that the flexible pipes are not placed next to hot surfaces or directly on them, are not pressed or loaded and do not touch the sharp edges or other objects which may damage the pipes.
• Install the easily accessible certified gas shut-off valve between the gas installation and the device, to ensure that if necessary the gas supply could be quickly shut off. - After installation of the gas wok cooker perform the tightness test of the connections of the pressurized gas installation using the spray for detection of leaks or other non-corrosive foaming agent.
Control of gas pressure and rated heat load (fig. 9)
- During the first installation the installer must check the rated heat load of the device and if necessary introduce appropriate changes or modify the device for a different type of gas.
• DO NOT attempt to increase the rated efficiency or heat load of the device.
- Check the heat load with use of gas meter and stop-watch. Thoroughly measure the amount of gas consumed by the device in the time unit at maximum efficiency.
- Compare the measured value with the data in section 4.1 “Technical specification”. The allowable deviation is ±5%.
- If the deviation during the measurement is higher check the diameter and quality of installed injectors and the gas pressure in the network. If the gas pressure it the network is to be measured with use of liquid gauge (e.g. U-tube manometer with calibration every 0,1 mbar), proceed as below:
- Connect hose “E” to the manometer “M” after unscrewing the cover of the pressure inlet “C”.
• Measure the connection pressure: If the measured value in outside of range listed in the table below the device may not operate correctly. In such case contact the gas supplier in order to find the solution of that problem.
• Install the pressure reducer when required.
- After the pressure measurement disconnect hose “E” and retighten the cover of the pressure inlet “C”.
- Reinstall all parts in the opposite sequence.
Fig. 9
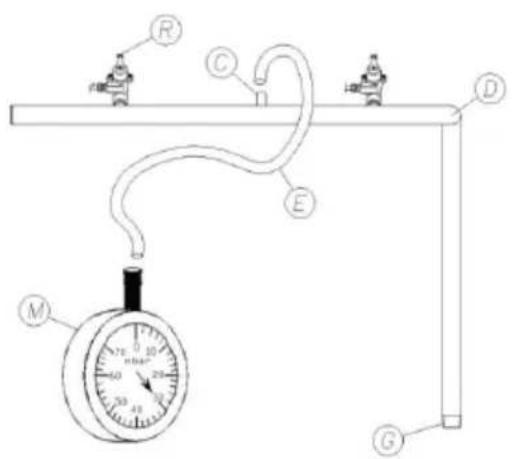
| C = pressure inlet |
| D = gas line |
| E = hose |
| G = inlet connection |
| M = manometer |
| R = gas valve |
Table 1: Inlet pressure
| Gas type | Inlet pressure (mbar) | ||
| normal | minimum value | maximum value | |
| natural gas G20 20 1 | 8 25 | ||
| liquid gas G 30/G 31 | 50 42.5 57.5 | ||
Table 2: Use of gas categories and pressures in various countries

CAUTION!
The device operates correctly only when the pressure in the gas line is in range specified in the table below for the individual gas types.
| Country Categories Gas type | Gas pressure (mbar) | |||
| AT Austria | II_2H3B/P | G20 - G30/G31 20 | 50/50 | |
| BE Belgium | II_2E+3+ | G20/G25 - G30/G31 20 | 20/25 - 28-30/37 | |
| BG Bulgaria | II_2H3B/P | G20 - G30/G31 20 | 30/30 | |
| CH | Switzerland | II_2H3+ II_2H3B/P | G20 - G30/G31G20 - G30/G31 | 20 - 28-30/3720 - 50/50 |
| CY Cyprus | II_2H3+ II_2H3B/P | G20 - G30/G31G20 - G30/G31 | 20 - 28-30/3720 - 30/30 | |
| CZ Czech Republic | II_2H3+ | G20 - G30/G31 | 20 - 28-30/37 | |
| DE Germany | II_2ELL3B/P | G20 - G25 - G30/G31 | 20 - 20 - 50/50 | |
| DK | Denmark | II_2H3B/P | G20 - G30/G31 20 | 30/30 |
| EE Estonia | II_2H3B/P | G20 - G30/G31 20 | 30/30 | |
| ES Spain | II_2H3+ | G20 - G30/G31 | 20 - 28-30/37 | |
| FI | Finland | II_2H3B/P | G20 - G30/G31 20 | 30/30 |
| FR France | II_2E+3+ | G20/G25 - G30/G31 20 | 20/25 - 28-30/37 | |
| GB United Kingdom | II_2H3+ | G20 - G30/G31 | 20 - 28-30/37 | |
| GR Greece | II_2H3+ II_2H3B/P | G20 - G30/G31G20 - G30/G31 | 20 - 28-30/3720 - 30/30 | |
| HR | Croatia | II_2H3B/P | G20 - G30/G31 20 | 30/30 |
| HU | Hungary | I_3B/P | G30/G31 | 30/30 |
| Country Categories Gas type | Gas pressure (mbar) | |||
| IE Ireland | II_2H3+ | G20 - G30/G31 20 | 28-30/37 | |
| IS Iceland | I_3B/P | G30/G31 30/30 | ||
| IT Italy | II_2H3+ | G20 - G30/G31 20 | 28-30/37 | |
| LT Lithuania | II_2H3+ II_2H3B/P | G20 - G30/G31G20 - G30/G31 | 20 - 28-30/3720 - 30/30 | |
| LU Luxemburg | I_2E | G20 20 | ||
| LV Latvia | II_2H3B/P | G20 - G30/G31 20 | 30/30 | |
| MT Malta | I_3B/P | G30/G31 30/30 | ||
| NL Netherlands | II_2L3B/P | G25 - G30/G31 25 | 30/30 | |
| NO Norway | II_2H3B/P | G20 - G30/G31 20 | 30/30 | |
| PL Poland | II_2E | G20 20 | ||
| PT Portugal | II_2H3+ | G20 - G30/G31 20 | 28-30/37 | |
| RO Romania | II_2H3B/P II_2E3B/P II_2L3B/P | G20 - G30/G31G20 - G30/G31G25 - G30/G31 | 20 - 30/3020 - 30/3025 - 30/30 | |
| SE Sweden | II_2H3B/P | G20 - G30/G31 20 | 30/30 | |
| SI Slowenia | II_2H3+ II_2H3B/P | G20 - G30/G31G20 - G30/G31 | 20 - 28-30/3720 - 30/30 | |
| SK Slowakia | II_2H3+ II_2H3B/P | G20 - G30/G31G20 - G30/G31 | 20 - 28-30/3720 - 50/50 | |
| TR Turkey | II_2H3+ II_2H3B/P | G20 - G30/G31G20 - G30/G31 | 20 - 28-30/3720 - 30/30 | |
In case of deviations from the listed values the correct operation and start-up of the device are not guaranteed. Order the inspection of the gas supply to the installer (check the gas line, valves and reduction valves), contact the gas supplier when required.
Modification for a different type of gas / required settings
- The device is designed and certified to operate with the type of gas shown on the rating plate (liquefied petroleum gas - LPG).
- If the factory settings of the device are not consistent with the available type of gas they should be adjusted accordingly. In order to modify the device for a natural gas use special nozzles (included in the delivery) and modify the settings.
- The modification must be performed by the qualified gas installer only, according to the technical data, by replacement of the nozzle in the main burner and adjustment of the nozzle in the ignition burner.
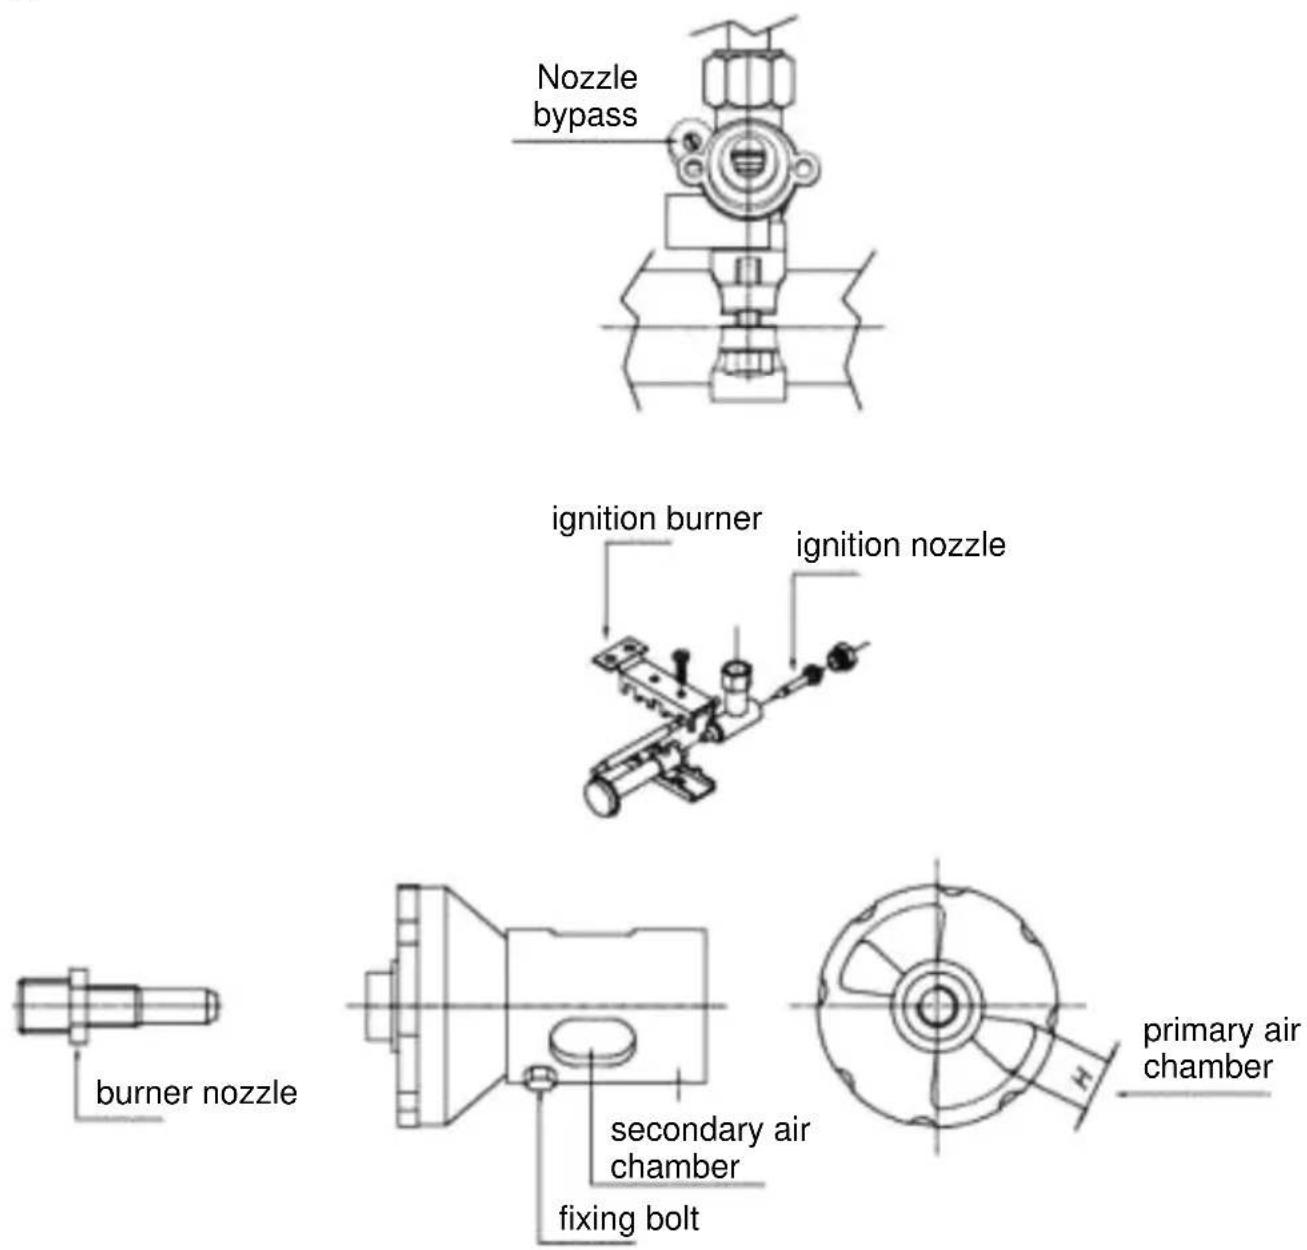
Replacement of the nozzle in the main burner (fig. 10)
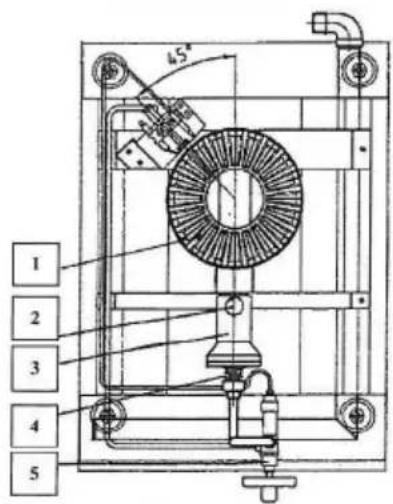
Fig. 10
a) Remove the burner ring (1).
b) Unscrew the fixing bolt (2) which holds the burner and is accessible from below.
c) Dismantle a complete air mixing chamber (3) by turning it counterclockwise.
d) Release the main burner nozzle from the nozzle bracket (4) and replace it with the nozzle designed for the relevant type of gas (data related to the nozzle are shown in the table 3 "Characteristics of burners and nozzles").
e) Install the removed parts in the reverse order.
Table 3: Characteristics of nozzles and burners
| Rated power | Gas type | Pressure (mbar) | Main burner nozzle ∅ (mm) | Ignition burner nozzle ∅ (mm) | Primary air chamber H (mm) | Secondary air chamber | Nozzle bypass |
| 11.5 kW | G30-31 | 28-30/37 | 1.80 0 | 20 12 opened | ∅ 0.95 | ||
| 50/50 1 | .60 0.20 | 12 opened ∅ 0.85 | |||||
| 13 kW | G20 | 20 | 3.05 | adjustable | 5 | closed | adjustable |
| G25 | 20 3.30 | adjustable | 5 closed | adjustable | |||
| 25 3.15 | adjustable | 5 closed | adjustable |
| Low flame power | Gas consumption |
| 3.00 kW | G30 0.907 kg/h |
| G31 0.893 kg/h | |
| G20 1.376 m^3/h | |
| G20 1.376 m^3/h | |
| G25 1.600 m^3/h |
Adjustment of primary air (fig. 11)
The primary air is adjusted and sealed permanently according to the country of destination and type of gas. The adjustment data are shown on the package and the rating plate. If the modification is required, adjust the primary air according to the table 3 „Characteristics of burners and nozzles“ on page 49:
Fig. 11
Adjustment of the ignition flame (Fig. 12)
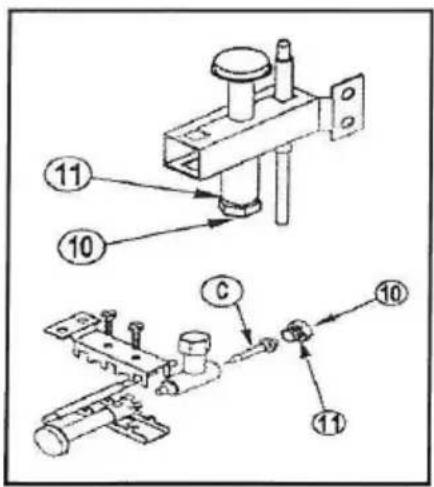
After modification of the device for the natural gas, adjust the ignition flame. Please follow the instructions listed below.
a) Ignite the gas burner according to the instructions in section 5.2.2 „First Start-up”
b) With the use of 11mm open ended spanner remove the screw plug (10) and a washer (11);
c) In order to adjust the nozzle of the ignition flame (C) turn the nozzle clockwise using a small screwdriver to reduce the gas supply. To increase the gas supply, turn the nozzle counterclockwise.
Fig. 12
d) If the device is fuelled with liquefied petroleum gas (LPG), turn the ignition burner nozzle (C) clockwise.
e) After adjusting the ignition flame, reinstall the screw plug (10) and a washer(11).
f) Check the mixing of gas with air according to the data included in the table 3 „Characteristics of burners and nozzles” on page 49.

CAUTION!
• After the modification for a different type of gas, perform the tightness test with an appropriate spray or water with soap (never use open flame!).
• After completing all modifications, replacements or adjustments related to the device, reinstall all the removed parts to make sure the device is ready to work.
- Then replace the old rating plate with a new rating plate (delivered with the device) showing modified data and information about the new type of gas.
5.2 Instructions for the user

CAUTION!
Carefully read the manual below as it includes the safety and operation instructions.
Store the operation manual for later reference.
Incorrect installation, operation, maintenance and any modifications may lead to improper operation, damages and injuries.
5.2.1 Safety instructions

CAUTION!
The device is designed for professional use and must be operated by the professional personnel.
Before start-up make sure that the device is in perfect technical condition and is located in a well-ventilated room. Always follow the safety instructions listed below.
- Make sure that the electric hood is in good condition and that no objects next to or under the device limit the amount of air required for gas combustion.
- In case of permanent disturbances do not use the device and call the authorized installer.
- The user is authorized to perform daily routing activities in order to keep the device in good condition.
- Any work connected with the installation and maintenance must be performed by the authorized gas installer according to the legal regulations in force.
- The gas wok cooker must be used only for the preparation of food: frying, baking, cooking. DO NOT use the cooker for any other purposes. Other uses are considered improper and dangerous.
- Do not place flat bottom pans on the wok ring insert. Both with the work ring insert and without it, at full burner output the flames go out from the sides or above the insert. This may lead to serious burns.
- Never leave the operating device unattended.
- Before the first use of the gas wok cooker clean the cooker thoroughly and remove the residual industrial oil or grease.
- After using the device rotate the knobs of all cooking stations to off position (●) and close the gas shut-off valve of the gas installation.
5.2.2 First start-up
Cooking station knob
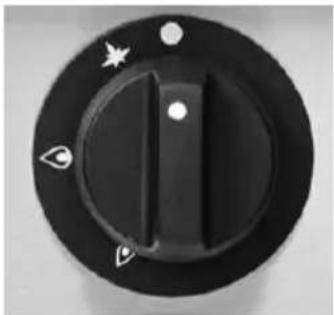
natural_image
Close-up of a black circular mechanical knob with star and arrow symbols (no text or labels visible)Fig. 13
Switching the gas wok cooker on / off
- Switching the burner on
a. Open the gas shut-off valve to start the gas supply.
b. Rotate the knob to the ignition position ⚙, press and hold it, then ignite the flame with the lighter. Hold the knob pressed until the flame is
stable, then release it and set the desired flame size (large) or (small).
- Switching the burner off
a. In order to put out the flame rotate all knobs to off position (●).
b. Close the gas shut-off valve.
6. Cleaning and maintenance

CAUTION!
The device is not designed for direct washing with the water jet. Do not use water stream for cleaning!
Cleaning
- Clean the device periodically in order to keep it ready for work and prolong its life span.
o Perform the regular cleaning as listed below and follow the warning information :
○ Make sure that the gas shut-off valve is closed and the knobs of the cooking stations are in off positions (●).
- Wait for the unit to cool.
- Steel parts should be cleaned daily with warm water and soap, rinsed with clean water and thoroughly dried. Do not use any agents containing chlorine (bleaching agent, hydrochloric acid, etc.) or brushes or spatulas from steel wool, which may leave steel particles. Such materials may be oxidized and leave rust on the device.
o Clean the burner with warm water and gentle cleaning agent.
- Check if the burner holes are not blocked. When required, use the pillow from the steel wool to remove the deposits without damaging the ignition device.
- Do not use any acidic food products, like vinegar, salt, lemon, etc., as they may cause damages.
- Use soft and dry cloth to dry and polish the surfaces after cleaning.
○ In case of longer break in operation clean the steel parts with moistened cloth and cover with vaseline oil. Then cover the device with protective foil and place in well ventilated room.
Maintenance
○ Inspect the device at regular intervals. Contact the vendor for assistance in repairs and regular maintenance (at least once a year).
○ In case of damages or failures contact the vendor or our service department. First use the failure detection instruction in section 7.
7. Possible failures
Before contacting the service check the possible failures in the table below.
| Failure Cause Solution | ||
| The ignition flame does not start | blocked gas pipe to the ignition burnerblocked ignition burnerblocked ignition headblocked ignition nozzle | check and removecheck and removeclean with small steel brushcheck and replace |
| Yellow ignition flame | air adjustment requiredcontaminated burner | check and removecheck and clean with brush |
| The burner does not operate | damaged gas shut-off valve | check and replace |
| The ignition flame is not maintained | contaminated thermocouplethe thermocouple does not indicate voltage (mV)the thermocouple is loosethe thermocouple magnet is damaged | check and clean with small steel brushcheck and removecheck and removecheck and replace |
The cases listed above are for the reference and example only. In order to remove such problems stop the operation of the device until the problem is solved. Contact the service or vendor. Prepare the article number and the serial number, shown on the rating plate on the back wall of the device.
8. Removing of waste material
The worn out device should be removed according to the national and local regulations. To do this, contact the professional company or with the waste removing department of the local authorities.

CAUTION!
In order to exclude the incorrect use and connected danger prevent the start-up of the worn out device before its removing and transport it to the appropriate collection point.
Bartscher GmbH
Dimensions 1052103 / GWH2

Dimensions 1053103 / GWH3
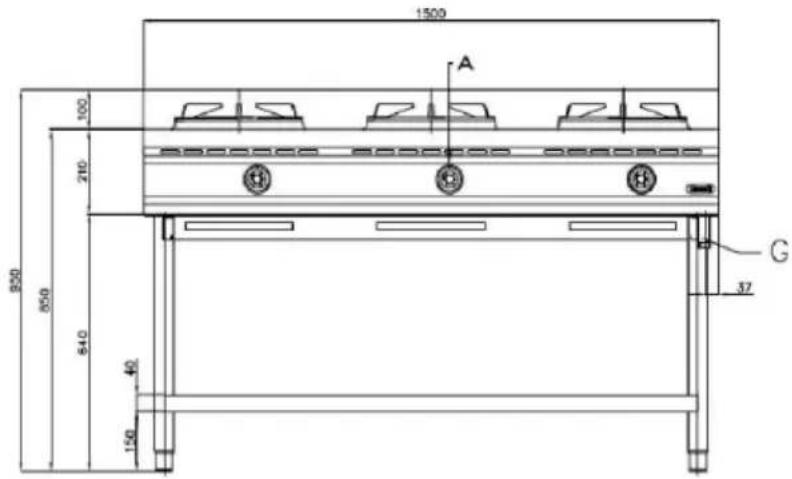
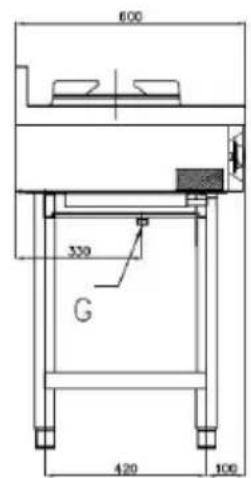
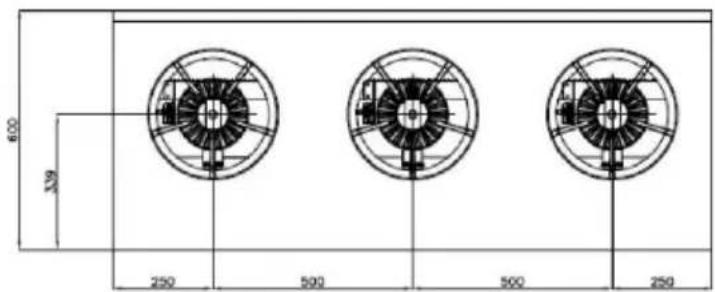
Fig. 3
| GB | II2H3+ | G20; 2H; 20 mbarG30/31; 3+; 28-30/37 mbar | ☐☐ |
| This appliance must be installed according to the regulations in force and used only in o well aired place. Consult the instructions before installing and using this appliance. This package must be disposed according to the regulations in force. | |||
Fig. 12
natural_image
Close-up of a black circular device knob with adjustment knobs and star symbols (no readable text or labels)Fig. 13
Fig. 3
| GB | II2H3+ | G20; 2H; 20 mbarG30/31; 3+; 28-30/37 mbar | ☐☐ |
| This appliance must be installed according to the regulations in force and used only in o well aired place. Consult the instructions before installing and using this appliance.This package must be disposed according to the regulations in force. | |||
5. Montaggio e uso
natural_image
Close-up of a black circular mechanical knob with adjustment knobs and mounting holes (no text or symbols visible)Fig. 13
II. 3
| GB | II2H3+ | G20; 2H; 20 mbarG30/31; 3+; 28-30/37 mbar | ☐☐ |
| This appliance must be installed according to the regulations in force and used only in o well aired place. Consult the instructions before installing and using this appliance. This package must be disposed according to the regulations in force. | |||
5. Montaje y uso
II. 12
natural_image
Circular black industrial knob with three slots and a star-shaped mark (no text or symbols visible)II. 13
| GB | II2H3+ | G20; 2H; 20 mbarG30/31; 3+; 28-30/37 mbar | ☐☐ |
| This appliance must be installed according to the regulations in force and used only in o well aired place. Consult the instructions before installing and using this appliance.This package must be disposed according to the regulations in force. | |||
5. Montage en bediening
| C = drukinlaat |
| D = gasleiding |
| E = slang |
| G = inlaataansluiting |
| M = manometer |
| R = gaskraan |
Tabel 1: Inlaatdruk
Afb. 12
natural_image
Close-up of a black circular device knob with star and arrow symbols (no readable text or numbers)Afb. 13
| GB | II2H3+ | G20; 2H; 20 mbarG30/31; 3+; 28-30/37 mbar | □□ |
| This appliance must be installed according to the regulations in force and used only in o well aired place. Consult the instructions before installing and using this appliance. This package must be disposed according to the regulations in force. | |||
5. Montaż i obsługa
natural_image
Close-up of a black circular industrial control knob with star and flame symbols (no text or labels visible)Rys. 13


- Gebrauchsanleitung
- Gas-Wokherd
- Seite 1 bis 28
- Instruction manual
- Gas wok cooker
- from page 29 to 56
- Mode d'emploi
- Table of contents
- Safety 30
- General information 34
- Transport, packaging and storage.... 35
- Technical data 36
- Installation and operation 42
- Instructions for the user 52
- Cleaning and maintenance 54
- Possible failures....55
- Removing of waste material 56
- Read these instructions before using and keep them available at all times!
- Safety
- Safety instructions
- Key to symbols
- DANGER!
- WARNING!
- CAUTION!
- NOTE!
- Hazard sources
- DANGER! Risk of suffocation!
- WARNING! Risk of burning!
- WARNING! Risk of fire or explosion!
- Intended use
- General information
- Liability and Warrantees
- Copyright protection
- Declaration of conformity
- Transport, packaging and storage
- Delivery check
- Packaging
- Storage
- Technical data
- Technical specification
- Installation dimensions 1052103 / GWH2
- Overview of parts
- Features of gas wok cookers
- Rating/information plate
- Fig. 7
- Installation and operation
- Instructions for the installer
- Assembly of the lower section
- Installation
- Gas connection
- Gas supply connection
- Control of gas pressure and rated heat load (fig. 9)
- Table 2: Use of gas categories and pressures in various countries
- Modification for a different type of gas / required settings
- Replacement of the nozzle in the main burner (fig. 10)
- Adjustment of primary air (fig. 11)
- Adjustment of the ignition flame (Fig. 12)
- Instructions for the user
- Safety instructions
- First start-up
- Cooking station knob
- Switching the gas wok cooker on / off
- - Switching the burner on
- - Switching the burner off
- Cleaning and maintenance
- Cleaning
- Maintenance
- Possible failures
- Removing of waste material
- Dimensions 1052103 / GWH2
- Montaggio e uso
- Montaje y uso
- Montage en bediening
- Montaż i obsługa
Brand : BARTSCHER
Model : 1053103
Category : Fondue, raclette and wok appliance