
SU12F70SD - Vacuum Cleaner SAMSUNG - Free user manual and instructions
Find the device manual for free SU12F70SD SAMSUNG in PDF.
| Product type | Canister vacuum with integrated portable vacuum |
| Brand | Samsung |
| Model | SU12F70SD |
| Portable vacuum | Integrated, removable |
| Brush bar | Motorized, with on/off button |
| Main filter type | HEPA filter (non-washable) |
| Pre-motor filter | Washable with water, drying 12h |
| Tank capacity | MAX mark (no specific value) |
| Protection | Overload protector and thermal shutdown |
| Included accessories | Tube, 2-in-1 accessory, portable vacuum |
| Optional accessories | Accessory kit (pet brush, etc.) |
| Maintenance | Empty tank, clean filters, check brush |
| Safety | Polarized plug, indoor use only |
| Use | Dry surfaces, indoors |
| Documentation | User manual included |
| Product registration | www.samsung.com/register |
| Power cord | With storage hooks |
| Reset | Reset button on the brush bar |
| Use modes | Upright position and portable mode |
| Window cleaning | Multi-angle accessory included |
Frequently Asked Questions - SU12F70SD SAMSUNG
User questions about SU12F70SD SAMSUNG
0 question about this device. Answer the ones you know or ask your own.
Ask a new question about this device
Download the instructions for your Vacuum Cleaner in PDF format for free! Find your manual SU12F70SD - SAMSUNG and take your electronic device back in hand. On this page are published all the documents necessary for the use of your device. SU12F70SD by SAMSUNG.
USER MANUAL SU12F70SD SAMSUNG
Vacuum Cleaner user manual
* Please read the User Manual thoroughly before operating the vacuum.
* For indoor use only.
English
imagine the possibilities
Thank you for purchasing a Samsung product.
To receive a more complete service,
please register your product at
www.samsung.com/register
SAMSUNG
YOUR VACUUM CLEANER

06 Product view
07 Carton contents
BEFORE USING THE VACUUM CLEANER

08 Assemble the handy vacuum, pipe, and 2 in 1 accessory
09 Using the accessories
OPERATING CLEANER

10 Stowing the power cord
11 Operating the On / Off switch
12 Operating the Brush bar On / Off switch
12 Resetting the overload protector
13 Using the vacuum's handle (The dust bin handle)
13 Using the accessory kit (optional)
MAINTENANCE

16 Emptying the dust bin
17 Cleaning the grille
18 Cleaning the premotor filter
20 Cleaning the hepa filter
22 Checking the brush
23 Checking for clogs
24 Emptying the dust bin of the handy vacuum cleaner
25 Cleaning the filter of the handy vacuum cleaner
TROUBLESHOOTING

Safety information
SAFETY INFORMATION

Before operating the appliance, please read this manual thoroughly and retain it for your reference.

Because the following operating instructions cover various models, the characteristics of your vacuum cleaner may differ slightly from those described in this manual.
CAUTION/WARNING SYMBOLS USED
| WARNING | Indicates that a risk of death or serious injury exists. |
| CAUTION | Indicates that a risk of personal injury or material damage exists. |
OTHER SYMBOLS USED
 | Indicates something you must NOT do. |
 | Indicates instructions you must follow. |
 | Indicates that you must disconnect the power plug from the socket. |

This vacuum cleaner is designed for household use only.
Do not use this vacuum cleaner to clean building waste or debris.
Clean the filters regularly to prevent fine dust from collecting in them.
Do not use this vacuum cleaner with any of the filters removed.
Failure to meet these requirements could cause injury, damage the vacuum cleaner, and void your warranty.
IMPORTANT SAFETY INSTRUCTIONS
When using an electrical appliance, you should always follow these basic precautions:
READ ALL INSTRUCTIONS BEFORE USING YOUR UPRIGHT VACCUM
WARNING – TO REDUCE THE RISK OF FIRE, ELECTRIC SHOCK, OR INJURY:
- Do not leave the vacuum cleaner unattended when it is plugged in. Unplug it from the outlet when your are not using it and before servicing.
- Do not use outdoors or on wet surfaces.
- Do not allow the vacuum to be used as a toy. Pay close attention when the vacuum is used by or near children.
- Use only as described in this manual. Use only the manufacturer's recommended attachments.
- Do not use with a damaged cord or plug. If the vacuum is not working as it should, has been dropped, damaged, left outdoors, or dropped into water, bring it to a service center.
- Do not pull or carry the vacuum by the cord, use the cord as a handle, close a door on the cord, or pull the cord around sharp edges or corners. Do not run the vacuum over the cord. Keep the cord away from heated surfaces.
- Do not unplug by pulling on the cord. To unplug, grasp the plug, not the cord.
- Do not handle the plug or vacuum with wet hands.
- Do not put any object into openings or vents. Do not use with any opening blocked. Keep free of dust, lint, hair, and anything that may reduce air flow.
- Keep hair, loose clothing, fingers, and all parts of your body away from openings and moving parts.
- Turn off all controls before unplugging.
- Use extra care when cleaning on stairs.
- Do not use to pick up flammable or combustible liquids, such as gasoline, or use in areas where they may be present.
- Do not pick up anything that is burning or smoking, such as cigarettes, matches, or hot ashes.
- Do not use without the dirt cup and/or filters in place.
- Do not use the vacuum cleaner in an enclosed space filled with vapors given off by oil base paint, paint thinner, some moth proofing substances, flammable dust, or other explosive or toxic materials.
-
Store your vacuum cleaner indoors, in a cool and dry area.
-
Use only on dry, indoor surfaces.
- Do not modify the polarized plug to fit a non-polarized outlet or extension cord.
- Do not touch the brush drum when it is rotating.
- Keep suction away from your face when using nozzles and pipe.
- Do not pull the power cord around sharp corners and do not allow it to become trapped.
- This vacuum is not intended for use by persons (including children) with reduced physical, sensory or mental capabilities, or lack of experience and knowledge, unless they have been given supervision or instruction concerning its use by a person responsible for their safety.
- Children should be supervised to ensure that they do not play with the vacuum.
- You must remove the plug from the socket-outlet before cleaning or performing maintenance on the vacuum.
- If the power cord is damaged, it must be replaced by the manufacturer or its service agent or a similarly qualified person.
- Hold plug when rewinding onto cord reel. Do not allow plug to whip when rewinding.
- Do not pick up hard or sharp objects such as glass, nails, screws, coins, etc.
- Always turn off the vacuum before connecting or disconnecting the handy vacuum cleaner.
- Don't touch the exhaust vent when the exhaust temperature is hot.
SAVE THESE INSTRUCTIONS
POLARIZED PLUG INSTRUCTIONS
- To reduce the risk of electric shock, this appliance has a polarized plug (one blade is wider than the other).
This plug will fit in a polarized outlet only one way.
If the plug does not fit fully in the outlet, reverse the plug.
If it still does not fit, contact a qualified electrician to install a proper outlet.
Do not modify the plug in any way.
State of California Proposition 65 Warning (US only)

This product contains chemicals known to the State of California to cause cancer and reproductive toxicity.
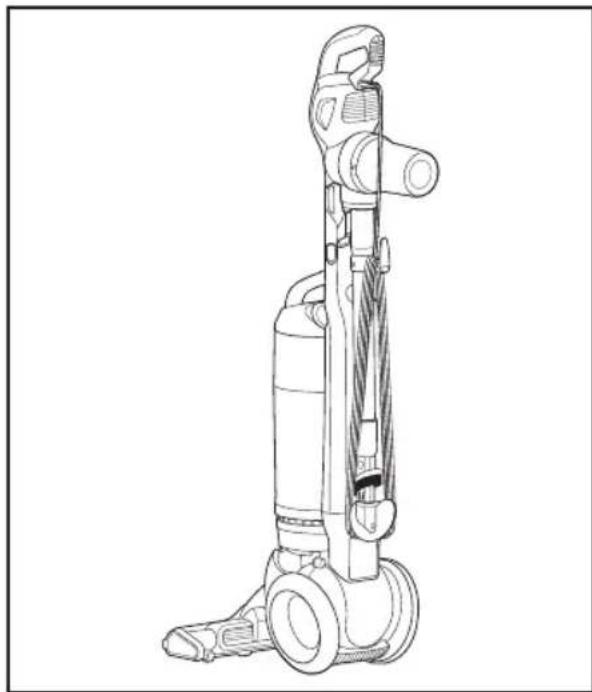
PRODUCT VIEW
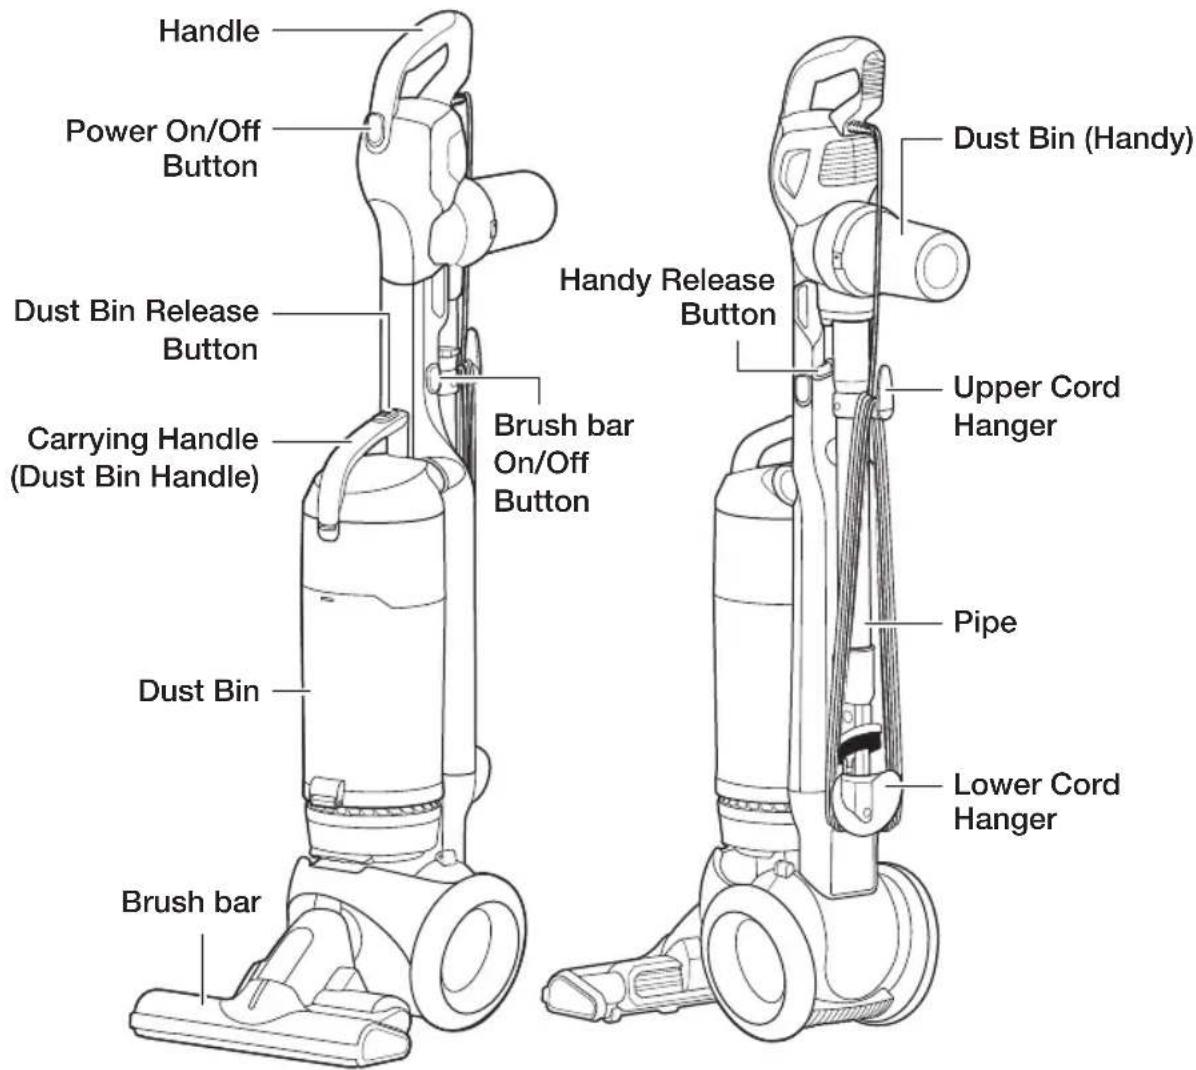

Do not plug in your vacuum cleaner until you are familiar with all instructions and operating procedures.

Plastic film can be dangerous.
To avoid the danger of suffocation, keep the film away from babies and children.
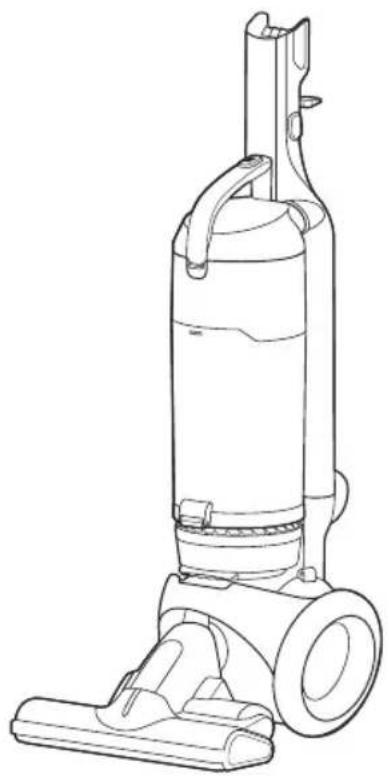
natural_image
Line drawing of a vacuum cleaner with handle and wheels (no text or symbols)(1)(2)(3)
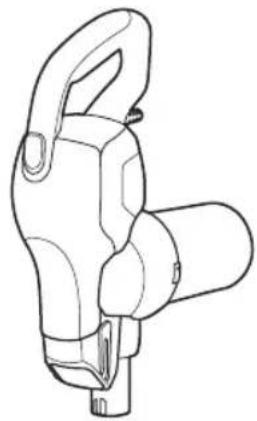
natural_image
Line drawing of a mechanical clamp or connector (no text or symbols)

(4)(5)(6)
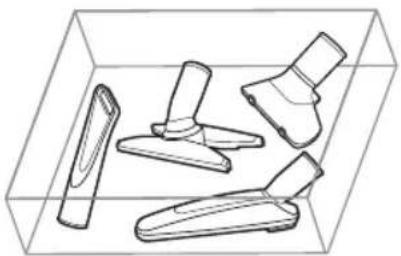
natural_image
Line drawing of four mechanical parts inside a transparent container (no text or symbols)
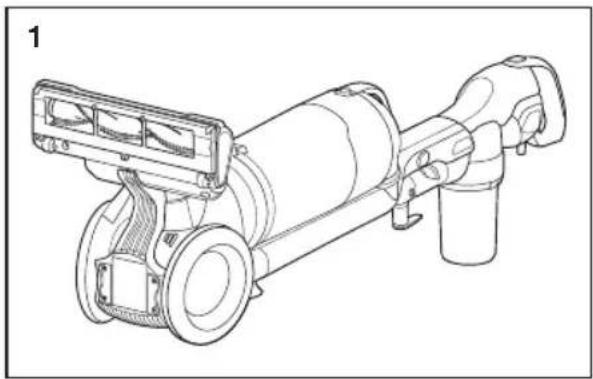
- Empty carton. Find the parts shown above before disposing of packing materials.
- Vacuum cleaner body
- Handy Vacuum cleaner
- Pipe
- 2 In 1 Accessory
- Accessory Kit (Optional depending on the model)
- Users Manual
Before using the vacuum cleaner
ASSEMBLE THE HANDY VACUUM, PIPE, AND 2 IN 1 ACCESSORY
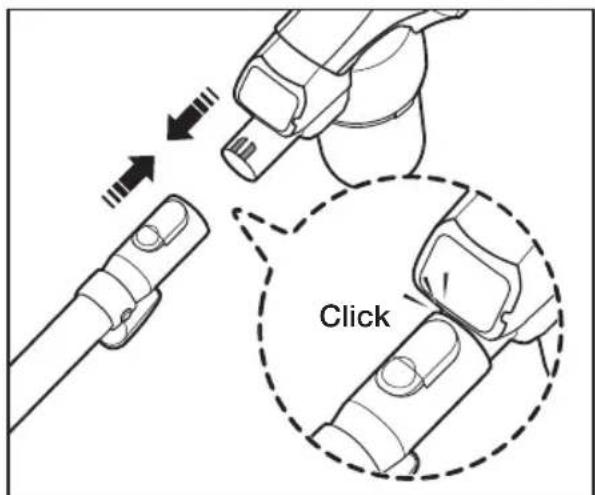
- Connect the Handy Vacuum cleaner and pipe.

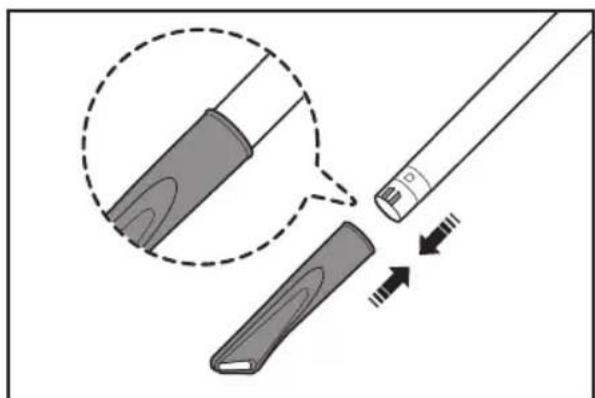
- Connect the 2 In 1 Accessory and the pipe.
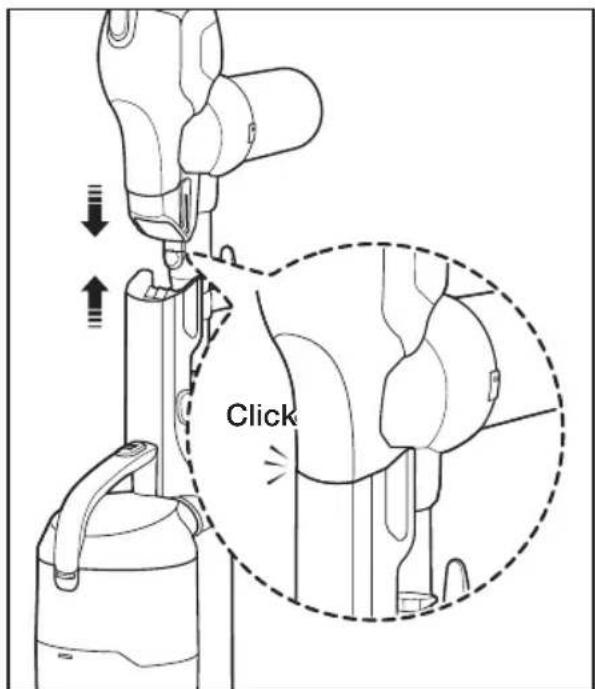
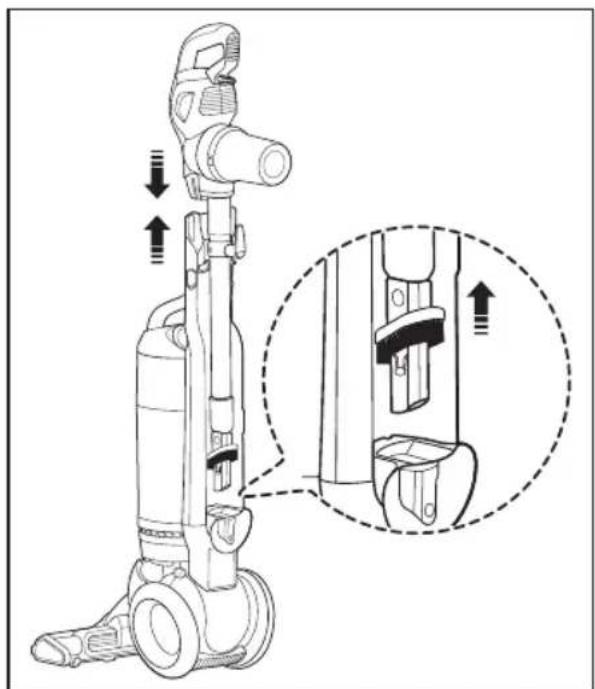
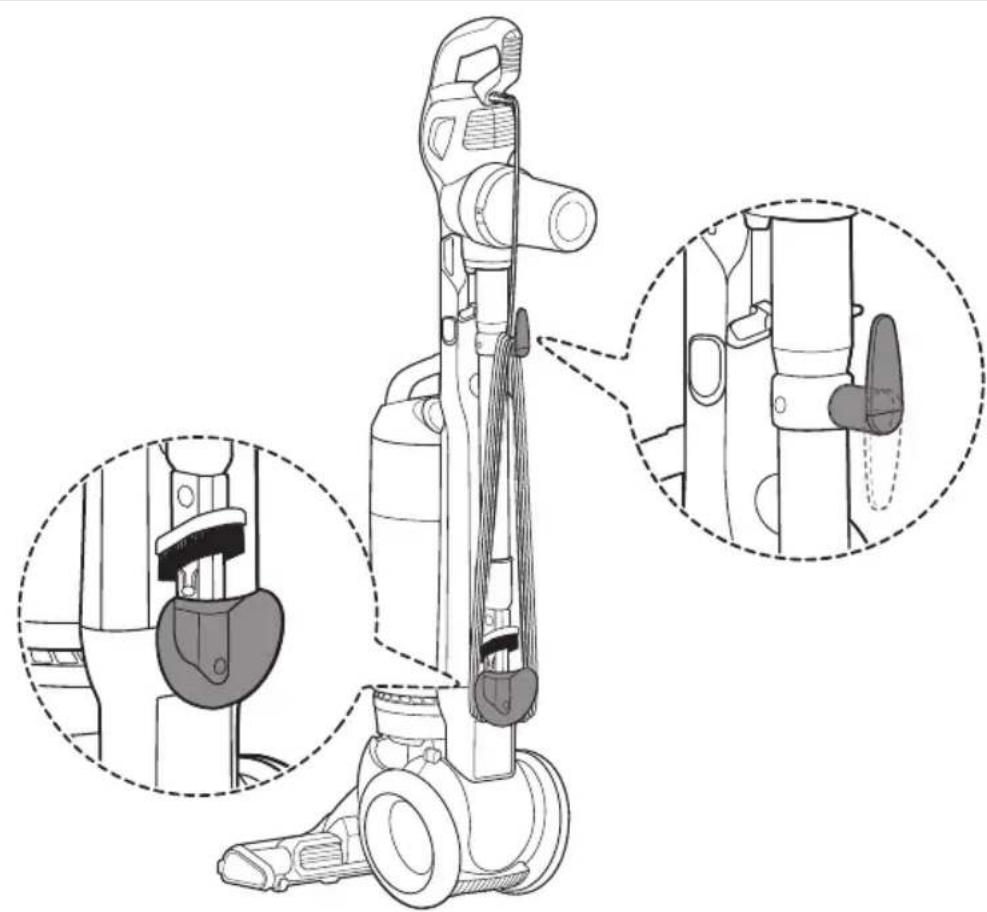
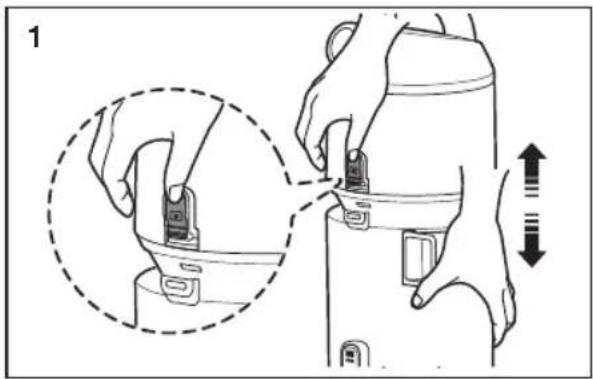
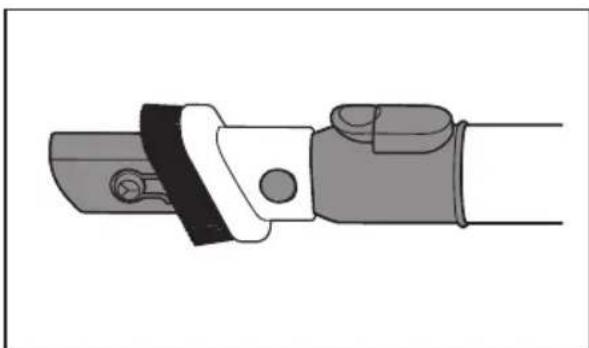
- When inserting the handle (the handy vacuum cleaner) into the top of vacuum body, put in the hole of the lower cord hanger after pull back the dusting brush.
natural_image
Technical line drawing of a vacuum cleaner with mechanical components and a close-up inset showing internal components (no text or symbols)- Wind the cord around the cord hangers and secure with clip.
natural_image
Line drawing of a vacuum cleaner with attached pump and wheels (no text or symbols)USING THE ACCESSORIES
natural_image
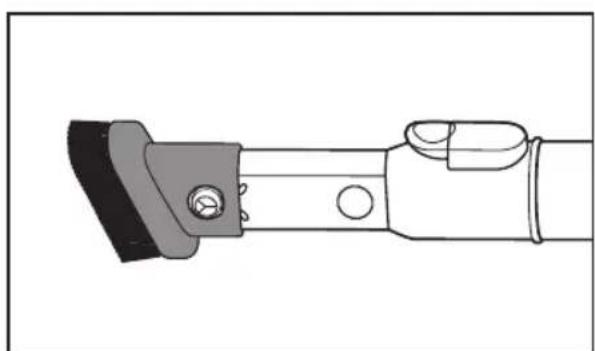
Illustration of a hand holding a wristwatch with a finger pointing to the button (no text or symbols present)- Crevice tool
natural_image
Illustration of a mechanical clamp or bracket with no visible text or symbols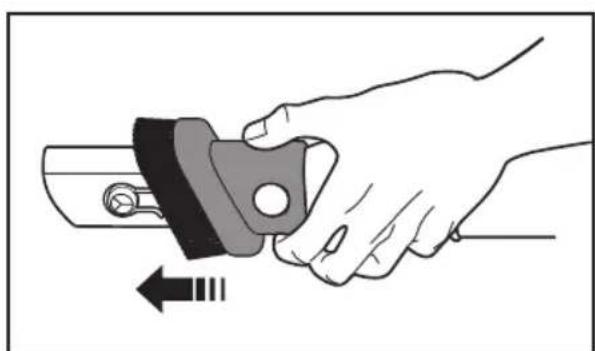
natural_image
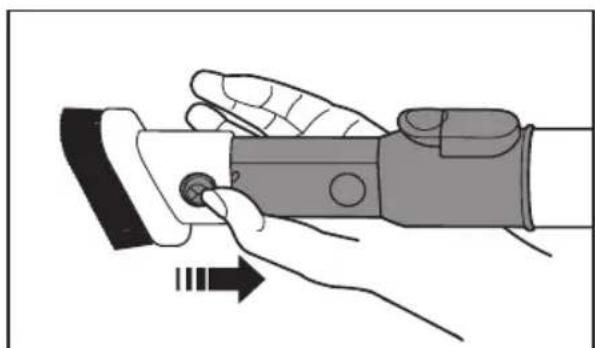
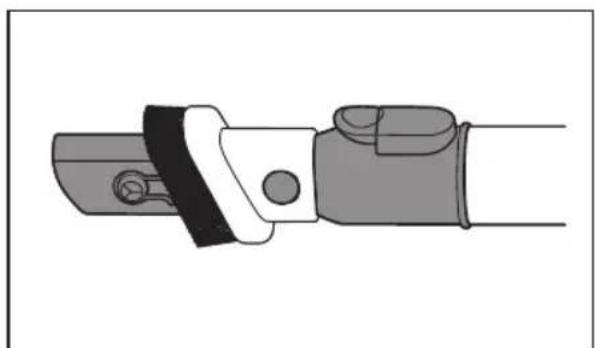
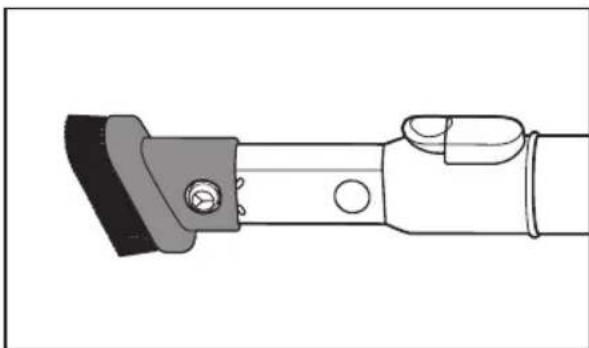
Illustration of a hand holding a mechanical component with an arrow indicating motion (no text or symbols)- Dusting Brush
natural_image
Technical line drawing of a mechanical clamp or bracket assembly (no text or symbols)Operating cleaner
STOWING THE POWER CORD
natural_image
Technical line drawing of a vacuum cleaner with close-up views of its internal components (no text or symbols)
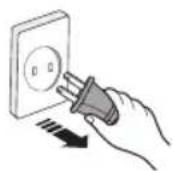
When removing the plug from an electrical outlet, grasp the plug, not the cord.
Handy vacuum cleaner mode
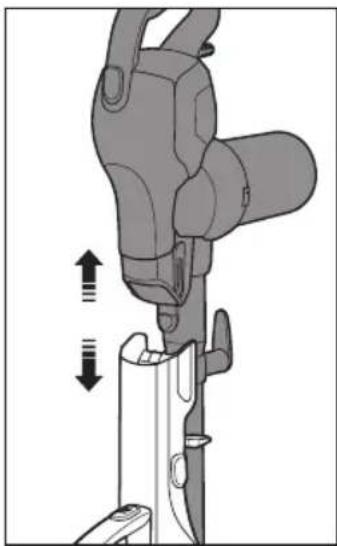
natural_image
Mechanical assembly diagram showing a clamping tool interacting with a bracket (no text or symbols visible)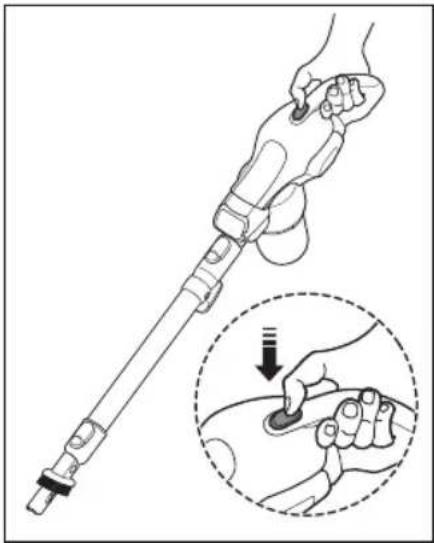
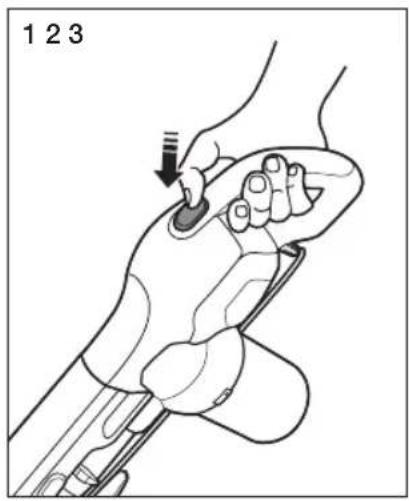
natural_image
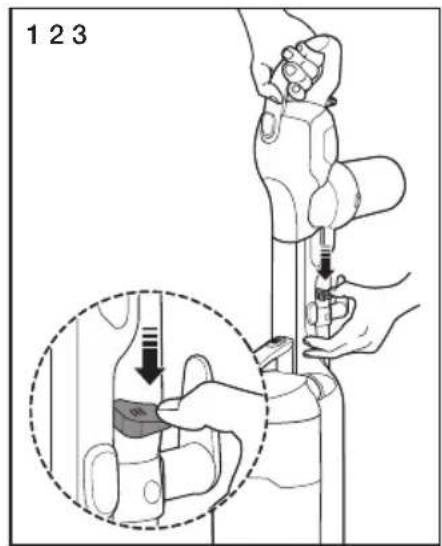
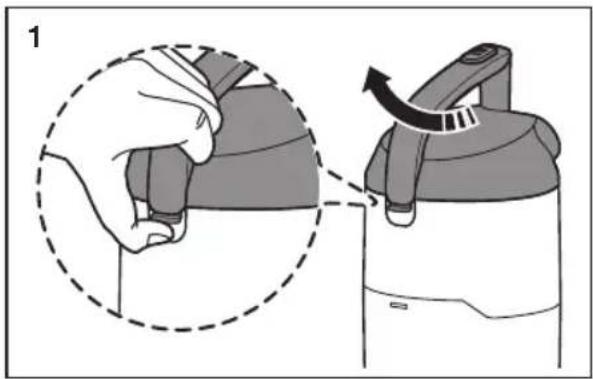
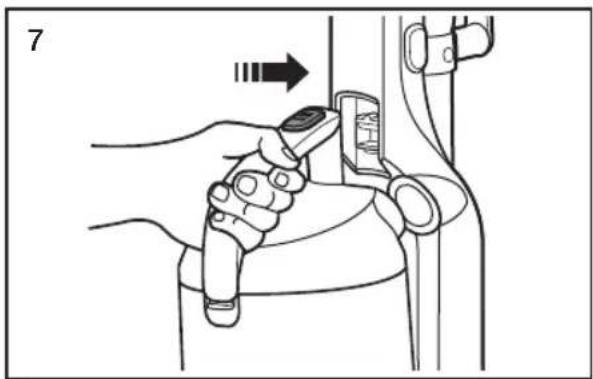
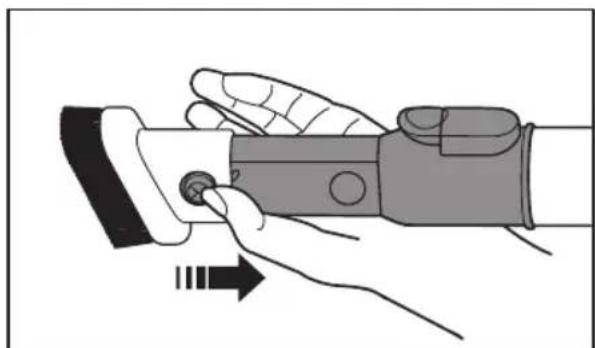
Illustration of a hand holding a medical or robotic tool with a magnified inset showing the hand pressing a button (no text or symbols present)- Push the release button, and then separate the handy vacuum cleaner from the body.
- Push the power On/Off switch.
Upright mode
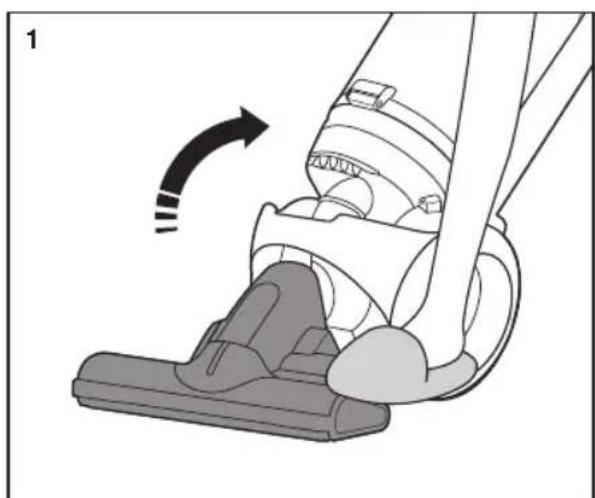
natural_image
Diagram of a vacuum cleaner's side arm and foot, showing mechanical components and motion direction (no text or symbols)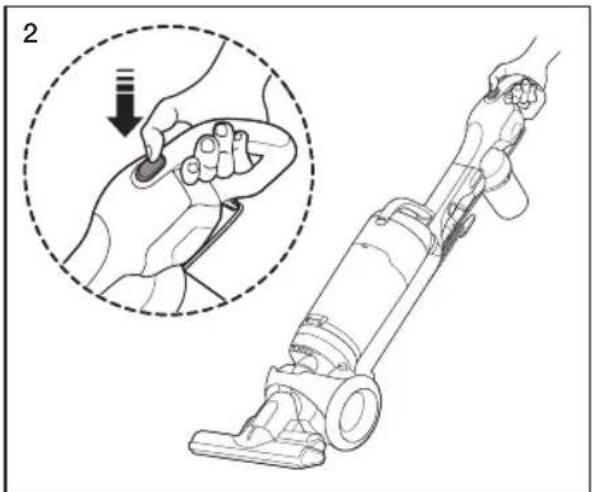
natural_image
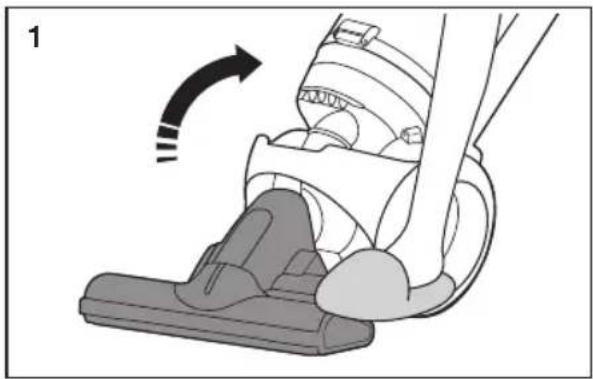
Line drawing of a hand using a vacuum cleaner to adjust the interior area, with an inset showing the step of the tool (no text or symbols present)- Place a foot on the brush, and then tilt the handle back gently to release the lock.
- Push the power On/Off switch.
natural_image
Illustration of a hand holding a medical device with a tool, showing a finger insertion step (no text or symbols)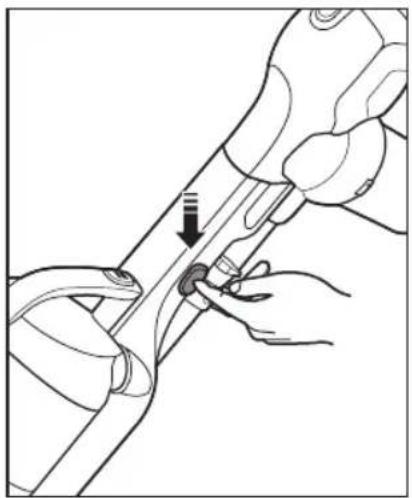
natural_image
Illustration of hands using a tool to adjust or install a mechanical component (no text or symbols visible)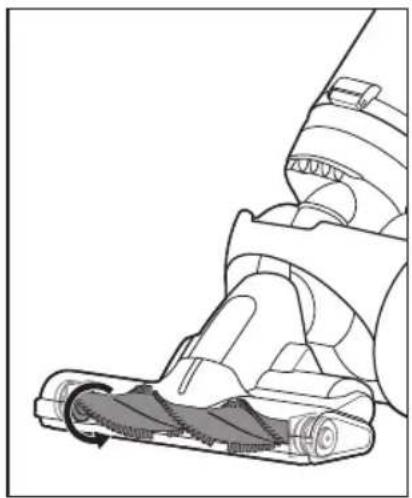
natural_image
Technical line drawing of a vacuum cleaner's side view showing internal components and motion arrows (no text or symbols)- Push the power On/Off switch, and then push the brush bar On/Off switch.

When the vacuum is in the upright position, the brush bar does not work.
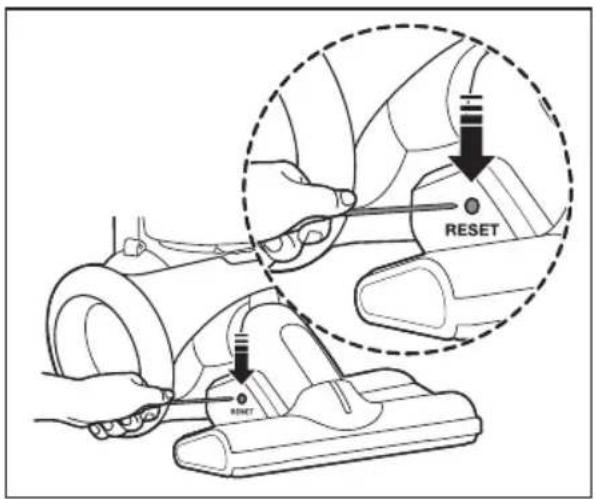
RESETTING THE OVERLOAD PROTECTOR
- The overload protector shuts off the brush motor if the brush bar becomes obstructed. To reset the overload protector, use a pen tip to press the reset switch.
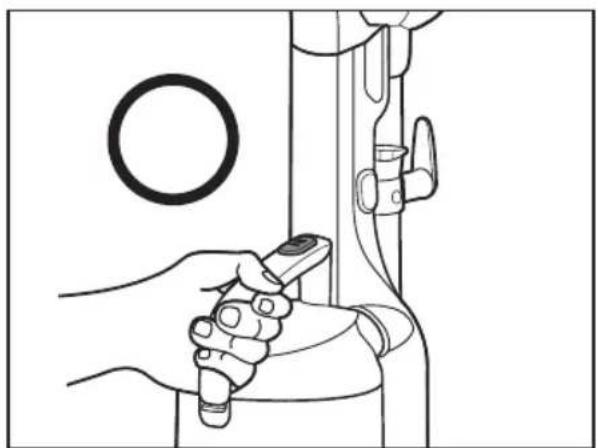
USING THE VACUUM'S HANDLE (THE DUST BIN HANDLE)
natural_image
Line drawing of a hand holding a remote control device, with a circular component and mechanical components nearby (no text or symbols)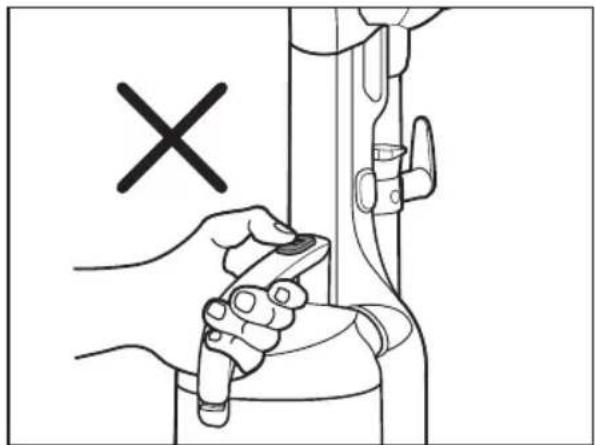
natural_image
Illustration of a hand holding a tool near a mechanical component, with a black 'X' symbol indicating a specific point (no text or symbols present)
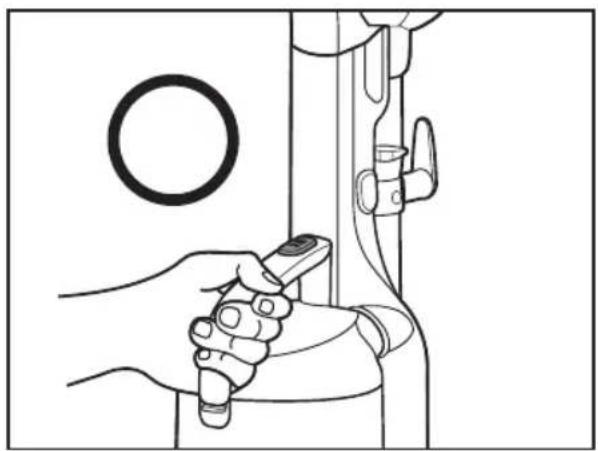
When you carry the vacuum cleaner by the handle, do not push the dust bin release button.
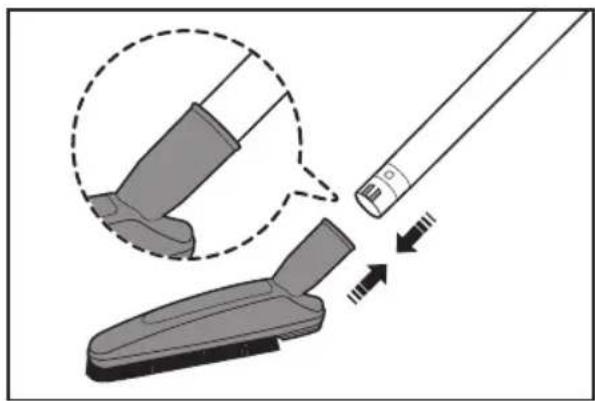
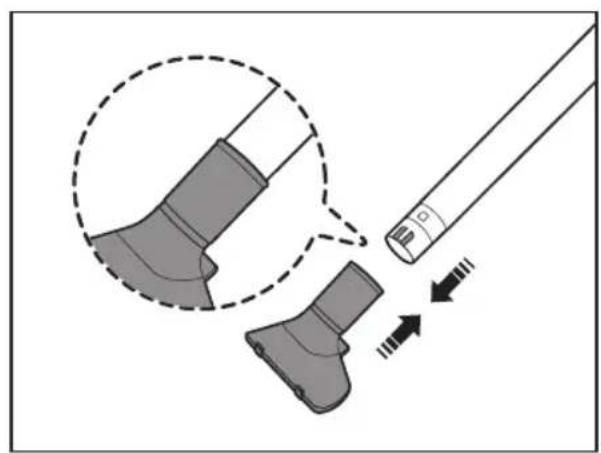
USING THE ACCESSORY KIT (OPTIONAL)
Furniture tool
natural_image
Diagram showing a cleaning tool interacting with a cleaning device, with arrows indicating motion (no text or symbols present)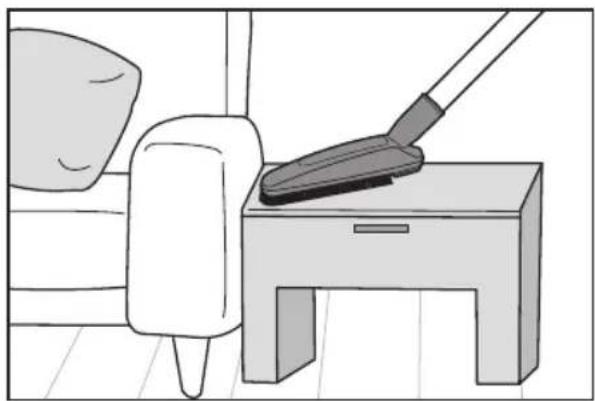
natural_image
Illustration of a person cleaning a small table with a mop (no text or symbols)Window tool
natural_image
Diagram showing a tool interacting with a mechanical component, with arrows indicating motion (no text or symbols present)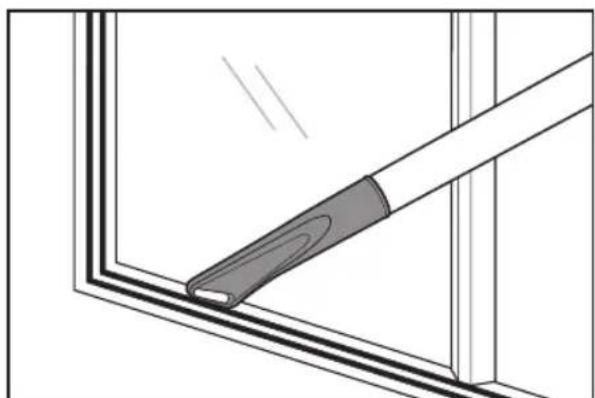
natural_image
Diagram of a window corner with a tool applying material to the edge (no text or symbols)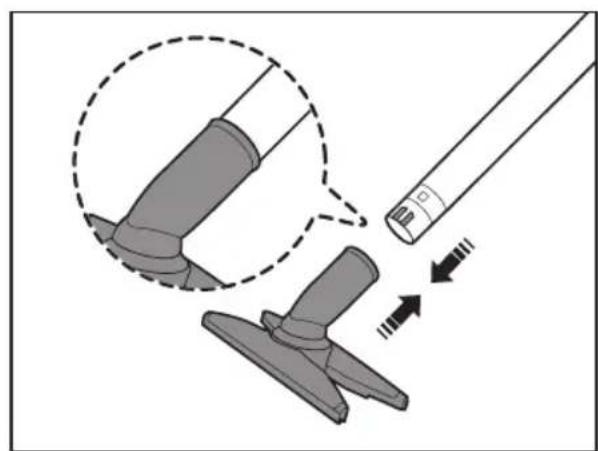
natural_image
Diagram showing a tool interacting with a mechanical component, with arrows indicating motion (no text or symbols present)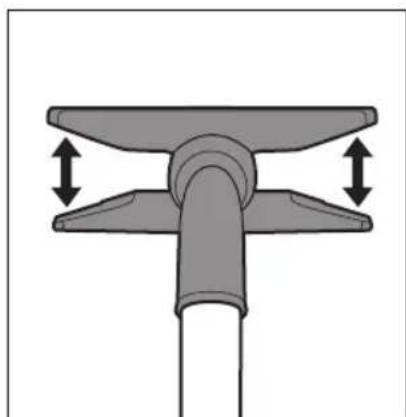
natural_image
Mechanical component diagram showing a T-shaped joint with two upward arrows indicating force or movement (no text or symbols)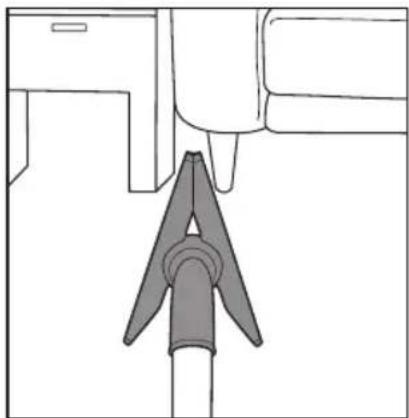
natural_image
Simple line drawing of a mechanical component with a triangular base and rectangular side (no text or symbols)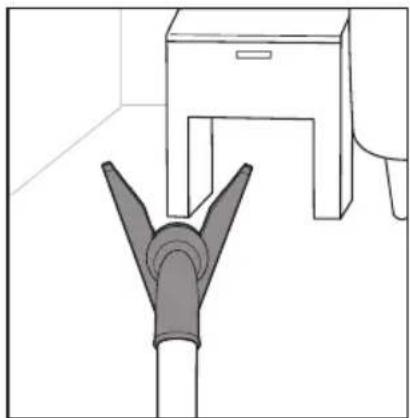
natural_image
Line drawing of a pipe fitting with a cabinet, no text or symbols present- Cleaning a narrow corner.
natural_image
Diagram of a mechanical component with a curved arrow indicating rotation or force direction (no text or symbols)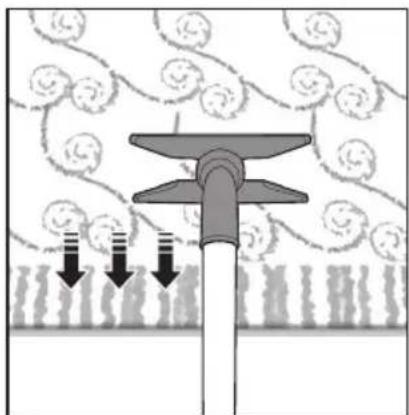
natural_image
Diagram of a mechanical or fluidic device with downward arrows indicating flow or movement, surrounded by circular patterns (no text or symbols)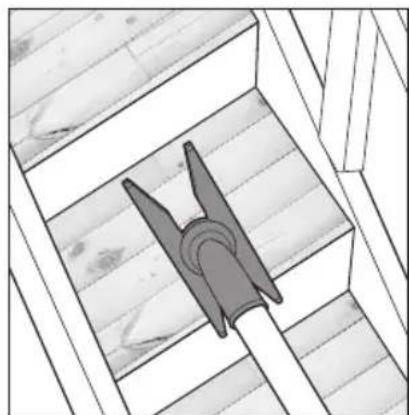
natural_image
Architectural diagram of a wooden structure with a triangular tool inserted into a slot (no text or symbols)• Cleaning a carpet and stairs.
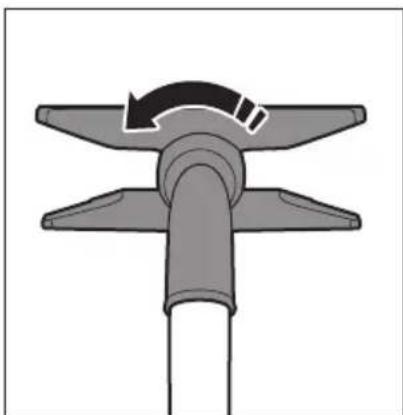
- Adjust the multiple angle tool manually. You can rotate the entire tool 90 degrees and change the angle of both wings.
natural_image
Diagram showing a tool interacting with a mechanical component, with arrows indicating motion direction (no text or symbols)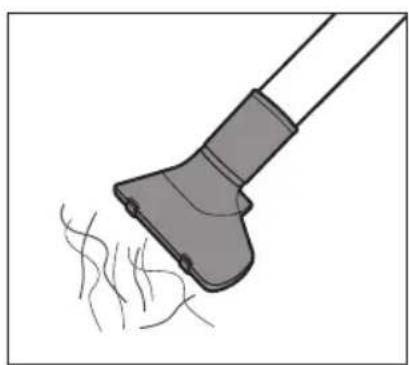
natural_image
Illustration of a hairdryer with fine hairs, no text or symbols present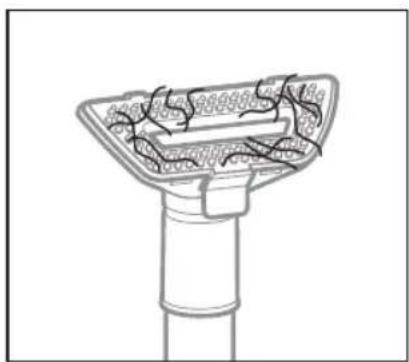
natural_image
Diagram of a mechanical component with internal structure and no visible text or symbols- Rake the hair.
natural_image
Illustration of a hand using a handheld device to lift a trash bin with an arrow indicating motion (no text or symbols)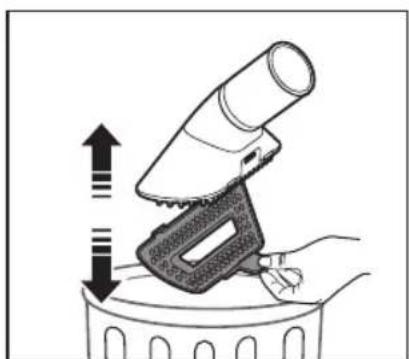
natural_image
Illustration of a hand using a handheld device to press down a trash bin (no text or symbols present)- Seperate the cover from the pet tool, and then throw the hair away.
natural_image
Illustration of a hand using a tool to press down or press over a device (no text or symbols visible)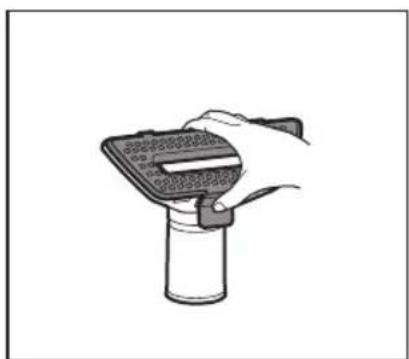
natural_image
Hand holding a handheld device with a screen and connector, mounted on a cylindrical stand (no text or symbols visible)- Re-attach the cover.
EMPTYING THE DUST BIN

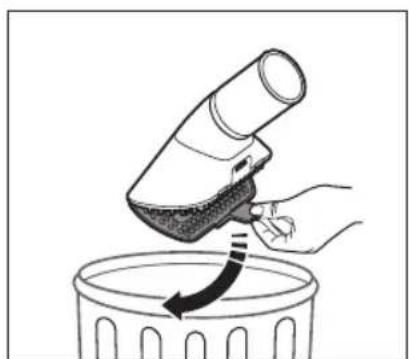
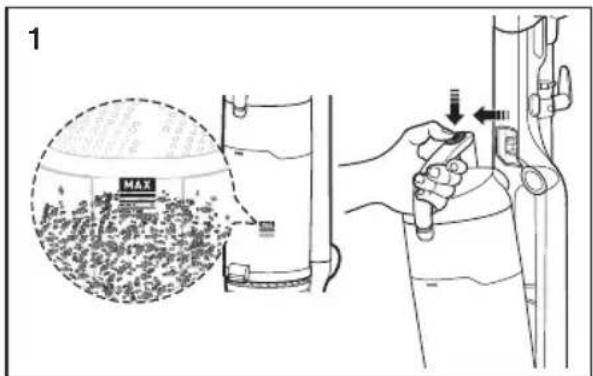
- Empty the dust bin when dust reaches the 'MAX' mark.
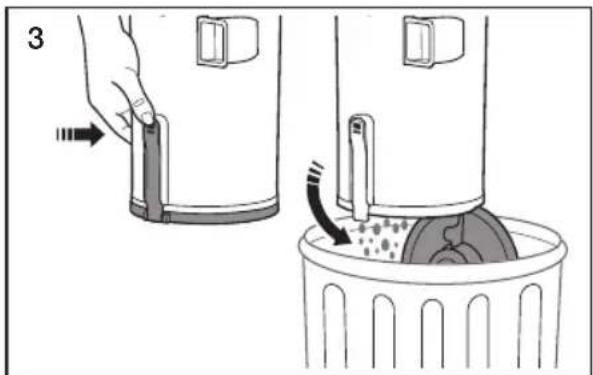
• Take the dust bin out by pushing the button on the handle. - To empty the dust bin, hold the dust bin over a garbage can, and then push the button near the bottom of the bin.
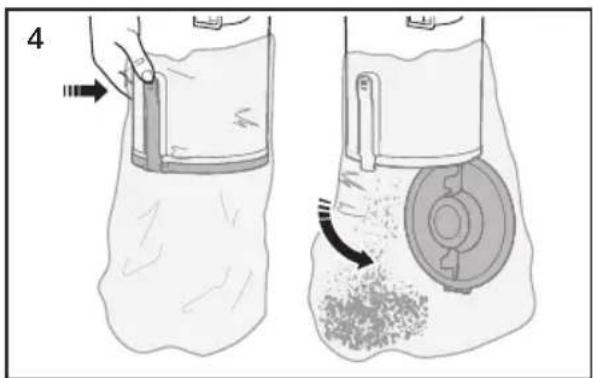
- To empty the dust bin, hold the dust bin into a plastic bag, and then push the button near the bottom of the bin. (Recommended for asthma/allergy sufferers.)
- Close the bottom of the bin, and then drop the plastic bag in the trash can. (Recommended for asthma/allergy sufferers.)
natural_image
Illustration of a hand holding a device next to a bag with granular material, showing mechanical components and motion arrows (no text or symbols)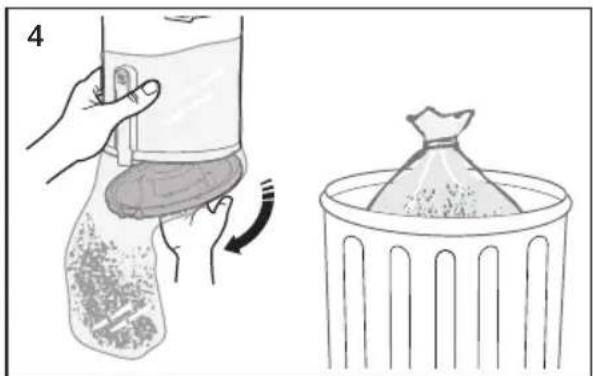
natural_image
Illustration showing a hand placing a container with liquid into a bag, and a close-up of a bag filled with granular material inside a trash bin (no text or symbols)- Push the button. Separate the dust bin from the vacuum's body.
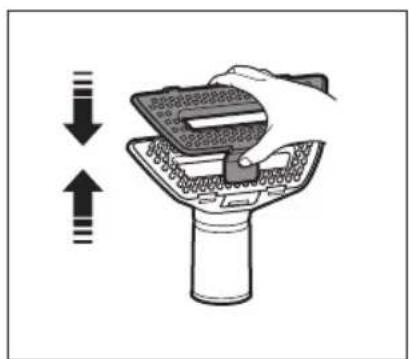
- Clean the grille with the dusting brush to remove lint.
- To re-attach the dust bin to the vacuum's body, follow steps 3 and 4.
natural_image
Illustration of hands using a device to adjust or install a component, showing a close-up and directional arrows (no text or symbols)
natural_image
Illustration of a hand using a tool to lift a cylindrical device into a granular material (no text or symbols visible)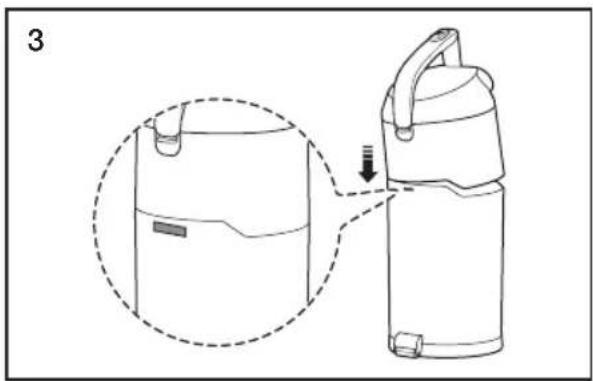
natural_image
Line drawing of a portable device with a handle and lid, showing a zoomed-in view of its internal structure (no text or symbols)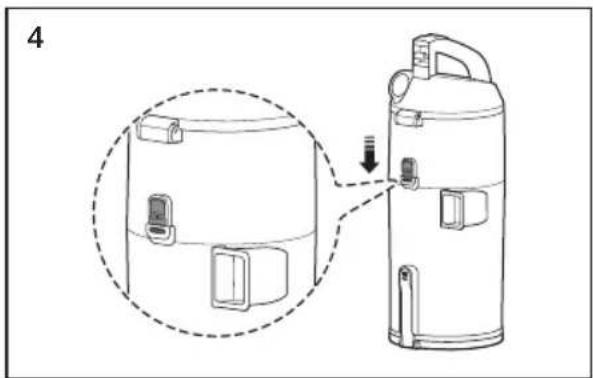
natural_image
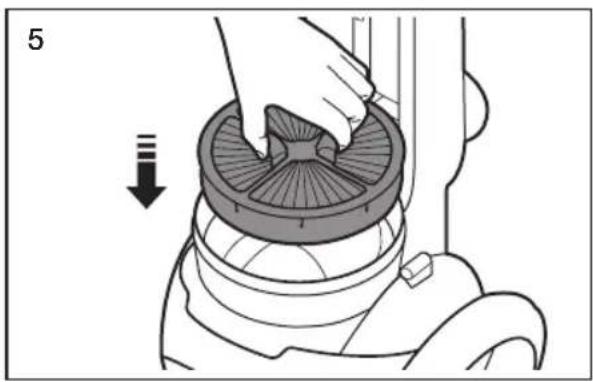
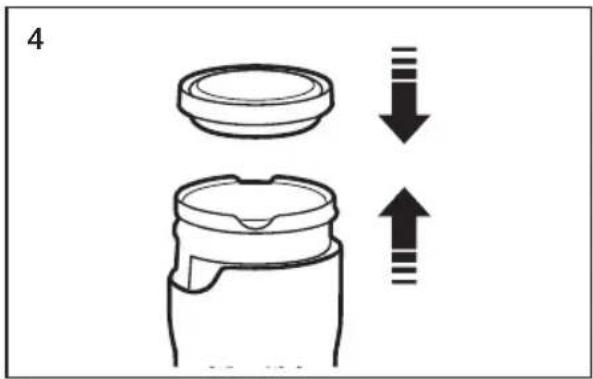
Diagram of a portable water heater with a close-up view showing internal components and a downward arrow indicating motion (no text or symbols present)- Pull the dust bin cover to open.
- Remove the filter from the dust bin.
- Shake the filter to remove dust, and then wash the filter.
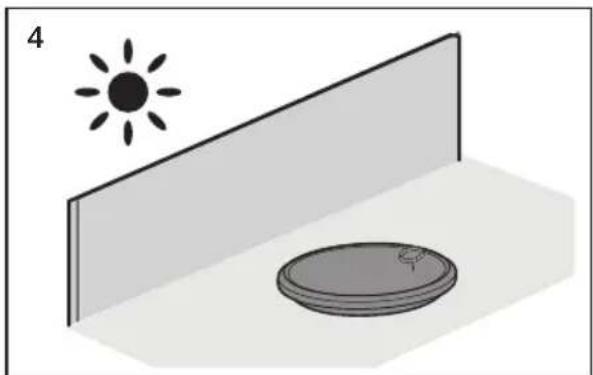
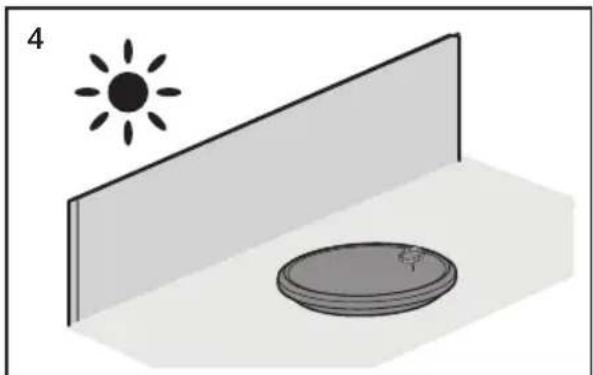
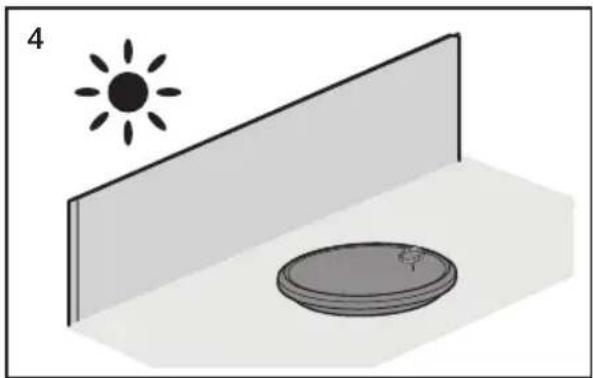
- Leave the filter in the shade until completely dry.
natural_image
Illustration of a hand holding a device with a dashed circular outline and an arrow indicating rotation (no text or symbols)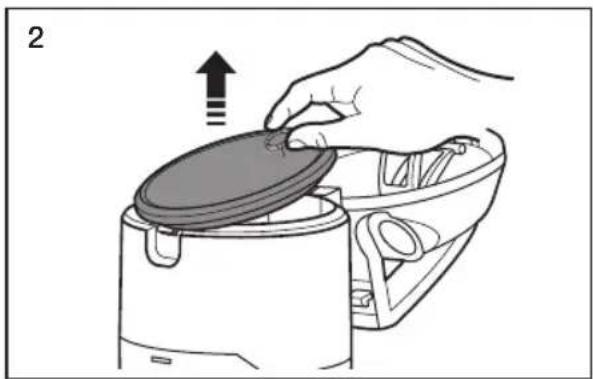
natural_image
Illustration of a hand placing a lid onto a kitchen appliance (no text or symbols)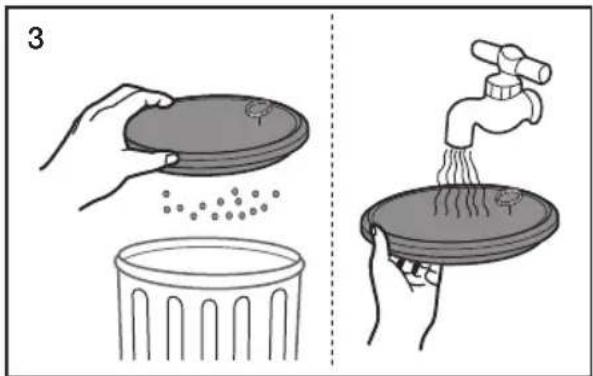
natural_image
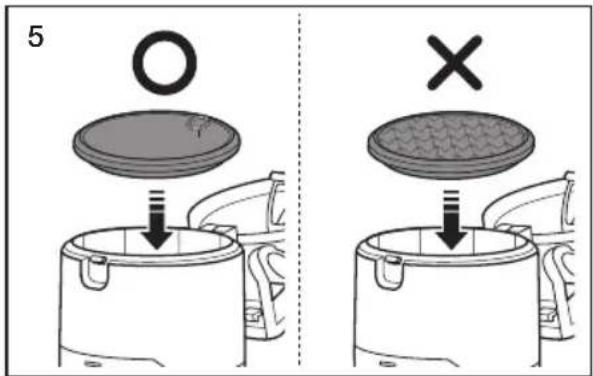
Simple 3D illustration of a sun and a circular object on a platform, no text or symbols present- Put the filter into the dust bin.

Check the filter regularly and wash every 1\~2 months.
Make sure the filter is completely dry before putting it back into the vacuum cleaner.
Allow it to dry for 12 hours.
Do not use a wet filter
Replace the dust filter if it becomes damaged or deformed.
The dust bin cover will not close if the filter is not installed correctly.
- Take the dust bin out by pushing button on the handle.
- Remove the filter cover.
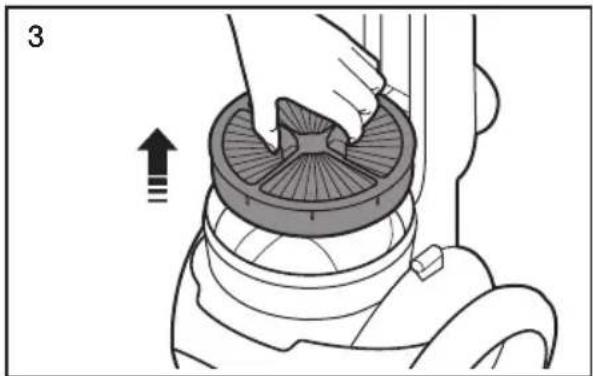
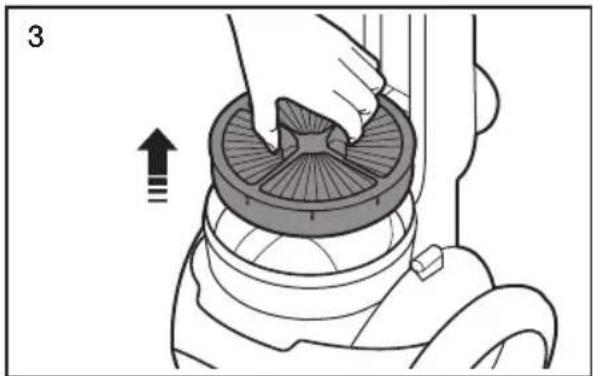
- Separate the Hepa filter from the vacuum's body.
- Shake the filter to remove dust.
natural_image
Illustration of a hand holding a device with directional arrows indicating movement or adjustment (no text or symbols present)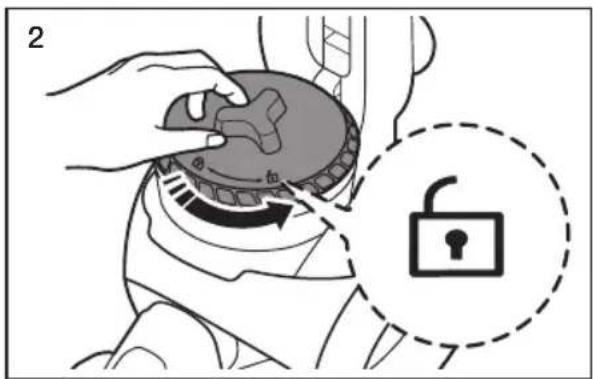
natural_image
Illustration of a hand using a vacuum cleaner to press down a circular component, with an arrow indicating press direction (no text or symbols present)
natural_image
Illustration of a hand placing a fan into a trash bin with particles (no text or symbols)
Clean the HEPA filter when suction is noticeably and continuously reduced or the vacuum cleaner overheats abnormally.
Note: HEPA Filters are not washable.
Replace the filter if cleaning does not resolve the problem.
• Re-insert the filter into the vacuum's body.
- Re-assemble the filter and filter cover.
• Re-attach the dust bin to the vacuum.
natural_image
Illustration of a hand using a vacuum cleaner to lift a circular component, with a downward arrow indicating motion (no text or symbols)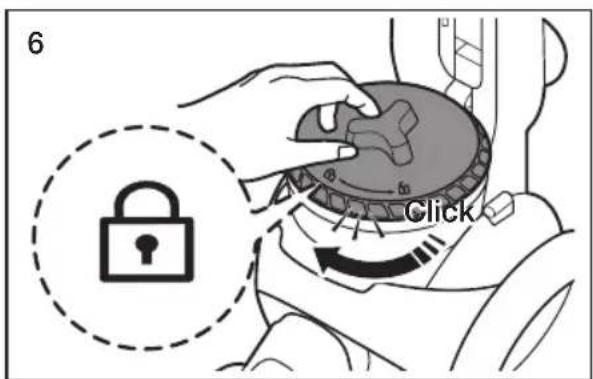
natural_image
Illustration of a hand using a tool to interact with a device (no text or symbols visible)
The dust bin will not re-attach to the vacuum if the filter cover is not installed correctly.
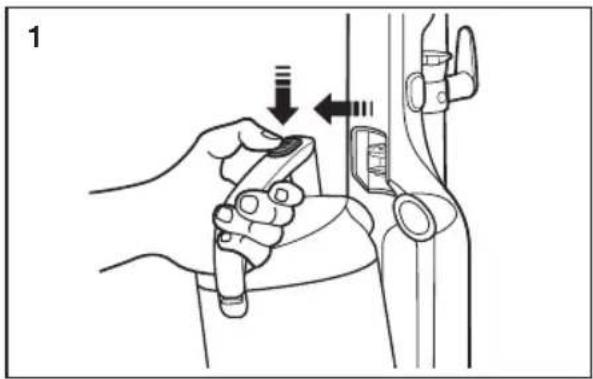
- Turn off and unplug the vacuum. Lie the vacuum down so its bottom is accessible as shown.
- Carefully cut off any hair or string caught in the brush.
natural_image
Technical line drawing of a mechanical device with no visible text or symbols
natural_image
Line drawing of a hand inserting cable into a device component (no text or symbols)
Before inspecting the brush bar, turn off the brush bar and unplug the vacuum.
- Place a foot on the brush, and then tilt the handle back gently to release the lock.
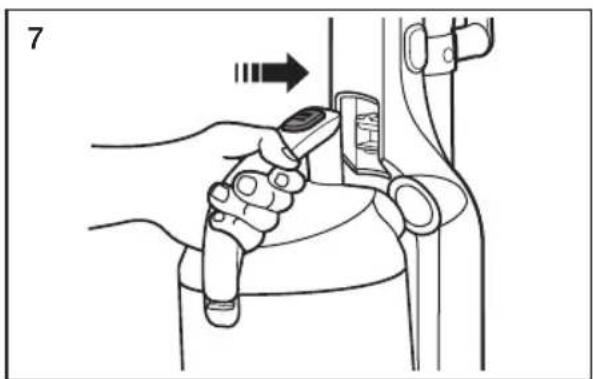
- Push the release button on the brush housing, and then pull the hose out.
- Check for clogs in the opening of the brush housing and in the hose.
- When done, re-attach the hose to the brush housing.
natural_image
Diagram of a hand washing a vacuum cleaner's seat, showing motion direction with no text or symbols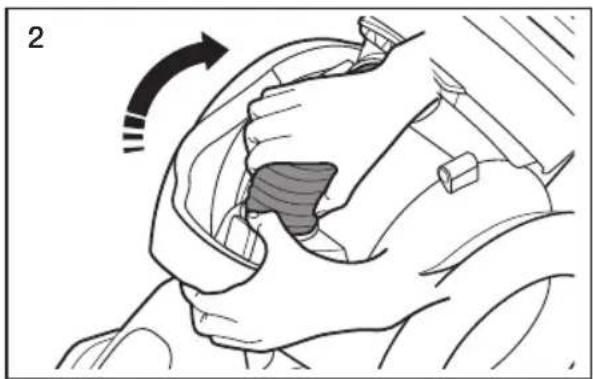
natural_image
Illustration of a hand gripping a car with a shaded interior area, showing motion direction (no text or symbols)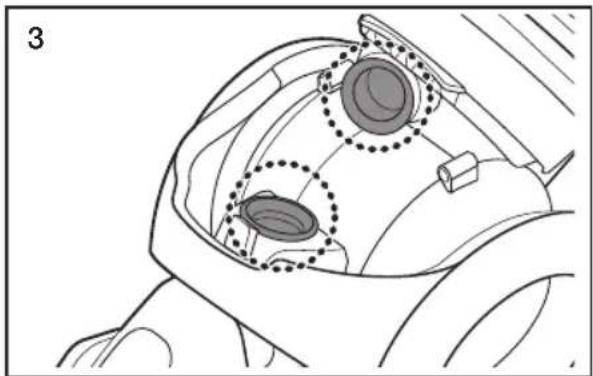
natural_image
Technical line drawing of a mechanical component with two circular features highlighted (no text or symbols)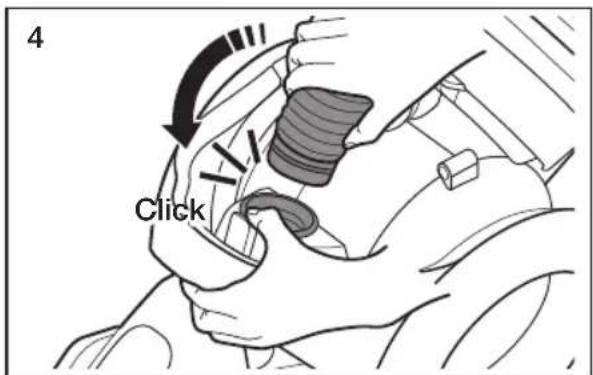
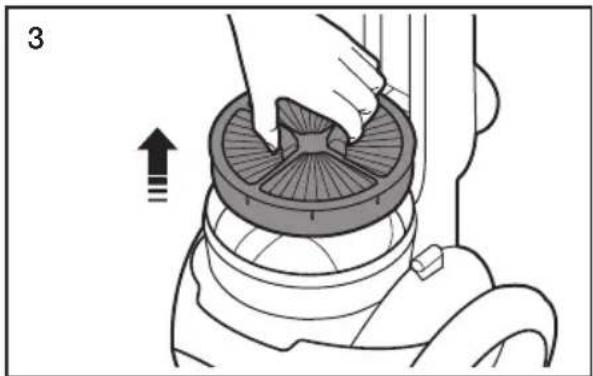
- Separate the dust bin from the vacuum's body.
- Remove the filter and grille.
- Empty the dust bin.
• Re-assemble the filter and grille.
natural_image
Line drawing of a hand pouring granular material into a trash bin (no text or symbols)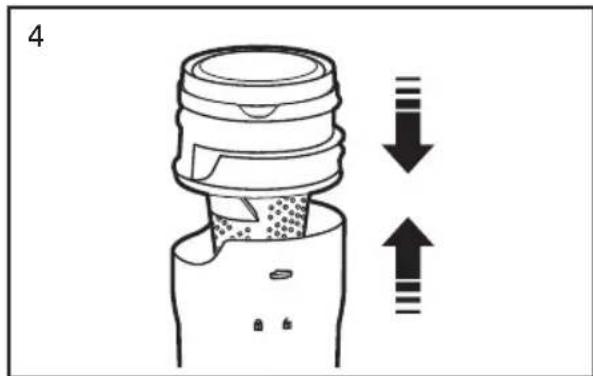
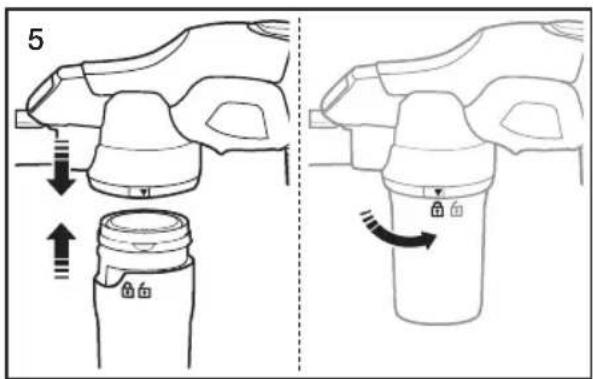
- Re-attach the dust bin to the vacuum body. (Align the open lock symbol on the dust bin with the arrow on the body, and then turn the bin counterclockwise so that the closed lock symbol aligns with the arrow.)
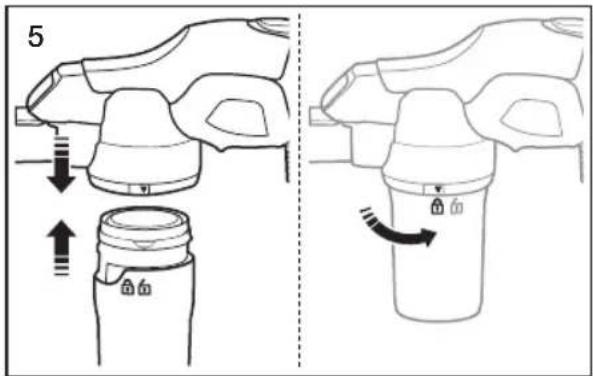
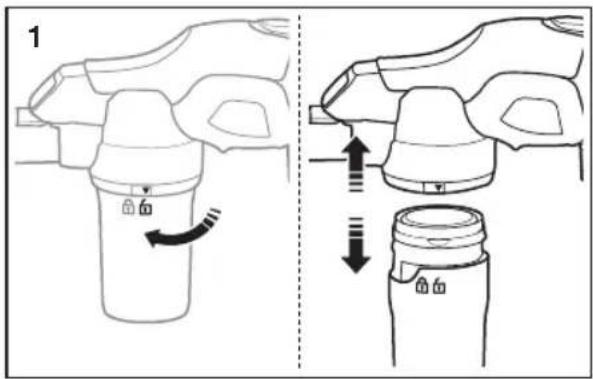
CLEANING THE FILTER OF THE HANDY VACUUM CLEANER

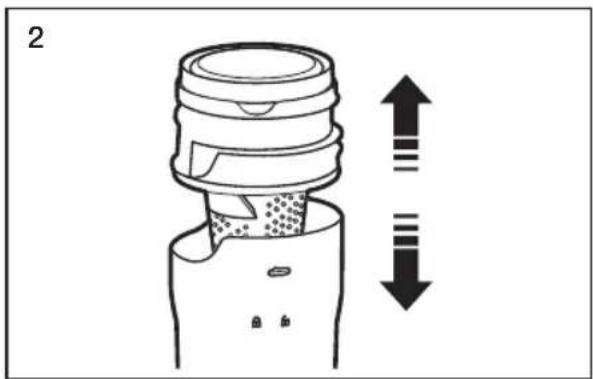
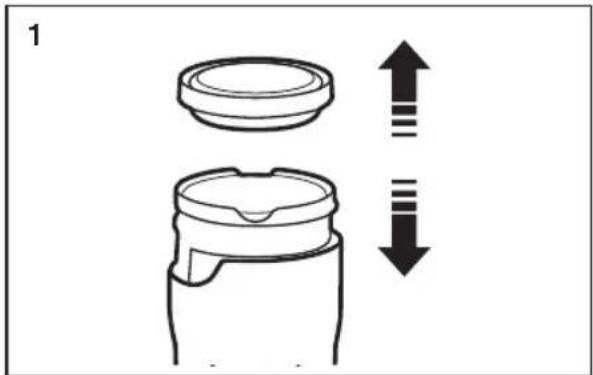
- Separate the dust bin from the vacuum's body, and then remove the filter.
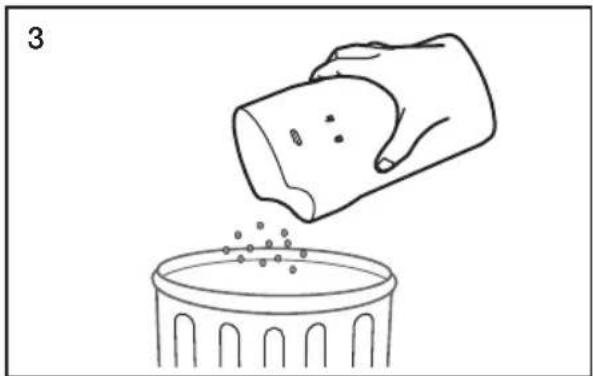
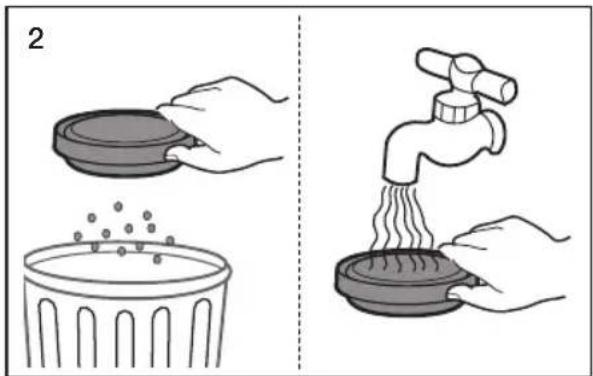
- Shake the filter to remove dust, and then wash the filter.
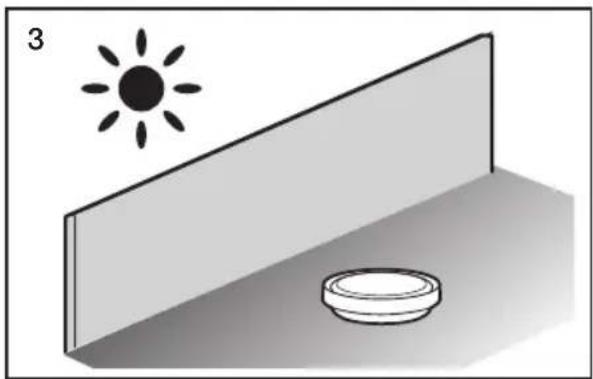
- Leave the filter in the shade until completely dry.
natural_image
Simple 3D diagram showing a sun icon above a wall and a bowl on a surface (no text or symbols)• Re-assemble the dust bin.
- Re-attach the dust bin to the vacuum body. (Align the open lock symbol on the dust bin with the arrow on the body, and then turn the bin counterclockwise so that the closed lock symbol aligns with the arrow.)

Make sure the filter is completely dry before putting it back into the vacuum cleaner. Allow it to dry for 12 hours.
Do not use a wet filter.
Replace the dust filter if it becomes damaged or deformed.
Do not operate the vacuum cleaner without the filter in place.
Troubleshooting
Check this list of possible problems and solutions before bringing your vacuum to a service center.
| PROBLEM SOLUTION | |
| Cleaner won’t run. | Check the electrical plug. Make sure it is fully plugged in.Press the Power on/off button.Reset the overload protector. |
| Suction Motor does not start.Thermal protector activated. | Allow the vacuum to cool. |
| Brush Motor does not start. | Check the power ON/OFF button and the brush ON/OFF button.Cut hair or string off the brush.Reset the overload protector. |
| Cleaner won’t pick up or low suction. | Empty the dust bin.Clean the filter and confirm that the filter assembly is positioned properly.Check the hose connection or flow path. |
| Dust escaping from cleaner. | Empty the dust bin.Clean the pre-motor filters.Clean or replace the exhaust filter. (HEPA filter)Confirm that the filter assembly is positioned properly. |
| Cleaner tools won’t pick-up.(Handy vacuum cleaner) | Check inlets, pipe, and dust bin for obstructions.Remove obstruction.Empty the dust bin.Remove and clean the filters.Confirm that the dust bin is locked properly. |

If you have any questions or comments relating to Samsung products, please contact the SAMSUNG customer care center.
| COUNTRY CUSTOMER CARE CENTER WEB SITE | ||
| U.S 1-800-SAMSUNG www.samsung.com | ||
| CANADA 1-800-SAMSUNG (726-7864) www.samsung.com | ||
Aspirateur
INSTRUCTIONS DES PRISES POLARISÉES
natural_image
Line drawing of a vacuum cleaner with attached mechanical components and directional arrows indicating motion (no text or symbols)natural_image
Line drawing of a vacuum cleaner with attached pump and wheels (no text or symbols)natural_image
Illustration of a hand holding a wristwatch with a circular button, showing mechanical adjustment (no text or symbols)- Suceur plat
natural_image
Technical illustration of a mechanical clamp or connector (no text or symbols)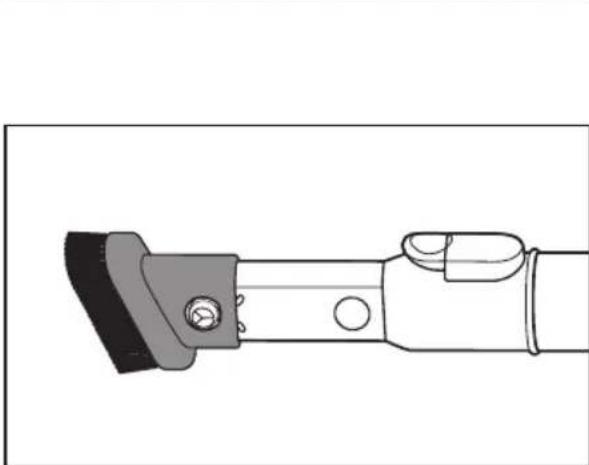
natural_image
Technical line drawing of a mechanical clamp or bracket with no visible text or symbols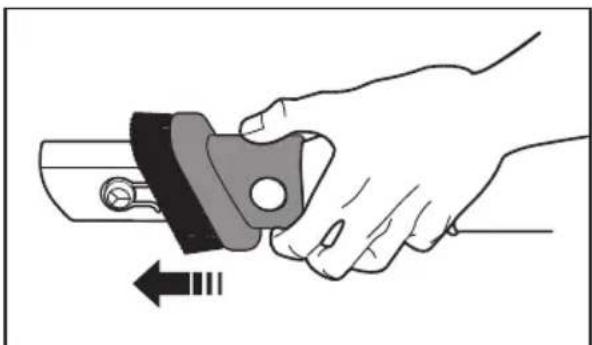
natural_image
Illustration of a hand holding a mechanical component with an arrow indicating motion (no text or symbols)- Brosse à épousseter
natural_image
Technical line drawing of a mechanical clamp or lever component (no text or symbols)natural_image
Technical line drawing of a vacuum cleaner with close-up insets showing internal components (no text or symbols)
natural_image
Mechanical assembly diagram showing a lever mechanism with bidirectional arrows indicating movement (no text or symbols present)
natural_image
Illustration of a hand holding a medical or robotic device with a magnified inset showing the hand pressing a button (no text or symbols present)natural_image
Diagram of a vacuum cleaner's side arm and base, showing mechanical components and motion direction (no text or symbols)
natural_image
Line drawing of a hand using a vacuum cleaner with a magnified inset showing the step of adjustment (no text or symbols present)natural_image
Illustration of a hand holding a small object with a downward arrow indicating motion (no text or symbols)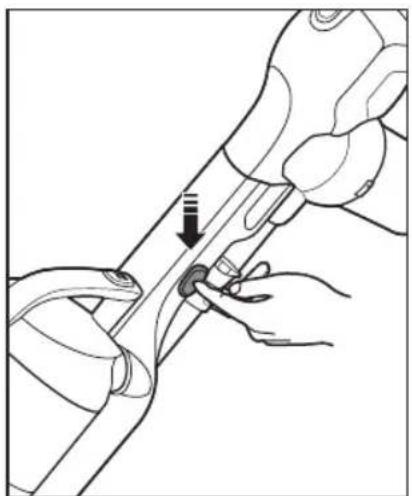
natural_image
Illustration of hands performing a manual tool manipulation on a curved mechanical component (no text or symbols visible)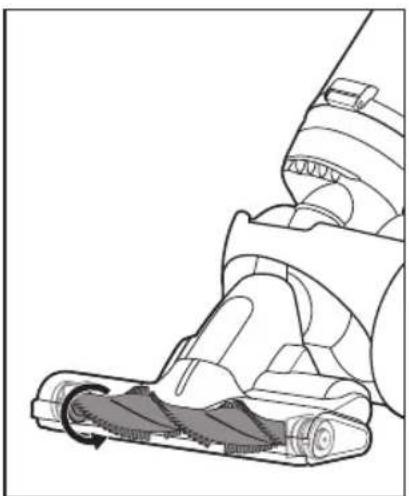
natural_image
Technical illustration of a vacuum cleaner's internal mechanism (no text or symbols)natural_image
Line drawing of a hand holding a remote control panel, with a circular inset showing a ring (no text or symbols)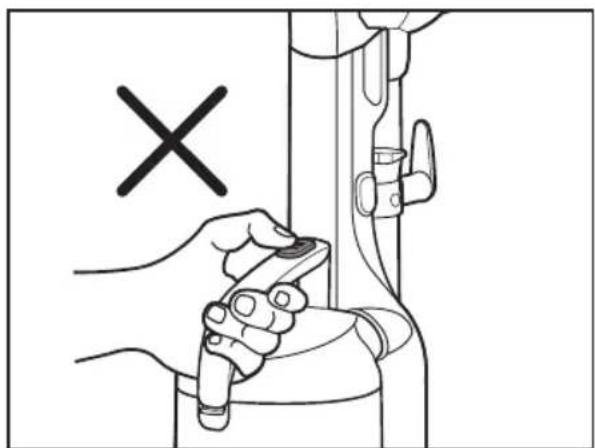
natural_image
Illustration of a hand holding a tool near a mechanical component, with a black 'X' symbol indicating a specific point (no text or symbols present)
natural_image
Diagram showing a cleaning or cleaning process with a tool and a close-up of the blade (no text or symbols)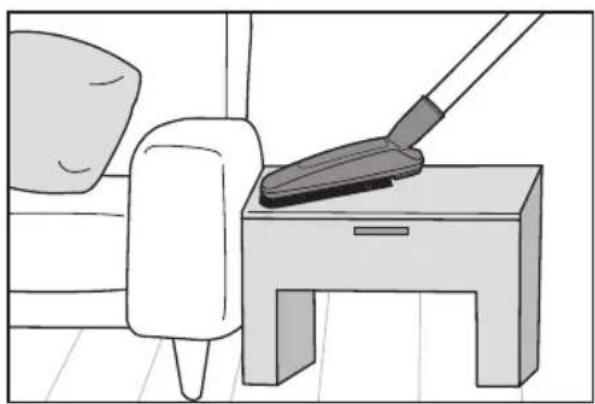
natural_image
Illustration of a person cleaning a small table with a mop (no text or symbols)natural_image
Diagram showing a tool interacting with a mechanical component, with arrows indicating motion (no text or symbols present)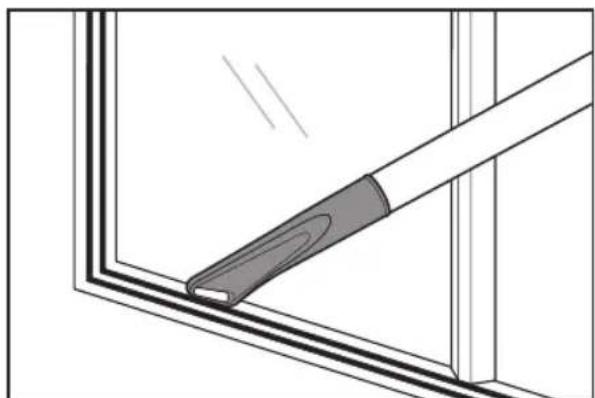
natural_image
Diagram of a tool interacting with a window frame, showing a handle and blade (no text or symbols)
natural_image
Diagram showing a tool interacting with a mechanical component, with arrows indicating motion (no text or symbols present)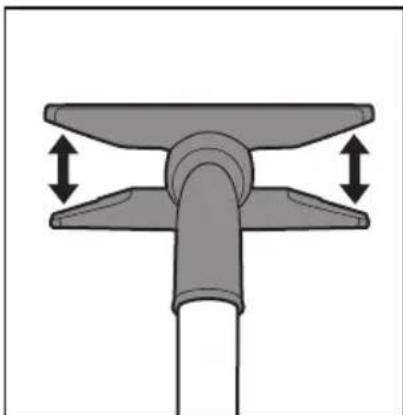
natural_image
Mechanical component diagram showing a lever with two upward arrows indicating motion or force direction (no text or symbols)
natural_image
Diagram of a mechanical component with a triangular tool inserted into a housing (no text or symbols)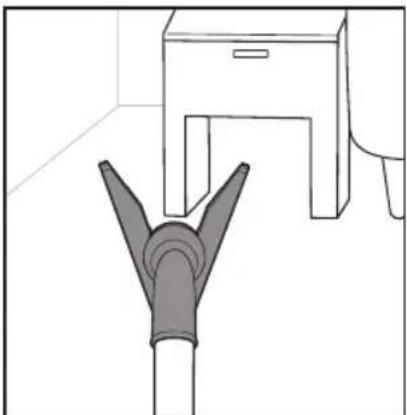
natural_image
Line drawing of a pipe fitting with a cabinet and support structure (no text or symbols)natural_image
Mechanical component diagram showing a rotating shaft with a curved arrow indicating rotation (no text or symbols)
natural_image
Diagram of a mechanical component with downward arrows indicating force or movement, surrounded by textured patterns (no text or symbols)
natural_image
Architectural diagram of a wooden structure with diagonal beams and a central blade (no text or symbols)natural_image
Diagram showing a tool interacting with a mechanical component, with arrows indicating motion (no text or symbols present)
natural_image
Illustration of a hairdryer with fine hairs, no text or symbols present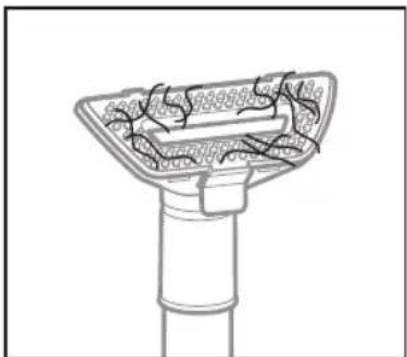
natural_image
Technical line drawing of a mechanical component with internal channels and mounting base (no text or symbols)natural_image
Illustration of a hand using a handheld device to lift a trash bin with an arrow indicating motion (no text or symbols)
natural_image
Illustration of a hand using a hairdryer to lift a trash bin with an upward arrow indicating motion (no text or symbols)natural_image
Illustration of a hand using a tool to press or adjust a device, with no visible text or symbols.
natural_image
Hand holding a handheld device with a textured screen and handle, mounted on a cylindrical base (no text or symbols visible)natural_image
Illustration of a hand holding a device next to a bag with granular material, showing mechanical components and motion (no text or symbols)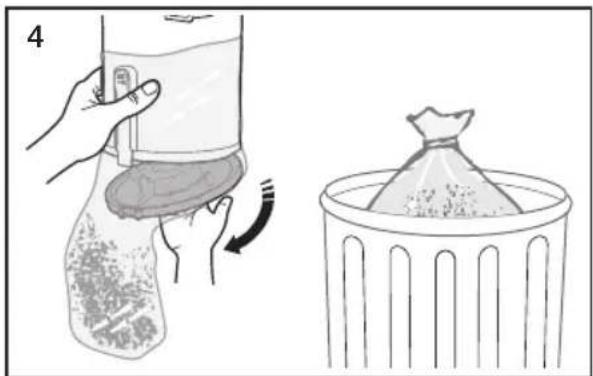
natural_image
Illustration showing a hand holding a bag with a curved arrow indicating rotation, next to a trash bin (no text or symbols)natural_image
Illustration of a hand using a device to adjust or install a device, showing a close-up and directional arrow (no text or symbols)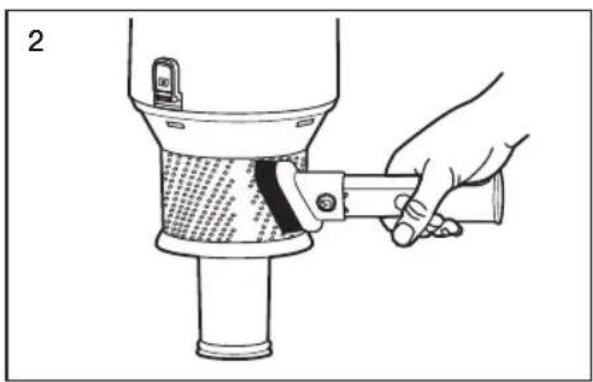
natural_image
Illustration of a hand using a tool to lift a cylindrical object, no text or symbols present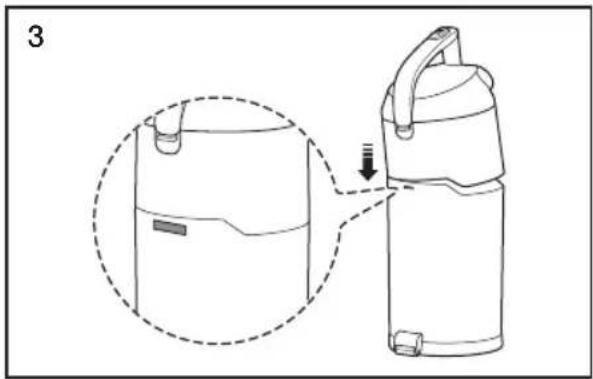
natural_image
Line drawing of a portable refrigerator with a handle and side panel, showing a close-up of its lid (no text or symbols)
natural_image
Diagram of a thermospan device with a magnified inset showing internal components (no text or symbols)NETTOYAGE DU FILTRE AVANT MOTEUR

natural_image
Illustration of a hand pressing down on a device with an arrow indicating rotation (no text or symbols present)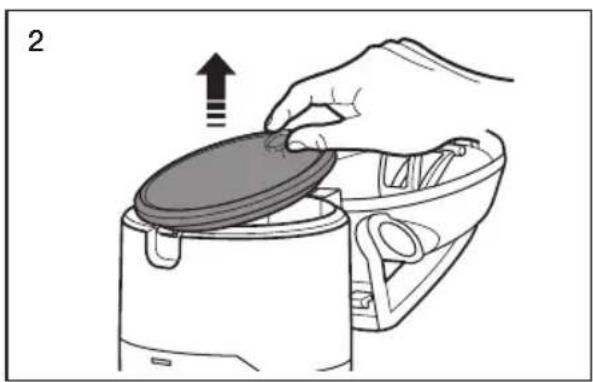
natural_image
Illustration of a hand placing a lid onto a food processor with an upward arrow (no text or symbols)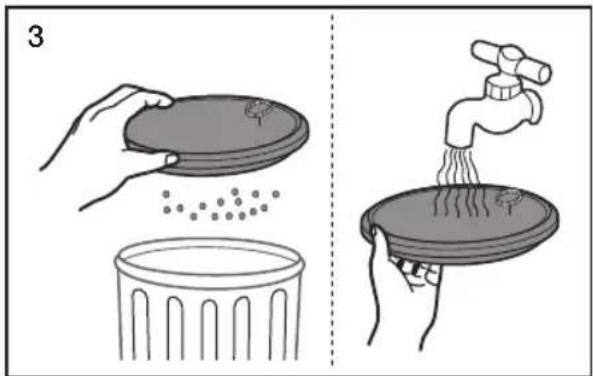
natural_image
Simple 3D diagram showing a sun above a wall and a circular object on a base, no text or symbols present.natural_image
Illustration of a hand holding a tool with directional arrows indicating movement or adjustment (no text or symbols present)
natural_image
Illustration of a hand using a vacuum cleaner to press down a circular component, with an arrow indicating the process (no text or symbols present)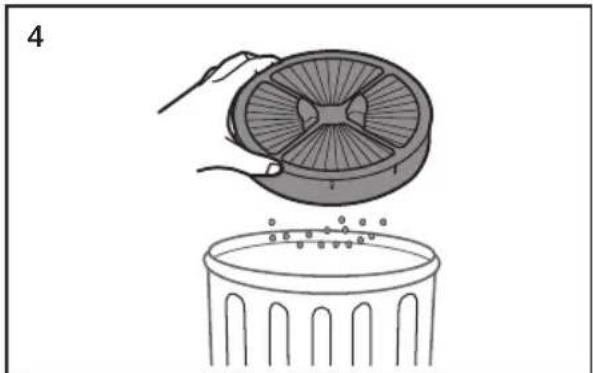
natural_image
Illustration of a hand placing a fan into a trash bin (no text or symbols)
natural_image
Illustration of a hand using a circular component to press down a fan, with a downward arrow indicating motion (no text or symbols present)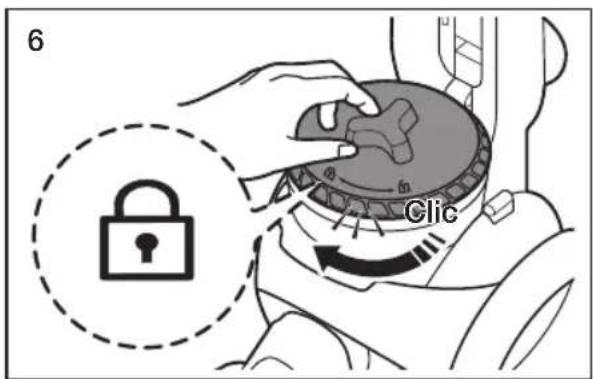
natural_image
Illustration of a hand holding a device with an arrow indicating direction (no text or symbols present)
natural_image
Technical line drawing of a mechanical device with no visible text or symbols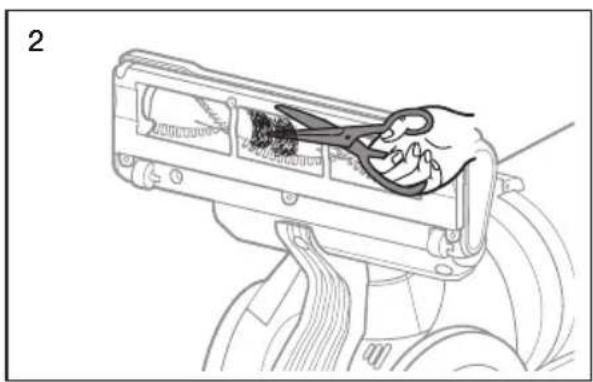
natural_image
Line drawing of a hand using scissors to clean or store items inside a device (no text or symbols visible)
natural_image
Diagram of a vacuum cleaner's side arm and wheel, showing motion direction with arrow (no text or symbols)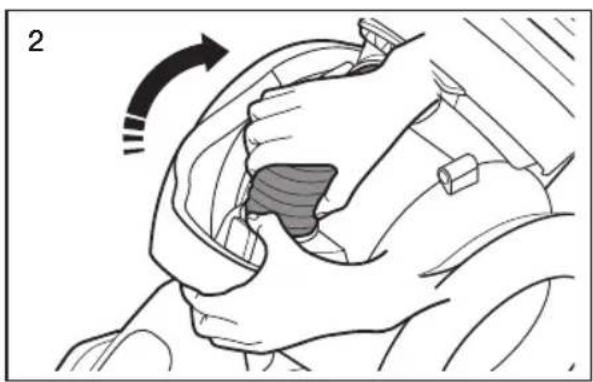
natural_image
Illustration of a hand gripping a car interior with a highlighted area, showing motion direction (no text or symbols)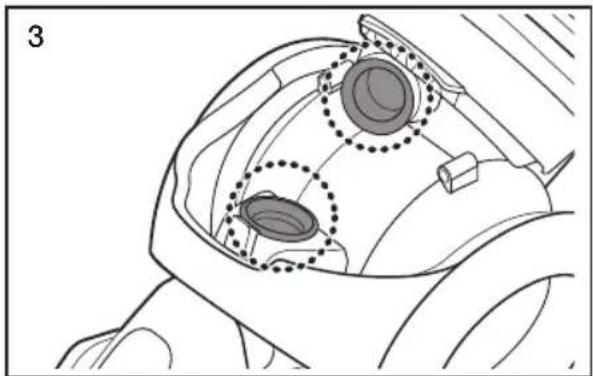
natural_image
Technical line drawing of a mechanical component with two circular features highlighted (no text or symbols)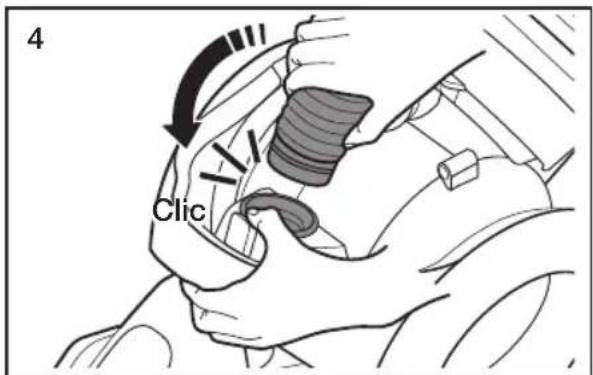

natural_image
Simple line drawing of a hand pouring granular material into a trash bin (no text or symbols)natural_image
Diagram showing a mechanical component with two views: top view with a lid and arrow indicating upward and downward motion (no text or symbols)natural_image
Simple 3D diagram showing a sun icon above a wall and a bowl, with no text or symbols present.natural_image
Technical line drawing of a vacuum cleaner with mechanical components and a close-up inset showing internal structure (no text or symbols)natural_image
Line drawing of a vacuum cleaner with attached mechanical components (no text or symbols)USO DE LOS ACCESORIOS
natural_image
Illustration of a hand holding a wristwatch with a button, showing a finger movement (no text or symbols)- Boquilla para rincones

natural_image
Technical illustration of a mechanical clamp or connector (no text or symbols)
natural_image
Illustration of a hand holding a mechanical component with an arrow indicating rotation (no text or symbols)natural_image
Technical line drawing of a mechanical clamp or bracket component (no text or symbols)natural_image
Technical line drawing of a vacuum cleaner with close-up insets showing internal components (no text or symbols)
natural_image
Mechanical assembly diagram showing a lever mechanism with bidirectional arrows indicating movement (no text or symbols present)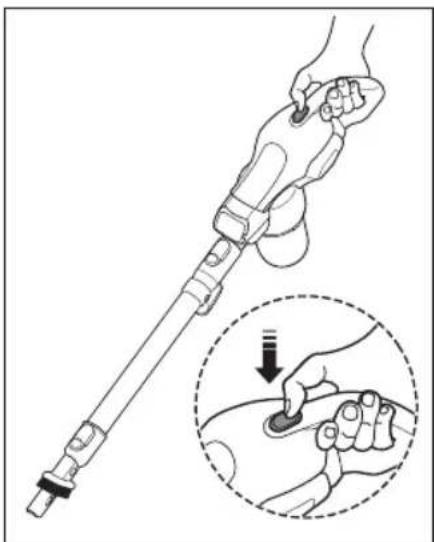
natural_image
Illustration of a hand holding a medical or robotic device with a magnified inset showing the hand pressing a button (no text or symbols present)natural_image
Diagram of a vacuum cleaner's side arm and base, showing mechanical components and motion direction (no text or symbols)
natural_image
Line drawing of a hand using a vacuum cleaner with a magnified inset showing the step of adjustment (no text or symbols present)natural_image
Illustration of a hand holding a medical device with a finger inserted, showing anatomical positioning (no text or symbols)
natural_image
Illustration of hands performing a manual tool manipulation on a mechanical component (no text or symbols visible)
natural_image
Technical illustration of a vacuum cleaner's internal structure with motion arrows (no text or symbols)USO DE LA MANIJA DE LA ASPIRADORA (LA MANIJA DEL DEPÓSITO DE POLVO)
natural_image
Line drawing of a hand holding a remote control device, with a circular inset showing a ring (no text or symbols)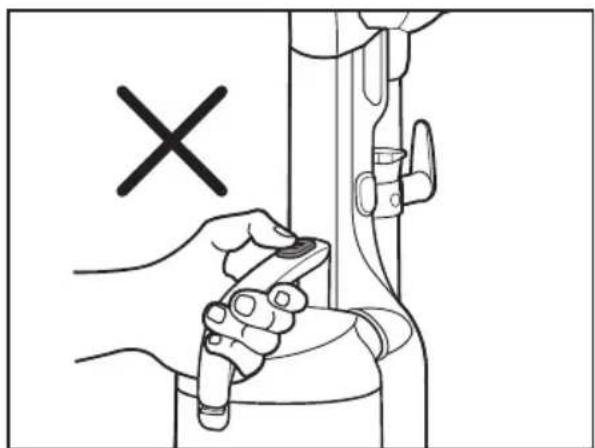
natural_image
Illustration of a hand holding a tool near a mechanical component, with a black 'X' symbol indicating a specific part (no text or symbols present)
natural_image
Diagram showing a cleaning tool interacting with a cleaning machine, with arrows indicating motion (no text or symbols present)
natural_image
Illustration of a mop cleaning a small table with a pillow, no text or symbols presentnatural_image
Diagram showing a tool interacting with a mechanical component, with no visible text or symbols.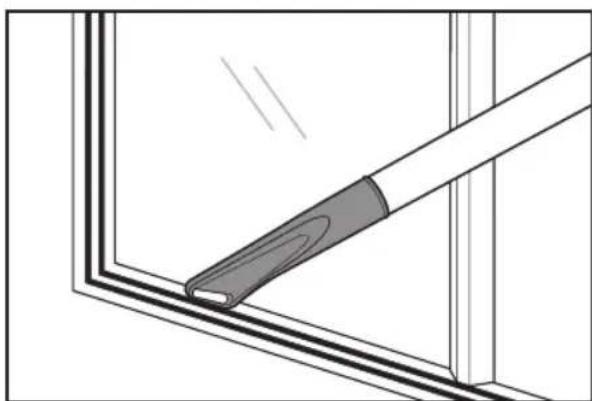
natural_image
Diagram of a window frame with a handle and a clip, showing structural details (no text or symbols)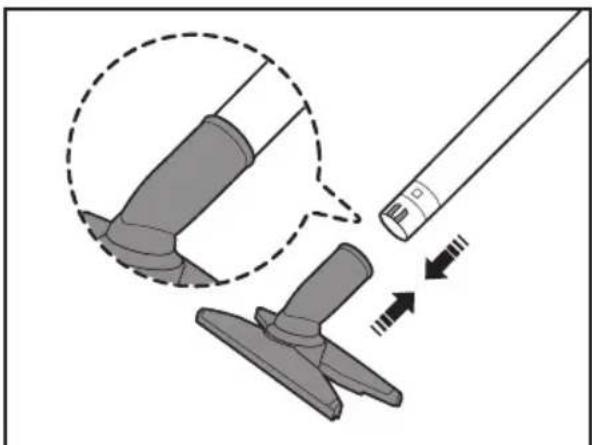
natural_image
Diagram showing a tool interacting with a mechanical component, with arrows indicating motion (no text or symbols present)
natural_image
Mechanical component diagram showing a lever with two upward arrows indicating motion or force direction (no text or symbols)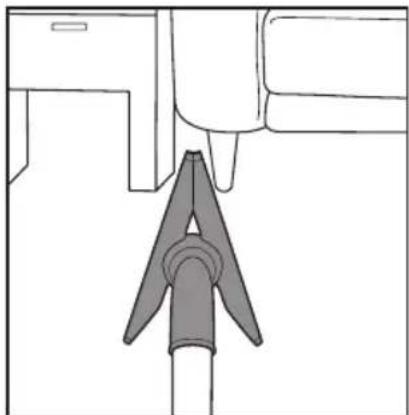
natural_image
Diagram of a mechanical component with a pointed tip and rectangular body, no text or symbols present
natural_image
Simple line drawing of a pipe fitting and a cabinet (no text or symbols)natural_image
Mechanical component diagram showing a rotating shaft with curved arrows indicating rotation (no text or symbols)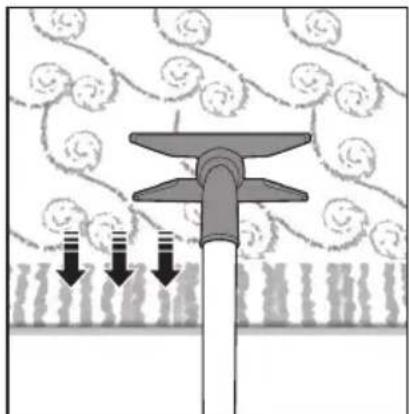
natural_image
Diagram of a mechanical or fluidic device with downward arrows indicating flow or movement, surrounded by textured background (no text or symbols)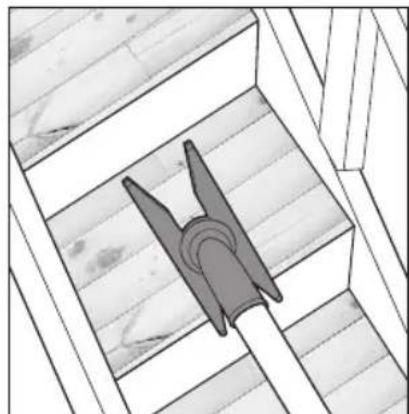
natural_image
Architectural diagram of a wooden structure with a triangular tool inserted into a slot (no text or symbols)natural_image
Diagram showing a tool interacting with a mechanical component, with arrows indicating motion (no text or symbols present)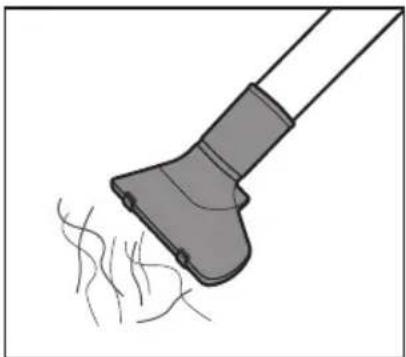
natural_image
Illustration of a hairdryer with fine hairs, no text or symbols present
natural_image
Technical line drawing of a mechanical component with internal channels and mounting base (no text or symbols)natural_image
Illustration of a hand using a handheld device to lift a trash bin with an arrow indicating motion (no text or symbols)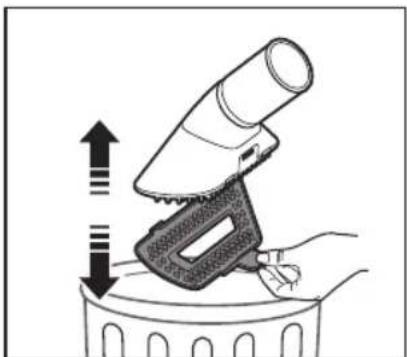
natural_image
Illustration of a hand using a hairdryer to lift a trash bin with an upward arrow indicating motion (no text or symbols)natural_image
Illustration of a hand using a tool to press or adjust a device, with no visible text or symbols.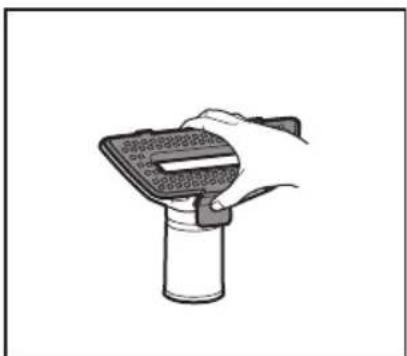
natural_image
Hand holding a handheld device with a textured screen and handle, mounted on a cylindrical base (no text or symbols visible)natural_image
Illustration of a hand holding a bag with a mechanical component, showing two states of movement (no text or symbols)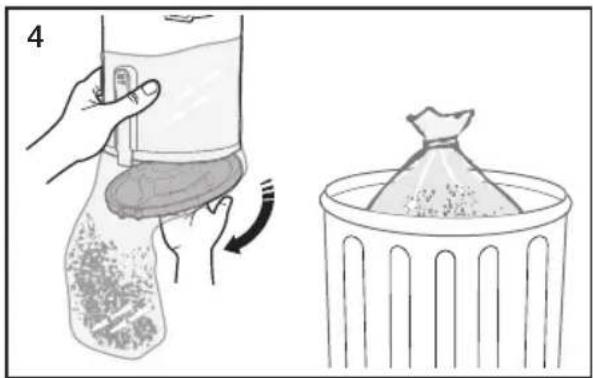
natural_image
Illustration showing a hand cleaning a bag with a brush and rotating around it, alongside a close-up of a bag filled with granular material (no text or symbols)natural_image
Illustration of hands using a device to adjust or install a device, showing a close-up and directional arrow (no text or symbols)
natural_image
Illustration of a hand using a tool to lift a cylindrical object with a textured inner layer (no text or symbols visible)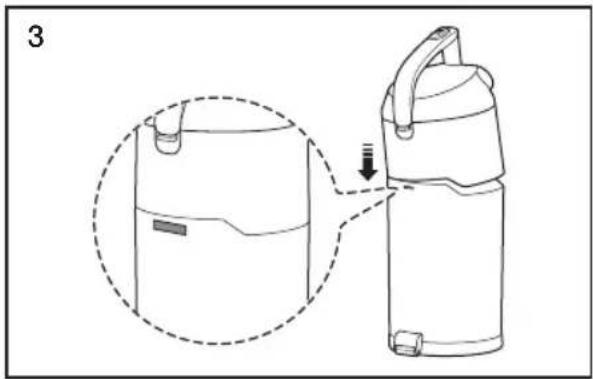
natural_image
Line drawing of a portable water dispenser with a dashed outline showing the interior and side view (no text or symbols)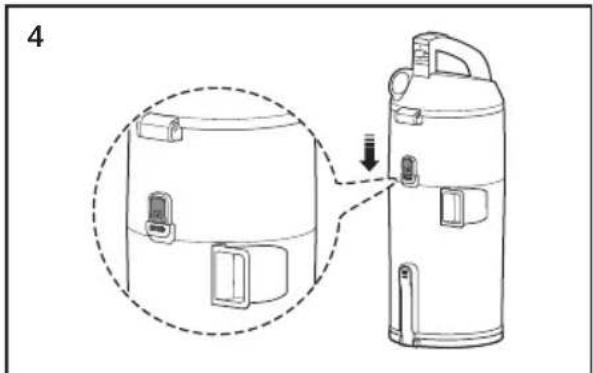
natural_image
Line drawing of a thermospan device with a magnified inset showing internal components (no text or symbols)LIMPIEZA DEL FILTRO PREMOTOR

natural_image
Illustration of a hand holding a device with a dashed circular inset showing the process (no text or symbols)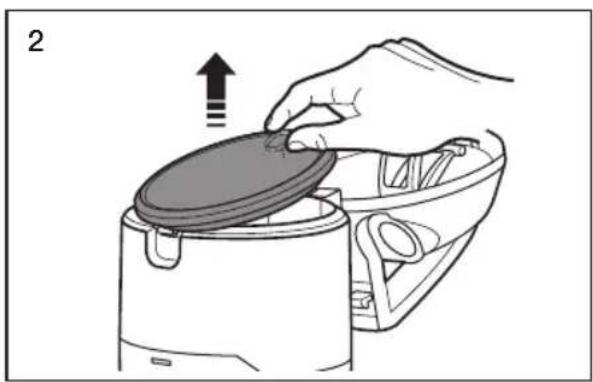
natural_image
Illustration of a hand placing a lid onto a kitchen appliance with an upward arrow (no text or symbols)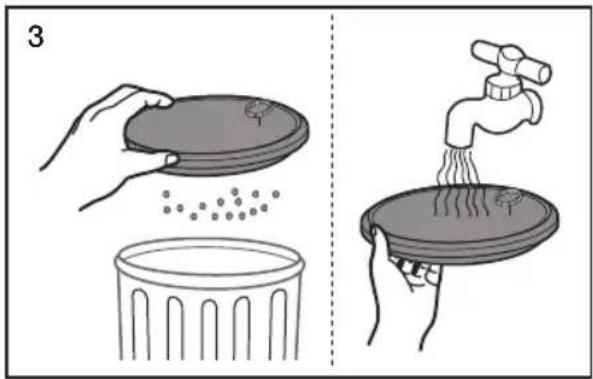
natural_image
Simple 3D diagram showing a sun above a wall and a circular object on a base, no text or symbols present.natural_image
Illustration of a hand holding a tool with directional arrows indicating movement or adjustment (no text or symbols present)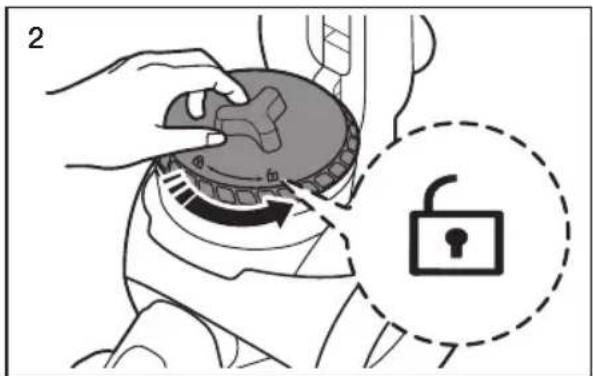
natural_image
Illustration of a hand using a vacuum cleaner to press down a circular component, with an arrow indicating press direction (no text or symbols present)
natural_image
Illustration of a hand placing a fan into a trash bin (no text or symbols)
natural_image
Illustration of a hand using a circular component to press down a fan, with a downward arrow indicating motion (no text or symbols)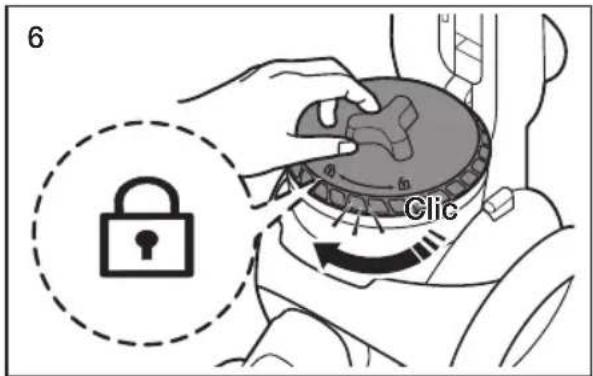

natural_image
Illustration of a hand using a tool to adjust or install a device, with no visible text or symbols.
natural_image
Technical line drawing of a mechanical device with no visible text or symbols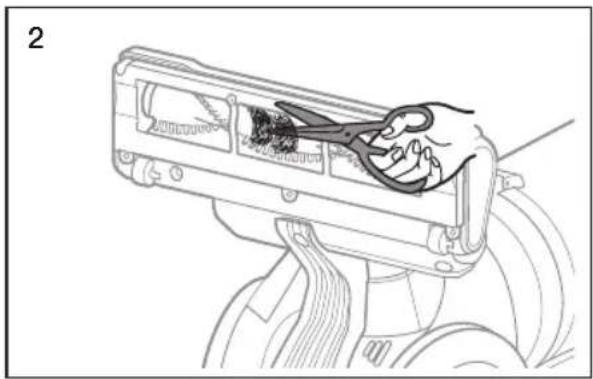
natural_image
Line drawing of a hand inserting wires into a device component (no text or symbols)
natural_image
Diagram of a hand washing a vacuum cleaner's seat, showing motion direction with no text or symbols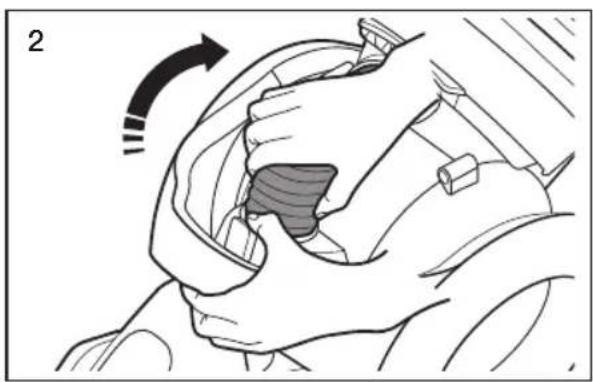
natural_image
Illustration of a hand gripping a car seat with a shaded interior area, showing motion direction (no text or symbols)
natural_image
Technical line drawing of a mechanical component with two circular features highlighted (no text or symbols)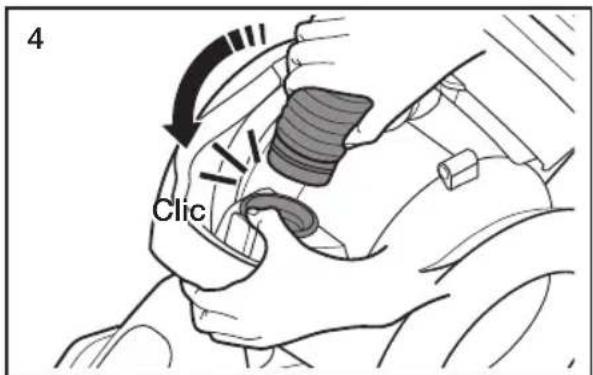

natural_image
Simple line drawing of a hand pouring granular material into a trash bin (no text or symbols)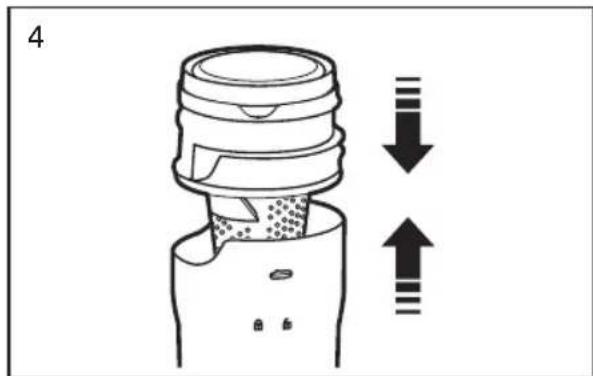
natural_image
Diagram showing a mechanical component with two views: top view with a lid and arrow indicating upward and downward motion (no text or symbols)natural_image
Simple 3D diagram showing a sun icon above a wall and a bowl on a shelf (no text or symbols)
- Vacuum Cleaner user manual
- imagine the possibilities
- YOUR VACUUM CLEANER
- BEFORE USING THE VACUUM CLEANER
- OPERATING CLEANER
- MAINTENANCE
- TROUBLESHOOTING
- Safety information
- CAUTION/WARNING SYMBOLS USED
- OTHER SYMBOLS USED
- IMPORTANT SAFETY INSTRUCTIONS
- READ ALL INSTRUCTIONS BEFORE USING YOUR UPRIGHT VACCUM
- WARNING – TO REDUCE THE RISK OF FIRE, ELECTRIC SHOCK, OR INJURY:
- SAVE THESE INSTRUCTIONS
- POLARIZED PLUG INSTRUCTIONS
- State of California Proposition 65 Warning (US only)
- PRODUCT VIEW
- ASSEMBLE THE HANDY VACUUM, PIPE, AND 2 IN 1 ACCESSORY
- USING THE ACCESSORIES
- STOWING THE POWER CORD
- Handy vacuum cleaner mode
- Upright mode
- RESETTING THE OVERLOAD PROTECTOR
- USING THE VACUUM'S HANDLE (THE DUST BIN HANDLE)
- USING THE ACCESSORY KIT (OPTIONAL)
- Furniture tool
- Window tool
- EMPTYING THE DUST BIN
- CLEANING THE FILTER OF THE HANDY VACUUM CLEANER
- Aspirateur
- INSTRUCTIONS DES PRISES POLARISÉES
- NETTOYAGE DU FILTRE AVANT MOTEUR
- USO DE LOS ACCESORIOS
- USO DE LA MANIJA DE LA ASPIRADORA (LA MANIJA DEL DEPÓSITO DE POLVO)
- LIMPIEZA DEL FILTRO PREMOTOR
Brand : SAMSUNG
Model : SU12F70SD
Category : Vacuum Cleaner