Elevate Control Power Team UK30100COM - Vacuum Cleaner Oreck - Free user manual and instructions
Find the device manual for free Elevate Control Power Team UK30100COM Oreck in PDF.


User questions about Elevate Control Power Team UK30100COM Oreck
0 question about this device. Answer the ones you know or ask your own.
Ask a new question about this device
Download the instructions for your Vacuum Cleaner in PDF format for free! Find your manual Elevate Control Power Team UK30100COM - Oreck and take your electronic device back in hand. On this page are published all the documents necessary for the use of your device. Elevate Control Power Team UK30100COM by Oreck.
USER MANUAL Elevate Control Power Team UK30100COM Oreck
Ultimate Handheld Vacuum
natural_image
Illustration of a black ORECK vacuum cleaner with attached blade and handle (no text or symbols)1600 Series
Important!
Read this manual carefully, and keep for future reference.
Enjoy

text_image
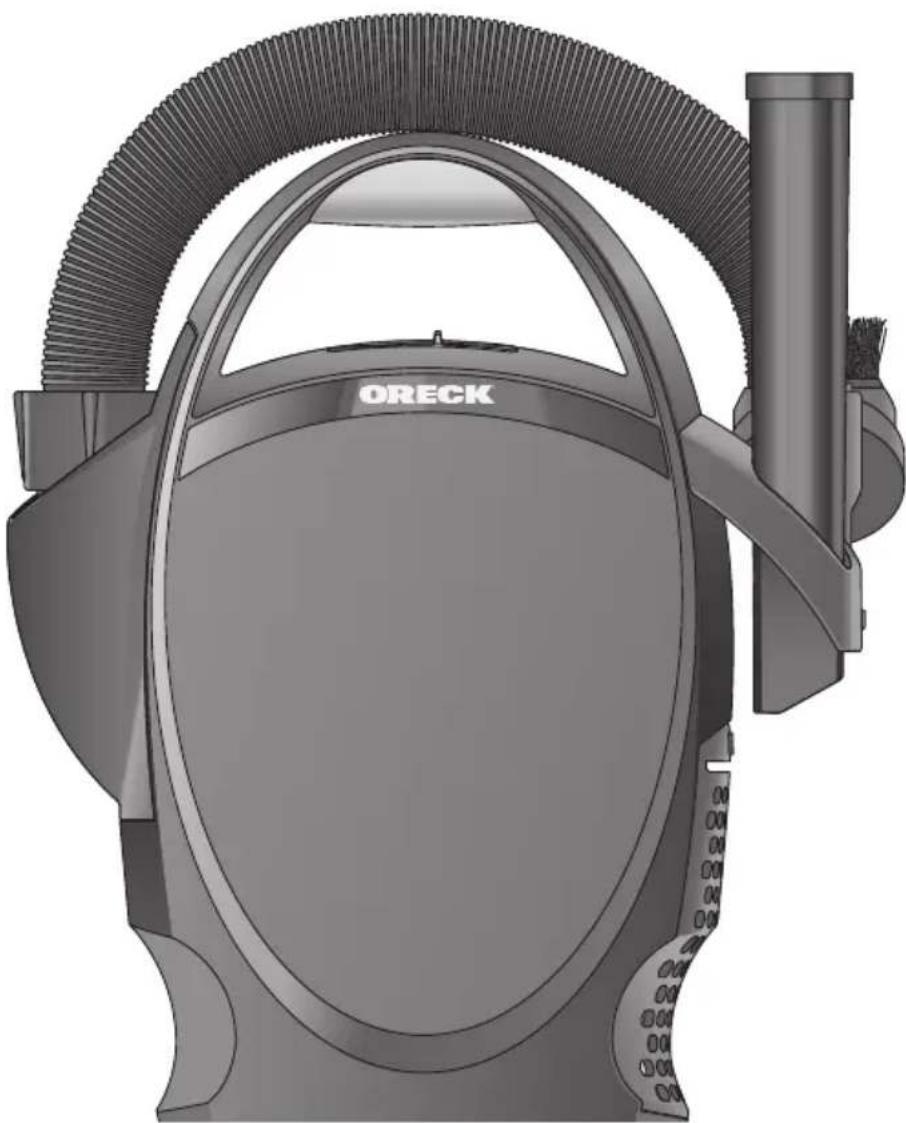
ORECKThank You for purchasing our Ultimate Handheld Vacuum. The Ultimate Handheld Vacuum weighs about five pounds and comes with a variety of accessories for any cleaning need. The installed HEPA filter helps keep dust and dirt from escaping as you vacuum.
Welcome to our Call, Click customer service program.
To contact Oreck Call or Click using the information below.
Call
Click

USA: 1•800•989•3535
Canada: 1•888•676•7325

On the web, point and click at: www.oreck.com and click locate a store on the top right.
Contents
Safety 4
General Warnings....4
Polarized Plug 5
Parts & Features. 6
Assemble 8
Attach the Tool Caddy....8
Attach the Slinky Hose and Tools. . . . . . . . . . . . 9
Attach the Adjustable Shoulder Strap ..... 10
Use 11
Using the Vacuum 11
After Using the Vacuum ..... 11
Maintain 12
Replacing the Disposable Inner Bag ..... 12
Replacing the Micro Filter....13
Replacing the HEPA Filter 14
Trouble shoot 15
Parts....16
Warranty....17

IMPORTANT SAFETY INSTRUCTIONS
Read all instructions before using the vacuum cleaner.
WARNING! To reduce the risk of fire, electric shock, or injury when using an electrical appliance, basic precautions should always be followed, including the following:
- Do not leave appliance unattended when plugged in. Unplug from outlet when not in use and before servicing.
• Do not use outdoors or on wet surfaces. - Do not allow to be used as a toy. Close attention is necessary when used by or near children.
- Use only as described in this manual. Use only manufacturer's recommended attachments.
- Do not use with damaged cord or plug. If appliance is not working as it should, has been dropped, damaged, left outdoors, or dropped into water, return it to a service center or call customer service at: US: 1-800-989-3535
Canada: 1-888-676-7325 - Do not pull or carry by cord, use cord as a handle, close door on cord, or pull cord around sharp edges or corners.
- Keep cord away from heated surfaces.
• Do not run appliance over cord. - Do not unplug by pulling on cord. To unplug, grasp the plug, not the cord.
- Do not handle plug or appliance with wet hands.
- Do not put any object into openings. Do not use with any opening blocked; keep free of dust, lint, hair and anything that may reduce air flow.
- Keep hair, loose clothing, fingers and all parts of body away from openings and moving parts.
- Do not use to pick up anything that is burning or smoking, such as cigarettes, matches, or hot ashes.
-
Do not use without filter bag assembly in place.
• Turn off all controls before unplugging.
• Use extra care when cleaning on stairs. -
Do not use to pick up flammable or combustible liquids, such as gasoline or lighter fluid, or use in areas where they may be present.
- Do not use appliance in an enclosed space where flammable, explosive or toxic vapors are given off by oil base paint, paint thinner, some mothproofing substances, or in an area where flammable dust is present.
- Do not pick up toxic material such as chlorine bleach, drain cleaner, gasoline, etc. with this appliance.
• Use caution when vacuuming over area rug edges and fringe.
Polarized Plug
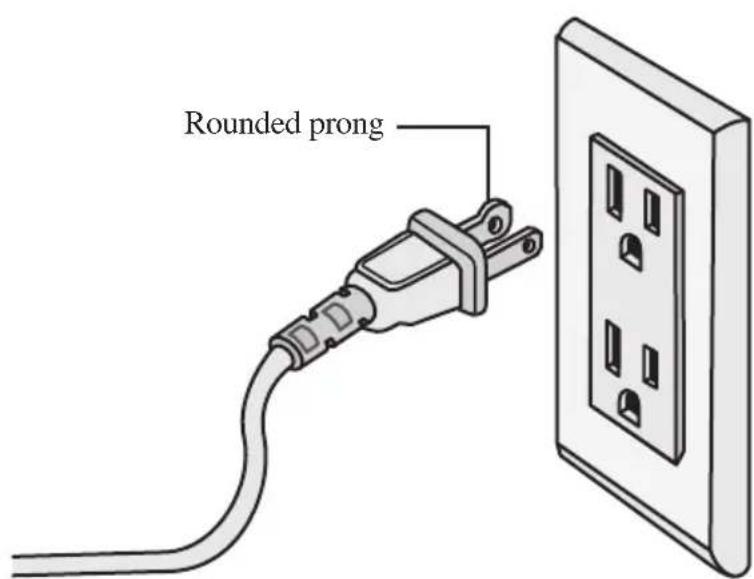
A polarized plug has one rounded prong and one straight prong. The rounded end goes into the longest socket slot. To reduce the risk of electric shock, this equipment has a polarized plug (one blade is wider than the other). This plug will fit in a polarized outlet only one way. If the plug does not fit fully in the outlet, reverse the plug. If it still does not fit, contact qualified personnel to install the proper outlet. Do not alter the plug in any way.
text_image
Rounded prongSAVE THESE INSTRUCTIONS
For household use only
Parts & Features
text_image
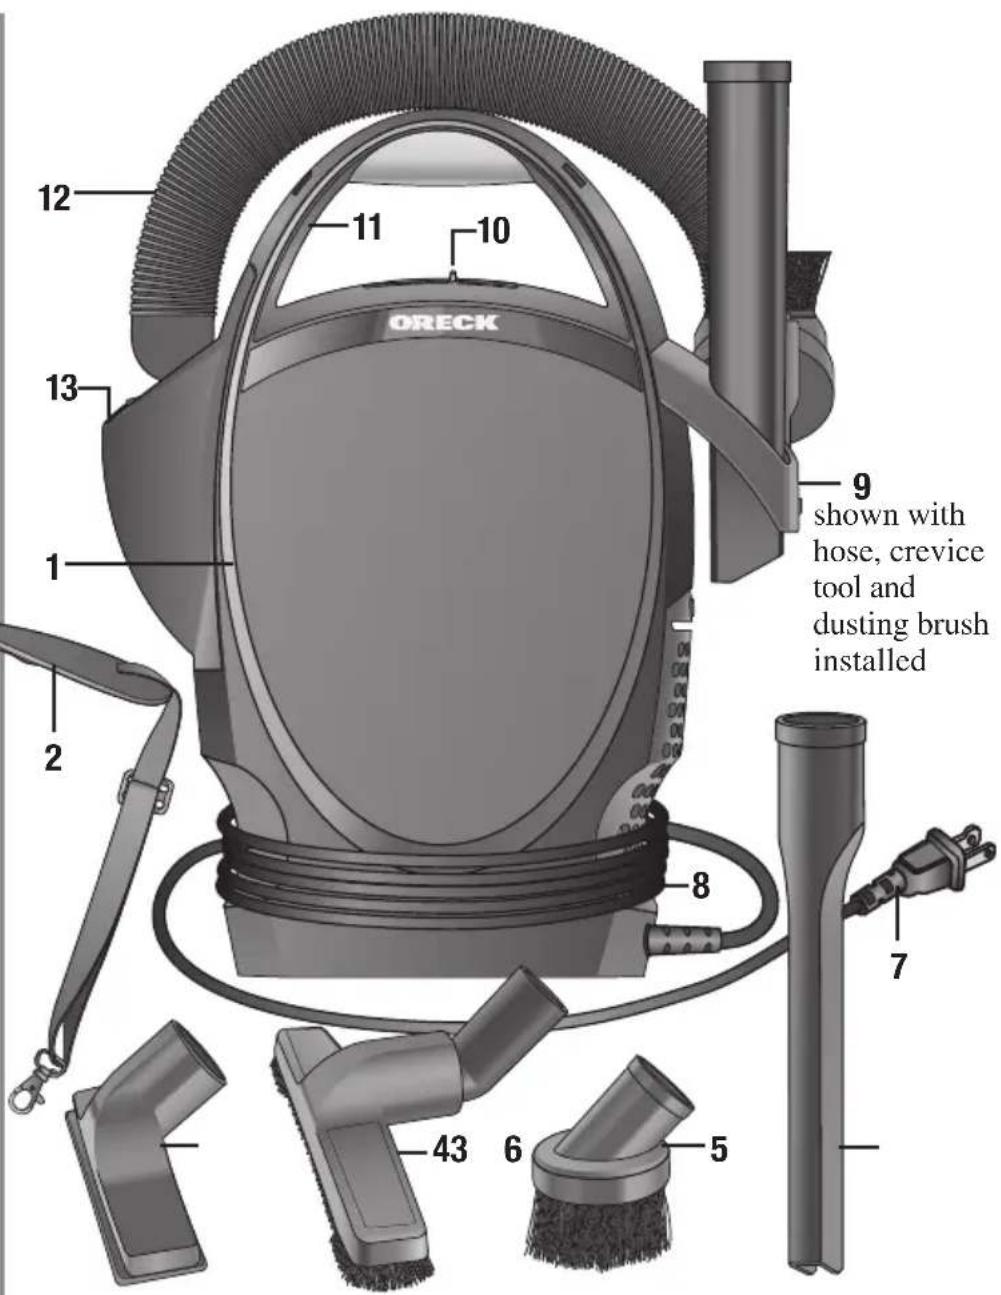
ORECK 12 11 10 13 9 shown with hose, crevice tool and dusting brush installed 1 1 2 8 7 43 6 5- Ultimate handheld vacuum: Core canister vacuum unit.
- Adjustable shoulder strap: Attaches to the canister in both horizontal and vertical positions.
- Upholstery tool: Cleans upholstered furniture and drapery.
- Large floor tool: Hand-held tool for cleaning bare floors and walls.
-
Dusting brush: Best for delicate surfaces.
-
Crevice tool: Cleans tight areas such as cracks and crevices.
- Power cord: Twenty foot cord for long distances.
- Cord wrap: Power cord storage area.
- Tool caddy: Stores tools on board the vacuum.
- On/Off switch: Turns the vacuum on and off.
- Carry handle with strap hooks: Use to carry the vacuum and attach the straps.
text_image
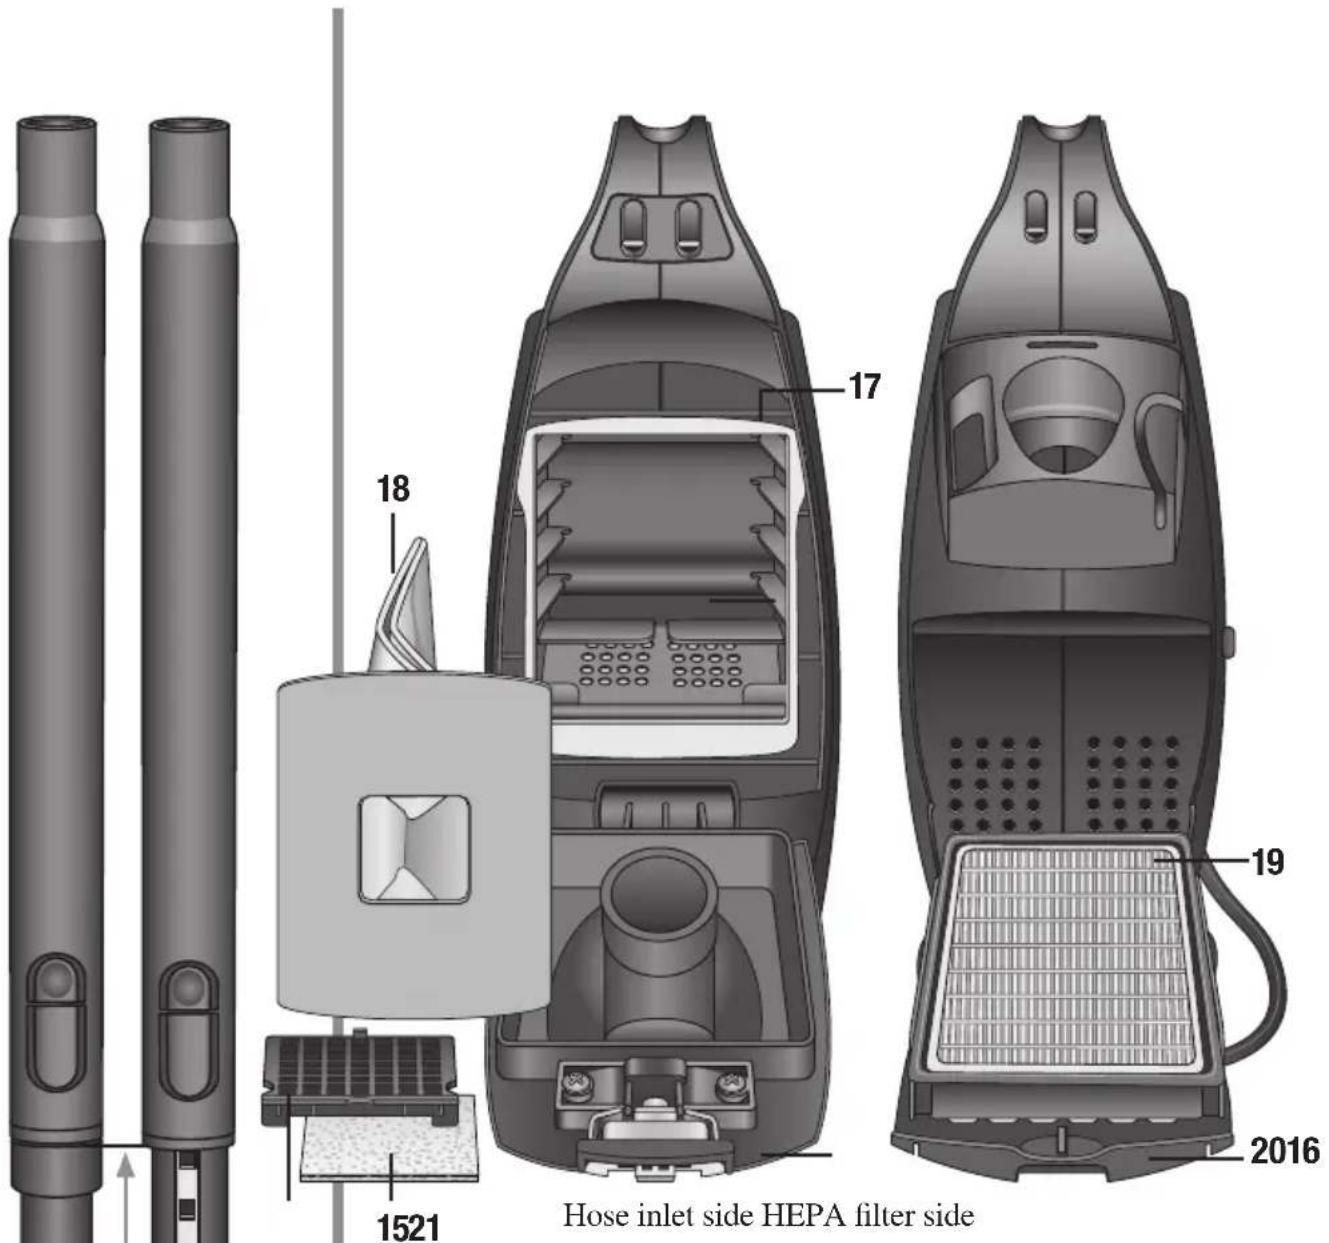
1521 18 17 19 2016 Hose inlet side HEPA filter side- Slinky hose: Easy to use flexible hose.
- Hose inlet: Hose connection location.
- Extension wand: Extends an additional ten inches with the push of a button.
- Micro Filter: Keeps dirt and dust from entering the vacuum motor.
-
Inner bag door: Allows access to the inner bag.
-
Bag Gasket: Creates a tight seal to guard against air leaks. Do not remove.
- Disposable inner bag: Collects debris from the vacuuming process.
- HEPA Filter: Helps keep dust and dirt inside the vacuum as you clean.
- HEPA Filter door: The HEPA filter is secured to this door.
- Micro Filter Frame: Holds the Micro Filter.
Assemble
Attach the Tool Caddy
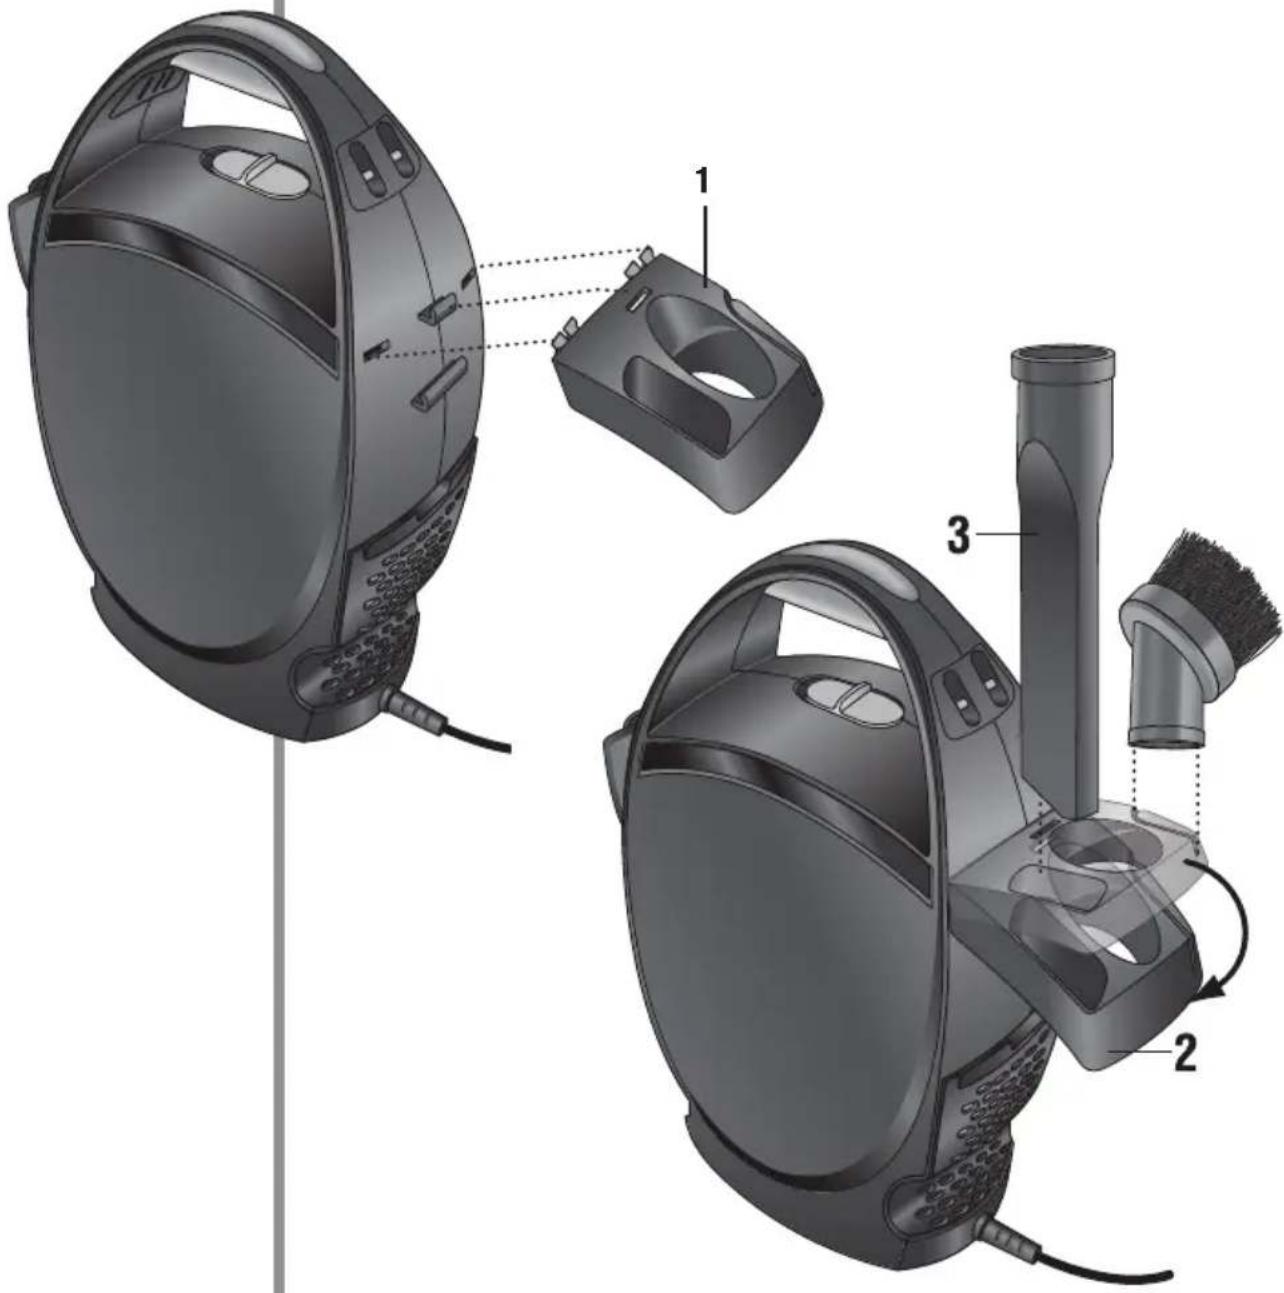
Before you attach the hose or any tools onto your vacuum, you will first want to attach the tool caddy.
- Align the middle slot and two pronged tabs on the tool caddy with the middle tab and two slots on the side of the vacuum.
- Rotate and snap the tool caddy down into place.
- Load the tools onto the tool caddy in the designated outside slots.
text_image
Technical diagram of a vacuum cleaner with labeled parts including housing, air gap, and brush head assembly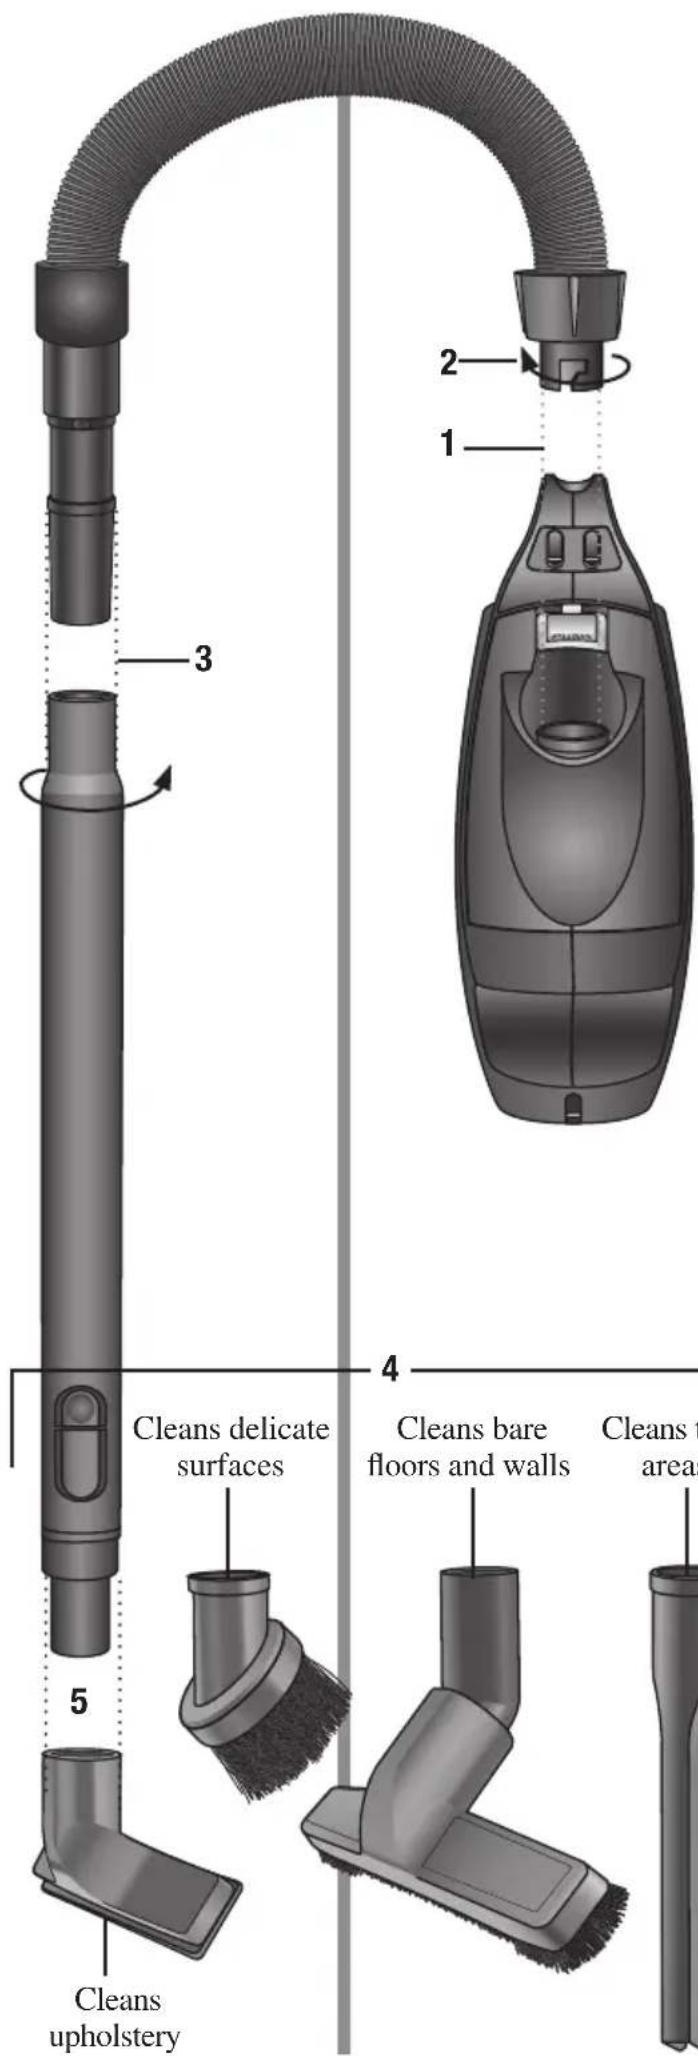
text_image
1 2 3 4 5 Cleans delicate surfaces Cleans bare floors and walls Cleans 1 areas Cleans upholsteryAttach the Slinky Hose and Tools
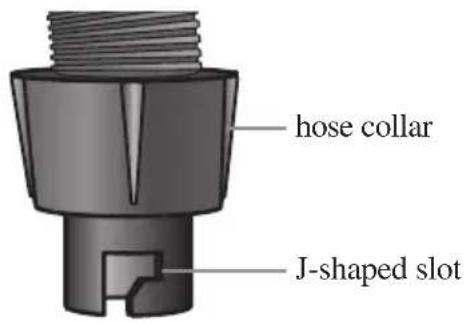
- Align the J-shaped slot at the end of the hose with the tab inside the hose inlet.
text_image
hose collar J-shaped slot- Turn the hose collar clockwise to lock into place. To unlock, turn the collar counterclockwise.
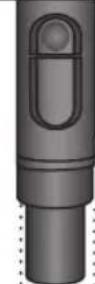
- Attach the adjustable extension wand. The wand and all cleaning tools supplied with the vacuum lock together with friction. Twist and push to lock tightly when attaching. Twist and pull to remove.
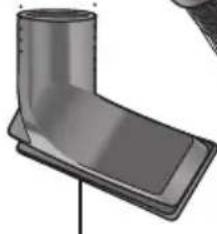
- Choose the tool you would like to use for your cleaning job.
- Attach the tool onto the end of the extension wand by using the twist and push friction method described in step three.
natural_image
3D rendered illustration of a curved mechanical component with a flat base and cylindrical top (no text or symbols)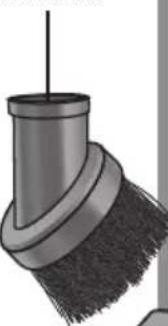
natural_image
Illustration of a cleaning brush head with a textured brush (no text or symbols)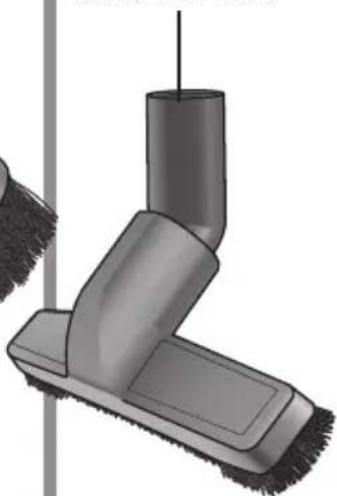
natural_image
Illustration of a vacuum cleaner with black filter and handle (no text or symbols)Cleans tight areas

natural_image
3D rendering of a cylindrical mechanical component with flanges and a central shaft (no text or symbols)Attach the Adjustable Shoulder Strap
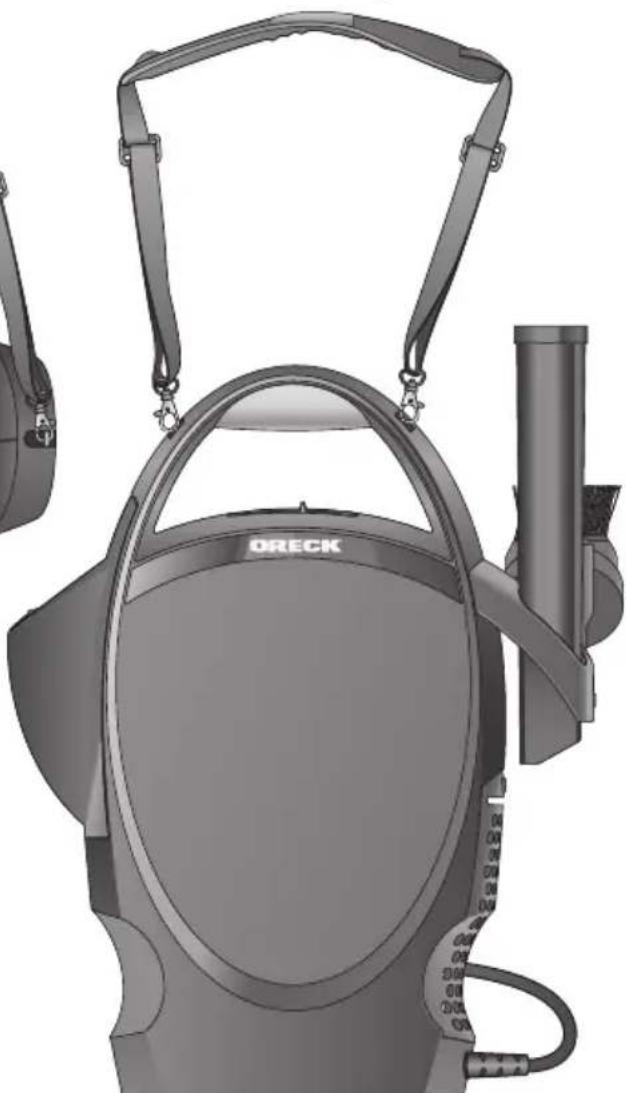
The shoulder strap can be attached to use the vacuum in the horizontal or vertical position depending on what is most comfortable for your use.
- To adjust the shoulder strap length, loosen the straps, and slide the clip up or down depending on the length you desire.
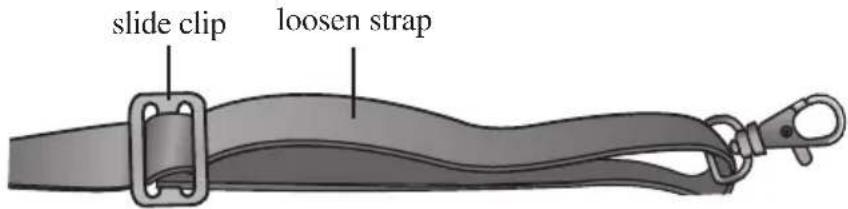
text_image
slide clip loosen strap-
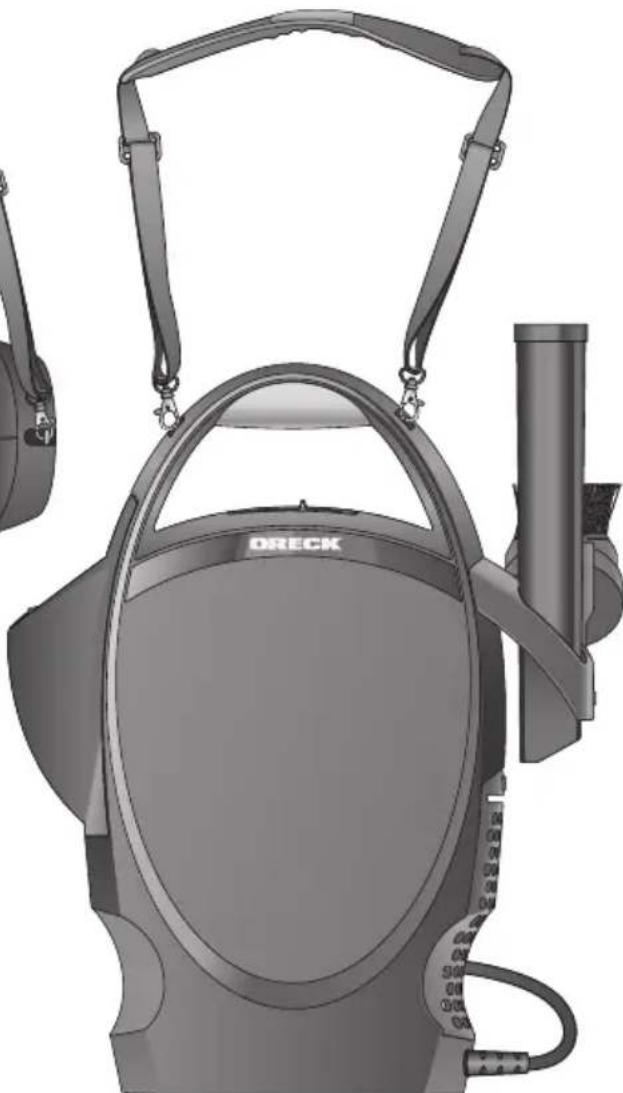
To carry the vacuum in the vertical position: clip each end of the shoulder strap into the two slots on the sides of the carry handle.
-
To carry the vacuum in the horizontal position: clip one end of the shoulder strap into the slot of the carry handle, on the hose inlet side. Clip the opposite end of the strap into the slot on the bottom of the vacuum on the hose inlet side.
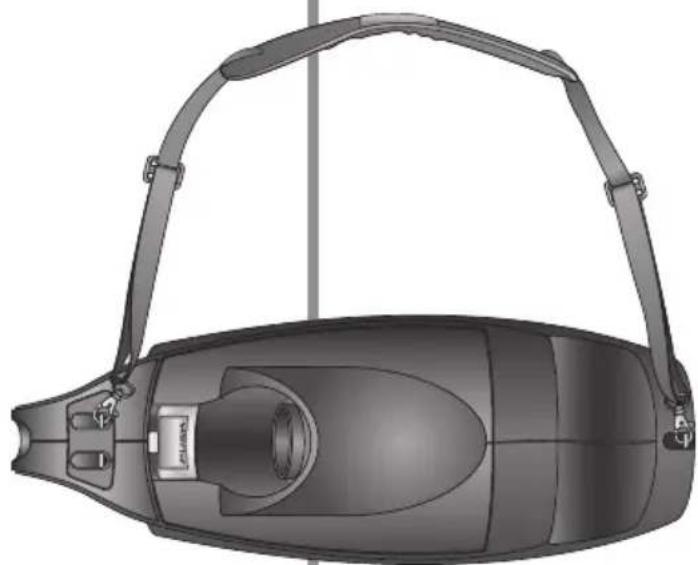
natural_image
Top-down technical illustration of a handheld device with adjustable arms and a central hub (no text or symbols)horizontal position
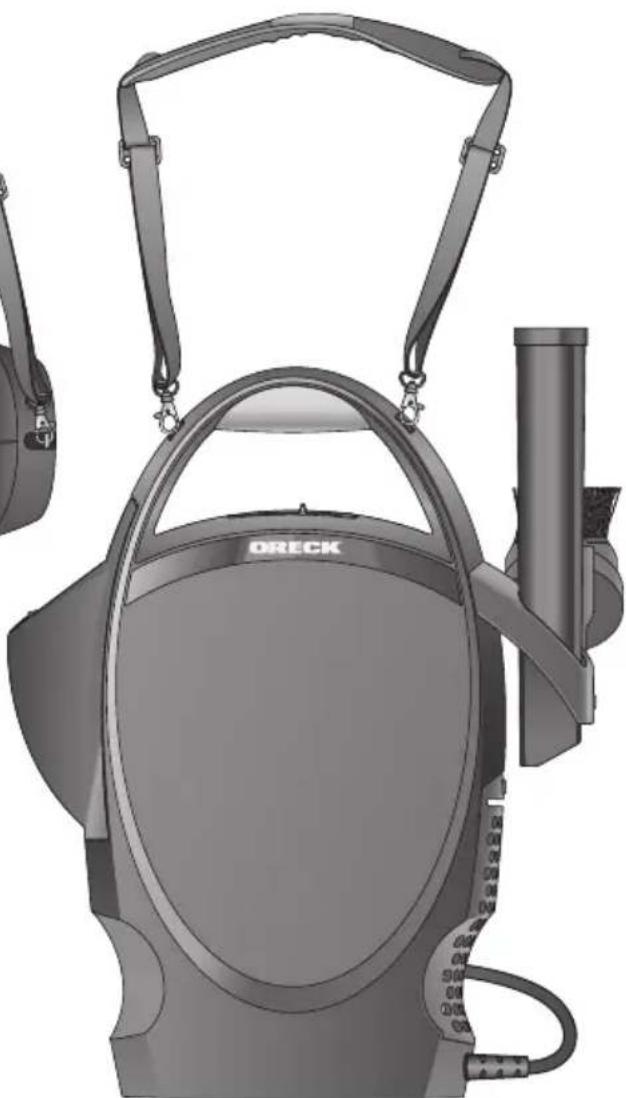
natural_image
Illustration of a ORECK portable device with handle and neck (no text or symbols on body)vertical position
Use
Using the Vacuum
- Unwrap the cord around the bottom of the cord wrap area.
- Plug the cord into the electrical socket.
- Attach the tool you need for your cleaning job to the end of the extension wand.
- Press the button on the extension wand for more length if needed.
- Slide the power switch to the ON position.
- Begin vacuuming.

text_image
Technical diagram of a vacuum cleaner with labeled parts 3 and 4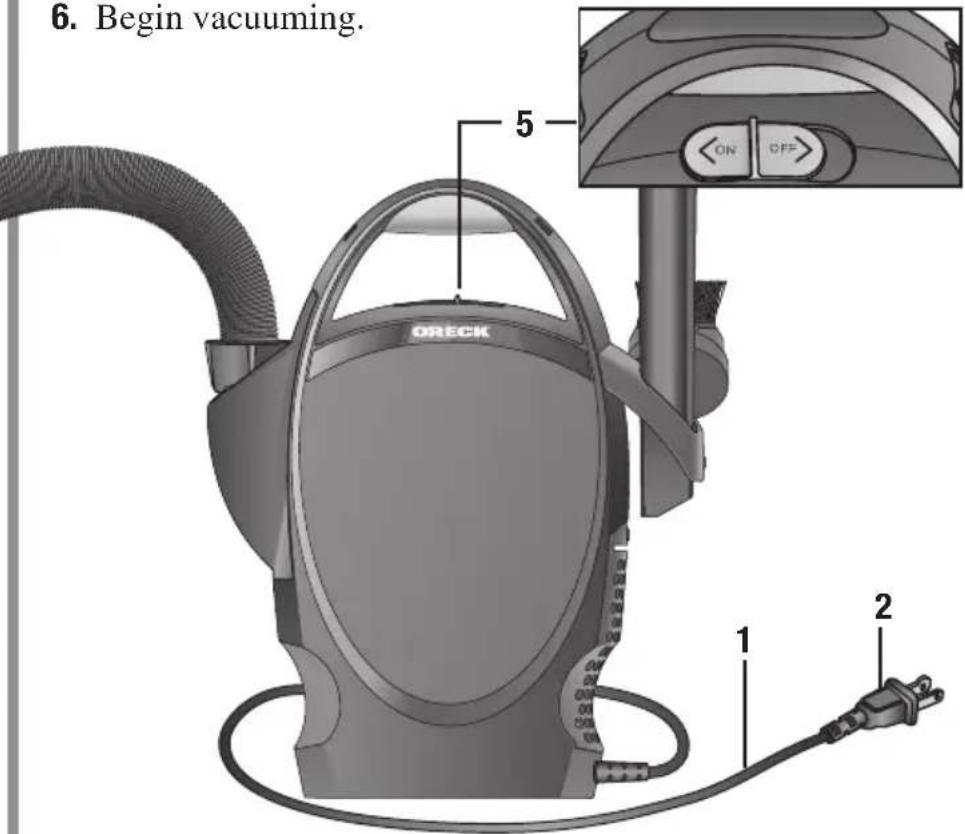
text_image
6. Begin vacuuming. 5 ORECK 1 2 ON OFFAfter Using the Vacuum
- Slide the power switch to the OFF position.
- Unplug the power cord.
- Wrap the cord around the cord wrap area and store.
Note: The Ultimate Handheld Vacuum has a MOTOR PROTECTION SYSTEM: If fine materials such as soot, cement, plaster dust, copy machine powder, etc. are picked up, the bag surface may seal and cause the motor to shut off to avoid overheating. If this happens, turn the switch off and unplug the cleaner. If full, replace disposable inner bag. Check and clear any clogs in hose or accessories. After approximately thirty minutes the motor will have cooled and the cleaner will be ready to use.
IMPORTANT: The cleaner must remain unplugged for thirty minutes for motor to cool and system to reset.
Maintain
Replacing the Disposable Inner Bag
When the disposable inner bag is full you will need to replace the bag with a new one. Use only genuine Oreck filter bags.
For best results, change disposable inner bag regularly even if it is not completely full. An extremely dirty bag or a bag close to full will affect the suction of the cleaner and can create excessive motor heat that could damage the motor.
To replace the inner bag:
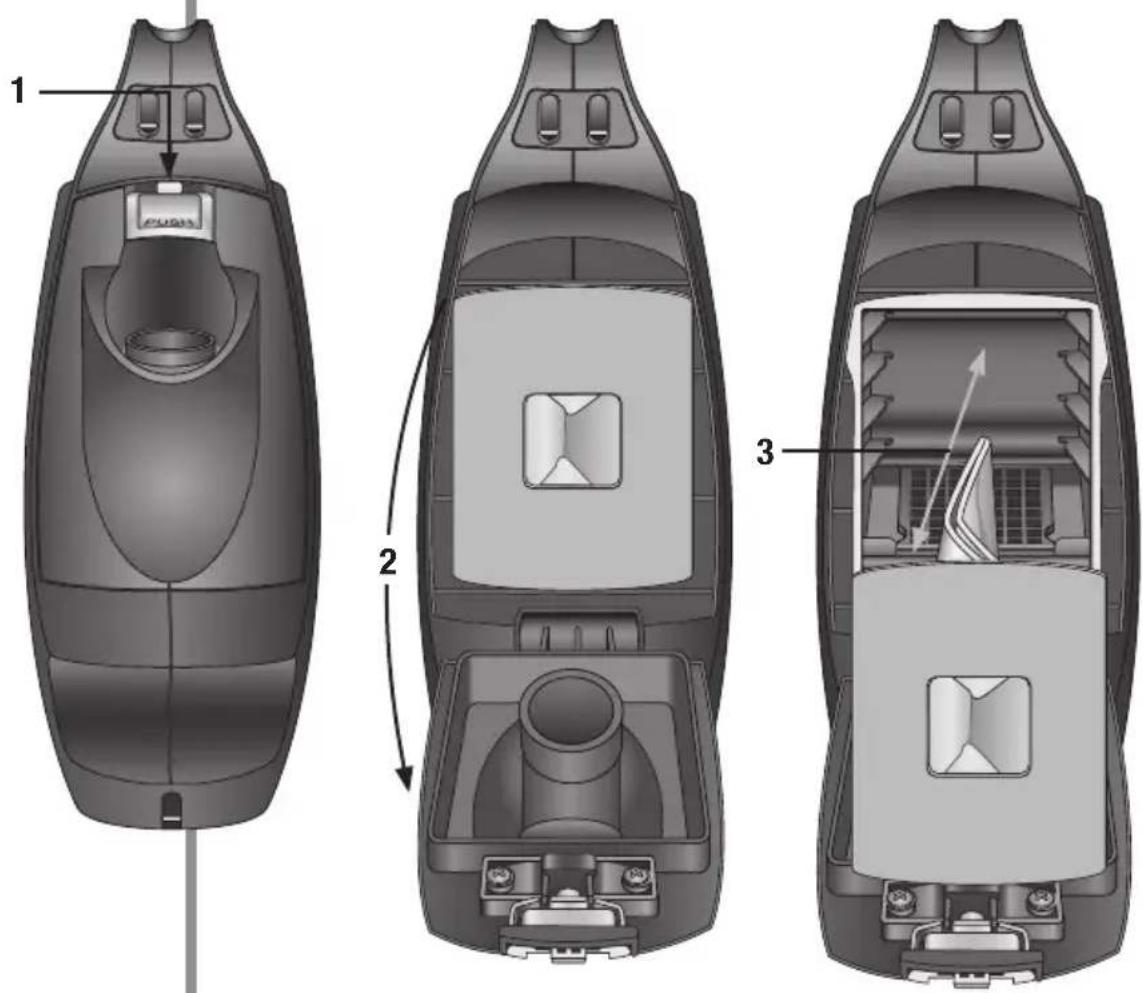
- Push down on the inner bag door release button located above the hose inlet.
- Rotate the inner bag door down.
- Pull the inner bag out.
- Insert a new inner bag by fitting the cardboard rim between the tabs inside the recessed bag holder.
- Close the inner bag door.
text_image
Technical diagram of a three-part car interior with labeled parts and directional arrows indicating movement or assembly.Replacing the Micro Filter
The micro filter is extra protection against dust and dirt getting into the vacuum motor. To keep your vacuum running in top condition you will want to change the micro filter when it gets dirty.
To replace the micro filter:
- Follow steps 1-3 on page 12, Replacing the Disposable Inner Bag.
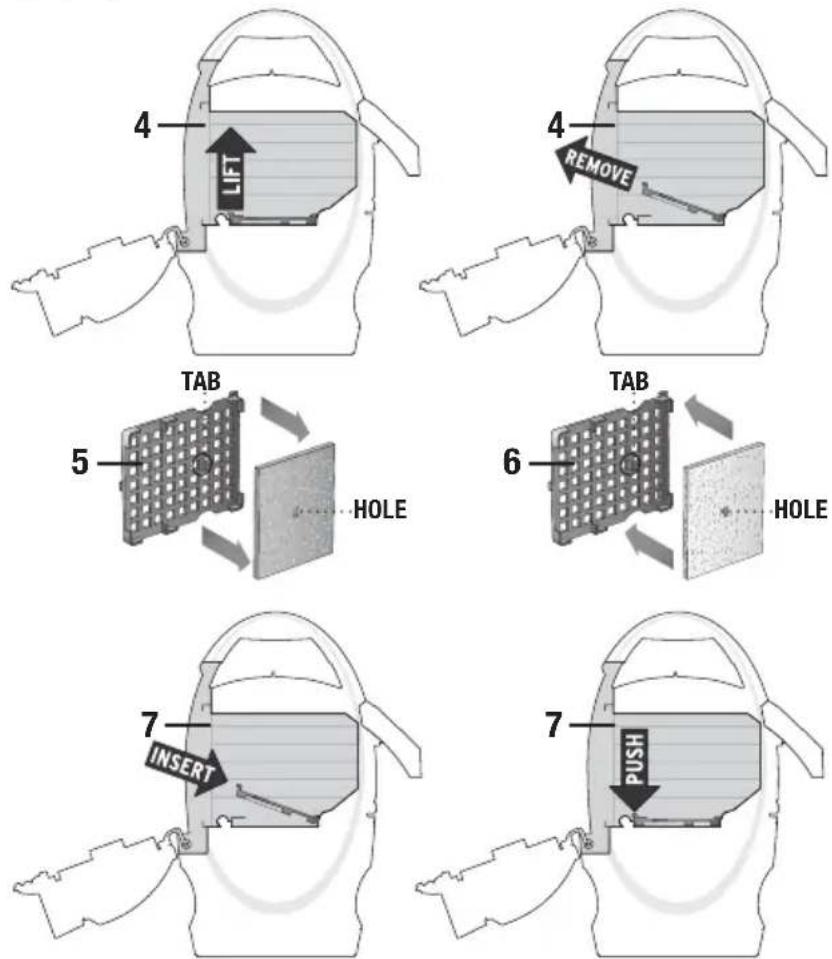
- To remove the Micro Filter, lift up on the recessed finger tab and pull out.
- Remove the Micro Filter from the Micro Filter Frame.
- Replace by pressing a new Micro Filter onto the tab located on the underside of the Micro Filter Frame.
- Insert the Micro Filter Frame into the housing under the ribs located at the back of the housings, and locate the rear tab between the ribs.
- Insert the inner bag back into place, and close the inner bag door.
IMPORTANT: Never remove the white gasket surrounding the inner bag opening. The vacuum will leak air and not run properly.
Replacing the HEPA Filter
The HEPA filter should be replaced every six months, or more often if the vacuum is used to pick up fine particles or in extremely dirty areas.
To replace the HEPA door:
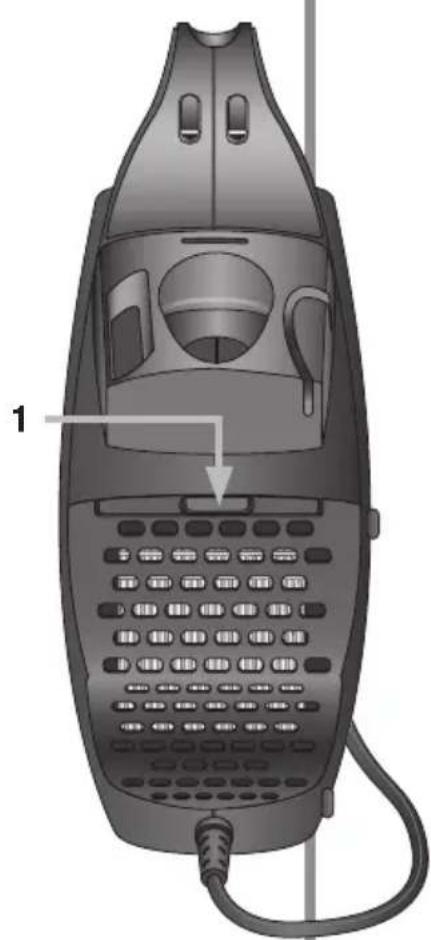
- Push down on tab of the HEPA filter door.
- Pull the door out of its slot.
- Slide the HEPA filter up and out of the door.
- Insert a new filter by aligning the slots on the side of the filter with the tabs on the inside of the filter door.
- Place the HEPA filter door assembly back into the slot and rotate the door up until it snaps into place.
natural_image
Illustration of a mobile phone with control panel and cable, no text or symbols visible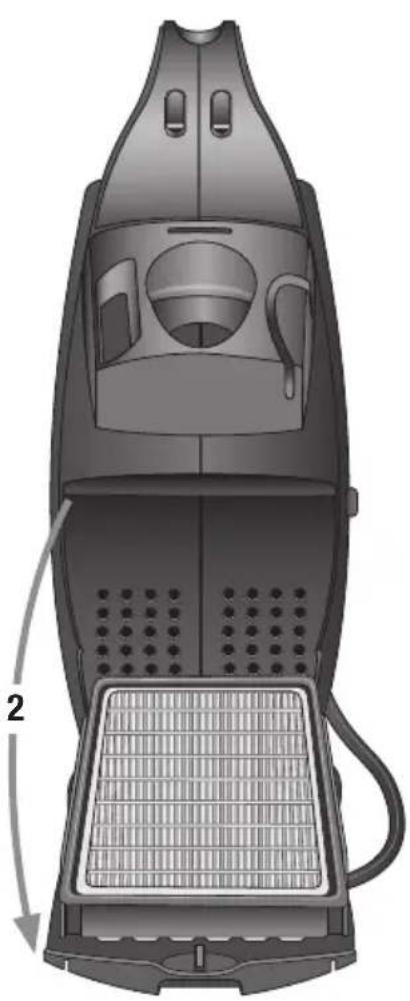
natural_image
Technical illustration of a vacuum cleaner with labeled component '2' (no text or symbols beyond label)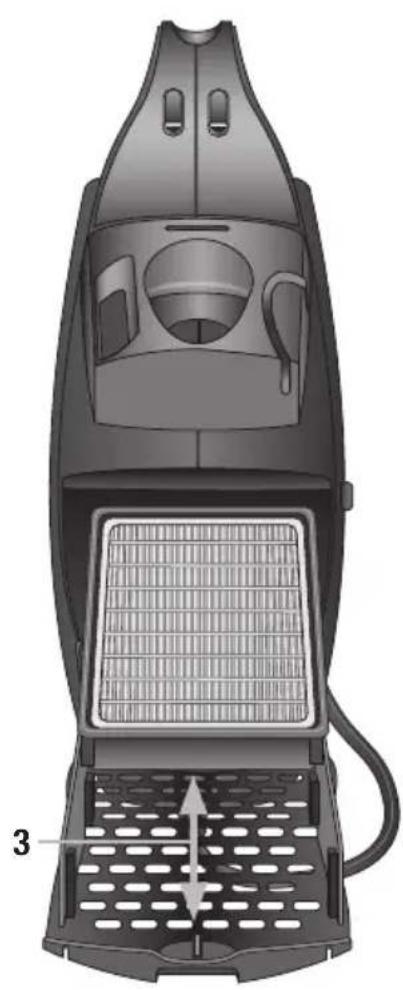
natural_image
Technical illustration of a hair dryer with mesh grille and ventilation slots (no text or symbols)Trouble shoot
Service problems that appear to be major can often be solved easily. You can be your own troubleshooter by reviewing this guide. All other servicing should be done by an Oreck authorized service center.
| Problem Check Solution | ||
| Vacuum will not run | Not plugged in properlyNo electricity in wall outlet.Motor protector tripped.Needs service. | Be sure cleaner is firmly plugged into wall outlet.Reset circuit breaker/ground fault interrupter, or replace fuse. If you need assistance contact a licensed electrician.SeeMotor Protection Systempage 11.Visit or call your nearest service center. |
| Vacuum will not pick up or has low suction. | Inner bag is full.Hose/wand tool is clogged.Air leak due to missing or damaged gasket. | Replace the Inner bag. SeeReplacing the Disposable Inner Bag, page 12.Removeobstructions.Replace the white bag gasket. |
| Extension wand and tools will not stay together. | Proper friction fit not being obtained. | Push and twist the tools together to properly attach. |
Parts
All accessories and replacement parts are sold separately. To order, call our customer service group or visit our website. Please have your model number from the data label on the bottom of the unit.
| Part Number | |
| Replacement Paper inner bags (Twelve pack with one Micro filter) | PK BB12DW |
| Replacement Odor Fighting inner bags (Twelve pack with one Micro filter) | PKBB12OF |
| Replacement HEPA filter HF1000 | |
| Replacement Micro filter 72005-01 | |
| Replacement white bag gasket 72017-02 | |
Warranty
Ultimate Handheld Vac- uum
ORECK MANUFACTURING COMPANY: (ORECK gives you the following limited warranty for this product only if it was originally purchased for use, not resale, from ORECK or an ORECK Authorized Retail Dealer.)
ORECK will repair or replace, free of charge, to the original purchaser, any part which is found to be defective in material or workmanship within three (3) years of the date of purchase. This limited warranty applies to normal domestic use. Any commercial use of this product will void this limited warranty.
Parts subject to normal wear are not covered by this limited warranty.
This limited warranty does not apply to any part subjected to accident, abuse, commercial use, alteration, misuse, damage caused by fire or act of God, the use of voltages other than indicated on the serial number plate of this product or service of this product by other than ORECK or an ORECK Factory Authorized Service Center.
ORECK does not authorize any person or representative to assume or grant any other warranty obligation with the sale of this product.
ORECK's limited warranty is valid only if you retain proof of purchase from ORECK or an ORECK Authorized Retail Dealer for this product. If you purchase this product from any other source, your purchase is “AS IS,” which means ORECK grants you no warranty, and that you, not ORECK, assume the entire risk of the quality and performance of this product, including the entire cost of any necessary servicing or repairs of any defects.
ORECK's liability for damages to you for any costs whatsoever arising out of this statement of limited warranty shall be limited to the amount paid for this product at the time of original purchase, and ORECK shall not be liable for any direct, indirect, consequential or incidental damages arising out of the use or inability to use this product.
Some states do not allow the exclusion or limitation of incidental or consequential damages, so the above limitation or exclusion may not apply to you.
ALL EXPRESS AND IMPLIED WARRANTIES FOR THIS PRODUCT, INCLUDING IMPLIED WARRANTIES OF MERCHANTABILITY AND FITNESS FOR A PARTICULAR PURPOSE, ARE LIMITED IN DURATION TO THE WARRANTY PERIOD, AND NO WARRANTIES, WHETHER EXPRESS OR IMPLIED, WILL APPLY AFTER THIS PERIOD.
Some states do not allow limitations on the duration of implied warranties, so the above limitation may not apply to you.
This warranty gives you specific legal rights, and you may also have other rights which vary from state to state.
Guía del usuario
ORECK®
natural_image
Illustration of a black ORECK vacuum cleaner with attached brush and handle (no text or symbols)Serie 1600
¡Importante!
natural_image
Technical illustration of a handheld device with arched handle and central component (no text or symbols)posición horizontal
natural_image
Illustration of a DRECK portable device with handle and control panel (no text or symbols)posición vertical
Uti- lización

text_image
4 3text_image
Technical diagram of a three-part car interior with labeled components and directional arrows indicating assembly or movement.natural_image
Illustration of a mobile phone with keypad and cable, labeled with number 1 (no text or symbols on device body)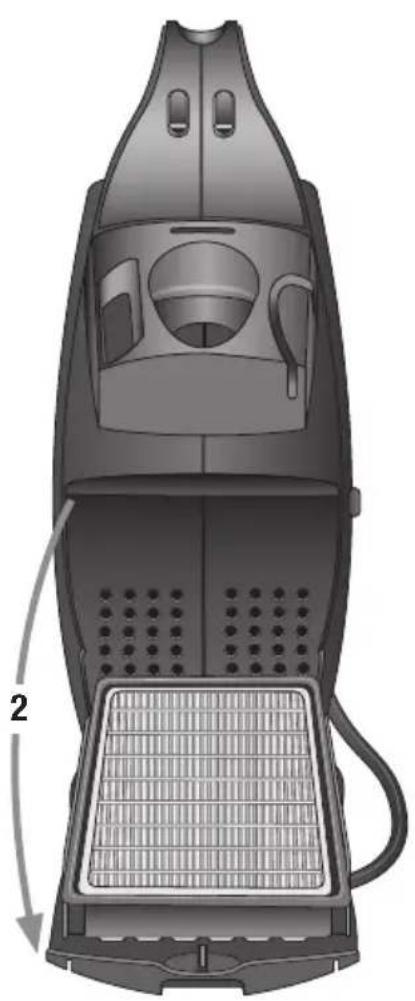
natural_image
Technical illustration of a steamer with internal components and a 2D arrow indicating rotation (no text or symbols)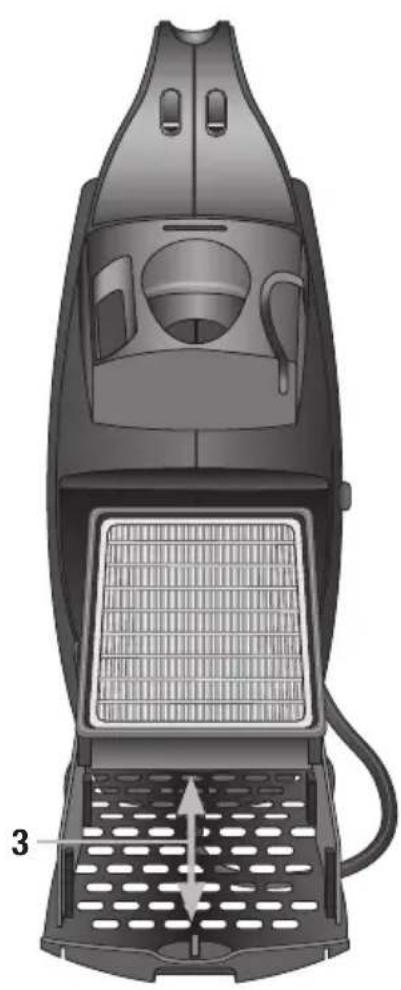
natural_image
Technical illustration of a hair dryer with ventilation grilles and a mesh chamber (no text or symbols)natural_image
Illustration of a black ORECK vacuum cleaner with attached brush and handle (no text or symbols on the device itself)Série 1600
Important!
text_image
Technical diagram of a vacuum cleaner with labeled parts including airbags, housing, and brush head assembly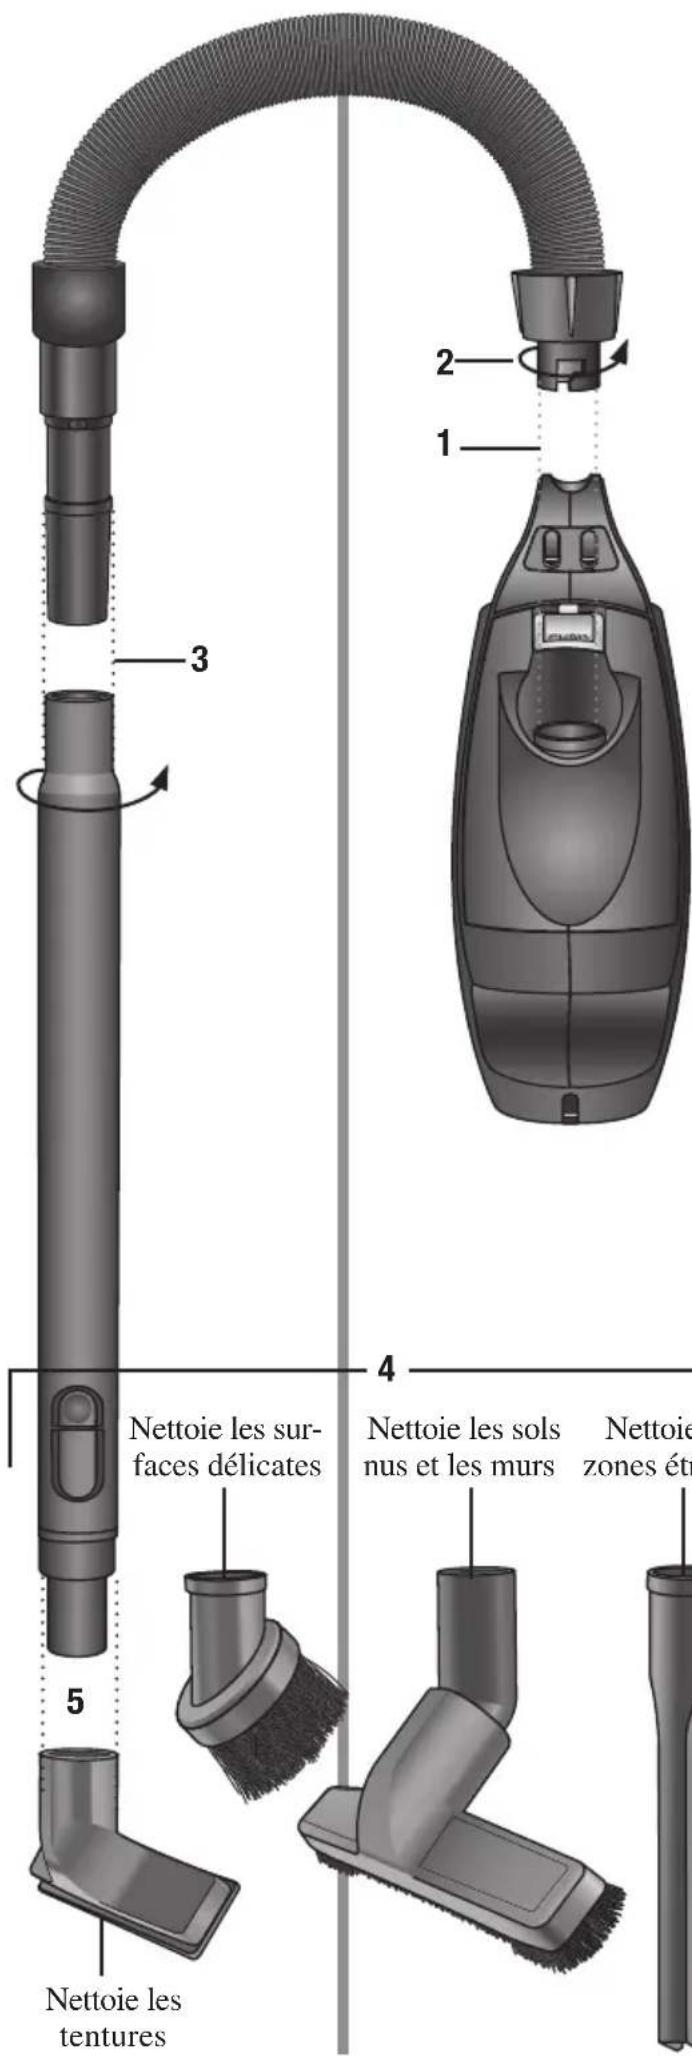
natural_image
Technical illustration of a handheld device with arched handle and central component (no text or symbols)Position horizontale
natural_image
Illustration of a ORECK portable device with handle and cable, no visible text or symbols on the device itselfPosition verticale
Utilisa- tion
text_image
Technical diagram of a vacuum cleaner with labeled parts 3 and 4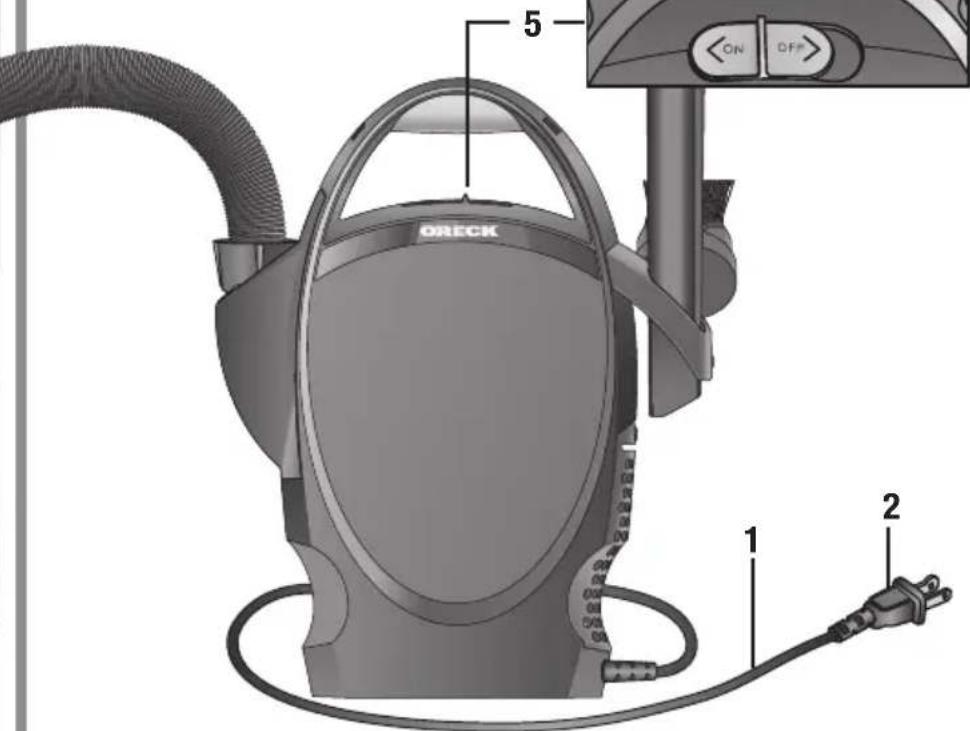
text_image
ORECK 1 2 5 ON OFFtext_image
Technical diagram of a three-part aircraft showing front, side, and top views with labeled components and directional arrows.natural_image
Illustration of a mobile phone with control panel and cable, no text or symbols present
natural_image
Technical illustration of a mechanical device with internal components and a labeled component '2' (no text or symbols beyond the label)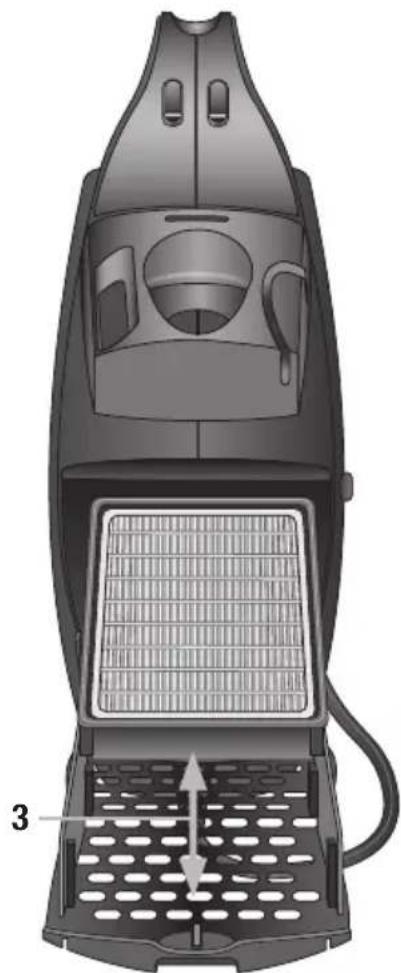
natural_image
Illustration of a hair dryer with mesh grille and ventilation slots (no text or symbols)Dépan- nage
© 2011 Oreck Holdings, LLC.
All rights reserved. All marks, text, logos, product configurations and registered trademarks are owned and used under the authority of Oreck Holdings, LLC.
73136-01 REV A 04/11 R-10315